Ford C-MAX Hybrid / Energi (2016 year). Manual - part 39


  Index      Ford     Ford C-MAX Hybrid / Energi - service manual 2016 year in english


Search            


Content   ..  37  38  39  40   ..


Ford C-MAX Hybrid / Energi (2016 year). Manual - part 39


The light ring located around the charge
port indicates the charge status of the high
voltage battery in your vehicle:

When the top right-hand side quadrant
is pulsing, the charge is between 0-25
percent.

When the top right-hand side quadrant
is on and the bottom right-hand
quadrant is pulsing, the charge is
between 25-50 percent.

When both right-hand side quadrants
are on and the bottom left-hand side
quadrant is pulsing, the charge is
between 50-75 percent.

When three quadrants are on and the
top left-hand side quadrant is pulsing,
the charge is between 75-100 percent.

When all the lights on the light ring are
on, the charge is complete.

Note: The light ring will turn off one minute
after reaching a full charge.

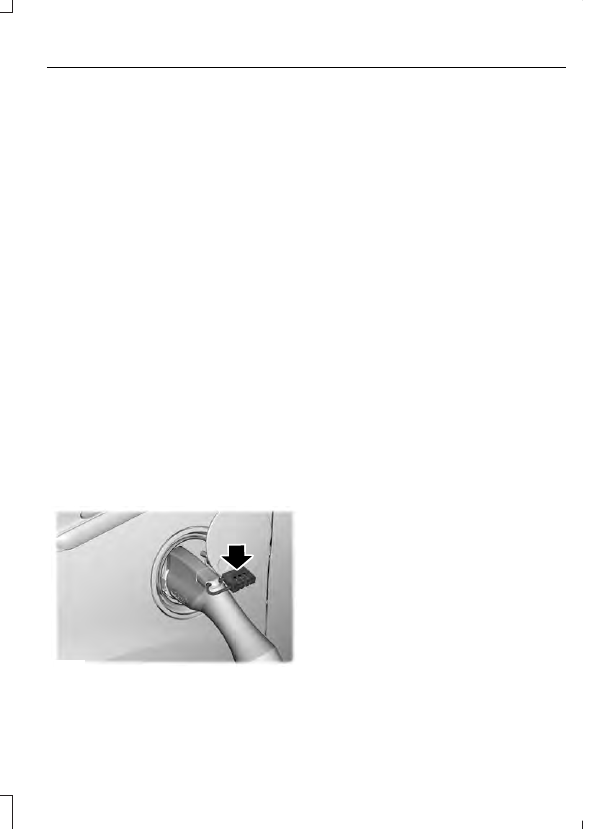
Locking the Charging Coupler

Note: To lock the charging coupler, you
need a padlock or a combination lock with
a shackle diameter of 0.2 in (5 mm) or less.
Also, the straight portion of the shackle
must be 1.0 in (25.4 mm) or longer.

E172036

1.

Insert the lock through the hole in the
charging coupler button.

2. Lock the padlock or combination lock.

Waiting to Charge

When you select Value Charge, charging
may not begin upon plugging in. The
vehicle may delay charging to take
advantage of off-peak electricity rates. The
vehicle will optimize the charge schedule
to be complete by the next GO Time.

When waiting to charge (not actively
charging), the light ring will indicate the
present state of charge of the high voltage
battery as follows:

When the top right quadrant light is off,
the charge is between 0–25 percent.

When the top right quadrant light is on
and the bottom right quadrant is off,
the charge is between 25–50 percent.

When both right side quadrant lights
are on and the bottom left quadrant is
off, the charge is between 50–75
percent.

When three quadrant lights are on and
the top left quadrant is off, the charge
is between 75–100 percent.

When all lights on the entire ring are
on, the charge is 100 percent.

Note: When the vehicle is waiting to charge,
the light ring will turn off one minute after
displaying the present state of charge. When
the vehicle automatically begins charging,
the light ring will turn on and display how
far along the charge is per the section above.

Note: If the system detects a vehicle
charging system fault at any point in a
charge cycle, the entire light ring will flash
continuously for one minute and then turn
off. If this happens, unplug the charging
coupler and then plug it back into the charge
port receptacle. If the problem persists,
contact an authorized dealer.

You can modify the light ring lighting
conditions by using the touchscreen
system.

Disconnecting the Charging
Coupler

Note: Do not pull the wall plug from the
wall while the vehicle is charging. Doing so
may damage the outlet and the cord.

1.

Remove the lock from the charging
coupler button.

2. Press the button on the charging

coupler.

3. While holding the button, remove the

charging coupler from the charge port
receptacle on your vehicle.

E144781

4. Close the charge port door by pressing

the indentation on the charge port
door. Continue pressing the indentation
while the door rotates
counterclockwise and closes.

HIGH VOLTAGE BATTERY CUT-
OFF SWITCH

The high-voltage shut off operation shuts
off power from the high-voltage battery
after a collision, or if your vehicle receives
a substantial physical jolt.

To reactivate your vehicle after either
event, perform the following steps:

1.

Turn the ignition off.

2. Turn the ignition on.

3. If your vehicle is not powered after this

sequence, repeat steps 1 and 2 up to
two more times.

For vehicles equipped with a push button
start system:

1.

Press the START/STOP button to
turn ignition off.

2. Press the brake pedal and press the

START/STOP button.

3. If your vehicle is not powered after this

sequence, repeat steps 1 and 2 up to
two more times.

Note: During this process, your vehicle will
detect if the electrical system is safe and
reactivate. Once your vehicle determines
the electrical system safe, you can start your
vehicle as you would normally by either
turning the ignition key or by pressing the
brake in combination with the
START/STOP button.

Note: In the event your vehicle does not
reactivate after the third key cycle, contact
an authorized dealer.

AUTOMATIC TRANSMISSION

WARNINGS

Always set the parking brake fully
and make sure the gearshift is
latched in park (P). Turn the ignition

to the off position and remove the key
whenever you leave your vehicle.

Do not apply the brake pedal and
accelerator pedal simultaneously.
Applying both pedals simultaneously

for more than three seconds will limit
engine rpm, which may result in difficulty
maintaining speed in traffic and could lead
to serious injury.

Note: Do not leave your vehicle with the
transmission in neutral (N). Leaving your
vehicle with the transmission in neutral (N)
will drain the battery and you may not be
able to start your vehicle.

Automatic Transmission

Putting your vehicle in gear:

1.

Fully press down the brake pedal.

2. Move the gearshift lever to the desired

gear.

3. Come to a complete stop.

4. Move the gearshift lever and securely

latch it in park (P).

E144820

Park (P)

This position locks the transmission and
prevents the front wheels from turning.
Come to a complete stop before putting
your vehicle into and out of park (P).

Reverse (R)

With the gearshift lever in reverse (R), your
vehicle will move backward. Always come
to a complete stop before shifting into and
out of reverse (R).

Neutral (N)

With the gearshift lever in neutral (N), your
vehicle can be started and is free to roll.
Hold the brake pedal down while in this
position.

Drive (D)

Drive (D) is the normal driving position for
the best fuel economy.

Low (L)

Provides maximum engine braking.

The transmission may be shifted into
low (L) at any vehicle speed.

Is not intended for use under extended
or normal driving conditions and results
in lower fuel economy.

Grade assist:

Press the transmission control switch on
the side of the gearshift lever to activate
grade assist.

E146092

Provides additional grade braking with
a combination of engine motoring and
high-voltage battery charging to help
maintain vehicle speed when
descending a grade.

As your vehicle determines the amount
of engine motoring and high-voltage
battery charging, you may notice the
engine speed increasing and
decreasing to help maintain your
vehicle speed when descending a
grade.

The grade assist lamp in the instrument
cluster is illuminated.

E144523

The grade assist lamp will
appear in the instrument cluster
when grade assist is turned on.

Press the transmission control switch
again to return to normal drive (D).

Brake-Shift Interlock

WARNINGS

Do not drive your vehicle until you
verify that the brake lamps are
working.

WARNINGS

When doing this procedure, you will
be taking your vehicle out of park
which means your vehicle can roll

freely. To avoid unwanted vehicle
movement, always fully set the parking
brake prior to doing this procedure. Use
wheel chocks if appropriate.

If the parking brake is fully released,
but the brake warning lamp remains
illuminated, the brakes may not be

working properly. See your authorized
dealer.

Note: See your authorized dealer as soon
as possible if this procedure is used.

Note: For some markets this feature will be
disabled.

Use the brake shift interlock lever to move
the gearshift lever from the park position
in the event of an electrical malfunction or
if your vehicle has a dead battery.

Apply the parking brake and turn the
ignition off before performing this
procedure.


Content   ..  37  38  39  40   ..