Citroen C3 (2017 year). Manual - part 7


  Index      Citroen     Citroen C3 - service manual 2017 year in english


Search            


Content   ..  5  6  7  8   ..


Citroen C3 (2017 year). Manual - part 7


95

3

Ease of use and comfort

B618_en_Chap03_Ergonomie-et-confort_ed01-2016

This comes on automatically when the boot is 
opened and switches off automatically when 
the boot is closed.
Different lighting times are provided:
-  when the ignition is off, approximately 

ten minutes,

-  in energy economy mode, approximately 

thirty seconds,

-  when the engine is running, no limit.

Boot lamp

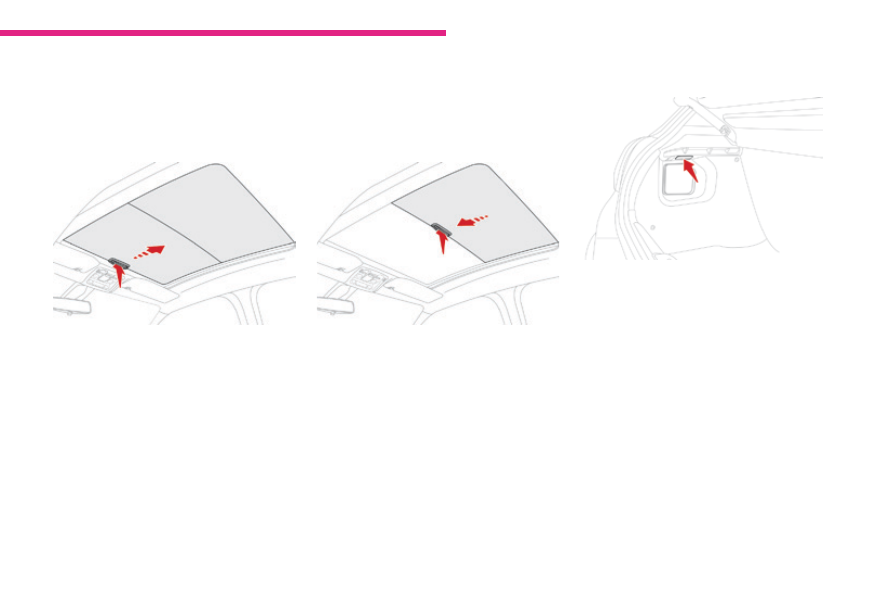
This has a manual blind in two sections which helps to maintain a comfortable temperature and 
reduce the noise in the passenger compartment.

Panoramic sunroof

F

  Pull the blind rearwards until it locks in.

Closing

Opening

F

  Pull the blind forwards until it locks in.

96

Ease of use and comfort

B618_en_Chap03_Ergonomie-et-confort_ed01-2016

Interior fittings

1.  Sun visor.
2.  Glove box.
3.
  12 V accessory socket (max. 120 W).
4.
  USB port.
5.
  Auxiliary socket.
6.
  Open storage with double cup holder.
7.
  Front armrest 
 

(depending on version)

8.  Storage trays.
9. Mat. 
 

(depending on version)

97

3

Ease of use and comfort

B618_en_Chap03_Ergonomie-et-confort_ed01-2016

Glove box

Sun visor

The driver's sun visor is fitted with a vanity 
mirror, with concealing flap and a document  
(or ticket) holder.

It can be used to hold a water bottle, the 
vehicle's handbook pack, etc.
Depending on version, it may have a lid. In this 
case:
F

  To open the glove box, raise the handle.

F

  To connect a 12 V accessory (maximum 

power: 120 Watts), lift the cover and 
connect a suitable adaptor.

12 V socket

Do not exceed the maximum power 
rating of the socket (otherwise there is a 
risk of damaging your portable device).

Do not attach or stick anything to the 
passenger's sun visor; this could cause 
injuries if the front airbag (fitted in the 
roof) is deployed.

The connection of an electrical device 
not approved by CITROËN, such as a 
USB charger, may adversely affect the 
operation of vehicle electrical systems, 
causing faults such as poor telephone 
reception or interference with displays 
in the screens.

98

Ease of use and comfort

B618_en_Chap03_Ergonomie-et-confort_ed01-2016

Auxiliary socket

USB port

For more information on the use of this 
equipment, refer to the "Audio and telematics
supplement.

When the USB port is used, the 
portable device charges automatically.
A message is displayed if the power 
drawn by the portable device exceeds 
the current supplied by the vehicle.

It permits the connection of a portable device 
so that you can listen to your music files via the 
vehicle's speakers.
The management of the files is done using your 
portable device.

It allows the connection of a portable device or 
a USB memory stick.
It reads the audio files which are sent to your 
audio system and played via the vehicle's 
speakers.
You can manage these files using the steering 
mounted or audio system controls.

For more information on using this equipment, 
refer to the "Audio and telematics" supplement.

Front armrest

Comfort system for the driver and front 
passenger.

Height adjustment

F

  Fully lower the armrest.

F

  Raise it to the required position (low, 

intermediate or high).

F

  Once in the high position, lift to release it 

and return it to the low position.

99

3

Ease of use and comfort

B618_en_Chap03_Ergonomie-et-confort_ed01-2016

Coat hooks

They are located above each rear door.

Mats

Fitting

When fitting the mat for the first time, on the 
driver's side use only the fixings provided.
The other mats are simply placed on the 
carpet.

Removal

To remove the mat on the driver's side:
F

  move the seat as far back as possible,

F

  unclip the fixings,

F

  remove the mat.

To avoid any risk of jamming of the 
pedals:
-  only use mats which are suited to 

the fixings already present in the 
vehicle; these fixings must be used,

-  never fit one mat on top of another.
The use of mats not approved by 
CITROËN may interfere with access to 
the pedals and hinder the operation of 
the cruise control / speed limiter.
The mats approved by CITROËN have 
two fixings located below the seat.

Refitting

To refit the mat on the driver's side:
F

  position the mat correctly,

F

  refit the fixings by pressing,

F

  check that the mat is secured correctly.

100

Ease of use and comfort

B618_en_Chap03_Ergonomie-et-confort_ed01-2016

Boot fittings

1.

  Rear parcel shelf.

2.

  Hooks.

3.

  Storage box.

4.

  Lighting.

5.

  Stowing rings.

101

3

Ease of use and comfort

B618_en_Chap03_Ergonomie-et-confort_ed01-2016

To remove the shelf:
F

  unhook the two cords,

F

  raise the shelf slightly, then remove it.

Rear parcel shelf

There are several options for storing the shelf:
-  either upright behind the front seats,
-  or flat at the base of the boot.

The hooks can be used to secure shopping 
bags.

Hooks

Storage box

For versions with storage box: it must 
be in place before loading the boot.

F

  Remove the boot carpet for access to the 

storage box.

Depending on the configuration, it is laid out for 
storing:
-  a towing eye,
-  a temporary puncture repair kit,
-  a warning triangle,
-  ...

Take care to secure only light bags.

102

Ease of use and comfort

B618_en_Chap03_Ergonomie-et-confort_ed01-2016

Rear parcel shelf (enterprise version)

This conceals the interior of the vehicle in 
combination with the existing shelf.

Do not place objects above the load 
stop.

If your vehicle is fitted with a protective grille, 
you can place objects above the load stop.

Do not place hard or heavy objects on 
the rear parcel shelf.
They could become dangerous 
projectiles in the event of sudden 
braking or a collision.

To access the spare wheel on the enterprise 
versions:
-  Remove the tray.
-  Raise the hinged floor.
-  Remove the shim.

103

4

Lighting and visibility

B618_en_Chap04_Eclairage-et-visibilite_ed01-2016

Mirrors

Door mirrors

Each fitted with an adjustable mirror glass 
providing the lateral rearward vision necessary 
for overtaking or parking. They can also be 
folded for parking in confined spaces.

As a safety measure, the mirrors should 
be adjusted to reduce the "blind spots".

The objects observed are, in reality, 
closer than they appear.
Take this into account in order to 
correctly judge the distance of vehicles 
approaching from behind.

Demisting - Defrosting

Electric adjustment

F  Move control A

 to the right or to the left to 

select the corresponding mirror.

F

  Move control in all four directions to adjust.

F

  Return control to the central position.

For more information on demisting and 
defrosting the rear screen, refer to the 
corresponding section.

Demisting-defrosting of the door 
mirrors operates with the engine 
running, by switching on the heated 
rear screen.

Manual folding

You can fold the mirrors manually (tight parking 
space, narrow garage...).
F

  Turn the mirror towards the vehicle.

Manual adjustment

F  Operate the lever in the four directions to 

adjust the angle of the mirror glass.

104

Lighting and visibility

B618_en_Chap04_Eclairage-et-visibilite_ed01-2016

Rear view mirror

Manual model

Adjustment
F

  Adjust the mirror so that the glass is 

directed correctly in the "day" position.

Equipped with an anti-dazzle system, which darkens the mirror glass and reduces the nuisance to 
the driver caused by the sun, headlamps from other vehicles...

Day / night position
F

  Pull the lever to change to the "night" anti-

dazzle position.

F

  Push the lever to change to the normal 

"day" position.

Automatic "electrochrome" 
model

This system automatically and progressively 
changes between the day and night uses by 
means of a sensor, which measures the light 
from the rear of the vehicle.

In order to ensure optimum visibility 
during your manoeuvres, the mirror 
lightens automatically when reverse 
gear is engaged.

105

4

Lighting and visibility

B618_en_Chap04_Eclairage-et-visibilite_ed01-2016

Lighting control

Main lighting

The various front and rear lamps of the vehicle 
are designed to adapt the driver's visibility 
progressively according to the climatic 
conditions:
-  sidelamps, to be seen,
-  dipped beam headlamps to see without 

dazzling other drivers,

-  main beam headlamps to see clearly when 

the road is clear.

Additional lighting

Other lamps are provided (depending on 
version) to meet the requirements of particular 
driving conditions:
-  a rear foglamp,
-  front foglamps,
-  daytime running lamps to be more visible 

during the day,

-  guide-me-home lighting to facilitate your 

exit from the vehicle,

-  parking lamps as vehicle position markers.

In the event of the failure of one or more 
bulbs, a message advises you to check 
the lamp(s) in question.

Travelling abroad

For motoring in countries that drive 
on the other side of the road, it is 
necessary to adapt the adjustment of 
the dipped beams so as not to dazzle 
the drivers of approaching vehicles. 
Contact a CITROËN dealer or qualified 
workshop.

Programming

Certain functions can be configured:
-  guide-me-home lighting,
-  welcome lighting,
-  daytime running lamps.

In some weather conditions (e.g. low 
temperature or humidity), the presence 
of misting on the internal surface of the 
glass of the headlamps and rear lamps 
is normal; it disappears after the lamps 
have been on for a few minutes.

106

Lighting and visibility

B618_en_Chap04_Eclairage-et-visibilite_ed01-2016

Without AUTO lighting

With AUTO lighting

Selection ring for main lighting 
mode

Turn the ring to position the symbol required 
facing the mark.

Lighting off / Daytime running lamps.

Automatic illumination of headlamps.

Sidelamps only.

Dipped or main beam headlamps.

Dipping the headlamps

Pull the stalk to switch the lighting between 
dipped / main beam headlamps.

In the lighting off and sidelamps modes, the 
driver can switch on the main beam headlamps 
temporarily ("headlamp flash") by maintaining a 
pull on the stalk.

Display

Illumination of the corresponding indicator lamp 
in the instrument panel confirms the lighting 
switched on.

107

4

Lighting and visibility

B618_en_Chap04_Eclairage-et-visibilite_ed01-2016

Foglamp selection ring

The foglamps operate with dipped and main beam headlamps.

Front foglamps and rear 
foglamp

When the headlamps switch off with automatic 
illumination of headlamps (AUTO model) 
or when the dipped beam headlamps are 
switched off manually, the foglamps and 
sidelamps remain on.
F

  Turn the ring rearwards to switch off 

the foglamps, the sidelamps will then 
switch off.

Rear foglamp only

F

  To switch it on, turn the ring forwards.

When the lighting is switched off automatically 
(with AUTO model), the foglamp and the dipped 
beam headlamps will remain on.
F

  To switch it off, turn the ring rearwards.

Rotate and release the ring:
F

  forwards a first time to switch on the front 

foglamps,

F

  forwards a second time to switch on the 

rear foglamp,

F

  rearwards a first time to switch off the rear 

foglamp,

F

  rearwards a second time to switch off the 

front foglamps.

108

Lighting and visibility

B618_en_Chap04_Eclairage-et-visibilite_ed01-2016

In good or rainy weather, both day 
and night, the front foglamps and the 
rear foglamp are prohibited. In these 
situations, the power of their beams 
may dazzle other drivers. They should 
only be used in fog or snow.
In these weather conditions, it is your 
responsibility to switch on the foglamps 
and dipped beam headlamps manually 
as the sunshine sensor may detect 
sufficient light.
Do not forget to switch off the front 
foglamps and the rear foglamp when 
they are no longer necessary.

Switching off the lamps when 
the ignition is switched off

On switching off the ignition, all of the 
lamps turn off immediately, except for 
dipped beam if guide-me-home lighting 
is activated.

Switching on the lamps 
after the ignition is 
switched off

To reactivate the lighting control, rotate 
the ring to the "0" position - lamps off, 
then to the desired position.
On opening the driver's door a 
temporary audible signal warns the 
driver that the lighting is on.
The lamps, with the exception of the 
sidelamps, switch off automatically after 
a maximum duration of 30 minutes to 
avoid discharging the battery.

Direction indicators

F

  Left: lower the lighting control stalk passing 

the point of resistance.

F

  Right: raise the lighting control stalk 

passing the point of resistance.

Three flashes of the direction 

indicators

F  Press briefly upwards or downwards, 

without going beyond the point of 
resistance; the direction indicators will 
flash 3 times.

109

4

Lighting and visibility

B618_en_Chap04_Eclairage-et-visibilite_ed01-2016

Activation

F

  Turn the ring to the "AUTO" position.

Activation of the function is accompanied by 
the display of a message.

When a low level of ambient light is detected by a sunshine sensor, the number plate lamps, sidelamps and dipped beam headlamps are switched on 
automatically, without any action on the part of the driver. They can also come on if rain is detected, at the same time as automatic operation of the 
windscreen wipers.
As soon as the brightness returns to a sufficient level or after the windscreen wipers are switched off, the lamps are switched off automatically.

Deactivation

F

  Turn the ring to another position.

Deactivation of the function is accompanied by 
the display of a message.

Operating fault

In the event of a malfunction of the 
sunshine sensor, the lighting comes 
on, this warning lamp is displayed in 
the instrument panel accompanied by 
an audible signal and/or a message.

Do not cover the sunshine sensor, 
coupled with the rain sensor and 
located at the top centre of the 
windscreen behind the rear view mirror; 
the associated functions would no 
longer be controlled.

Contact a CITROËN dealer or a qualified 
workshop.

Automatic illumination of headlamps

In fog or snow, the sunshine sensor 
may detect sufficient light. In this 
case, the lighting will not come on 
automatically.

110

Lighting and visibility

B618_en_Chap04_Eclairage-et-visibilite_ed01-2016

Parking lamps

Side markers for the vehicle by illumination of 
the sidelamps on the traffic side only.
F

  Depending on version, within one minute 

of switching off the ignition, operate the 
lighting control stalk up or down depending 
on the traffic side (e.g. when parking on 
the left, lighting control stalk upwards, the 
right-hand sidelamps are on).

This is confirmed by an audible signal and 
illumination of the corresponding direction 
indicator warning lamp in the instrument panel.
To switch off the parking lamps, return the 
lighting control stalk to the central position.

The front and rear lamps come on 
automatically when the engine is started.
They provide the following functions:
-  Daytime running lamps (lighting control 

stalk in position "0" or "AUTO" with 
adequate light level).

-  Sidelamps (lighting control stalk in 

position "AUTO

" with low light level or 

"Sidelamps only" or "Main or dipped beam 
headlamps").

The LEDs are brighter when operating 
as daytime running lamps.

Daytime running  
lamps / Sidelamps


Content   ..  5  6  7  8   ..