Dodge Chassis Cab (2012 year). Instruction - part 22


  Index      Dodge     Dodge Chassis Cab (2012 year) - instruction in english


Search            copyright infringement  


Content      ..     20      21      22      23     ..


Dodge Chassis Cab (2012 year). Instruction - part 22


Trailer Towing Weights
(Maximum Trailer Weight Ratings)

Refer to the following website address for your specific
vehicle’s

“BASE

WEIGHTS/GCW/PAYLOAD/

TRAILER TOW” information and restrictions based on
the type of trailer hitch:

• http://www.dodge.com/bodybuilder

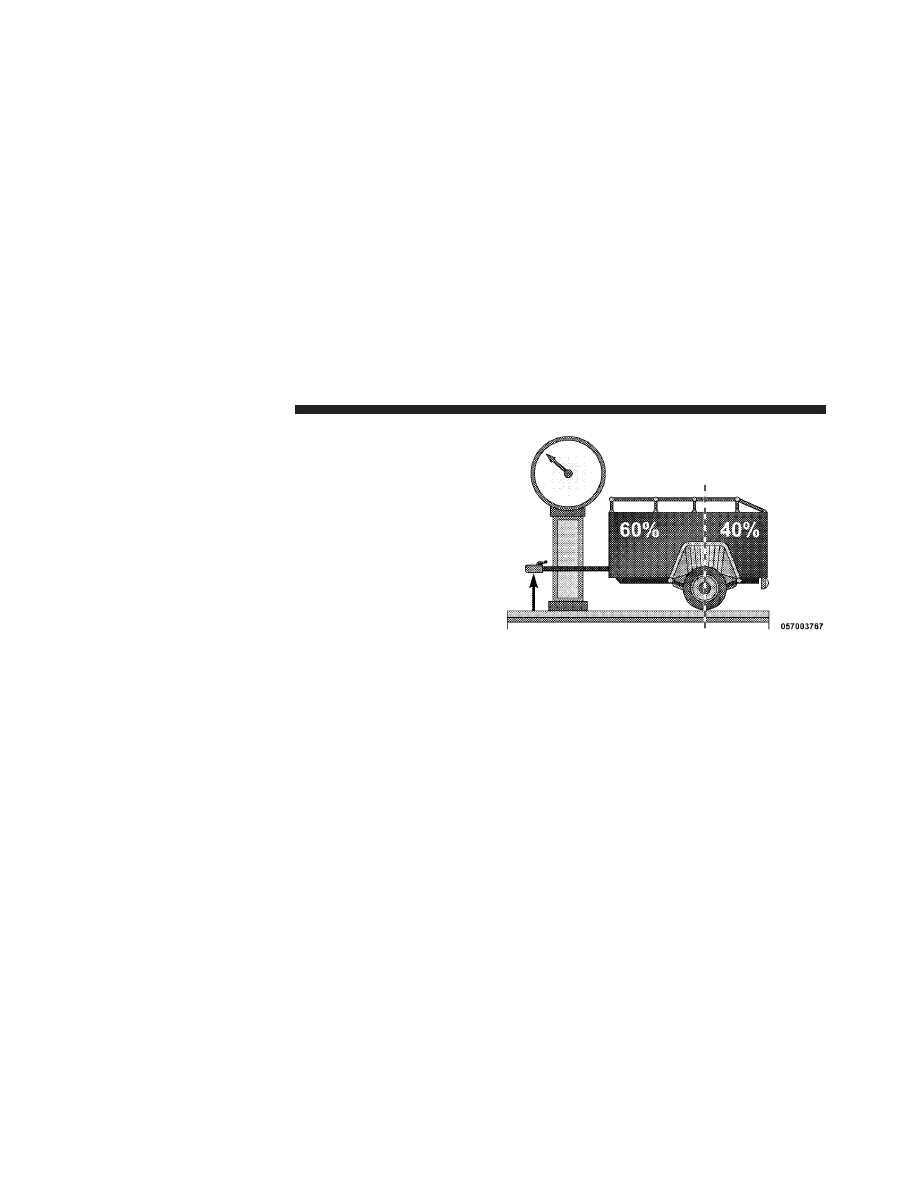
Trailer And Tongue Weight

Always load a trailer with 60% to 65% of the weight in
the front of the trailer. This places 10% to 15% of the GTW
on the tow hitch of your vehicle. Loads balanced over the
wheels or heavier in the rear can cause the trailer to sway
severely

side to side which will cause loss of control of

the vehicle and trailer. Failure to load trailers heavier in
front is the cause of many trailer collisions.

Never exceed the maximum tongue weight stamped on
your trailer hitch.

Consider the following items when computing the
weight on the rear axle of the vehicle:

• The tongue weight of the trailer
• The weight of any other type of cargo or equipment

put in or on your vehicle

• The weight of the driver and all passengers.

348

STARTING AND OPERATING

NOTE:

Remember that everything put into or on the

trailer adds to the load on your vehicle. Also, additional
factory-installed options or dealer-installed options must
be considered as part of the total load on your vehicle.
Refer to “Tire Safety Information/Tire and Loading In-
formation Placard” in “Starting and Operating” for fur-
ther information.

Towing Requirements

To promote proper break-in of your new vehicle drive-
train components the following guidelines are recom-
mended:

CAUTION!

• Do not tow a trailer at all during the first 500 miles

(805 km) the new vehicle is driven. The engine,
axle or other parts could be damaged.

(Continued)

CAUTION! (Continued)

• Then, during the first 500 miles (805 km) that a

trailer is towed, do not drive over 50 mph
(80 km/h) and do not make starts at full throttle.
This helps the engine and other parts of the
vehicle wear in at the heavier loads.

WARNING!

Improper towing can lead to a collision. Follow these
guidelines to make your trailer towing as safe as
possible:

(Continued)

5

STARTING AND OPERATING

349

WARNING! (Continued)

• Make certain that the load is secured in the trailer

and will not shift during travel. When trailering
cargo that is not fully secured, dynamic load shifts
can occur that may be difficult for the driver to
control. You could lose control of your vehicle and
have a collision.

• When hauling cargo or towing a trailer, do not

overload your vehicle or trailer. Overloading can
cause a loss of control, poor performance or dam-
age to brakes, axle, engine, transmission, steering,
suspension, chassis structure or tires.

• Safety chains must always be used between your

vehicle and trailer. Always connect the chains to
the hook retainers of the vehicle hitch. Cross the
chains under the trailer tongue and allow enough
slack for turning corners.

(Continued)

WARNING! (Continued)

• Vehicles with trailers should not be parked on a

grade. When parking, apply the parking brake on
the tow vehicle. Put the tow vehicle transmission
in PARK. For four-wheel drive vehicles, make sure
the transfer case is not in NEUTRAL. Always,
block or

chockⴖ the trailer wheels.

• GCWR must not be exceeded.
• Total weight must be distributed between the tow

vehicle and the trailer such that the following four
ratings are not exceeded:
1. GVWR
2. GTW
3. GAWR
4. Trailer tongue weight rating for the trailer hitch
utilized (This requirement may limit the ability to
always achieve the 10% to 15% range of tongue
weight as a percentage of total trailer weight).

350

STARTING AND OPERATING

Towing Requirements – Tires

• Do not attempt to tow a trailer with less than the full

size spare tire.

• Proper tire inflation pressures are essential to the safe

and satisfactory operation of your vehicle. Refer to
“Tires – General Information” in “Starting and Oper-
ating” for proper tire inflation procedures.

• Check the trailer tires for proper tire inflation pres-

sures before trailer usage.

• Check for signs of tire wear or visible tire damage

before towing a trailer. Refer to “Tires – General
Information” in “Starting and Operating” for the
proper inspection procedure.

• When replacing tires, refer to “Tires – General Infor-

mation” in “Starting and Operating” for proper tire

replacement procedures. Replacing tires with a higher
load carrying capacity will not increase the vehicle’s
GVWR and GAWR limits.

Towing Requirements – Trailer Brakes

• Do not interconnect the hydraulic brake system or

vacuum system of your vehicle with that of the trailer.
This could cause inadequate braking and possible
personal injury.

• An electronically actuated trailer brake controller is

required when towing a trailer with electronically
actuated brakes. When towing a trailer equipped with
a hydraulic surge actuated brake system, an electronic
brake controller is not required.

• Trailer brakes are recommended for trailers over

1,000 lbs (454 kg) and required for trailers in excess of
2,000 lbs (907 kg).

5

STARTING AND OPERATING

351

CAUTION!

If the trailer weighs more than 1,000 lbs (454 kg)
loaded, it should have its own brakes and they
should be of adequate capacity. Failure to do this
could lead to accelerated brake lining wear, higher
brake pedal effort, and longer stopping distances.

WARNING!

• Do not connect trailer brakes to your vehicle’s

hydraulic brake lines. It can overload your brake
system and cause it to fail. You might not have
brakes when you need them and could have a
collision.

(Continued)

WARNING! (Continued)

• Towing any trailer will increase your stopping

distance. When towing you should allow for addi-
tional space between your vehicle and the vehicle
in front of you. Failure to do so could result in a
collision.

Integrated Trailer Brake Module – If Equipped
Your vehicle may have a Integrated Trailer Brake Module
for electric trailer brakes.

NOTE:

This module has been designed and verified for

electric trailer brakes. To determine the type of brakes on
your trailer, check with your trailer manufacturer or
dealer.

352

STARTING AND OPERATING

The user interface consists of the following:

GAIN/ Brake Output Power Display
Shows the current GAIN setting.

This display may also be used to display diagnostic
information, if needed.

• SC — Short Circuit to Ground
• Sb — Short to Battery
• CF — Controller Fault – If this message appears on the

display, see your authorized dealer.

When the vehicle brakes are applied, the display will no
longer show GAIN and will change to the output to the
trailer brakes.

1 — GAIN/Brake Output Power Display
2 — Instruction Brake Control Lever
3 — Trailer Brake Status Indicator Light
4 — GAIN Adjustment Buttons

5

STARTING AND OPERATING

353

Instruction Brake Control Lever
Slide the instruction brake control lever to the right to
activate power to the trailer’s electric brakes independent
of the tow vehicle’s brakes. If the instruction brake control
lever is activated while the brake is also applied, the
greater of the two inputs determines the power sent to
the trailer brakes.

The trailer and the vehicle’s brake lamps will come on
when either vehicle braking or instruction trailer brakes are
applied.

Trailer Brake Status Indicator Light
This light indicates the trailer electrical connection status.

If no electrical connection is detected after the ignition is
turned on, pressing the GAIN adjustment button or
sliding the instruction brake control lever will display the
GAIN setting for 10 seconds and the “Trailer Brake Status
Indicator Light” will not be displayed.

If a fault is detected in the trailer wiring or the Integrated
Trailer Brake Module (ITBM), the “Trailer Brake Status
Indicator Light” will flash.

GAIN Adjustment Buttons (+/-)
Pressing these buttons will adjust the brake control
power output to the trailer brakes in 0.5 increments. The
GAIN setting can be increased to a maximum of 10 or
decreased to a minimum of 0 (no trailer braking).

GAIN
The GAIN setting is used to set the trailer brake control
for the specific towing condition and should be changed
as towing conditions change. Changes to towing condi-
tions include trailer load, vehicle load, road conditions
and weather.

Adjusting GAIN

NOTE:

This should only be performed in a traffic free

environment at speeds of approximately 20–25 mph
(30–40 km/h).

354

STARTING AND OPERATING

1. Make sure the trailer brakes are in good working
condition, functioning normally, and properly adjusted.
See your trailer dealer if necessary.

2. Hook up the trailer and make the electrical connec-
tions according to the trailer manufacturer’s instructions.

3. When a trailer with electric/EOH brakes is plugged
in, the GAIN setting will illuminate and the correct type
of trailer must be selected from the EVIC options (refer to
“Electronic Vehicle Information Center/Programmable
Features” in “Understanding Your Instrument Panel” for
further information).

4. Use the GAIN adjustment (+/-) buttons to increase or
decrease the GAIN setting to the desired starting point. A
GAIN setting of 5 is a good starting point.

5. In a traffic-free environment, tow the trailer on a dry,
level surface at a speed of 20–25 mph (30–40 km/h) and
squeeze the instruction brake control lever completely.

6. If the trailer wheels lockup (indicated by squealing
tires), reduce the GAIN setting; if the trailer wheels turn
freely, increase the GAIN setting.

Repeat Steps 5 and 6 until the GAIN setting is at a point
just below trailer wheel lockup. If towing a heavier
trailer, trailer wheel lockup may not be attainable even
with the maximum GAIN setting of 10.

EVIC Display Messages
The trailer brake control interacts with the Electronic
Vehicle Information Center (EVIC). Display messages,
along with a single chime, will be displayed when a
malfunction is determined in the trailer connection,
trailer brake control, or on the trailer. Refer to “Electronic
Vehicle Information Center (EVIC)” in “Understanding
Your Instrument Panel” for further information.

5

STARTING AND OPERATING

355

CAUTION!

The ITBM module has been designed and verified
for electric trailer brakes. Connecting a trailer that is
not compatible with the ITBM system may result in
reduced or complete loss of trailer braking. There
may be a increase in stopping distance or trailer
instability which could result in damage to your
vehicle, trailer, or other property.

WARNING!

The ITBM module has been designed and verified
for electric trailer brakes. Connecting a trailer that is
not compatible with the ITBM system may result in
reduced or complete loss of trailer braking. There
may be a increase in stopping distance or trailer
instability which could result in personal injury.

NOTE:

• An aftermarket controller may be available for use

with trailers with air or electric-over-hydraulic trailer
brake systems. To determine the type of brakes on
your trailer and the availability of controllers, check
with your trailer manufacturer or dealer.

• Removal of the ITBM will cause errors and it may

cause damage to the electrical system and electronic
modules of the vehicle. See your authorized dealer if
an aftermarket module is to be installed.

Towing Requirements – Trailer Lights And Wiring
Whenever you pull a trailer, regardless of the trailer size,
stop lights and turn signals on the trailer are required for
motoring safety.

NOTE:

Do not cut or splice wiring into the vehicle’s

wiring harness.

356

STARTING AND OPERATING

WARNING!

Any work done to the vehicle’s electrical system or
wiring should be performed by a qualified automo-
tive technician. If done improperly it may cause
damage to the electrical system wiring and could
result in serious or fatal injury.

Towing Tips

Before setting out on a trip, practice turning, stopping
and backing the trailer up in an area away from heavy
traffic.

Automatic Transmission
The “DRIVE” range can be selected when towing. How-
ever, if frequent shifting occurs while in this range, select
“TOW/HAUL” mode or select a lower gear using the
Electronic Range Select (ERS) feature.

NOTE:

Using “TOW/HAUL” mode or a lower gear

range while operating the vehicle under heavy operating
conditions will improve performance and extend trans-
mission life by reducing excessive shifting and heat build
up. This action will also provide better engine braking.

The automatic transmission fluid and filter should be
changed if you regularly tow a trailer for more than
45 minutes of continuous operation. Refer to “Mainte-
nance Schedule” for the proper maintenance intervals.

NOTE:

Check the automatic transmission fluid level

before towing.

Tow/Haul
To reduce potential for automatic transmission overheat-
ing, turn the “TOW/HAUL” feature ON when driving in
hilly areas, or select a lower gear range (using the
Electronic Range Select (ERS) feature) on more severe
grades.

5

STARTING AND OPERATING

357

Electronic Speed Control – If Equipped

− Do not use in hilly terrain or with heavy loads.

− When using the speed control, if you experience speed

drops greater than 10 mph (16 km/h), disengage until
you can get back to cruising speed.

− Use speed control in flat terrain and with light loads to

maximize fuel efficiency.

Cooling System
To reduce potential for engine and transmission over-
heating, take the following actions:

− City Driving
When stopped for short periods of time, shift the trans-
mission into NEUTRAL and increase engine idle speed.

− Highway Driving
Reduce speed.

− Air Conditioning
Turn off temporarily.

SNOWPLOW

Snowplow Prep Packages are available as a factory
installed option. These packages include components
necessary to equip your vehicle with a snowplow.

NOTE:

Before installation of a snowplow it is highly

recommended that the owner/installer obtain and follow
the recommendations contained within the current
Dodge Body Builders Guide. See your authorized dealer,
installer or snowplow manufacturer for this information.
There are unique electrical systems that must be con-
nected to properly assure operator safety and prevent
overloading vehicle systems.

358

STARTING AND OPERATING

WARNING!

Attaching a snowplow to this vehicle could adversely
affect performance of the airbag system in a collision.
Do not expect that the airbag will perform as de-
scribed earlier in this instruction

CAUTION!

The “Lamp Out” indicator could illuminate if exte-
rior lamps are not properly installed.

Before Plowing

• Check the hydraulic system for leaks and proper fluid

level.

• Check the mounting bolts and nuts for proper tight-

ness.

• Check the runners and cutting edge for excessive wear.

The cutting edge should be 1/4 to 1/2 in (6 cm to
1.2 cm) above ground in snow plowing position.

• Check that snowplow lighting is connected and func-

tioning properly.

Snowplow Prep Package Model Availability

For Information about snowplow applications visit
www.dodge.com or refer to the current Dodge Body
Builders Guide.

1. The maximum number of occupants in the truck
should not exceed two.

2. The total GVWR or the Front GAWR or the Rear
GAWR should never be exceeded.

3. Cargo capacity will be reduced by the addition of
options or passengers, etc.

5

STARTING AND OPERATING

359

The loaded vehicle weight, including the snowplow
system, all aftermarket accessories, driver, passengers,
options, and cargo, must not exceed either the Gross
Vehicle Weight (GVWR) or Gross Axle Weight (GAWR)
ratings. These weights are specified on the Safety Com-
pliance Certification Label on the driver’s side door
opening.

NOTE:

Detach the snowplow when transporting pas-

sengers.

Vehicle front end wheel alignment was set to specifica-
tions at the factory without consideration for the weight
of the plow. Front end toe-in should be checked and reset
if necessary at the beginning and end of the snowplow
season. This will help prevent uneven tire wear.

The blade should be lowered whenever the vehicle is
parked.

Maintain and operate your vehicle and snowplow equip-
ment following the recommendations provided by the
specific snowplow manufacturer.

Over The Road Operation With Snowplow
Attached

The blade restricts air flow to the radiator and causes the
engine to operate at higher than normal temperatures.
Therefore, when transporting the plow, angle the blade
completely and position it as low as road or surface
conditions permit. Do not exceed 40 mph (64 km/h). The
operator should always maintain a safe stopping distance
and allow adequate passing clearance.

Operating Tips

Under ideal snow plowing conditions, 20 mph (32 km/h)
should be maximum operating speed. The operator
should be familiar with the area and surface to be
cleaned. Reduce speed and use extreme caution when
plowing unfamiliar areas or under poor visibility.

360

STARTING AND OPERATING

NOTE:

During snowplow usage on vehicles equipped

with outside temperature display, the display may show
higher temperatures than the outside ambient tempera-
ture. The higher displayed temperature is due to blocked
or reduced airflow to the underhood ambient tempera-
ture sensor caused by the snowplow. In addition, on
vehicles equipped with Automatic Temperature Control
(ATC), it is suggested that the interior cabin temperature
be instructionly controlled should the system not perform as
desired while in automatic mode. Both the outside tem-
perature display and ATC operation will return to nor-
mal when the snowplow is removed.

General Maintenance

Snowplows should be maintained in accordance with the
plow manufacturer’s instructions.

Keep all snowplow electrical connections and battery
terminals clean and free of corrosion.

When plowing snow, to avoid transmission and drive-
train damage, the following precautions should be ob-
served.

• Operate with transfer case in 4L when plowing small

or congested areas where speeds are not likely to
exceed 15 mph (24 km/h). At higher speeds operate in
4H.

• Vehicles with automatic transmissions should use 4L

range when plowing deep or heavy snow for extended
periods of time to avoid transmission overheating.

• Do not shift the transmission unless the engine has

returned to idle and wheels have stopped. Make a
practice of stepping on the brake pedal before shifting
the transmission.

5

STARTING AND OPERATING

361

RECREATIONAL TOWING (BEHIND MOTORHOME, ETC.)
Towing This Vehicle Behind Another Vehicle

Towing Condition

Wheels OFF The

Ground

Two-Wheel Drive

Models

Four-Wheel Drive Models

Flat Tow

NONE

NOT ALLOWED

See Instructions

• Transmission in PARK
• Transfer case in NEUTRAL (N)
• Tow in forward direction

Dolly Tow

Front

NOT ALLOWED

NOT ALLOWED

Rear

OK

NOT ALLOWED

On Trailer

ALL

OK

OK

362

STARTING AND OPERATING

Recreational Towing – Two-Wheel Drive Models

DO NOT flat tow this vehicle. Damage to the drivetrain
will result.

Recreational towing (for two-wheel drive models) is
allowed ONLY if the rear wheels are OFF the ground.
This may be accomplished using a tow dolly or vehicle
trailer. If using a tow dolly, follow this procedure:

1. Properly secure the dolly to the tow vehicle, following
the dolly manufacturer’s instructions.

2. Drive the rear wheels onto the tow dolly.

3. Firmly set the parking brake. Place the transmission in
PARK.

4. Properly secure the rear wheels to the dolly, following
the dolly manufacturer’s instructions.

5. Remove the key fob from the ignition switch.

6. Install a suitable clamping device, designed for tow-
ing, to secure the front wheels in the straight position.

CAUTION!

• Towing with the rear wheels on the ground will

cause severe transmission damage. Damage from
improper towing is not covered under the New
Vehicle Limited Warranty.

• Do not disconnect the driveshaft because fluid

may leak from the transmission, causing damage
to internal parts.

5

STARTING AND OPERATING

363


Content      ..     20      21      22      23     ..