Dodge Chassis Cab (2012 year). Instruction - part 11


  Index      Dodge     Dodge Chassis Cab (2012 year) - instruction in english


Search            copyright infringement  


Content      ..     9      10      11      12     ..


Dodge Chassis Cab (2012 year). Instruction - part 11


CUPHOLDERS

Front Instrument Panel Cupholders —
(40–20–40 Seats)

The cupholders are located in the pull-out tray on the
center stack of the instrument panel.

Front Instrument Panel Cupholders — Floor
Storage Bin

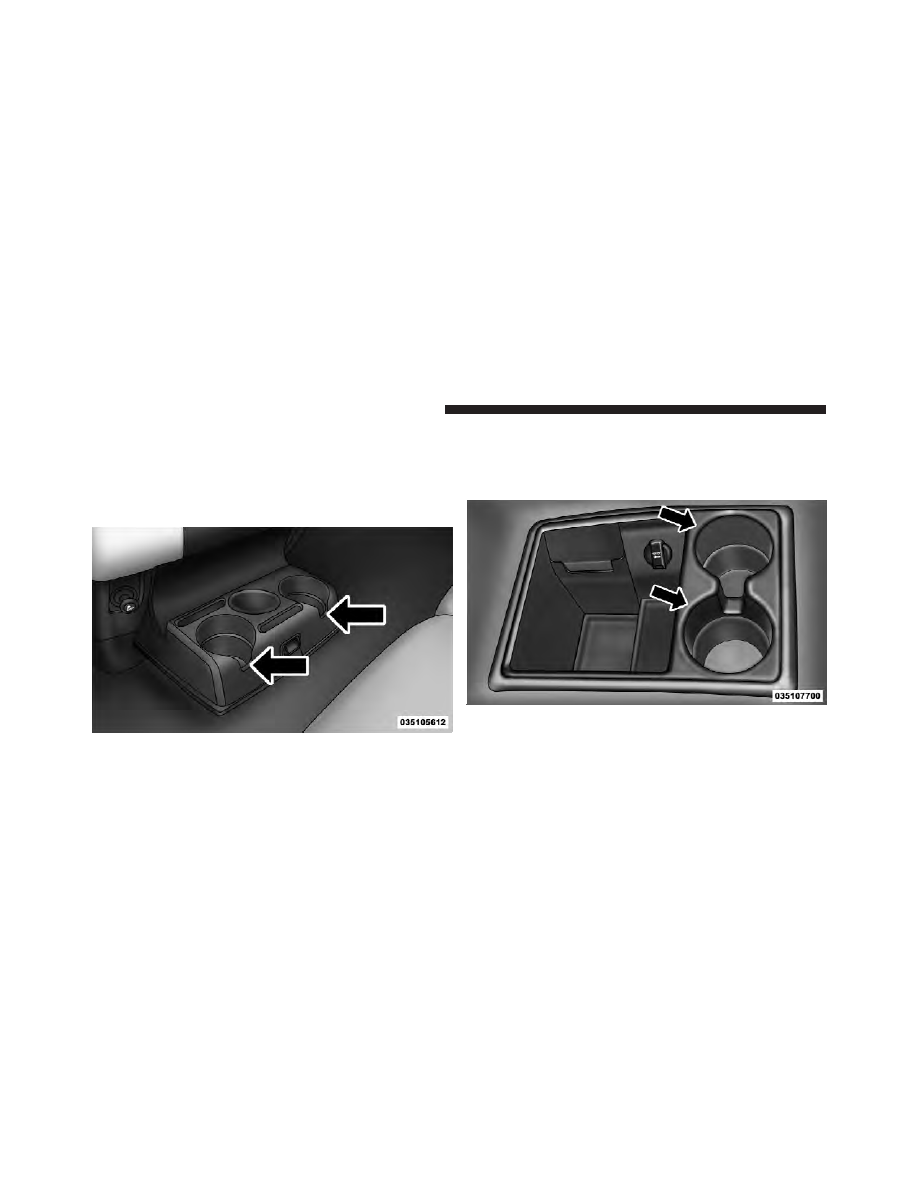
For vehicles equipped with bucket seats two cupholders
are located in the floor storage bin.

Front Cupholders

Cupholders

172

UNDERSTANDING THE FEATURES OF YOUR VEHICLE

Rear Cupholder — Crew Cab

Crew Cab vehicles are equipped with rear cupholders
located in the center armrest.

STORAGE
Glove Box Storage

The glove box is located on the passenger side of the
instrument panel and features both an upper (if
equipped) and lower storage area.

Crew Cab Rear Armrest Cupholder

Glove Box

1 — Upper Glove Box (If Equipped)
2 — Lower Glove Box

3

UNDERSTANDING THE FEATURES OF YOUR VEHICLE

173

To open the upper glove box push upward on the handle
release. The glove box door will automatically open.

To open the lower glove box, pull on the handle to release
the latch and lower the door.

Upper Glove Box

Lower Glove Box

174

UNDERSTANDING THE FEATURES OF YOUR VEHICLE

Door Storage

Front Door Storage — If Equipped
Storage areas and bottle holders (drivers side only) are
located in the door trim panels.

Rear Door Storage — Crew Cab
Storage compartments are located in both the driver and
passenger door trim panels.

Front Door Storage

Rear Door Storage

3

UNDERSTANDING THE FEATURES OF YOUR VEHICLE

175

Center Storage Compartment — If Equipped

The center storage compartment is located between the
driver and passenger seats. The storage compartment
provides an armrest and contains both and upper and
lower storage area.

WARNING!

• This armrest is not a seat. Anyone seated on the

armrest could be seriously injured during vehicle
operation, or a collision. Only use the center
seating position when the armrest is fully upright.

• In a collision, the latch may open if the total

weight of the items stored exceeds about 10 lbs
(4.5 kg). These items could be thrown about en-
dangering occupants of the vehicle. Items stored
should not exceed a total of 10 lbs (4.5 kg).

Pull on the upper handle on the front of the armrest to
raise the cover. The upper storage area contains a 12 Volt
power outlet that can be used to power small electrical
devices, refer to “Electrical Power Outlets” for further
information.

Center Storage Compartment

176

UNDERSTANDING THE FEATURES OF YOUR VEHICLE

With the upper lid closed, pull on the lower handle to
open the lower storage bin.

Upper Storage Compartment

Lower Storage Bin

3

UNDERSTANDING THE FEATURES OF YOUR VEHICLE

177

WARNING!

Do not operate this vehicle with a console compart-
ment lid in the open position. Cellular phones, music
players, and other handheld electronic devices
should be stowed while driving. Use of these devices
while driving can cause an accident due to distrac-
tion, resulting in death or injury.

Seatback Storage

Located in the back of both the driver and passenger
front seats are pockets that can be used for storage.

Storage (Regular Cab)

The storage bin is located behind the front seats and runs
the length of the cab.

Drivers Side Seatback Storage

178

UNDERSTANDING THE FEATURES OF YOUR VEHICLE

Storage and Seats (Crew Cab)

The Crew Cab models provide additional storage under
the rear seats. Lift the seats to access the storage com-
partment.

To open the storage compartments, lift upward on the
handle of the latch and open the lid.

CAUTION!

Always lift the storage compartment lids by using
the handle. Failure to lift the lids by using the handle
can result in damage to the lids.

Storage Bin

Crew Cab Storage

3

UNDERSTANDING THE FEATURES OF YOUR VEHICLE

179

Plastic Grocery Bag Retainers
(Regular Cab Models)

Retainer hooks which will hold plastic grocery bag
handles are built into the back panel of the cab, behind
the seats.

REAR WINDOW FEATURES

Rear Window Defroster

The rear window defroster button is located on the
climate control panel. Press this button to turn on

the rear window defroster and the heated outside mirrors
(if equipped). An indicator in the button will illuminate
when the rear window defroster is on. The rear window
defroster automatically turns off after approximately
10 minutes. For an additional five minutes of operation,
press the button a second time.

NOTE:

To prevent excessive battery drain, use the rear

window defroster only when the engine is operating.

Grocery Bag Hooks

180

UNDERSTANDING THE FEATURES OF YOUR VEHICLE

CAUTION!

Failure to follow these cautions can cause damage to
the heating elements:
• Use care when washing the inside of the rear

window. Do not use abrasive window cleaners on
the interior surface of the window. Use a soft cloth
and a mild washing solution, wiping parallel to
the heating elements. Labels can be peeled off
after soaking with warm water.

• Do not use scrapers, sharp instruments, or abra-

sive window cleaners on the interior surface of the
window.

• Keep all objects a safe distance from the window.

Power Sliding Rear Window — If Equipped

The switch for the power sliding rear window is located
on the overhead console.

Push the switch to the right to open the glass. Pull the
switch to the left to close the glass.

Instruction Sliding Rear Window — If Equipped

A locking device in the center of the window helps to
prevent entry from the rear of the vehicle. Squeeze the
lock to release the window.

Rear Window Switch

3

UNDERSTANDING THE FEATURES OF YOUR VEHICLE

181

UNDERSTANDING YOUR INSTRUMENT PANEL

CONTENTS

䡵 Instrument Panel Features . . . . . . . . . . . . . . . 186
䡵 Instrument Cluster — Base . . . . . . . . . . . . . . . 187
䡵 Instrument Cluster — Premium . . . . . . . . . . . 188
䡵 Instrument Cluster Descriptions . . . . . . . . . . . 189
䡵 Electronic Vehicle Information Center

(EVIC) — If Equipped . . . . . . . . . . . . . . . . . . . 203

▫ Electronic Vehicle Information Center

(EVIC) Displays . . . . . . . . . . . . . . . . . . . . . 205

▫ Distance To Empty (DTE) . . . . . . . . . . . . . . 212

▫ EVIC Average Fuel Economy . . . . . . . . . . . . 212
▫ Trip Functions . . . . . . . . . . . . . . . . . . . . . . 212
▫ Vehicle Info

(Customer Information Features) . . . . . . . . . 213

▫ Units . . . . . . . . . . . . . . . . . . . . . . . . . . . . . 214
▫ Compass / Temperature Display . . . . . . . . . 214
▫ Customer-Programmable Features

(System Setup) . . . . . . . . . . . . . . . . . . . . . . 217

4

䡵 Media Center 730N/430/430N (RHR/RER/

RBZ/RHB) CD/DVD/HDD/NAV — If
Equipped 
. . . . . . . . . . . . . . . . . . . . . . . . . . . . 222

▫ Operating Instructions (Voice Command

System) — If Equipped . . . . . . . . . . . . . . . . 222

▫ Operating Instructions

(Uconnect™ Phone) — If Equipped . . . . . . . 222

䡵 Media Center 130 (Sales Code RES) . . . . . . . . . 223

▫ Operating Instructions — Radio Mode . . . . . 223
▫ Operation Instructions — CD Mode For CD

And MP3 Audio Play . . . . . . . . . . . . . . . . . 226

▫ Notes On Playing MP3 Files . . . . . . . . . . . . 228
▫ Operation Instructions - Auxiliary Mode . . . . 231

䡵 Media Center 130 With Satellite Radio

(Sales Code RES+RSC). . . . . . . . . . . . . . . . . . . 232

▫ Operating Instructions — Radio Mode . . . . . 232
▫ Operation Instructions — CD Mode For CD

And MP3 Audio Play . . . . . . . . . . . . . . . . . 238

▫ Notes On Playing MP3 Files . . . . . . . . . . . . 240
▫ List Button (CD Mode For MP3 Play) . . . . . . 242
▫ Info Button (CD Mode For MP3 Play) . . . . . . 242
▫ Uconnect™ Multimedia

(Satellite Radio) — If Equipped . . . . . . . . . . 243

䡵 iPod威/USB/MP3 Control — If Equipped . . . . . 247

▫ Connecting The iPod威 Or External USB

Device . . . . . . . . . . . . . . . . . . . . . . . . . . . . 248

▫ Using This Feature . . . . . . . . . . . . . . . . . . . 249

184

UNDERSTANDING YOUR INSTRUMENT PANEL

▫ Controlling The iPod威 Or External USB

Device Using Radio Buttons . . . . . . . . . . . . . 249

▫ Play Mode . . . . . . . . . . . . . . . . . . . . . . . . . 250
▫ List Or Browse Mode . . . . . . . . . . . . . . . . . 251
▫ Bluetooth Streaming Audio (BTSA) . . . . . . . . 253

䡵 Steering Wheel Audio Controls —

If Equipped . . . . . . . . . . . . . . . . . . . . . . . . . . 254

▫ Radio Operation . . . . . . . . . . . . . . . . . . . . . 255
▫ CD Player . . . . . . . . . . . . . . . . . . . . . . . . . 255

䡵 CD/DVD Disc Maintenance . . . . . . . . . . . . . . 256
䡵 Radio Operation And Mobile Phones . . . . . . . 256

䡵 Climate Controls . . . . . . . . . . . . . . . . . . . . . . 257

▫ Instruction Heating And Air Conditioning

System . . . . . . . . . . . . . . . . . . . . . . . . . . . . 257

▫ Automatic Temperature Control (ATC) — If

Equipped . . . . . . . . . . . . . . . . . . . . . . . . . . 261

▫ Summer Operation . . . . . . . . . . . . . . . . . . . 266
▫ Winter Operation . . . . . . . . . . . . . . . . . . . . 266
▫ Vacation/Storage . . . . . . . . . . . . . . . . . . . . 267
▫ Window Fogging And Frosting . . . . . . . . . . 267
▫ Outside Air Intake . . . . . . . . . . . . . . . . . . . 267
▫ Operating Tips . . . . . . . . . . . . . . . . . . . . . . 268

4

UNDERSTANDING YOUR INSTRUMENT PANEL

185

INSTRUMENT PANEL FEATURES

1 — Headlight Switch

7 — 115v Power Inverter Outlet

13 — Transfer Case Position Switch

2 — Instrument Cluster

8 — Power Outlet

14 — Ignition Switch

3 — Radio

9 — Lower Switch Bank

15 — Hood Release

4 — Upper Switch Bank

10 — Cup Holders

16 — Parking Brake Release

5 — Upper Glove Compartment

11 — Climate Controls

6 — Lower Glove Compartment

12 — Power Outlet/Cigar Lighter

186

UNDERSTANDING YOUR INSTRUMENT PANEL

INSTRUMENT CLUSTER — BASE

4

UNDERSTANDING YOUR INSTRUMENT PANEL

187


Content      ..     9      10      11      12     ..