Dodge 2500 (2009 year). Instruction - part 2


  Index      Dodge     Dodge 2500 (2009 year) - instruction in english


Search            copyright infringement  


Content      ..      1      2      3      ..


Dodge 2500 (2009 year). Instruction - part 2


Power Door Locks — If Equipped
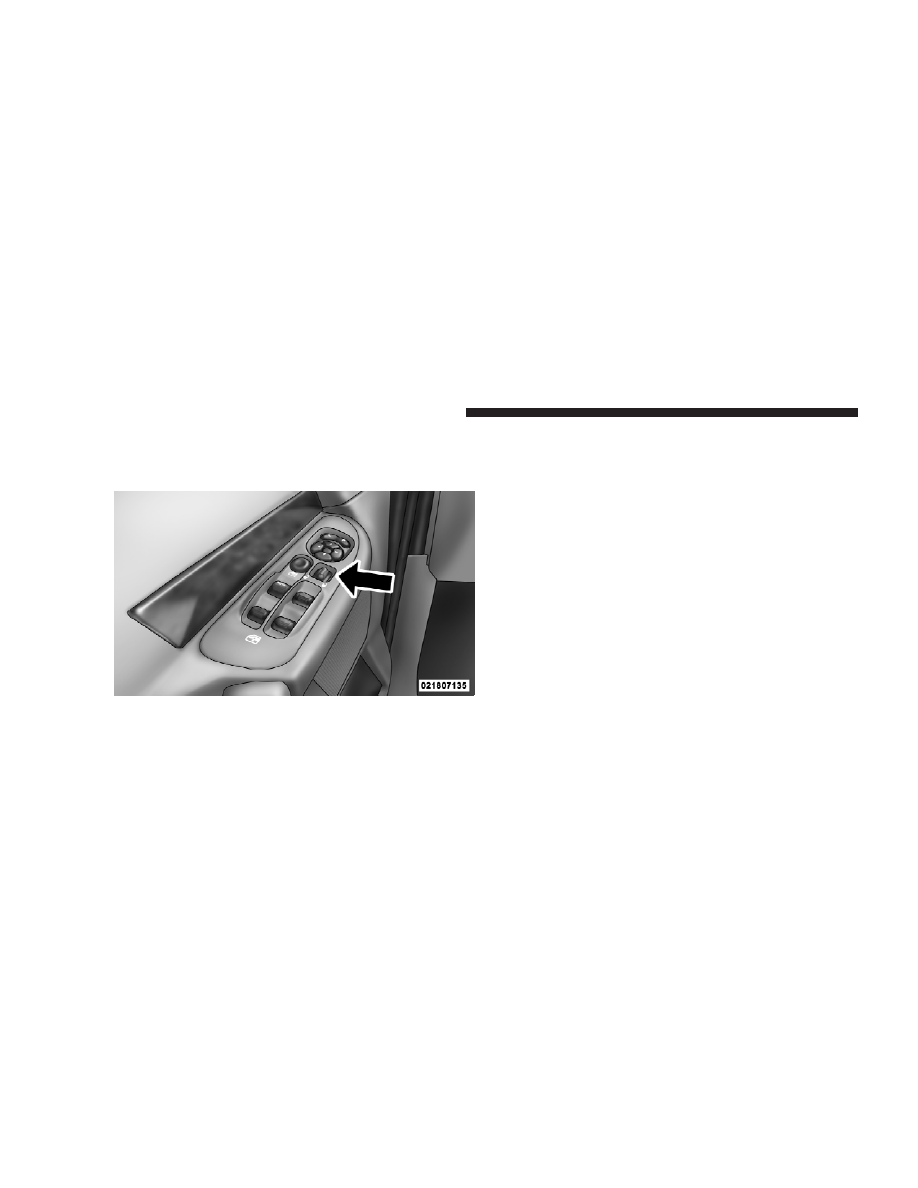
A power door lock switch is on each front door trim
panel. Use this switch to lock or unlock the doors.

If you press the power door lock switch while the key is
in the ignition, and any front door is open, the power

locks will not operate. This prevents you from acciden-
tally locking your keys in the vehicle. Removing the key
or closing the door will allow the locks to operate. A
chime will sound if the key is in the ignition switch and
a door is open, as a reminder to remove the key.

Automatic Door Locks – If Equipped
If this feature is enabled, your door locks will lock
automatically when the vehicle’s speed exceeds 15 mph
(24 km/h).

Automatic Door Lock Programming
This feature is enabled when your vehicle is shipped
from the assembly plant and can be disabled by using the
following procedure:

1. Enter your vehicle and close all doors.

2. Fasten your seat belt. (Fastening the seat belt will
cancel any chiming that may confuse you during this
programming procedure.)

Power Door Lock Switch Location

28

THINGS TO KNOW BEFORE STARTING YOUR VEHICLE

3. Place the key into the ignition.

4. Within 15 seconds, cycle the key from the LOCK
position to the ON/RUN position a minimum of four
times, ending in the ON/RUN position. (Do not start the
engine)

.

5. Within 30 seconds, press the driver’s door lock switch
in the LOCK direction.

6. A single chime will be heard to indicate the feature has
been disabled.

7. To reactivate this feature, repeat the above steps.

8. If a chime is not heard, program mode was canceled
before the feature could be disabled. If necessary, repeat
the above procedure.

Auto Unlock On Exit — If Equipped
This feature unlocks all of the doors of the vehicle when
any door is opened. This will occur only after the vehicle
has been shifted into the PARK position after the vehicle
has been driven (shifted out of PARK and all doors
closed).

Auto Unlock On Exit Programming — If Equipped
Customer programming sequence to enable or disable
the Auto Unlock on Exit feature:

1. Enter your vehicle and close all doors.

2. Fasten your seat belt. (Fastening the seat belt will
cancel any chimes that may be confusing during this
programming procedure.)

3. Insert the key into the ignition.

THINGS TO KNOW BEFORE STARTING YOUR VEHICLE

29

2

4. Within 15 seconds, cycle the key from the LOCK
position to the ON/RUN position a minimum of four
times, ending in the ON/RUN position. (Do not start the
engine)

.

5. Within 30 seconds, press the driver’s door lock switch
in the UNLOCK direction.

6. A single chime will sound to indicate the feature has
been changed.

7. Repeat the above steps to alternate the availability of
this feature.

8. If a chime is not heard, the program mode was
canceled before the feature could be changed. If neces-
sary, repeat the above procedure.

Child Protection Door Lock
To provide a safer environment for children riding in the
rear seat, the rear doors of your vehicle have the Child
Protection Door Lock system.

Child Protection Door Lock Location

30

THINGS TO KNOW BEFORE STARTING YOUR VEHICLE

To use the system, open each rear door, slide the lever UP
to engage the locks and DOWN to disengage the child
protection door locks. When the system on a door is
engaged, that door can only be opened by using the
outside door handle even, if the inside door LOCK is in
the UNLOCKED position.

WARNING!

Avoid trapping anyone in a vehicle in a collision.
Remember that the rear doors can only be opened
from the outside when the child protection locks are
engaged.

NOTE:

After setting the Child Protection Door Lock

system, always test the door from the inside to make
certain it is in the desired position.

For emergency exit with the system engaged, move the
door lock switch to the UNLOCK position, roll down the
window and open the door with the outside door handle.

Child Door Lock Control

THINGS TO KNOW BEFORE STARTING YOUR VEHICLE

31

2

WINDOWS

Power Windows—If Equipped

The control on the left front door panel has Up/Down
switches that give you fingertip control of all power
windows. There is a single opening and closing switch on
the front passenger door for passenger window control

and on the rear doors of Quad Cab

威 and Mega Cab威

models. The windows will operate when the ignition
switch is turned to the ON or ACC position, and for
10 minutes after the ignition is turned OFF or a front door
is opened.

NOTE:

The Power Accessory Delay feature will allow

the power windows to operate for 10 minutes after the
ignition is turned OFF.

WARNING!

Never leave children alone in a vehicle. Leaving
unattended children in a vehicle is dangerous for a
number of reasons. A child or others could be seri-
ously or fatally injured. Don’t leave the key in the
ignition. A child could operate power windows,
other controls, or move the vehicle.

Power Window Switches

32

THINGS TO KNOW BEFORE STARTING YOUR VEHICLE

Auto-Down (Driver’s Side Only)
The driver’s window switch has an Auto-Down feature.
Press the window switch past the detent, release, and the
window will automatically go down.

Window Lockout Switch (4–Door Models Only)
The window lockout switch on the driver’s door allows
you to disable the window control on the other doors. To
disable the window controls on the other doors, press the
window LOCK button. To enable the window controls,
press the window LOCK button again.

Wind Buffeting
Wind buffeting can be described as the perception of
pressure on the ears or a helicopter-type sound in the
ears. Your vehicle may exhibit wind buffeting with the
windows down or partially open positions. This is a
normal occurrence and can be minimized. If the buffeting

Window Lockout Switch

THINGS TO KNOW BEFORE STARTING YOUR VEHICLE

33

2

occurs with the rear windows open, open the front and
rear windows together to minimize the buffeting.

OCCUPANT RESTRAINTS
Some of the most important safety features in your
vehicle are the restraint systems. These include the front
and rear seat belts for the driver and all passengers, front
airbags for both the driver and front passenger and if
equipped, window bags for the driver and passengers
seated next to a window. If you will be carrying children
too small for adult-sized belts, your seat belts also can be
used to hold infant and child restraint systems.

Please pay close attention to the information in this
section. It tells you how to use your restraint system
properly, to keep you and your passengers as safe as
possible.

WARNING!

In a collision, you and your passengers can suffer
much greater injuries if you are not properly buckled
up. You can strike the interior of your vehicle or other
passengers, or you can be thrown out of the vehicle.
Always be sure you and others in your vehicle are
buckled up properly.

Buckle up even though you are an excellent driver, even
on short trips. Someone on the road may be a poor driver
and cause a collision that includes you. This can happen
far away from home or on your own street.
Research has shown that seat belts save lives, and that
they can reduce the seriousness of injuries in a collision.
Some of the worst injuries happen when people are
thrown from the vehicle. Seat belts reduce the possibility
of ejection and the risk of injury caused by striking the
inside of the vehicle. Everyone in a motor vehicle should
be belted at all times.

34

THINGS TO KNOW BEFORE STARTING YOUR VEHICLE

Lap/Shoulder Belts
All seating positions except the Quad Cab

威 front center

seating position have combination lap/shoulder belts.
The belt webbing retractor is designed to lock during
very sudden stops or collisions. This feature allows the
shoulder part of the belt to move freely with you under
normal conditions. But in a collision, the belt will lock
and reduce the risk of you striking the inside of the
vehicle or being thrown out.

WARNING!

• It is extremely dangerous to ride in a cargo area,

inside or outside of a vehicle. In a collision, people
riding in these areas are more likely to be seri-
ously injured or killed.

(Continued)

WARNING! (Continued)

• Do not allow people to ride in any area of your

vehicle that is not equipped with seats and seat
belts.

• Be sure everyone in your vehicle is in a seat and

using a seat belt properly.

• Wearing a seat belt incorrectly is dangerous. Seat

belts are designed to go around the large bones of
your body. These are the strongest parts of your
body and can take the forces of a collision the best.
Wearing your belt in the wrong place could make
your injuries in a collision much worse. You might
suffer internal injuries, or you could even slide out
of part of the belt. Follow these instructions to
wear your seat belt safely and to keep your pas-
sengers safe, too.

(Continued)

THINGS TO KNOW BEFORE STARTING YOUR VEHICLE

35

2

WARNING! (Continued)

• Two people should never be belted into a single

seat belt. People belted together can crash into one
another in an accident, hurting one another badly.
Never use a lap/shoulder belt or a lap belt for more
than one person, no matter what their size.

Lap/Shoulder Belt Operating Instructions

1. Enter the vehicle and close the door. Sit back and
adjust the seat.

2. The seat belt latch plate is above the back of the front
seat, next to your arm on the pillar. Grasp the latch plate
and pull out the belt. Slide the latch plate up the webbing
as far as necessary to allow the belt to go around your
lap.

Pulling Out the Lap/Shoulder Belt Latch Plate

1 — Latch Plate

36

THINGS TO KNOW BEFORE STARTING YOUR VEHICLE

3. When the belt is extended long enough to fit, insert the
latch plate into the buckle until you hear a “click.”

WARNING!

• A belt buckled into the wrong buckle will not

protect you properly. The lap portion could ride
too high on your body, possibly causing internal
injuries. Always buckle your belt into the buckle
nearest you.

• A belt that is too loose will not protect you as well.

In a sudden stop you could move too far forward,
increasing the possibility of injury. Wear your seat
belt snugly.

(Continued)

Inserting Latch Plate into Buckle

THINGS TO KNOW BEFORE STARTING YOUR VEHICLE

37

2

WARNING! (Continued)

• A belt that is worn under your arm is very danger-

ous. Your body could strike the inside surfaces of
the vehicle in a collision, increasing head and neck
injury. And a belt worn under the arm can cause
internal injuries. Ribs aren’t as strong as shoulder
bones. Wear the belt over your shoulder so that
your strongest bones will take the force in a
collision.

• A shoulder belt placed behind will not protect you

from injury during a collision. You are more likely
to hit your head in a collision if you do not wear
your shoulder belt. The lap and shoulder belt are
meant to be used together.

4. Position the lap belt across your thighs, below your
abdomen. To remove slack in the lap belt portion, pull up
on the shoulder belt. To loosen the lap belt if it is too tight,
tilt the latch plate and pull on the lap belt. A snug belt
reduces the risk of sliding under the belt in a collision.

Removing Slack from Belt

38

THINGS TO KNOW BEFORE STARTING YOUR VEHICLE

WARNING!

• A lap belt worn too high can increase the risk of

internal injury in a collision. The belt forces won’t
be at the strong hip and pelvic bones, but across
your abdomen. Always wear the lap belt as low as
possible and keep it snug.

• A twisted belt can’t do its job as well. In a

collision, it could even cut into you. Be sure the
belt is straight. If you can’t straighten a belt in
your vehicle, take it to your authorized dealer and
have it fixed.

5. Position the shoulder belt on your chest so that it is
comfortable and not resting on your neck. The retractor
will withdraw any slack in the belt.

6. To release the belt, push the red button on the buckle.
The belt will automatically retract to its stowed position.
If necessary, slide the latch plate down the webbing to
allow the belt to retract fully.

WARNING!

• A frayed or torn belt could rip apart in a collision

and leave you with no protection. Inspect the belt
system periodically, checking for cuts, frays, or
loose parts.

• Damaged parts must be replaced immediately. Do

not disassemble or modify the system.

• Seat belt assemblies must be replaced after a

collision if they have been damaged (i.e., bent
retractor, torn webbing, etc.) or if the airbag
deployed.

THINGS TO KNOW BEFORE STARTING YOUR VEHICLE

39

2

Regular Cab Front Center Three-Point Belt

1. The front center seat belt on the Regular Cab may be
disconnected to open up utilization of the storage areas
behind the front seats. The black latch plate can be
detached from the black keyed seat belt buckle located on
the inboard side of the passenger seat. Insert the vehicle
ignition key into the center white slot on the black buckle.
The black buckle latch plate can be removed when the
key is pressed into the buckle. Allow the retractor to take
up the surplus webbing, and the buckles will hang
vertically from the cab back exit bezel, thus freeing up all
the area behind the front seats.

2. To reattach the seat belt to the front center seat, pull
the black buckle latch plate forward from the cab back
panel and insert it into the black keyed buckle until there
is an audible click. Refer to the previous section for the
proper seat belt usage.

Detaching Buckle with Key

40

THINGS TO KNOW BEFORE STARTING YOUR VEHICLE

WARNING!

• If the black latch and black buckle are not prop-

erly connected when the seat belt is used by an
occupant, the seat belt will not be able to provide
proper restraint and will increase the risk of injury
in a collision.

• When reattaching the black latch and black

buckle, ensure the seat belt webbing is not
twisted. If the webbing is twisted, follow the
preceding procedure to detach the black latch and
black buckle, untwist the webbing, and reattach
the black latch and black buckle.

Inserting Latch Plate

THINGS TO KNOW BEFORE STARTING YOUR VEHICLE

41

2

WARNING!

If the black latch and buckle are not connected when
the seat belt is used by an occupant, the seat belt will
not restrain you properly.

Adjustable Upper Shoulder Belt Anchorage
In the front row outboard seats, the shoulder belt can be
adjusted upward or downward to help position the belt
away from your neck. Press the button located on the
upper belt guide, and then move it up or down to the
position that fits you best.

In-Use Position

Shoulder Belt Adjustment

42

THINGS TO KNOW BEFORE STARTING YOUR VEHICLE

As a guide, if you are shorter than average, you will
prefer a lower position, and if you are taller than average,
you will prefer a higher position. When you release the
anchorage, try to move it up or down to make sure that
it is locked in position.

Automatic Locking Retractors (ALR) Mode – If
Equipped
In this mode, the shoulder belt is automatically pre-
locked. The belt will still retract to remove any slack in
the shoulder belt. The Automatic Locking Mode is avail-
able on all passenger seating positions with a combina-
tion lap/shoulder belt.

When to Use the Automatic Locking Mode
Use this mode anytime a child safety seat is installed in a
passenger seating position. Children 12 years old and
younger should be properly restrained in the rear seat
whenever possible.

How to Use the Automatic Locking Mode

1. Buckle the combination lap/shoulder belt.

2. Grasp the shoulder portion and pull downward until
the entire belt is extracted.

3. Allow the belt to retract. As the belt retracts, you will
hear a “clicking” sound. This indicates the safety belt is
now in the Automatic Locking Mode.

How to Disengage the Automatic Locking Mode
Disconnect the combination lap/shoulder belt and allow
it to retract completely to disengage the Automatic
Locking Mode and activate the Vehicle Sensitive (Emer-
gency) Locking Mode.

THINGS TO KNOW BEFORE STARTING YOUR VEHICLE

43

2


Content      ..      1      2      3      ..