Dodge 5500 Chassis Cab (2008 year). Instruction - part 29


  Index      Dodge     Dodge 5500 Chassis Cab (2008 year) - instruction in english


Search            copyright infringement  


Content      ..     27      28      29      30     ..


Dodge 5500 Chassis Cab (2008 year). Instruction - part 29


Maintenance Log and Service Chart (Diesel Engines)

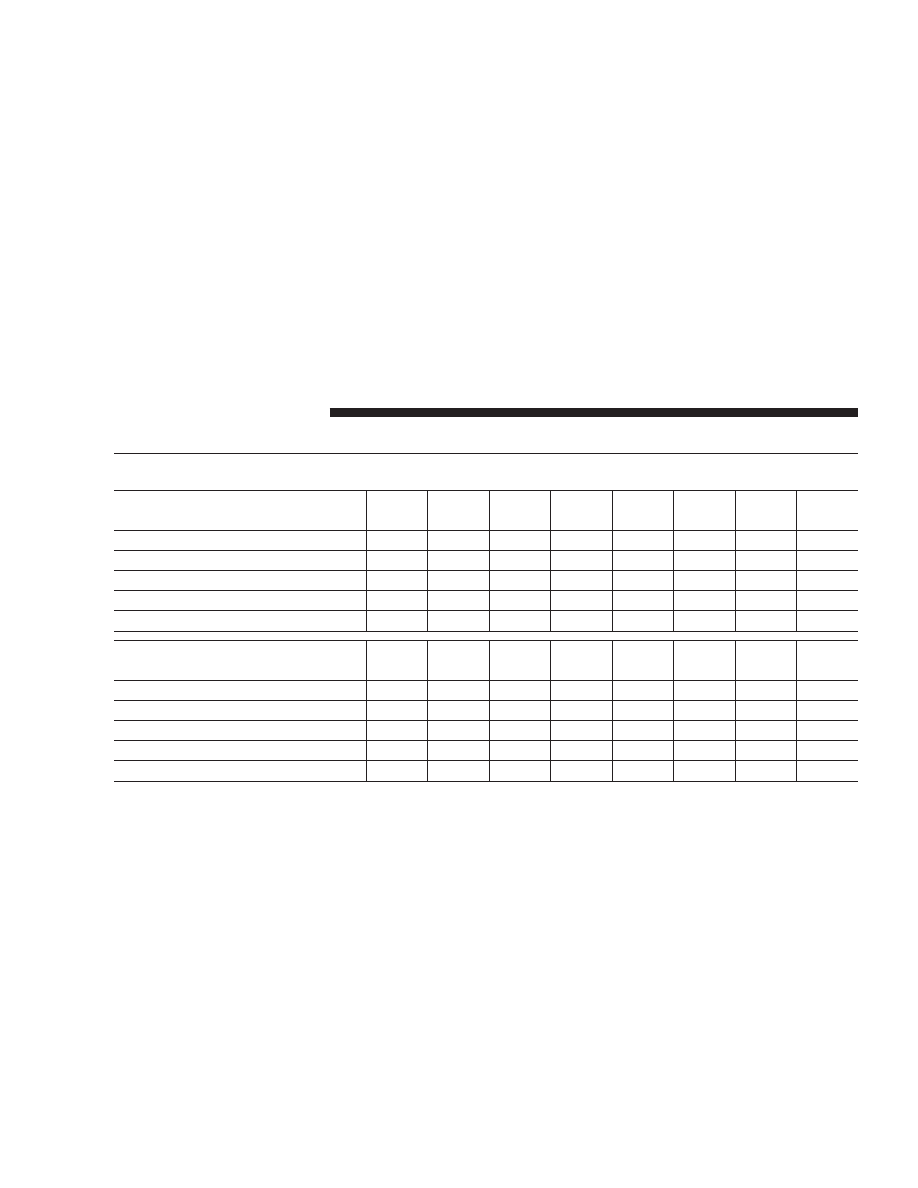
Noise Systems Maintenance Chart and Service Log — Insert Month, Day, Year under column mileage closest to
the mileage at which service was performed.
MILES

7,500

15,000

22,500

30,000

37,500

45,000

52,500

60,000

KILOMETERS

12 000

24 000

36 000

48 000

60 000

72 000

84 000

96 000

Exhaust system-inspect
Air cleaner assembly-inspect
ODOMETER READING
PERFORMED BY
PERFORMED AT

MILES

67,500

75,000

82,500

90,000

97,500

84,000

105,00

112,500

KILOMETERS

108 000 120 000 132 000 144 000 126 000 156 000 168 000 181 000

Exhaust system-inspect
Air cleaner assembly-inspect
ODOMETER READING
PERFORMED BY
PERFORMED AT

456

MAINTAINING YOUR VEHICLE

Appearance Care and Protection from Corrosion

Protection of Body and Paint from Corrosion
Vehicle body care requirements vary according to geo-
graphic locations and usage. Chemicals that make roads
passable in snow and ice, and those that are sprayed on
trees and road surfaces during other seasons, are highly
corrosive to the metal in your vehicle. Outside parking,
which exposes your vehicle to airborne contaminants,
road surfaces on which the vehicle is operated, extreme
hot or cold weather and other extreme conditions will
have an adverse effect on paint, metal trim, and under-
body protection.

The following maintenance recommendations will enable
you to obtain maximum benefit from the corrosion
resistance built into your vehicle.

What Causes Corrosion?
Corrosion is the result of deterioration or removal of
paint and protective coatings from your vehicle.

The most common causes are:

• Road salt, dirt and moisture accumulation.
• Stone and gravel impact.
• Insects, tree sap and tar.
• Salt in the air near seacoast localities.
• Atmospheric fallout/industrial pollutants.

Washing

• Wash your vehicle regularly. Always wash your ve-

hicle in the shade using Mopar

t Car Wash or a mild

car wash soap, and rinse the panels completely with
clear water.

• If insects, tar or other similar deposits have accumu-

lated on your vehicle, use Mopar

t Super Kleen Bug

and Tar Remover to remove.

MAINTAINING YOUR VEHICLE

457

7

• Use Mopart Cleaner Wax to remove road film, stains

and to protect your paint finish. Take care never to
scratch the paint.

• Avoid using abrasive compounds and power buffing

that may diminish the gloss or thin out the paint
finish.

CAUTION!

Do not use abrasive or strong cleaning materials such
as steel wool or scouring powder, which will scratch
metal and painted surfaces.

Special Care

• If you drive on salted or dusty roads or if you drive

near the ocean, hose off the undercarriage at least once
a month.

• It is important that the drain holes in the lower edges

of the doors, rocker panels and trunk be kept clear and
open.

• If you detect any stone chips or scratches in the paint,

touch them up immediately. The cost of such repairs is
considered the responsibility of the owner.

• If your vehicle is damaged due to an accident or

similar cause which destroys the paint and protective
coating, have your vehicle repaired as soon as pos-
sible. The cost of such repairs is considered the respon-
sibility of the owner.

• If you carry special cargo such as chemicals, fertilizers,

de-icer salt, etc., be sure that such materials are well
packaged and sealed.

• If a lot of driving is done on gravel roads, consider

mud or stone shields behind each wheel.

458

MAINTAINING YOUR VEHICLE

• Use Mopart touch up paint on scratches as soon as

possible. Your dealer has touch up paint to match the
color of your vehicle.

Wheel and Wheel Trim Care
All wheels and wheel trim, especially aluminum and
chrome plated wheels should be cleaned regularly with a
mild soap and water to prevent corrosion. To remove
heavy soil and/or excessive brake dust, use Mopar

t

Wheel Cleaner (05066247AB) or equivalent or select a
nonabrasive, non-acidic cleaner. Do not use scouring
pads, steel wool, a bristle brush, or metal polishes. Only
Mopar

tor equivalent is recommended. Do not use oven

cleaner. Avoid automatic car washes that use acidic
solutions or harsh brushes that may damage the wheels’
protective finish.

YES Essentials

Fabric Cleaning Procedure – If

equipped
YES Essentials

t seats may be cleaned in the following

manner:

• Remove as much of the stain as possible by blotting

with a clean, dry towel.

• Blot any remaining stain with a clean, damp towel.
• For tough stains, apply Mopart Total Clean or a mild

soap solution to a clean, damp cloth and remove stain.
Use a fresh, damp towel to remove soap residue.

• For grease stains, apply Mopart Multi-purpose

cleaner to a clean, damp cloth and remove stain. Use a
fresh, damp towel to remove soap residue.

• Do not use any solvents or protectants on Yes Essen-

tials products.

MAINTAINING YOUR VEHICLE

459

7

Interior Care
Use Mopar

t Total Clean to clean fabric upholstery and

carpeting.

Use Mopar

t Total Clean to clean vinyl upholstery.

Mopar

tTotal Clean is specifically recommended for

leather upholstery.

Your leather upholstery can be best preserved by regular
cleaning with a damp soft cloth. Small particles of dirt
can act as an abrasive and damage the leather upholstery
and should be removed promptly with a damp cloth.
Stubborn soils can be removed easily with a soft cloth
and Mopar

t Total Clean. Care should be taken to avoid

soaking your leather upholstery with any liquid. Please
do not use polishes, oils, cleaning fluids, solvents, deter-
gents, or ammonia based cleaners to clean your leather
upholstery. Application of a leather conditioner is not
required to maintain the original condition.

WARNING!

Do not use volatile solvents for cleaning purposes.
Many are potentially flammable, and if used in
closed areas they may cause respiratory harm.

Cleaning Headlights
Your vehicle has plastic headlights that are lighter and
less susceptible to stone breakage than glass headlights.

Plastic is not as scratch resistant as glass and therefore
different lens cleaning procedures must be followed.

To minimize the possibility of scratching the lenses and
reducing light output, avoid wiping with a dry cloth. To
remove road dirt, wash with a mild soap solution fol-
lowed by rinsing.

Do not use abrasive cleaning components, solvents, steel
wool or other aggressive material to clean the lenses.

460

MAINTAINING YOUR VEHICLE

Glass Surfaces
All glass surfaces should be cleaned on a regular basis
with Mopar

t Glass Cleaner or any commercial

household-type glass cleaner. Never use an abrasive type
cleaner. Use caution when cleaning the inside rear win-
dow equipped with electric defrosters or the right rear
quarter window equipped with the radio antenna. Do
not use scrapers or other sharp instruments which may
scratch the elements. When cleaning the rear view mirror,
spray cleaner on the towel or rag that you are using. Do
not spray cleaner directly on the mirror.

Cleaning Plastic Instrument Cluster Lenses
The lenses in front of the instruments in this vehicle are
molded in clear plastic. When cleaning the lenses, care
must be taken to avoid scratching the plastic.

1. Clean with a wet soft rag. A mild soap solution may be
used, but do not use high alcohol content or abrasive
cleaners. If soap is used, wipe clean with a clean damp
rag.

2. Dry with a soft tissue.

Seat Belt Maintenance
Do not bleach, dye or clean the belts with chemical
solvents or abrasive cleaners. This will weaken the fabric.
Sun damage can also weaken the fabric.

If the belts need cleaning, use a mild soap solution or
lukewarm water. Do not remove the belts from the car to
wash them.

Replace the belts if they appear frayed or worn or if the
buckles do not work properly.

Dry with a soft tissue.

MAINTAINING YOUR VEHICLE

461

7

FUSES (INTEGRATED POWER MODULE)

An integrated Power Module is located in the engine
compartment near the battery. This center contains car-
tridge fuses and mini fuses. A description of each fuse
and component may be stamped on the inside cover
otherwise the cavity number of each fuse is stamped on
the inside cover that corresponds to the following chart.

Integrated Power Module Location

462

MAINTAINING YOUR VEHICLE

Cavity Cartridge

Fuse

Mini

Fuse

Description

1

20 Amp
Yellow

Power Outlet Console

2

20 Amp
Yellow

Cabin Compartment
Node (CCN) Door
Locks

3

4

15 Amp
Blue

Aisin Transmission
Controls (Diesel Only)

5

20 Amp
Yellow

Power Sunroof

6

10 Amp
Red

Vistronic Fan/
Wastegate Solenoid

7

8

10 Amp
Red

Heated Mirrors

Cavity Cartridge

Fuse

Mini

Fuse

Description

9

30 Amp
Pink

Off Road Module
Power

10

5 Amp
Orange

Trx-Off Rd Pkg Sen
(Gas Engine Only)
NOTE: Insert 5 amp
fuse in this cavity to
enable the TRX capa-
bility (If Equipped).

11

20 Amp
Yellow

Ignition Off Draw
(IOD)-Cabin Com-
partment Node
(CCN)/Radio/Under
Hood Lamp/Wireless
Control Module
(WCM)/Satellite Digi-
tal Audio Receiver
(SDARS)/Hands Free
Module (HFM)/EOM

MAINTAINING YOUR VEHICLE

463

7

Cavity Cartridge

Fuse

Mini

Fuse

Description

12

30 Amp
Pink

Electric Brake

13

25 Amp
Natural

Power-Battery
RWAL/ABS Module
Feed

14

15 Amp
Blue

Park Lamps Left

15

20 Amp
Yellow

Trailer Park Lamps

16

15 Amp
Blue

Park Lamps Right

17

18

40 Amp
Green

ABS Pump

19

30 Amp
Pink

Trailer Tow Battery
Feed

Cavity Cartridge

Fuse

Mini

Fuse

Description

20

10 Amp
Red

Occupant Restraints
Controller (ORC) 2

21

10 Amp
Red

Occupant Restraints/
Pass Disable Switch

22

2 Amp
Gray

IGN Switch Feed

23

10 Amp
Red

HVAC

24

20 Amp
Blue

AISIN Relay Feed
(Diesel Only)

25

10 Amp
Red

Power Mirror/T-Case
Brake

26

20 Amp
Yellow

Brake Switch/Center
High Mount Stop
Lamp (CHMSL)/
Aftermarket CHMSL

464

MAINTAINING YOUR VEHICLE

Cavity Cartridge

Fuse

Mini

Fuse

Description

27

40 Amp
Green

Power Seats

28

10 Amp
Red

Power Run/Start-
PCM/Steering Angle
Sensor

29

10 Amp
Red

4X4 Switch/Pass Dr
Switch/EC Mirror

30

15 Amp
Blue

Power Run/Start-
ABS/RWAL/Smart
Bar/YAW Sensor/
Universal Exhaust
Gas Oxygen (Uego)
Sensor Controller

31

10 Amp
Red

PCM (Gas)/TCM
(Diesel 58RFE)

Cavity Cartridge

Fuse

Mini

Fuse

Description

32

10 Amp
Red

Power Ignition Run
— Adjustable Pedals
LED

33

10 Amp
Red

Power-IGN Run —
HVAC

34

35

15 Amp
Blue

Cabin Compartment
Node (CCN) Illumi-
nation

36

25 Amp
Natural

Audio_Amplifier

37

15 Amp
Blue

Variable Gate Turbo
(VGT) — Turbo Die-
sel

38

20 Amp
Yellow

Power Outlet IP

MAINTAINING YOUR VEHICLE

465

7

Cavity Cartridge

Fuse

Mini

Fuse

Description

39

10 Amp
Red

Seatbelt Tension
Reducer/Power IGN
Run/Acc

40

20 Amp
Yellow

Power IGN Run/Acc
— Cigar Lighter/Rear
Power Point

41

42

30 Amp
Pink

Diesel PCM (Diesel
Only)

CAUTION!

• When installing the Integrated Power Module

cover, it is important to ensure the cover is prop-
erly positioned and fully latched. Failure to do so
may allow water to get into the Integrated Power
Module, and possibly result in a electrical system
failure.

• When replacing a blown fuse, it is important to

use only a fuse having the correct amperage rating.
The use of a fuse with a rating other than indicated
may result in a dangerous electrical system over-
load. If a properly rated fuse continues to blow, it
indicates a problem in the circuit that must be
corrected.

466

MAINTAINING YOUR VEHICLE

VEHICLE STORAGE

If you are storing your vehicle for more than 21 days, we
recommend that you take the following steps to mini-
mize the drain on your vehicle’s battery:

• Disconnect the Ignition-Off Draw fuse (I.O.D.) fuse

located in the Integrated Power Module, located in the
engine compartment. The I.O.D. cavity includes a
snap-in retainer that allows the fuse to be discon-
nected, without removing it from the fuse block.

• The electronic shift transfer case should be placed in

the 4HI mode and kept in this position to minimize the
battery drain.

• As an alternative to the above steps you may, discon-

nect the negative cables from both batteries.

• Anytime you store your vehicle, or keep it out of

service (i.e. vacation) for two weeks or more, run the
air conditioning system at idle for about five minutes

in the fresh air and high blower setting. This will
insure adequate system lubrication to minimize the
possibility of compressor damage when the system is
started again.

NOTE:

When reinstalling the IOD fuse push firmly until

fully seated, the gages in the Instrument Cluster will do
a full sweep, when the ignition key is cycled to RUN. This
is a normal condition.

NOTE:

When the vehicle is shipped from the factory,

the IOD fuse is in the up, or extracted position. If the
radio, interior lamps, keyless entry, or other features do
not work with the key off, check the position of the fuse
(or check to see if the fuse is blown) to ensure that it is
fully seated. When the IOD fuse is extracted, the instru-
ment cluster, in the odometer window, will display

9NO

FUSE

MAINTAINING YOUR VEHICLE

467

7

REPLACEMENT LIGHT BULBS

LIGHT BULBS — Inside

Bulb No.

Overhead Console Lights . . . . . . . . . . . . . . . TS 212-2
Dome Light. . . . . . . . . . . . . . . . . . . . . . . . . . . . 7679

NOTE:

For lighted switches, see your dealer for replace-

ment instructions.

All of the inside bulbs are brass or glass wedge base.
Aluminum base bulbs are not approved.

LIGHT BULBS — Exterior

Bulb No.

Back-Up . . . . . . . . . . . . . . . . . . . . . . . . . . . . . . 1156
Fog Lamp . . . . . . . . . . . . . . . . . . . . . . . . . . . 9006LL
Headlamp (Halogen) . . . . . . . . . . . . . . . . . . . . . H13
Side Marker, Park & Turn Signal . . . . . . . . . . . . . 1157
Rear License Plate Lamp. . . . . . . . . . . . . . . . . . . 1157
Rear Cargo Light. . . . . . . . . . . . . . . . . . . . . . . . . 912
Tail & Stop . . . . . . . . . . . . . . . . . . . . . . . . . . . . 1157

BULB REPLACEMENT

Headlight (Halogen)/Front Park and Turn Lights

CAUTION!

This is a halogen bulb. Avoid touching the glass with
your fingers. Reduced bulb life will result.

1. Open the hood

468

MAINTAINING YOUR VEHICLE

2. Remove the two (2) bolts from the front of the head-
light housing.

3. Remove the plug from the inner fender well and
remove the nut through the access hole.

Front Headlight Housing Bolts

Inner Fender Plug

MAINTAINING YOUR VEHICLE

469

7

4. Pull the housing out from the fender to allow room to
disconnect the electrical connectors.

NOTE:

For easier removal, pull the headlight assembly

straight forward, applying the greatest amount of force to
the outer edge of the headlight assembly.

Rear Headlight Housing Nut Access

Headlight Removal

470

MAINTAINING YOUR VEHICLE

5. Unlock and pull connector straight from the base of
the headlight halogen bulb.

6. Twist connector on the side marker/turn signal/park
light bulb

1

4

turn and remove connector and bulb from

housing.

7. Remove housing from vehicle with headlight halogen
bulb in housing.

8. Twist the headlight halogen bulb

1

4

turn and remove

headlight bulb from the housing.

9. Replace headlight or side marker/turn signal/park
light bulb. Do not touch the headlight halogen bulb.

10. Reverse procedure for installation of bulbs and hous-
ing.

Bulb Removal

MAINTAINING YOUR VEHICLE

471

7


Content      ..     27      28      29      30     ..