Pontiac Montana SV6 (2006 year). Instruction - part 24


  Index      Pontiac     Pontiac Montana SV6 (2006 year) - instruction in english


Search            copyright infringement  


Content      ..     22      23      24      25     ..


Pontiac Montana SV6 (2006 year). Instruction - part 24


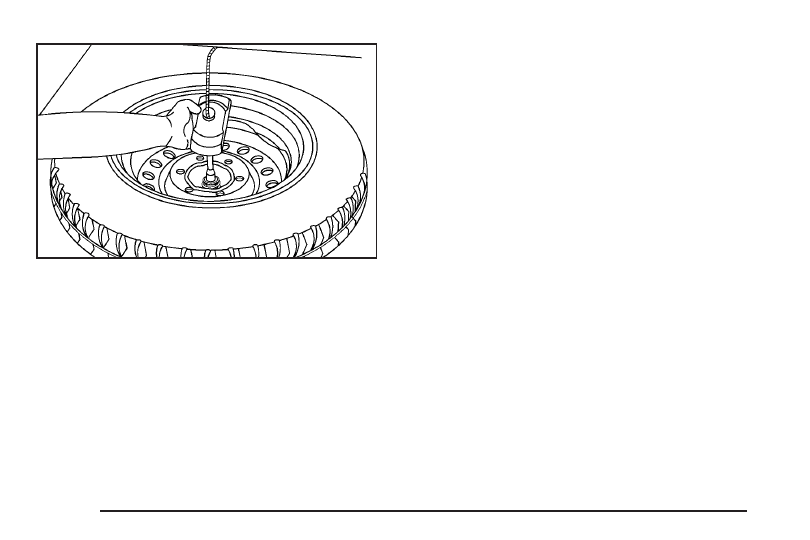
3. Tilt the retainer at the end of the cable to remove

the compact spare tire, so it can be pulled up
through the wheel opening.

If your vehicle is an AWD vehicle, after removing
the compact spare tire, turn the wrench clockwise to
raise the cable back up. On an AWD vehicle, you
can not store a full-size tire under the vehicle.
It should be stowed inside the vehicle by the cable
provided. See “Storing the Flat Tire on an
All-Wheel-Drive Vehicle” under Storing a Flat or
Spare Tire and Tools 
on page 5-83 for more
information.

If you have a front-wheel-drive vehicle, the hoist is
used to store a full-size or a flat road tire under
the vehicle. See “Storing the Flat Tire on an
Front-Wheel-Drive Vehicle” under Storing a Flat or
Spare Tire and Tools 
on page 5-83 for more
information.

4. Remove the compact spare tire from the cable.

If the compact spare tire will not lower, check under the
vehicle to see if the tire is hanging loose and the
cable end and spring under the wheel plate are missing.
If so, the secondary latch system is engaged.
See Secondary Latch System on page 5-81.

To continue changing the flat tire, see Removing the
Flat Tire and Installing the Spare Tire 
on page 5-75.

5-74

-------------------------------------------------------------------------------------------------------------------------------------------------------------

Removing the Flat Tire and
Installing the Spare Tire

If the wheel has a center cap, use the handle of the
folding wrench to pry it off. Then, with the other end of
the folding wrench, loosen the nuts.

If your vehicle has the plastic bolt-on wheel covers,
loosen the bolts completely using the folding wrench,
and remove the wheel cover.

Once the center cap and/or wheel cover are removed,
use the following steps to remove the flat tire and install
the spare tire.

1. Loosen the wheel nuts

using the folding wrench,
but do not remove them.
Turn the handle
counterclockwise about
180 degrees, then flip
the handle back to
the starting position.
This avoids taking the
wrench off the lug nut
for each turn.

Notice: If your vehicle has wheel locks and you
use an impact wrench to remove the wheel nuts,
you could damage the lock nut or wheel lock key.
Do not use an impact wrench to remove the
wheel nuts if your vehicle has wheel locks.

Notice: If you use a jack to raise the vehicle without
positioning it correctly, you could damage your
vehicle. When raising your vehicle on a jack, avoid
contact with the rear axle control arms.

5-75

-------------------------------------------------------------------------------------------------------------------------------------------------------------

Notice: If you position the jack under the rocker
molding and attempt to raise the vehicle, you could
break the molding and/or cause other damage to
your vehicle. Always position the jack so that when
the jack head is raised, it will fit firmly in the
notch located inboard from the rocker molding.

A. Front Location

B. Rear Location

2. Near each wheel, there is a notch (A and B) in the

vehicle’s frame, inboard of the rocker molding.
Position the jack and raise the jack head until it fits
firmly into the notch in the vehicle’s frame nearest
the flat tire.

Do not raise the vehicle yet.

3. Put the compact spare tire near you.

{

CAUTION:

Getting under a vehicle when it is jacked up is
dangerous. If the vehicle slips off the jack you
could be badly injured or killed. Never get under
a vehicle when it is supported only by a jack.

{

CAUTION:

Raising your vehicle with the jack improperly
positioned can damage the vehicle and even
make the vehicle fall. To help avoid personal
injury and vehicle damage, be sure to fit the
jack lift head into the proper location before
raising the vehicle.

5-76

-------------------------------------------------------------------------------------------------------------------------------------------------------------

4. Attach the folding wrench (A) to the jack (B), and

turn the wrench clockwise to raise the jack head
approximately 3 inches (7.6 cm).

5. Raise the vehicle by turning the folding wrench

clockwise in the jack. Raise the vehicle far
enough off the ground so there is enough room for
the compact spare tire to fit under the wheel well.

6. Remove all the wheel nuts and take off the flat tire.

5-77

-------------------------------------------------------------------------------------------------------------------------------------------------------------

{

CAUTION:

Rust or dirt on the wheel, or on the parts to
which it is fastened, can make the wheel nuts
become loose after a time. The wheel could
come off and cause an accident. When you
change a wheel, remove any rust or dirt from
the places where the wheel attaches to the
vehicle. In an emergency, you can use a cloth
or a paper towel to do this; but be sure to use
a scraper or wire brush later, if needed, to get
all the rust or dirt off.

7. Remove any rust or dirt

from the wheel bolts,
mounting surfaces
and spare wheel.

{

CAUTION:

Never use oil or grease on studs or nuts. If you
do, the nuts might come loose. Your wheel
could fall off, causing a serious accident.

5-78

-------------------------------------------------------------------------------------------------------------------------------------------------------------

8. Install the compact

spare tire and put the
wheel nuts back
on with the rounded
end of the nuts toward
the wheel.

Tighten each nut by hand until the wheel is held
against the hub.

9. Lower the vehicle by attaching the folding wheel

wrench to the jack and turning the wrench
counterclockwise. Lower the jack completely.

5-79

-------------------------------------------------------------------------------------------------------------------------------------------------------------

{

CAUTION:

Incorrect wheel nuts or improperly tightened
wheel nuts can cause the wheel to come loose
and even come off. This could lead to an
accident. Be sure to use the correct wheel
nuts. If you have to replace them, be sure to
get new GM original equipment wheel nuts.
Stop somewhere as soon as you can and have
the nuts tightened with a torque wrench to the
proper torque specification. See Capacities
and Specifications 
on page 5-103 for wheel nut
torque specification.

Notice: Improperly tightened wheel nuts can lead
to brake pulsation and rotor damage. To avoid
expensive brake repairs, evenly tighten the wheel
nuts in the proper sequence and to the proper
torque specification. See Capacities and
Specifications 
on page 5-103 for the wheel nut
torque specification.

10. Tighten the wheel nuts

firmly in a crisscross
sequence, as shown.

Notice: Wheel covers will not fit on your compact
spare. If you try to put a wheel cover on the compact
spare, you could damage the cover or the spare.

11. Do not try to put a wheel cover on the compact

spare tire. It will not fit. Store the wheel cover
securely in the rear of the vehicle until you have
the flat tire repaired or replaced.

5-80

-------------------------------------------------------------------------------------------------------------------------------------------------------------

Secondary Latch System

Your vehicle may have an underbody-mounted tire hoist
assembly equipped with a secondary latch system.
It is designed to stop a tire from suddenly falling off your
vehicle if the cable holding the spare tire is damaged.
For the secondary latch to work, the tire must be stowed
with the valve stem pointing down.

Your vehicle uses the underbody tire hoist assembly to
store either the compact spare or a flat road tire.
See Storing a Flat or Spare Tire and Tools on page 5-83
for instructions on storing the spare or flat tire correctly.

{

CAUTION:

Before beginning this procedure read all the
instructions. Failure to read and follow the
instructions could damage the hoist assembly
and you and others could get hurt. Read and
follow the instructions listed below.

{

CAUTION:

Someone standing too close during the
procedure could be injured by the jack.
If the spare tire does not slide off the jack
completely, make sure no one is behind you or
on either side of you as you pull the jack out
from the spare.

5-81

-------------------------------------------------------------------------------------------------------------------------------------------------------------

To release the spare tire from the secondary latch,
do the following:

1. Place the jack under the vehicle, ahead of the rear

bumper. Position the center lift point of the jack
under the center of the compact spare tire.

2. Turn the folding wrench clockwise to raise the jack

until it lifts the secondary latch device under the
wheel plate.

3. Keep raising the jack until the compact spare tire

stops moving upward and is held firmly in place.
This lets you know that the secondary latch
has released.

4. Lower the jack by turning the folding wrench

counterclockwise. Keep lowering the jack until
the compact spare tire is resting on the folding
wrench.

5-82

-------------------------------------------------------------------------------------------------------------------------------------------------------------

5. Grasp the compact spare tire with both hands and

pull it out from under the vehicle.

6. Reach under the vehicle and remove the folding

wrench and jack.

Have the hoist assembly inspected as soon as you can.
You will not be able to store a spare or flat tire using
the hoist assembly until it has been repaired or replaced.

Storing a Flat or Spare Tire
and Tools

{

CAUTION:

Storing a jack, a tire, or other equipment in the
passenger compartment of the vehicle could
cause injury. In a sudden stop or collision,
loose equipment could strike someone.
Store all these in the proper place.

5-83

-------------------------------------------------------------------------------------------------------------------------------------------------------------

Storing the Spare Tire

{

CAUTION:

The underbody-mounted spare tire needs to be
stored with the valve stem pointing down. If the
spare tire is stored with the valve stem pointing
upwards, its secondary latch won’t work
properly and the spare tire could loosen and
suddenly fall from your vehicle. If this happened
when your vehicle was being driven, the tire
might contact a person or another vehicle,
causing injury and, of course, damage to itself
as well. Be sure the underbody-mounted spare
tire is stored with its valve stem pointing down.

To store the spare tire, do the following:

1. Lay the tire near the rear of the vehicle with the

valve stem down.

2. Remove the small center cap by tapping the back

of the cap with the extension of the shaft, if the
vehicle has aluminum wheels.

3. Slide the cable retainer through the center of the

wheel and start to raise the tire.

Make sure the retainer is fully seated across the
underside of the wheel.

4. When the tire is almost in the stored position,

turn the tire so the valve is towards the rear of
the vehicle.

This will help when you check and maintain tire
pressure in the spare.

5. Raise the tire fully against the underside of the

vehicle. Continue turning the folding wrench until
you feel more than two clicks. This indicates that the
compact spare tire is secure and the cable is
tight. The spare tire hoist cannot be overtightened.

5-84

-------------------------------------------------------------------------------------------------------------------------------------------------------------

6. Make sure the tire is stored securely. Push, pull (A),

and then try to turn (B) the tire. If the tire moves,
use the folding wrench to tighten the cable.

Storing the Flat Tire on a
Front-Wheel-Drive Vehicle

The flat tire is stored the same as the spare tire for
front-wheel-drive vehicles. Refer to “Storing the Spare
Tire” listed previously.

Storing the Flat Tire on an
All-Wheel-Drive Vehicle

1. Remove the tire storage bag and cable package

from the jack storage area.

2. Remove the small center cap by tapping the back

of the cap with the extension of the shaft, if the
vehicle has aluminum wheels.

3. Put the flat tire in the tire storage bag and place it

in the rear storage area with the valve stem
pointing toward the front of the vehicle.

5-85

-------------------------------------------------------------------------------------------------------------------------------------------------------------

A. Cable

B. Liftgate Hinges

C. Door Striker

4. Pull the cable through the door striker and the

center of the wheel.

5. Hook the cable onto

the outside portion of
the liftgate hinges.

6. Pull on the cable to make sure it is secure.

7. Make sure the metal

tube is centered at the
striker. Push the
tube towards the front
of the vehicle.

8. Close the liftgate and make sure it is latched

properly.

5-86

-------------------------------------------------------------------------------------------------------------------------------------------------------------

Storing the Tools

A. Strap

B. Bag and Tools

C. Jack

Put back all tools as they were stored in the jack
storage compartment and put the compartment cover
back on.

To put the cover back on, line up the tabs on the right
of the cover with the slots in the cover opening. Push the
cover in place and push down the tab so that it rests
in the groove. This secures the cover in place.

Store the center cap or the plastic bolt-on wheel covers
until a full size tire is put back on the vehicle. When
you replace the compact spare with a full-size tire,
reinstall the bolt-on wheel covers or the center cap.
Hand-tighten them over the wheel nuts, using the
folding wrench.

5-87

-------------------------------------------------------------------------------------------------------------------------------------------------------------

Compact Spare Tire

Although the compact spare tire was fully inflated when
the vehicle was new, it can lose air after a time.
Check the inflation pressure regularly. It should be
60 psi (420 kPa).

After installing the compact spare on the vehicle, stop
as soon as possible and make sure the spare tire
is correctly inflated. The compact spare is made to
perform well at speeds up to 65 mph (105 km/h)
for distances up to 3,000 miles (5 000 km), so you can
finish your trip and have the full-size tire repaired or
replaced at your convenience. Of course, it is best
to replace the spare with a full-size tire as soon as
possible. The spare tire will last longer and be in good
shape in case it is needed again.

Notice: When the compact spare is installed,
do not take your vehicle through an automatic
car wash with guide rails. The compact spare can
get caught on the rails. That can damage the tire and
wheel, and maybe other parts of your vehicle.

Do not use the compact spare on other vehicles.

And do not mix the compact spare tire or wheel with
other wheels or tires. They will not fit. Keep the
spare tire and its wheel together.

Notice: Tire chains will not fit your compact spare.
Using them can damage your vehicle and can
damage the chains too. Do not use tire chains on
your compact spare.

Appearance Care

Cleaning the Inside of Your Vehicle

Your vehicle’s interior will continue to look its best if
it is cleaned often. Although not always visible, dust and
dirt can accumulate on your upholstery. Dirt can
damage carpet, fabric, leather, and plastic surfaces.
Regular vacuuming is recommended to remove particles
from your upholstery. It is important to keep your
upholstery from becoming and remaining heavily soiled.
Soils should be removed as quickly as possible.
Your vehicle’s interior may experience extremes of heat
that could cause stains to set rapidly.

Lighter colored interiors may require more frequent
cleaning. Use care because newspapers and garments
that transfer color to your home furnishings may also
transfer color to your vehicle’s interior.

When cleaning your vehicle’s interior, only use cleaners
specifically designed for the surfaces being cleaned.
Permanent damage may result from using cleaners on
surfaces for which they were not intended. Use glass
cleaner only on glass. Remove any accidental
over-spray from other surfaces immediately. To prevent
over-spray, apply cleaner directly to the cleaning cloth.

5-88

-------------------------------------------------------------------------------------------------------------------------------------------------------------

Notice: If you use abrasive cleaners when cleaning
glass surfaces on your vehicle, you could scratch
the glass and/or cause damage to the rear window
defogger. When cleaning the glass on your
vehicle, use only a soft cloth and glass cleaner.

Many cleaners contain solvents that may become
concentrated in your vehicle’s breathing space.
Before using cleaners, read and adhere to all safety
instructions on the label. While cleaning your vehicle’s
interior, maintain adequate ventilation by opening
your vehicle’s doors and windows.

Dust may be removed from small buttons and knobs
using a small brush with soft bristles.

Your GM dealer has a product for cleaning your
vehicle’s glass. Should it become necessary, you can
also obtain a product from your GM dealer to remove
odors from your vehicle’s upholstery.

Do not clean your vehicle using the following cleaners
or techniques:

Never use a knife or any other sharp object to
remove a soil from any interior surface.

Never use a stiff brush. It can cause damage to
your vehicle’s interior surfaces.

Never apply heavy pressure or rub aggressively
with a cleaning cloth. Use of heavy pressure
can damage your interior and does not improve
the effectiveness of soil removal.

Use only mild, neutral-pH soaps. Avoid laundry
detergents or dishwashing soaps with degreasers.
Using too much soap will leave a residue that
leaves streaks and attracts dirt. For liquid cleaners,
about 20 drops per gallon (3.78 L) of water is a
good guide.

Do not heavily saturate your upholstery while
cleaning.

Damage to your vehicle’s interior may result from
the use of many organic solvents such as naptha,
alcohol, etc.

5-89

-------------------------------------------------------------------------------------------------------------------------------------------------------------


Content      ..     22      23      24      25     ..