Pontiac Montana SV6 (2006 year). Instruction - part 10


  Index      Pontiac     Pontiac Montana SV6 (2006 year) - instruction in english


Search            copyright infringement  


Content      ..     8      9      10      11     ..


Pontiac Montana SV6 (2006 year). Instruction - part 10


Using Cruise Control on Hills

How well the cruise control will work on hills depends
upon the vehicle’s speed, its load, and the steepness of
the hills. When going up steep hills, the accelerator
pedal might have to be used in order to maintain the
vehicle’s speed. When going downhill, the brakes might
have to be applied, or the transaxle might have to be
shifted to a lower gear to keep the vehicle’s speed down.
Doing either of these things will take the vehicle out
of cruise. It may be better not to use the cruise control if
the brakes constantly have to be applied, or the vehicle
continuously needs to be shifted to a lower gear.

Cancelling Cruise Control

To cancel a cruise control session, pull the cruise
control lever forward, or step lightly on the brake pedal.

Doing either of these things will only end the current
cruise control session, but the set speed will be retained
in memory.

Push the button at the end of the cruise control lever to
turn the system off.

Erasing Speed Memory

When the cruise control or the ignition is turned off, the
cruise control set speed memory is erased.
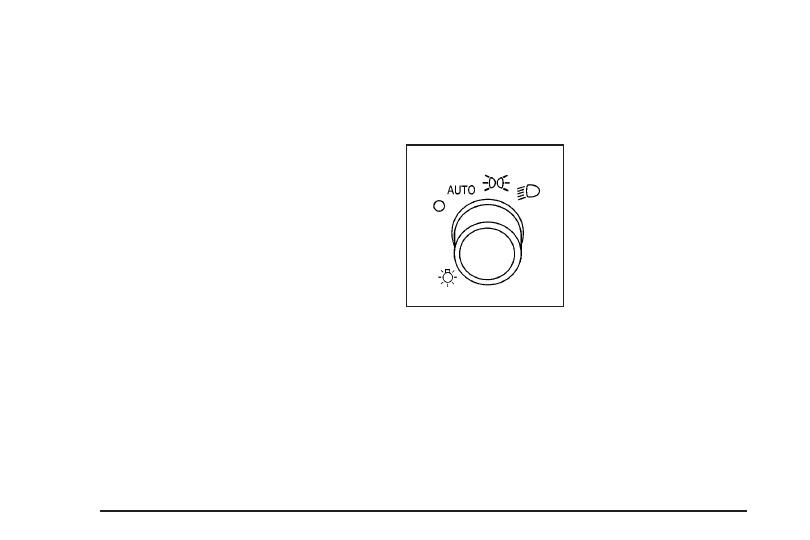
Exterior Lamps

The control to the left of
the steering column
operates the exterior
lamps.

9

(Off): Turn the control to this position to toggle off

all lamps. This is a momentary control that will spring
back to AUTO when released.

This momentary control will turn the automatic
headlamps and/or the Daytime Running Lamps on and
off for U.S. vehicles. For vehicles first sold in Canada,
this is only true when the transaxle is in PARK (P).

3-14

-------------------------------------------------------------------------------------------------------------------------------------------------------------

AUTO (Automatic): Turn the control to this position to
set your headlamps in automatic mode. AUTO mode,
if enabled, will turn the exterior lamps on and off
automatically depending on how much light is available
outside the vehicle.

Due to the momentary switch design, your automatic
lights may be disabled even if the control is in the
AUTO position.

;

(Parking Lamps): Turn the control to this position

to turn on the parking lamps together with the
following:

Taillamps

Instrument Panel Lights

5

(Headlamps): Turn the control to this position to

turn on the headlamps, together with the previously
listed lamps and lights.

Wiper Activated Headlamps

This feature, if equipped, will automatically activate
the headlamps and parking lamps after the windshield
wipers have been in use for about 30 seconds and when
all of the following conditions are met.

The exterior lamp control is in AUTO.

The headlamps have not already been activated by
automatic lighting.

The automatic lighting feature has not been
disabled using the exterior lamp control.

See Exterior Lamps on page 3-14 for additional
information.

If the wipers are activated for over 30 seconds and the
exterior lamp control is in the parking lamps position,
or the automatic lighting feature has been disabled using
the exterior lamp control, a HEADLAMPS SUGGESTED
message will appear on the Driver Information Center,
if equipped.

3-15

-------------------------------------------------------------------------------------------------------------------------------------------------------------

Headlamps on Reminder

If you turn the ignition to LOCK while leaving the lamps
on, you will hear a warning chime once the driver’s
door is opened.

Daytime Running Lamps (DRL)/
Automatic Headlamp System

Daytime Running Lamps (DRL) can make it easier for
others to see the front of your vehicle during the
day. DRL can be helpful in many different driving
conditions, but they can be especially helpful in the short
periods after dawn and before sunset. Fully functional
daytime running lamps are required on all vehicles
first sold in Canada.

A light sensor on top of the instrument panel makes the
DRL work, so be sure it is not covered. The DRL
system will make front parking and turn signal lamps
come on in daylight when the following conditions
are met:

The ignition is on.

The exterior lamps control is off.

The parking brake is released.

When the DRL are on, only your front parking and turn
signal lamps will be on. Your instrument panel will
not be lit up.

When it is dark enough outside, the exterior lamps will
come on automatically. When it is bright enough
outside, the exterior lamps will turn off and the DRL will
turn on. Of course, you may still turn on the headlamps
any time you need to.

If you start your vehicle in a dark garage, the automatic
headlamp system will come on immediately. Once you
leave the garage, it will take approximately one minute
for the automatic headlamp system to change to DRL
if it is light outside. During that delay, your instrument
panel cluster may not be as bright as usual. Make sure
your instrument panel brightness control is in the full
bright position. See Instrument Panel Brightness
on page 3-17.

To idle your vehicle with the DRL and automatic
headlamps off, set the parking brake while the ignition is
in OFF or LOCK. Then start the vehicle. The DRL and
automatic headlamps will stay off until you release
the parking brake.

As with any vehicle, you should turn on the regular
headlamp system when you need it.

3-16

-------------------------------------------------------------------------------------------------------------------------------------------------------------

Instrument Panel Brightness

The knob to adjust the
instrument panel
brightness is located in the
center of the interior
lamp controls.

Turn the knob clockwise to brighten the lights and
counterclockwise to dim them.

Interior Lamps Control

The interior lamp control is
located to the right of the
exterior lamp controls on
the instrument panel to the
left of the steering
column.

R

(Interior Lamp Override): Turn the outer knob to

this position to have your interior lamps remain off
while any door is open.

1

(Door): Turn the outer knob to this position to turn

the interior lamps on while any door is open and
when the ignition key is removed from the ignition.

+

(Interior Lamps): Turn the outer knob to

this position to turn the interior lamps on.

Turn the inner knob to adjust the instrument panel
brightness, described earlier in this section.

3-17

-------------------------------------------------------------------------------------------------------------------------------------------------------------

Dome Lamp

The dome lamp is located in the headliner and has
two buttons to instructionly turn it on or off. The dome lamp
will come on each time you open a door, unless you
turn on the interior lamps override feature. See Interior
Lamps Control 
on page 3-17.

Entry Lighting

With entry lighting, the interior of your vehicle is
illuminated so that you can see inside before you enter
your vehicle. The lamps will come on for 20 seconds
if you unlock your door using your key or the remote
keyless entry transmitter and the ignition is in LOCK.
After 20 seconds have passed, the interior lamps
will slowly fade out. The lamps will turn off before the
20 seconds if you do one of the following:

Lock all the doors using the key.

Press lock on the power door lock switch.

Press lock on the remote keyless entry transmitter.

When any door is opened, entry lighting is cancelled.
The interior lamps will stay on while any door or the
liftgate is open, and slowly fade out when all doors and
the liftgate are closed.

The interior lamps may stay on for up to 25 seconds
after all doors have been closed if they have not been
locked. See Delayed Lighting on page 3-18.

To turn the entry lighting feature off or on, see DIC
Vehicle Personalization (Uplevel Only) 
on page 3-68.

Delayed Lighting

The delayed lighting feature will continue to illuminate
the interior for 20 seconds after all doors have been
closed, so that you can find your ignition and buckle your
safety belt at night. Delayed lighting will not occur
while the ignition is in RUN or ACCESSORY. After
20 seconds have passed, the interior lamps will slowly
fade out. The lamps will fade out before the 20 seconds
have passed if you do one of the following:

Turn the ignition to RUN or ACCESSORY.

Lock all doors using the remote keyless entry
transmitter.

Lock all doors using the power door lock switch or
the key.

To turn the delayed lighting feature off or on, see DIC
Vehicle Personalization (Uplevel Only) 
on page 3-68.

3-18

-------------------------------------------------------------------------------------------------------------------------------------------------------------

Exit Lighting

With exit lighting, the interior lamps will come on for
about 25 seconds whenever you remove the key from
the ignition. If you turn the ignition key to RUN or
ACCESSORY, the lamps will fade out. The lamps will
also fade out if you lock the doors with the power door
lock switch or the remote keyless entry transmitter.

When any door is opened, exit lighting is cancelled.
The interior lamps will stay on while any door or the
liftgate is open, and slowly fade out when all doors and
the liftgate are closed.

The interior lamps may stay on for up to 20 seconds
after all doors have been closed if they have not been
locked. See Delayed Lighting on page 3-18.

To turn the exit lighting feature off or on, see DIC
Vehicle Personalization (Uplevel Only) 
on page 3-68.

Front Reading Lamps

There are two reading lamps and one courtesy lamp in
the overhead console. To turn either reading lamp
on or off, press the lens of the lamp. The courtesy lamp
will come on each time you open a door, unless you
turn on the interior lamps override feature. See Interior
Lamps Control 
on page 3-17.

Rear Reading Lamps

There are two reading lamps in the third row headliner.
To turn either reading lamp on or off, press the lens
of the lamp.

There may also be a reading lamp in the second row,
integrated with the dome lamp. To turn the second
row reading lamp on or off, press the button next to the
lamp lens.

Cargo Lamp

The cargo lamp is located in the rear of your vehicle,
above the liftgate opening, and does not have a switch.
The cargo lamp will come on each time you open a
door, unless you turn on the interior lamps override.
See Interior Lamps Control on page 3-17.

3-19

-------------------------------------------------------------------------------------------------------------------------------------------------------------

Battery Run-Down Protection

Your vehicle has a feature to help prevent you from
draining the battery, in case you accidentally leave the
interior lamps on. If you leave any interior lamps on
while the ignition is in lock or off, they will automatically
turn off after 10 minutes. The lamps will not come
back on again until you do one of the following:

Turn the ignition to RUN or ACCESSORY

Open a closed door, or close and reopen a door.

Turn the interior lamps on if they are in the door or
override position.

Turn the interior lamps to the door or override
position and then to on again if the interior
lamp control is in the on position.

If your vehicle has less than 15 miles (25 km) on the
odometer, the battery saver will turn off the lamps after
only three minutes.

Overhead Console Switchbank

The overhead console switchbank is located in the
overhead console. This switchbank may include
the following:

Power Sliding Door(s)/Override Switch(es). See
Power Sliding Door (PSD) on page 2-16.

Power Rear Quarter Windows. See Power Rear
Quarter Windows 
on page 2-25.

Ultrasonic Rear Parking Assist (URPA) Disable
Switch. See Ultrasonic Rear Parking Assist
(URPA) 
on page 3-21.

If your vehicle does not have some of these options,
there will be a blank.

3-20

-------------------------------------------------------------------------------------------------------------------------------------------------------------

Ultrasonic Rear Parking
Assist (URPA)

If your vehicle is equipped with the Ultrasonic Rear
Parking Assist (URPA) system, it is designed to help you
park, while the vehicle is in REVERSE (R). It operates
only at very low speeds, less than 3 mph (5 km/h).
URPA can help make parking easier and to help you
avoid colliding with objects such as parked vehicles.
The URPA system can detect objects up to 5 feet
(1.5 m) behind the vehicle, and tell you how close these
objects are from your rear bumper.

Your vehicle’s URPA operates when the shift lever is
moved into REVERSE (R) and the vehicle speed is less
than 3 mph (5 km/h). Four ultrasonic sensors located at
the rear bumper are used to detect the distance to the
object. The URPA display is located inside the vehicle,
near the rear window. It has three color-coded lights used
to provide distance and system information to the driver.

{

CAUTION:

Even with the Ultrasonic Rear Park Assist
system, the driver must check carefully
before backing up. The system does not
operate above typical backing speeds of 3 mph
(5 km/h) while parking. And, the system does
not detect objects that are more than 5 feet
(1.5 meters) behind the vehicle.

So, unless you check carefully behind you
before and when you back up, you could strike
children, pedestrians, bicyclists or pets behind
you, and they could be injured or killed.

Whether or not you are using rear park assist,
always check carefully behind your vehicle
before you back up and then watch closely as
you do.

3-21

-------------------------------------------------------------------------------------------------------------------------------------------------------------

URPA can be turned off by
pressing the rear park aid
disable switch located
in the overhead console
switchbank. While the
system is disabled,
an indicator light will be lit
on the switch. You will
not see any lights on the
rear display if the switch is
in the off position.

How the System Works

Unless disabled, the URPA will turn on automatically
when the shift lever is moved into REVERSE (R). When
the system turns on, the three lights on the display will
illuminate for one and a half seconds to let you know
that the system is working. If your vehicle is moving
in REVERSE (R) at a speed greater than 3 mph
(5 km/h), the red light will flash to remind you that
the system does not work at speed greater than
3 mph (5 km/h).

If an object is detected at a REVERSE (R) speed of
less than 3 mph (5 km/h), one of the following will occur:

Description

English

Metric

amber light

5 ft

1.5 m

amber/amber lights

40 in

1.0 m

amber/amber/red lights &

continuous chime

20 in

0.5 m

amber/amber/red lights

flashing & continuous

chime

1 ft

0.3 m

A chime will sound the first time an object is detected
between 20 inches (0.5 m) and 5 feet (1.5 m) away.

URPA cannot detect objects that are above liftgate level.
In order for the rear sensors to recognize an object,
it must be within detection range behind the vehicle.

3-22

-------------------------------------------------------------------------------------------------------------------------------------------------------------

When the System Does Not Seem to
Work Properly

The light may flash red when the vehicle is in
REVERSE (R) if the ultrasonic sensors are not kept
clean. So be sure to keep your rear bumper free of mud,
dirt, snow, ice and slush. Other conditions that may
affect system performance include things like the
vibrations from a jackhammer or the compression of
air brakes on a very large truck. If after cleaning the
rear bumper and then driving forward at least 15 mph
(25 km/h), the display continues to flash red, see
your dealer.

If a trailer was attached to your vehicle, or a bicycle or
an object was on the back of, or hanging out of your
liftgate during your last drive cycle, the light may
also flash red. The light will continue to flash whenever
in REVERSE (R) until your vehicle is driven forward
at least 15 mph (25 km/h) without any obstructions
behind the vehicle.

Accessory Power Outlet(s)

Your vehicle may be equipped with a front accessory
power outlet located below the climate controls on
the instrument panel. It can be used to plug in electrical
equipment such as a cellular telephone or CB radio.

Pull the cover down to use the accessory power outlet.
When not in use, keep the cover on.

The rear accessory power outlet is located on the rear
compartment on the driver’s side.

To remove the cover, pull the tab on the cover and pull
it off. To put the cover back on, line up the tabs at
the back of the cover and put the cover in place. Push
down the tab to secure the cover. When not in use,
always cover the rear accessory power outlet with the
protective cap.

3-23

-------------------------------------------------------------------------------------------------------------------------------------------------------------

Notice: Leaving electrical equipment on for
extended periods will drain the battery. Always turn
off electrical equipment when not in use and do
not plug in equipment that exceeds the maximum
amperage rating.

Certain electrical accessories may not be compatible
with the accessory power outlet and could result
in blown vehicle or adapter fuses. If you experience
a problem see your dealer for additional information on
accessory power outlets.

Notice: Adding any electrical equipment to your
vehicle may damage it or keep other components
from working as they should. The repairs would not
be covered by your warranty. Do not use equipment
exceeding maximum amperage rating. Check
with your dealer before adding electrical equipment.

When adding electrical equipment, be sure to follow
the proper installation instructions included with
the equipment.

Notice: Improper use of the power outlet can cause
damage not covered by your warranty. Do not
hang any type of accessory or accessory bracket
from the plug because the power outlets are
designed for accessory power plugs only.

Power Outlet 115 Volt Alternating
Current

Your vehicle may have a power outlet that can be
used to plug in auxiliary electrical equipment with a
maximum limit of 150 watts. If you try to use equipment
that requires more than the limit, a protection circuit
will cut the power supply. To reset the outlet, unplug the
item and plug it back in or turn the ignition to OFF or
ACCESSORY and then back on. The power will
automatically restart when equipment that operates
within the limit is plugged in.

The power outlet is located
behind the third row seats
on the passenger’s
side rear quarter trim
panel.

3-24

-------------------------------------------------------------------------------------------------------------------------------------------------------------

The power outlet is not designed for the following
electrical equipment and may not work properly if these
items are plugged into the power outlet:

Equipment with high initial peak wattage such as:
compressor-driven refrigerators and electric
power tools.

Other equipment requiring an extremely stable
power supply such as: microcomputer-controlled
electric blankets, touch sensor lamps, etc.

Cigarette Lighter

Your vehicle may have a cigarette lighter. To use the
lighter, located on the instrument panel below the
climate controls, push it in all the way and let go. When
it is ready, it will pop back out by itself.

Notice: Holding a cigarette lighter in while it is
heating will not allow the lighter to back away from
the heating element when it is hot. Damage from
overheating may occur to the lighter or heating
element, or a fuse could be blown. Do not hold a
cigarette lighter in while it is heating.

Notice: If you put papers, pins, or other flammable
items in the ashtray, hot cigarettes or other
smoking materials could ignite them and possibly
damage your vehicle. Never put flammable items in
the ashtray.

Climate Controls

Climate Control System

With this system you can control the heating, cooling
and ventilation for your vehicle.

Operation

Turn the right knob clockwise or counterclockwise to
direct the airflow inside of your vehicle.

3-25

-------------------------------------------------------------------------------------------------------------------------------------------------------------

To change the current mode, select one of the following:

H

(Vent): This mode directs air to the instrument

panel outlets.

)

(Bi-Level): This mode directs half of the air to the

instrument panel outlets, then directs the remaining
air to the floor outlets. Cooler air is directed to the upper
outlets and warmer air to the floor outlets.

6

(Floor): This mode directs most of the air to the

floor outlets. Use this mode to send air to the rear of the
vehicle. Keep the area under the front seats free of
objects that could obstruct airflow to the rear of
the vehicle.

The right knob can also be used to select defog or
defrost mode. For more information, see “Defogging and
Defrosting” later in this section.

Outside Air: This mode will be automatically selected
when your vehicle is in any mode except maximum
air conditioning.

A

(Fan): Turn the left knob clockwise or

counterclockwise to increase or decrease the fan speed.
Turn the knob to 0 to turn off the fan. The fan must
be turned on for the air conditioning compressor
to operate.

Temperature Control: Turn the center knob clockwise
or counterclockwise to increase or decrease the air
temperature inside your vehicle.

#

(Air Conditioning): Press this button to turn the

air-conditioning system on or off. When it is pressed,
an indicator light in the button will come on to let
you know that air conditioning is activated.

You may notice a slight change in engine performance
when the air conditioning compressor shuts off and
turns on again. This is normal. The system is designed
to make adjustments to help with fuel economy while
still maintaining the selected temperature.

On hot days, open the windows to let hot inside air
escape; then close them. This helps to reduce the time
it takes for your vehicle to cool down. It also helps
the system to operate more efficiently.

The air conditioning system removes moisture from the
air, so you may sometimes notice a small amount of
water dripping underneath your vehicle while idling
or after turning off the engine. This is normal.

#

MAX (Maximum Air Conditioning): Turn the right

knob to this position for maximum air conditioning.
This will select air conditioning and recirculation
for maximum cooling of your vehicle. This mode directs
air to the instrument panel outlets.

3-26

-------------------------------------------------------------------------------------------------------------------------------------------------------------

Recirculation: This mode keeps outside air from
coming in the vehicle. It can be used to prevent outside
air and odors from entering your vehicle or help heat
or cool the air inside your vehicle more quickly.
This mode will automatically be selected when you
select maximum air conditioning.

(

(Heated Seats): Press this button to turn on the

heated seats. The button on the left controls the driver’s
seat and the button on the right controls the passenger’s
seat. See Heated Seats on page 1-3 for additional
information.

Defogging and Defrosting

Fog on the inside of windows is a result of high humidity,
or moisture, condensing on the cool window glass.
This can be minimized if the climate control system is
used properly. There are two modes to clear fog or frost
from your windshield. Use the defog mode to clear the
windows of fog or moisture and warm the passengers.
Use the defrost mode to remove fog or frost from
the windshield more quickly.

Turn the right knob to select the defog or defrost mode.

-

(Defog): This mode directs air to the windshield and

the floor outlets. When you select this mode, the system
runs the air-conditioning compressor unless the outside
temperature is at or below freezing. The recirculation
mode cannot be selected while in the defog mode.

0

(Defrost): This mode directs most of the air to the

windshield and the side window outlets, with some
air directed to the floor outlets. In this mode, the system
will automatically run the air-conditioning compressor,
unless the outside temperature is at or below freezing.
Recirculation cannot be selected while in the
defrost mode.

Do not drive the vehicle until all the windows are clear.

Rear Window Defogger

The rear window defogger uses a warming grid to
remove fog from the rear window.

<

REAR: Press this button to turn the rear window

defogger on or off. An indicator light in the button
will come on to let you know that the rear window
defogger is activated.

The rear window defogger will turn off about 10 minutes
after the button is pressed. If turned on again, the
defogger will only run for about five minutes before
turning off. The defogger can also be turned off by
pressing the button again or by turning off the engine.

Notice: Do not use anything sharp on the inside of
the rear window. If you do, you could cut or
damage the warming grid, and the repairs would not
be covered by your warranty. Do not attach a
temporary vehicle license, tape, a decal or anything
similar to the defogger grid.

3-27

-------------------------------------------------------------------------------------------------------------------------------------------------------------

Outlet Adjustment

k

(Open): Turn the thumbwheel to this position to

open the air outlets.

l

(Closed): Turn the thumbwheel to this position to

close the air outlets.

Use the louvers located on the air outlets to change the
direction of the airflow.

Operation Tips

Clear away any ice, snow, or leaves from the air
inlets at the base of the vehicle that may block
the flow of air into your vehicle.

Use of non-GM approved hood deflectors may
adversely affect the performance of the system.

Keep the path under the front seats clear of objects
to help circulate the air inside of your vehicle more
effectively.

Rear Climate Control System

Your vehicle may have a rear climate control system
that allows the driver to adjust the fan speed for the rear
seating area. This system works with the main climate
control system in your vehicle.

This thumbwheel is located below the main climate
control system on the instrument panel. Use this
thumbwheel to adjust the fan speed for the rear seat
passengers.

A

(Fan): Slide the thumbwheel to 1, 2, or 3 to

increase or decrease airflow to the rear seating area.
Slide the fan knob to 0 to turn the fan off.

AUX: Slide the thumbwheel to AUX to allow the rear
passengers to adjust the temperature and airflow to the
rear seating area.

3-28

-------------------------------------------------------------------------------------------------------------------------------------------------------------

Your vehicle may also have a rear climate control
system that allows the rear passengers to adjust the
temperature and fan speed for the rear seating area.

When the front climate control is in AUX and the rear
climate control fan or temperature button is pressed,
the display will show the same airflow modes as
the front climate control system. See Climate Control
System 
on page 3-25

The front control must be in AUX position to enable
adjustment of the temperature and fan speed on the rear
control system. If it is not in AUX, pressing the fan or
temperature button on the rear climate control will show
a DISABLED message on the rear seat entertainment
system display.

t r

(Decrease Setting): Press this button to

decrease the fan or temperature setting when arrows
are active in the display.

[ u

(Increase Setting): Press this button to

increase the fan or temperature setting when arrows are
active in display.

9

(Fan): Press this button to increase or decrease

fan speed. After pressing this button, arrows and a fan
will appear in the display. The arrows indicate that to
increase or decrease fan speed, you need to press
either the left or right arrow button. The displayed arrows
and fan will disappear after a few seconds.

b

(Temperature): Press this button to increase or

decrease temperature. After pressing this button, arrows
and a temperature scale will appear in the display.
The arrows indicate that to increase or decrease
temperature, you need to press either the left or right
arrow button. The displayed arrows and temperature
scale will disappear after a few seconds.

3-29

-------------------------------------------------------------------------------------------------------------------------------------------------------------


Content      ..     8      9      10      11     ..