Pontiac Montana SV6 (2006 year). Instruction - part 9


  Index      Pontiac     Pontiac Montana SV6 (2006 year) - instruction in english


Search            copyright infringement  


Content      ..     7      8      9      10     ..


Pontiac Montana SV6 (2006 year). Instruction - part 9


Folding Tray

Your vehicle may be
equipped with folding
convenience trays located
between seats. To use
each tray lift up on the
handle located on its front
end, while pulling up on the
tray to lock it into place.
There are four cupholders
on each tray.

Second Row Center Console

If your vehicle has the second row center console, use
the following procedure to remove or install the console.

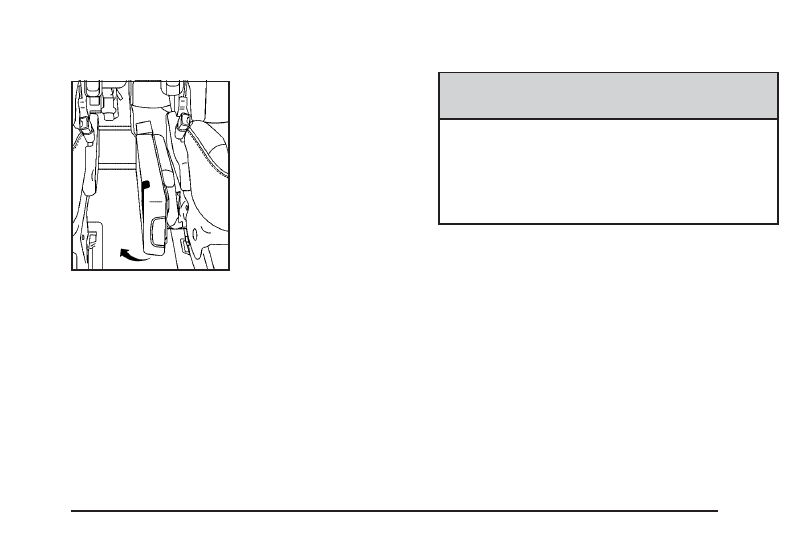
Removing the Center Console

1. Locate the attachment lever in an opening on the

rear of the console

2. Pull the attachment lever upward to release the

attachment hook.

3. Lift the console up to remove it from the vehicle.

Replacing the Center Console

{

CAUTION:

A second row center console that is not locked
into place properly can move around in a
crash or sudden stop. People in the vehicle
could be injured. Be sure to lock the console
into place properly when installing it.

1. Position the second row center console above the

forward floor attachments between the second row
bucket seats.

For information on installing the seats, see Rear
Seat Operation 
on page 1-6.

2. Place the console’s front hooks onto the forward

floor attachments.

3. Locate the attachment lever at the rear of the

console and pull up.

4. Rock the rear attachment bracket onto the floor

attachment and release the lever.

5. Pull up on the console to ensure the rear

attachment hook is latched.

2-51

-------------------------------------------------------------------------------------------------------------------------------------------------------------

Luggage Carrier

{

CAUTION:

If you try to carry something on top of your
vehicle that is longer or wider than the luggage
carrier — like paneling, plywood, a mattress
and so forth — the wind can catch it as you
drive along. This can cause you to lose
control. What you are carrying could be
violently torn off, and this could cause you or
other drivers to have a collision, and of course
damage your vehicle. You may be able to carry
something like this inside. But, never carry
something longer or wider than the luggage
carrier on top of your vehicle.

If you have the luggage carrier, you can load things on
top of your vehicle. Crossrails are not standard on
this vehicle and must be purchased at your dealer.

Notice: Loading cargo on the luggage carrier that
weighs more than 150 lbs (68 kg) or hangs over
the rear or sides of the vehicle may damage your
vehicle. Load cargo so that it rests on the slats
as far forward as possible and against the side rails,
making sure to fasten it securely.

Do not exceed the maximum vehicle capacity when
loading your vehicle. For more information on vehicle
capacity and loading, see Loading Your Vehicle on
page 4-32
.

To prevent damage or loss of cargo as you are driving,
check now and then to make sure the cargo is still
securely fastened.

Convenience Net (With Rear
Convenience Center)

Your vehicle may have a convenience net. The
convenience net is designed to help keep small loads,
from falling out of the vehicle when the liftgate is
opened. Install the convenience net at the rear of your
vehicle, inside the liftgate.

To use the convenience net, do the following:

1. Attach the upper loops to the posts on both sides of

the liftgate opening. The label on the net should be
in the upper left corner.

2. Attach the lower loops to the tabs at the rear edge

of the rear convenience center.

When not in use, it is recommended that you take down
the convenience net to extend the life of the net and
to help retain its elasticity, and to keep the rear
exit clear.

2-52

-------------------------------------------------------------------------------------------------------------------------------------------------------------

Convenience Net (Without Rear
Convenience Center)

Your vehicle may have a convenience net. The
convenience net is designed to help keep small loads,
like grocery bags, from falling over. Install the
convenience net at the rear of your vehicle, inside
the liftgate.

To use the convenience net, do the following:

1. Attach the upper loops to the posts on both sides of

the liftgate opening. The label on the net should be
in the upper left corner.

2. Attach the lower hooks to the metal rings on the

floor.

3. Once you have loaded items into the net, stretch

the higher side of the net up and over the top of
the load to hold it firmly in place.

The convenience net has a maximum capacity of
100 lbs (45 kg). It is not designed to hold larger, heavier
loads. Store such loads on the floor of your vehicle,
as far forward as you can.

When not in use, it is recommended that you take down
the convenience net to extend the life of the net and
to help retain its elasticity, and to keep the rear
exit clear.

Convenience Center

{

CAUTION:

If any removable convenience item is not
secured properly, it can move around in a
collision or sudden stop. People in the vehicle
could be injured. Be sure to secure any such
item properly.

Your vehicle may have a convenience center. It provides
extra storage space for the rear of the vehicle.

To open the convenience center, pull up on the door
latch located on the front of the cover. The convenience
center cover has two automatic prop rods to hold it
up and in place.

To close the convenience center cover, you must pull
one of the prop rod linkages toward you while holding
onto the door latch and lower the convenience
center cover to close it.

2-53

-------------------------------------------------------------------------------------------------------------------------------------------------------------

Removing the Convenience Center

1. Make sure that all items are off the convenience

center and that it is empty.

2. Turn the hand knob, located at the rear of the

convenience center, counterclockwise until the
knob is loose.

3. Lift up on the hand knob, then grip and pull up

on the convenience center to remove it from
the vehicle.

Replacing the Convenience Center

1. Make sure the third row seat is properly installed in

the vehicle. See Third Row Seat on page 1-18 for
more information. If the third row seat is not in
the vehicle with the convenience center, the
convenience center will not be locked into the
correct position in the vehicle.

2. Make sure that the convenience center is empty

and closed.

3. Lift the convenience center up and into the rear of

the vehicle.

4. Slide the convenience center in and align it to the

rear seat.

5. Press down on the front of the convenience center

so the center is aligned on the sill mounting
bracket.

6. Turn the hand knob clockwise until it is tight.

7. Pull up on the convenience center to make sure it

is locked into place.

The cover of the convenience center can be left in its
upright position while the vehicle is moving.

The convenience center and the third row seat both
have a maximum weight capacity of 400 lbs (181.6 kg).

Notice: Overloading your vehicle may cause
damage. Repairs would not be covered by your
warranty. Do not overload your vehicle.

2-54

-------------------------------------------------------------------------------------------------------------------------------------------------------------

Instrument Panel Overview ...............................3-4

Hazard Warning Flashers ................................3-6
Other Warning Devices ...................................3-6
Horn .............................................................3-6
Tilt Wheel .....................................................3-6
Turn Signal/Multifunction Lever .........................3-7
Turn and Lane-Change Signals ........................3-7
Headlamp High/Low-Beam Changer ..................3-8
Flash-to-Pass .................................................3-8
Windshield Wipers ..........................................3-9
Windshield Washer .........................................3-9
Rear Window Wiper/Washer ...........................3-10
Cruise Control ..............................................3-10
Exterior Lamps .............................................3-14
Wiper Activated Headlamps ............................3-15
Headlamps on Reminder ................................3-16
Daytime Running Lamps (DRL)/Automatic

Headlamp System .....................................3-16

Instrument Panel Brightness ...........................3-17
Interior Lamps Control ...................................3-17
Dome Lamp .................................................3-18
Entry Lighting ...............................................3-18
Delayed Lighting ...........................................3-18

Exit Lighting .................................................3-19
Front Reading Lamps ....................................3-19
Rear Reading Lamps ....................................3-19
Cargo Lamp .................................................3-19
Battery Run-Down Protection ..........................3-20
Overhead Console Switchbank .......................3-20
Ultrasonic Rear Parking Assist (URPA) ............3-21
Accessory Power Outlet(s) .............................3-23
Power Outlet 115 Volt Alternating Current ........3-24
Cigarette Lighter ...........................................3-25

Climate Controls ............................................3-25

Climate Control System .................................3-25
Outlet Adjustment .........................................3-28
Rear Climate Control System .........................3-28
Passenger Compartment Air Filter ...................3-30

Warning Lights, Gages, and Indicators ............3-31

Instrument Panel Cluster ................................3-32
Speedometer and Odometer ...........................3-33
Trip Odometer ..............................................3-33
Tachometer .................................................3-33
Safety Belt Reminder Light .............................3-34

Section 3

Instrument Panel

3-1

-------------------------------------------------------------------------------------------------------------------------------------------------------------

Passenger Safety Belt Reminder Light .............3-34
Airbag Readiness Light ..................................3-35
Passenger Airbag Status Indicator ...................3-36
Charging System Light ..................................3-38
Brake System Warning Light ..........................3-38
Anti-Lock Brake System Warning Light .............3-39
Traction Control System (TCS) Warning Light ......3-40
Engine Coolant Temperature Gage ..................3-40
Malfunction Indicator Lamp .............................3-41
Oil Pressure Light .........................................3-44
Security Light ...............................................3-44
Cruise Control Light ......................................3-45
Highbeam On Light .......................................3-45
Fuel Gage ...................................................3-45
Low Fuel Warning Light .................................3-46

Driver Information Center (DIC) .......................3-46

DIC Operation and Displays ...........................3-47
DIC Warnings and Messages .........................3-52
DIC Vehicle Personalization (Uplevel Only) .........3-68

Audio System(s) .............................................3-76

Setting the Time ...........................................3-77
Radio with CD ..............................................3-78
Rear Seat Entertainment System ....................3-96
Rear Seat Audio (RSA) ................................3-110
Theft-Deterrent Feature ................................3-112
Audio Steering Wheel Controls ......................3-112
Radio Reception .........................................3-113
Care of Your CDs and DVDs ........................3-114
Care of the CD and DVD Player ...................3-114
Fixed Mast Antenna ....................................3-115
XM™ Satellite Radio Antenna System ............3-115
Chime Level Adjustment ...............................3-115

Section 3

Instrument Panel

3-2

-------------------------------------------------------------------------------------------------------------------------------------------------------------

Instrument Panel Overview

3-4

-------------------------------------------------------------------------------------------------------------------------------------------------------------

The main components of the instrument panel are the following:

A. Air Outlets. See Outlet Adjustment on page 3-28.

B. Turn Signal/Multifunction Lever. See Turn

Signal/Multifunction Lever on page 3-7.

C. Audio Steering Wheel Controls (If Equipped). See

Audio Steering Wheel Controls on page 3-112.

D. Instrument Panel Cluster. See Instrument Panel

Cluster on page 3-32.

E. Driver Information Center (DIC) Controls (If

Equipped). See Driver Information Center (DIC) on
page 3-46
.

F. Traction Control System Button (If Equipped). See

Traction Control System (TCS) on page 4-9.

G. Hazard Warning Flasher Switch. See Hazard

Warning Flashers on page 3-6.

H. Passenger Airbag Status And Passenger Seatbelt

Reminder Indicator. See Passenger Airbag
Status Indicator 
on page 3-36 and Passenger Safety
Belt Reminder Light 
on page 3-34.

I. Audio System. See Audio System(s) on page 3-76.

J. Exterior Lamps Control. See Exterior Lamps on

page 3-14.

K. Interior Lamps Control. See Interior Lamps Control

on page 3-17. Instrument Panel Brightness Control.
See Instrument Panel Brightness on page 3-17.

L. Hood Release. See Hood Release on page 5-11.

M. Parking Brake. See Parking Brake on page 2-36.

N. Horn. See Horn on page 3-6.

O. Cruise Controls (If Equipped). See Cruise Control on

page 3-10.

P. Climate Controls. See Climate Control System on

page 3-25.

Q. Heated Seat Controls (If Equipped). See Heated

Seats on page 1-3.

R. Glove Box. See Glove Box on page 2-48.

3-5

-------------------------------------------------------------------------------------------------------------------------------------------------------------

Hazard Warning Flashers

Your hazard warning flashers let you warn others. They
also let police know you have a problem. Your front
and rear turn signal lamps will flash on and off.

The hazard warning
flasher button is located
in the center of the
instrument panel.

Your hazard warning flashers work no matter what
position your key is in, and even if the key is not in.

Press the button to make the front and rear turn signal
lamps flash on and off. Press the button again to
turn the flashers off.

When the hazard warning flashers are on, your turn
signals will not work.

Other Warning Devices

If you carry reflective triangles, you can set them up at
the side of the road about 300 feet (100 m) behind
your vehicle.

Horn

Press near or on the horn symbols on your steering
wheel pad to sound the horn.

Tilt Wheel

A tilt wheel allows you to adjust the steering wheel
before you drive. You can raise the steering wheel to
the highest level to give your legs more room when you
enter and exit the vehicle.

The lever that allows you to tilt the steering wheel is
located on the left side of the steering column.

To tilt the wheel, hold the
wheel and pull the lever.
Then move the wheel
to a comfortable position
and release the lever
to lock the wheel in place.

3-6

-------------------------------------------------------------------------------------------------------------------------------------------------------------

Turn Signal/Multifunction Lever

The lever on the left side of the steering column
includes the following:

G

Turn and Lane Change Signals. See Turn and

Lane-Change Signals on page 3-7.

53

Headlamp High/Low-Beam Changer. See

Headlamp High/Low-Beam Changer on page 3-8.

Flash-to-Pass. See Flash-to-Pass on page 3-8.

N

Windshield Wipers. See Windshield Wipers on

page 3-9.

L

Windshield Washer. See Windshield Washer

on page 3-9.

Z

Rear Window Wiper. See Windshield Washer

on page 3-9.

=

Rear Window Washer. See Windshield Washer

on page 3-9.

For information on the headlamps, see Exterior Lamps
on page 3-14.

Turn and Lane-Change Signals

The turn signal has two upward (for right) and
two downward (for left) positions. These positions
allow you to signal a turn or a lane change.

To signal a turn, move the lever all the way up or
down. When the turn is finished, the lever will return
automatically.

3-7

-------------------------------------------------------------------------------------------------------------------------------------------------------------

An arrow on the instrument
panel cluster will flash in
the direction of the
turn or lane change.

To signal a lane change, just raise or lower the lever
until the arrow starts to flash. Hold it there until you
complete your lane change. The lever will return by itself
when you release it.

As you signal a turn or a lane change, if the arrow
flashes faster than normal, a signal bulb may be burned
out and other drivers will not see your turn signal.

If a bulb is burned out, replace it to help avoid an
accident. If the arrows do not go on at all when you
signal a turn, check for burned-out bulbs and check the
fuse. See Bulb Replacement on page 5-48 and Fuses
and Circuit Breakers 
on page 5-98.

If you have a trailer towing option with added wiring for
the trailer lamps, the signal indicator will flash at a
normal rate even if a turn signal bulb is burned out.
Check the front and rear turn signal lamps regularly to
make sure they are working.

Turn Signal On Chime

If either turn signal is left on for more than 3/4 mile
(1.2 km), a chime will sound to let the driver know to
turn it off. If you need to leave the signal on for more
than 3/4 mile (1.2 km), turn off the signal and then turn it
back on.

Headlamp High/Low-Beam Changer

To change the headlamps from low beam to high beam,
push the turn signal/multifunction lever away from you.

When the high beams
are on, this light will
appear on the instrument
panel cluster.

To change the headlamps from high beam to low beam,
pull the turn signal/multifunction lever toward you.

Flash-to-Pass

When the headlamps are off, pull the lever toward you
to momentarily turn on the high beams. This will
signal that you are going to pass. When you release the
lever, they will turn off.

3-8

-------------------------------------------------------------------------------------------------------------------------------------------------------------

Windshield Wipers

You control the windshield wipers by turning the band
with the wiper symbol on it.

8

(Mist): For a single wiping cycle, turn the band to

mist. Hold it there until the wipers start. Then let go.
The wipers will stop after one wipe. If you want
more wipes, hold the band on mist longer.

9

(Off): To stop the wipers, move the band to off.

N

(Delay): You can set the wiper speed for a long or

short delay between wipes. This can be very useful
in light rain or snow. Turn the band to choose the delay
time. The closer to the top of the lever, the shorter
the delay.

6

(Low Speed): For steady wiping at low speed,

turn the band away from you to the first solid band past
the delay settings. For high-speed wiping, turn the
band further, to the second solid band past the delay
settings. To stop the wipers, move the band to off.

1

(High Speed): For high-speed wiping, turn the

band further, to the second solid band past the
delay settings.

Be sure to clear ice and snow from the wiper blades
before using them. If they are frozen to the windshield,
carefully loosen or thaw them. If your blades do
become worn or damaged, get new blades or blade
inserts.

Windshield Washer

LQ

(Windshield Washer): Press and hold the

windshield washer paddle with this symbol on it to wash
your windshield. The washers and wipers will operate.

When you release the paddle, the washers will stop, and
the wipers will continue to operate for two cycles, unless
your wipers had already been on. In that case, the wipers
will resume the wiper speed you had selected earlier.

{

CAUTION:

In freezing weather, do not use your washer
until the windshield is warmed. Otherwise the
washer fluid can form ice on the windshield,
blocking your vision.

3-9

-------------------------------------------------------------------------------------------------------------------------------------------------------------

Rear Window Wiper/Washer

{

CAUTION:

In freezing weather, do not use your washer
until the windshield is warmed. Otherwise the
washer fluid can form ice on the windshield,
blocking your vision.

The controls for the rear
window washer/wiper are
located on the end of
the turn signal/multifunction
lever.

9

(Off): Move the lever to this position to turn the

rear washers/wipers off.

Z

(Rear Wiper): Move the lever to this position to

turn the rear wipers on.

=

(Rear Washer/Wiper): Move the lever to this

position to wash and wipe the rear window.

Cruise Control

Your vehicle may have cruise control.

{

CAUTION:

Cruise control can be dangerous where
you cannot drive safely at a steady speed.
So, do not use your cruise control on winding
roads or in heavy traffic.

Cruise control can be dangerous on slippery
roads. On such roads, fast changes in tire
traction can cause needless wheel spinning,
and you could lose control. Do not use cruise
control on slippery roads.

3-10

-------------------------------------------------------------------------------------------------------------------------------------------------------------

The cruise control lever is
located below the
windshield wiper control on
the right side of the
steering wheel.

Q

RES + (Resume/Accelerate): Push the lever up to

resume the cruise control speed, or to accelerate when
passing another vehicle.

J

ON/OFF

q

Press the button on the end of the

lever to turn the cruise control on. Press it again to turn
cruise control off.

R

SET — (Set/Coast/Decelerate): Push the lever

down to set the cruise speed. If the cruise speed
is already set this position can be used to coast or
decelerate from a higher speed.

CANCEL

R

Pull the lever to cancel the cruise

control speed.

Cruise control allows a speed of approximately 25 mph
(40 km/h) or more to be maintained without keeping
your foot on the accelerator. This is helpful on long trips.
Cruise control does not work at speeds below about
25 mph (40 km/h).

When the brakes are applied, the cruise control
shuts off.

If the vehicle is in cruise control and the Traction Control
System (TCS) begins to limit wheel spin, the cruise
control will automatically disengage. See Traction Control
System (TCS) 
on page 4-9. When road conditions allow,
the cruise control can be used again.

3-11

-------------------------------------------------------------------------------------------------------------------------------------------------------------

Setting Cruise Control

{

CAUTION:

If you leave your cruise control on when you
are not using cruise, you might hit a button
and go into cruise when you do not want to.
You could be startled and even lose control.
Keep the cruise control switch off until you
want to use cruise control.

1. Push the button at the end of the cruise control

lever to turn the cruise control on.

2. Accelerate to the desired speed.

3. Push down on the cruise control lever and release

it. This will set the speed in cruise control.

4. Remove your foot from the accelerator pedal.

This symbol will appear on
the instrument panel
cluster when the cruise
control is set.

This symbol will disappear when the brakes are applied
or the cruise control is cancelled. It will reappear when
the set cruise speed is resumed.

Resuming a Set Speed

If the cruise control is set at a desired speed and then
the brakes are applied, the cruise control shuts off.
But the cruise control does not need to be reset.

Once the vehicle is traveling approximately 25 mph
(40 km/h) or more, the cruise control lever can be
pushed upward toward the plus (resume/accelerate)
position to return to the preset cruise speed.

The vehicle will return to and stay at the preset
cruise speed. If the cruise control lever is pushed up
and held toward the plus (resume/accelerate) position,
the vehicle speed will increase until the lever is
released or the brakes are applied. Do not continue to
hold the lever in the plus (resume/accelerate) position,
unless a faster speed is desired.

3-12

-------------------------------------------------------------------------------------------------------------------------------------------------------------

Increasing Speed While Using
Cruise Control

There are two ways to go to a higher speed:

Use the accelerator pedal to get to the higher
speed. Push up on the cruise control lever toward
the plus (resume/accelerate) position, then
release the lever and take your foot off the
accelerator pedal. The vehicle will now cruise at
the higher speed.

Push up and hold the cruise control lever toward
the plus (resume/accelerate) position until the
vehicle reaches the desired speed. Then release
the cruise control lever. To increase the vehicle’s
speed in very small amounts, push up briefly on the
cruise control lever and release it. Each time this
is done, the vehicle will speed up approximately
one mph (1.6 km/h).

The acceleration feature will only work after the cruise
control speed has been set by pushing the cruise control
lever down to the set position.

Reducing Speed While Using
Cruise Control

There are two ways to reduce the vehicle’s speed while
using cruise control:

Push the cruise control lever downward toward the
minus (set/coast/decelerate) position until a lower
speed is reached, then release it.

To slow down in very small amounts, push the
cruise control lever downward toward the minus
(set/coast/decelerate) position briefly. Each time this
is done, the vehicle will slow down approximately
one mph (1.6 km/h).

Passing Another Vehicle While Using
Cruise Control

Use the accelerator pedal to increase the vehicle’s
speed. When you take your foot off the pedal, the
vehicle will slow down to the cruise control speed
set earlier.

3-13

-------------------------------------------------------------------------------------------------------------------------------------------------------------


Content      ..     7      8      9      10     ..