Westfalia. Testing repair electrical manual - part 23


  Index      Westfalia     Westfalia (903.662) testing repair electrical manual in english


Search            copyright infringement  


Content   ..  21  22  23  24   ..


Westfalia. Testing repair electrical manual - part 23


AR82.62-D-1100A

Remove/install speaker

24.6.04

MODEL  903.662


with CODE (ZU8) National version for USA


with CODE (Z29) "James Cook" touring camper, NAFTA


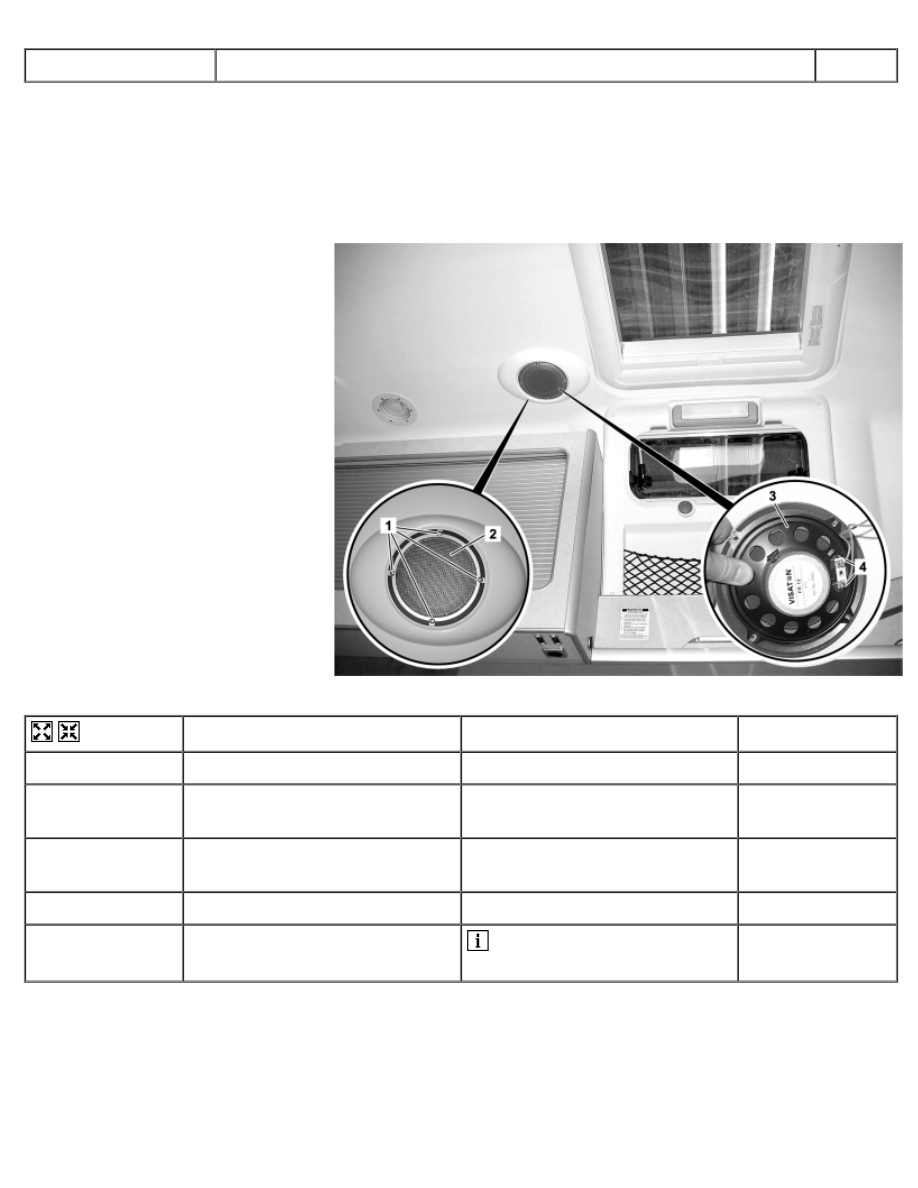
Speaker in raised roof

1 Bolts 
2 Covering 
3 Loudspeaker 
4 Electrical connectors


D82.62-1104-06


Remove/Install


1

Remove screws (1)


2

Remove speaker (3) with
covering (2)


3

Detach electrical connectors (4)
from speaker (5)


4

Install in the reverse order


5

Perform a function test

 Switch radio on, off (see

operator's manual).


AR83.10-D-0011A

Remove, install ventilation screens

21.4.04

MODEL  903.662


with CODE (ZU8) National version for USA


with CODE (Z29) "James Cook" touring camper, NAFTA


On horizontal wall cabinet

1 Bolts 
2 Ventilation grille


D83.10-1113-06


Remove/Install


1

Remove caps from bolts (1)


2

Remove screws (1)


3

Remove ventilation grille (2)


4

Install in the reverse order


AR83.10-D-4800A

Removing and installing rear air nozzle

19.4.04

MODEL  903.662


with CODE (ZU8) National version for USA


with CODE (Z29) "James Cook" touring camper, NAFTA


In horizontal wall cabinet

1 Air nozzle 
2 Lugs


D83.10-1116-04


Remove/Install


1

Unlock air outlet (1) on the lugs
(2) on both sides


2

Remove air outlet (1) from
horizontal wall cabinet


3

Install in the reverse order


AR83.30-D-1000A

Removing/installing roof air conditioning on vehicle roof

30.4.04

MODEL  903.662


with CODE (ZU8) National version for USA


with CODE (Z29) "James Cook" touring camper, NAFTA

D83.50-1166-08

1 Hanging cabinet 
2 Evaporator housing


3 Drain hoses


4 Electrical connectors

D83.50-1169-08

5 Bolts 
6 Ground cable


7 Positive cable


8 Roof air conditioning


Remove


 Danger!

Risk of death from coming into
contact with electrical parts of
the 110 V system Risk of injury
caused by burns, which can be
produced by electrical shocks or
by body parts coming in direct
contact with electrical currents.

Do not touch any conductive
parts of the 110 V system.

AS00.00-Z-0027-
01A

 Danger!

Risk of death caused by falling
down from the roof of the
vehicle. Risk of injury to other
persons caused by falling objects
during work in the area of the
roof.

Work on or in the area of the
vehicle's roof may only be
performed on suitable equipment
(ladders, scaffolds, lifting
platforms). Sufficiently secure
the area to be worked in.

AS65.00-Z-0002-
01B

 Danger!

Risk of injury caused by exiting
refrigerant and by contact with
the components of the
refrigerant system

Wear protective clothing, safety
gloves and safety glasses

AS86.61-Z-0002-
01A

1

Switch off roof air conditioning
(8)

 See Operator's Manual


2

Disconnect external 110 V feed
line from the vehicle

 See Operator's Manual


3

Remove web-type fuse

Of the roof air conditioning in the
engine compartment

AR54.15-D-
2100B

4

Remove hanging cabinet (1)

Lateral hanging cabinet

AR86.60-D-
0051A

5

Remove foam pad from the
evaporator housing (2)


6

Remove electrical lines from the
evaporator housing (2)


7

Undo hose clamps for drain
hoses (3)

 Left and right side


8

Detach drain hoses (3) from the
evaporator housing (2)

 Left and right side


9

Disconnect electrical connectors
(4).


10

Remove cover for roof air
conditioning (8) on vehicle roof


AR83.30-D-
1010A

11

Disconnect roof air conditioning
(8) from the vehicle's line system


AR83.30-D-1000-
01A

12

Unscrew bolts (5).


13

Release roof air conditioning (8)
from the vehicle roof

 Helper required.


 Roof air conditioning (8) is

sealed on the vehicle roof using
rooflight tape.

14

Lift roof air conditioning (8) out of
the vehicle roof

 Helper required.


 Lift roof air conditioning (8)

out of the vehicle roof using
suitable lifting device.


Install


15

Prepare installation location of
roof air conditioning (8) for
installation

 Insert roof air conditioning (8)

into the vehicle roof immediately
after applying the rooflight
sealing tape.

AR83.30-D-1000-
03A

16

Insert roof air conditioning (8)
into the vehicle roof

 Helper required.


 Insert roof air conditioning (8)

into the vehicle roof using
suitable lifting device.


17

Screw in screws (5)


18

Connect roof air conditioning (8)
to vehicle's line system


AR83.30-D-1000-
05A

19

Install cover for roof air
conditioning (8) on vehicle roof


AR83.30-D-
1010A

20

Connect electrical connectors (4)  


21

Connect drain hoses (3) to the
evaporator housing (2)

 Left and right side


22

Secure hose clamps for drain
hoses (3)

 Left and right side


23

Secure electrical lines to the
evaporator housing (2)

 Use new foam pads.


24

Install wall cupboard (1)

Lateral hanging cabinet

AR86.60-D-
0051A

25

Install web-type fuse

Of the roof air conditioning in the
engine compartment

AR54.15-D-
2100B

26

Perform a function test

 Switch roof air conditioning

(8) off and on.


AR83.30-D-1010A

Remove/install cover for roof air conditioning on vehicle roof

26.4.04

MODEL  903.662


with CODE (ZU8) National version for USA


with CODE (Z29) "James Cook" touring camper, NAFTA

D83.50-1182-08

1 Cover


2 Bolts


3 Cap


Remove/Install


 Danger!

Risk of death caused by falling
down from the roof of the
vehicle. Risk of injury to other
persons caused by falling objects
during work in the area of the
roof.

Work on or in the area of the
vehicle's roof may only be
performed on suitable equipment
(ladders, scaffolds, lifting
platforms). Sufficiently secure
the area to be worked in.

AS65.00-Z-0002-
01B

 Danger!

Risk of injury caused by exiting
refrigerant and by contact with
the components of the refrigerant
system

Wear protective clothing, safety
gloves and safety glasses

AS86.61-Z-0002-
01A

1

Switch off roof air conditioning

 See Operator's Manual


2

Remove covering caps (3)


3

Unscrew bolts (2)


4

Remove cover (1)


5

Install in the reverse order


AR83.30-D-1760C

Draining, evacuating and refilling air conditioning, checking function
and checking for leaks

11.8.04

MODEL  903.662


with CODE (ZU8) National version for USA


with CODE (Z29) "James Cook" touring camper, NAFTA


Roof air conditioning made by Kerstner, model 103K

D83.30-1160-08

1 Test and filling valve, low-pressure side


2 Test and filling valve, high-pressure side


Draining


 Danger!

Risk of death caused by falling
down from the roof of the
vehicle. Risk of injury to other
persons caused by falling objects
during work in the area of the
roof.

Work on or in the area of the
vehicle's roof may only be
performed on suitable equipment
(ladders, scaffolds, lifting
platforms). Sufficiently secure
the area to be worked in.

AS65.00-Z-0002-
01B

 Danger!

Risk of explosion from welding
or soldering work on closed air
conditioning system. Risk of
poisoning
 from inhaling
overheated refrigerant vapors.
Risk of injury to skin and eyes
caused by contact with liquid
refrigerant.

Never perform welding work on
or near a closed air conditioning
system. No smoking or open
flames. Wear safety glasses and
protective gloves. Work only in
well ventilated areas. Carry out
repair work on the air
conditioning system circuit only
after the system has been
discharged.

AS83.00-Z-0001-
01A

 Danger!

Risk of injury caused by exiting
refrigerant and by contact with

Wear protective clothing, safety
gloves and safety glasses

AS86.61-Z-0002-
01A


Content   ..  21  22  23  24   ..