Vauxhall Movano C (2023 year). Manual in english - page 3


  Index      Manuals     Vauxhall Movano C (2023 year). Manual in english


Search            copyright infringement  


Content      ..     1      2      3      4      ..


Vauxhall Movano C (2023 year). Manual in english - page 3


66

Instruments and controls

Emergency call

The emergency call function will

establish a connection to the nearest

public safety answering point (PSAP).

A minimum set of data including

vehicle and location information will

be sent to the PSAP.
In case of an emergency, press the

red SOS button in the overhead

console for more than two seconds.

The LED flashes green to confirm that

a connection to the nearest PSAP is

being established. The LED

illuminates steadily as long as the call

is active.
Pressing the SOS button immediately

a second time will terminate the call.

The LED switches off.

Automatic crash notification

In case of an accident with airbag

deployment and without damage of

needed hardware, an automatic

emergency call is established and an

automatic crash notification will be

transmitted to the next PSAP.
Lighting

67

Lighting

Exterior lighting ............................ 67

Light switch ................................ 67

Automatic light control ............... 68

High beam ................................. 68

High beam assist ....................... 68

Headlight flash ........................... 69

Headlight range adjustment ...... 69

Headlights when driving

abroad ...................................... 69

Daytime running lights ............... 69

Hazard warning flashers ............ 70

Turn lights .................................. 70

Front fog lights ........................... 70

Rear fog light ............................. 71

Parking lights ............................. 71

Reversing lights ......................... 71

Misted light covers ..................... 71

Interior lighting ............................. 71

Instrument panel illumination

control ....................................... 71

Interior lights .............................. 72

Load compartment lighting ........ 72

Lighting features .......................... 73

Centre console lighting .............. 73

Exit lighting ................................ 73

Battery discharge protection ...... 73

Exterior lighting

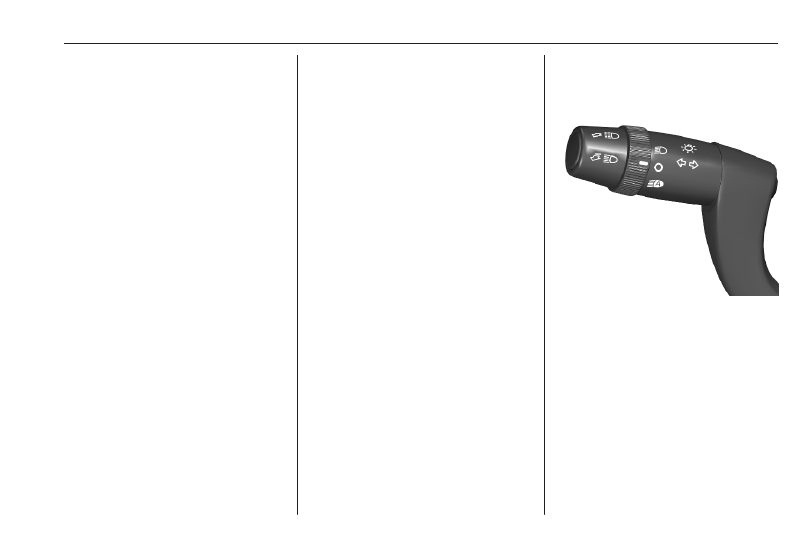
Light switch

Turn the adjuster wheel:

8

: off / daytime running light

D

: low beam / high beam

2

: automatic light control

Control indicator 

F


3

 59.

Tail lights

The tail lights are illuminated together

with the low / high beam and the

sidelights.

68

Lighting

Automatic light control

When the automatic light control

function is switched on and the

engine is running, the system

switches between daytime running

lights and headlights automatically

depending on the external lighting

conditions.
The sensitiveness of the sensor can

be set in the vehicle settings.
Daytime running light 

3

 69.

High beam assist 

3

 68.

High beam

To change between low and high

beam, pull the lever beyond the

resistance point.

High beam assist

The system switches from low beam

to high beam and vice versa to

prevent glaring. Once activated, high

beam assist remains active and

switches high beam on and off

depending on surrounding

conditions.

It switches automatically back to low

beam when

● a sensor detects the lights of

oncoming or preceding vehicles.

● driving in urban areas.
● the vehicle is slower than 9 mph.
● it is foggy or snowy.
● front or rear fog lights are

switched on.

If there are no restrictions detected

and the vehicle is faster than

25 mph, the system switches back to

high beam.

Enabling high beam assist

Lighting

69

Press the button MODE and select

the required settings.
Vehicle personalisation 

3

 65.

Driver Information Centre 

3

 60.

Activating

Turn the adjuster wheel in position

2

.

Activate the high beam assist by

pulling the indicator lever beyond the

resistance point.
The green control indicator 

2

illuminates continuously when the

assist is activated, the blue one 

7

illuminates when the high beam is on.

Deactivating

To deactive the high beam assist, pull

the indicator lever again beyond the

resistance point.

Headlight flash

To activate the headlight flash, pull

the lever briefly without passing the

resistance point.
High beam 

3

 68.

Headlight range adjustment

To adapt the headlight range to the

vehicle load to prevent dazzling: push

button 

Z

 or 

1

.

The position is indicated in the Driver

Information Centre:
0 : driver's seat occupied

1 : all seats occupied

2 : all seats occupied and load

compartment laden

3 : driver's seat occupied and load

compartment laden

Headlights when driving

abroad

When driving in countries where

traffic drives on the opposite side of

the road, contact a workshop for

adjustment or covering of the

headlights.

Daytime running lights

Daytime running lights increase

visibility of the vehicle during daylight.
They are switched on automatically

when the engine is running.

70

Lighting

If the sidelights, high beam or low

beam are turned on manually or

automatically, the daytime running

lights are turned off.

Hazard warning flashers

Operated by pressing 

¨

.

When braking in an emergency, the

hazard warning flashers are switched

on automatically, depending on the

force of deceleration. They are

switched off automatically, as soon as

the vehicle is accelerated again.

Turn lights

up

: right turn lights

down : left turn lights
A resistance point can be felt when

moving the indicator lever.
Constant flashing is activated when

the indicator lever is being moved

beyond the resistance point. It is

deactivated when the steering wheel

is moved in the opposite direction or

the indicator lever is manually moved

back to its neutral position.

Activate temporary flashing by

holding the indicator lever just before

the resistance point. Turn lights will

flash until the indicator lever is being

released.
To activate five flashes, tap the

indicator lever briefly without passing

the resistance point.

Front fog lights

Operated by pressing 

>

.

Light switch in position 

2

: switching

on the front fog lights will switch the

headlights on automatically.

Lighting

71

Rear fog light

Operated by pressing 

H

.

Light switch in position 

2

: switching

on the rear fog light will switch the

headlights on automatically.
The vehicle rear fog light is

deactivated when a plug is connected

to the power outlet of the trailer hitch.

Parking lights

When the vehicle is parked, the

parking lights can be activated:

1. Switch off the ignition.
2. Turn the adjuster wheel of the

indicator lever to position 

§

.

3. Turn the adjuster wheel to

position 

9

.

The control indicator 

F

 illuminates

continously.

Reversing lights

The reversing light comes on when

the ignition is on and the reverse gear

is selected.

Misted light covers

The inside of the light housing may

mist up briefly in poor, wet and cold

weather conditions, in heavy rain or

after washing. The mist disappears

quickly by itself; to help switch on the

headlights.

Interior lighting

Instrument panel

illumination control

Brightness of the following lights can

be adjusted when the parking lights

are on:

● instrument panel illumination
● Info Display
● illuminated switches and

operation elements

Press the button MODE and select

the required settings.
Driver Information Centre 

3

 60.

72

Lighting

Interior lights

The front courtesy light comes on:

● by opening or closing the door.
● by unlocking and locking the

door.

It switches off:

● if the switches are in its central

position: automatically.

● if the doors are open: after a

delay of 15 minutes.

● if the ignition is switched on.

Front courtesy light

press

AUTO / OFF

: switching off both

lights

press 

W

: switching on both

lights

press 

X

: switching on driver

side light

press 

Y

: switching on

passenger light

Load compartment lighting

If available there are one or two lights

above the rear doors and sliding

doors.
Load compartment lighting can be set

to illuminate when the side or rear

doors are opened, or switched on

constantly.
With the switch in its central position,

the light functions as a courtesy light.

It switches off after a few minutes, if

the doors are open.

● Operated by pressing on the left

part of the light: on constantly.

● Operated by pressing on the right

part of the light: off constantly.

Lighting

73

Lighting features

Centre console lighting

A spotlight integrated in the overhead

console illuminates the centre

console.

Exit lighting

Path lighting

The headlights illuminate the

surrounding area for about

30 seconds after leaving the vehicle.

Activating

1. Switch off the ignition.
2. Pull within two minutes the

indicator lever in the direction of

the steering wheel.

3.

F

 illuminates.

Every pull extends the duration by

30 seconds up to 3.5 minutes.

Deactivating

Pull the light switch in direction of the

steering wheel for more than two

seconds.

Battery discharge protection

To prevent discharge of the vehicle

battery when the ignition is switched

off, some interior lights are switched

off automatically after some time.

74

Infotainment system

Infotainment system

Multimedia Navi ........................... 74
Multimedia ................................... 75

Multimedia Navi

Control panel

1.

)

Switch the system on / off.

2. RADIO

Select the radio band.

3. MEDIA

Select the media source.

4. PHONE

Display the phone menu.

5. NAV / 

w

Depending on version, display the

navigation menu or turn the

screen on / off.

6. USB port

7.

h

Decrease the volume.

8.

g

Increase the volume.

9.

?

Display the home screen.

Pairing a mobile device

1. Ensure that the vehicle is

stationary.
The pairing process between the

vehicle and the mobile phone is

only possible when the vehicle is

stationary.

2. Make sure that Apple CarPlay /

Android Auto is not active on the

mobile phone.

3. Activate the Bluetooth function of

the mobile phone.

4. Press PHONE.
5. Open the Bluetooth 

V

 menu and

touch 

g

 on the screen.

Infotainment system

75

6. Open the Bluetooth menu on the

mobile phone and search for the

vehicle in the list of available

Bluetooth devices.

7. Confirm the code that is displayed

on the mobile phone or enter the

PIN code that is displayed on the

screen.

After the software of the mobile phone

has been updated, it is recommended

to delete and pair the mobile phone

again.
The detailed Infotainment Manual is

available on our website: https://

www.stellantisinfotainment.com

Multimedia

Control panel

1.

9

Mute the volume.

2.

)

Short press: switch the system on.
Long press: switch the system off.
Rotation: adjust the volume.

3.

G

Display the media menu.

4.

O

Display the radio menu.

5.

w

Display the phone menu or

answer an incoming call.

6.

x

Hang up an ongoing call.

7.

8

Short press: confirm a display

message.
Stepwise rotation: change the

radio station or change a

selection.
Continuous rotation: change a

selection.

8.

1

Display the previous screen or

menu.

9.

6

Display the settings menu.

10. 4 

3

Short press: recall the stored

radio station or repeat the current

track or all tracks.
Long press: store the current

radio station.

11. 3 

e

Short press: recall the stored

radio station or play the next track.

76

Infotainment system

Long press: store the current

radio station or fast-forward the

current track.

12.

h

Connect an external device to the

USB port.

13. 2 

d

Short press: recall the stored

radio station or play the previous

track.
Long press: store the current

radio station or rewind the current

track.

14. 1 

6

Short press: recall the stored

radio station or shuffle the active

playlist.
Long press: store the current

radio station.

15.

I

Play or pause the current track.

Pairing a mobile device

1. Press 

w

.

2. Select the menu entry for adding

a device.

A PIN code will be displayed on

the screen.

3. Open the Bluetooth menu on the

mobile phone and search for the

vehicle in the list of available

Bluetooth devices.

4. Enter the PIN code that is

displayed on the screen.

The detailed Infotainment Manual is

available on our website: https://

www.stellantisinfotainment.com

Climate control

77

Climate control

Climate control systems ............... 77

Heating and ventilation system . 77

Air conditioning system ............. 78

Electronic climate control

system ...................................... 80

Auxiliary heater .......................... 82

Parking heater ........................... 83

Air vents ....................................... 85

Adjustable air vents ................... 85

Fixed air vents ........................... 86

Glovebox cooler ........................ 86

Maintenance ................................ 87

Air intake ................................... 87

Air conditioning regular

operation .................................. 87

Service ...................................... 87

Climate control systems

Heating and ventilation

system

Controls for:

● temperature
● fan speed
● air distribution
● air recirculation

Notice

Electric vehicles: The control panel

for heating the interior of electric

vehicles is located next to the

steering wheel, below the Mode

control panel.
Auxiliary heater 

3

 82.

Temperature

Adjust the temperature by turning

temperature control to the desired

temperature.
blue : cold

red : warm
Heating will not be fully effective until

the engine has reached normal

operating temperature.
Electric vehicles

For heating the interior of electric

vehicles: Switch on auxiliary heater,

turn temperature setting to highest

(red zone) and adjust air flow.
Auxiliary heater 

3

 82.

Fan speed

Adjust the air flow by turning 

y

 to the

desired speed.

78

Climate control

Air distribution

x

: to head area

L

: to head area and foot well

y

: to foot well

J

: to foot well, windscreen and

front door windows

h

: to windscreen and front door

windows

Air recirculation system

Turn control to 

P

 to activate air

recirculation mode.
Turn control to 

O

 to deactivate

recirculation mode.

9

Warning

The exchange of fresh air is

reduced in air recirculation mode.

In operation without cooling the air

humidity increases, so the

windows may mist up from inside.

The quality of the passenger

compartment air deteriorates,

which may cause the vehicle

occupants to feel drowsy.

Demisting and defrosting

● Set temperature control to

warmest level.

● Set fan speed 

y

 to highest level.

● Set air distribution control to 

V

.

● Switch on heated rear window

è

.

● Open side air vents as required

and direct them towards the door

windows.

● For simultaneous warming of the

foot well, set air distribution

control to 

J

.

Heated rear window 

è


3

 17.

Air conditioning system

Controls for:

● cooling 

n

● temperature
● fan speed
● air distribution
● air recirculation

Notice

Electric vehicles: The control panel

for heating the interior of electric

vehicles is located next to the

steering wheel, below the Mode

control panel.
Auxiliary heater 

3

 82.

Climate control

79

Cooling

Press 

n

 to switch on cooling. The

LED in the button illuminates to

indicate activation. Cooling is only

functional when the engine is running

and fan is switched on.
Press 

n

 again to switch off cooling.

The air conditioning system cools and

dehumidifies (dries) as soon as the

outside temperature is slightly above

the freezing point. Therefore,

condensation may form and drip from

under the vehicle.
If no cooling or drying is required,

switch off the cooling system for fuel

saving reasons.
Activated cooling may inhibit

Autostops.
Stop-start system 

3

 91.

Temperature

Adjust the temperature by turning

temperature control to the desired

temperature.
blue : cold

red : warm

Heating will not be fully effective until

the engine has reached normal

operating temperature.
Electric vehicles

For heating the interior of electric

vehicles: Switch on auxiliary heater,

turn temperature setting to highest

(red zone) and adjust air flow.
Auxiliary heater 

3

 82.

Fan speed

Adjust the air flow by turning 

y

 to the

desired speed.

Air distribution

x

: to head area

L

: to head area and foot well

y

: to foot well

J

: to foot well, windscreen and

front door windows

h

: to windscreen and front door

windows

Air recirculation

Turn control to 

P

 to activate air

recirculation mode.
Turn control to 

O

 to deactivate

recirculation mode.

9

Warning

The exchange of fresh air is

reduced in air recirculation mode.

In operation without cooling the air

humidity increases, so the

windows may mist up from inside.

The quality of the passenger

compartment air deteriorates,

which may cause the vehicle

occupants to feel drowsy.

In warm and very humid ambient air

conditions, the windscreen may mist

up from outside when cold air is

directed towards it. If windscreen

mists up from outside, activate

windscreen wiper and deactivate 

w

.

Maximum cooling

Briefly open the windows so that hot

air can disperse quickly.

● Switch on cooling 

n

.

● Press 

x

 for air distribution.

● Set temperature control to

coldest level.

80

Climate control

● Set fan speed to highest level.
● Open all vents.

Demisting and defrosting

● Set temperature control to

warmest level.
Electric vehicles: activate

auxiliary heater.
Auxiliary heater 

3

 82.

● Set fan speed 

y

 to highest level.

● Switch on cooling 

n

, if required.

● Set air distribution control to 

V

.

● Switch on heated rear window

è

.

● Open side air vents as required

and direct them towards the door

windows.

● For simultaneous warming of the

foot well, set air distribution

control to 

J

.

Heated rear window 

è


3

 17.

Notice

If the settings for demisting and

defrosting are selected, an

Autostop may be inhibited.

If the settings for demisting and

defrosting are selected while the

engine is in an Autostop, the engine

will restart automatically.
Stop-start system 

3

 91.

Electronic climate control

system

Controls for:

● automatic mode AUTO
● temperature
● air distribution 

Y

4

 or 

Z

● fan speed 

x

● cooling 

n

● complete system off OFF

● demisting and defrosting 

$

● air recirculation 

P

Activated functions are indicated by

the LED in the respective control or by

a symbol shown in the display.
The electronic climate control system

is only fully operational when the

engine is running.

Notice

Electric vehicles: The control panel

for heating the interior of electric

vehicles is located next to the

steering wheel, below the Mode

control panel.
Auxiliary heater 

3

 82.

Automatic mode

Basic setting for maximum comfort:

● Press AUTO (FULL AUTO

appears in the display).

● Set desired temperature by

turning the ring around AUTO

according to a scale between HI

(approx. 32 °C) and LO (approx.

16 °C).

Climate control

81

● Open all air vents to allow

optimised air distribution.

● Press 

n

 to switch on cooling and

demisting. The symbol in the

display indicates activation.

During full automatic mode, the

settings for fan speed, air distribution,

cooling and air recirculation are

automatically regulated by the

system. The preselected temperature

is maintained automatically.
For correct operation, do not cover

the sensor on the instrument panel.

Manual settings

Climate control system settings can

be manually adapted by use of air

distribution, fan speed and air

recirculation controls. The display

changes from FULL AUTO to AUTO.
When the system cannot maintain

preselected temperature with manual

settings, temperature display will

flash and AUTO will disappear from

screen.
To return to full automatic mode,

press AUTO.

Air distribution

Press 

Y

4

 or 

Z

.

Y

: to windscreen and front door

windows

4

: to head area

Z

: to foot well

To return to automatic air distribution,

press AUTO.

Fan speed 

x

Press 

h

 or 

g

 to adjust the air flow.

To return to automatic mode, press

AUTO.

Cooling 

n

Press 

n

 to switch on cooling. The

symbol on the display indicates

activation. Cooling is only functional

when the engine is running and

climate control fan is switched on.
Press 

n

 again to switch off cooling.

The air conditioning system cools and

dehumidifies (dries) when outside

temperature is above a specific level.

Therefore, condensation may form

and drip from under the vehicle.

If no cooling or drying is required,

switch off the cooling system for fuel

saving reasons.
Activated cooling may inhibit

Autostops.
Stop-start system 

3

 91.

Manual air recirculation 

P

Press 

P

 to activate the air

recirculation mode. The LED in the

button illuminates to indicate

activation.
Press 

P

 again to deactivate

recirculation mode.

9

Warning

The exchange of fresh air is

reduced in air recirculation mode.

In operation without cooling, the

air humidity increases, so the

windows may mist up from inside.

The quality of the passenger

compartment air deteriorates,

which may cause the occupants to

feel drowsy.

82

Climate control

In warm and very humid ambient air

conditions, the windscreen may mist

up from outside, when cold air is

directed towards it. If windscreen

mists up from outside, activate

windscreen wiper and deactivate 

Y

.

Demisting and defrosting the

windows 

$

● Press 

$

. The LED in the button

illuminates to indicate activation.

● Temperature and air distribution

are set automatically and the fan

runs at high speed.

● Switch on cooling by pressing 

n

,

if required.

● Switch on heated rear window 

f

3

 17.

● To return to previous mode,

press 

$

 again. To return to

automatic mode, press AUTO.

Notice

If 

à

 is pressed while the engine is

running, an Autostop will be inhibited

until 

à

 is pressed again.

If 

à

 is pressed while the engine is in

an Autostop, the engine will restart

automatically.

Stop-start system 

3

 91.

Deactivation of electronic climate

control system

Press OFF.

Auxiliary heater

The control panel for heating the

interior of electric vehicles is located

next to the steering wheel, below the

Mode control panel.

Notice

This control panel is for heating only.

To distribute cold air, use the

standard controls on the centre

console.

1 : heating on/off

2 : heating status

3 : temperature setting

4 : increase temperature

5 : decrease temperature

6 : access temperature settings
Heating status

OUT1 is displayed permanently:

heating is in operation.
OUT1 flashing: temperature

adjustment in progress.
OUT1 off: selected temperature has

been reached.

Activation

● Switch on ignition.
● Press 

)

 to switch on heater.

● Press set.
● Press 

Y

 or 

Z

 to increase or

decrease temperature setting

● Press set to confirm temperatue

setting.

● On standard heating and

ventilation control in centre

console:
Set temperature control to

warmest level to avoid entry of

Climate control

83

cold air and for the selected

temperature to be reached

quickly without consuming too

much energy.
Adjust air flow.

Heating will start after two to three

minutes.
Temperature settings will be stored

when engine is switched off.

Notice

If the charging level of the high

voltage battery is below 15%,

heating is switched off automatically.
It is recommended to select a

temperature between 16 °C and 22

°C in order to preserve the high

voltage battery's range.
Heating can be switched on while

charging the vehicle. In this case,

the vehicle is heated using the

electricity supply.

Deactivation

Press 

)

 to switch off heating.

Parking heater

9

Warning

Do not operate the system when

refuelling, when dust or

combustible vapours are present

or in enclosed spaces (e.g.

garage).

The programmable heater gradually

brings the engine to a good

temperature to facilitate its starting. A

built-in clock allows time presets for

delayed start of heating. The cab will

warm up faster. The warming-up of

the cab, de-icing and demisting are

facilitated.
Heating switches off when the vehicle

battery voltage is low, so as to allow

engine starting. The heater is fed by

the vehicle's fuel tank. Ensure that the

low fuel warning lamp is not on.
The heater is fitted with a temperature

limiter which cuts off the combustion

in the event of engine overheating

due to a lack of coolant. Check the

level and top up if necessary. Then

press set before switching the heating

on again. Engine coolant 

3

 149.

Notice

Have the parking heater checked at

least once a year at the beginning of

winter. Maintenance and repairs

should only be carried out by a

qualified workshop. Use only

genuine replacement parts.

1 : time setting

2 : heating indicator

3 : time display

4 : ventilation indicator

5 : set

6 : preset numbers

84

Climate control

7 : timer indicator

8 : immediate heating

Setting system clock time

Set the clock of the parking heater

before setting up time presets for

heating.

● Press and hold set. The display

and the timer indicator will come

on.

● Within ten seconds, while still

holding set, press 

P

 or 

Q

 to

decrease or increase hours until

correct time is displayed. Press

and hold 

P

 or 

Q

 to decrease or

increase hours faster.

● Release set.

When the display switches off, the

time is stored.

Display time

Press 

P

 or 

Q

.

Timer indicator will come on and the

time will be displayed for approx. ten

seconds.

Immediate start of heating system

● Before turning on the heating,

check that temperature control of

the climate control system is set

to warmest level and fan speed is

set to second level.

● Press button for immediate

heating (8) to start heating.

The display and the heating indicator

will come on and stay on for the entire

operating time.

Preset start of heating

The start time can be preset between

one minute and 24 hours in advance.

Up to three different start times can be

stored, but only a single preset start

can be programmed.
To perform a daily start at a fixed time,

reprogramme the stored time each

day.

● Press set. The display will switch

on.
--:-- or the previous stored time

and corresponding preset

number (1, 2 or 3) are displayed

for ten seconds.

To recall other preset times,

press set several times before

the end of the ten seconds.

● Within ten seconds, press 

P

 or

Q

 to select the desired start time.

When the new preset time is stored

display of start time and preset

number will disappear and display

lighting will switch off.
By default, preset times are already

stored in the system (1 = 06:00, 2 =

16:00, 3 = 22:00). Any change

cancels and replaces the previous

preset time. If the vehicle battery is

disconnected, the default preset

times will be restored.

Cancel preset heating

To delete the preset start time, briefly

press set.
Display and preset number will go off.

Recalling one of the preset start times

Press set as many times as

necessary until the number

corresponding to the desired preset

start time (1, 2 or 3) appears.

Climate control

85

After ten seconds, timer display

disappears but remains stored while

the corresponding number (1, 2 or 3)

and the display remain on.

Setting operating duration

The operating duration can be set

between ten and 60 minutes

● Press and hold set.
● Press simultaneously 

P

 or 

Q

.

The display and the timer

indicator will come on.

● Press and hold set and 

P

 or 

Q

again.
The programmed operating

duration is displayed and the

heating or ventilation indicator

flashes.

● Adapt the duration by pressing

P

 or 

Q

.

New duration is stored and confirmed

by the disappearance of the duration

display or by pressingset again.

Switching off heating

In the event of a preset start, the

heating switches off automatically at

the end of the programmed duration.
In the event of an immediate start,

press button for immediate heating

(8) again to switch it off manually.
The heating indicator and the display

go off.

Air vents

Adjustable air vents

Inner air vents

Direct the flow of air by tilting and

swivelling the slats.

86

Climate control

Adjust the air amount at the vent

outlet by turning the adjuster wheel.

The vent is closed when the adjuster

wheel is turned close to the left or

right.

Outer air vents

Direct the flow of air by tilting the slats.
Adjust the air amount at the vent

outlet by turning the adjuster wheel.

The vent is closed when the adjuster

wheel is turned close to the left or

right.

9

Warning

Do not attach any objects to the

slats of the air vents. Risk of

damage and injury in case of an

accident.

Fixed air vents

Additional air vents are located

beneath the windscreen, the door

windows and in the foot wells.

Glovebox cooler

The front storage provides an air vent

which can be closed 

3

 37.

Climate control

87

Maintenance

Air intake

The air intake in front of the

windscreen in the engine

compartment must be kept clear to

allow air intake. Remove any leaves,

dirt or snow.

Air conditioning regular

operation

In order to ensure continuously

efficient performance, cooling must

be operated for a few minutes once a

month, irrespective of the weather

and time of year. Operation with

cooling is not possible when the

outside temperature is too low.

Service

For optimal cooling performance, it is

recommended to annually check the

climate control system, starting

three years after initial vehicle

registration, including:

● functionality and pressure test
● heating functionality

● leakage check
● check of drive belts
● cleaning of condenser and

evaporator drainage

● performance check

88

Driving and operating

Driving and

operating

Driving hints ................................. 88

Control of the vehicle ................. 88

Steering ..................................... 89

Starting and operating ................. 89

New vehicle running-in .............. 89

Ignition switch positions ............. 89

Starting the engine .................... 90

Stop-start system ...................... 91

Parking ...................................... 93

Air suspension ........................... 93

Engine exhaust ............................ 95

Exhaust filter .............................. 95

Catalytic converter ..................... 96

AdBlue ....................................... 96

Electric drive unit ......................... 99
Manual transmission .................. 101
Brakes ........................................ 101

Antilock brake system ............. 101

Parking brake .......................... 102

Brake assist ............................. 103

Hill start assist ......................... 103

Regenerative braking .............. 103

Ride control systems ................. 104

Electronic Stability Control and

Traction Control system ......... 104

Descent control system ........... 106

Driver assistance systems ......... 107

Cruise control .......................... 107

Speed limiter ........................... 110

Forward collision alert ............. 112

Active emergency braking ....... 114

Parking assist .......................... 117

Side blind spot alert ................. 118

Rear view camera ................... 121

Rear cross traffic alert ............. 122

Traffic sign assistant ................ 124

Lane departure warning .......... 125

Charging .................................... 127

General information ................. 127

Charging types ........................ 128

Charging cable ........................ 128

Charging status ....................... 134

Fuel ............................................ 134

Fuel for diesel engines ............ 134

Refuelling ................................ 136

Trailer hitch ................................ 137

General information ................. 137

Driving characteristics and

towing tips .............................. 137

Trailer towing ........................... 138

Towing equipment ................... 139

Driving hints

Control of the vehicle

Never coast with engine not

running

Many systems will not function in this

situation (e.g. brake servo unit, power

steering). Driving in this manner is a

danger to yourself and others.
All systems function during an

Autostop.
Stop-start system 

3

 91.

Pedals

To ensure the pedal travel is

uninhibited, there must be no mats in

the area of the pedals.
Use only floor mats, which fit properly

and are fixed by the retainers on the

driver side.

Driving and operating

89

Steering

If power steering assist is lost

because the engine stops or due to a

system malfunction, the vehicle can

be steered but may require increased

effort.

Starting and operating

New vehicle running-in

Do not brake unnecessarily hard for

the first few journeys and after new

disc brake pads have been fitted.
During the first drive, smoke may

occur because of wax and oil

evaporating off the exhaust system.

Park the vehicle in the open for a

while after the first drive and avoid

inhaling the fumes.
During the running-in period, fuel and

engine oil consumption may be

higher.
Additionally, the cleaning process of

the exhaust filter may take place more

often.
Exhaust filter 

3

 95.

Ignition switch positions

Turn key:

STOP : ignition off: some functions

may remain active for some

time

MAR : ignition on power mode:

ignition is on, diesel engine

is preheating, control

indicators illuminate and

most electrical functions are

operable

AVV : engine start: release key

after engine has been

started

Steering wheel lock

Remove key from ignition switch and

turn steering wheel until it engages.

90

Driving and operating

9

Danger

Never remove the key from

ignition switch during driving as

this will cause steering wheel lock.

Starting the engine

Combustion engine vehicle

Turn key to position MAR to release

the steering wheel lock.
Operate clutch and brake pedal.
Do not operate accelerator pedal.
Wait until control indicator 

z

extinguishes.

Turn key briefly to position AVV and

release after the engine has been

started.
During an Autostop, the engine can

be started by depressing the clutch

pedal 

3

 91.

Starting the vehicle at low

temperatures

Starting the engine without additional

heaters is basically possible.

Required are an engine oil with the

correct viscosity, the correct fuel,

performed services and a sufficiently

charged vehicle battery.

Turbo engine warm-up

Upon start-up, engine available

torque may be limited for a short time,

especially when the engine

temperature is cold. The limitation is

to allow the lubrication system to fully

protect the engine.

Electric vehicle

1. Operate the brake pedal and with

the parking brake applied, turn

key briefly to position AVV and

release it. A corresponding

message appears in the rear view

mirror display.

2. Do not operate the accelerator

pedal.

3. Depress the brake pedal

completely, then press D or R on

the gear selector 

3

 99.

4. Release the parking brake.

Driving and operating

91

Stop-start system

The stop-start system helps to save

fuel and to reduce the exhaust

emissions. When conditions allow, it

switches off the engine as soon as the

vehicle is at a low speed or at a

standstill, e.g. at a traffic light or in a

traffic jam.

Activation

The stop-start system is available as

soon as the engine is started, the

vehicle starts-off and the conditions

as stated below in this section are

fulfilled.

If the system is activated, the LED in

the button 

V

 is not illuminated.

To activate the system when the

system is deactivated, press 

V

. The

LED in the button is not illuminated.

Additionally, a message is displayed

in the Driver Information Centre.

Deactivation

Press 

V

 to deactivate the system.

The deactivation is indicated when

the LED in the button illuminates.

Additionally, a message is displayed

in the Driver Information Centre.

Autostop

Activate an Autostop as follows:

1. Depress the clutch pedal.
2. Set the selector lever to neutral.
3. Release the clutch pedal.

The engine will be switched off while

the ignition stays on.

Caution

Performing engine compartment

checks with activated stop-start

system increases the risk of

injuries caused by a possible

automatic restart of the engine.
Only perform engine compartment

checks when the stop-start system

is deactivated.

Indication

An Autostop is indicated by control

indicator 

n

.

During an Autostop, the heating and

brake performance will be

maintained.

Conditions for an Autostop

The stop-start system checks if each

of the following conditions is fulfilled.

92

Driving and operating

● The stop-start system is not

manually deactivated.

● The driver's door is closed or the

driver's seat belt is fastened.

● The reverse gear is not engaged.
● The vehicle battery is sufficiently

charged and in good condition.

● The engine is warmed up.
● The ambient temperature is

between 0 °C and 35 °C.

● The engine coolant temperature

is not too high.

● The engine exhaust temperature

is not too high, e.g. after driving

with high engine load.

● The rear window heating is

switched off.

● The windscreen wipers are not in

fast wiping mode.

● The brake vacuum is sufficient.
● The self-cleaning function of the

exhaust filter is not active.

● The vehicle was driven at least at

walking speed since the last

Autostop.

Otherwise an Autostop will be

inhibited.

Notice

The Autostop may be inhibited for

several hours after a vehicle battery

replacement or reconnection.

Certain settings of the climate control

system may inhibit an Autostop.
Climate control 

3

 78.

Immediately after high speed driving

an Autostop may be inhibited.
New vehicle running-in 

3

 89.

Vehicle battery discharge protection

To ensure reliable engine restarts,

several vehicle battery discharge

protection features are implemented

as part of the stop-start system.

Restart of the engine by the driver

Depress the clutch pedal to restart the

engine.
Control indicator 

n

 extinguishes

when the engine restarts.

If no actions are performed within

three minutes after an automatic

restart, the engine is switched off

permanently. To restart the engine,

use the ignition key.
Starting the engine 

3

 90.

Restart of the engine by the stop-

start system

If one of the following conditions

occurs during an Autostop, the

engine will be restarted automatically

by the stop-start system:

● the vehicle is free-wheeling on a

slope

● windscreen wipers are in fast

wiping mode

● engine temperature too low
● charging level of vehicle battery

below defined level

● brake vacuum not sufficient
● climate control system requests

engine start

● engine has been switched off for

around three minutes by the

system

Driving and operating

93

If one of these conditions occur, 

n

flashes for some seconds and a

message is displayed in the Driver

Information Centre.

Fault

In the event of a fault, the stop-start

system is deactivated, a warning light

is illuminated and a message is

displayed in the Driver Information

Centre.
Have the system checked by a

qualified workshop.
In the event of a fault in Autostop, the

engine can be restarted by fully

depressing the clutch pedal or setting

the selector lever to neutral.

Parking

9

Warning

● Do not park the vehicle on an

easily ignitable surface. The

high temperature of the

exhaust system could ignite the

surface.

● Apply the parking brake.
● If the vehicle is on a level

surface or uphill slope, engage

first gear or set the selector

lever to position N (electric

vehicle). On an uphill slope,

turn the front wheels away from

the kerb.
If the vehicle is on a downhill

slope, engage reverse gear or

set the selector lever to position

N (electric vehicle). Turn the

front wheels towards the kerb.

● Close the windows.
● Switch off the engine.
● Remove the ignition key from

the ignition switch. Turn the

steering wheel until the

steering wheel lock is felt to

engage.

● Lock the vehicle.
● Activate the anti-theft alarm

system.

● The engine cooling fans may run

after the engine has been

switched off 

3

 147.

Notice

In the event of an accident with

airbag deployment, the engine is

switched off automatically if the

vehicle comes to a standstill within a

certain time.

In countries with extremely low

temperatures it may be necessary to

park the vehicle without applied

parking brake. Make sure to park the

vehicle on a level surface.

Air suspension

Caution

Components under the body may

be damaged when driving with the

air suspension set too high or too

low, respectively.
The height may be adjusted

automatically to take account of

changes in temperature or

loading.
Do not adjust the height of the sill

level manually if somebody is

working underneath the vehicle, if

94

Driving and operating

a wheel is being changed or if the

vehicle is being transported by a

lorry, train, ferry, boat, etc.
In order to avoid injuries or

damages, always check that

nobody or nothing is underneath

the vehicle before adjusting the

height of the air suspension.

To facilitate the loading or unloading

of the vehicle, the height of the rear

loading sill can be adjusted.

Manual adjustment

The system provides seven preset

loading heights:

● Normal sill level 0
● Three higher sill levels from +1 to

+3

● Three lower sill levels from -1 to

-3

With the vehicle stationary, briefly

press 

Q

 to select the next higher sill

level.
Briefly press 

R

 to select the next

lower sill level.

Press and hold 

Q

 or 

R

 to select

the highest or lowest sill level,

respectively.
The current sill level will be displayed

in the Driver Information Centre. The

LED in the respective button

illuminates after each press.

Caution

Ensure there is adequate

clearance and that there are no

obstructions when adjusting the

suspension height.

Deactivation / reactivation

Press and hold 

Q

 and 

R

simultaneously to deactivate or

reactivate the system. The

deactivation is confirmed by the

illumination of the LEDs in both

buttons.
If the vehicle's speed exceeds

3 mph, the system is reactivated

automatically.

Driving and operating

95

Automatic adjustment

If the vehicle's speed exceeds

12 mph, the normal sill level 0 will be

set automatically by the system.

Fault

If a fault is detected, 

S

 illuminates.

Seek the assistance of a workshop.

Engine exhaust

9

Danger

Engine exhaust gases contain

poisonous carbon monoxide,

which is colourless and odourless

and could be fatal if inhaled.
If exhaust gases enter the interior

of the vehicle, open the windows.

Have the cause of the fault

rectified by a workshop.
Avoid driving with an open load

compartment, otherwise exhaust

gases could enter the vehicle.

Exhaust filter

Automatic cleaning process

The exhaust filter system filters soot

particles out of the exhaust gases.
The start of saturation of the exhaust

filter is indicated by the illumination of

t

 accompanied by a message in the

Driver Information Centre.

As soon as the traffic conditions

permit, regenerate the filter by driving

at a vehicle speed of at least 40 mph

with an engine speed of 2,000 rpm

until the control indicator

extinguishes.
This procedure can last up to

15 minutes.
Avoid switching off the engine before

the filter regeneration has been

finished. Repeated interruptions can

lead to early deterioration of the

engine oil.
It is not recommended to terminate

the filter regeneration with the vehicle

stationary.

Notice

On a new vehicle, the first exhaust

filter regeneration operations may

be accompanied by a burning smell,

which is normal. Following

prolonged operation of the vehicle at

very low speed or at idle, water

vapour can be emitted at the

exhaust on acceleration. This does

not affect the behaviour of the

vehicle or the environment.

96

Driving and operating

Fault

In the event of a fault, 

t

 and the

message in the Driver Information

Centre persit.
Seek the assistance of a workshop.

Catalytic converter

The catalytic converter reduces the

amount of harmful substances in the

exhaust gases.

Caution

Fuel grades other than those listed

on page 

3

 134 could damage the

catalytic converter or electronic

components.
Unburnt fuel will overheat and

damage the catalytic converter.

Therefore avoid excessive use of

the starter, running the fuel tank

dry and starting the engine by

pushing or towing.

In the event of misfiring, uneven

engine running, a reduction in engine

performance or other unusual

problems, have the cause of the fault

rectified by a workshop as soon as

possible. In an emergency, driving

can be continued for a short period,

keeping vehicle speed and engine

speed low.

AdBlue

General information

The selective catalytic reduction

(BlueInjection) is a method to

substantially reduce the nitrogen

oxides in the exhaust emission. This

is achieved by injecting a Diesel

Exhaust Fluid (DEF) into the exhaust

system. The ammonia released by

the fluid reacts with nitrous gases

(NO

x

) from the exhaust and turns it

into nitrogen and water.
The designation of this fluid is

AdBlue

®

. It is a non-toxic, non-

flammable, colourless and odourless

fluid which consists of 32% urea and

68% water.

9

Warning

Avoid contact of your eyes or skin

with AdBlue.
In case of eye or skin contact,

rinse off with water.

Caution

Avoid contact of the paintwork with

AdBlue.
In case of contact, rinse off with

water.

AdBlue freezes at a temperature of

approx. -11 °C. As the vehicle is

equipped with an AdBlue pre-heater,

the emissions reduction at low

temperatures is ensured. The AdBlue

pre-heater works automatically.
In some circumstances below the

mentioned temperature, an error

message appears in the Driver

Information Centre. In this event, park

the vehicle in a space with a higher

ambient temperature until AdBlue is

liquefied.

Driving and operating

97

Notice

Frozen and again liquefied AdBlue is

usable without quality loss.

Warning levels

Depending on the calculated range of

AdBlue, different messages are

displayed in the Driver Information

Centre. The messages and the

restrictions are a legal requirement.

1. As soon as the threshold value of

1500 miles has been reached, the

first warning level is activated.
When switching on the ignition, a

warning message with the

calculated range will be displayed

in the Driver Information Centre.

Additionally, the control indicator

u

 flashes accompanied by a

warning chime. Although driving

is possible without any

restrictions, it is recommended to

top up AdBlue as soon as

possible.

2. As soon as the threshold value of

372 miles has been reached, the

next warning level is activated.

When switching on the ignition, a

warning message with the

calculated range will be displayed

in the Driver Information Centre.

Additionally, the control indicator

u

 flashes accompanied by a

warning chime. Refill AdBlue as

soon as possible before the

AdBlue tank is completely empty.

Otherwise, a restart of the engine

will not be possible.
When driving, the chime sounds

and the message is displayed

every 31 miles until the AdBlue

tank has been topped-up.

3. The last warning level is entered

when the AdBlue tank is empty.

Restart of the engine is not

possible. A warning message will

be displayed in the Driver

Information Centre.
Refill the AdBlue tank completely,

otherwise restarting of the engine

is not possible. A label on the fuel

filler flap indicates this complete

filling.

High emission warnings

In the event of a fault with the

emissions control system, different

messages are displayed in the Driver

Information Centre. The messages

and the restrictions are a legal

requirement.

1. If a fault is detected for the first

time, the control indicator 

W

 will

illuminate, a warning message is

displayed accompanied by a

warning chime. Driving is possible

without any restrictions.
If it is a temporary fault, the alert

disappears during the next

journey, after self-diagnosis of the

emissions control system.

2. If the fault persists and it is

confirmed by the emission control

system, the message is displayed

every 30 seconds.
The control indicator 

W

continues to illuminate

accompanied by a warning chime.
Additionally, the remaining range

until the start of the engine start

prevention system will be

displayed.
Seek the assistance of a

workshop.

3. Once the permissible range has

been exceeded, each engine


Content      ..     1      2      3      4      ..