Vauxhall Astra L (2023 year). Manual in english - page 3
 

  Index      Manuals     Vauxhall Astra L (2023 year). Manual in english


Search            copyright infringement  


Content      ..     1      2      3      4      ..


Vauxhall Astra L (2023 year). Manual in english - page 3


70

Instruments and controls

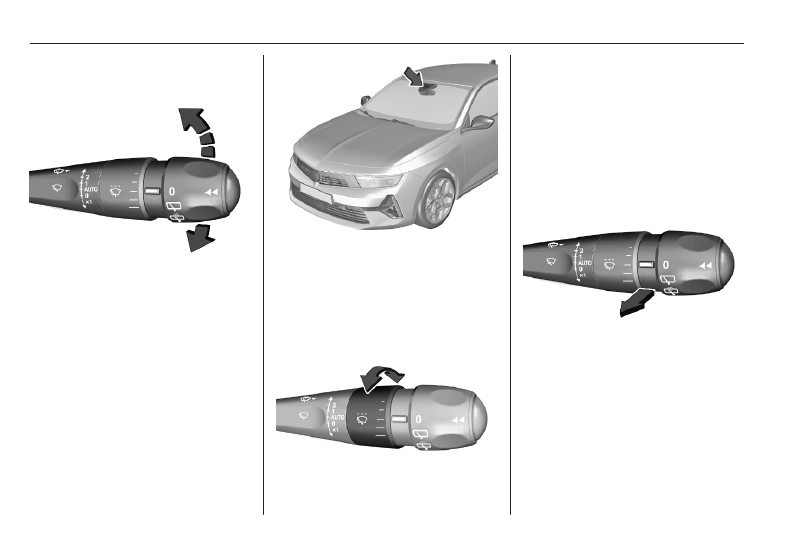
Windscreen wiper with rain

sensor

2

: fast

1

: normal

AUTO : automatic wiping

0

: off

x1

: single wipe

In AUTO position, the rain sensor

detects the amount of water on the

windscreen and automatically

regulates the frequency of the

windscreen wiper.
Do not use if the windscreen is frozen.
Switch off in car washes.

Keep the sensor free from dust, dirt

and ice.

Adjustable sensitivity of the rain

sensor

Turn the adjuster wheel to adjust the

sensitivity.
The longest dash indicates the

highest sensitivity and the shortest

dash indicates the lowest sensitivity.

Windscreen washer

Pull lever. Washer fluid is sprayed

onto the windscreen and the wiper

wipes a few times.
Washer fluid 
3

 214.

Instruments and controls

71

Rear window wiper and

washer

Rear window wiper

0 : off

S

: intermittent wiping

R

: screen wash

Do not use if the rear window is

frozen.
Switch off in car washes.
The rear window wiper comes on

automatically when the windscreen

wiper is switched on and reverse gear

is engaged.

To activate the rear wiper the next

time the ignition is switched on, turn

to position 0 and back to 

S

.

Rear window washer

Select 

R

.

Washer fluid is sprayed onto the rear

window and the wiper wipes as long

as 

R

 is selected.

The rear view camera will be washed

when the rear window washer is

operating.
Washer fluid 

3

 214.

Outside temperature

The outside temperature is shown in

the status bar in the Info Display.

9

Warning

The road surface may already be

icy even though the display

indicates a few degrees above 0

°C.

System settings 

3

 105.

Clock

The time is shown in the status bar in

the Info Display.
System settings 

3

 105.

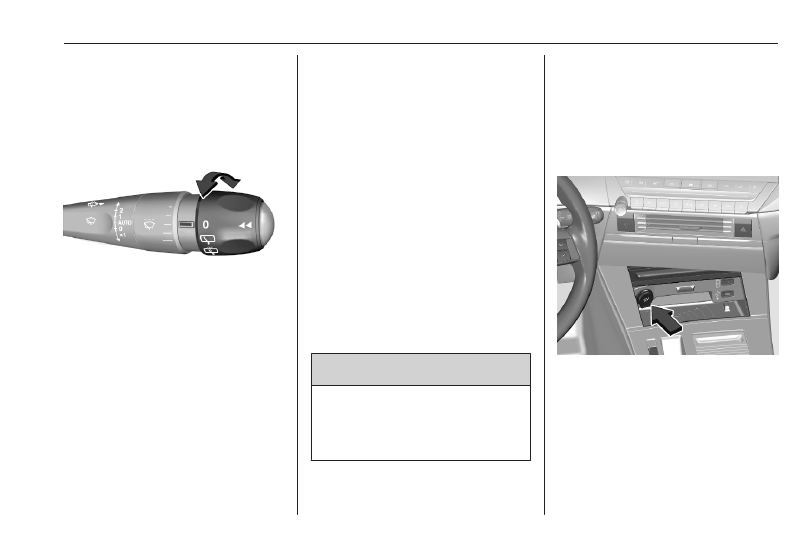
Power outlets

A 12 V power outlet is located in the

centre console.
Depending on version, another 12 V

power outlet is located in the load

compartment.
Do not exceed the maximum power

consumption of 120 W.

72

Instruments and controls

The 12 V power outlet is deactivated

in the event of low vehicle battery

voltage.
Electrical accessories that are

connected must comply with the

electromagnetic compatibility

requirements laid down in

DIN VDE 40 839.
Do not connect any current-delivering

accessories, e.g. electrical charging

devices or batteries.
Do not damage the outlet by using

unsuitable plugs.

USB ports

The USB ports can be used to charge

portable devices.
To connect a portable device to the

Infotainment system, use the USB

port marked with 

h

.

Notice

The sockets must always be kept

clean and dry.

Rear USB port

The USB port can be used to charge

a portable device.

Inductive charging

9

Warning

Inductive charging can affect the

operation of implanted

pacemakers or other medical

devices. If applicable, seek

medical advice before using the

inductive charging device.

9

Warning

Remove any metal objects from

the charging device before

charging a mobile device, as these

objects could become very hot.

To charge a mobile device:

Instruments and controls

73

1. Remove all objects from the

charging device.

2. Place the mobile device on the

charging area. Note that the

mobile device must be placed

between the positioning aids.

Qi compatible mobile devices can be

charged inductively.
On some mobile devices, a back

cover with an integrated coil or a

jacket may be required to use

inductive charging.
Protective cover for the mobile device

could have impact on the inductive

charging.

In the event that the mobile device is

not charging properly, rotate it 180°

and place it on the charging device

again.

Status LED

The LED indicates the current

charging status.

Illuminates green

The mobile device is charging.

Flashes yellow

The mobile device has not been

centred properly in the charging zone

or an unknown object has been

detected in the charging zone.

Illuminates yellow

There is a problem with the mobile

device's battery or a fault of the

inductive charger has been detected.
If the problem persists, seek the

assistance of a workshop.

Ashtrays

Caution

To be used only for ash and not for

combustible rubbish.

A portable ashtray can be placed in

the cupholders.

74

Instruments and controls

Warning lights, gauges

and indicators

Speedometer

Indicates vehicle speed.

Odometer

The total recorded distance is

displayed in miles.

Tachometer

Displays the engine speed.
Drive in a low engine speed range for

each gear as much as possible.
A red marker indicates the beginning

of the warning zone of excessive

revolutions. For Diesel engines, the

warning zone starts at 5000

revolutions per minute. For petrol

engines, the warning zone starts at

6500 revolutions per minute.

Instruments and controls

75

Caution

If the indicator is in the red warning

zone, the maximum permitted

engine speed is exceeded. The

engine can be damaged.

Fuel gauge

Never run the fuel tank dry.
The top-up quantity may be less than

the specified fuel tank capacity, due

to the remaining fuel in the tank.

High voltage battery gauge

Displays the high voltage battery

state of charge.

Power indicator gauge

The power indicator gauge informs

about the current energy situation of

the vehicle.
Charge : Battery is being charged

with energy resulting from

braking or deceleration of

the vehicle

Eco

: An optimum in energy is

accessible in all driving

modes

Power : Vehicle is driven in a

dynamic driving style with

focus on performance

76

Instruments and controls

Total vehicle range

Displays the total vehicle range.

Engine coolant temperature

gauge

Displays the coolant temperature.
grey marking /

90

: normal operating

temperature

red marking

: temperature too

high

Control indicator 

V

 illuminates red if

coolant temperature is too high.

Caution

If engine coolant temperature is

too high, stop vehicle, switch off

engine. Danger to engine. Check

coolant level.

Engine oil level monitor

The state of the engine oil level is

displayed in the Driver Information

Centre for a few seconds following

the service information after switching

on the ignition.
A proper state of engine oil level is

indicated by a message.
If engine oil level is low, 

T

 flashes

and a message is indicated,

accompanied by the 

C

 indicator.

Confirm engine oil level by using the

dipstick and top up engine oil

respectively.
Engine oil 

3

 212.

A fault of measurement is indicated

by a message. Check engine oil level

manually by using the dipstick.

Service display

The service system informs when to

change the engine oil and filter or a

vehicle service is required. Based on

driving conditions, the interval at

which an engine oil and filter change

are required can vary considerably.
Service information 

3

 240.

A required service due is displayed in

the Driver Information Centre for

several seconds after switching on

the ignition.
If no service is required for the next

1800 miles or more, no service

information appears in the display.
If service is required within the next

1800 miles, the remaining distance to

the next service due, the distance

travelled since the last service due or

the time period that remains to the

next service due is indicated for

several seconds. Simultaneously

symbol 

C

 illuminates temporary as

reminder.
If service is required in less than

600 miles, the remaining distance to

the next service due, the distance

travelled since the last service due or

Instruments and controls

77

the time period that remains to the

next service due is indicated for

several seconds. Simultaneously

C

 illuminates permanently as

reminder.
Overdued service is indicated by a

message in the Driver Information

Centre which indicates the overdued

distance. 

C

 flashes and then

illuminates permanently until service

is executed.

Reset of service interval

After each service, the service

indicator must be reset to ensure

proper functionality. It is

recommended to seek the assistance

of a workshop.
If service is executed by yourself,

operate as following:

● switch off ignition

● press and hold the button
● switch on ignition, the distance

indication begins a countdown

● when the display indicates =0,

release the button again

The symbol 

C

 disappears.

Retrieving service information

The status of the service information

can be retrieved at any time via the

Info Display. Press Check in the

vehicle settings menu. The service

information is displayed for a few

seconds.
Info Display 

3

 87.

Service information 

3

 240.

Control indicators

The control indicators described are

not present in all vehicles. Depending

on the equipment, the position of the

control indicators may vary. When the

ignition is switched on, most control

indicators will illuminate briefly as a

functionality test.
The control indicator colours mean:
red

: danger, important reminder

yellow : warning, information, fault

green : confirmation of activation

blue

: confirmation of activation

white : confirmation of activation

grey

: system paused, at least one

system limitation has been

detected

Control indicators are located in the

Driver Information Centre.
Driver Information Centre 

3

 86.

Overview

The numbers in the overview table

indicate what to do, when a control

indicator illuminates or flashes.
1 : only for information

2 : information and warning

78

Instruments and controls

3 : seek the assistance of a

workshop

4 : stop engine and seek the

assistance of a workshop

5 : have the cause of the fault

remedied immediately by a

workshop

6 : stop vehicle, do not continue the

journey and seek the assistance

of a workshop

;

 / 

:

1 Turn lights 

3

 79

a

2 Seat belt reminder

3

 79

d

5 Airbag and belt

tensioners 

3

 80

H

2 Airbag activated

3

 80

g

2 Airbag deactivated

3

 80

S

4 Charging system

3

 80

W

5 Malfunction indicator

light 

3

 80

C

5 Service vehicle soon

3

 81

+

4 Stop engine 

3

 81

i

5 Hybrid system fault

3

 81

h

6 Brake and clutch

system 

3

 81

j

1 /

5

Parking brake 

3

 81

k

5 Electric parking brake

fault 

3

 81

o

2 Automatic operation of

electric parking brake

off 

3

 82

i

2 Antilock brake system

(ABS) 

3

 82

g

4 Power steering 

3

 82

L

2 Lane keep assist

3

 82

(

2 Advanced lane keep

assist 

3

 82

e

2 Parking assist off

3

 83

J

2 /

5

Electronic Stability

Control and Traction

Control system 

3

 83

K

2 Electronic Stability

Control and Traction

Control system 

3

 83

V

4 Engine coolant temper‐

ature high 

3

 83

z

1 Preheating 

3

 83

B

AdBlue 

3

 83

q

2 /

3

Deflation detection

system 

3

 84

T

4 Engine oil pressure

3

 84

r

2 Low fuel 

3

 84

j

2 Charging cable

connected 

3

 84

READY 1 Vehicle ready 

3

 84

M

2 Reduced engine power

3

 85

Instruments and controls

79

b

1 Apply footbrake 

3

 85

n

Autostop 

3

 85

D

1 /

3

Stop-start system

deactivated 

3

 85

F

1 Exterior light 

3

 85

D

Low beam 

3

 85

A

High beam 

3

 85

N

1 High beam assist

3

 85

H

Rear fog light 

3

 85

K

3 Pedestrian safety alert

fault 

3

 85

m

2 /

3

Active emergency

braking 

3

 85

X

2 Door open 

3

 86

a

1 e-SAVE is activated

3

 87

Turn lights

;

 or 

:

 flashes green.

Flashes if a turn light is activated.

An audible warning can be heard

when the turn lights are on.
Turn lights 

3

 99.

Seat belt reminder

a

 illuminates or flashes in the Driver

Information Centre together with the

indication in the overhead console for

each seat belt.

a

 illuminates in different colours

depending on condition:
red

: seat belt not fastened

green : seat belt fastened

grey : seat not occupied

● When the ignition is switched on,

a

 illuminates in the overhead

console in the corresponding

colour.

● After driving off, 

a

 in the Driver

Information Centre and the

symbol for the respective seat in

the overhead console flash in red

for a certain time together with a

chime if the respective seat is

occupied but the seat belt is not

fastened. After a certain time of

driving, 

a

 illuminates constantly

in red until the seat belt of the

respective seat has been

fastened.

● If any passenger has unfastened

the seat belt during driving, 

a

 in

the Driver Information Centre and

the symbol for the respective

seat in the overhead console

flash in red for a certain time

together with a chime. After a

certain time of driving, 

a

illuminates constantly in red until

the seat belt of the respective

seat has been fastened again.

80

Instruments and controls

Depending on version, 

a

 could

illuminate in red when the respective

seat is not occupied or 

a

 could

extinguish after a certain time

independent on condition.
Seat belts 

3

 39.

Airbag and belt tensioners

d

 and 

C

 illuminate yellow.

When the ignition is switched on, the

control indicator illuminates for some

seconds. If it does not illuminate,

does not extinguish after some

seconds or illuminates whilst driving,

there is a fault in the airbag system.

Seek the assistance of a workshop.

The airbags and belt pretensioners

may fail to trigger in the event of an

accident.
Deployment of the belt pretensioners

or airbags is indicated by continuous

illumination of 

d

.

9

Warning

Have the cause of the fault

remedied immediately by a

workshop.

Belt pretensioners 

3

 39.

Airbag system 

3

 41.

Airbag deactivation

H

 illuminates yellow.

The front passenger airbag is

activated.

g

 illuminates yellow.

The front passenger airbag is

deactivated.
Airbag deactivation 

3

 46.

Charging system

S

 illuminates red.

Illuminates when the ignition is

switched on and extinguishes shortly

after the engine starts.

Illuminates when the engine is

running

Stop, switch off engine. Vehicle

battery is not charging. Engine

cooling may be interrupted. The

brake servo unit may cease to be

effective. Seek the assistance of a

workshop.

Malfunction indicator light

W

 illuminates or flashes yellow.

Illuminates when the ignition is

switched on and extinguishes shortly

after the engine starts.

Instruments and controls

81

Illuminates when the engine is

running

Fault in the emission control system.

The permitted emission limits may be

exceeded. Seek the assistance of a

workshop immediately.

Flashes when the engine is

running

Fault that could lead to catalytic

converter damage. Ease up on the

accelerator until the flashing stops.

Seek the assistance of a workshop

immediately.

Service vehicle soon

C

 illuminates yellow.

Illuminates briefly when the ignition is

switched on.
May illuminate together with other

control indicators and a

corresponding message in the Driver

Information Centre.
Seek the assistance of a workshop

immediately.

Stop engine

+

 illuminates red.

Illuminates briefly when the ignition is

switched on.
Illuminates together with other control

indicators, accompanied by a warning

chime and a corresponding message

in the Driver Information Centre.
Stop engine immediately and seek

the assistance of a workshop.

Hybrid system fault

i

 illuminates red.

The hybrid system has a fault.
Switch off ignition and seek the

assistance of a workshop.

Brake and clutch system

h

 illuminates red or yellow.

The brake and clutch fluid level is too

low.

9

Warning

Stop. Do not continue your

journey. Consult a workshop.

Brake fluid 

3

 215.

Parking brake

j

 illuminates or flashes red.

Illuminates

Parking brake is applied 

3

 145.

Flashes

Electric parking brake is not applied

automatically. The application or the

release are faulty.

9

Warning

Have the cause of the fault

remedied immediately by a

workshop.

Electric parking brake fault

k

 illuminates yellow.

82

Instruments and controls

Illuminates

Electric parking brake has a fault

3

 145.

9

Warning

Have the cause of the fault

remedied immediately by a

workshop.

Automatic operation of

electric parking brake off

o

 illuminates yellow.

Illuminates

Automatic operation is deactivated or

faulty. In the event of a fault, 

o

illuminates together with other control

indicators or it is accompanied by a

corresponding message in the Driver

Information Centre.
Activate automatic operation again or

have the cause remedied by a

workshop in the event of a fault.
Automatic operation 

3

 145.

Antilock brake system

(ABS)

i

 illuminates yellow.

Illuminates for a few seconds after the

ignition is switched on. The system is

ready for operation when the control

indicator extinguishes.
If the control indicator does not

extinguish after a few seconds, or if it

illuminates while driving, there is a

fault in the ABS. The brake system

remains operational but without ABS

regulation.
Antilock brake system 

3

 144.

Gear shifting

Y

 or 

Z

 with the number of a higher

or lower gear is indicated, when

upshifting or downshifting is

recommended for fuel saving

reasons.
On vehicles with automatic

transmission, the system is only

active in manual mode.
Manual mode 

3

 139.

Power steering

g

 illuminates red or yellow.

The power steering has a fault. Drive

carefully at a moderate speed and

consult a workshop.

Lane keep assist

L

 illuminates or flashes yellow.

Illuminates yellow

The system has been automatically

deactivated or placed on standby.
If 

L

 and 

C

 illuminate, the system

has a fault. Seek the assistance of a

workshop.

Flashes yellow

The system is correcting the

unintended lane change.
Lane keep assist 

3

 178.

Advanced lane keep assist

(

 illuminates grey, green or yellow.

Instruments and controls

83

Illuminates grey

The system is paused. At least one

system limitation has been detected.

Illuminates green

The system is active and ready to

operate.

Illuminates yellow

The system has a fault.
Advanced lane keep assist 

3

 180.

Parking assist

e

 illuminates yellow.

The system is deactivated.

Electronic Stability Control

and Traction Control system

J

 illuminates or flashes yellow.

Illuminates

A fault in the system is present.

Continued driving is possible. Driving

stability, however, may deteriorate

depending on road surface

conditions.

Have the cause of the fault remedied

by a workshop.
After reconnecting the vehicle

battery, (e.g. after maintenance

work), 

J

 is illuminated for several

seconds. After this time period, 

J

extinguishes. This is a normal

procedure, the vehicle does not need

any assistance.

Flashes

The system is actively engaged.

Engine output may be reduced and

the vehicle may be braked

automatically to a small degree.
Electronic Stability Control and

Traction Control system 

3

 148.

Engine coolant temperature

V

 illuminates red.

Illuminates red when the engine is

running

Stop, switch off engine.

Caution

Coolant temperature too high.

Check coolant level immediately

3

 213.

If there is sufficient coolant, consult a

workshop.

Preheating

z

 illuminates yellow.

Preheating of diesel engine is

activated. Only activates when

outside temperature is low. Start the

engine when control indicator

extinguishes.
Starting the engine 

3

 126.

AdBlue

B

 flashes or illuminates yellow.

Illuminates yellow

The remaining driving range is

between 500 miles and 1500 miles.

84

Instruments and controls

Flashes yellow

The remaining driving range is

between 0 and 500 miles.
AdBlue level is low. Refill AdBlue

soon to avoid prevention of the

engine start.
AdBlue 

3

 132.

Deflation detection system

q

 illuminates or flashes yellow.

Illuminates

Tyre pressure loss in one or more

wheels. Stop immediately and check

tyre pressure.

Flashes

Fault in system. Consult a workshop.
Deflation detection system 

3

 223.

Engine oil pressure

T

 illuminates red.

Illuminates when the ignition is

switched on and extinguishes shortly

after the engine starts.

Illuminates when the engine is

running

Caution

Engine lubrication may be

interrupted. This may result in

damage to the engine and / or

locking of the drive wheels.

1. Select neutral gear.
2. Move out of the flow of traffic as

quickly as possible without

impeding other vehicles.

3. Switch off ignition.

9

Warning

When the engine is off,

considerably more force is needed

to brake and steer. During an

Autostop the brake servo unit will

still be operational.
Do not remove key until vehicle is

stationary, otherwise the steering

wheel lock could engage

unexpectedly.

Keep engine turned off and let the

vehicle be towed to a workshop.

Low fuel

r

 illuminates yellow.

Level in fuel tank is too low.
Refuelling 

3

 198.

Bleeding the diesel fuel system

3

 218.

Charging cable connected

j

 illuminates red.

The vehicle plug of the charging cable

is still connected to the charge port.

The vehicle cannot be started.
Disconnect the vehicle plug from the

charge port and close the charge port

flap.
Charging 

3

 189.

Vehicle ready

READY illuminates green. The

vehicle is ready to be driven.

Instruments and controls

85

Reduced engine power

M

 illuminates yellow.

The charging level of the high voltage

battery is low. Only reduced engine

power is available.

Apply footbrake

b

 illuminates.

Insufficient or no pressure on the

brake pedal. Depress the brake pedal

before releasing the parking brake

and moving out of P.

Autostop

n

 illuminates or flashes green.

Illuminates green

Engine is in an Autostop.

Flashes green

Autostop is temporarily unavailable,

or Autostop mode is invoked

automatically.
If 

D

 illuminates yellow, the stop-start

system is deactivated.
Stop-start system 

3

 127.

Exterior light

F

 illuminates green.

The exterior lights are on 

3

 94.

Low beam

D

 illuminates green.

Illuminated when low beam is on.

High beam

A

 illuminates blue.

Illuminates when high beam is on or

during headlight flash 

3

 95.

High beam assist

N

 illuminates green or yellow.

Illuminates green when the high

beam assist is activated 

3

 95.

Illuminates yellow when a malfunction

has been detected. Seek the

assistance of a workshop.

Rear fog light

H

 illuminates yellow.

The rear fog light is on 

3

 100.

Pedestrian safety alert fault

K

 illuminates yellow.

The pedestrian safety alert is not

working.

Active emergency braking

m

 illuminates or flashes yellow.

Illuminates

The system has been deactivated or

a fault has been detected.
Additionally, a warning message is

displayed in the Driver Information

Centre.
Check the reason of the deactivation

3

 161 and in case of a system fault,

seek the assistance of a workshop.

Notice

m

 also illuminates if the seat belts

of the front passengers are not

fastened. In this case, active

emergency braking is deactivated.

Flashes

The system is actively engaged and

brakes automatically the vehicle.

86

Instruments and controls

Active emergency braking 

3

 161.

Door open

X

 illuminates red.

A door or the tailgate is open.

Displays

Driver Information Centre

In addition to warning lights, gauges

and indicators, the following

information is available:

● trip odometer
● gear shift indication
● service information
● vehicle and warning messages
● driver assistance messages
● pop-up messages
● infotainment information

Vehicle messages 

3

 90.

Pages

Press the button to scroll through the

pages or to close a pop-up message.

Personalisation

The Driver Information Centre can be

personalised via the menu in the Info

Display.

Instruments and controls

87

Several pages can be created by

choosing widgets to be displayed. It is

possible to memorise up to five pages

with one or two widgets each.
Personalisation 

3

 108.

Info Display

The Info Display can indicate:

● time 

3

 71

● outside temperature 

3

 71

● date 

3

 71

● Infotainment system 

3

 104

● navigation 

3

 111

● vehicle and system messages

3

 90

● settings for vehicle

personalisation 

3

 91

Selecting menus and settings

There are three options to operate the

display:

● via buttons below the display
● by touching the touchscreen with

the finger

● via the voice assistant

Button and touch operation

Press 

:

 to display the menu for the

driver assistance systems.
Press 

?

 to display the home screen.

Press 

;

 to display the climate menu.

Touch required menu display icon or

a function with the finger.
Confirm a required function or

selection by touching.
Infotainment system 

3

 104.

Personalisation

The Info Display can be personalised

via the personalisation menu.

Several pages can be created by

choosing widgets to be displayed.
Personalisation 

3

 108.

Powerflow

This menu displays the current

energy flow within the electric system.

The components will be highlighted

when they are active.

1. Press 

?

.

2. Touch 

a

.

3. Select Energy Flow.

Different colours show which engine

is used and whether energy is

regenerated.

88

Instruments and controls

● green: regenerating energy
● orange: combustion engine

operating (PHEV)

● blue: electric engine operating

Average consumption

This menu displays the average

power and fuel consumption during

the current trip. The current trip is

subdivided into time steps. For each

time step, the average consumption

is displayed. The time steps can be

modified.

1. Press 

?

.

2. Touch 

a

.

3. Select Statistics.
4. Press + and - to modify the time

steps.

Power consumption

The consumption of electrial power is

displayed in kWh/100 miles.

● The green graph shows the

energy regenerated during

deceleration and braking phases

to recharge the high voltage

battery.

● The blue graph shows the energy

consumed directly from the high

voltage battery.

Fuel consumption

The orange graph shows the average

fuel consumption on the current trip in

litre per 100 miles and historical

values.

e-SAVE function (PHEV)

This function allows to provide

electrical energy of the high voltage

battery for a later use, e.g. for driving

in areas restricted to electrical

vehicles. It is possible to reserve the

complete electrical energy of the

battery or a part of it.

Notice

If the energy requested exceeds the

energy of the high voltage battery,

the combustion engine charges the

battery. This results in a loss of

performance and a higher fuel

consumption.

The function can be activated in the

Info Display.

1. Press 

?

.

2. Touch 

a

.

3. Select e-SAVE.
4. Select the distance for which

electrical is to be reserved or

reserve the whole capacity of the

high voltage battery.

5. Press ON.

a

 illuminates in the Driver

Information Centre when the

function is activated.

6. To use the reserved electrical

energy change to electric mode.

Instruments and controls

89

The setting of this function is not

stored when the ignition is switched

off.

Head-up display

This extended head-up display

projects information onto the

windscreen in the driver's field of

vision so that they do not need to take

their eyes off the road.

Notice

The head-up display may not be

legible when wearing polarised

sunglasses.

Activation

The head-up display can be activated

or deactivated via the brightness

menu in the settings app 

z

 in the Info

Display. Also the brightness of the

head-up display can be adjusted.
Settings menu 

3

 105.

Height adjustment

The height of the head-up display can

be adjusted via the control in the

driver's door.

Select the head-up display by turning

the control to 

B

.

Then swivel the control forwards or

backwards until the desired height is

adjusted.
Interior care 

3

 238.

Personalisation

The content of the head-up display

can be chosen via the menu in the

Info Display.

One widget can be chosen for the

head-up display.
Personalisation 

3

 108.

90

Instruments and controls

Vehicle messages

Messages are indicated in the Driver

Information Centre, in some cases

together with a warning chime.

Press to confirm a message.

Vehicle and service messages

The vehicle messages are displayed

as text. Follow the instructions given

in the messages.

Messages in the Info Display

Some important messages may

appear additionally in the Info

Display. Some messages only pop-

up for a few seconds.

Warning chimes

The warning chime regarding not

fastened seat belts has priority over

any other warning chime.
Whenever a warning chime sounds,

pay attention to the messages

displayed and the warning lights in

the Driver Information Centre.

When starting the engine or whilst

driving

A warning chime will sound in

situations such as

● a seat belt is not fastened
● a door or the tailgate is not fully

closed

● a certain speed is exceeded with

parking brake applied

● cruise control deactivates

automatically

If several warnings appear at the

same time, only one warning chime

will sound.

When the vehicle is parked and /

or the driver's door is opened

● With exterior lights on.

During an Autostop

● If the driver's door is opened.
● If any condition for a restart of the

engine is not fulfilled.

Instruments and controls

91

Trip computer

The trip computer displays current trip

information since the last reset.

Pressing the button displays the

following tabs in turn:

● current information

● total range
● current consumption
● time counter for the stop-start

mode

● percentage of the current

journey travelled in all-

electric driving mode (PHEV)

● total distance recorder

● trip 1

● average speed
● average fuel consumption
● distance travelled

● trip 2

● average speed
● average fuel consumption
● distance travelled

The time counter is reset each time

the ignition is switched on.
To reset a trip, press the button for

more than two seconds when the

desired trip is displayed.

Vehicle personalisation

The vehicle's behaviour can be

personalised by changing the settings

in the Info Display.
Some functions are only displayed or

active when the engine is running.

Driver assistance systems

To display the settings of the

advanced driver assistance systems,

press 

:

.

A shortcut for each driver assistance

system can be created by touching

L

. All driver assistance systems with

92

Instruments and controls

a shortcut will be displayed in the

shortcut tab for fast activation or

deactivation.

Vehicle settings

The vehicle settings can be displayed

via the home screen:

● Press 

?

 to display the home

screen.

● If necessary, touch 

V

 and swipe

the screen downwards and touch

z

.

● Touch the vehicle settings menu

on the left side.

Telematics services

Emergency call

Notice

In order to be available and

operational, the system requires

functioning vehicle electrics, mobile

service and GPS or GLONASS

satellite link. Depending on

equipment, a backup battery is

used.
Notice

The service is only available for

markets where it is legally required.

Furthermore, it depends on the

availability of the emergency centres

and the infrastructure in the country.

Status LED in the overhead

console

Illuminates green and red and

extinguishes after a short time, when

the ignition is switched on: the system

works properly.
Illuminates red: fault in the system.

Contact a workshop.
Flashes red: backup battery needs

replacement. Contact a workshop.

Emergency call

The emergency call function will

establish a connection to the nearest

public safety answering point (PSAP).

A minimum set of data including

vehicle and location information will

be sent to the PSAP.
In case of an emergency, press the

red SOS button in the overhead

console for more than two seconds.

The LED flashes green to confirm that

a connection to the nearest PSAP is

being established. The LED

illuminates steadily as long as the call

is active.
Pressing the SOS button immediately

a second time will terminate the call.

The LED switches off.

Automatic crash notification

In case of an accident with airbag

deployment and without damage of

needed hardware, an automatic

emergency call is established and an

automatic crash notification will be

transmitted to the next PSAP.

Instruments and controls

93

Vauxhall Connect

Vauxhall Connect comprises multiple

connected services accessible via

app, online or within the vehicle.

Notice

Full functionality of

Vauxhall Connect  is subject to

registration and proper activation.

Connected services may include live

navigation such as online traffic

information and vehicle status and

information such as maintenance

alerts.
Services accessible within the vehicle

also include emergency call and

breakdown call. These functions are

automatically activated. Terms and

conditions apply.
Emergency call 

3

 92.

Breakdown call

Pressing the 

d

 button in the

overhead console for more than two

seconds connects to a roadside

assistance service provider.

For information about coverage and

scope of services of the roadside

assistance, please refer to the

Service and warranty booklet.

Privacy settings

Privacy settings of Vauxhall Connect

can be configured. This will impact

the set of data being sent, e.g., in

case a breakdown call is

triggered.The emergency call

function will not be impacted.
Depending on version, the privacy

settings can be changed by

simultaneously pressing 

d

 and SOS

in the overhead console or via the

system settings menu in the Info

Display.

94

Lighting

Lighting

Exterior lighting ............................ 94

Light switch ................................ 94

Automatic light control ............... 95

High beam ................................. 95

High beam assist ....................... 95

Headlight flash ........................... 96

Headlight range adjustment ...... 96

Headlights when driving

abroad ...................................... 96

Daytime running lights ............... 96

Matrix-LED headlights ............... 97

Hazard warning flashers ............ 99

Turn lights .................................. 99

Front fog lights ......................... 100

Rear fog light ........................... 100

Parking lights ........................... 101

Reversing lights ....................... 101

Misted light covers ................... 101

Interior lighting ........................... 101

Instrument panel illumination

control ..................................... 101

Interior lights ............................ 101

Reading lights .......................... 102

Sunvisor lights ......................... 102

Lighting features ........................ 102

Centre console lighting ............ 102

Entry lighting ............................ 102

Exit lighting .............................. 102

Vehicle locator lighting ............ 103

Battery discharge protection .... 103

Exterior lighting

Light switch

Turn adjuster wheel:
AUTO : automatic light control

switches automatically

between daytime running

light and headlight

8

: sidelights

9

: low beam / high beam

Control indicator 

8


3

 85.

Lighting

95

Automatic light control

When the automatic light control

function is switched on, the system

switches between daytime running

lights and headlights automatically

depending on the external lighting

conditions and information given by

the wiper system.
Daytime running light 

3

 96.

Automatic headlight activation

Turn the adjuster wheel in position:

AUTO
During poor lighting conditions the

headlights are switched on.

Additionally, headlights are switched

on if the windscreen wipers have

been activated for several wipes.

High beam

To activate or deactivate the high

beam, pull the lever beyond the

resistance point.

High beam assist

The system switches from low beam

to high beam and vice versa to

prevent glaring. Once activated, high

beam assist remains active and

switches high beam on and off

depending on surrounding

conditions. The latest setting of the

high beam assist will remain set after

the ignition is switched on again.
Glare-free high beam for Matrix-LED

headlights 

3

 97.

Activation

The high beam assist can be

activated via the vehicle settings

menu in the Info Display.
Info Display 

3

 87.

High beam is switched on

automatically in dark surroundings at

a speed above 28 mph. High beam is

switched off at a speed below

22 mph, but high beam assist remains

active.
The green control indicator 

F

illuminates continuously when the

high beam assist is activated, the blue

A

 illuminates when high beam is on.

Control indicator 

N


3

 85

A


3

 85.

High beam assist switches

automatically to low beam when:

● Driving in urban areas.
● Camera detects heavy fog.

96

Lighting

● Rear fog light is switched on.
● Oncoming or preceding vehicles

are detected by the camera.

If there are no restrictions detected,

the system switches back to high

beam.

Deactivation

The system can be deactivated via

the vehicle settings menu in the Info

Display.
Info Display 

3

 87.

Headlight flash

To activate the headlight flash, pull

the lever briefly without passing the

resistance point.

Headlight range adjustment

To adapt headlight range manually to

the vehicle load to prevent dazzling,

turn thumb wheel 

X

 to required

position.
ICE and PHEV:
0 : driver's seat occupied

2 : all seats occupied

2 : all seats occupied and load

compartment laden

3 : driver's seat occupied and load

compartment laden

BEV:
0 : driver's seat occupied

1 : all seats occupied

1 : all seats occupied and load

compartment laden

2 : driver's seat occupied and load

compartment laden

Propulsion types 

3

 4.

Headlights when driving

abroad

When driving in countries where

traffic drives on the opposite side of

the road, the headlights do not have

to be adjusted.

Daytime running lights

Daytime running lights increase

visibility of the vehicle during daylight.
Automatic light control 

3

 95.

Lighting

97

Matrix-LED headlights

The Matrix-LED headlight system

contains a variety of particular LEDs

in each headlight which enables the

control of the adaptive forward

lighting functions.
Light distribution and intensity of light

are variably triggered depending on

the lighting conditions, road type and

driving situation. The vehicle adapts

the headlights automatically to the

situation to enable optimal light

performance for the driver.
The adaptive forward lighting and the

Matrix-LED headlights functions can

be deactivated or activated in the

vehicle personalisation menu.
Vehicle personalisation 

3

 91.

Info Display 

3

 87.

The glare-free high beam function of

the Matrix-LED headlights are only

available with light switch in position

AUTO.

Country light

Activated automatically with vehicle

speed when driving in rural areas.

The illumination of the current lane

and the side of the road is adapted.

Oncoming and preceding vehicles

are not dazzled.

Town light

Activated automatically at a speed up

to approx. 30 mph. The light is wide

and symmetrical.

Adverse weather light

If bad weather conditions are

detected, low beam is dimmed to

avoid dazzling the oncoming traffic.

Cornering light

Particular LEDs, based on direction of

travel, are additionally triggered to

improve lighting. This function is

activated at a speed up to 25 mph

when turning off.

98

Lighting

Curve light

Particular LEDs, based on steering

angle and speed, are additionally

triggered to improve lighting in

curves. This function is activated at

speeds from 25 mph to 43 mph.

Reverse parking function

To assist driver's orientation when

parking, cornering lights and

reversing light illuminate when

headlights are activated and reverse

gear is engaged. Cornering light and

reversing light remain illuminated for

a short time after disengaging the

reverse gear, or when accelerating to

a speed above approx. 6 mph.

Eco mode

During an Autostop the headlight

functions are reduced to save power.

Glare-free high beam

9

Warning

The glare-free high beam function

may dazzle other road users when

the vehicle is driven in countries

where traffic moves on the

opposite side of the road. E.g.

when the vehicle was designed for

left hand drive traffic and it is

driven in a country with right hand

drive traffic.
Switch off glare-free high beam

function whenever you are driving

in countries mentioned above!

The system enables a glare-free high

beam when driving in dark

surroundings.

Each LED on right or left side is

triggered or faded out particularly

according to the traffic situation. This

gives the best light distribution

without dazzling other road users.
Glare-free high beam is switched on

automatically at a speed above

28 mph. It is switched off at a speed

below 22 mph, but the system

remains active.

Motorway mode

Activated automatically at a speed

above 65 mph. Illumination is

adapted to the higher speed driven on

motorways. If there is oncoming

Lighting

99

traffic, following vehicles ahead or

passing, the illumination on the side

of the vehicle is reduced.

Fault in LED headlight system

When the system detects a failure in

the LED headlight system, it selects a

preset position to avoid dazzling of

oncoming traffic. A warning is

displayed in the Driver Information

Centre.
After reconnecting the vehicle

battery, the system needs a

recalibration by driving a short

distance.

Hazard warning flashers

Operated by pressing 

c

.

When braking in an emergency, the

hazard warning flashers are switched

on automatically, depending on the

force of deceleration. They are

switched off automatically, as soon as

the vehicle is accelerated again.

Turn lights

up

: right turn lights

down : left turn lights
A resistance point can be felt when

moving the indicator lever.
Constant flashing is activated when

the indicator lever is being moved

beyond the resistance point. It is

deactivated when the steering wheel

is moved in the opposite direction or

indicator lever is manually moved

back to its neutral position.
After 20 seconds the volume of the

audible signal will increase if the

speed is above 50 mph.

100

Lighting

Activate temporary flashing by

holding the indicator lever just before

the resistance point. Turn lights will

flash until indicator lever is being

released.
To activate three flashes, tap the

indicator lever briefly without passing

the resistance point.

Front fog lights

Turn the adjuster wheel forwards /

backwards to switch on / off.
Light switch in position AUTO:

switching on front fog lights will switch

headlights on automatically.

Rear fog light

Depending on version:

Turn the adjuster wheel forwards /

backwards to switch on / off.

Turn the adjuster wheel forwards /

backwards to switch on / off the front

fog light.
Turn the adjuster wheel two times

forwards / backwards to switch on / off

the rear fog light.
Light switch in position AUTO:

switching on rear fog light will switch

headlights on automatically.
Light switch in position 

8

: rear fog

light can only be switched on with

front fog lights.
The vehicle rear fog light is

deactivated when towing a trailer or a

plug is connected with the socket,

e.g. when a bicycle carrier is used.

Lighting

101

Parking lights

When the vehicle is parked, the

parking lights on one side can be

activated:

1. Switch off ignition.
2. Move the lever all the way up

(right parking lights) or down (left

parking lights).

Confirmed by a signal and the

corresponding turn lights control

indicator.

Reversing lights

The reversing light comes on when

reverse gear is selected.

Misted light covers

The inside of the light housing may

mist up briefly in poor, wet and cold

weather conditions, in heavy rain or

after washing. The mist disappears

quickly by itself. To help, switch on the

headlights.

Interior lighting

Instrument panel

illumination control

The brightness of the following lights

can be adjusted in the settings app

z

 in the Info Display when the

exterior lights are on:

● instrument panel illumination
● Info Display
● illuminated switches and

operation elements

Interior lights


Content      ..     1      2      3      4      ..