THE M240G MACHINEGUNNER. Maintenance Manual MCI 0321B (2007) - page 1
Student Information
Number and
MCI 0321B
Title
THE M240G MACHINEGUNNER
Study Hours
6
Course
Text
Material
Review Agency School of Infantry (East)
Reserve
2
Retirement
Credits (RRC)
ACE
Not applicable to civilian training/education.
Assistance
For administrative assistance, have your training officer or NCO log on to the
MCI home page at www.mci.usmc.mil. Marines CONUS may call toll free
1-800-MCI-USMC. Marines worldwide may call commercial (202) 685-
7596 or DSN 325-7596.
MCI Course 0321B
iii
Study Guide
Congratulations
Congratulations on your enrollment in a distance education course from the
Distance Learning and Technologies Department (DLTD) of the Marine
Corps Institute (MCI). Since 1920, the Marine Corps Institute has been
helping tens of thousands of hard-charging Marines, like you, improve their
technical job performance skills through distance learning. By enrolling in
this course, you have shown a desire to improve the skills you have and
master new skills to enhance your job performance. The distance learning
course you have chosen, MCI 0321B, The M240G Machinegunner, provides
instruction to all Marines tasked with operating the M240G medium
machinegun. This course consists of learning experiences necessary to
perform those duties associated with operating and maintaining the M240G
and all of its associated equipment.
Your Personal
•
YOU ARE PROPERLY MOTIVATED. You have made a positive
Characteristics
decision to get training on your own. Self-motivation is perhaps the most
important force in learning or achieving anything. Doing whatever is
necessary to learn is motivation. You have it!
•
YOU SEEK TO IMPROVE YOURSELF. You are enrolled to improve
those skills you already possess, and to learn new skills. When you
improve yourself, you improve the Corps!
•
YOU HAVE THE INITIATIVE TO ACT. By acting on your own, you
have shown you are a self-starter, willing to reach out for opportunities to
learn and grow.
•
YOU ACCEPT CHALLENGES. You have self-confidence and believe
in your ability to acquire knowledge and skills. You have the self-
confidence to set goals and the ability to achieve them, enabling you to
meet every challenge.
•
YOU ARE ABLE TO SET AND ACCOMPLISH PRACTICAL
GOALS. You are willing to commit time, effort, and the resources
necessary to set and accomplish your goals. These professional traits will
help you successfully complete this distance learning course.
Continued on next page
MCI Course 0321B
v
Study Guide, Continued
Beginning Your Before you actually begin this course of study, read the student information
Course
page. If you find any course materials missing, notify your training officer or
training NCO. If you have all the required materials, you are ready to begin.
To begin your course of study, familiarize yourself with the structure of the
course text. One way to do this is to read the table of contents. Notice the
table of contents covers specific areas of study and the order in which they are
presented. You will find the text divided into several study units. Each study
unit is comprised of two or more lessons and lesson exercises.
Leafing
Leaf through the text and look at the course. Read a few lesson exercise
Through the
questions to get an idea of the type of material in the course. If the course has
Text
additional study aids, such as a handbook or plotting board, familiarize
yourself with them.
The First Study Turn to the first page of study unit 1. On this page, you will find an
Unit
introduction to the study unit and generally the first study unit lesson. Study
unit lessons contain learning objectives, lesson text, and exercises.
Reading the
Learning objectives describe in concise terms what the successful learner,
Learning
you, will be able to do as a result of mastering the content of the lesson text.
Objectives
Read the objectives for each lesson and then read the lesson text. As you read
the lesson text, make notes on the points you feel are important.
Completing the To determine your mastery of the learning objectives and text, complete the
Exercises
exercises developed for you. Exercises are located at the end of each lesson,
and at the end of each study unit. Without referring to the text, complete the
exercise questions and then check your responses against those provided.
Continued on next page
MCI Course 0321B
vi
Study Guide, Continued
Continuing to
Continue on to the next lesson, repeating the above process until you have
March
completed all lessons in the study unit. Follow the same procedures for each
study unit in the course.
Preparing for
To prepare for your final exam, you must review what you learned in the
the Final Exam
course. The following suggestions will help make the review interesting and
challenging.
•
CHALLENGE YOURSELF. Try to recall the entire learning sequence
without referring to the text. Can you do it? Now look back at the text to
see if you have left anything out. This review should be interesting.
Undoubtedly, you’ll find you were not able to recall everything. But with
a little effort, you’ll be able to recall a great deal of the information.
•
USE UNUSED MINUTES. Use your spare moments to review. Read
your notes or a part of a study unit, rework exercise items, review again;
you can do many of these things during the unused minutes of every day.
•
APPLY WHAT YOU HAVE LEARNED. It is always best to use the
skill or knowledge you’ve learned as soon as possible. If it isn’t possible
to actually use the skill or knowledge, at least try to imagine a situation in
which you would apply this learning. For example make up and solve
your own problems. Or, better still, make up and solve problems that use
most of the elements of a study unit.
•
USE THE “SHAKEDOWN CRUISE” TECHNIQUE. Ask another
Marine to lend a hand by asking you questions about the course. Choose a
particular study unit and let your buddy “fire away.” This technique can
be interesting and challenging for both of you!
•
MAKE REVIEWS FUN AND BENEFICIAL. Reviews are good habits
that enhance learning. They don’t have to be long and tedious. In fact,
some learners find short reviews conducted more often prove more
beneficial.
Continued on next page
MCI Course 0321B
vii
Study Guide, Continued
Tackling the
When you have completed your study of the course material and are confident
Final Exam
with the results attained on your study unit exercises, take the sealed envelope
marked “FINAL EXAM” to your unit training NCO or training officer.
Your training NCO or officer will administer the final examination and return
the examination and the answer sheet to MCI for grading. Before taking your
final examination, read the directions on the DP-37 answer sheet carefully.
Completing
The sooner you complete your course, the sooner you can better yourself by
Your Course
applying what you’ve learned! However, you do have 2 years from the date
of enrollment to complete this course.
Graduating!
As a graduate of this distance education course and as a dedicated Marine,
your job performance skills will improve, benefiting you, your unit, and the
Marine Corps.
Semper Fidelis!
MCI Course 0321B
viii
STUDY UNIT 1
INTRODUCTION TO THE M240G MEDIUM MACHINEGUN
Overview
Scope
The successful use and employment of the M240G medium machinegun
requires a basic knowledge of the weapon. To properly use and maintain the
M240G medium machinegun, you must know the weapon from one end to
the other—the parts, how it works, what it is capable of, and what it shoots.
In this study unit, you will learn the characteristics, nomenclature, and
functioning of the M240G medium machinegun. You will also learn the steps
for clearing, disassembling, assembling, and performing a function check.
The different types of ammunition used with the M240G and how the
ammunition is handled and stored will also be covered.
In This Study
This study unit contains the following lessons:
Unit
Lesson
See Page
Characteristics, Nomenclature, and Functioning
1-3
Clearing, Disassembly, Assembly, and Function Check
1-29
Ammunition
1-53
MCI Course 0321B
1-1
Study Unit 1
LESSON 1
CHARACTERISTICS, NOMENCLATURE, AND FUNCTIONING
Introduction
Scope
Knowing the capabilities of a weapon is essential to its use. However, to
maintain it, you must know what all the parts are and how they go together.
In this lesson, you will learn the purpose of the M240G medium machinegun;
the characteristics, capabilities, and nomenclature; and the nomenclature and
purpose of the related SL-3 components. Also, you will learn the steps in the
cycle of operation for the M240G.
Learning
After completing this lesson, you should be able to
Objectives
• Identify the purpose of the M240G medium machinegun.
• Identify the characteristics of the M240G medium machinegun.
• Identify the capabilities of the M240G medium machinegun.
• Identify the nomenclature of the M240G medium machinegun.
• Identify the purpose for each assembly of the M240G medium
machinegun.
• Identify the nomenclature of the M240G medium machinegun SL-3
components.
• Identify the purpose of the M240G medium machinegun SL-3
components.
• Identify the steps in the cycle of operation of the M24G medium
machinegun.
Continued on next page
MCI Course 0321B
1-3
Study Unit 1, Lesson 1
Introduction, Continued
In This Lesson This lesson contains the following topics:
Topic
See Page
Introduction
1-3
Purpose of the M240G Medium Machinegun
1-5
Characteristics and Capabilities
1-6
Nomenclature
1-8
SL-3 Components
1-14
Functioning
1-19
Lesson 1 Exercise
1-23
MCI Course 0321B
1-4
Study Unit 1, Lesson 1
Purpose of the M240G Medium Machinegun
Two-Fold
The M240G medium machinegun is used in offensive and defensive combat,
combat support, and combat logistics units in all parts of the MAGTF. The
purpose of the M240G is to
• Provide heavy volumes of close, accurate, and continuous fire support to
suppress and destroy enemy personnel in support of an attack.
• Serve as an integral part of a unit’s defensive fire plan when employing
final protective fires by breaking up and stopping an enemy’s assault.
MCI Course 0321B
1-5
Study Unit 1, Lesson 1
Characteristics and Capabilities
Descriptive
The M240G has four descriptive characteristics:
Characteristics
Characteristic
Description
Belt-fed
The gun is fed by a disintegrating metallic link belt.
Air-cooled
The barrel and receiver are exposed to permit cooling
by the air.
Gas-operated
Gas produced from firing one round provides the
energy to mechanically prepare the weapon to fire the
next.
Fully automatic
Continues to fire until the trigger is released, a
malfunction occurs, or the ammunition is exhausted.
Weight
The table below lists the weights of selected components of the M240G:
Item
Weight in Pounds
Machinegun (complete)
25.6
Spare barrel w/case (SL-3 complete)
6.6
M122 tripod, flex-mount, and traversing and
20
elevation (T&E) mechanism (complete)
Dimensions
The table below lists the dimensions of the M240G:
Item
Dimension in Inches
Length
49
Height on M122 tripod
17
Rifling
The barrels of the M240G consist of the following rifling characteristics:
• Four grooves
• Uniform right hand turn
• One turn per 12 inches
Continued on next page
MCI Course 0321B
1-6
Study Unit 1, Lesson 1
Characteristics and Capabilities, Continued
Rates of Fire
The table below lists the rates of fire for the M240G:
Rates
Rounds per Minute
Remarks
Fires continuously depending on the
Cyclic
650 to 950
gas setting
Fires 6 to 8 round bursts with 4 or 5
Sustained
100
seconds between bursts
Fires 10- to 12-round bursts with 2 or
Rapid
200
3 seconds between bursts
Range
The table below lists the ranges of the M240G:
Range
Limits in Meters
Maximum overall
3725
Maximum effective area target
1800
Maximum effective point target
800
Tracer burnout
About 900
Grazing fire
600
Limits of
The table below lists the traverse limits for the M240G (with M122 tripod and
Manipulation
T&E mechanism):
Item
Limits in Mils
Elevation
247
Depression
200
Traverse (traversing bar)
875
425 left/450 right
MCI Course 0321B
1-7
Study Unit 1, Lesson 1
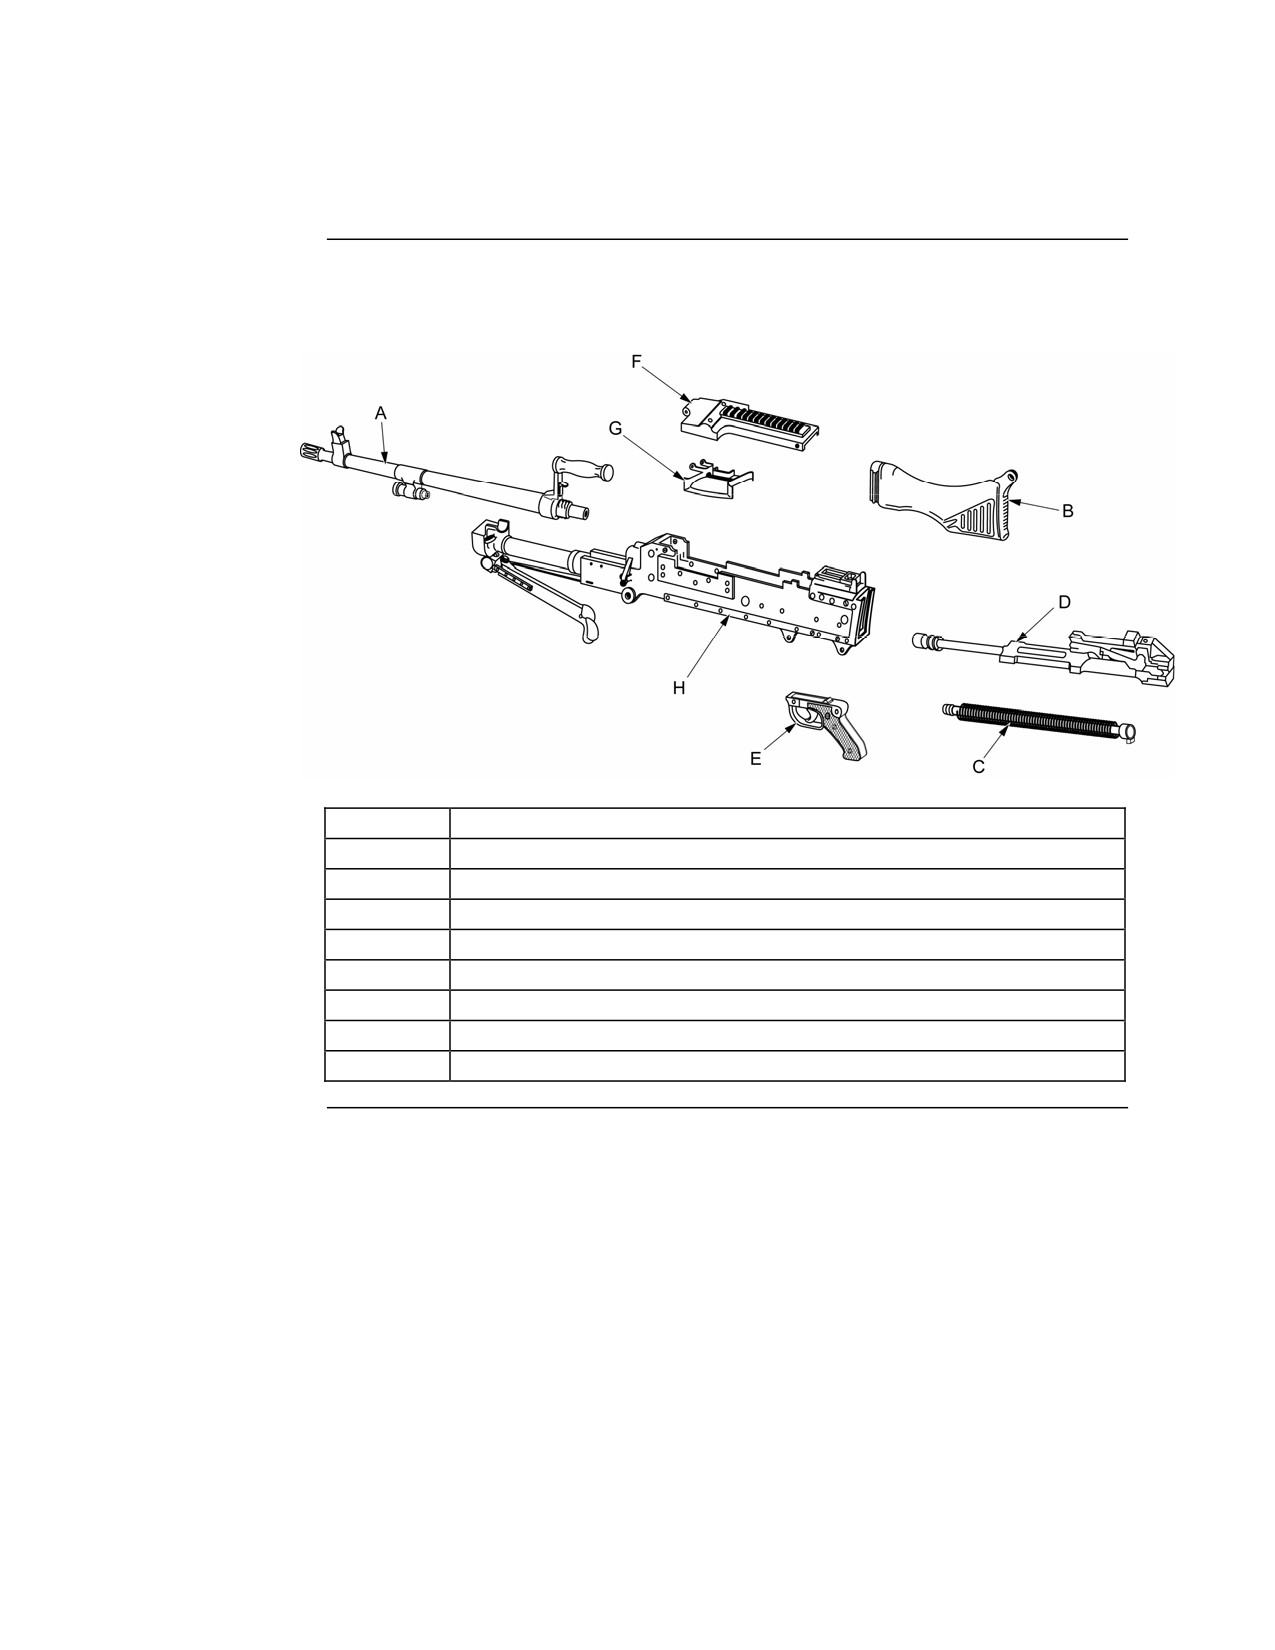
Nomenclature
Main
The M240G medium machinegun consists of the following main components:
Components
Item
Component
A
Barrel group
B
Buttstock and buffer group
C
Drive spring rod assembly (operating group sub-assembly)
D
Bolt and operating rod assembly (operating group sub-assembly)
E
Trigger housing group
F
Cover assembly (receiver group sub-assembly)
G
Feed tray (receiver group sub-assembly)
H
Receiver assembly (receiver group sub-assembly)
Continued on next page
MCI Course 0321B
1-8
Study Unit 1, Lesson 1
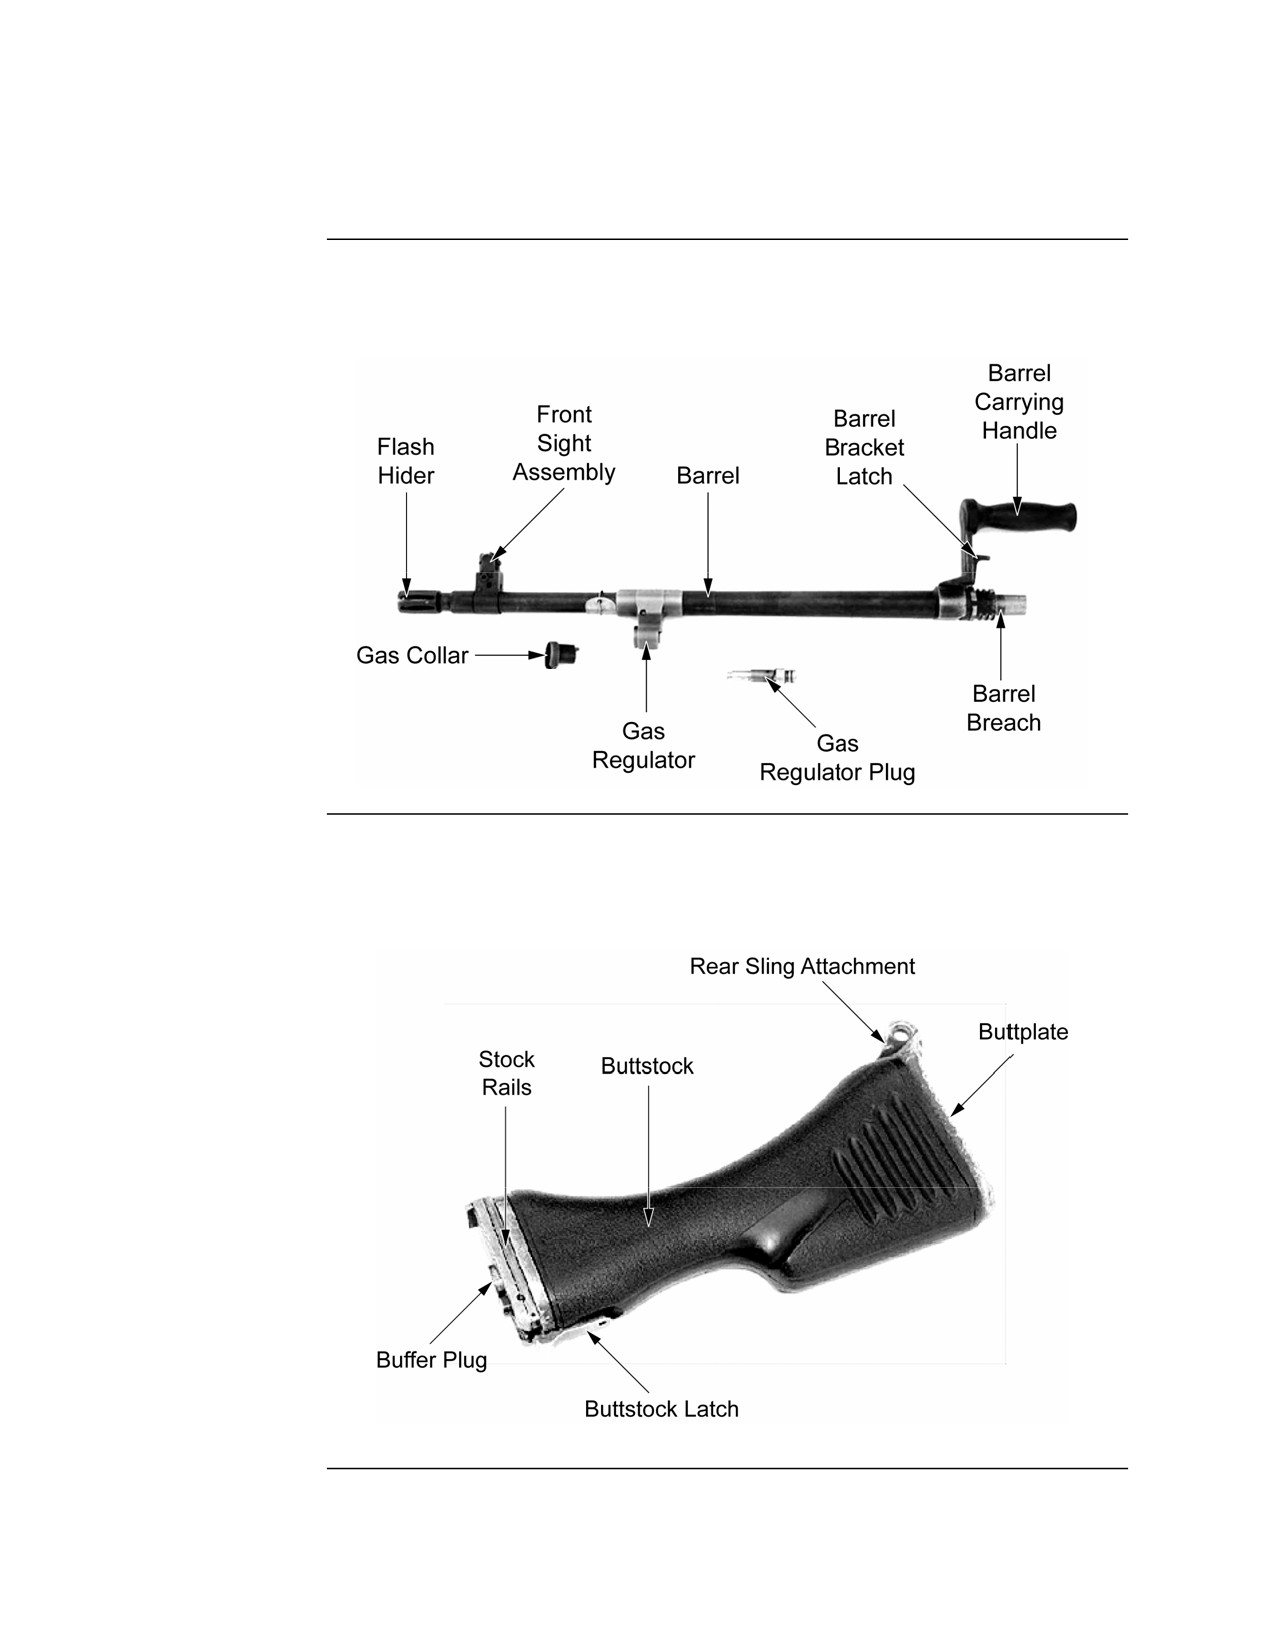
Nomenclature, Continued
Barrel Group
The barrel group houses rounds for firing and directs the projectile after
firing. Components of the barrel group are shown in the graphic below:
Buttstock and
The buttstock and buffer assembly absorbs the recoil for the bolt and
Buffer Group
operating rod assembly at the end of the recoil movement. Components of
the buttstock and buffer assembly are shown in the graphic below:
Continued on next page
MCI Course 0321B
1-9
Study Unit 1, Lesson 1
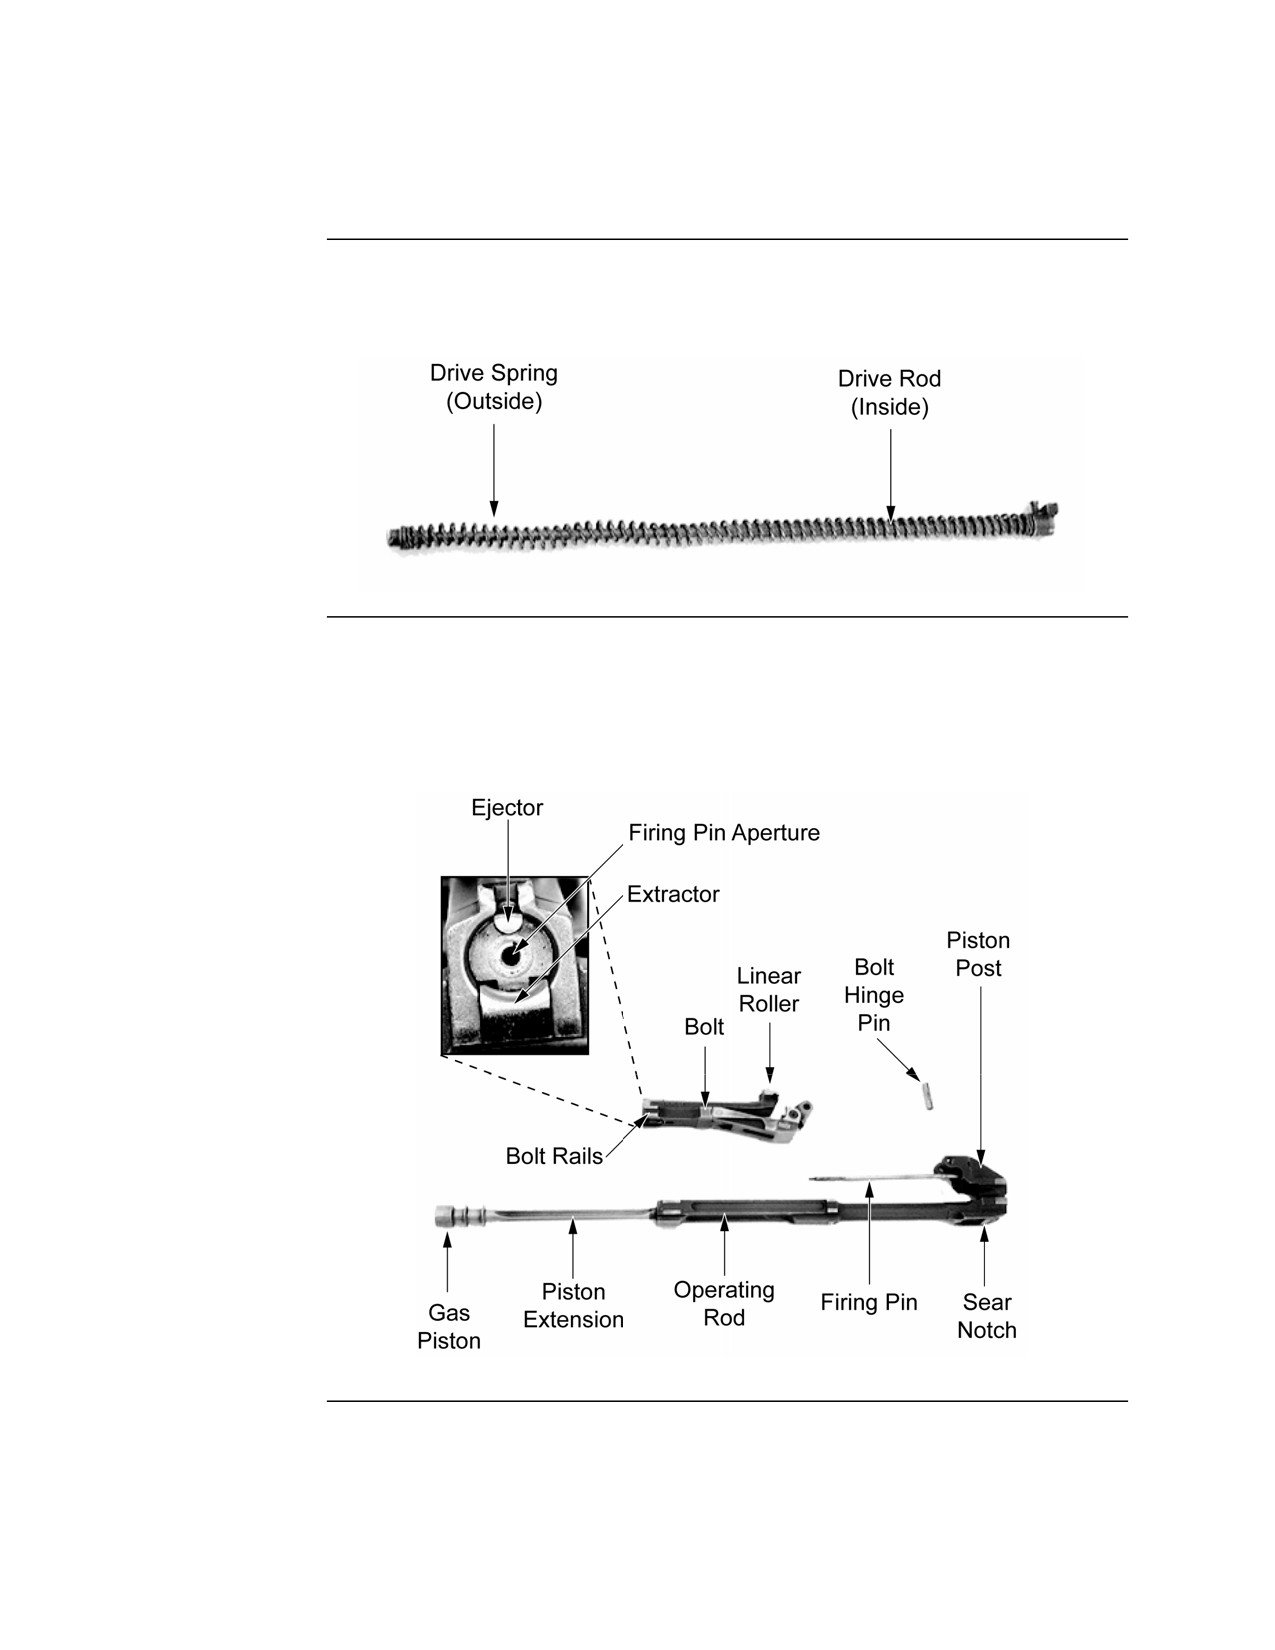
Nomenclature, Continued
Drive Spring
The drive spring rod assembly is part of the operating group. It provides
Rod Assembly
energy for returning the bolt and operating rod assembly to the firing position.
Bolt and
The bolt and operating rod assembly is part of the operating group. It
Operating Rod
provides feeding, striping, chambering, firing, extraction, and ejection of
Assembly
cartridges using the projectile-propelling gases for power. Components of the
bolt and operating rod assembly are shown in the graphic below:
Continued on next page
MCI Course 0321B
1-10
Study Unit 1, Lesson 1
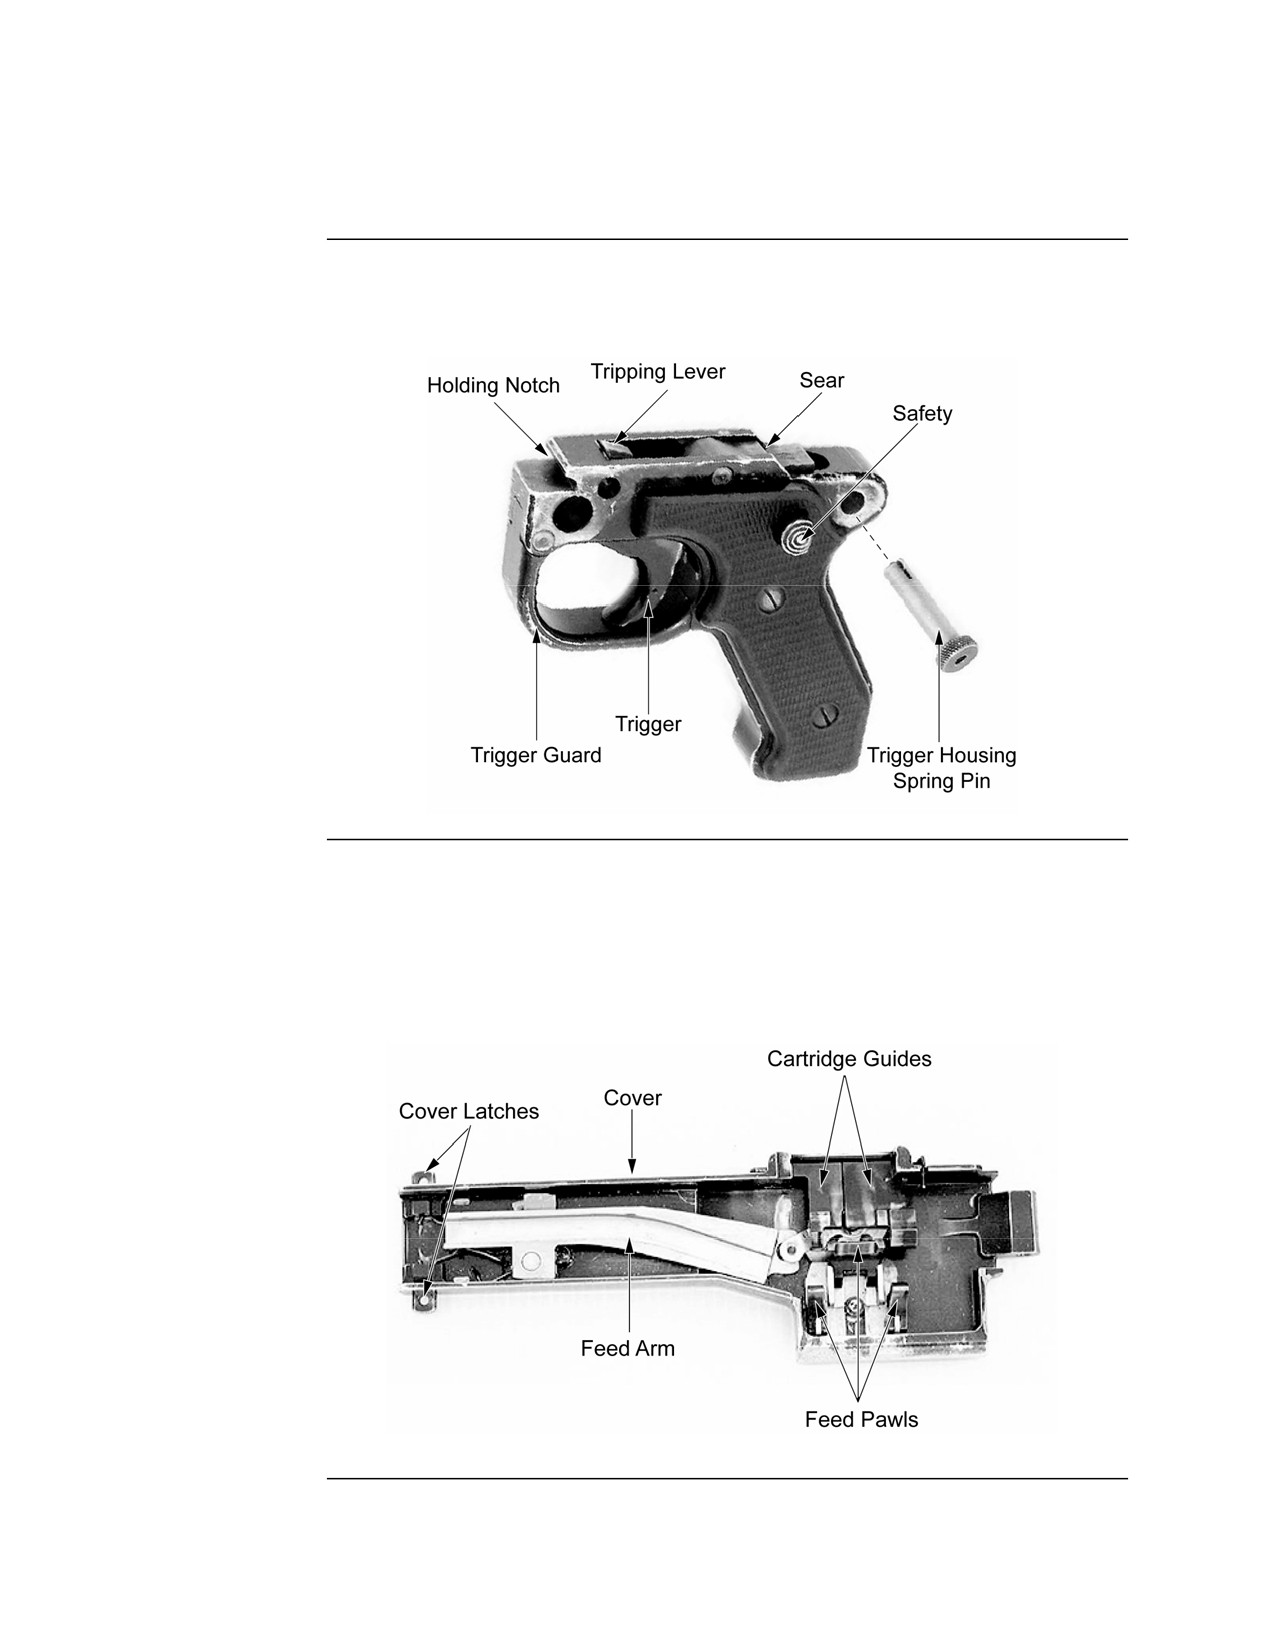
Nomenclature, Continued
Trigger
The trigger housing group controls the firing of the machinegun.
Housing Group
Components of the trigger housing group are shown in the graphic below:
Cover
The cover assembly is part of the receiver group. It feeds linked belt
Assembly
ammunition and positions and holds rounds in position for stripping, feeding,
and chambering. The cover has an integral sight mounting rail for current and
future accessories. Components of the cover assembly are shown in the
graphic below:
Continued on next page
MCI Course 0321B
1-11
Study Unit 1, Lesson 1
Nomenclature, Continued
Feed Tray
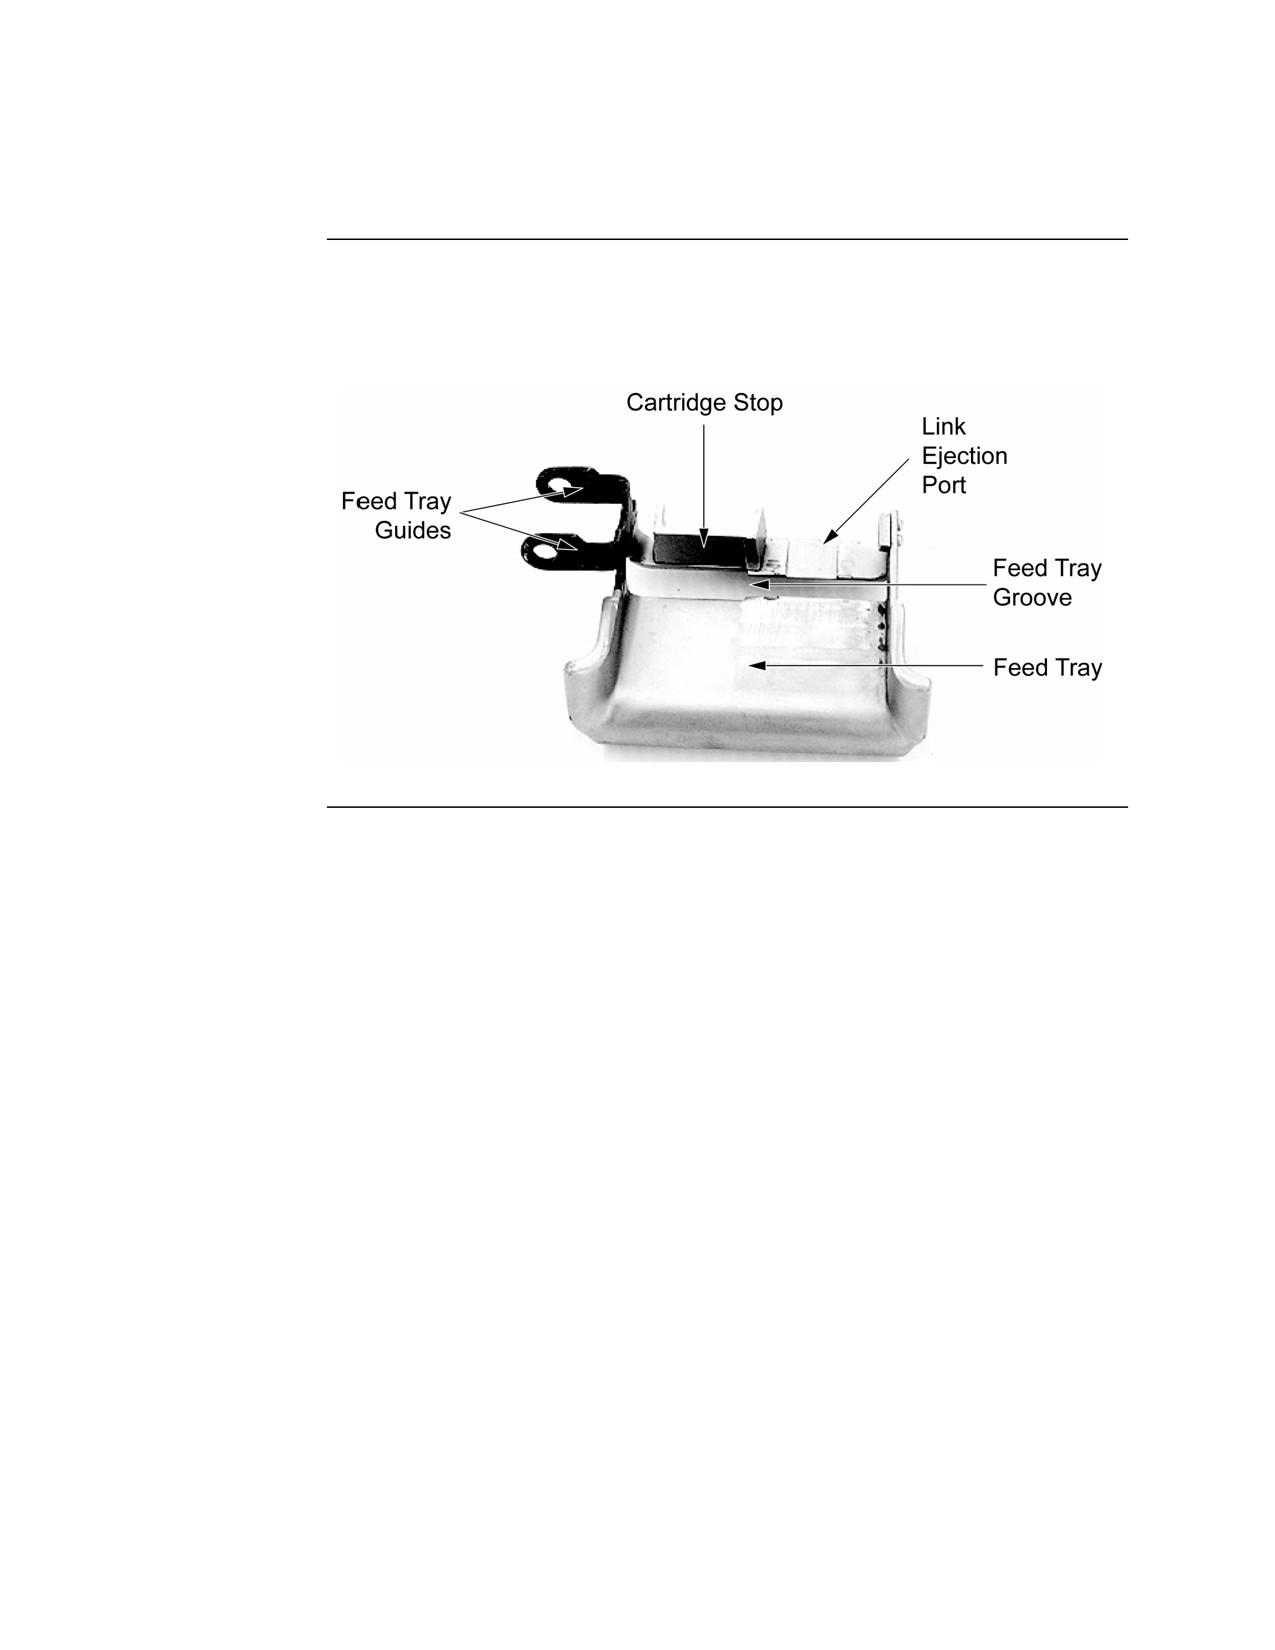
The feed tray is part of the receiver group. It serves as a guide for positioning
cartridges to assist in chambering. Components of the feed tray are shown in
the graphic below:
Continued on next page
MCI Course 0321B
1-12
Study Unit 1, Lesson 1
Nomenclature, Continued
Receiver
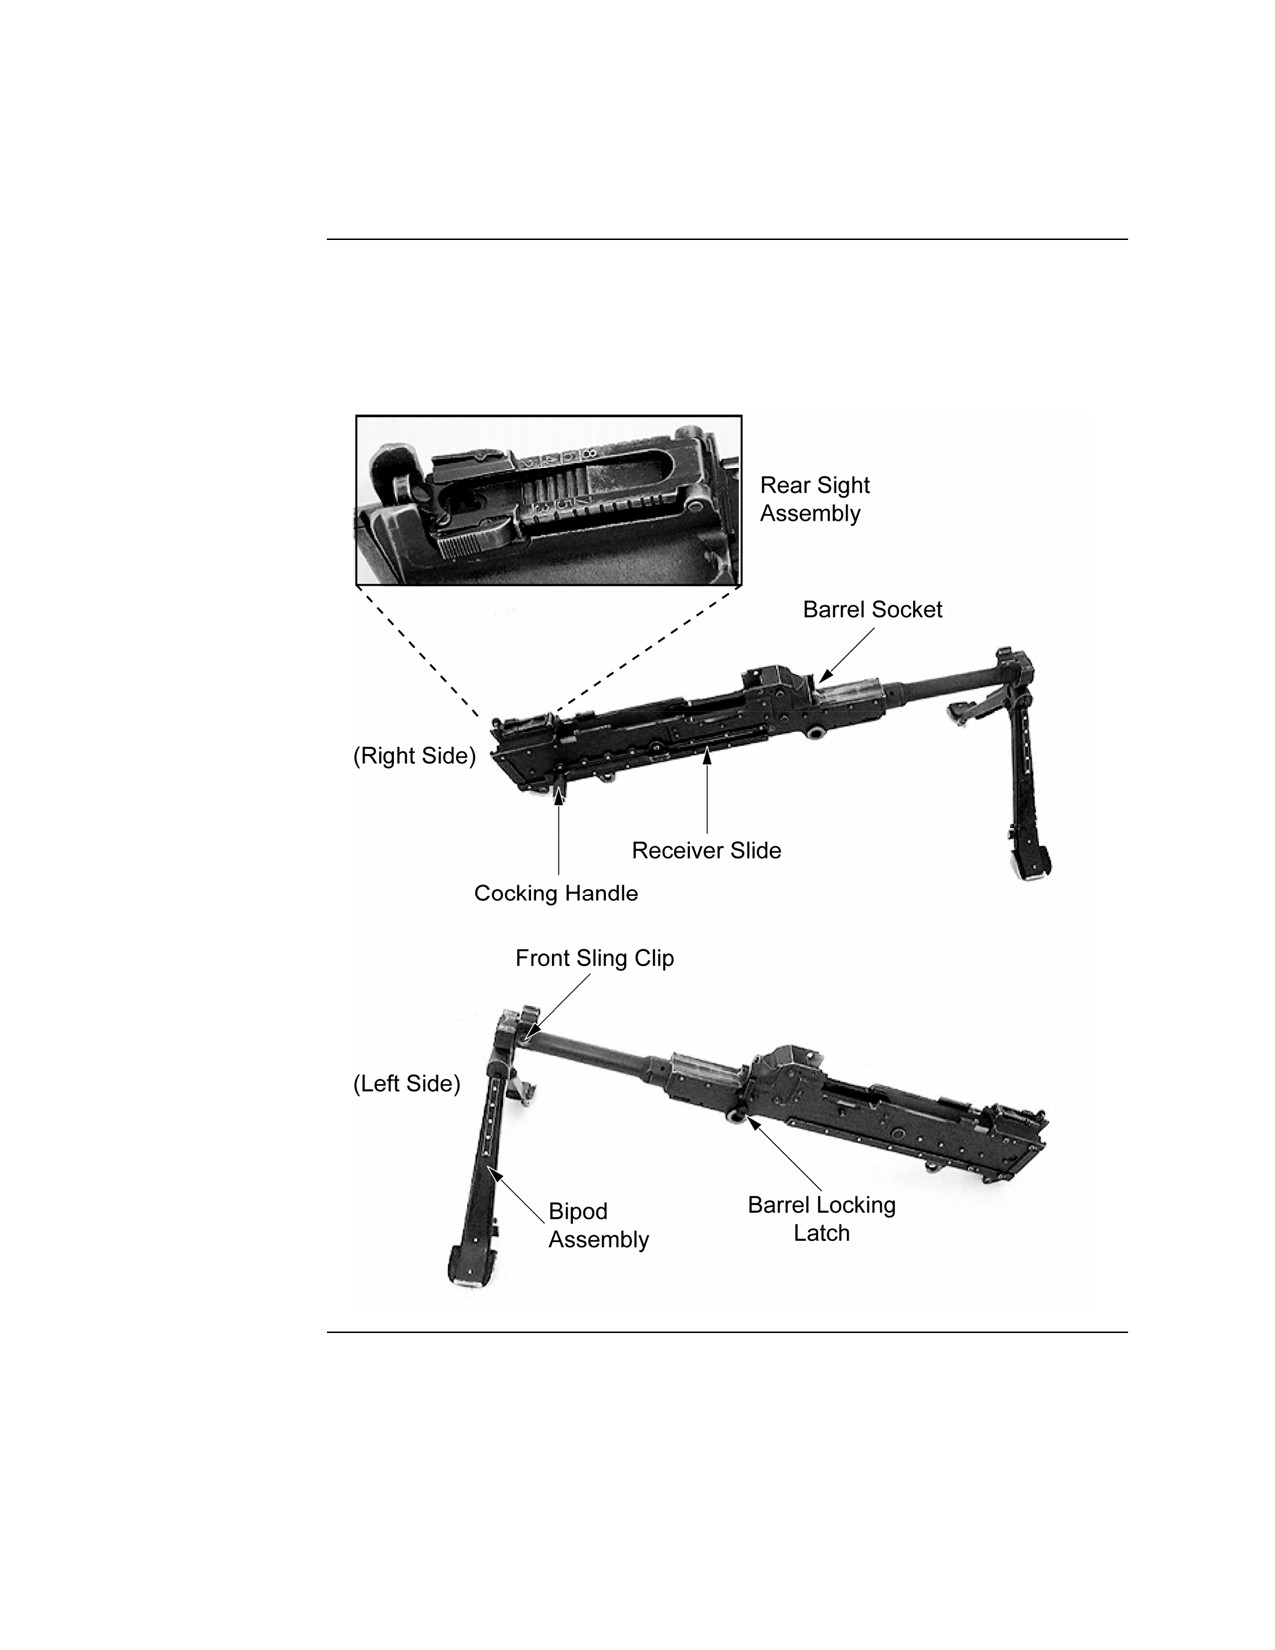
The receiver assembly is part of the receiver group. It serves as a support of
Assembly
all of the main components. It houses the action of the weapon and controls
the functioning of the weapon through a series of cam ways and rails.
Components of the receiver assembly are shown in the graphic below:
MCI Course 0321B
1-13
Study Unit 1, Lesson 1
SL-3 Components
M122 Tripod
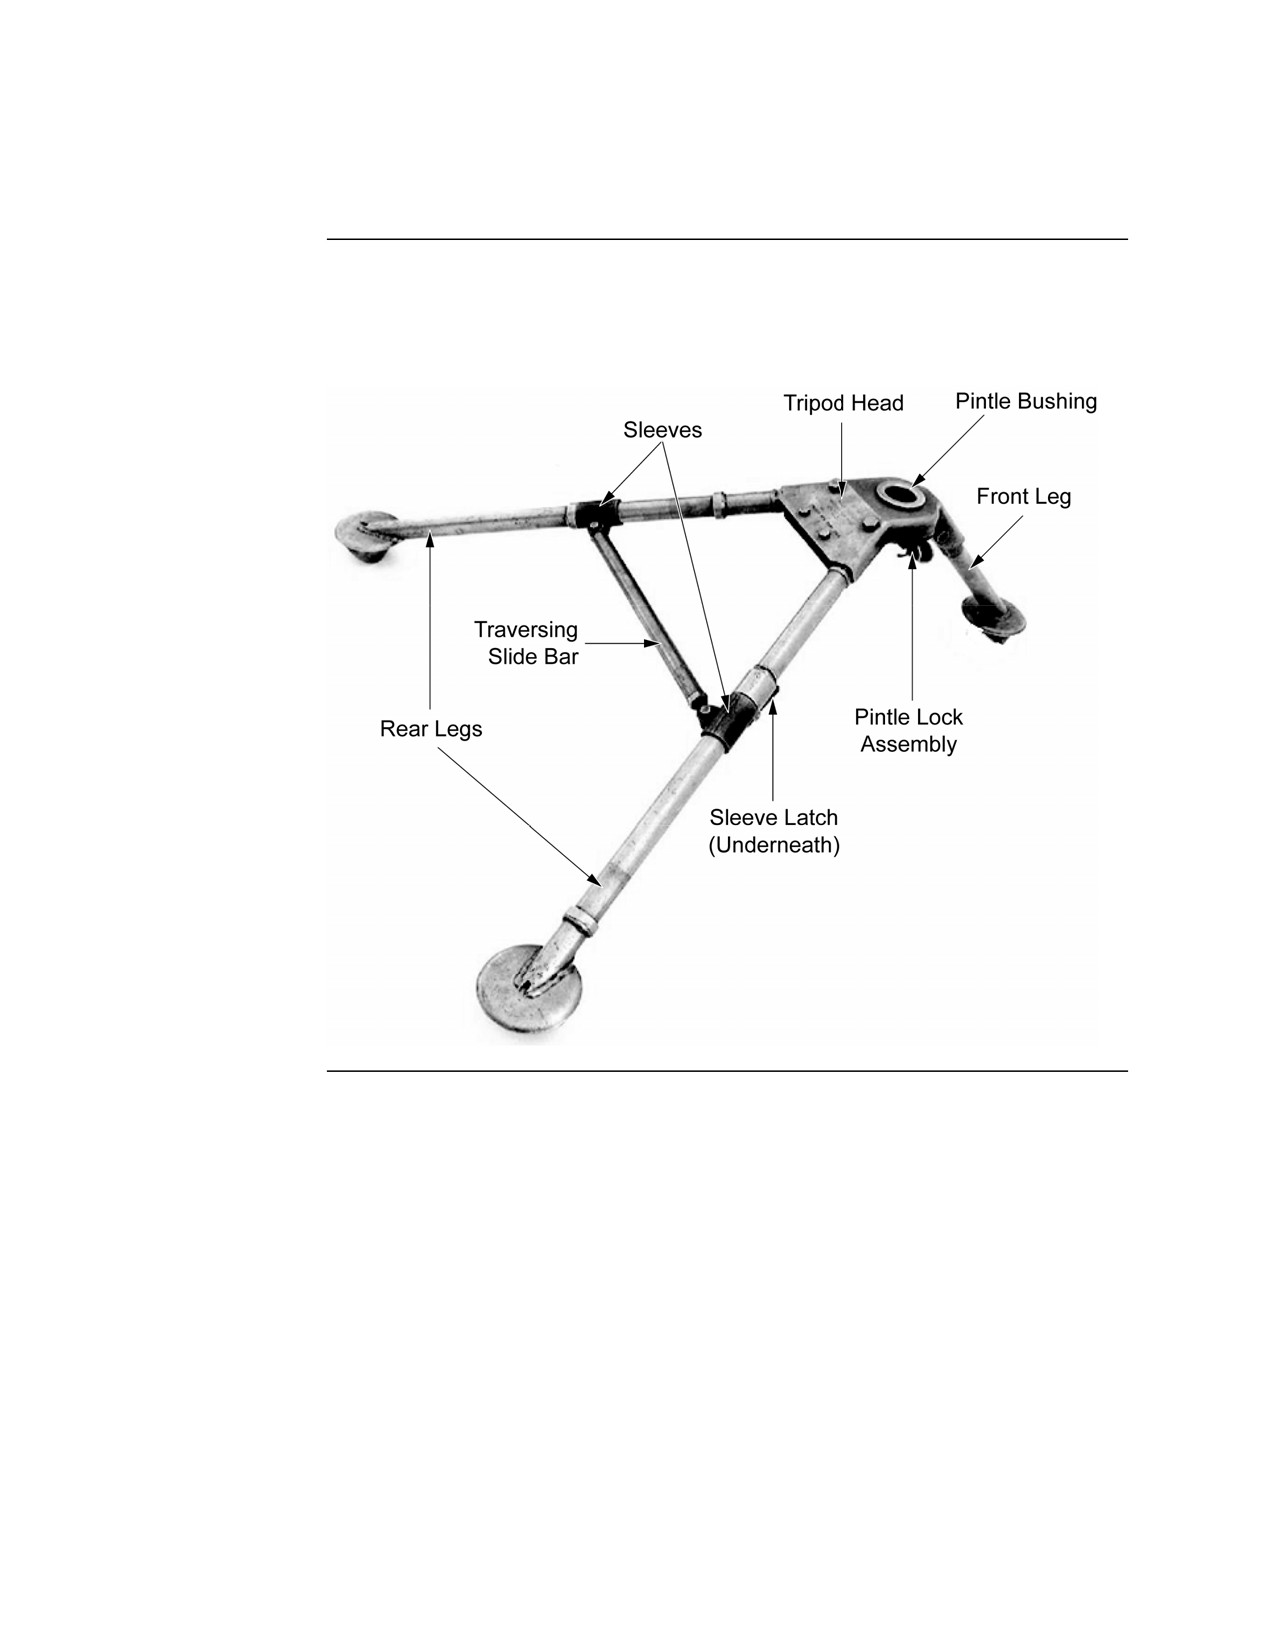
The M122 tripod provides a stable, lightweight base for the M240G. It can be
folded into a closed position for carrying or storage. Components of the
M122 tripod are shown in the graphic below:
Continued on next page
MCI Course 0321B
1-14
Study Unit 1, Lesson 1
SL-3 Components, Continued
Flex-Mount
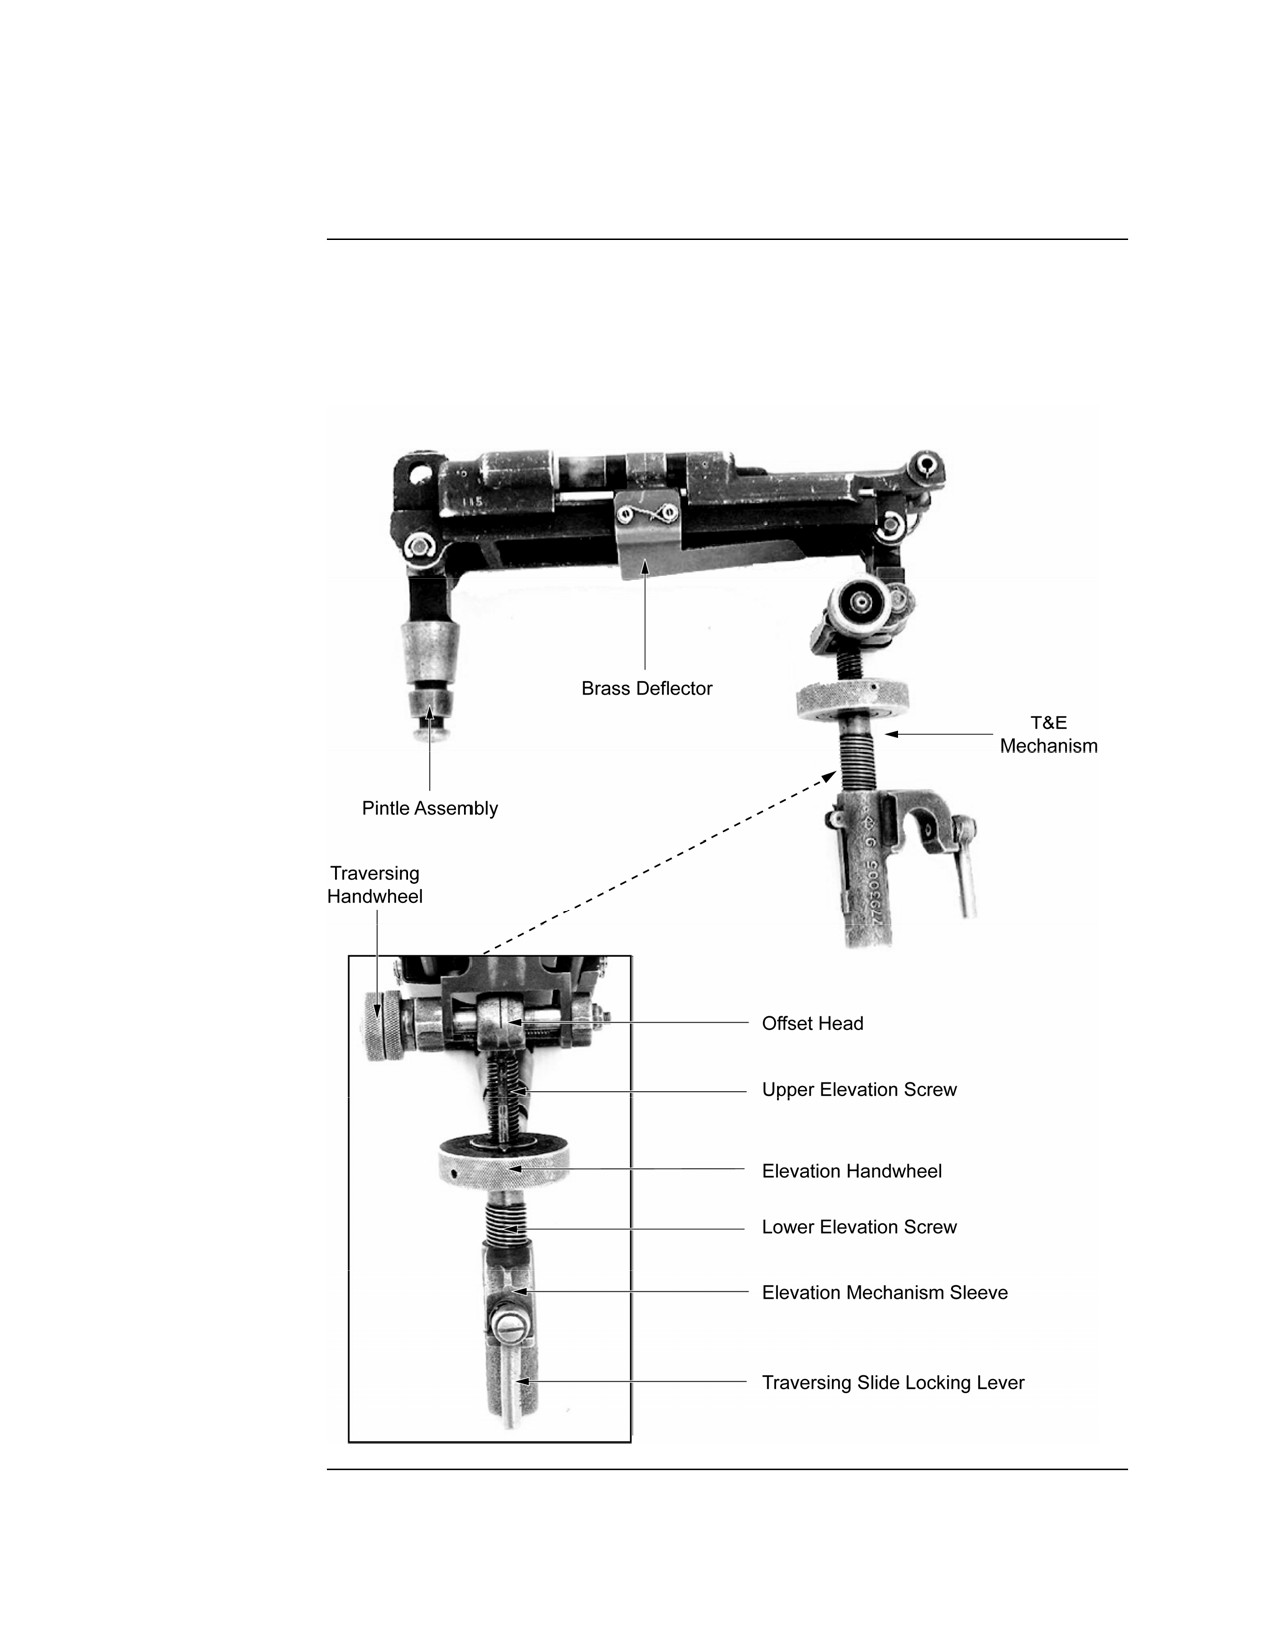
The flex-mount with the T&E mechanism is used to mount the M240G to the
with T&E
M122 tripod. It enhances the stability of the tripod and dampens the recoil of
Mechanism
the weapon. Components of the flex-mount with the T&E mechanism are
shown in the graphic below:
Continued on next page
MCI Course 0321B
1-15
Study Unit 1, Lesson 1
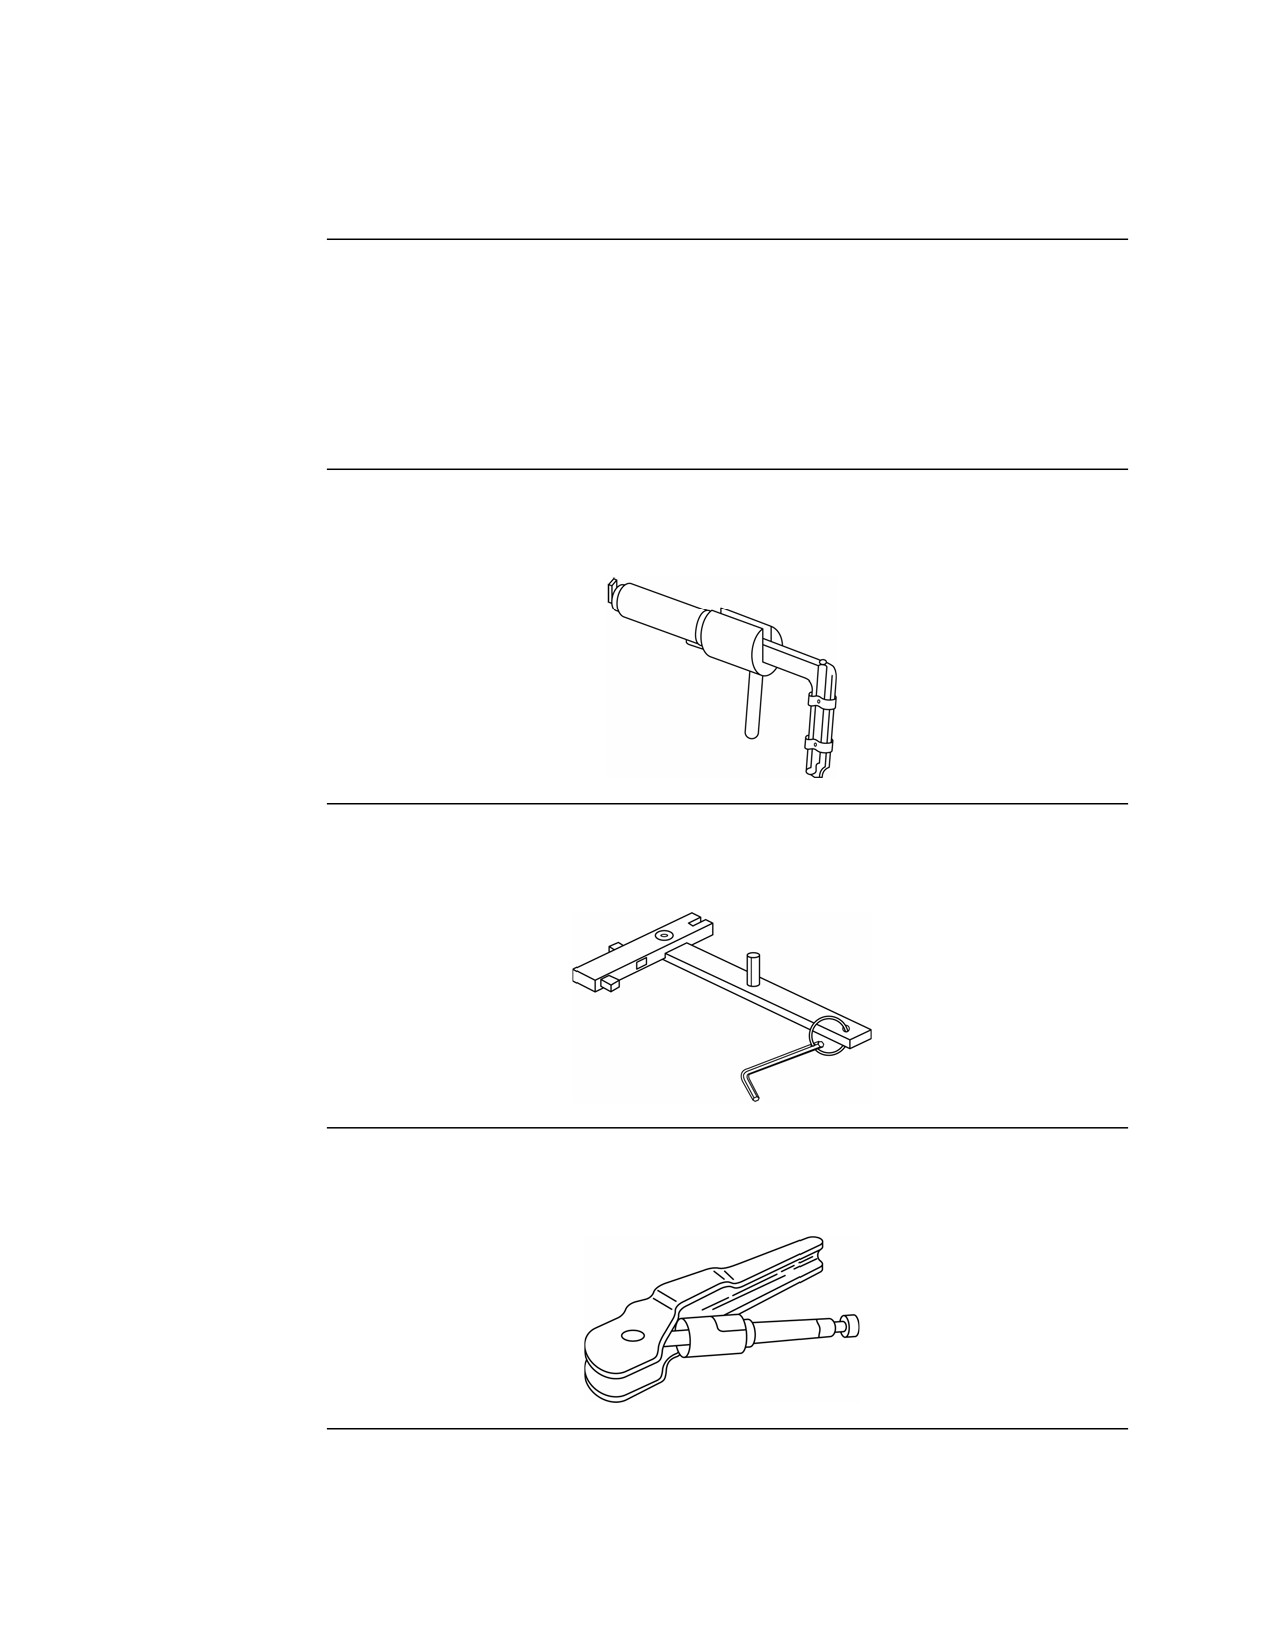
SL-3 Components, Continued
Gun Bag
The gun bag is used to carry and protect the M240G machinegun. It consists
of a large outer bag and a smaller, removable spare barrel bag inside. The
complete gun bag is used to carry the machinegun, tripod, flex-mount, spare
barrel, and all other SL-3 components. The removable spare barrel bag is
designed for field use and will carry the spare barrel and a complete set of
user maintenance equipment and accessories.
Combination
The combination scraper and extractor tool is used for removing carbon from
Scraper and
certain areas of the weapon during maintenance.
Extractor Tool
Front Sight
The front sight adjustment tool is used for adjusting the front sight of the
Adjustment
M240G during zeroing procedures.
Tool
Ruptured
The ruptured cartridge extractor is used to remove ruptured cartridges from
Cartridge
the chamber during troubleshooting procedures.
Extractor
Continued on next page
MCI Course 0321B
1-16
Study Unit 1, Lesson 1
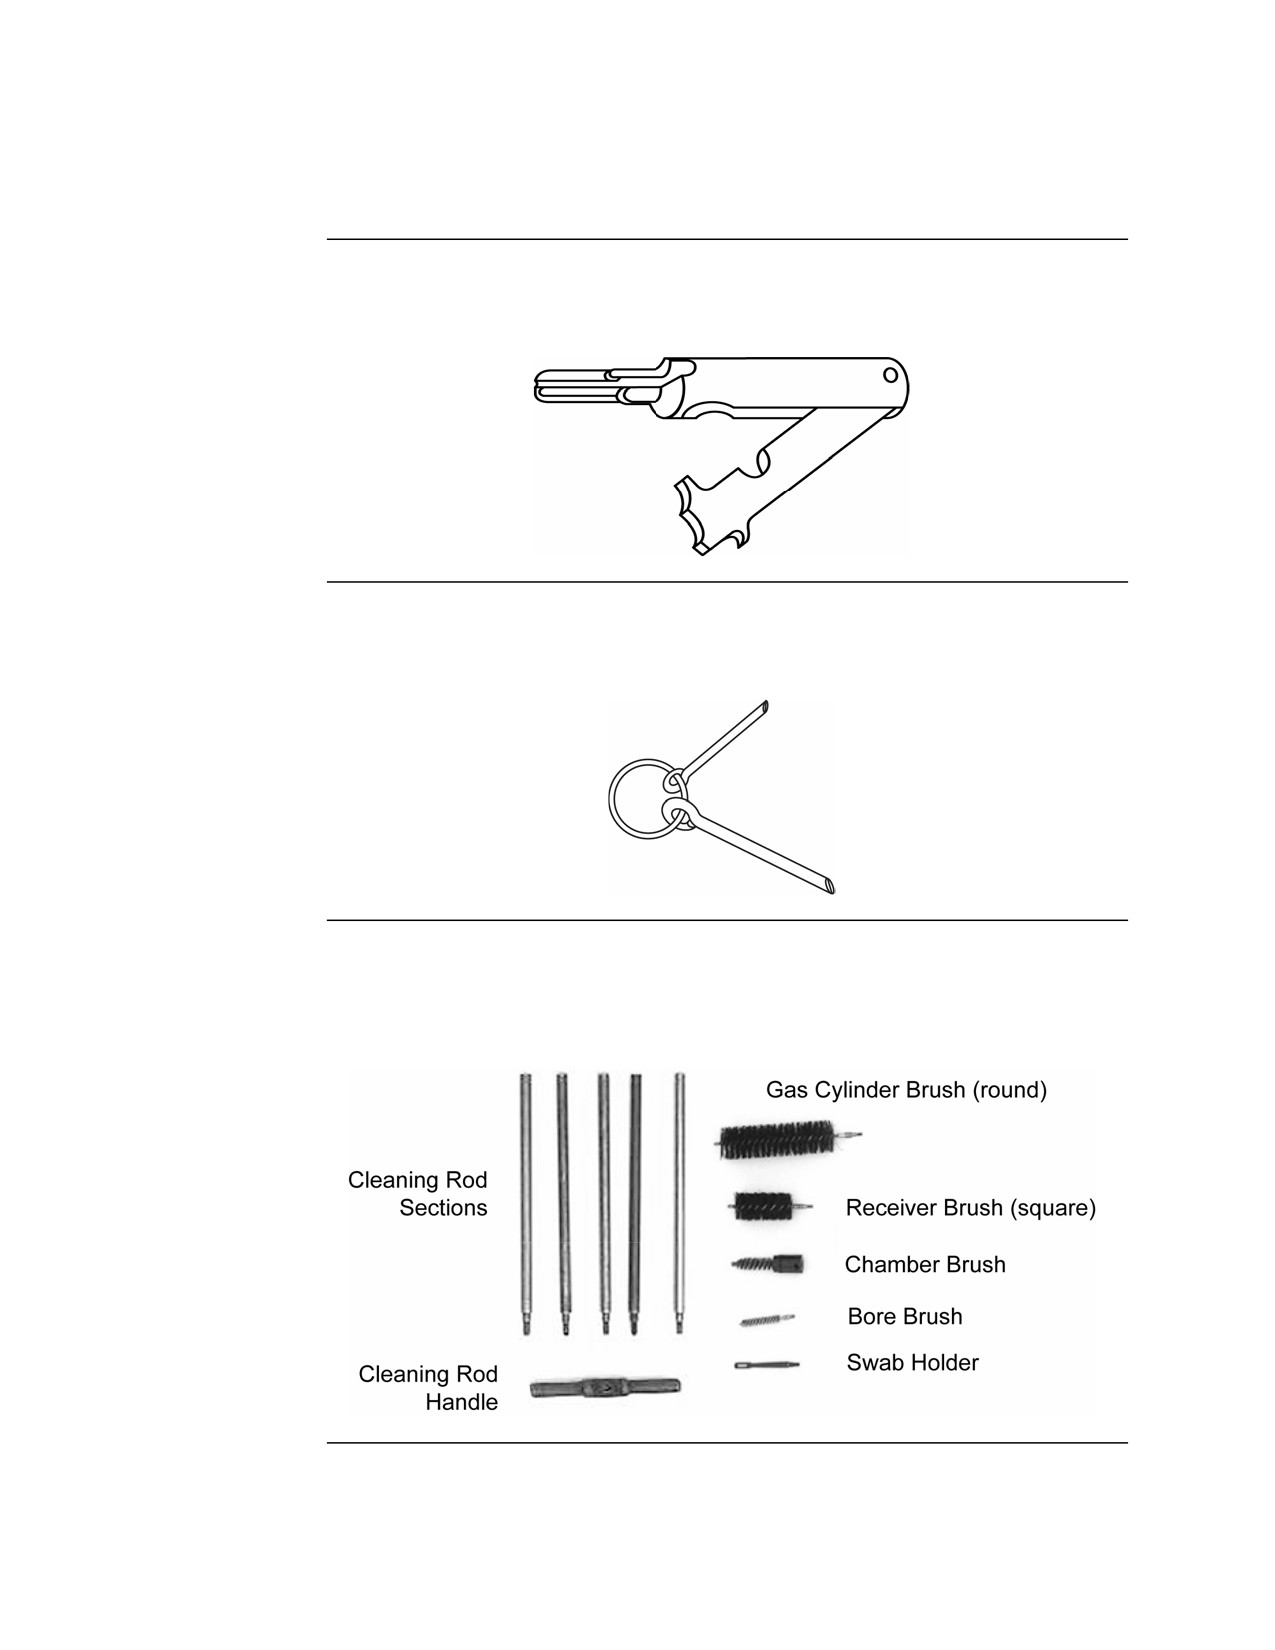
SL-3 Components, Continued
Combination
The combination regulator scraper—also known as the scraper tool—is used
Regulator
to remove carbon buildup from the gas regulator plug during maintenance.
Scraper
Large and
The reamers are used to clean the gas port holes on the gas regulator plug and
Small Reamers
the barrel.
Cleaning Rod
The five sections and handle assembly of the cleaning rod join together to
with
make the cleaning rod. The attachments are used with the cleaning rod to
Attachments
assist in the cleaning of various parts of the M240G.
Continued on next page
MCI Course 0321B
1-17
Study Unit 1, Lesson 1
SL-3 Components, Continued
Technical
Marine Corps Technical Manual (TM) 08670A/09712A-10/1B, dated
Manual
November 2002, is the operator’s manual for the M240G medium
machinegun.
MCI Course 0321B
1-18
Study Unit 1, Lesson 1
Functioning
Cycle of
The functioning of the M240G consists of a cycle of operation that can be
Operation
broken down into eight basic steps. Understanding how the M240G functions
will make it easier to recognize and correct malfunctions and stoppages that
occur during firing. The eight steps are listed below:
• Feeding
• Chambering
• Locking
• Firing
• Unlocking
• Extracting
• Ejecting
• Cocking
Feeding
Feeding is the process of moving the next round in the belt of ammunition
onto the feed tray groove. When the bolt is to the rear, the outer feed pawls
are outside the first round of ammunition. The inner feed pawl is between the
first and second rounds.
• The bolt moves forward to fire the round in the feed tray groove, causing
the belt feed pawl to move to the left.
• The feed pawl moves up and over the second round in the belt of
ammunition and is now in position to drag the second round into the feed
tray groove.
• The bolt moves to the rear after firing, causing the belt feed pawl to move
to the right, dragging the second round into the feed tray groove.
• Inside the cover, the cam roller, the feed arm with control spring, the feed
arm fork, and the pivot arm are present only so the feed pawls can move
back and forth, dragging rounds into position to be chambered.
Continued on next page
MCI Course 0321B
1-19
Study Unit 1, Lesson 1
Functioning, Continued
Chambering
Chambering is the process of stripping a round from the belt and seating it in
the chamber.
• The bolt travels forward, causing the upper locking lug of the bolt to
contact the base of the cartridge.
• The bolt strips the round from the belt link.
• The chambering ramp angles downward and forces the round toward the
chamber along with the spring tension of the cartridge guide pawl.
• The cartridge guide pawl also holds back the belt link.
• When the round is fully seated in the chamber, the extractor snaps over
the extractor rim of the cartridge, and the ejector is depressed.
Locking
Locking is the process of seating the bolt into the barrel socket. Although the
term locking is used here, it should be noted that in the M240G the bolt and
barrel do not physically interlock. This is why the barrel can be removed
even when the bolt is forward.
• During chambering, the bolt enters the barrel socket as the operating rod
is driven forward by the drive spring and the locking lever.
• Once the operating group with the bolt is all the way forward, the bolt is
“locked” into the barrel socket.
Firing
Firing is the process of detonating the round in the chamber.
• After the bolt reaches its locked position, the operating rod continues to
move forward, independent of the bolt.
• It carries the striker of the fixed firing pin through the aperture in the face
of the bolt, striking and detonating the primer of the cartridge.
Continued on next page
MCI Course 0321B
1-20
Study Unit 1, Lesson 1
Functioning, Continued
Unlocking
Unlocking is the process of moving the bolt back and out of the barrel socket.
• After the cartridge ignites and the projectile passes the gas port, part of the
gases enter the gas cylinder.
• The rapidly expanding gas enters the hollow end cap of the gas piston and
forces the operating group to the rear, providing the power for the last
four steps in the cycle of functioning.
• The operating rod now moves rearward, independent of the bolt, for a
short distance.
• The locking lever begins to swing toward the rear, carrying the bolt with it
into its unlocked position, and clears the barrel socket.
Extracting
Extracting is the process of removing the expended cartridge from the
chamber. The extractor grips the rim of the cartridge as the bolt and operating
rod pull the case from the chamber.
Continued on next page
MCI Course 0321B
1-21
Study Unit 1, Lesson 1
Functioning, Continued
Ejecting
Ejecting is the process of expelling the spent cartridge and link from the
weapon.
• The cartridge is withdrawn from the chamber, with the ejector exerting a
push from the top, and the extractor exerting a pull from the bottom.
• The casing falls from the gun as soon as it reaches the cartridge ejection
port.
• At approximately the same time, the empty link is forced out of the link
ejection port between the cartridge stops on the feed tray by the next
round moving into the feed tray groove.
Cocking
Cocking is the process of placing the parts of the gun in position to fire the
next round.
• During the rearward independent movement of the operating rod, the
firing pin striker is withdrawn from the face of the bolt.
• The bolt moves to the rear, far enough to pick up the next round for
chambering.
MCI Course 0321B
1-22
Study Unit 1, Lesson 1
Lesson 1 Exercise
Directions
Complete exercise items 1 through 8 by performing the action required.
Check your answers against those listed at the end of this lesson.
Item 1
Two purposes of the M240G medium machinegun are to
•
___________________________________________________________
___________________________________________________________
•
___________________________________________________________
___________________________________________________________
Item 2
The four descriptive characteristics of the M240G medium machinegun are
•
__________________________________________________________
•
__________________________________________________________
•
__________________________________________________________
•
__________________________________________________________
Item 3
Complete the following statement.
The maximum effective range of the M240G on an area target is __________
meters.
Continued on next page
MCI Course 0321B
1-23
Study Unit 1, Lesson 1 Exercise
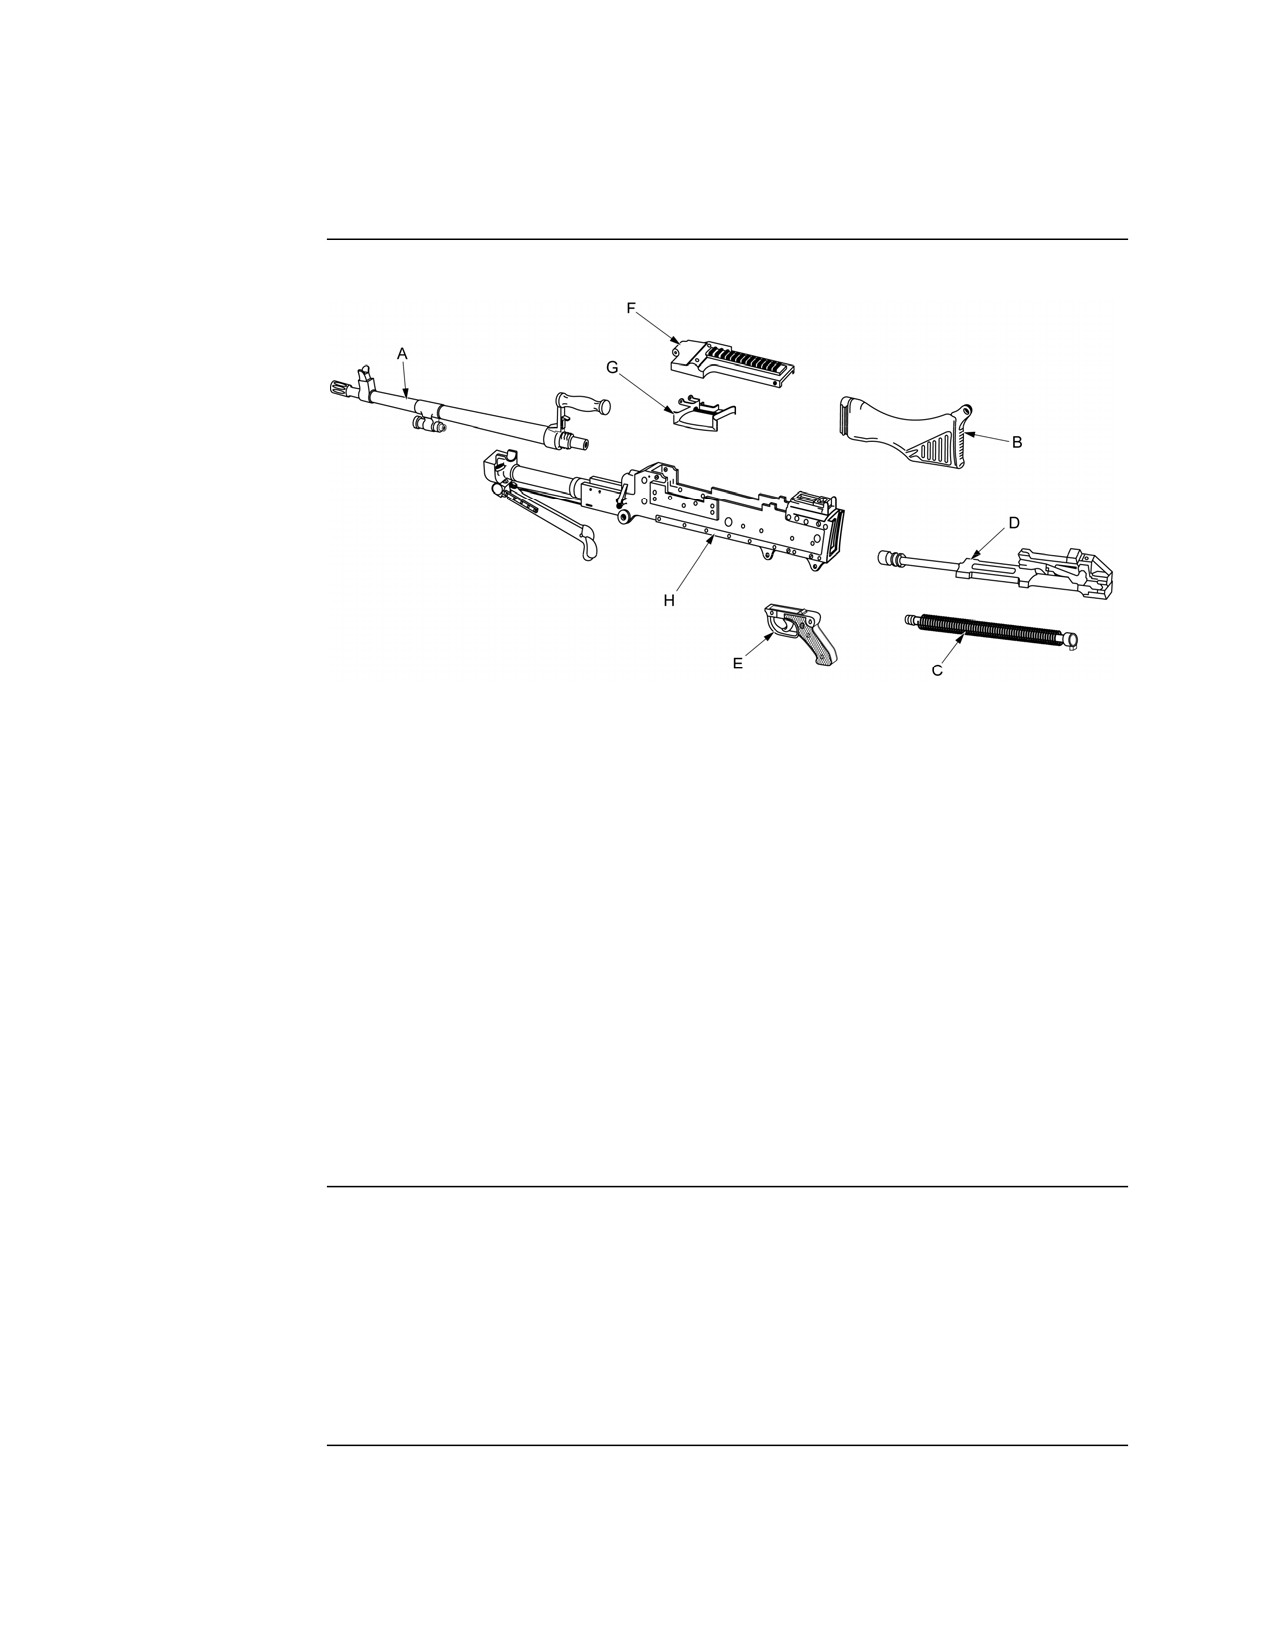
Lesson 1 Exercise, Continued
Item 4
Identify the main assembly for each item (A through H) shown below:
a.
___________________________________________________________
b.
___________________________________________________________
c.
___________________________________________________________
d.
___________________________________________________________
e.
___________________________________________________________
f.
___________________________________________________________
g.
___________________________________________________________
h.
___________________________________________________________
Item 5
The barrel assembly houses the round and _________________ the projectile
after firing.
a. aims
b. directs
c. removes
d. catches
Continued on next page
MCI Course 0321B
1-24
Study Unit 1, Lesson 1 Exercise
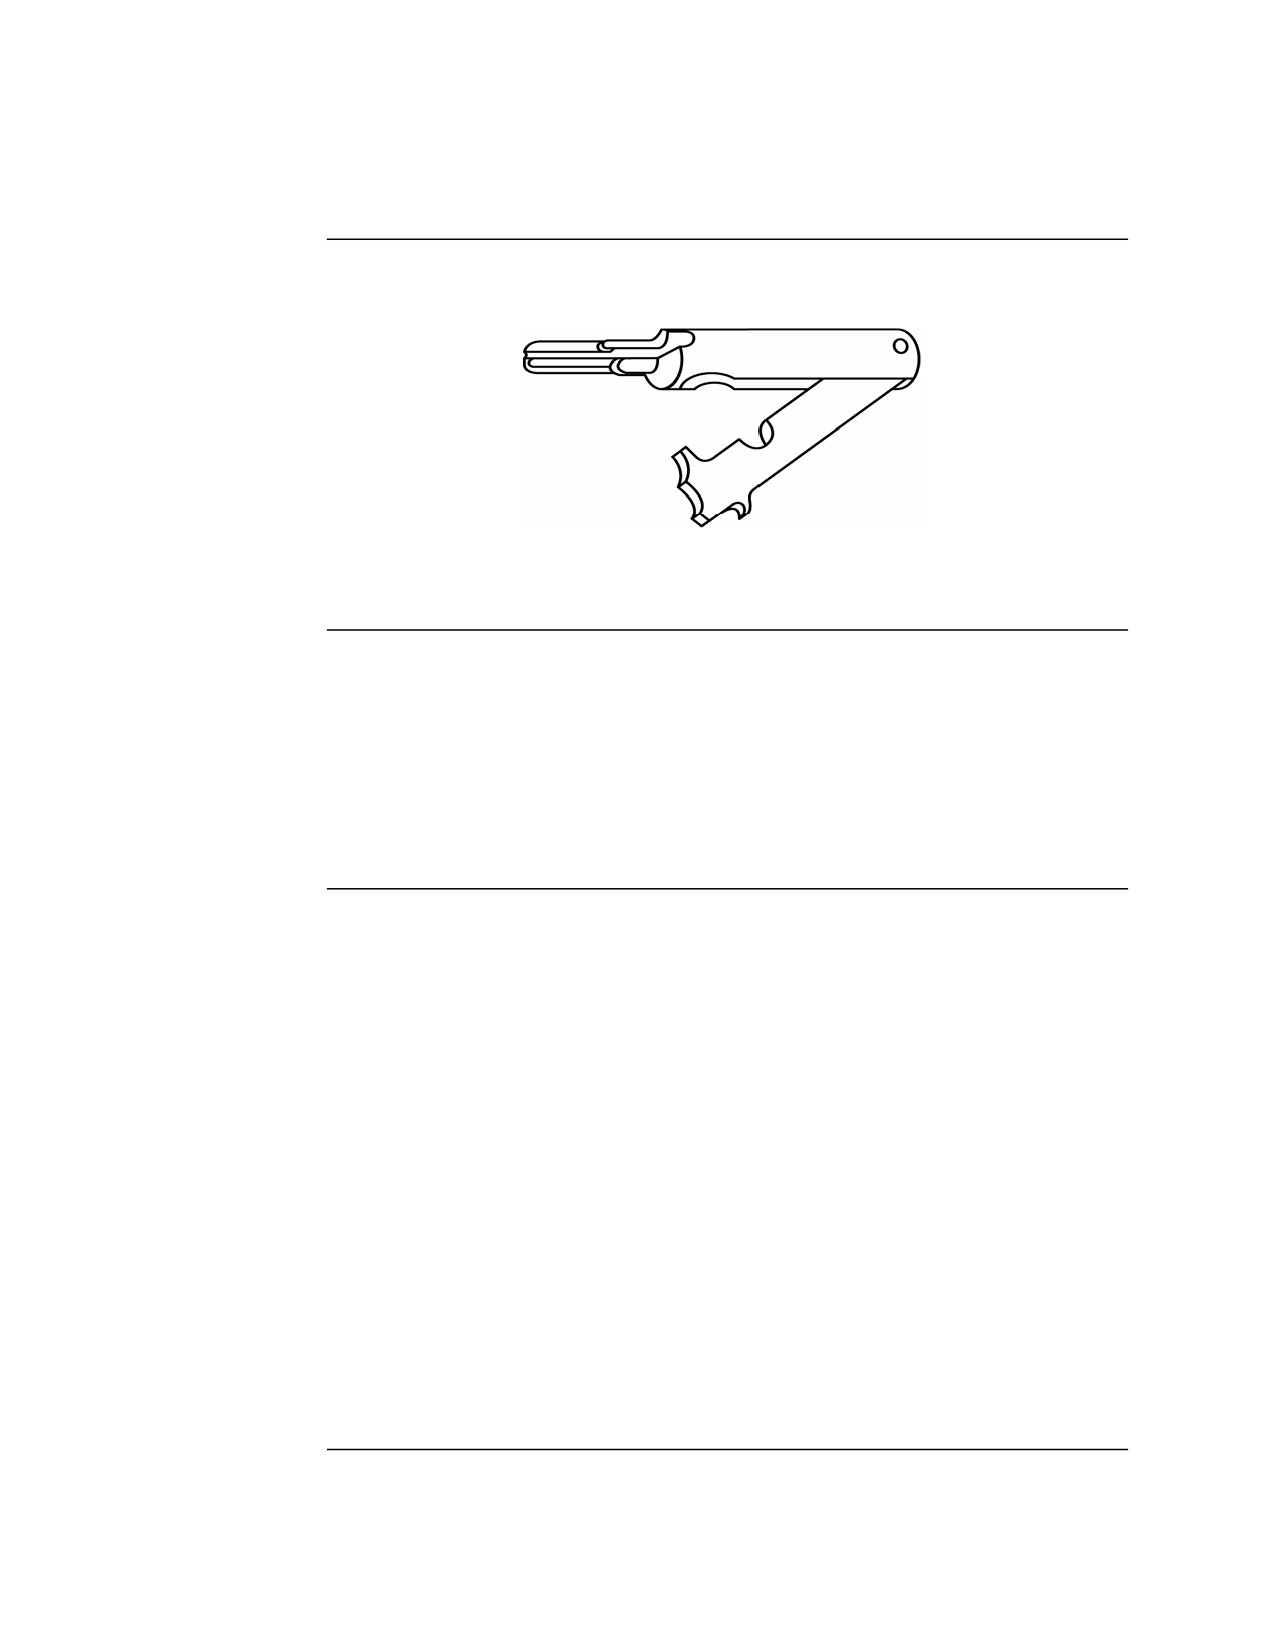
Lesson 1 Exercise, Continued
Item 6
Identify the SL-3 component shown below:
______________________________________________________________
Item 7
The purpose of the ruptured cartridge extractor is to remove a ruptured
cartridge from the
a. receiver.
b. buffer.
c. chamber.
d. feed tray.
Item 8
List the eights steps in the M240G cycle of operation.
•
__________________________________________________________
•
__________________________________________________________
•
__________________________________________________________
•
__________________________________________________________
•
__________________________________________________________
•
__________________________________________________________
•
__________________________________________________________
•
__________________________________________________________
Continued on next page
MCI Course 0321B
1-25
Study Unit 1, Lesson 1 Exercise
Lesson 1 Exercise, Continued
Answers
The table below lists the answers to the exercise items. If you have questions
about the items, refer to the reference page.
Item Number
Answer
Reference Page
1
• Provide heavy volumes of close,
1-5
accurate, and continuous fire
support to suppress and destroy
enemy personnel in support of an
attack.
• Serve as an integral part of a unit’s
defensive fire plan when
employing final protective fires by
breaking up and stopping an
enemy’s assault.
2
• Belt-fed
1-6
• Air-cooled
• Gas-operated
• Fully automatic
3
1800
1-7
4
a. Barrel assembly
1-8
b. Buttstock and buffer assembly
c. Drive spring rod assembly
d. Bolt and operating rod assembly
e. Trigger housing assembly
f. Cover assembly
g. Feed tray
h. Receiver assembly
5
b
1-9
6
Combination tool scraper and
1-16
extractor
7
c
1-16
Continued on next page
MCI Course 0321B
1-26
Study Unit 1, Lesson 1 Exercise
Lesson 1 Exercise, Continued
Answers,
continued
Item Number
Answer
Reference Page
8
• Feeding
1-19
• Chambering
• Locking
• Firing
• Unlocking
• Extracting
• Ejecting
• Cocking
Lesson
In this lesson, you have learned the purpose of the M240G medium
Summary
machinegun; the characteristics, capabilities, and nomenclature of the
weapon; the SL-3 components; and the functioning of the weapon.
In the next lesson, you will learn the procedures for clearing, disassembly,
assembly, and function check.
MCI Course 0321B
1-27
Study Unit 1, Lesson 1 Exercise
(This page left intentionally blank.)
MCI Course 0321B
1-28
Study Unit 1, Lesson 1 Exercise
LESSON 2
CLEARING, DISASSEMBLY, ASSEMBLY, AND FUNCTION
CHECK
Introduction
Scope
To safely use and maintain the M240G medium machinegun and ensure it is
in good working order, you must know certain procedures. Being able to
properly disassemble and assemble the weapon is essential for maintaining
the weapon. Performing a function check is required to make sure that the
weapon functions properly after cleaning.
In this lesson, you will learn the procedures for clearing, disassembly,
assembly, and performing a function check of the M240G medium
machinegun.
Learning
After completing this lesson, you should be able to
Objectives
• Identify the steps for clearing the M240G medium machinegun.
• Identify the two categories of disassembly and assembly.
• Identify the sequence of steps for disassembling the M240G medium
machinegun.
• Identify the sequence of steps for assembling the M240G medium
machinegun.
• State when a function check should be performed.
• Identify the sequence of steps for performing a function check of the
M240G medium machinegun.
Continued on next page
MCI Course 0321B
1-29
Study Unit 1, Lesson 2
Introduction, Continued
In This Lesson This lesson contains the following topics:
Topic
See Page
Introduction
1-29
Clearing
1-31
Disassembly
1-34
Assembly
1-43
Function Check
1-46
Lesson 2 Exercise
1-47
MCI Course 0321B
1-30
Study Unit 1, Lesson 2
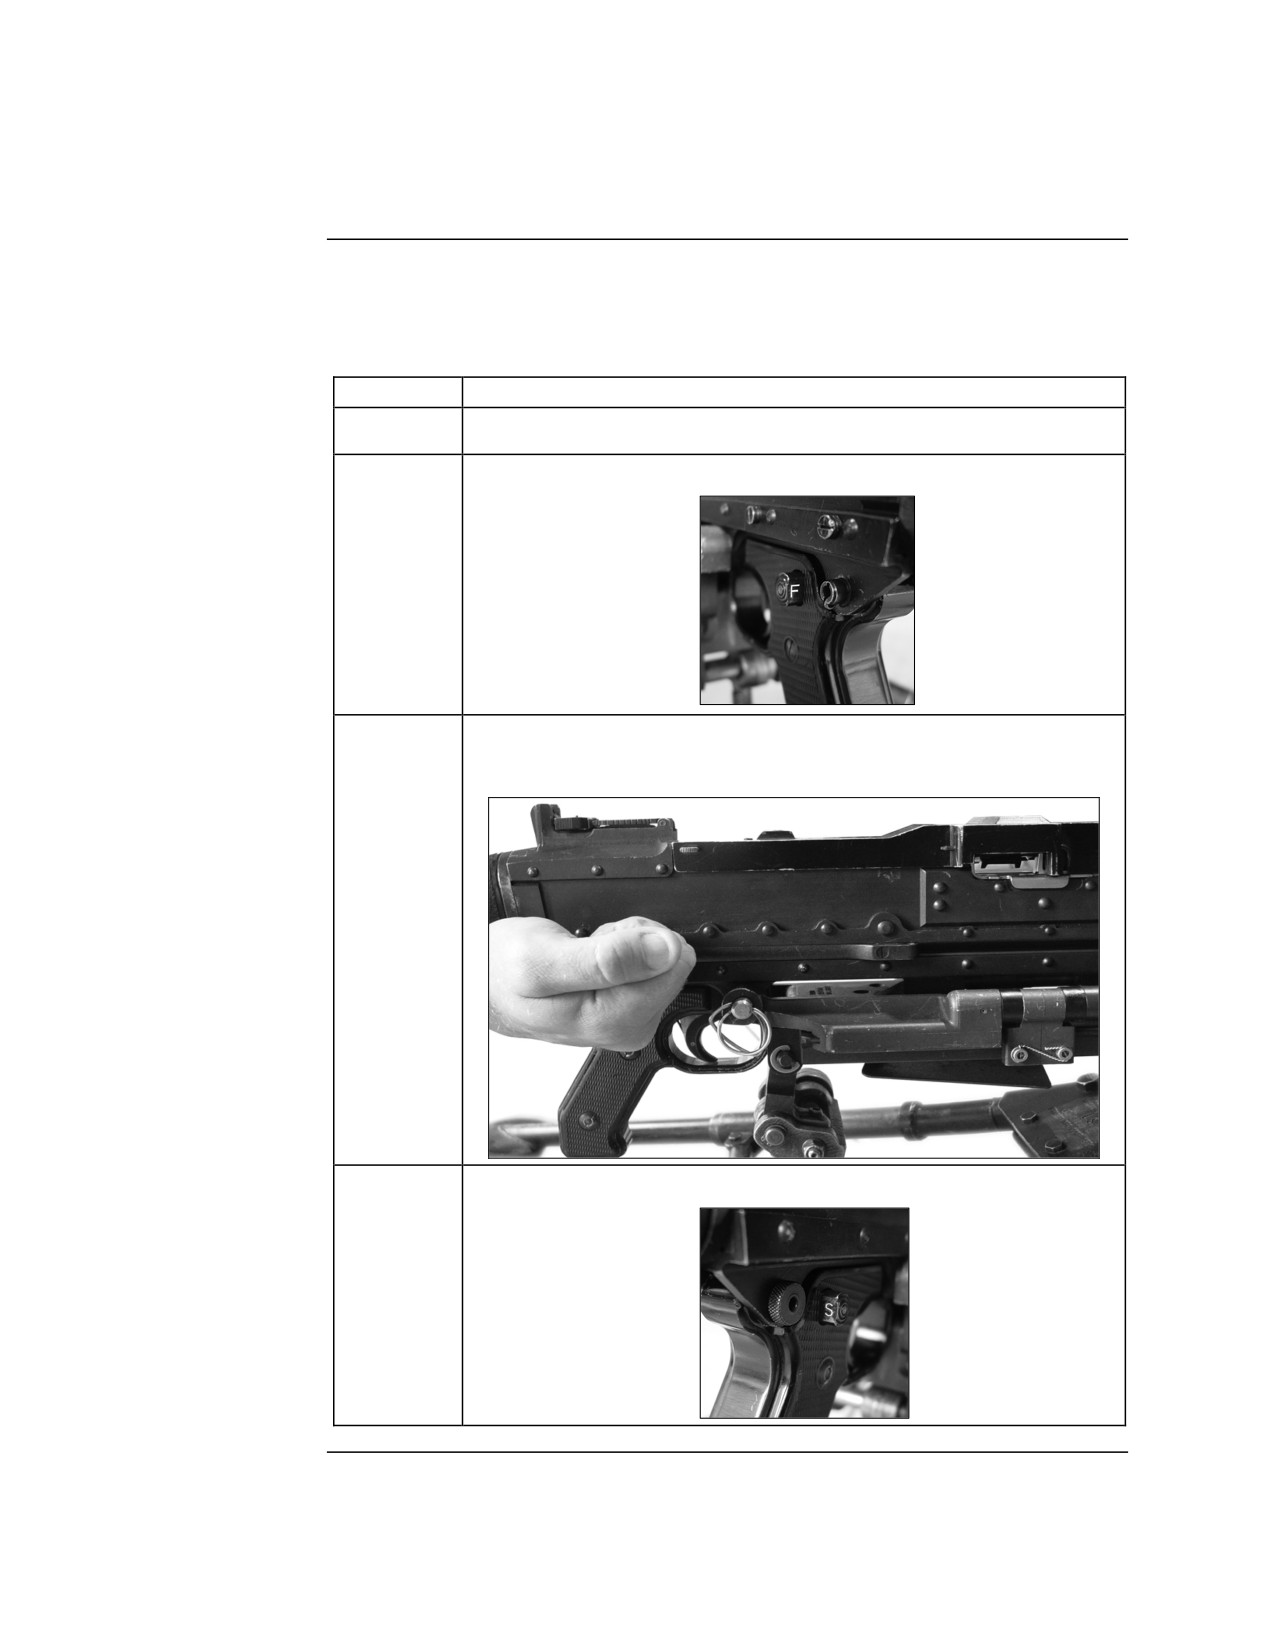
Clearing
Procedure
Before the weapon is handled or disassembled, it must be cleared. This
ensures the safety of the user and nearby personnel. The procedure for
properly clearing the M240G is listed in the table below:
Step
Action
1
Point the weapon in a safe direction, away from personnel.
2
Place the safety on “F” fire.
3
Pull the cocking handle to the rear to lock the bolt to the rear.
Push the cocking handle all the way forward.
4
Place the safety on “S” safe.
Continued on next page
MCI Course 0321B
1-31
Study Unit 1, Lesson 2
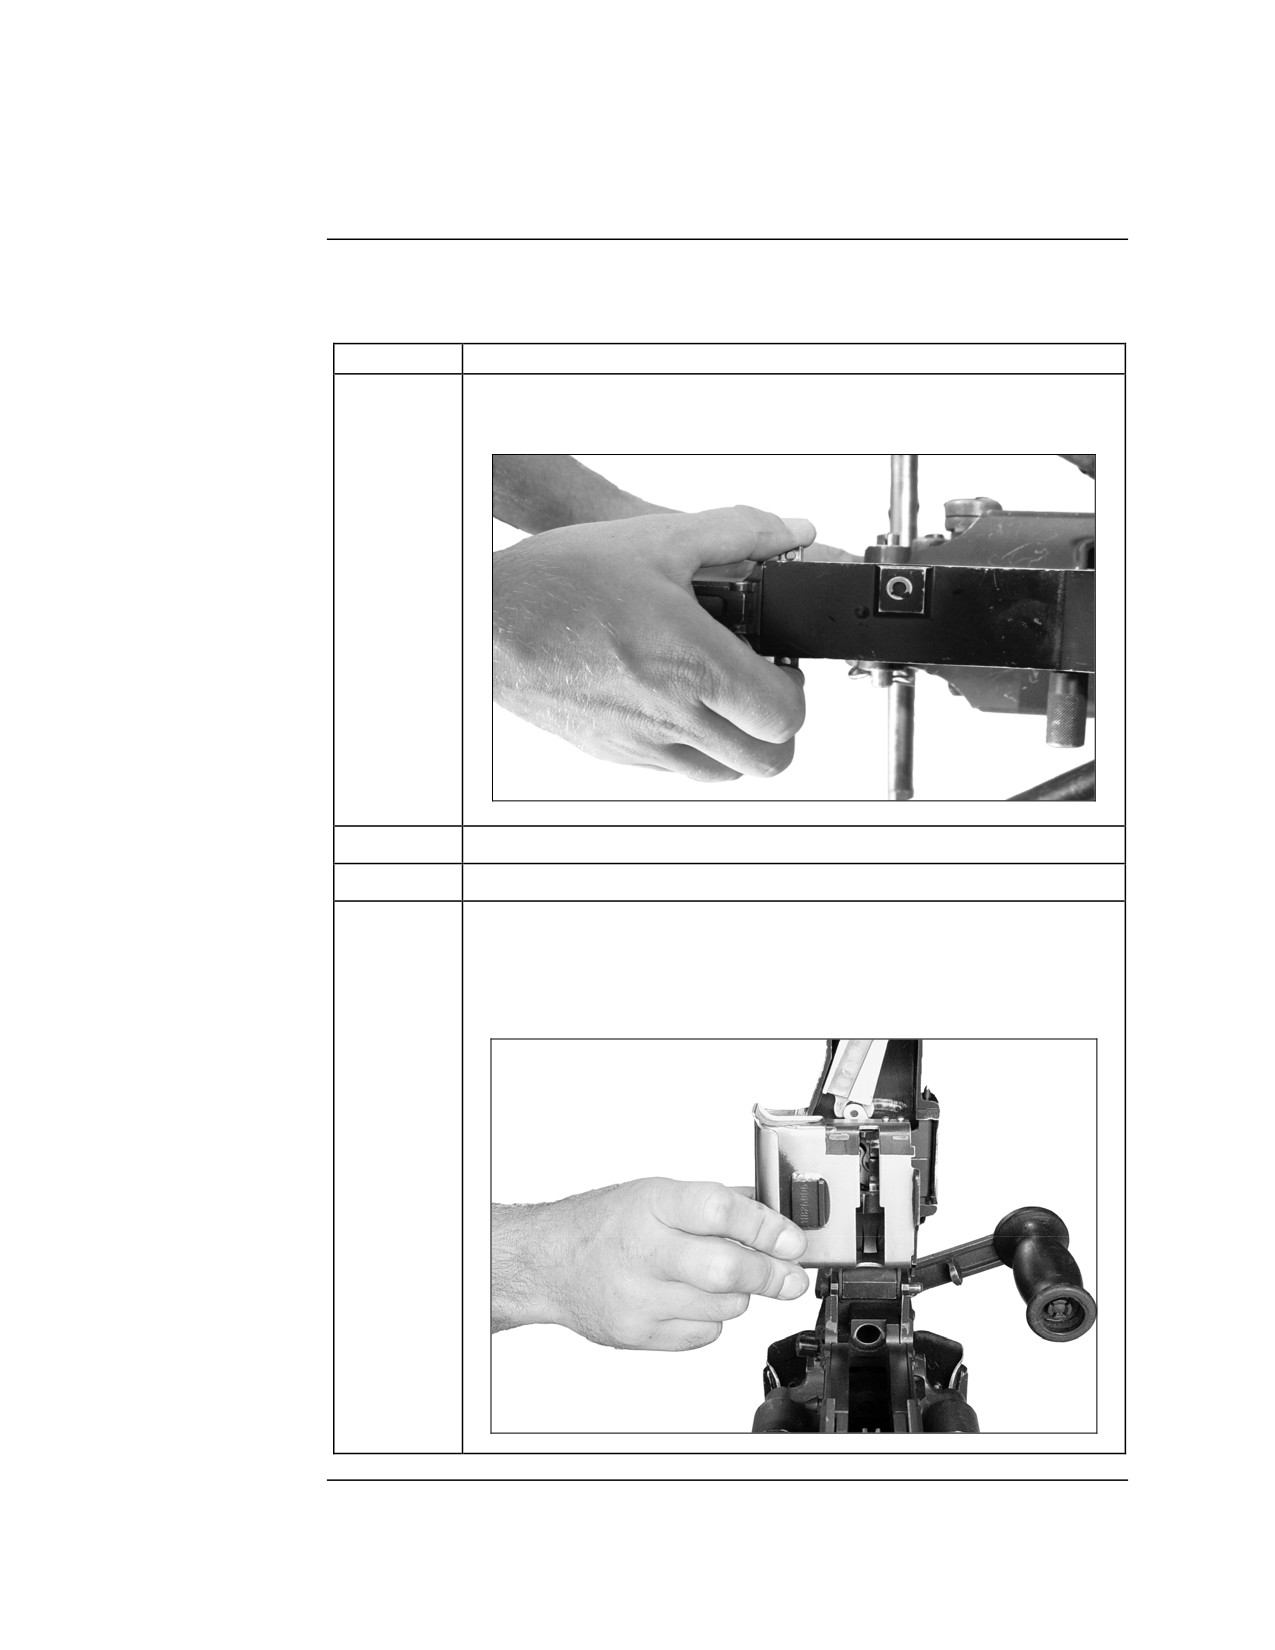
Clearing, Continued
Procedure,
continued
Step
Action
5
Push the cover latches in to release the cover and open the
cover assembly.
6
Remove any ammunition or links.
7
Raise the feed tray.
8
Visually and physically inspect the chamber to make sure it is
empty. If a round/cartridge is still in the chamber, remove the
round/cartridge as outlined in the troubleshooting section of
this course.
Continued on next page
MCI Course 0321B
1-32
Study Unit 1, Lesson 2
Clearing, Continued
Procedure,
continued
Step
Action
9
Lower the feed tray.
10
Place the safety on “F” fire.
11
Pull the cocking handle to the rear and hold it. Pull the trigger
and ease the bolt forward ensuring that it locks and the cocking
handle is all the way forward.
12
Close the cover.
MCI Course 0321B
1-33
Study Unit 1, Lesson 2
Disassembly
Introduction
The M240G is designed for easy disassembly—the use of force is not
necessary. No special tools are required. As the weapon is disassembled,
place the parts on a clean, flat surface. This reduces the possibility of losing a
part and aids in assembly. To prevent unnecessary wear, disassembly should
be kept to a minimum, consistent with maintenance and training
requirements.
Disassembly is divided into two categories—general and detailed. General
disassembly involves separating the weapon into main groups. This is also
known as field stripping. This allows the operator to quickly break the
weapon down into main components that can be hastily cleaned to keep the
weapon ready for action.
Detailed disassembly involves the removal of some component parts from
some of the main groups. This allows the operator to take more time to more
thoroughly clean the weapon. Complete general and detailed disassembly is
normal in garrison after field use or live fire but can also be done in a field
environment as necessary, to ensure the proper functioning and maintenance
of the weapon.
WARNING: Disassembly beyond the scope of this course, MCWP 3-15.1
Machineguns and Machinegun Gunnery, or TM
08670A/09712A-10/1B is not authorized, except by qualified
ordnance personnel.
General
Disassembly of the M240G medium machinegun begins with general
Disassembly
disassembly of the weapon into its five main groups in the following order:
• Barrel group
• Buttstock group
• Operating group
• Trigger housing group
• Receiver group
Note: Prior to disassembly of the M240G medium machinegun, ensure that
you have cleared the weapon.
Continued on next page
MCI Course 0321B
1-34
Study Unit 1, Lesson 2
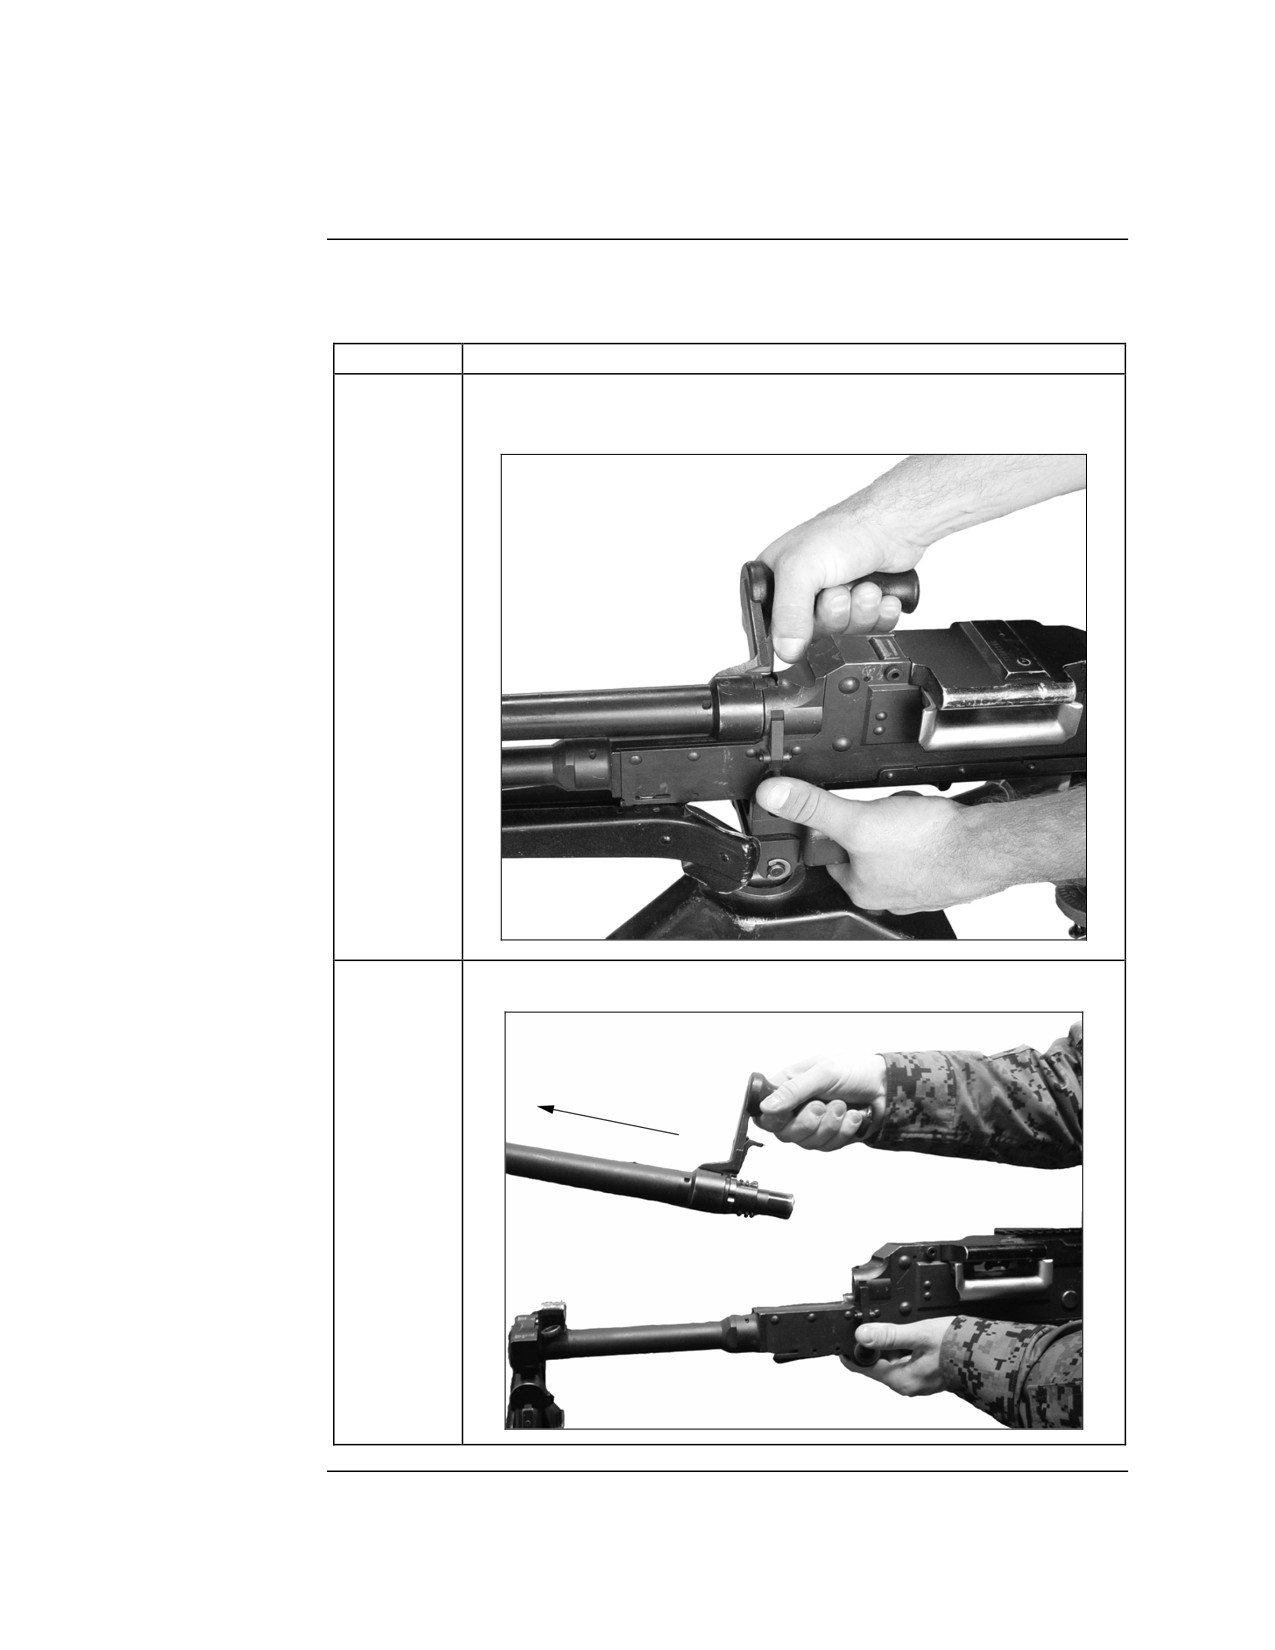
Disassembly, Continued
Removing the
The procedure for removing the barrel group is listed in the table below:
Barrel Group
Step
Action
1
Depress the barrel locking latch while grasping the barrel
carrying handle and rotating it to the upright position.
2
Push forward and pull up and remove the barrel.
Continued on next page
MCI Course 0321B
1-35
Study Unit 1, Lesson 2
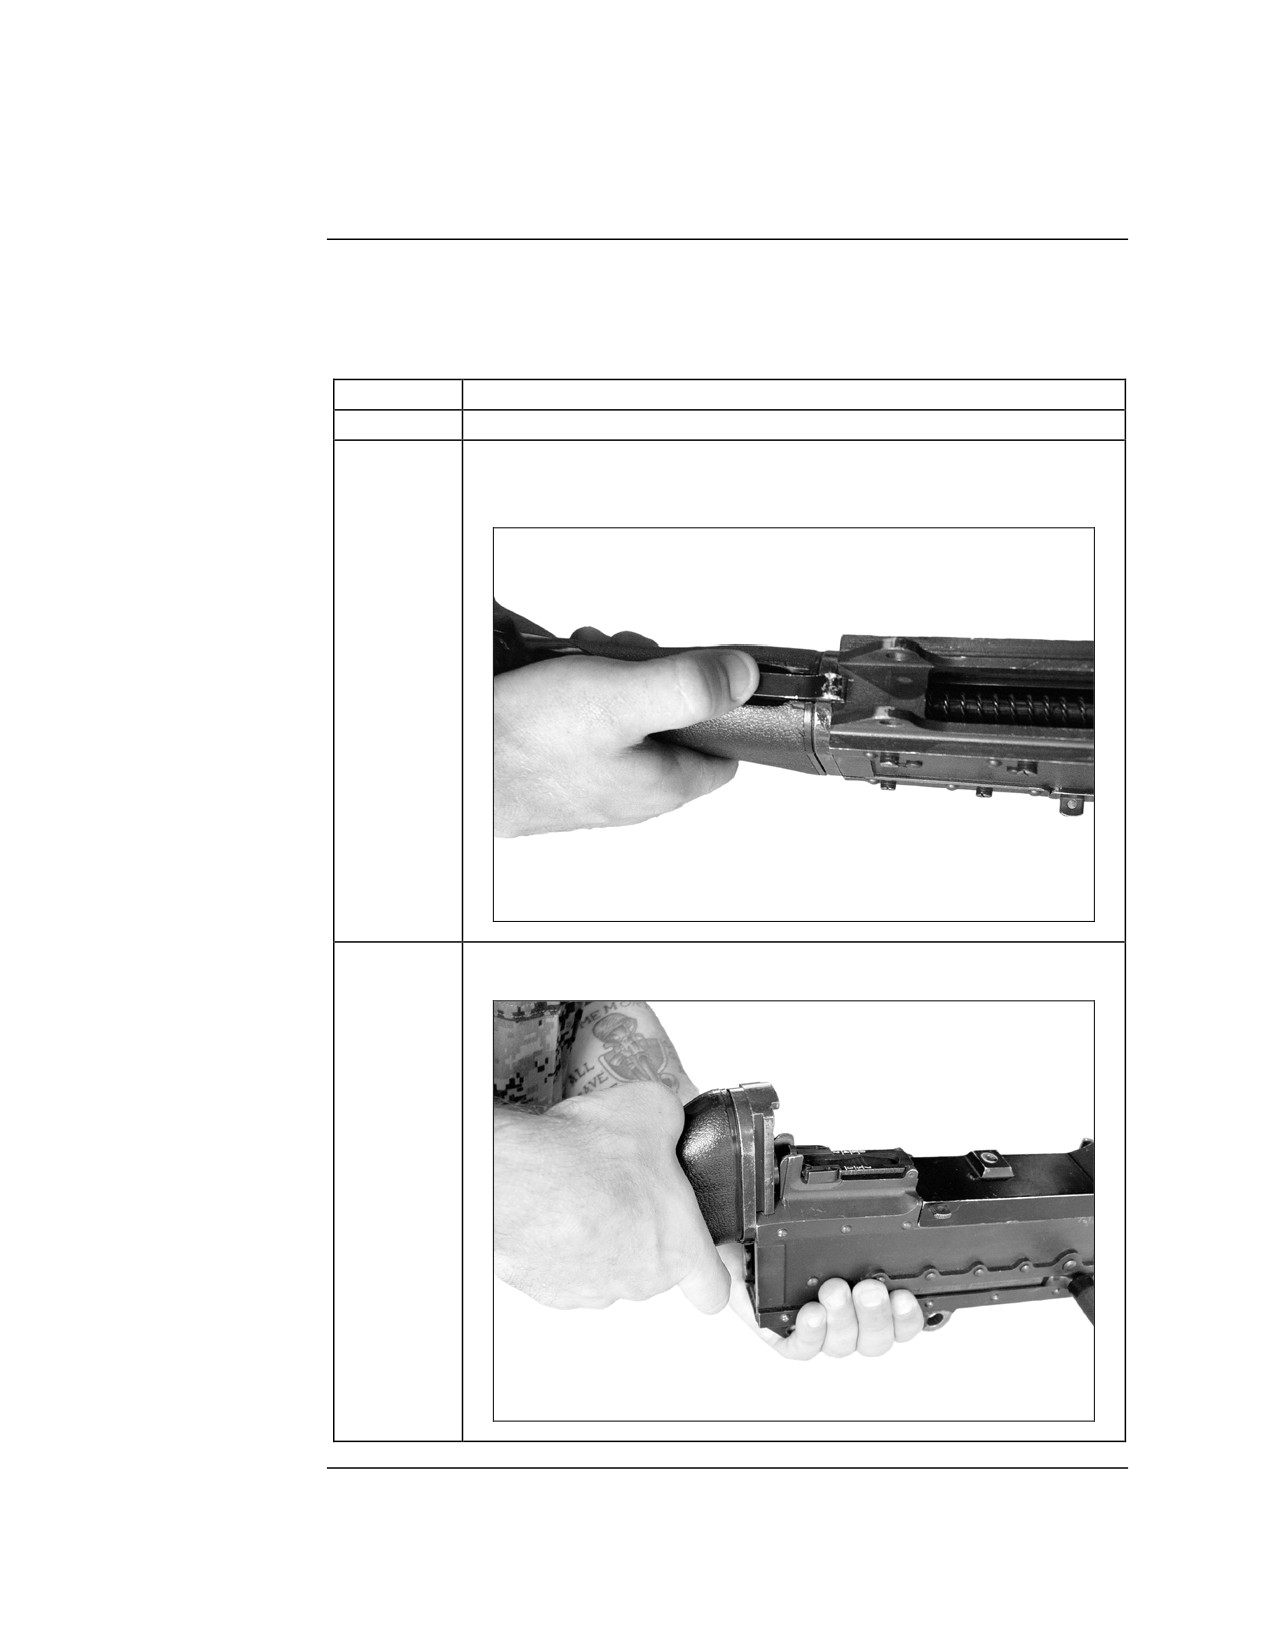
Disassembly, Continued
Removing the
The procedure for removing the buttstock group is listed in the table below:
Buttstock
Group
Step
Action
1
Make sure the bolt is forward and raise the cover.
2
Depress the buttstock latch located on the underside of the
buttstock where it joins the receiver.
3
Slide the buttstock upward and remove it from the receiver.
Continued on next page
MCI Course 0321B
1-36
Study Unit 1, Lesson 2
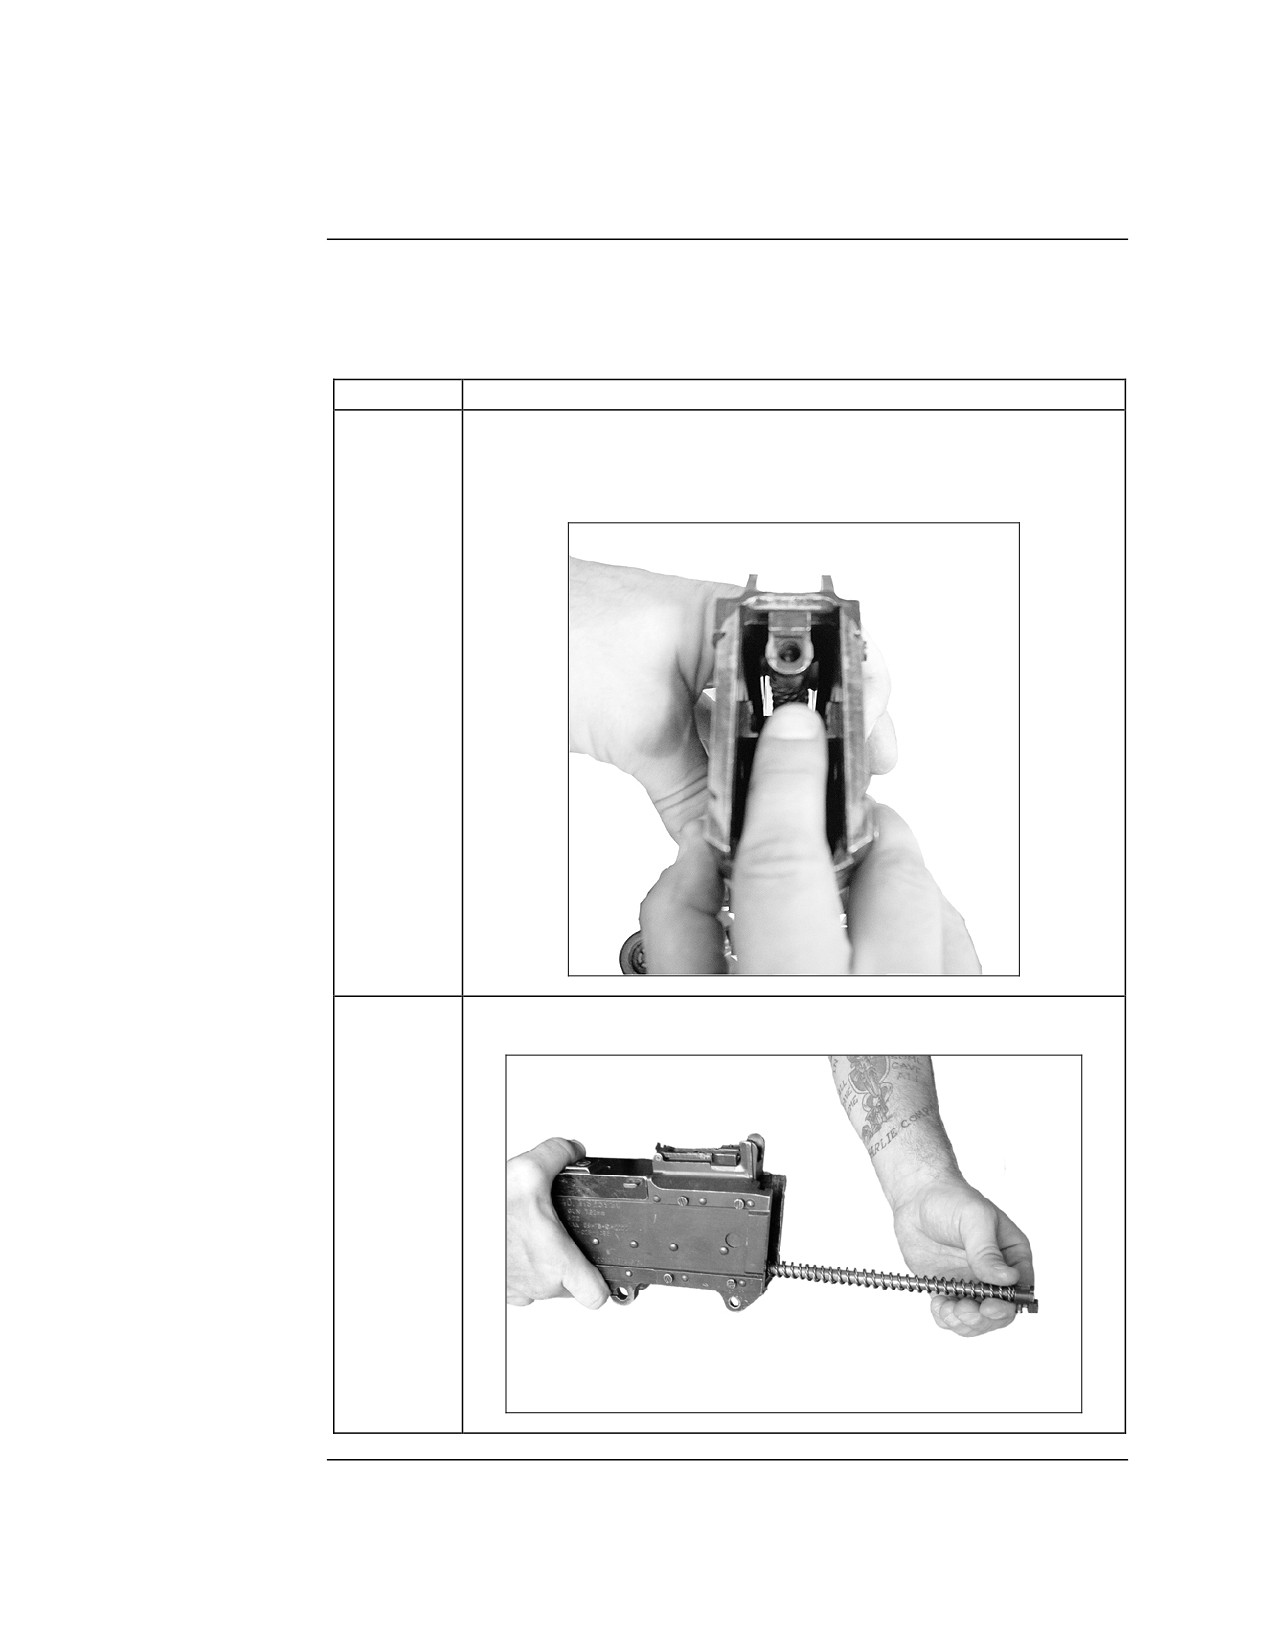
Disassembly, Continued
Removing the
The procedure for removing the operating group is listed in the table below:
Operating
Group
Step
Action
1
Push in against the base of the drive spring rod assembly and
lift upward and out so that it clears the retaining studs inside the
receiver.
2
Remove the drive spring rod assembly from the receiver.
Continued on next page
MCI Course 0321B
1-37
Study Unit 1, Lesson 2
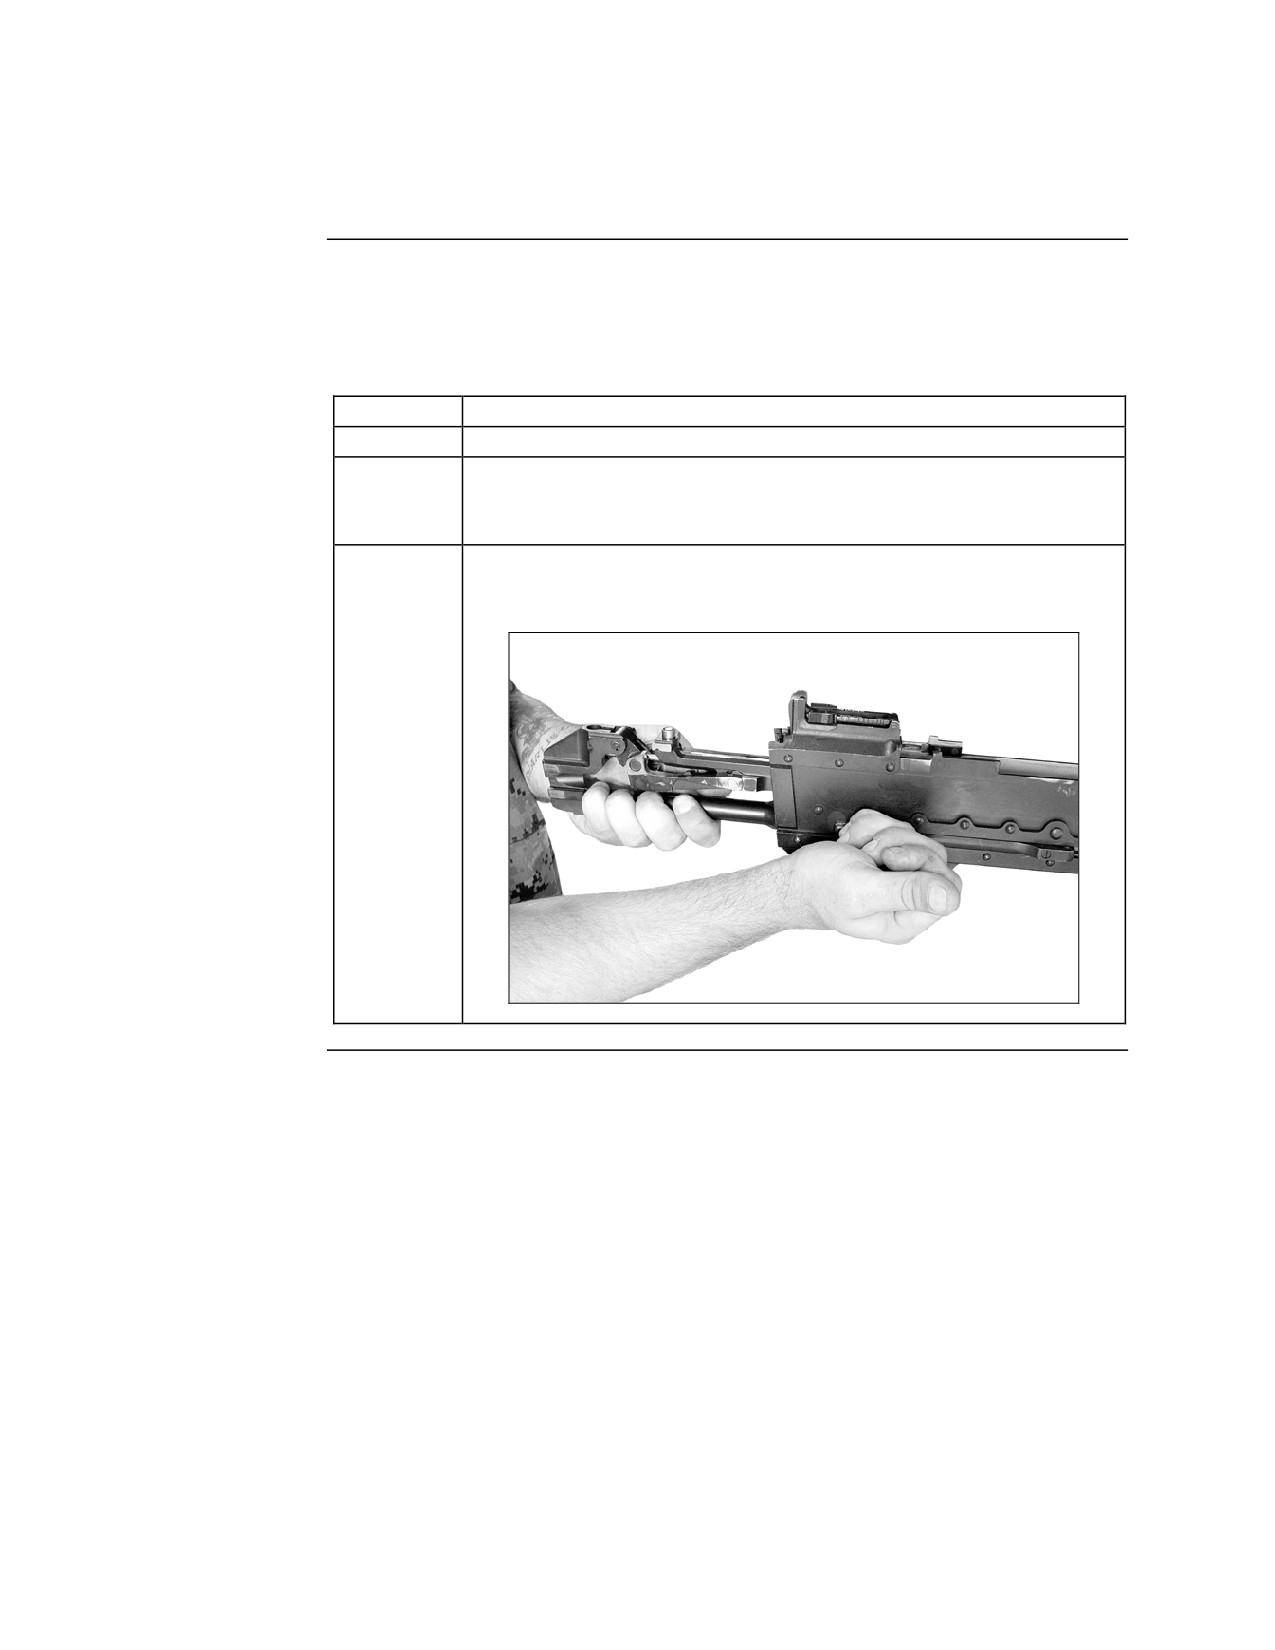
Disassembly, Continued
Removing the
Operating
Group,
continued
Step
Action
3
Pull the cocking handle to the rear.
4
Reach inside the top of the receiver and push rearward on the
face of the bolt with the index finger until the bolt and
operating rod assembly are exposed at the rear of the receiver.
5
Grasp the bolt and operating rod assembly and remove them
from the rear of the receiver.
Continued on next page
MCI Course 0321B
1-38
Study Unit 1, Lesson 2
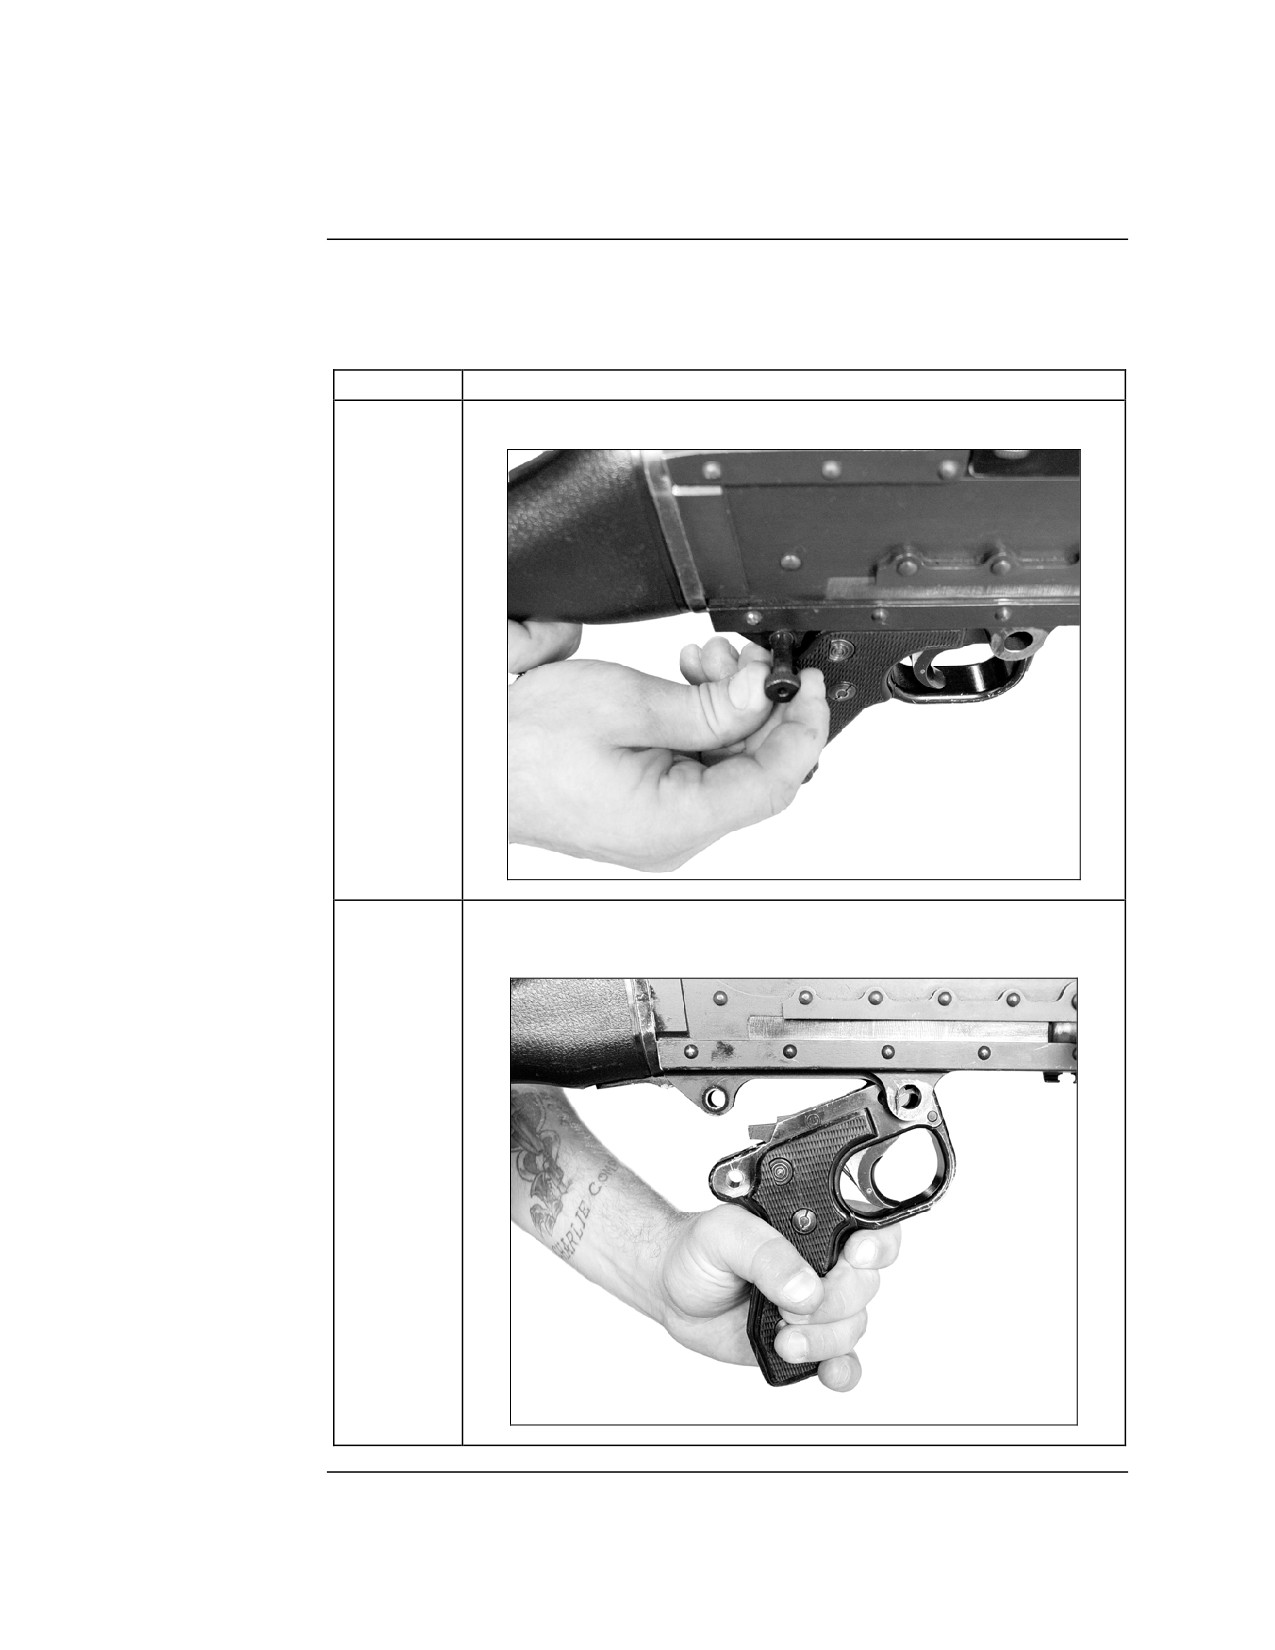
Disassembly, Continued
Removing the
The procedure for removing the trigger housing group is listed in the table
Trigger
below:
Housing Group
Step
Action
1
Remove the trigger housing spring pin.
2
Rotate the rear of the trigger housing assembly down and
remove the trigger housing assembly.
Continued on next page
MCI Course 0321B
1-39
Study Unit 1, Lesson 2
Disassembly, Continued
Detailed
Detailed disassembly involves removing component parts of some of the
Disassembly
main groups. Detailed disassembly of these groups should be kept to a
minimum to reduce the possibility of damaging or losing parts. The buttstock
and trigger housing groups will not have a detailed disassembly performed by
the operator.
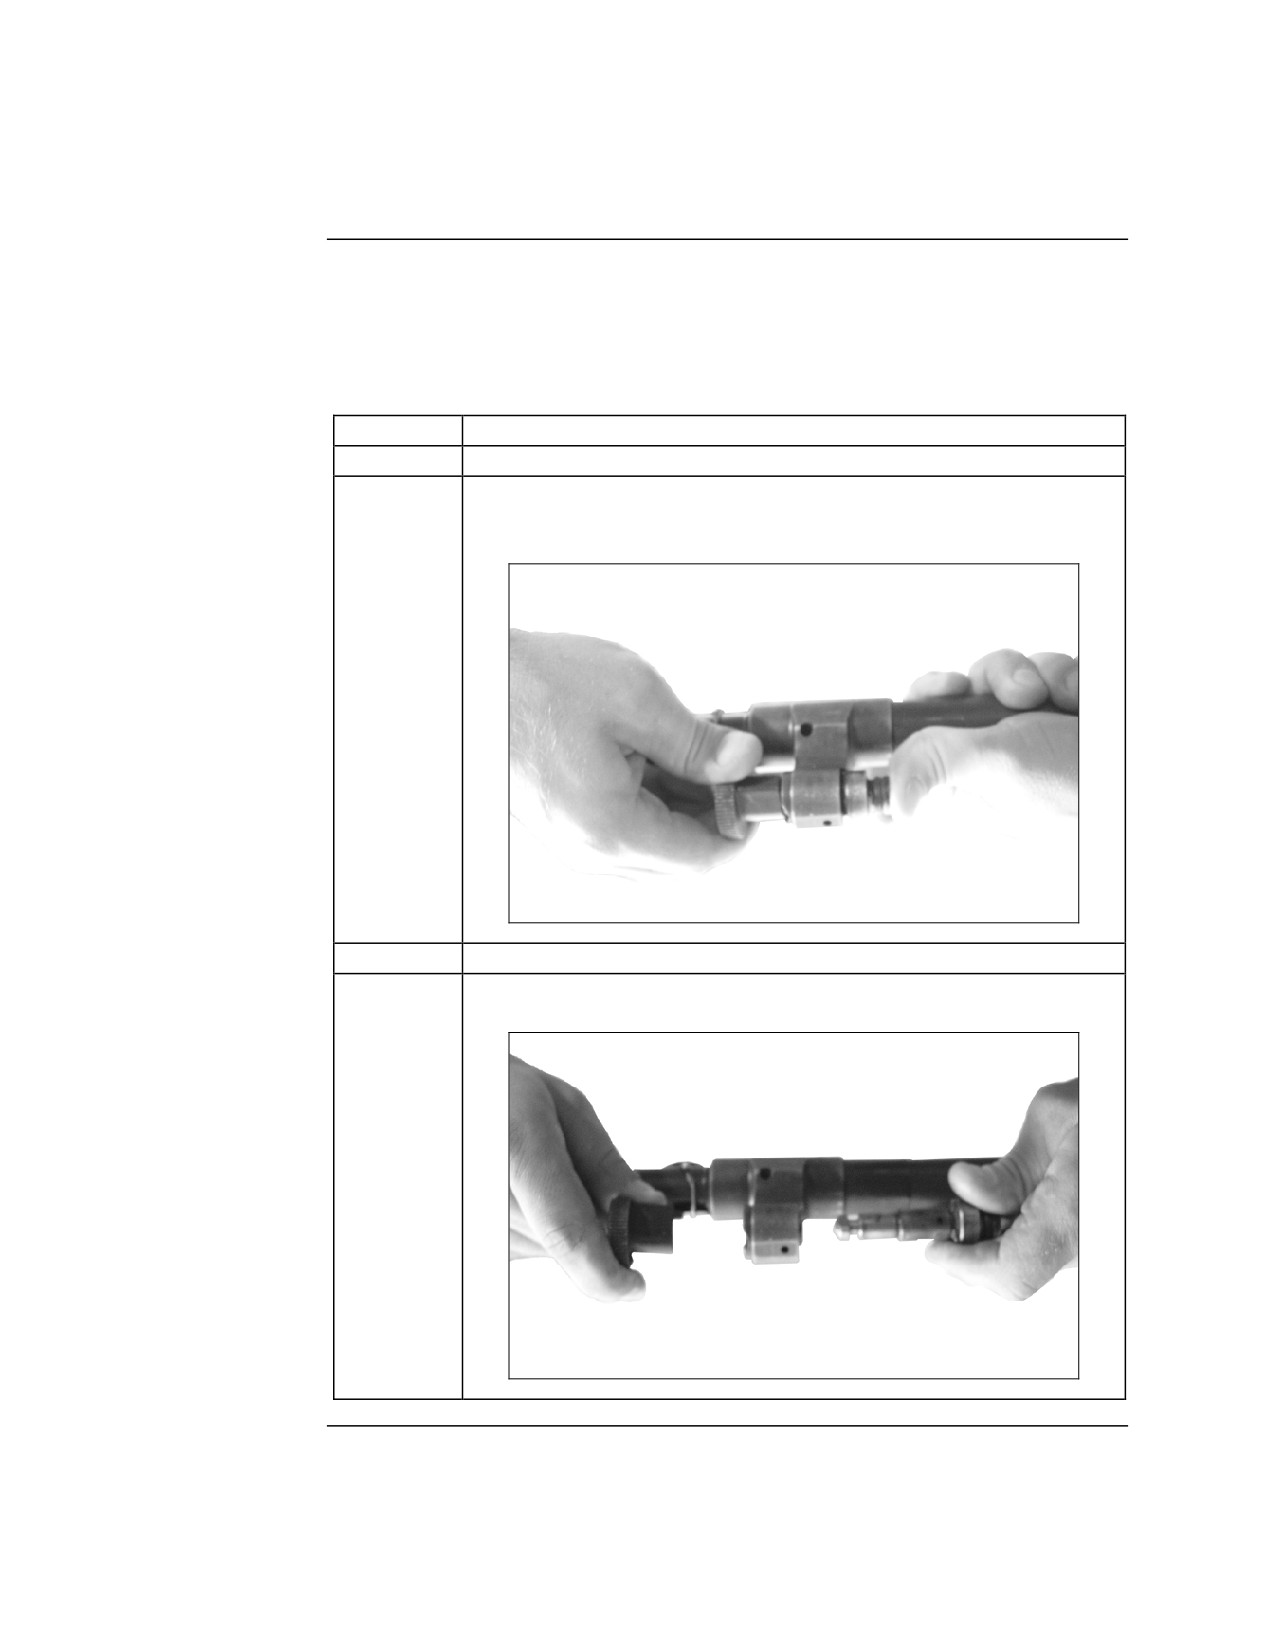
Operating
The operating group consists of the operating rod, bolt, and drive spring rod
Group
assembly. The bolt and operating rod assembly can have a detailed
disassembly performed by the operator. The procedures for performing
detailed disassembly on the bolt and operating rod are listed in the table
below.
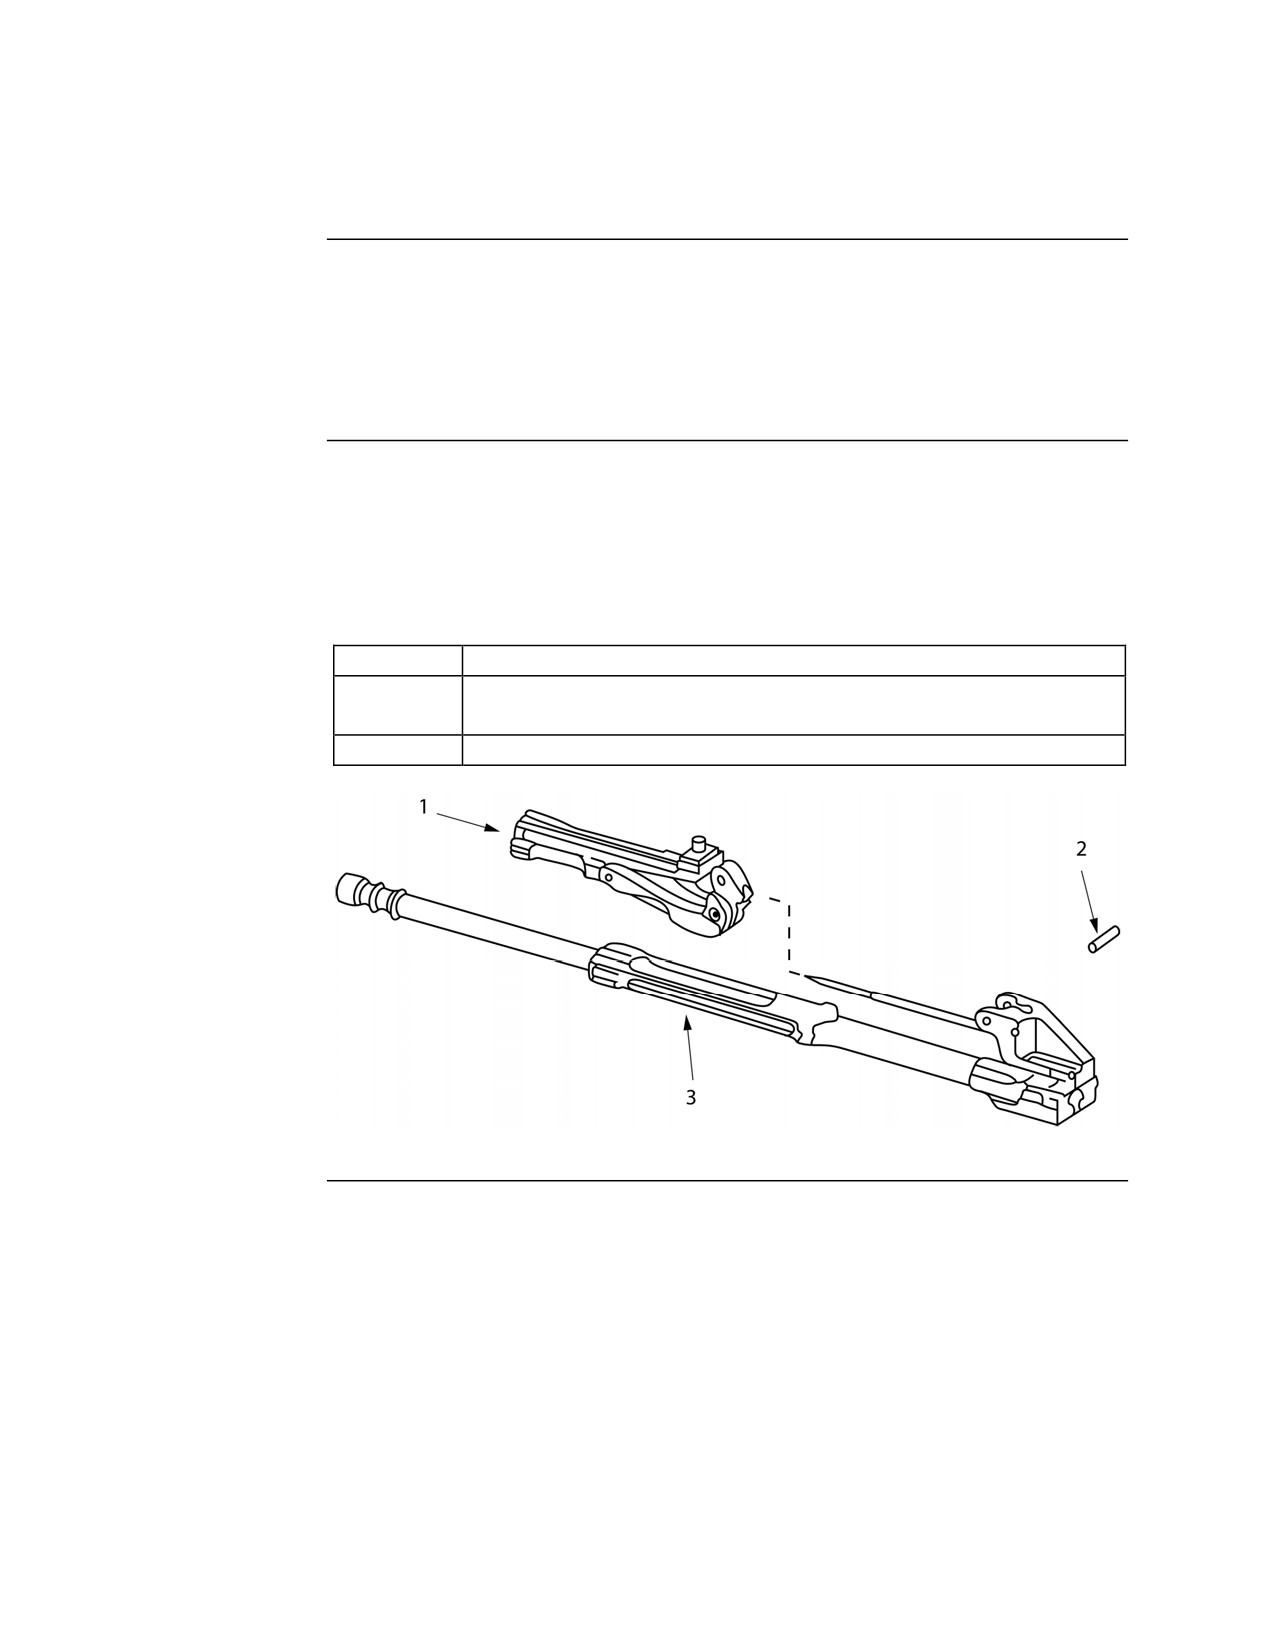
Step
Action
1
Remove the spring-loaded pin (2) that holds the bolt (1) onto
the operating rod (3) as shown in the graphic below.
2
Pull the bolt forward until it is clear of the firing pin.
Continued on next page
MCI Course 0321B
1-40
Study Unit 1, Lesson 2
Disassembly, Continued
Barrel Group
The barrel group consists of the barrel with attached gas system, adjustable
front sight assembly, flash hider, and barrel carrying handle. The gas system
can have a detailed disassembly performed by the operator. The procedures
for performing the detailed disassembly are listed in the table below:
Step
Action
1
Hold the barrel at the point where the gas system attaches to it.
2
Push down and rotate the collar counterclockwise until it
releases from the gas plug.
3
Remove the collar from the gas plug.
4
Slide the gas plug to the rear and out of the gas regulator.
Continued on next page
MCI Course 0321B
1-41
Study Unit 1, Lesson 2
Disassembly, Continued
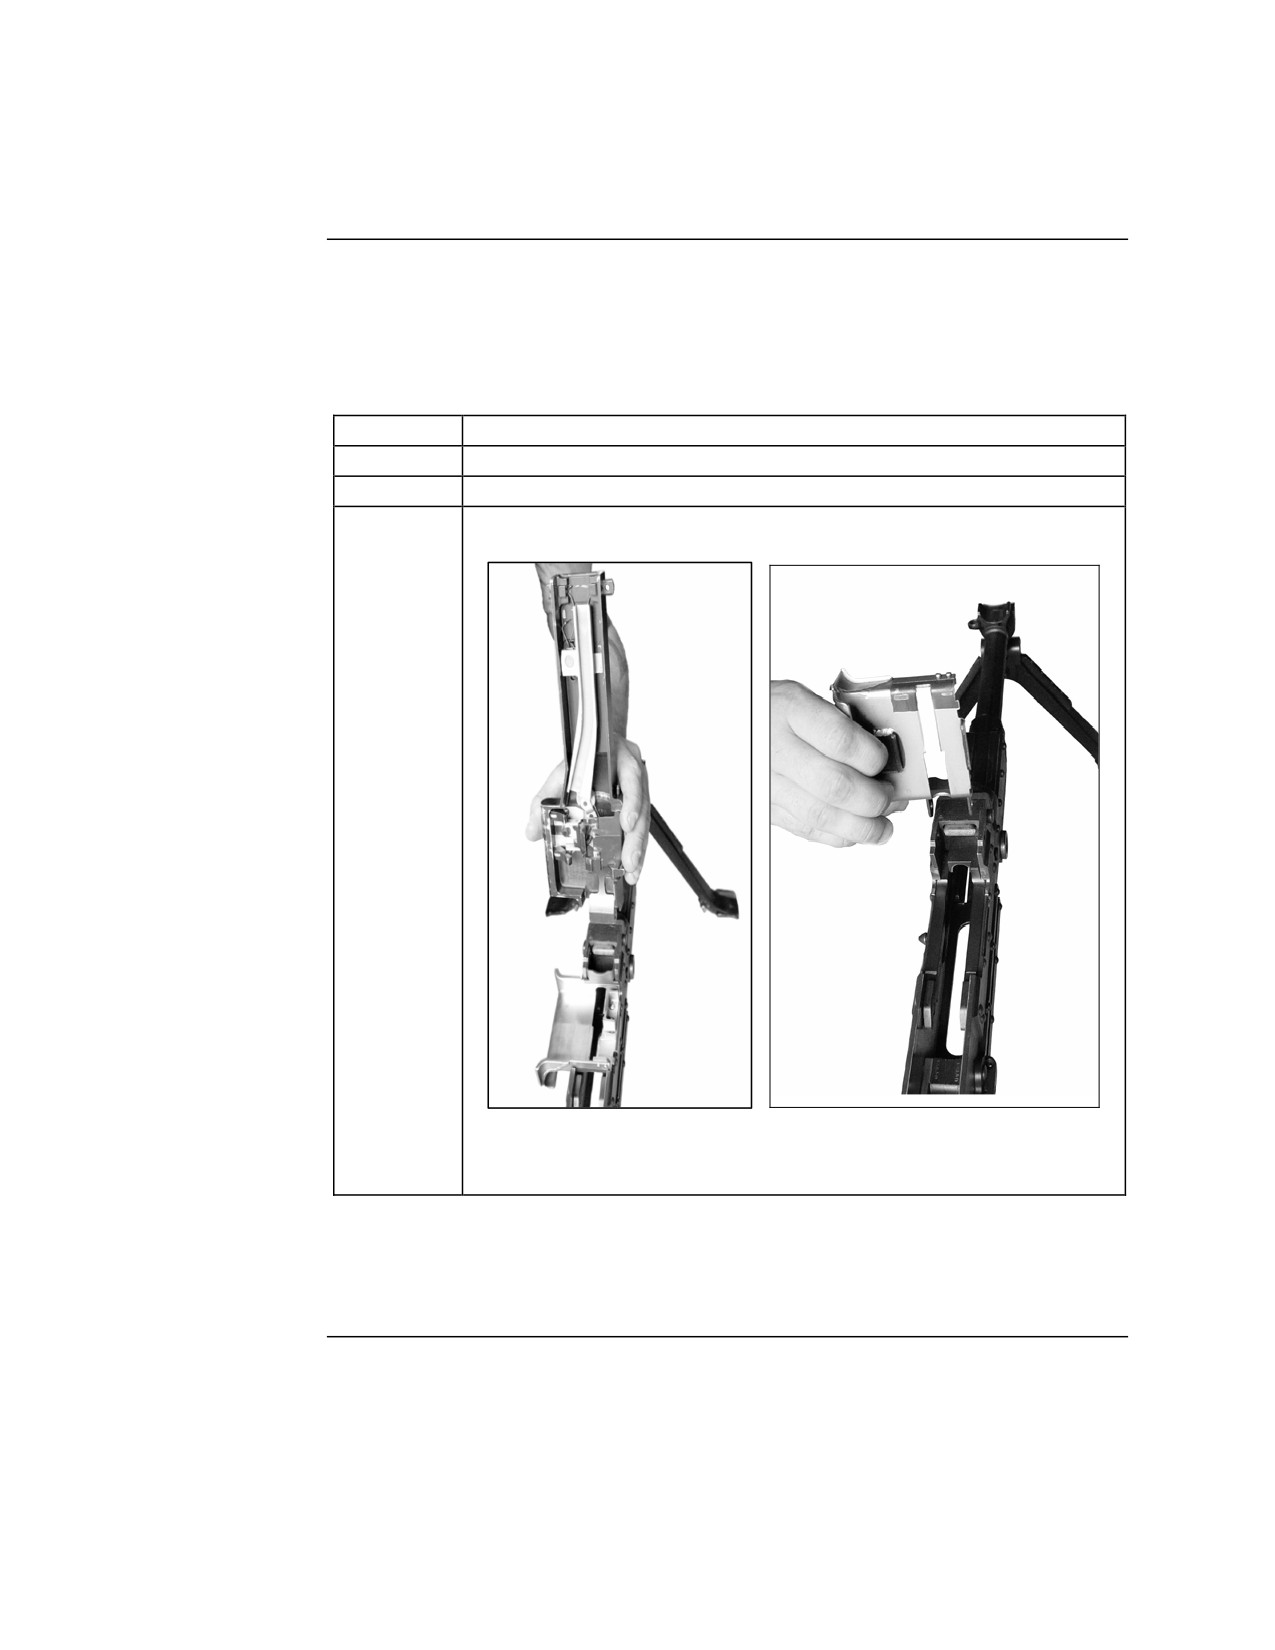
Receiver Group The receiver group consists of the receiver with rear sight, cover assembly,
feedtray, and bipod assembly. The cover assembly and feedtray can be
removed by the operator. The procedures for removing the cover assembly
and feedtray as listed in the table below:
Step
Action
1
Raise the cover straight up.
2
Pull the hinge spring pin out.
3
Lift the cover and feedtray from the receiver.
Note: Place cover down with moving parts facing up—moving
parts facing down can damage parts.
Note: This procedure completes general and detailed disassembly of the
M240G medium machinegun. Any further disassembly is not
authorized.
MCI Course 0321B
1-42
Study Unit 1, Lesson 2
Assembly
Detailed
Detailed assembly must be completed before general assembly of the weapon.
Detailed assembly is conducted on the operating group, barrel group, and
receiver group in any order.
Operating
The procedure for detailed assembly of the operating group is listed in the
Group
table below:
Step
Action
1
Hold the rod in one hand and slide the rear of the bolt over the
firing pin.
2
Align the holes on the bolt with those on the operating rod.
3
Push the spring loaded pin through the holes.
Barrel Group
The procedure for detailed assembly of the barrel group is listed in the table
below:
Step
Action
1
Insert the gas plug into the gas regulator.
2
Place the collar over the forward end of the gas plug.
3
Push against the collar while rotating clockwise until the collar
locks in place.
Receiver Group The procedure for detailed assembly of the receiver group is listed in the table
below:
Step
Action
1
Lay the feed tray on the receiver so the feed tray guides are
aligned with the receiver brackets.
2
Place the cover on the receiver aligning the mounting holes
with the mounting brackets on the receiver. Push the cover
down into the closed position.
3
Insert the cover hinge spring pin.
Continued on next page
MCI Course 0321B
1-43
Study Unit 1, Lesson 2
Assembly, Continued
General
General assembly is completed after detailed assembly. The process is the
reverse of general disassembly. The groups are assembled to the receiver
group in the following order:
• Trigger housing group
• Operating group
• Buttstock group
• Barrel group
Attaching the
The procedure for assembling the trigger housing group to the receiver group
Trigger
is listed in the table below:
Housing Group
Step
Action
1
Insert the holding notch on the front of the trigger housing into
its recesses on the bottom of the receiver.
2
Rotate the rear of the trigger housing group upward and align
the hole in the trigger housing with the mounting bracket on the
receiver.
3
Insert the trigger housing assembly spring pin into the hole.
Installing the
The procedure for assembling the operating group to the receiver group is
Operating
listed in the table below:
Group
Step
Action
1
Insert the bolt and operating rod into the receiver, aligning their
slots with the rails inside the receiver.
2
Extend the bolt to the unlock (forward) position.
3
Push the entire bolt and operating rod assembly into the
receiver.
4
Pull the trigger and continue to push the bolt and operating rod
all the way into the receiver.
5
Insert the drive spring rod assembly into the receiver aligning
the end with the recess in the rear of the operating rod.
6
Lower the drive spring rod assembly so that its base is seated
against the retaining stud inside the receiver.
Continued on next page
MCI Course 0321B
1-44
Study Unit 1, Lesson 2
Assembly, Continued
Attaching the
The procedure for assembling the buttstock group to the receiver group is
Buttstock
listed in the table below:
Group
Step
Action
1
Align the recessed grove at the front of the buttstock with the
vertical rails at the rear of the receiver.
2
Slide the buttstock downward until it locks in place.
Attaching the
The procedure for assembling the barrel group to the receiver group is listed
Barrel Group
in the table below.
Step
Action
1
Insert the barrel breach into the barrel socket on the receiver
aligning the gas plug with the gas cylinder.
2
Depress the barrel locking latch and fully seat the barrel in the
receiver.
3
Rotate the barrel carrying handle to the down position.
MCI Course 0321B
1-45
Study Unit 1, Lesson 2
Function Check
Purpose
The purpose of performing a function check is to ensure that the weapon is
working properly prior to use. Function checks should be done immediately
after any type of disassembly and assembly.
Procedure
The procedure for conducting a function check of the M240G medium
machinegun is listed in the table below:
Step
Action
1
Place the safety on “F” fire.
2
Pull the cocking handle to the rear and lock the bolt to the rear.
Return the cocking handle to the forward position.
3
Place the safety on “S” safe.
4
Pull the trigger; nothing should happen.
5
Place the safety on “F” fire.
6
Pull and hold the cocking handle to the rear.
7
Pull the trigger and ease the bolt forward until it locks.
MCI Course 0321B
1-46
Study Unit 1, Lesson 2
Lesson 2 Exercise
Directions
Complete exercise items 1 through 13 by performing the action required.
Check your answers against those listed at the end of this lesson.
Item 1
List the steps for clearing the M240G medium machinegun.
1.
___________________________________________________________
2.
___________________________________________________________
3.
___________________________________________________________
4.
___________________________________________________________
5.
___________________________________________________________
6.
___________________________________________________________
7.
___________________________________________________________
8.
___________________________________________________________
9.
___________________________________________________________
10. ___________________________________________________________
11. ___________________________________________________________
12. ___________________________________________________________
Item 2
The two categories of disassembly are
a. operator and upper echelon.
b. authorized and unauthorized.
c. general and detailed.
d. field and garrison.
Continued on next page
MCI Course 0321B
1-47
Study Unit 1, Lesson 2 Exercise
Lesson 2 Exercise, Continued
Item 3
To ensure the safety of the operator, prior to disassembling the M240G
medium machinegun, the operator should
a. clean the weapon.
b. clear the weapon to ensure it is not loaded.
c. make sure the rear sight is in the down position.
d. change the barrels.
Items 4
Matching: For items 4 through 7, match the letter of the component groups
Through 7
from column 2 to column 1 in the proper order they are disassembled from
the receiver group when performing general disassembly.
Column 1
Column 2
Order
Group
___ 4.
a. Barrel
___ 5.
b. Trigger housing
___ 6.
c. Buttstock
___ 7.
d. Operating
Items 8
Matching: For items 8 through 11, match the letter of the component groups
Through 11
from column 2 to column 1 in the proper order they are assembled to the
receiver group when performing general assembly.
Column 1
Column 2
Order
Group
___ 8.
a. Trigger housing
___ 9.
b. Buttstock
___ 10.
c. Operating
___ 11.
d. Barrel
Continued on next page
MCI Course 0321B
1-48
Study Unit 1, Lesson 2 Exercise
Lesson 2 Exercise, Continued
Item 12
After completing disassembly and assembly, the operator should
a. return the M240G to the armory.
b. place the M240G in the gun bag.
c. change the barrels.
d. perform a function check.
Item 13
List the steps for performing a function check for the M240G medium
machinegun.
1.
___________________________________________________________
2.
___________________________________________________________
3.
___________________________________________________________
4.
___________________________________________________________
5.
___________________________________________________________
6.
___________________________________________________________
7.
___________________________________________________________
Continued on next page
MCI Course 0321B
1-49
Study Unit 1, Lesson 2 Exercise
Lesson 2 Exercise, Continued
Answers
The table below provides the answers to the exercise items. If you have any
questions, refer to the reference page listed for each item.
Item Number
Answer
Reference Page
1
1. Point the weapon in a safe direction,
1-31
away from personnel.
through
2. Place the safety on “F” fire.
1-33
3. Pull the cocking handle to the rear
to lock the bolt to the rear. Push the
cocking handle all the forward.
4. Place the safety on “S” safe.
5. Push the cover latches in to release
the cover and open the cover
assembly.
6. Remove any ammunition or links.
7. Raise the feed tray.
8. Visually and physically inspect the
chamber to make sure it is empty.
If a round/cartridge is still in the
chamber, remove the
round/cartridge.
9. Lower the feed tray.
10. Place the safety on “F” fire.
11. Pull the cocking handle to the rear
and hold it. Pull the trigger and
ease the bolt forward ensuring that
it locks and the cocking handle is all
the way forward.
12. Close the cover.
2
c
1-34
3
b
1-34
4
c
1-34
5
d
1-34
6
b
1-34
7
a
1-34
8
a
1-44
9
c
1-44
10
b
1-44
Continued on next page
MCI Course 0321B
1-50
Study Unit 1, Lesson 2 Exercise
Lesson 2 Exercise, Continued
Answers,
continued
Item Number
Answer
Reference Page
11
d
1-44
12
d
1-46
13
1. Place the safety on “F” fire.
1-46
2. Pull the cocking handle to the rear
and lock the bolt to the rear. Return
the cocking handle to the forward
position.
3. Place the safety on “S” safe.
4. Pull the trigger; nothing should
happen.
5. Place the safety on “F” fire.
6. Pull and hold the cocking handle to
the rear.
7. Pull the trigger and ease the bolt
forward until it locks.
Lesson
In this lesson, you have learned the procedures for clearing the M240G,
Summary
performing disassembly and assembly, and conducting a function check.
In the next lesson, you will learn about the ammunition used with the M240G
medium machinegun.
MCI Course 0321B
1-51
Study Unit 1, Lesson 2 Exercise
(This page intentionally left blank.)
MCI Course 0321B
1-52
Study Unit 1, Lesson 2 Exercise
LESSON 3
AMMUNITION
Introduction
Scope
Another aspect of employing the M240G medium machinegun is knowing
which type of ammunition to use.
In this lesson, you will learn the different types of ammunition used with the
M240G, how to identify the ammunition, and the purpose of each type. In
addition, you will also learn how to properly store and handle the
ammunition.
Learning
After completing this lesson, you should be able to
Objectives
• Identify the types of ammunition used with the M240G medium
machinegun.
• Identify the purpose of the different types of ammunition used with the
M240G medium machinegun.
• Identify the guidelines when storing M240G ammunition.
• Identify the guidelines when handling the M240G ammunition.
In This Lesson This lesson contains the following topics:
Topic
See Page
Introduction
1-53
Ammunition
1-54
Ammunition Storage and Handling
1-56
Lesson 3 Exercise
1-58
MCI Course 0321B
1-53
Study Unit 1, Lesson 3
Ammunition
Characteristics The ammunition used for the M240G medium machinegun has the following
common characteristics:
•
7.62 mm NATO cartridge
• Uses a disintegrating metallic split-link belt
• Linked in 100-round bandoleers (belts) that weigh approximately 7 pounds
Types
There are five different types of M240G medium machinegun 7.62mm
ammunition.
• M80 ball
• M62 tracer
• M82 blank
• M63 dummy
• M61 armor-piercing
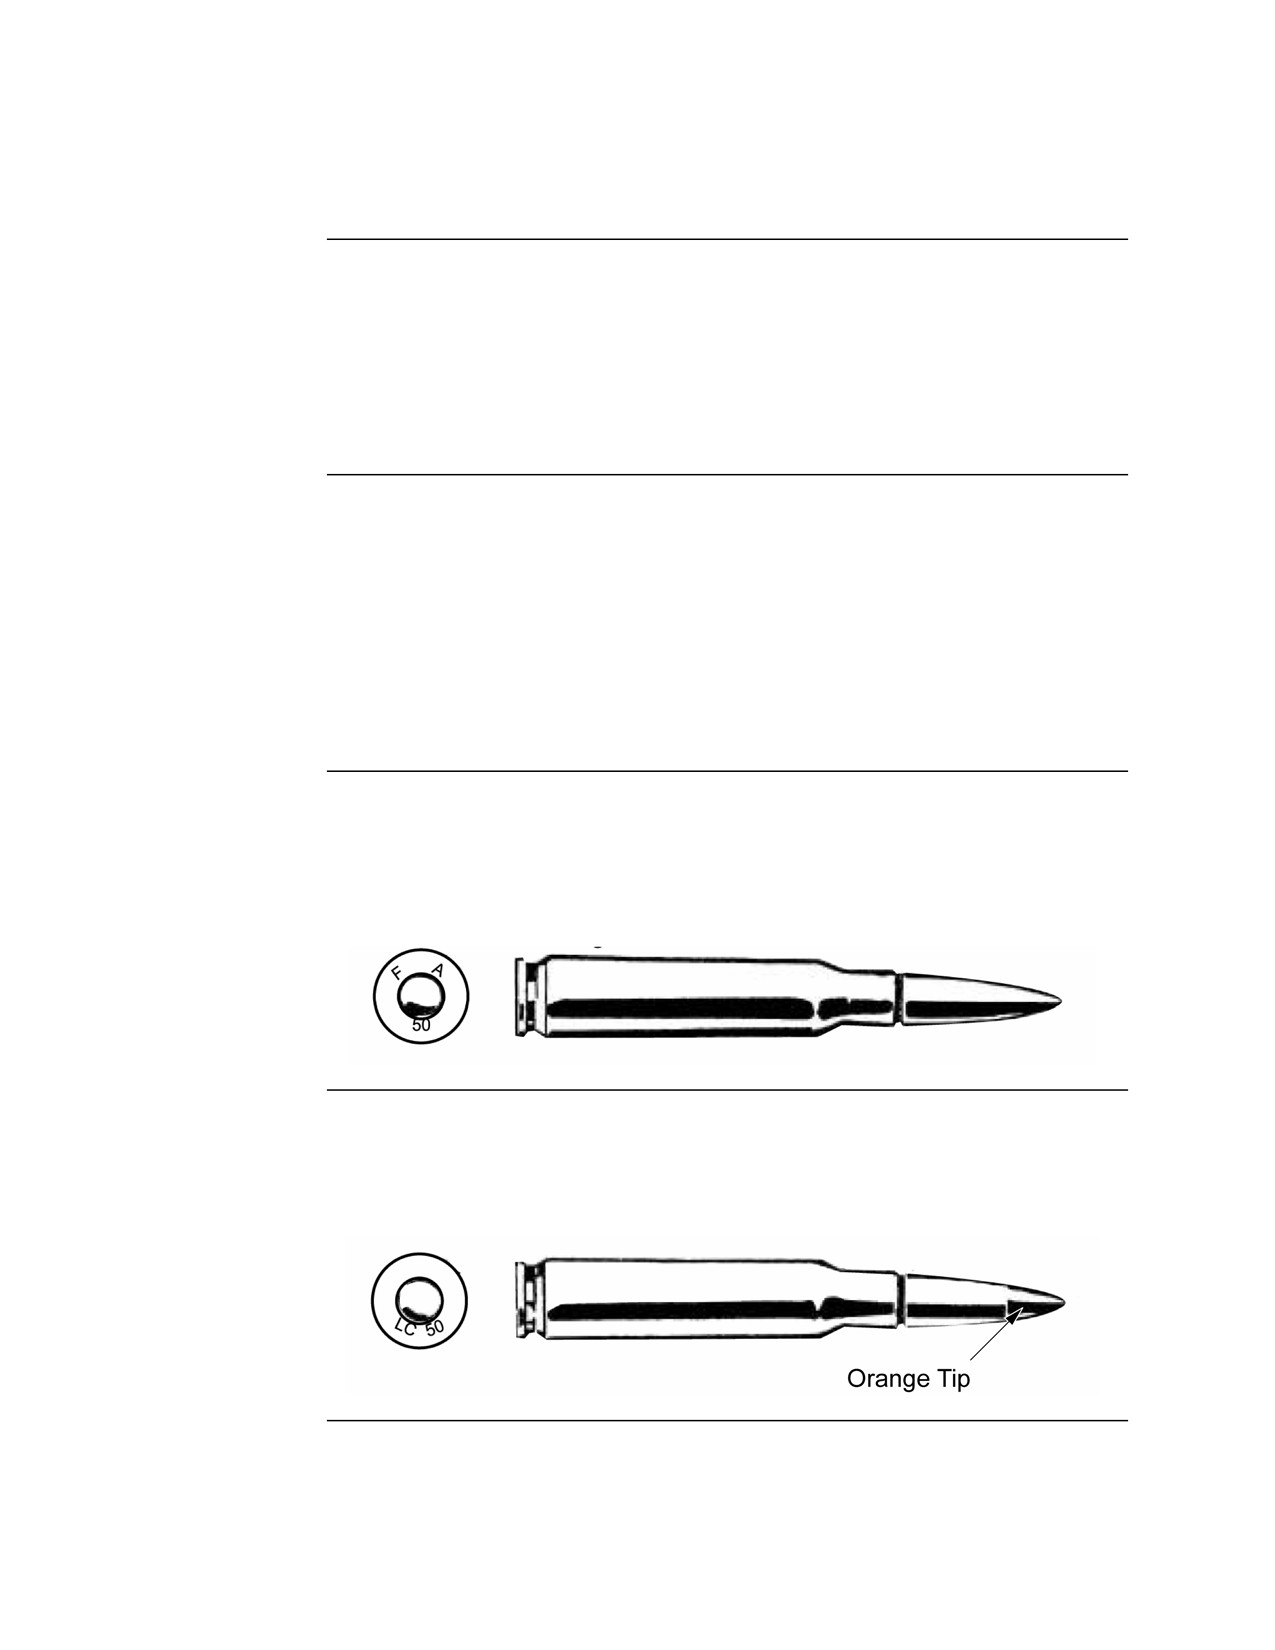
M80 Ball
The M80 ball 7.62 mm cartridge is identified by a plain bullet tip with a full
metal jacket. It is used for marksmanship training, anti-personnel, and light
material targets. The M80 ball is the non-tracer component used in the 4 and
1 combat mix.
M62 Tracer
The M62 tracer 7.62 mm cartridge is identified by an orange bullet tip. It is
used for the observation of fire, incendiary effects, signaling, and marking
targets. The M62 tracer is the tracer component of the 4 and 1 combat mix.
Continued on next page
MCI Course 0321B
1-54
Study Unit 1, Lesson 3
Ammunition, Continued
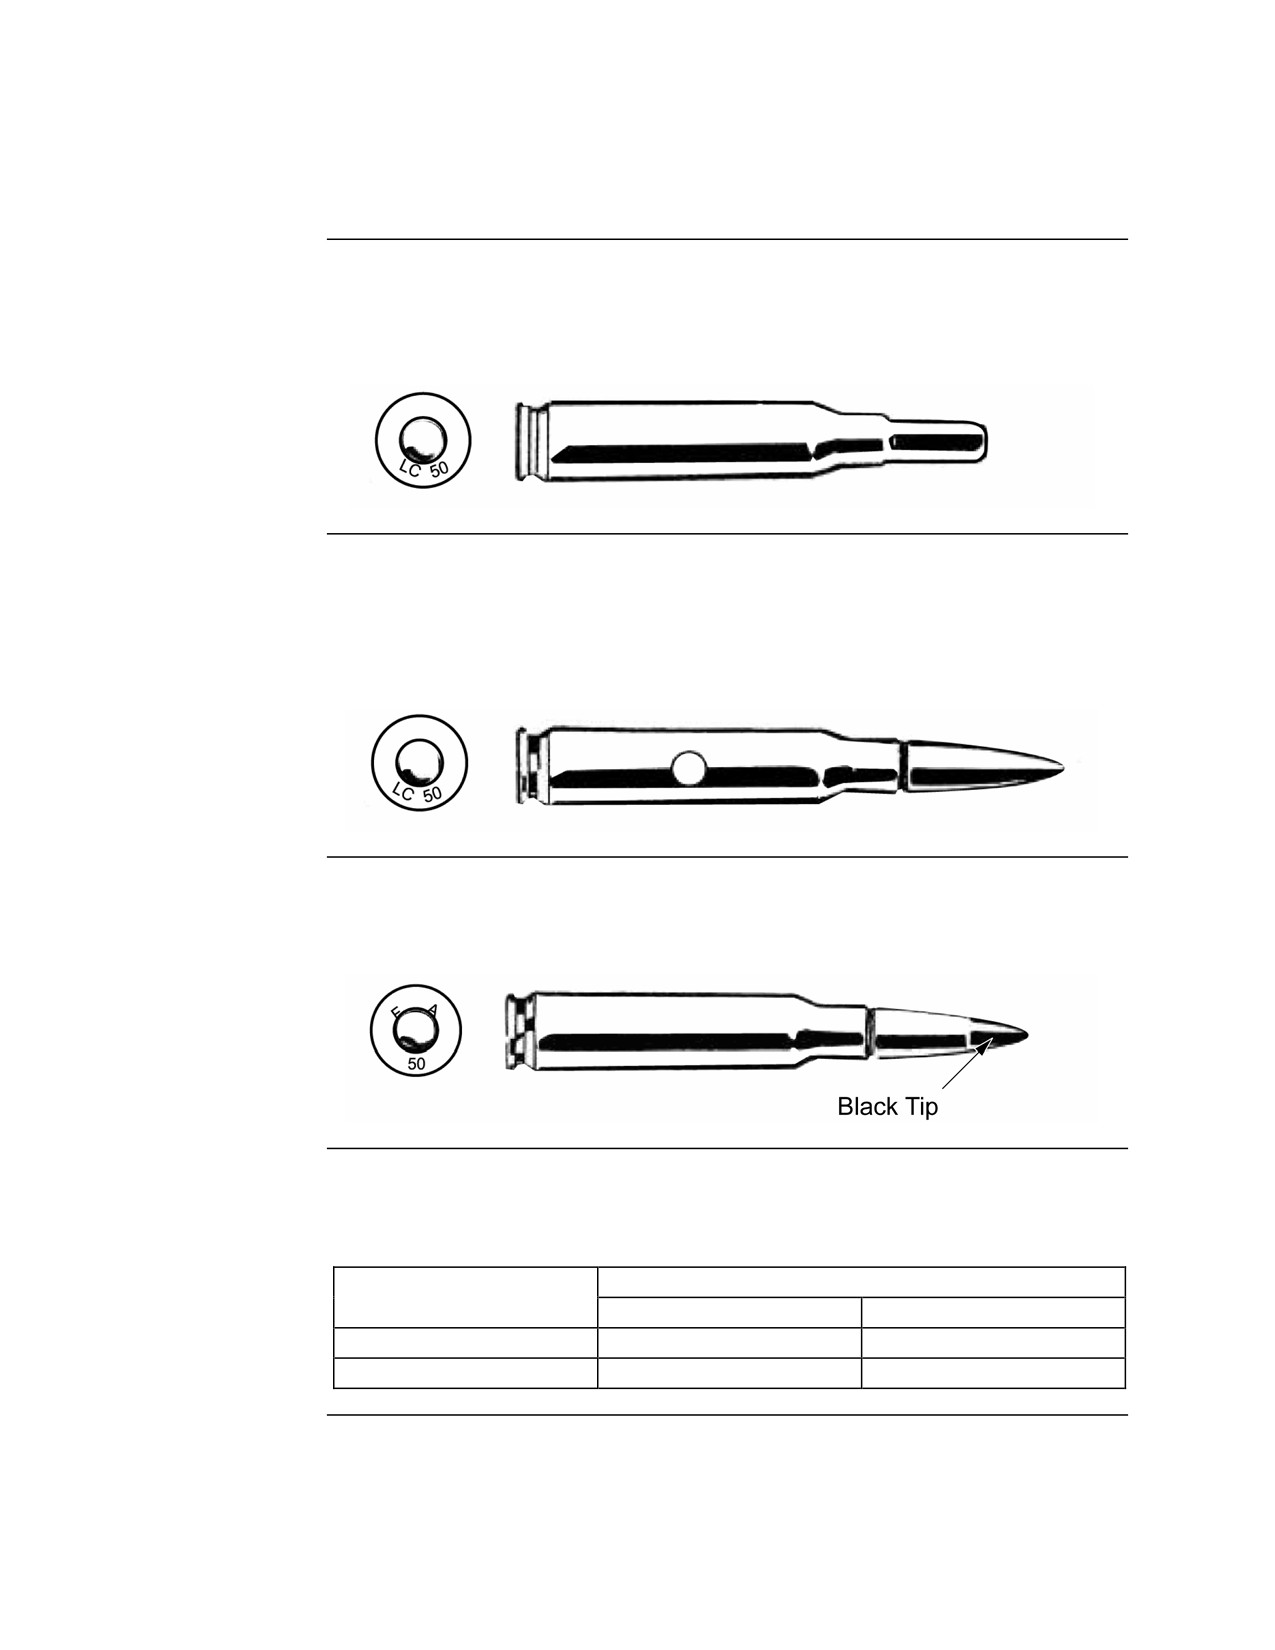
M82 Blank
The M82 blank cartridge is identified by the absence of a bullet and a double-
tapered neck, only a sealed metal casing. It is used with a special adapter to
simulate live-fire during training.
M63 Dummy The M63 dummy cartridge is identified by a plain bullet, six longitudinal
corrugations (flutings) along the casing, and the absence of a vent hole in the
primer pocket. It is used for training purposes such as loading, unloading,
and gun drills.
M61 Armor-
The M61 armor-piercing is identified by a black bullet tip. It is used against
Piercing
lightly armored targets where armor penetration effects are desired.
Armor
The table below details the armor penetration of the M80 ball and M61
Penetration
armor-piercing ammunition.
Armor Penetration
Ammunition Type
300 Meters
500 Meters
M80 ball
4mm
3mm
M61 armor-piercing
7mm
5mm
MCI Course 0321B
1-55
Study Unit 1, Lesson 3
Ammunition Storage and Handling
Ammunition
The following guidelines should be followed when storing M240G
Storage
ammunition:
• Store away from heat sources such as open flame, radiators, heaters, and
hot water pipes.
• Do not store ammunition in the direct rays of the sun for long periods. If
the powder is hot, excessive pressure may be developed when the weapon
is fired.
• If stored outdoors in the open, keep the ammunition at least six inches off
the ground and covered with tarp. Use materials to keep the tarp elevated
off the ammunition to allow free air circulation.
Ammunition
The following guidelines should be followed when handling M240G
Handling
ammunition.
• Ammunition containers should not be opened until the ammunition is to
be used. Ammunition removed from containers in damp environments
can corrode.
• Protect the ammunition from mud, dirt, and water. If the ammunition gets
wet or dirty, wipe it off prior to use.
• Wipe off light corrosion when it is discovered. Ammunition that is
heavily corroded should be replaced.
Continued on next page
MCI Course 0321B
1-56
Study Unit 1, Lesson 3
Ammunition Storage and Handling, Continued
Ammunition
The following guidelines should be followed during live-fire of the M240G:
Handling When
Firing
• Avoid getting the ammunition in the dirt when firing. The ammunition
can pick up pieces of dirt that can cause a weapon to malfunction.
• Do not oil or grease the ammunition. Dust and other abrasives will collect
on it and could damage the operating parts of the weapon.
• Do not fire dented cartridges, cartridges with loose projectiles, or other
defective rounds.
• Do not fire over friendly troops with ammunition marked as FOR
TRAINING PURPOSES ONLY. Special lots of ammunition are
approved for overhead fire and are marked FOR OVERHEAD FIRE.
• Do not fire ammunition, other than blank ammunition, that cannot be
identified by type (i.e., the colored marking is rubbed off).
MCI Course 0321B
1-57
Study Unit 1, Lesson 3
Lesson 3 Exercise
Directions
Complete exercise items 1 through 8 by performing the action required.
Check your answers against those listed at the end of this lesson.
Item 1
List the five types of ammunition used with the M240G medium machinegun.
•
___________________________________________________________
•
___________________________________________________________
•
___________________________________________________________
•
___________________________________________________________
•
___________________________________________________________
Item 2
What is the purpose of M80 ball ammunition?
______________________________________________________________
______________________________________________________________
Item 3
What is the purpose of M62 tracer ammunition?
______________________________________________________________
______________________________________________________________
Item 4
What is the purpose of M82 blank ammunition?
______________________________________________________________
______________________________________________________________
Continued on next page
MCI Course 0321B
1-58
Study Unit 1, Lesson 3 Exercise
Lesson 3 Exercise, Continued
Item 5
What is the purpose of M63 dummy ammunition?
______________________________________________________________
______________________________________________________________
Item 6
What is the purpose of M61 armor-piercing ammunition?
______________________________________________________________
______________________________________________________________
Item 7
Which of the following is a storage consideration when storing M240G
ammunition?
a. Store ammunition near heat sources.
b. Store ammunition away from heat sources.
c. Store ammunition at least 6 inches off the ground and cover with tarps to
restrict air circulation.
d. Store ammunition in the direct rays of the sun.
Item 8
Which of the following is a consideration when handling M240G ammunition
during live fires?
a. You should oil or grease the ammunition to aid in operation.
b. You should fire dented cartridges, cartridges with loose projectiles, or
other defective rounds.
c. You should avoid getting the ammunition in the dirt when firing.
d. It is acceptable to fire ammunition, other than blank ammunition, that
cannot be identified by type (i.e., the colored marking is rubbed off).
Continued on next page
MCI Course 0321B
1-59
Study Unit 1, Lesson 3 Exercise
Lesson 3 Exercise, Continued
Answers
The table below provides the answers to the exercise items. If you have any
questions, refer to the reference page listed for each item.
Item Number
Answer
Reference Page
1
• M80 ball
1-54
• M62 tracer
• M82 blank
• M63 dummy
• M61 armor-piercing
2
Marksmanship training, anti-personnel,
1-54
and light material targets.
3
Observation of fire, incendiary effects,
1-54
signaling, and marking targets.
4
Simulate live-fire during training.
1-55
5
Training purposes such as loading,
1-55
unloading, and gun drills.
6
Against lightly armored targets where
1-55
armor penetration effects are desired.
7
b
1-56
8
c
1-57
Lesson
In this lesson, you learned the different types of ammunition, how to identify
Summary
them, and their purpose. You also learned considerations when storing and
handling M240G ammunition.
Study Unit 1
In this study unit, you have learned the characteristics, nomenclature,
Summary
functioning, and ammunition used with the M240G medium machinegun.
Also, you learned the procedures to clear, disassemble, assemble, and perform
a function check.
In the next study unit, you will learn how to maintain the weapon and its
associated equipment.
MCI Course 0321B
1-60
Study Unit 1, Lesson 3 Exercise
STUDY UNIT 2
MAINTENANCE
Overview
Scope
Having a weapon that is clean and functioning properly is paramount to the
success of your mission. To ensure the M240G is ready for combat, you need
to know how to properly clean and inspect it for damage.
In this study unit, you will learn how to properly care for the M240G medium
machinegun. This includes the authorized cleaning materials to use, how to
clean and inspect each main group of the M240G, and how to care for the
associate components such as the tripod, mount, and carrying bags.
In This Study
This study unit contains the following lessons:
Unit
Lesson
See Page
Cleaning Materials and Lubricants
2-3
Caring for the M240G Medium Machinegun
2-9
Caring for the SL-3 Components
2-29
MCI Course 0321B
2-1
Study Unit 2
(This page intentionally left blank.)
MCI Course 0321B
2-2
Study Unit 2
LESSON 1
CLEANING MATERIALS AND LUBRICANTS
Introduction
Scope
Cleaning the weapon is important to ensure it is in good working condition.
Using the wrong materials or the wrong lubrication can cause damage that
can render the M240G useless.
In this lesson, you will learn what materials are authorized to clean the
M240G, what lubricants to use, and under what conditions each lubricant
should be used.
Learning
After completing this lesson, you should be able to
Objectives
• Identify the authorized cleaning materials for the M240G medium
machinegun.
• Identify the authorized lubricants for the M240G medium machinegun.
• Identify which lubricants should be used under certain temperatures.
In This Lesson This lesson contains the following topics:
Topic
See Page
Introduction
2-3
Cleaning Materials
2-4
Lubricants
2-5
Lesson 1 Exercise
2-6
MCI Course 0321B
2-3
Study Unit 2, Lesson 1
Cleaning Materials
Authorized
Only three cleaning agents are authorized for use when cleaning the M240G
Cleaning
medium machinegun:
Agents
• CLP (cleaner, lubricant, and preservative)
• RBC (rifle bore cleaner)
• Dry cleaning solvent
CLP
Cleaner, lubricant, and preservative is used for general cleaning, carbon
removal, and corrosion removal.
RBC
Rifle bore cleaner is used for general cleaning, carbon removal, and corrosion
removal in the chamber and barrel areas.
Dry Cleaning
Dry cleaning solvent is a chemical used to remove lubricants and other
Solvent
cleaning agents from the weapon. Use dry cleaning solvent to remove
lubricants from the weapon when changing from one lubricant to another.
MCI Course 0321B
2-4
Study Unit 2, Lesson 1
Lubricants
Authorized
Lubricants are used on the M240G medium machinegun on certain operating
Lubricants
parts before, during, and after operation. The lubrication aids in the operation
of the weapon and helps to protect it from corrosion. Only the lubricants
listed below are authorized for use on the M240G medium machinegun:
• CLP (cleaner, lubricant, and preservative)
• LSA (lubricating oil, semi-fluid)
• LSA-T (lubricating oil, semi-fluid with Teflon)
• LAW (lubricating oil, arctic weather)
Lubricant Use
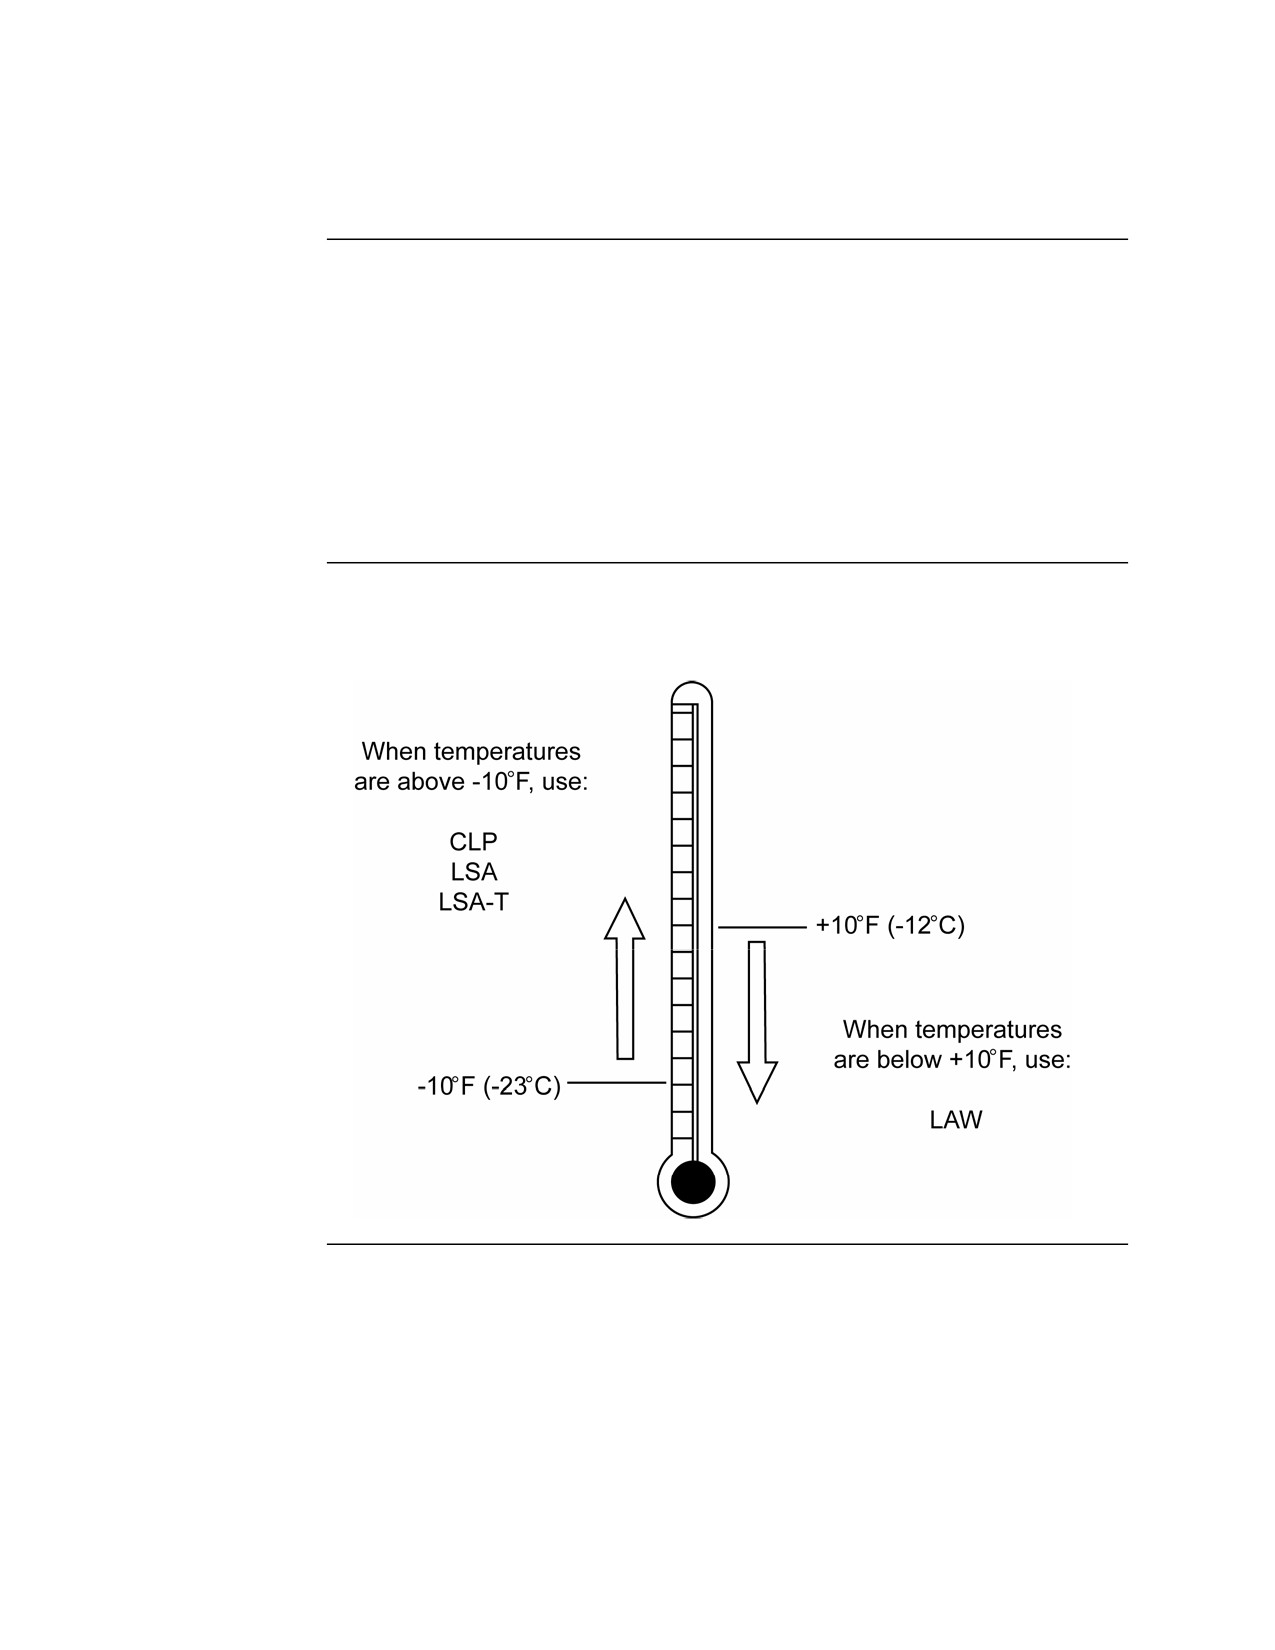
CLP, LSA, or LSA-T should be used under all but the coldest arctic
conditions:
MCI Course 0321B
2-5
Study Unit 2, Lesson 1
Lesson 1 Exercise
Directions
Complete exercise items 1 through 3 by performing the action required.
Check your answers against those listed at the end of this lesson.
Item 1
List the authorized cleaning materials for use on the M240G medium
machinegun.
•
___________________________________________________________
•
___________________________________________________________
•
___________________________________________________________
Item 2
List the authorized lubricants for use on the M240G medium machinegun.
•
___________________________________________________________
•
___________________________________________________________
•
___________________________________________________________
•
___________________________________________________________
Item 3
Which lubricant should be used when the normal outside temperature is
+10°F (-12°C) or below?
a. CLP
b. LSA
c. LSA-T
d. LAW
Continued on next page
MCI Course 0321B
2-6
Study Unit 2, Lesson 1 Exercise
Lesson 1 Exercise, Continued
Answers
The table below lists the answers to the exercise items. If you have questions
about the items, refer to the reference page.
Item Number
Answer
Reference Page
1
• CLP
2-4
• RBC
• Dry cleaning solvent
2
• CLP
2-5
• LSA
• LSA-T
• LAW
3
d
2-5
Summary
In this lesson, you have learned what items are used to clean and lubricate the
M240G as well as which lubricants to use under what conditions.
In the next lesson, you will learn how to properly care for the M240G
medium machinegun.
MCI Course 0321B
2-7
Study Unit 2, Lesson 1 Exercise
(This page intentionally left blank.)
MCI Course 0321B
2-8
Study Unit 2, Lesson 1 Exercise
LESSON 2
CARING FOR THE M240G MEDIUM MACHINEGUN
Introduction
Scope
Not maintaining the M240G correctly can result in poor weapon performance
or even failure. As an operator of the M240G medium machinegun, it is your
responsibility to keep the weapon clean and operational at all times.
In this lesson, you will learn how to properly clean, lubricate, and inspect
each group of the M240G. You will also learn how to perform a function
check to ensure the machinegun is working properly. In addition, the
required care before, during, and after firing will also be covered.
Learning
After completing this lesson, you should be able to
Objectives
• List general maintenance guidelines.
• Identify the steps for maintaining the different groups of the M240G.
• Identify the steps for inspecting the M240G.
• Identify the steps for care before, during, and after firing.
• Identify the steps for checking the headspace.
Continued on next page
MCI Course 0321B
2-9
Study Unit 2, Lesson 2
Introduction, Continued
In This Lesson This lesson contains the following topics:
Topic
See Page
Introduction
2-9
Operator Maintenance Guidelines
2-11
Barrel Group
2-12
Buttstock and Buffer Group
2-17
Operating Group
2-18
Trigger Group
2-20
Receiver Group
2-21
Care and Cleaning Before, During, and After Firing
2-24
Lesson 2 Exercise
2-25
MCI Course 0321B
2-10
Study Unit 2, Lesson 2
Operator Maintenance Guidelines
Precautions
When cleaning the M240G medium machinegun, follow these guidelines:
• Use care when removing excess carbon from the weapon. Carbon may
chip off and fly into the eyes. Protective goggles should be worn.
• Using cleaning materials other than those listed in the previous section
such as gasoline, kerosene, hydraulic oil, benzene, bensol, or high-pressure
water is prohibited.
• Do not use abrasives to clean the bore, piston, gas cylinder, or gas
regulator plug.
• Do not apply lubricants to composite or rubber components.
• Do not apply dry solvent to plastic parts.
Non-Use
If the M240G is not used, it should still be maintained (cleaned and
lubricated) at least every 90 days.
Preparation
Before cleaning the M240G medium machinegun, do the following:
• Clear the weapon.
• Perform general and detailed disassembly on the weapon.
• To ensure thorough cleaning, clean the M240G one group at a time.
Note: Upon completion of operator maintenance, be sure to perform a
function check after assembling the weapon.
Continued on next page
MCI Course 0321B
2-11
Study Unit 2, Lesson 2
Barrel Group
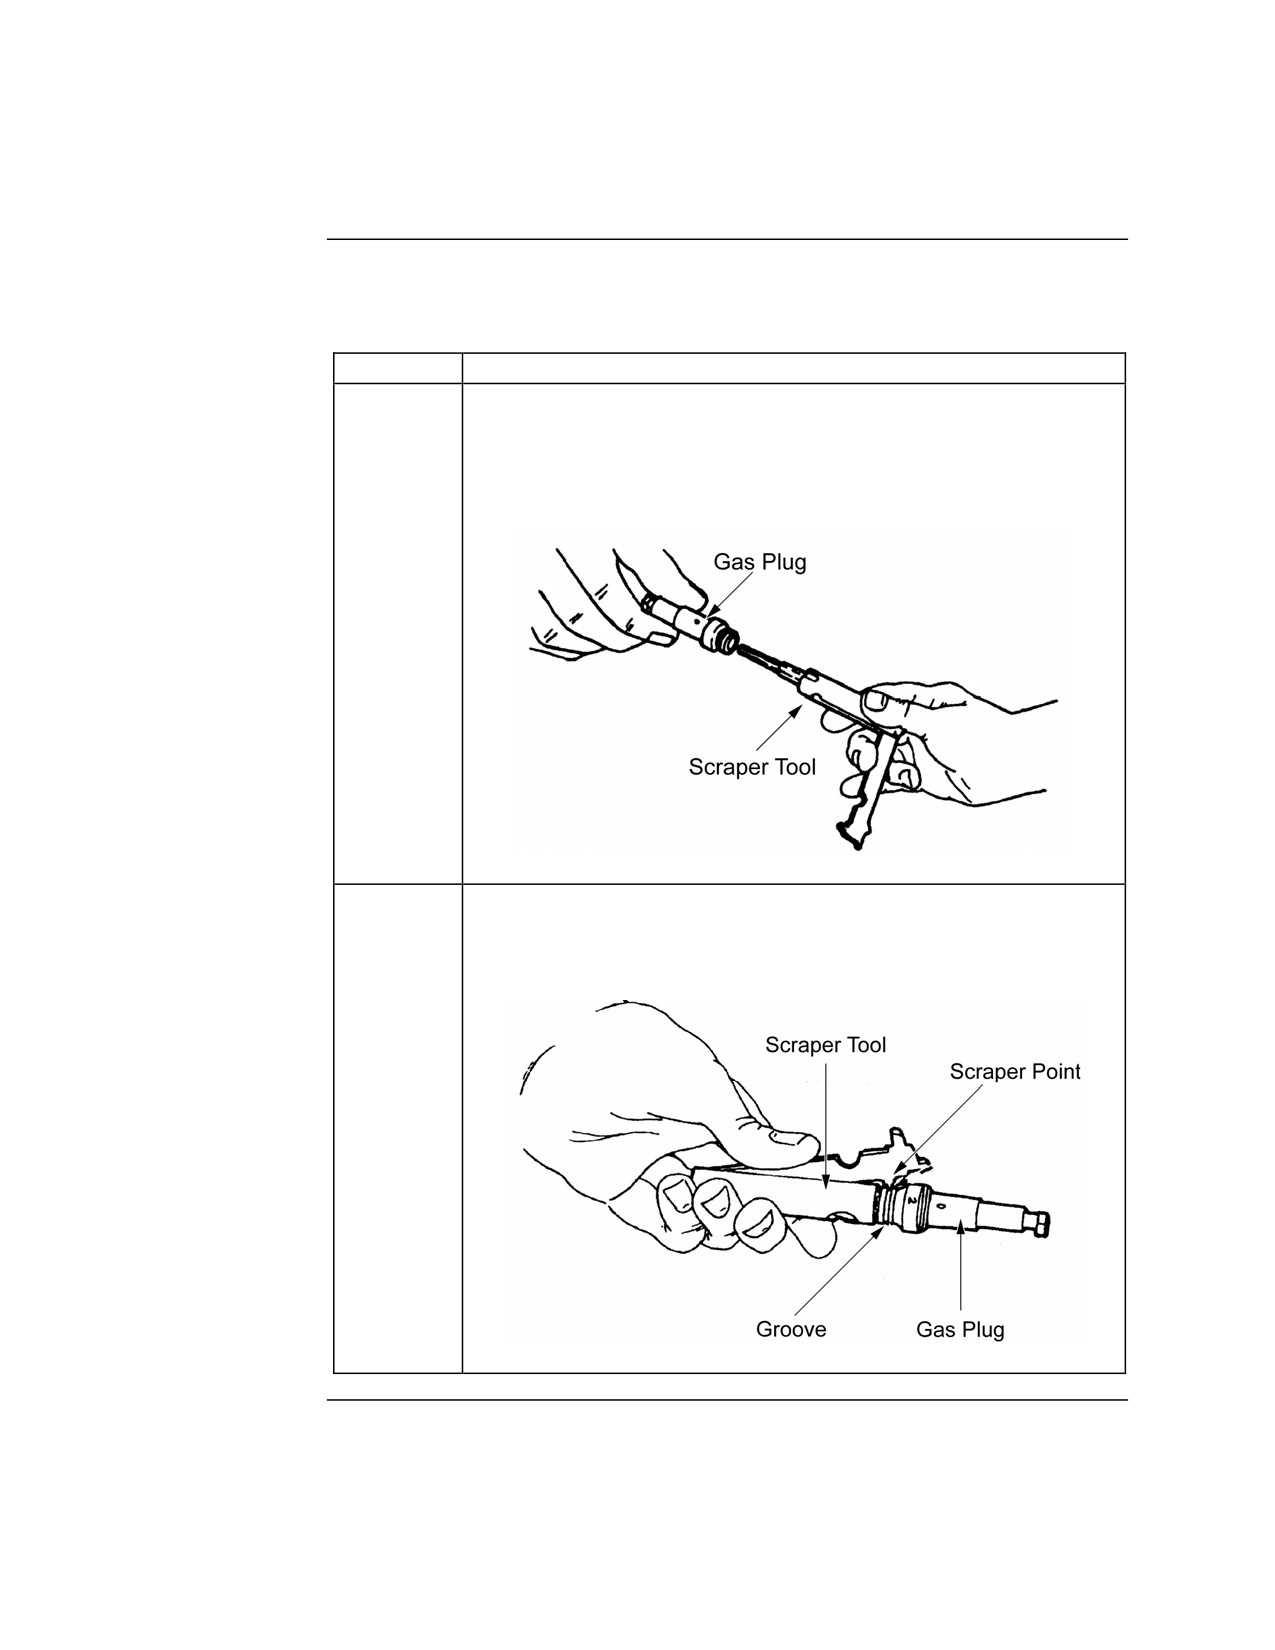
Gas Regulator Use the procedure in the table below to maintain the gas regulator plug:
Plug
Step
Action
1
Using the scraper tool, insert the scraper into the center hole of
the gas regulator plug as shown below. Twist the scraper
clockwise to remove carbon from the center hole until the
scraper is fully seated against the gas regulator plug.
2
Fold the scraper over and press the scraper point into the
groove. Turn the gas regulator plug clockwise to remove
carbon from the groove.
Continued on next page
MCI Course 0321B
2-12
Study Unit 2, Lesson 2
Barrel Group, Continued
Gas Regulator
Plug, continued
Step
Action
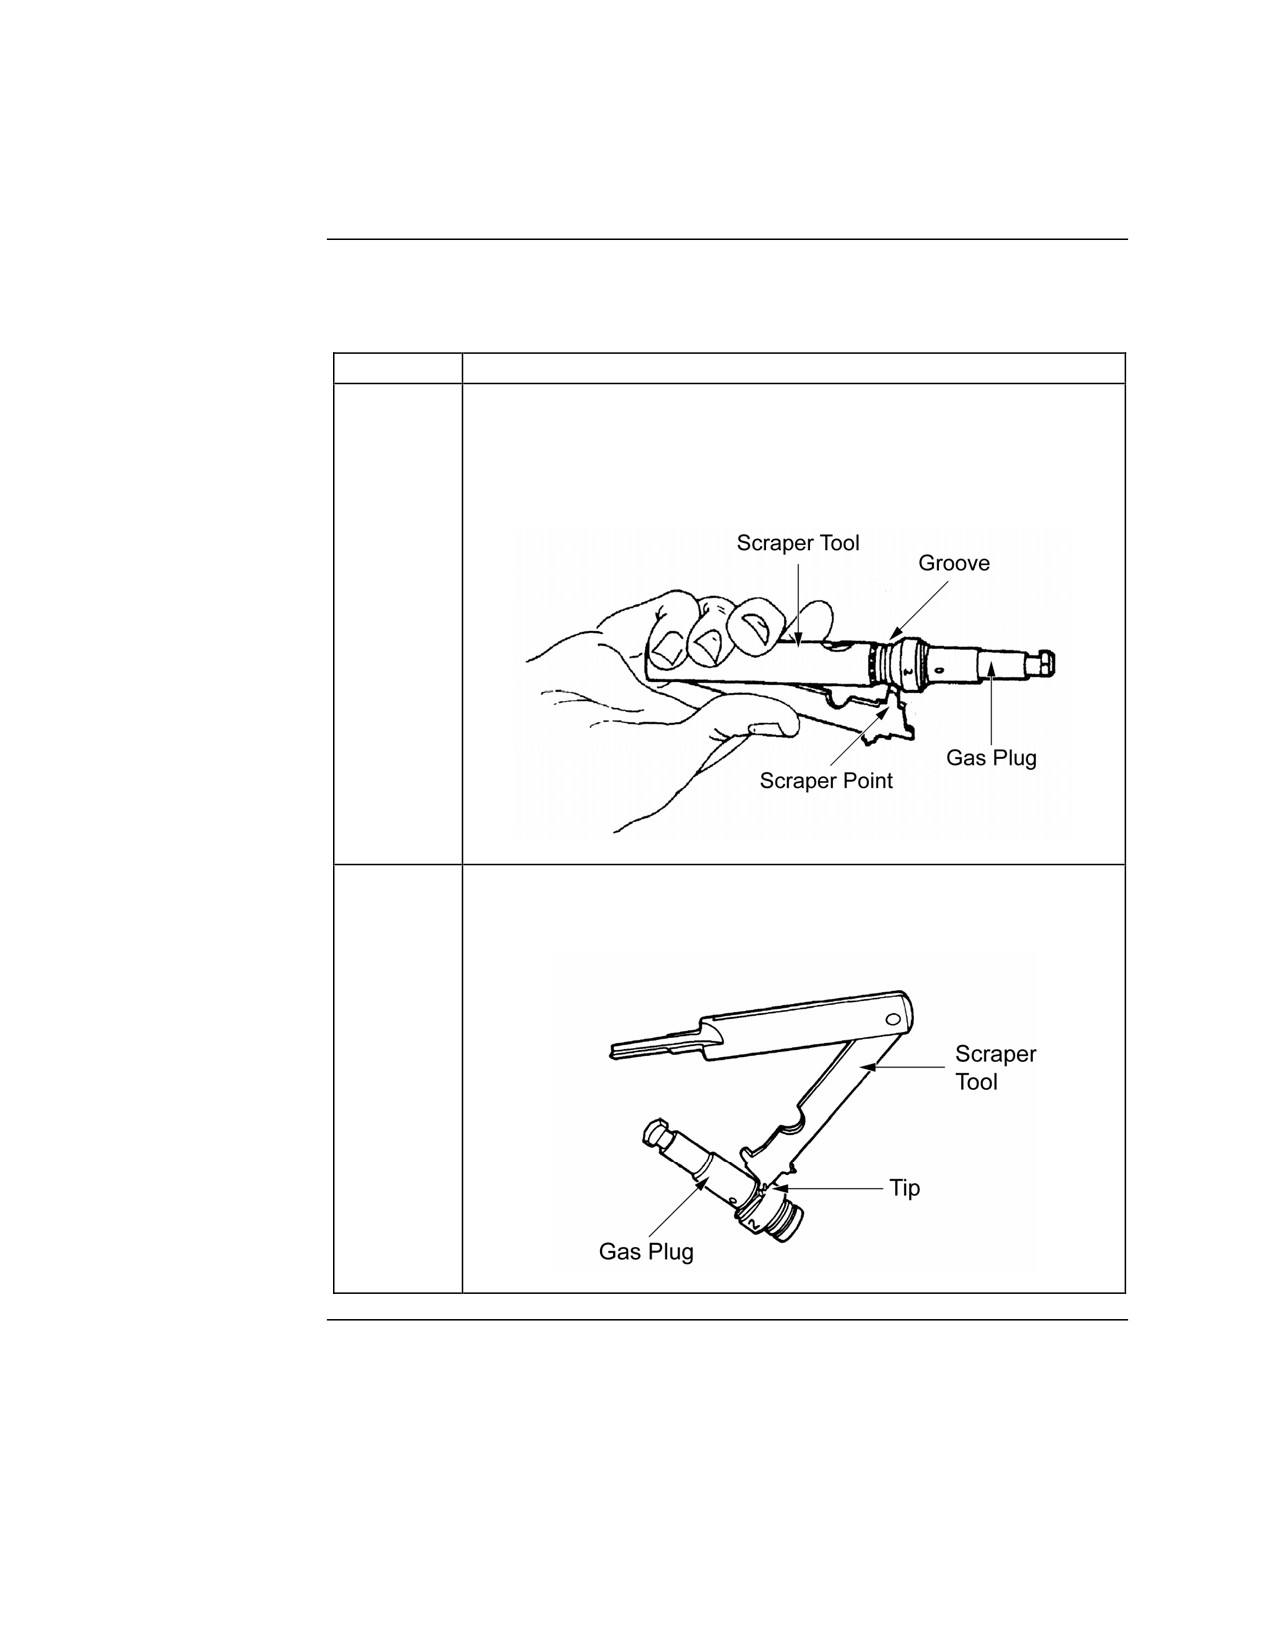
3
Pivot the scraper blade 180° to the opposite side and place the
scraper point into the groove of the gas regulator plug. Turn
the gas regulator plug clockwise to remove carbon from the
groove.
4
Using the tip of the scraper, scrape carbon from the surface of
the gas regulator plug.
Continued on next page
MCI Course 0321B
2-13
Study Unit 2, Lesson 2
Barrel Group, Continued
Gas Regulator
Plug, continued
Step
Action
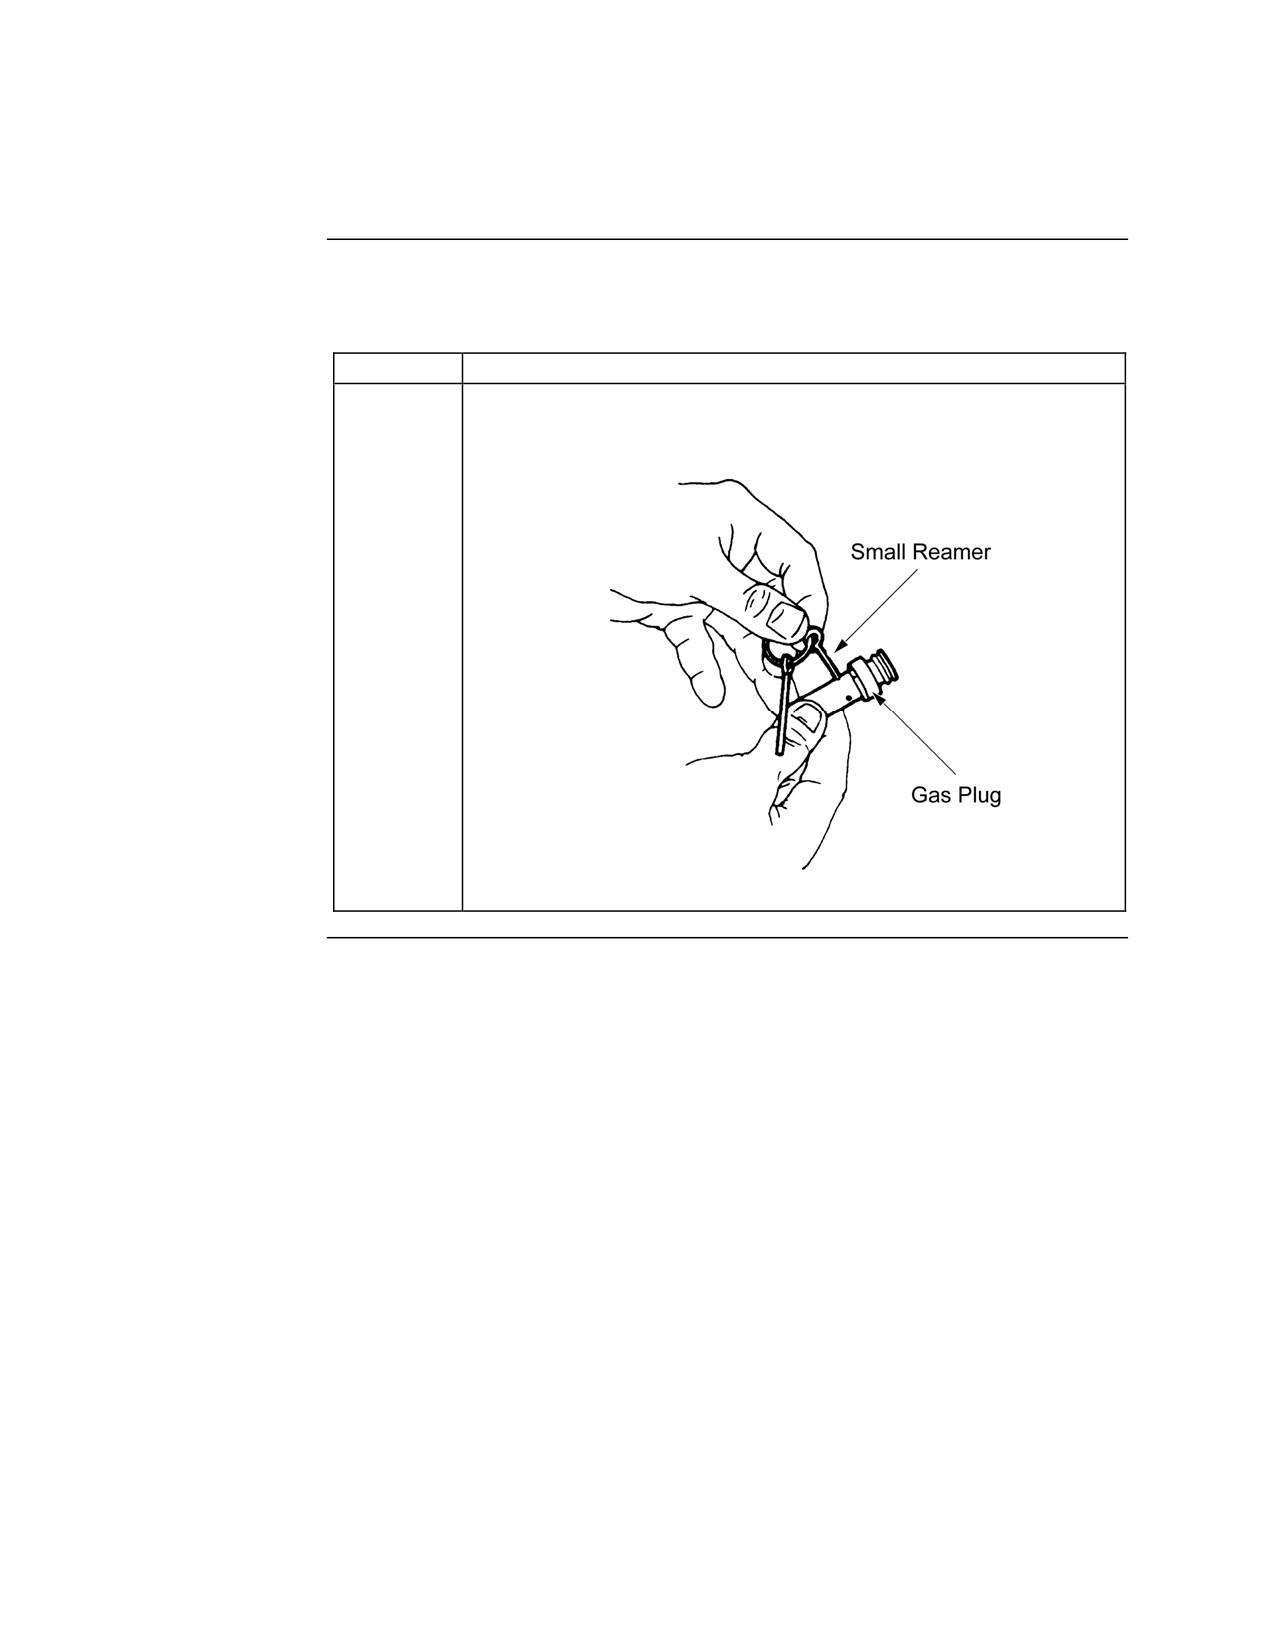
5
Insert the small reamer into each gas inlet hole of the gas
regulator plug and twist back-and-forth to remove carbon.
MCI Course 0321B
2-14
Study Unit 2, Lesson 2
Barrel Group, Continued
Maintaining
Use the procedure in the table below to maintain the barrels. Make sure the
procedure is done to both barrels:
Step
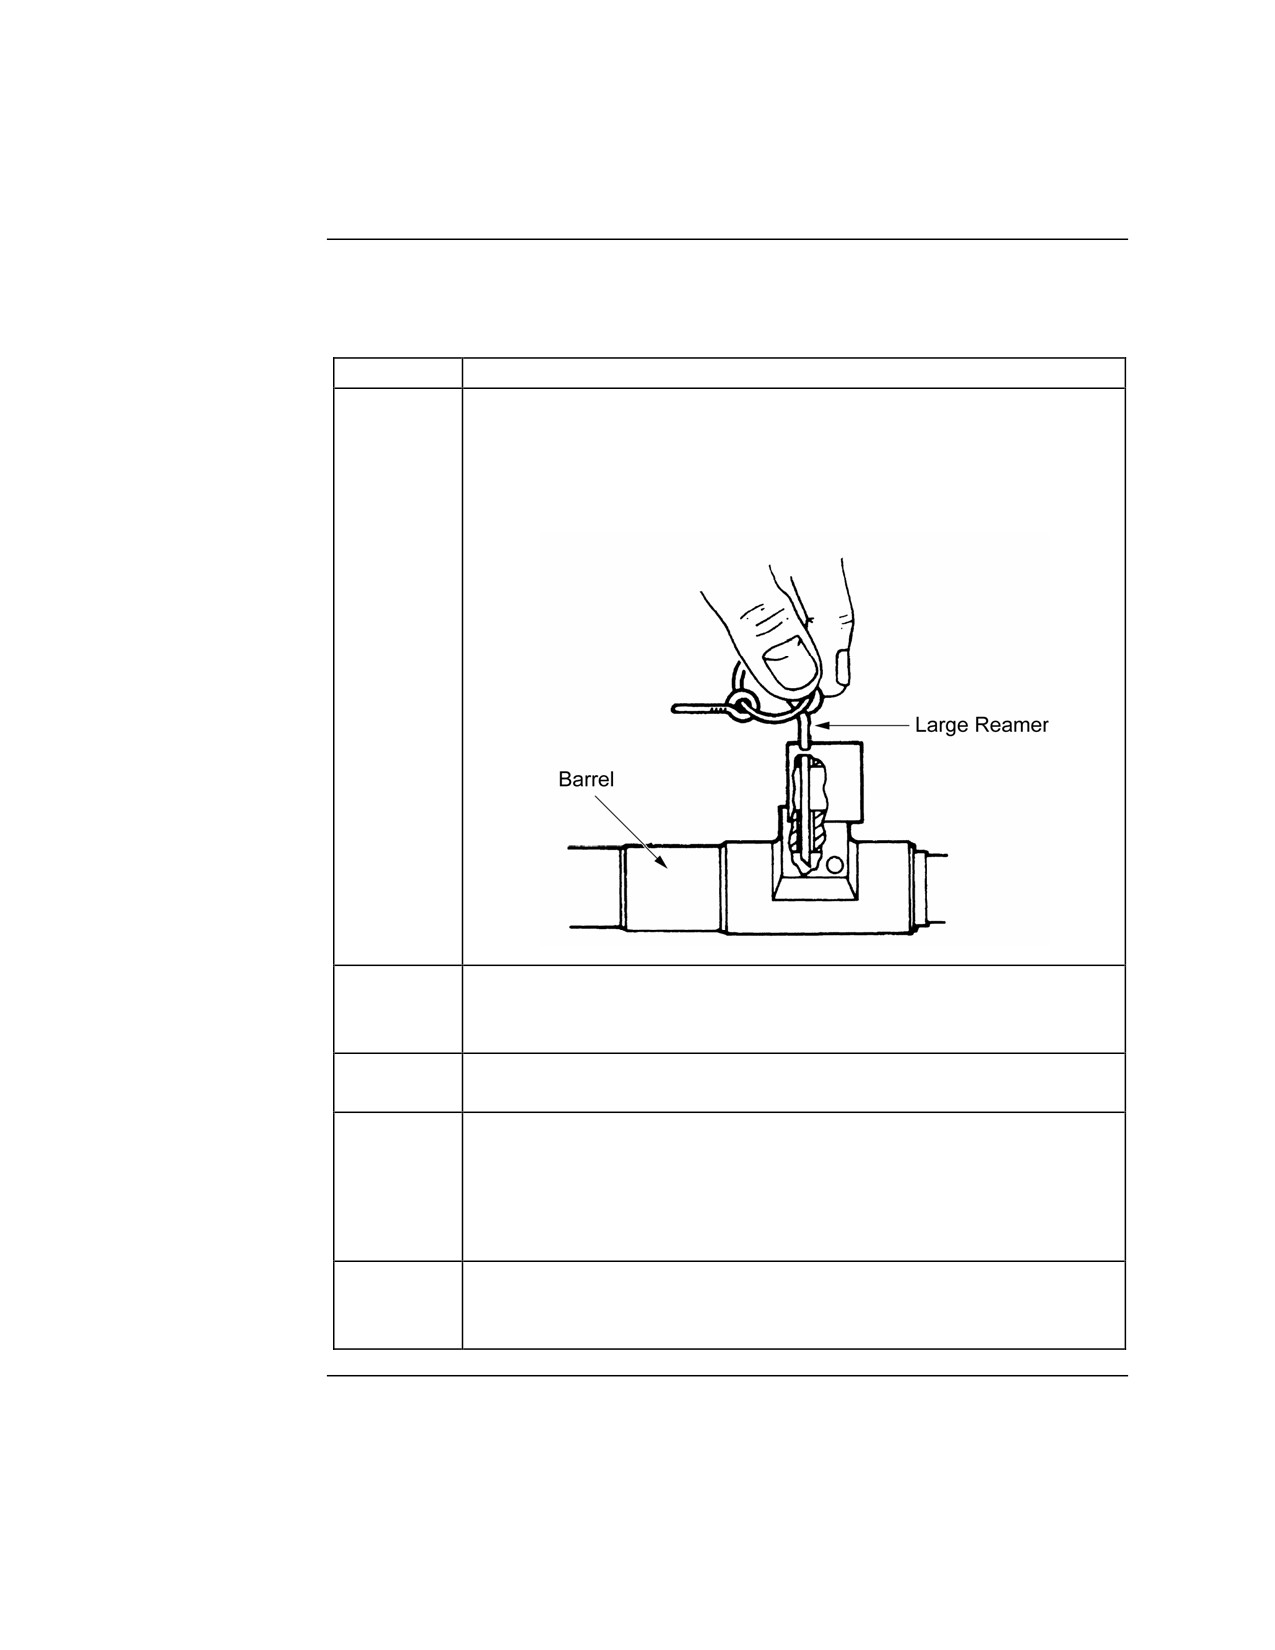
Action
1
Insert the large reamer through the hole in the gas port busing
into the gas port hole in the barrel. Twist the reamer back-and-
forth until the reamer enters the bore of the barrel to remove
carbon.
2
Remove carbon, dirt, and corrosion from the bore and chamber
using the cleaning rod with the bore brush, chamber brush, and
swabs dampened with CLP or RBC.
3
Clean the remaining parts of the barrel using a soft bristle brush
and wiping rag dampened with CLP.
4
Lubricate the barrel surfaces with CLP, LSA, or LSA-T.
• Apply a light coat of lubricant to all metal surfaces.
• Apply a light coat of lubricant to the bore using the
cleaning rod and a swab lightly moistened with lubricant.
5
Assemble the barrel group. Make sure the gas regulator plug is
set to 1 and facing the barrel before securing it with the gas
collar.
MCI Course 0321B
2-15
Study Unit 2, Lesson 2
Barrel Group, Continued
Inspecting
When inspecting the barrel group, look for the following:
• Cracks, dents, or metal burrs which may hinder the operation of the
weapon
• Obstructions in the bore or chamber of the barrel
• Damage to the front sight
• Damage to the barrel carrying handle, bracket, or bracket latch
• Damage to the flash hider
• Buffer plug damage
MCI Course 0321B
2-16
Study Unit 2, Lesson 2
Buttstock and Buffer Group
Maintaining
Use the procedure in the table below to maintain the trigger housing group:
Step
Action
1
Clean the metal parts: stock rails, buttstock latch, buttplate,
and rear sling attachment with CLP to remove any corrosion
and carbon residue.
2
Clean the composite/plastic parts with a damp wiping rag
removing any dirt or carbon residue.
3
Lubricate the buttstock and buffer assembly. Make sure
lubricant does not get on composite/plastic parts. Lightly
lubricate the
• Stock rails
• Buttstock latch
• Buttplate and rear sling attachment to prevent corrosion
Inspecting
When inspecting the buttstock and buffer group, look for the following:
• Loose fit when the buttstock assembly is attached to the receiver
• Proper operation of the buttstock latch
• Damage to the rear sling attachment
• Buffer plug sticking out 1/8 inch (weapon will not function.)
MCI Course 0321B
2-17
Study Unit 2, Lesson 2
Operating Group
Maintaining
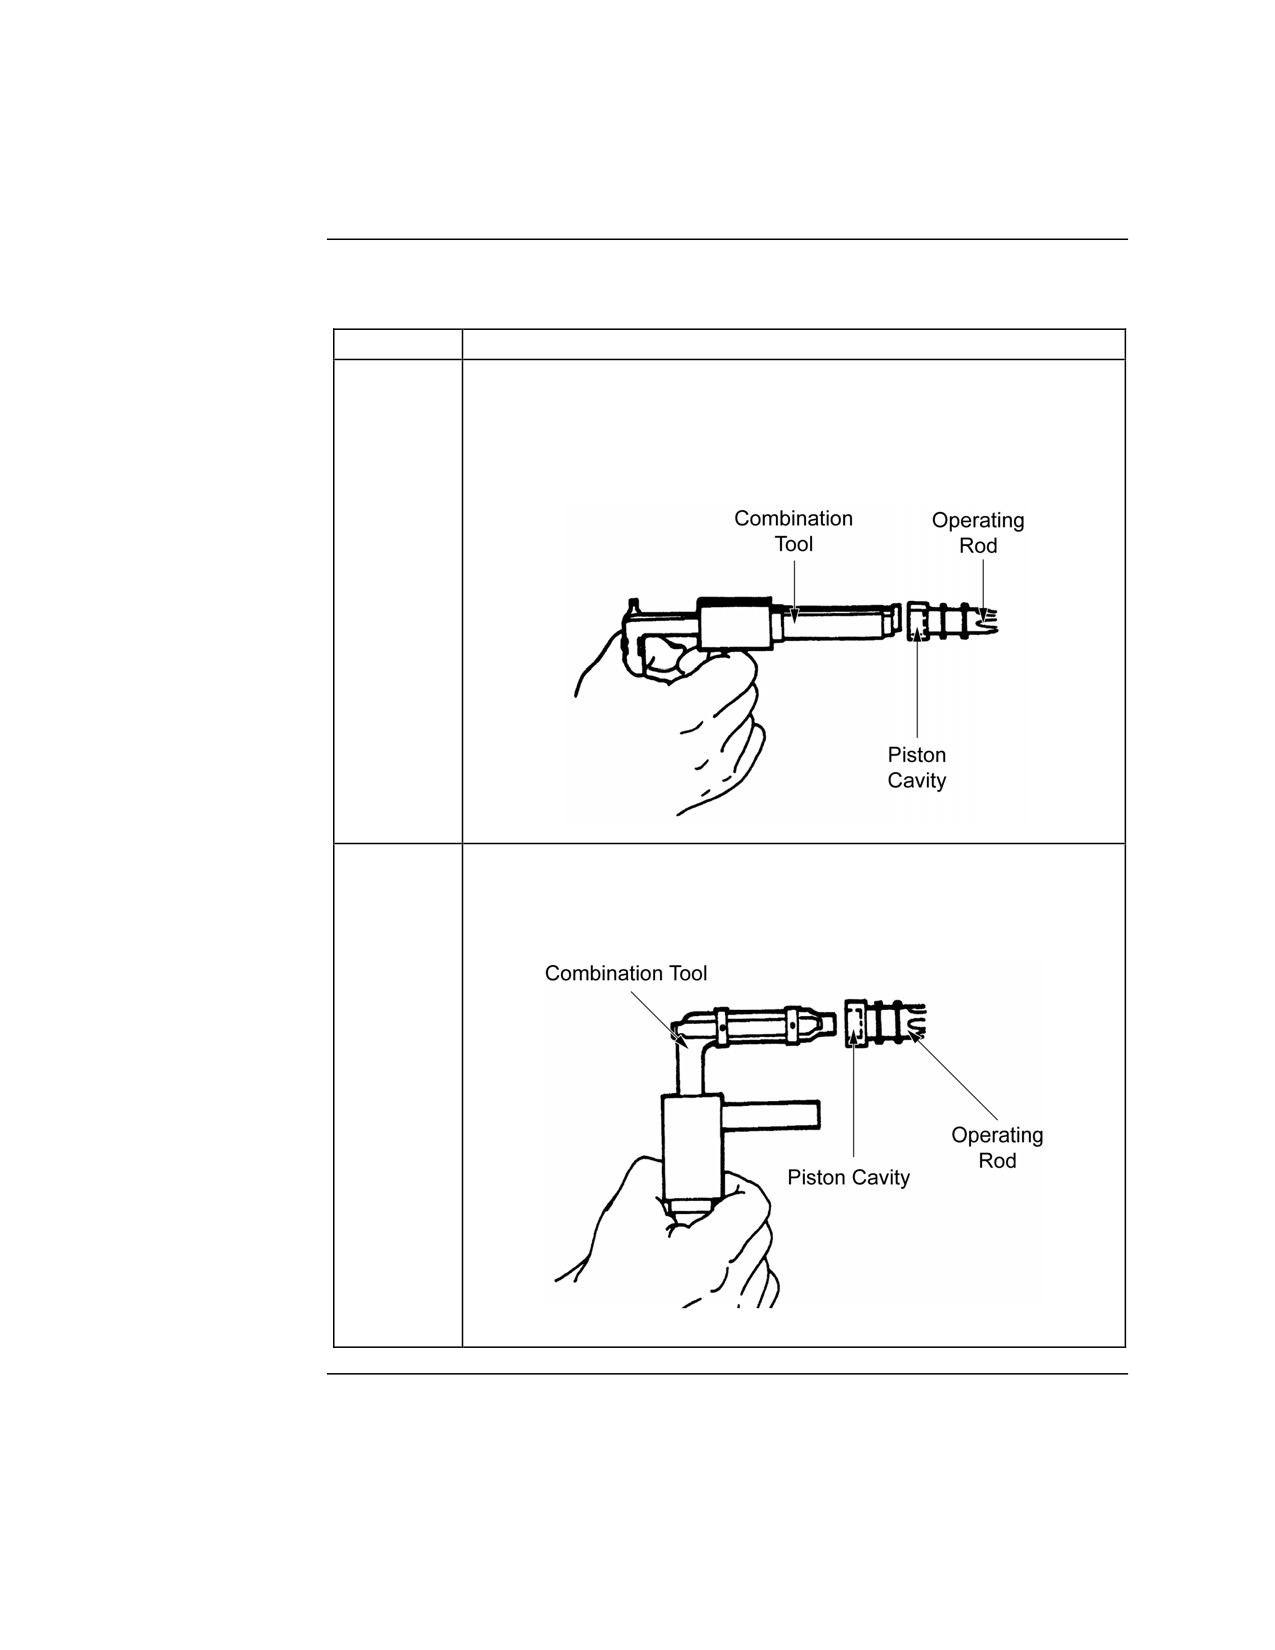
Use the procedure in the table below to maintain the operating group:
Step
Action
1
Insert the combination tool into the cavity of the piston on the
operating rod. Squeeze the handle firmly while twisting the
combination tool back-and-forth to remove carbon from the
sides of the cavity.
2
Insert the screwdriver end of the combination tool into the
cavity of the piston on the operating rod. Twist back-and-forth
to remove carbon in the bottom of the cavity.
Continued on next page
MCI Course 0321B
2-18
Study Unit 2, Lesson 2
Operating Group, Continued
Maintaining,
continued
Step
Action
3
Clean the remaining portions of the operating group to include
the operating rod, firing pin, bolt, and driving spring using an
all-purpose brush moistened with CLP and a wiping rag.
4
Apply a thin coat of lubricant to the operating group:
• Bolt and operating rod moving parts
• Polished areas
• Firing pin
• Linear roller
• Driving spring
5
Assemble the operating group.
Inspecting
When inspecting the operating group, look for the following:
• Burrs, cracks, broken pins or a frozen linear roller on the bolt and
operating rod.
• Broken strands on the driving spring. If two or more strands are broken
on the same coil or three or more strands are broken in any location,
notify unit maintenance.
MCI Course 0321B
2-19
Study Unit 2, Lesson 2
Trigger Housing Group
Maintaining
Use the procedure in the table below to maintain the trigger housing group:
Step
Action
1
Clean the internal parts with a cotton swab moistened with CLP
or RBC to remove any carbon residue.
2
Clean the outside with a cleaning rag.
3
Lubricate the internal moving parts including tripping lever,
sear, trigger, and trigger housing spring pin with a light coat of
lubricant.
Inspecting
When inspecting the trigger housing group, look for the following:
• Broken or damaged trigger housing lug.
• Broken, cracked, or missing grips.
• Make sure trigger guard is not bent and interferes with trigger operation.
• Burrs, cracks, or wear on the tripping lever and sear.
• Test cocking action by pushing back on the tripping lever then pulling
trigger.
• Test safety function. Place safety on SAFE, pull trigger, sear should not
lower. Place safety on FIRE, pull trigger, sear should lower.
MCI Course 0321B
2-20
Study Unit 2, Lesson 2
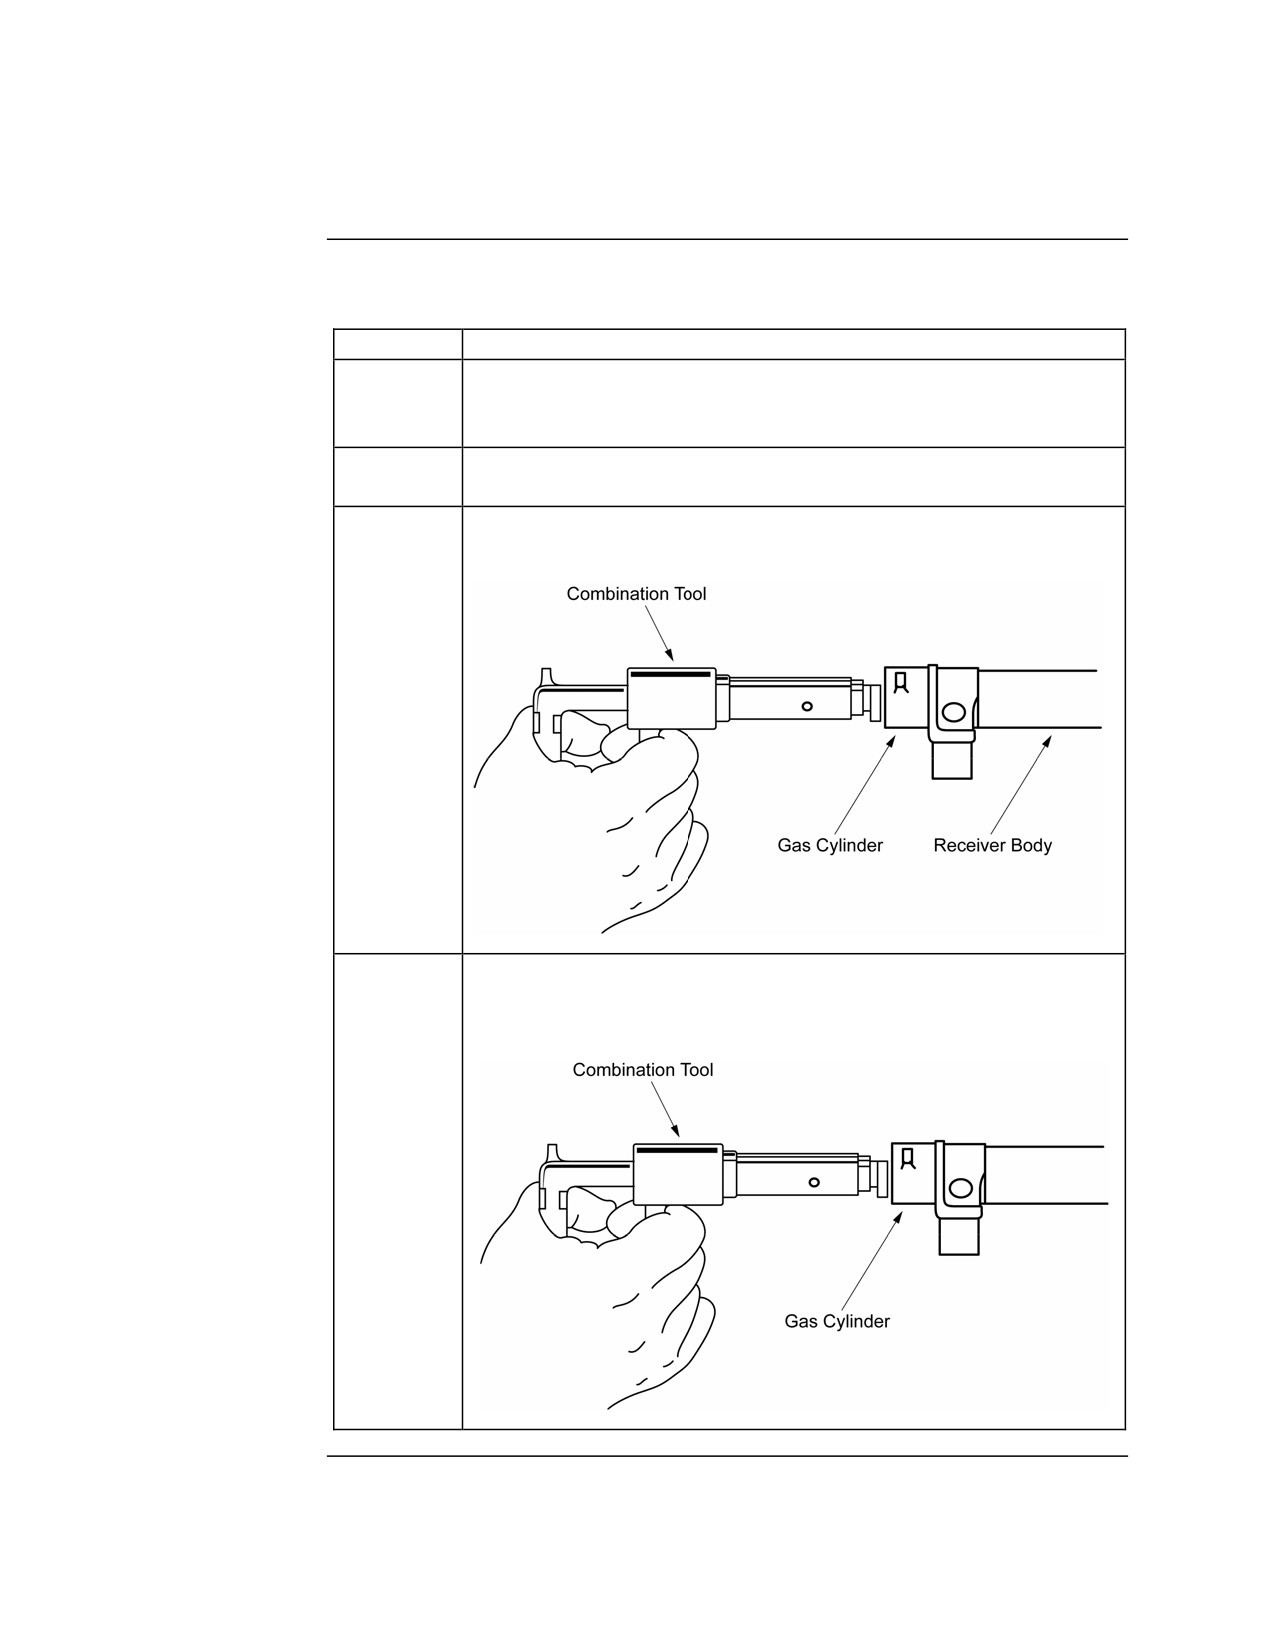
Receiver Group
Maintaining
Use the procedure in the table below to maintain the receiver group:
Step
Action
1
Remove carbon from inside of cover assembly using wiping
rags and swaps moistened with CLP. Pay close attention to the
moving parts such as the feed pawls and feed lever.
2
Clean the top of the cover and accessory mounting rails with a
wiping rag and all-purpose brush moistened with CLP.
3
Carefully insert the combination tool into the fore end of the
gas cylinder of the receiver body.
4
Make sure the combination tool is fully seated in the gas
cylinder. Apply slight pressure to the handles and twist back-
and-forth to remove carbon.
Continued on next page
MCI Course 0321B
2-21
Study Unit 2, Lesson 2
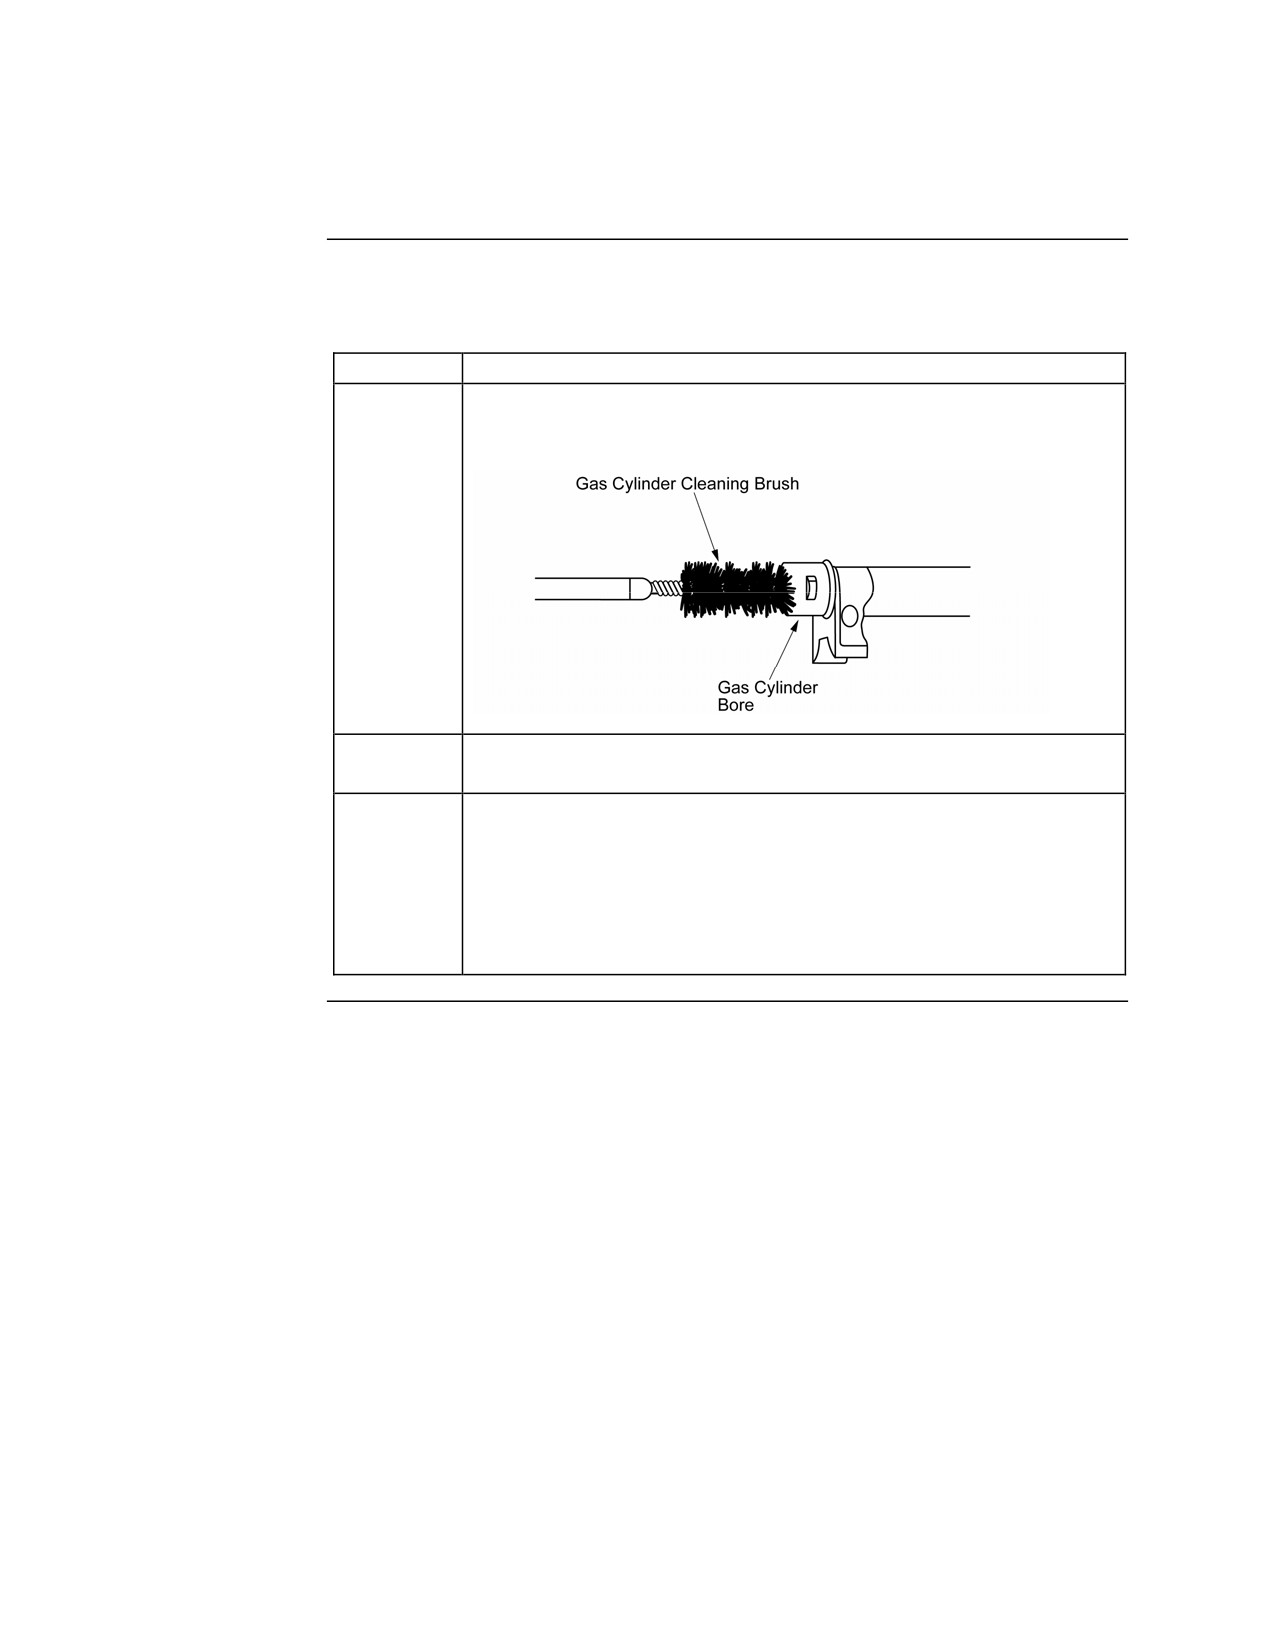
Receiver Group, Continued
Maintaining,
continued
Step
Action
5
Clean the gas cylinder bore with the gas cylinder brush
moistened with CLP or RBC.
6
Clean the remainder of the receiver group to include the
receiver body, rear sight, and bipods.
7
Lightly lubricate the receiver group:
• Moving parts of the cover assembly
• Moving parts of the receiver body
• Rails inside the receiver body
• Moving parts of the bipod assembly
Continued on next page
MCI Course 0321B
2-22
Study Unit 2, Lesson 2
Receiver Group, Continued
Inspecting
When inspecting the receiver group, check the following:
• Proper operation of the bipod latch
• Proper operation of the bipod assembly
• Spring tension on the front and rear feed pawls (press on them.)
• Spring tension on the feed arm (move it back and forth.)
• Spring tension on the cartridge guides
• Excessive wear of the moving parts of the cover
• Proper operation of the cover latches
• Damage to the mounting rail on the cover
• Spring tension and operation of the barrel locking latch
• Smooth operation of the cocking handle
• Damage on the rear sight assembly
• Operation of the rear sight assembly
MCI Course 0321B
2-23
Study Unit 2, Lesson 2
Care and Cleaning Before, During, and After Firing
Before Firing
Before firing the M240G, the operator should
• Inspect the M240G for cleanliness, proper mechanical condition (function
check), and missing or broken parts.
• Remove excess lubricant from the bore, chamber, barrel socket, and face
of the bolt.
• Apply lubricant on the recesses of the operating rod that make contact with
the receiver rails.
• Lightly lubricate the spring pin, roller, and other moving parts of the bolt.
• Lubricate the receiver by pulling the bolt to the rear with the cocking
handle and running a line of lubricant on either side of the bolt. Manually
pull the bolt back and forth to spread the lubricant over the bolt and
receiver rails.
Check
Check the headspace of both barrels by rotating the barrel handle and
Headspace
counting the number of clicks heard. There should be a minimum of two
clicks and a maximum of seven. If there are less than two or more than
seven, the weapon should not be fired, but turned in for higher level
maintenance.
During Firing
Maintain a light coat of lubrication on the areas that were lubricated prior to
firing. Ensure the gas system remains tight. Change barrels when necessary.
After Firing
After firing the M240G, the operator should
• Perform operator maintenance for three consecutive days. After cleaning
each day, all cleaning materials should be wiped off the weapon. Then,
place a light coat of CLP on all metal surfaces.
• If the weapon is fired daily, general cleaning should be performed on the
weapon broken down into the five main groups. Repeated detailed
disassembly will cause unnecessary wear.
MCI Course 0321B
2-24
Study Unit 2, Lesson 2
Lesson 2 Exercise
Directions
Complete exercise items 1 through 6 by performing the action required.
Check your answers against those listed at the end of this lesson.
Item 1
Before performing maintenance on the M240G medium machinegun, the
operator should
a. request authorization from the section leader.
b. soak the entire machinegun in dry cleaning solvent for one hour.
c. fire the machinegun so that it is dirty.
d. clear the weapon prior to disassembling it.
Item 2
When cleaning the gas regulator plug, the operator should use ____________
to remove carbon.
a. the scraper tool
b. a screwdriver
c. steel wool
d. abrasive cleaners
Item 3
How many strands can be broken on a single coil of the driving spring before
it should be replaced?
a.
1
b.
2
c.
3
d.
4
Continued on next page
MCI Course 0321B
2-25
Study Unit 2, Lesson 2 Exercise
Lesson 2 Exercise, Continued
Item 4
Prior to firing the M240G, the operator should remove excess lubricant from
the
a. front and rear sight assemblies.
b. belt of ammunition.
c. bore, chamber, barrel socket, and face of the bolt.
d. barrel surface.
Item 5
When checking the headspace on the M240G, there should be between
________ and ________ clicks.
a.
1; 5
b.
2; 5
c.
1; 7
d.
2; 7
Continued on next page
MCI Course 0321B
2-26
Study Unit 2, Lesson 2 Exercise
Lesson 2 Exercise, Continued
Answers
The table below lists the answers to the exercise items. If you have questions
about the items, refer to the reference page.
Item Number
Answer
Reference Page
1
d
2-11
2
a
2-12
3
b
2-19
4
c
2-24
5
d
2-24
Summary
In this lesson, you have learned how to properly care for the M240G medium
machinegun.
In the next lesson, you will learn how to care for the associated components
such as the M122 tripod and the flex-mount/T&E mechanism.
MCI Course 0321B
2-27
Study Unit 2, Lesson 2 Exercise
(This page intentionally left blank.)
MCI Course 0321B
2-28
Study Unit 2, Lesson 2 Exercise
LESSON 3
CARING FOR THE SL-3 COMPONENTS
Introduction
Scope
Often, the associated components are needed to help accomplish the mission
with the M240G. If the tripod or mount fails during combat, it can have
serious consequences on the outcome of the mission.
In this lesson, you will learn how to care for the associate components of the
M240G medium machinegun.
Learning
Upon completion of this lesson, you should be able to
Objectives
• Identify the procedures for caring for the M122 tripod.
• Identify the procedures for caring for the flex-mount/T&E mechanism.
• Identify the procedures for caring for the carrying bag and the spare barrel
bag.
In This Lesson This lesson contains the following topics.
Topic
See Page
Introduction
2-29
M122 Tripod
2-30
Flex-Mount/T&E Mechanism
2-31
Carrying Bag and Spare Barrel Bag
2-32
Lesson 3 Exercise
2-33
MCI Course 0321B
2-29
Study Unit 2, Lesson 3
M122 Tripod
Cleaning
To clean the M122 tripod, do the following:
• Remove all dirt using a soft bristle brush and a damp wiping rag.
• Remove any corrosion using a soft bristle brush dampened with CLP.
Inspecting
Inspect the following areas on the M122 tripod:
• Rear legs expand properly and lock in place
• Sleeve latch functions properly
• Front leg folds out properly
• Legs are not bent
• Markings on the traverse slide bar are legible
• Pintle lock functions by locking the flex-mount onto the tripod head
Lubricating
Lubricate the M122 tripod using the same guidelines for the M240G medium
machinegun. Lightly lubricate the following areas of the tripod:
• Pintle lock assembly
• Sleeve latch
• Moving parts of the sleeve and portion of the legs on which the sleeves
slide
MCI Course 0321B
2-30
Study Unit 2, Lesson 3
Flex-Mount/T&E Mechanism
Cleaning
To clean the flex-mount/T&E mechanism, do the following:
• Remove all dirt with a soft bristle brush and a damp wiping rag.
• Remove any corrosion with a soft bristle brush dampened with CLP.
• Extend the T&E mechanism to clean the entire length of both the upper
and lower elevating screws.
• Turn the traversing handwheel all the way in both directions to clean the
entire traversing screw.
Inspecting
Inspect the following areas on the flex-mount/T&E mechanism:
• Pintle for excessive wear or burrs that may interfere with its fit into the
tripod
• Pivot points on the flex-mount so
• that they move freely
• Brass deflector is not bent up to obstruct the ejection of brass during
operation
• Traversing handwheel for smooth operation and dead clicks
• Elevating handwheel for smooth operation and dead clicks
• Elevation and traverse scales can be read without difficulty
• Traversing slide lock lever or proper operation
Lubricating
Lubricate the flex-mount/T&E mechanism using the same guidelines for the
M240G medium machinegun. Lightly lubricate the flex-mount/T&E
mechanism:
• Pivot points on the flex-mount
• Entire length of the upper and lower elevating screws
• Entire traversing screw
• Pivot point on the traversing slide lock lever
MCI Course 0321B
2-31
Study Unit 2, Lesson 3
Carrying Bag and Spare Barrel Bag
Cleaning
To clean the bags, use the following guidelines:
• Remove any dirt or mud with a stiff bristle brush.
• Wash the bags with a mild detergent and cold or warm water. Rinse
thoroughly with clean water.
• Air dry the bags in the shade or indoors.
• Do not wash in hot water.
• Do not wash or dry in laundry machines.
• Do not use chlorine bleach, yellow soap, cleaning fluids, or solvents to
clean the bags.
• Do not dry in direct sunlight, direct or extreme heat, or with an open
flame.
• Do not attempt to dye or repair the bags. Turn them in for replacement.
Inspecting
Inspect the following on the carrying and spare barrel bags:
• Excessive wear
• Closures on both bags for serviceability
• Retaining straps for serviceability
• Carrying straps for serviceability
MCI Course 0321B
2-32
Study Unit 2, Lesson 3
Lesson 3 Exercise
Directions
Complete exercise items 1 through 3 by performing the action required.
Check your answers against those listed at the end of this lesson.
Item 1
When caring for the M122 tripod, what are the three areas you should
lubricate?
•
___________________________________________________________
•
___________________________________________________________
•
___________________________________________________________
Item 2
When caring for the T&E mechanism, what two components should be
checked for smooth operation and dead clicks?
•
___________________________________________________________
•
___________________________________________________________
Item 3
When cleaning the carrying bag or spare barrel bag, do not
•
___________________________________________________________
•
___________________________________________________________
•
___________________________________________________________
•
___________________________________________________________
•
___________________________________________________________
Continued on next page
MCI Course 0321B
2-33
Study Unit 2, Lesson 3
Lesson 3 Exercise, Continued
Answers
The table below provides the answers to the exercise items. If you have any
questions, refer to the reference page listed for each item.
Item Number
Answer
Reference Page
1
• Pintle latch assembly
2-30
• Sleeve latch
• Portion of legs on which the
sleeves move
2
• Traversing handwheel
2-31
• Elevating handwheel
3
• Do not wash in hot water.
2-32
• Do not wash or dry in laundry
machines.
• Do not use chlorine bleach, yellow
soap, cleaning fluids, or solvents
to clean the bags.
• Do not dry in direct sunlight,
direct or extreme heat, or with an
open flame.
• Do not attempt to dye or repair the
bags.
Lesson
In this lesson, you learned how to properly care for the M122 tripod, flex-
Summary
mount/T&E mechanism, and the carrying bags.
Study Unit 2
In this study unit, you learned which cleaning materials and lubricants are
Summary
authorized for use on the M240G medium machinegun. Also, you learned
how to properly clean, inspect, and lubricate the different parts of the weapon
and its associated components. Proper cleaning with the proper materials is
instrumental in keeping the M240G medium machinegun operational and in
the fight.
In the next study unit, you will learn how to mount, load, zero, operate, and
troubleshoot the M240G.
MCI Course 0321B
2-34
Study Unit 2, Lesson 3
STUDY UNIT 3
OPERATING THE M240G MEDIUM MACHINEGUN
Overview
Scope
Proper operation of the M240G is the key to a successful mission. As the
operator, you need to know how to properly setup and load the weapon to get
accurate fire on your targets as quickly as possible. The mission may depend
on your ability to accurately suppress the enemy and destroy targets. If your
M240G stops working, you have to be able to identify the problem, correct it,
and get your weapon back in action with minimal down time.
In this study unit, you will learn how to mount the M240G on bipod and
tripod mounts; loading and unloading procedures; how to fire the weapon;
how to zero the weapon; and how to troubleshoot problems if something goes
wrong.
In This Study
This study unit contains the following lessons:
Unit
Lesson
See Page
Mounting
3-3
Loading and Unloading
3-19
Firing
3-27
Zeroing
3-47
Troubleshooting
3-57
MCI Course 0321B
3-1
Study Unit 3
(This page left intentionally blank)
MCI Course 0321B
3-2
Study Unit 3
LESSON 1
MOUNTING
Introduction
Scope
Being able to operate the M240G and provide accurate fire is essential to the
mission. Hollywood has portrayed automatic weapons as being effective
when fired as the action star is running into combat—each round hitting its
intended target every time. The truth is automatic weapons are only effective
and accurate when they have a stable base to fire from.
In this lesson, you will learn how to properly set up the M240G for firing
from the attached bipod and the M122 tripod.
Learning
Upon completion of this lesson, you will be able to
Objectives
• List the steps for setting up the M240G with the bipod mount.
• List the steps for setting up the M240G with the tripod mount.
• List the steps for preparing the T&E mechanism.
In This Lesson This lesson contains the following topics:
Topic
See Page
Introduction
3-3
Using the Bipod
3-4
Using the Tripod
3-7
Lesson 1 Exercise
3-17
MCI Course 0321B
3-3
Study Unit 3, Lesson 1
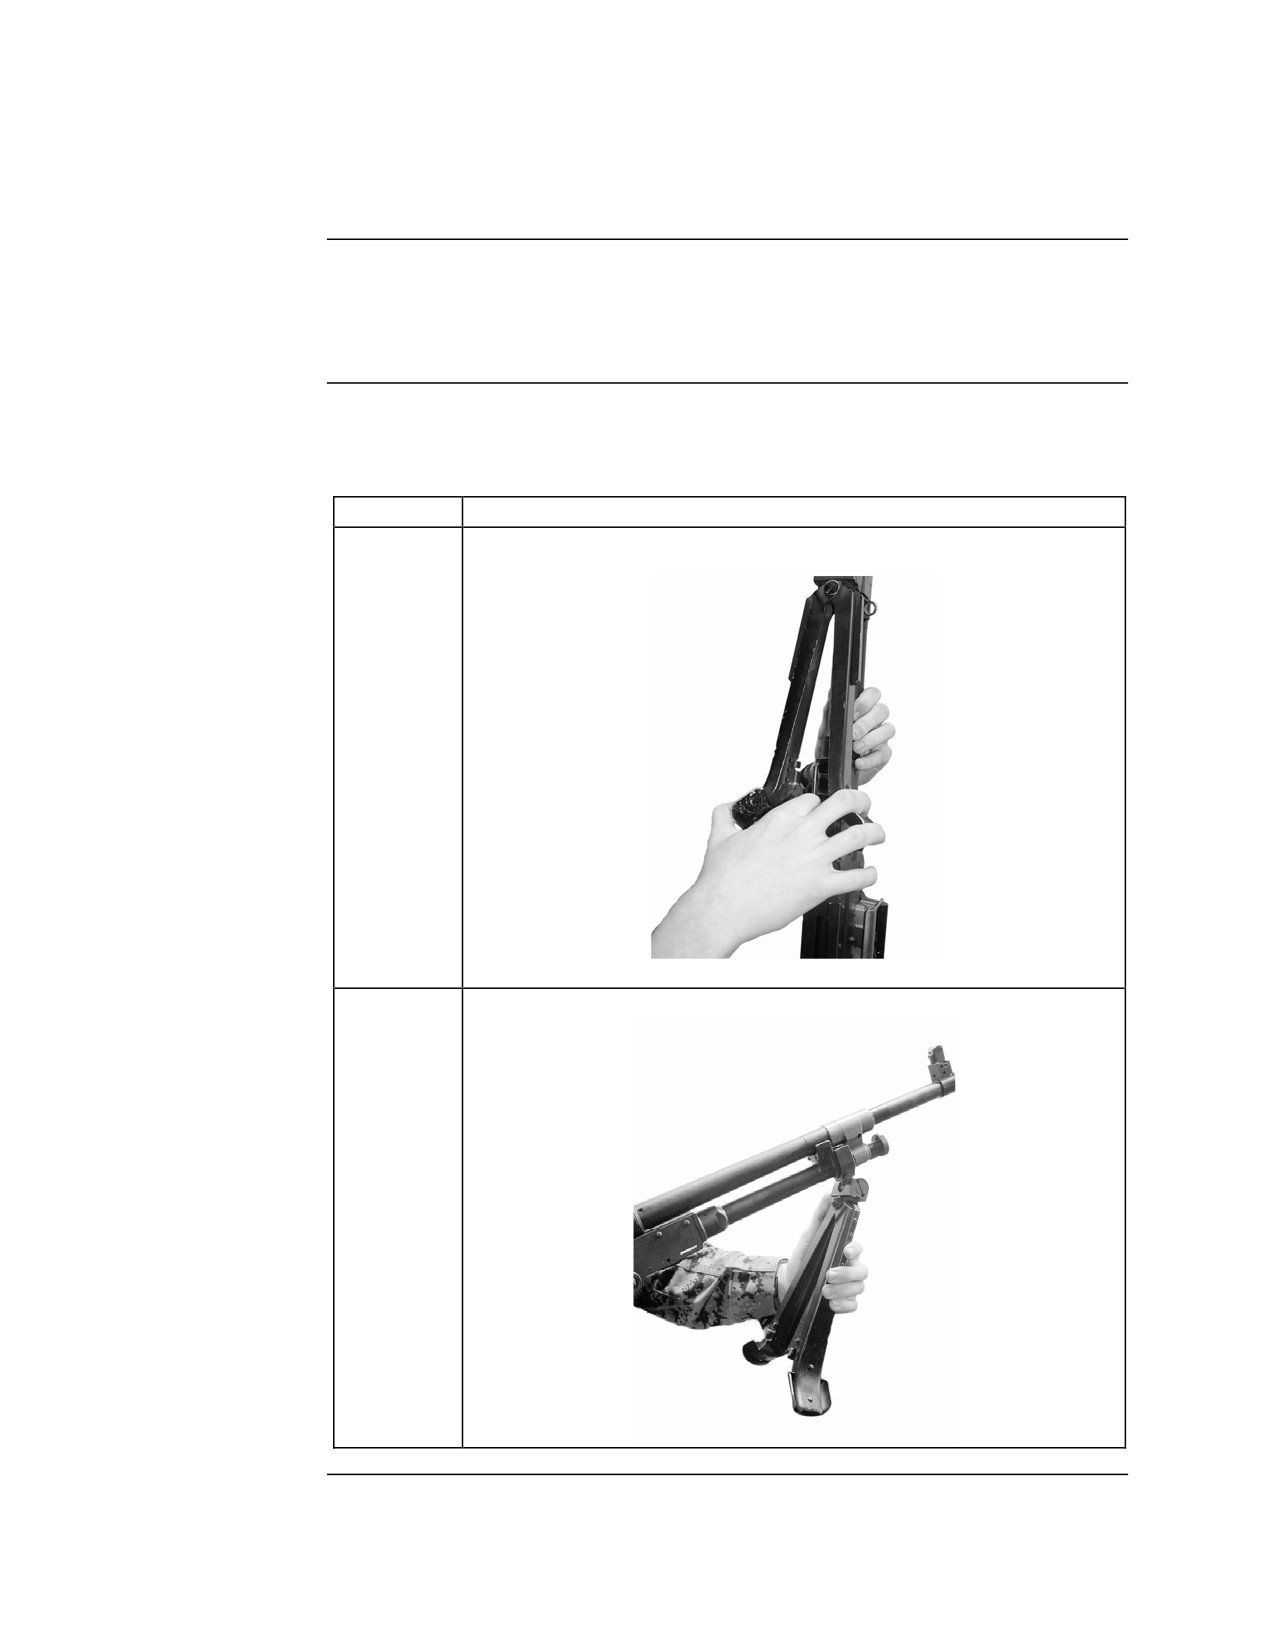
Using the Bipod
The Bipod
The bipod is permanently attached to the M240G and is a part of the receiver
group. The bipod is attached to the receiver by a ball joint that allows limited
movement.
Lowering the
Use the steps listed in the table below to lower the bipod:
Bipod
Step
Action
1
Grasp the bipod and push in on the bipod latch.
2
Rotate the bipod legs down and forward.
Continued on next page
MCI Course 0321B
3-4
Study Unit 3, Lesson 1
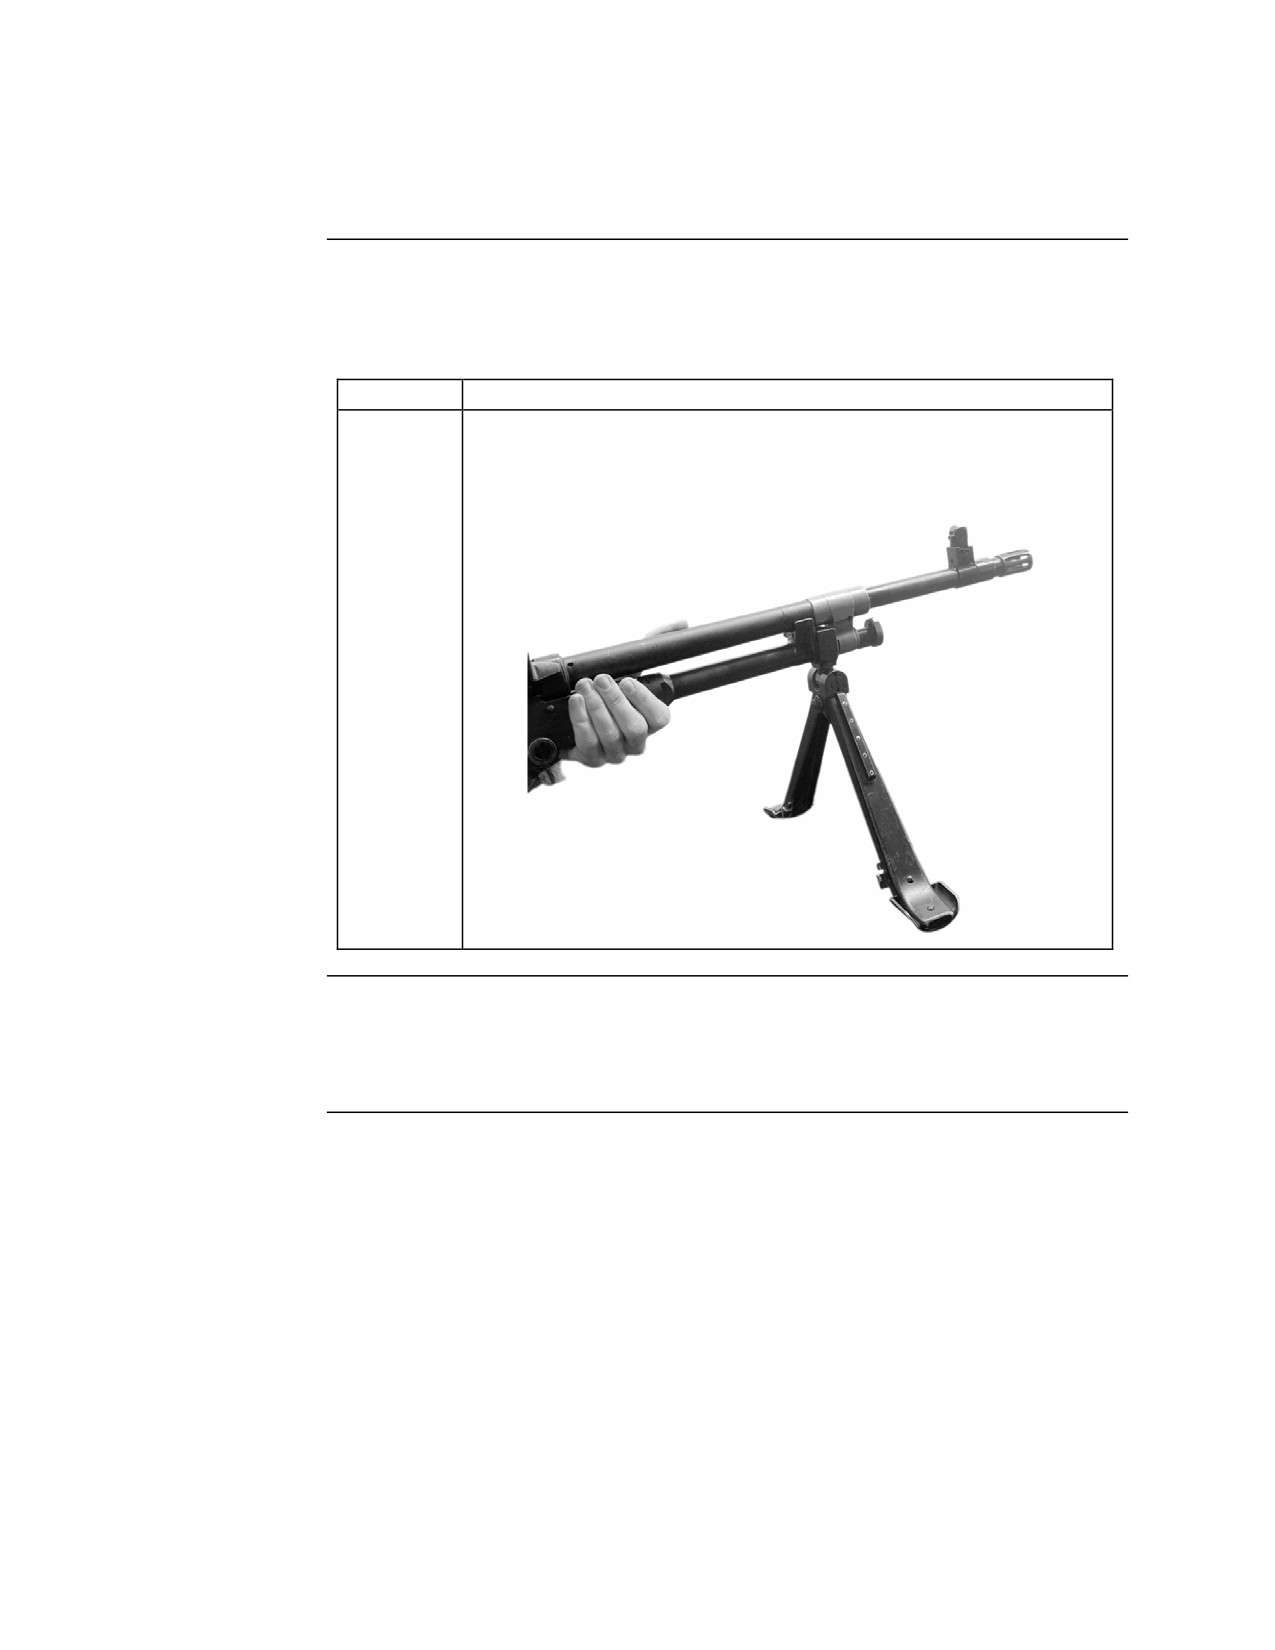
Using the Bipod, Continued
Lowering the
Bipod,
continued
Step
Action
3
Release the legs. They will automatically expand to the
outward and locked position.
Moving the
The bipod pivots on the ball joint, allowing quick and easy left or right lateral
M240G on the
movement of the weapon.
Bipod
Continued on next page
MCI Course 0321B
3-5
Study Unit 3, Lesson 1
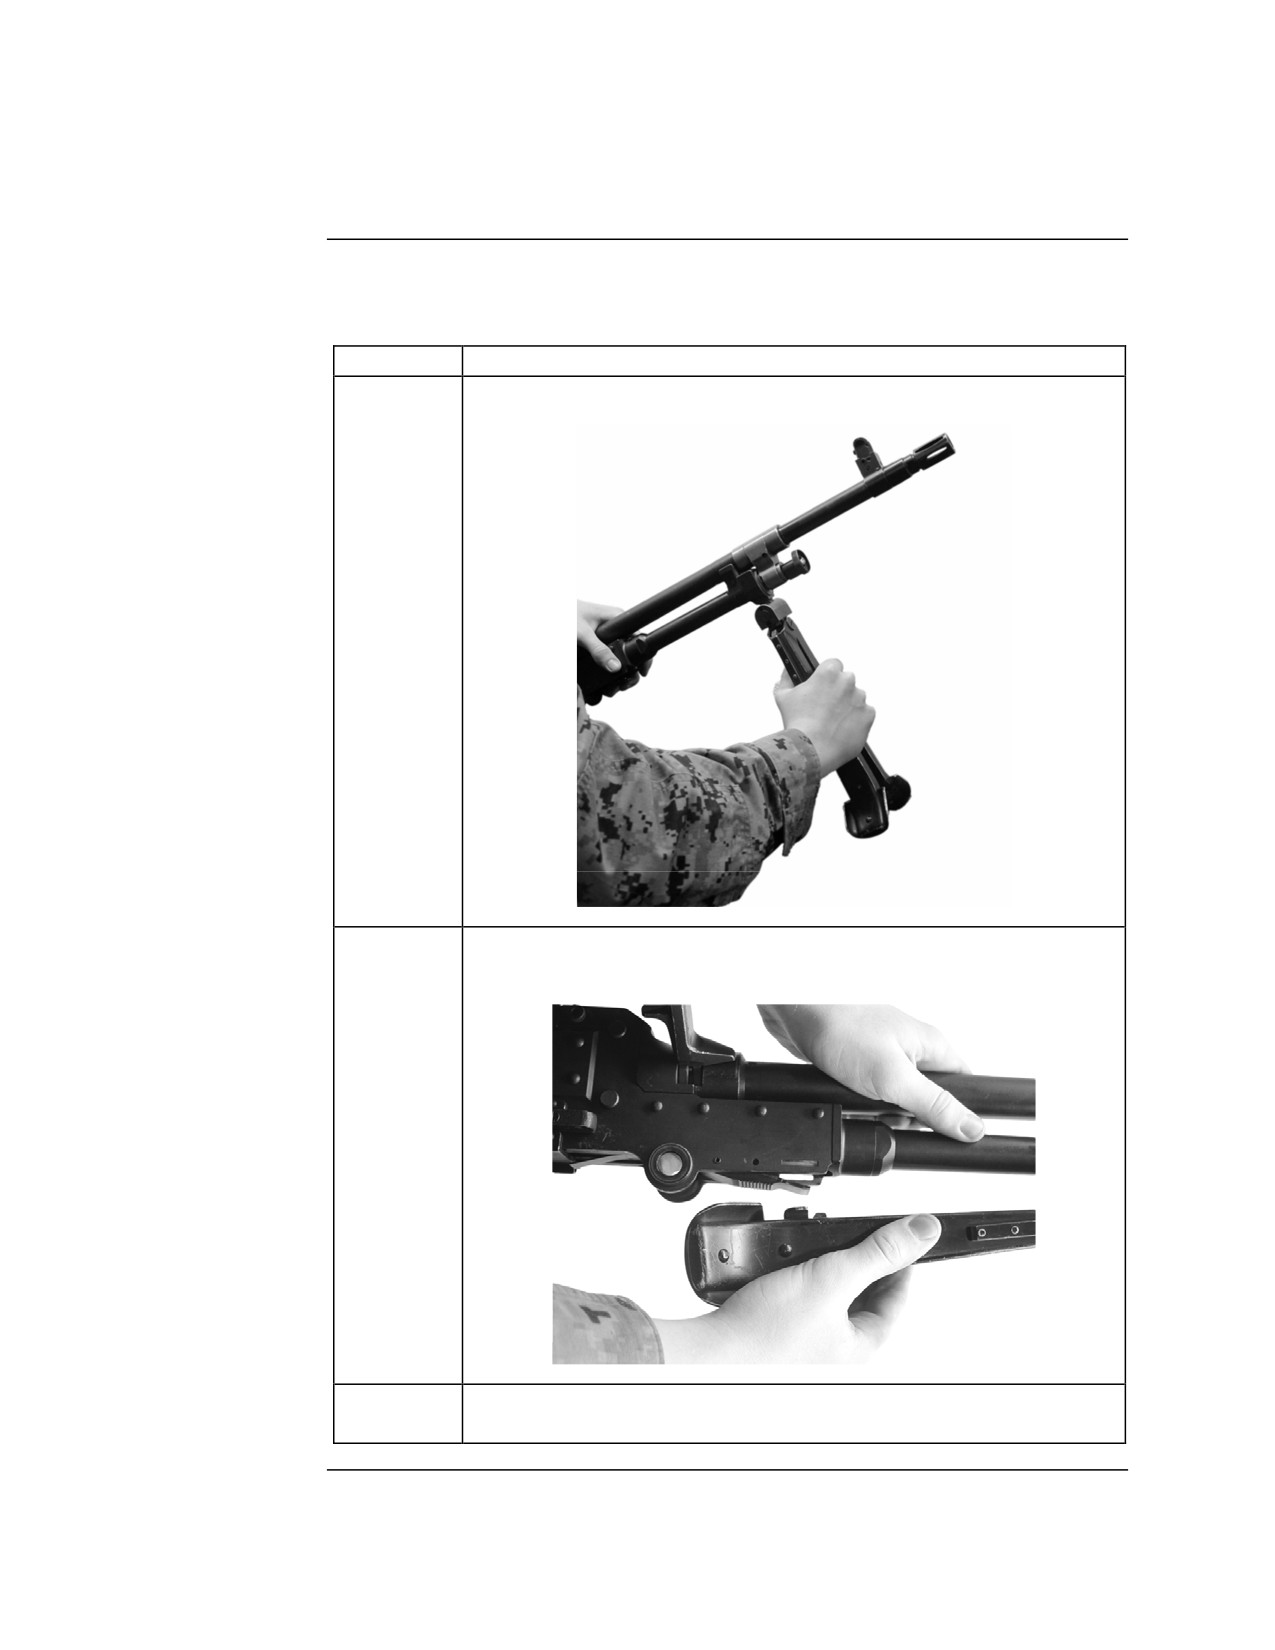
Using the Bipod, Continued
Raising the
The steps for raising the bipod are listed in the table below:
Bipod
Step
Action
1
Squeeze the bipod legs together.
2
Rotate the legs rearward and upward into the slot on the bottom
of the receiver.
3
Push in until the bipod latch engages, locking the bipod in
place.
MCI Course 0321B
3-6
Study Unit 3, Lesson 1
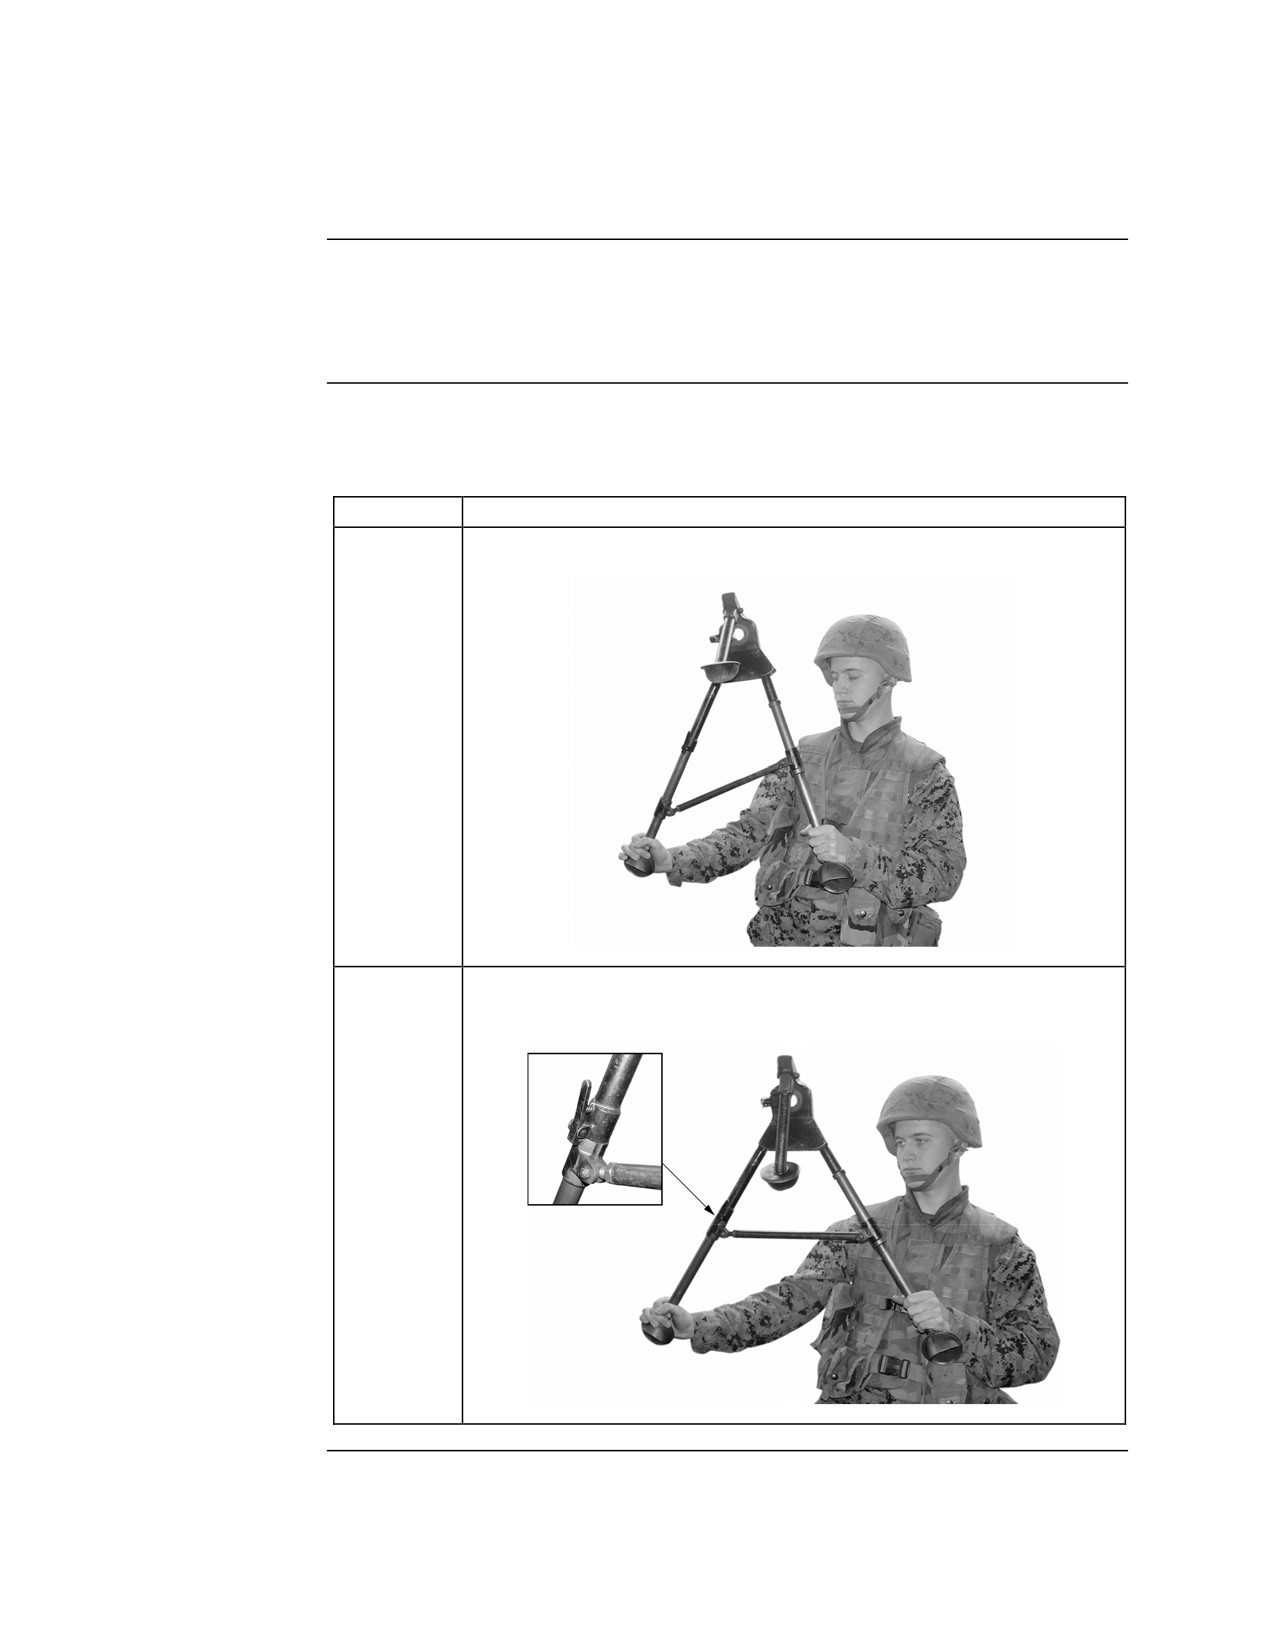
Using the Tripod
The Tripod
The tripod mount consists of the M122 tripod and the flex-mount with T&E
Mount
mechanism. The tripod provides a stable and lightweight base that is far
superior to the bipod. The tripod is the preferred method of employment.
Setting up the
The steps for setting up the tripod are listed in the table below:
Tripod
Step
Action
1
Spread the rear tripod legs apart to extend them.
2
Continue until the sleeve latch engages, locking them in the
open position.
Continued on next page
MCI Course 0321B
3-7
Study Unit 3, Lesson 1
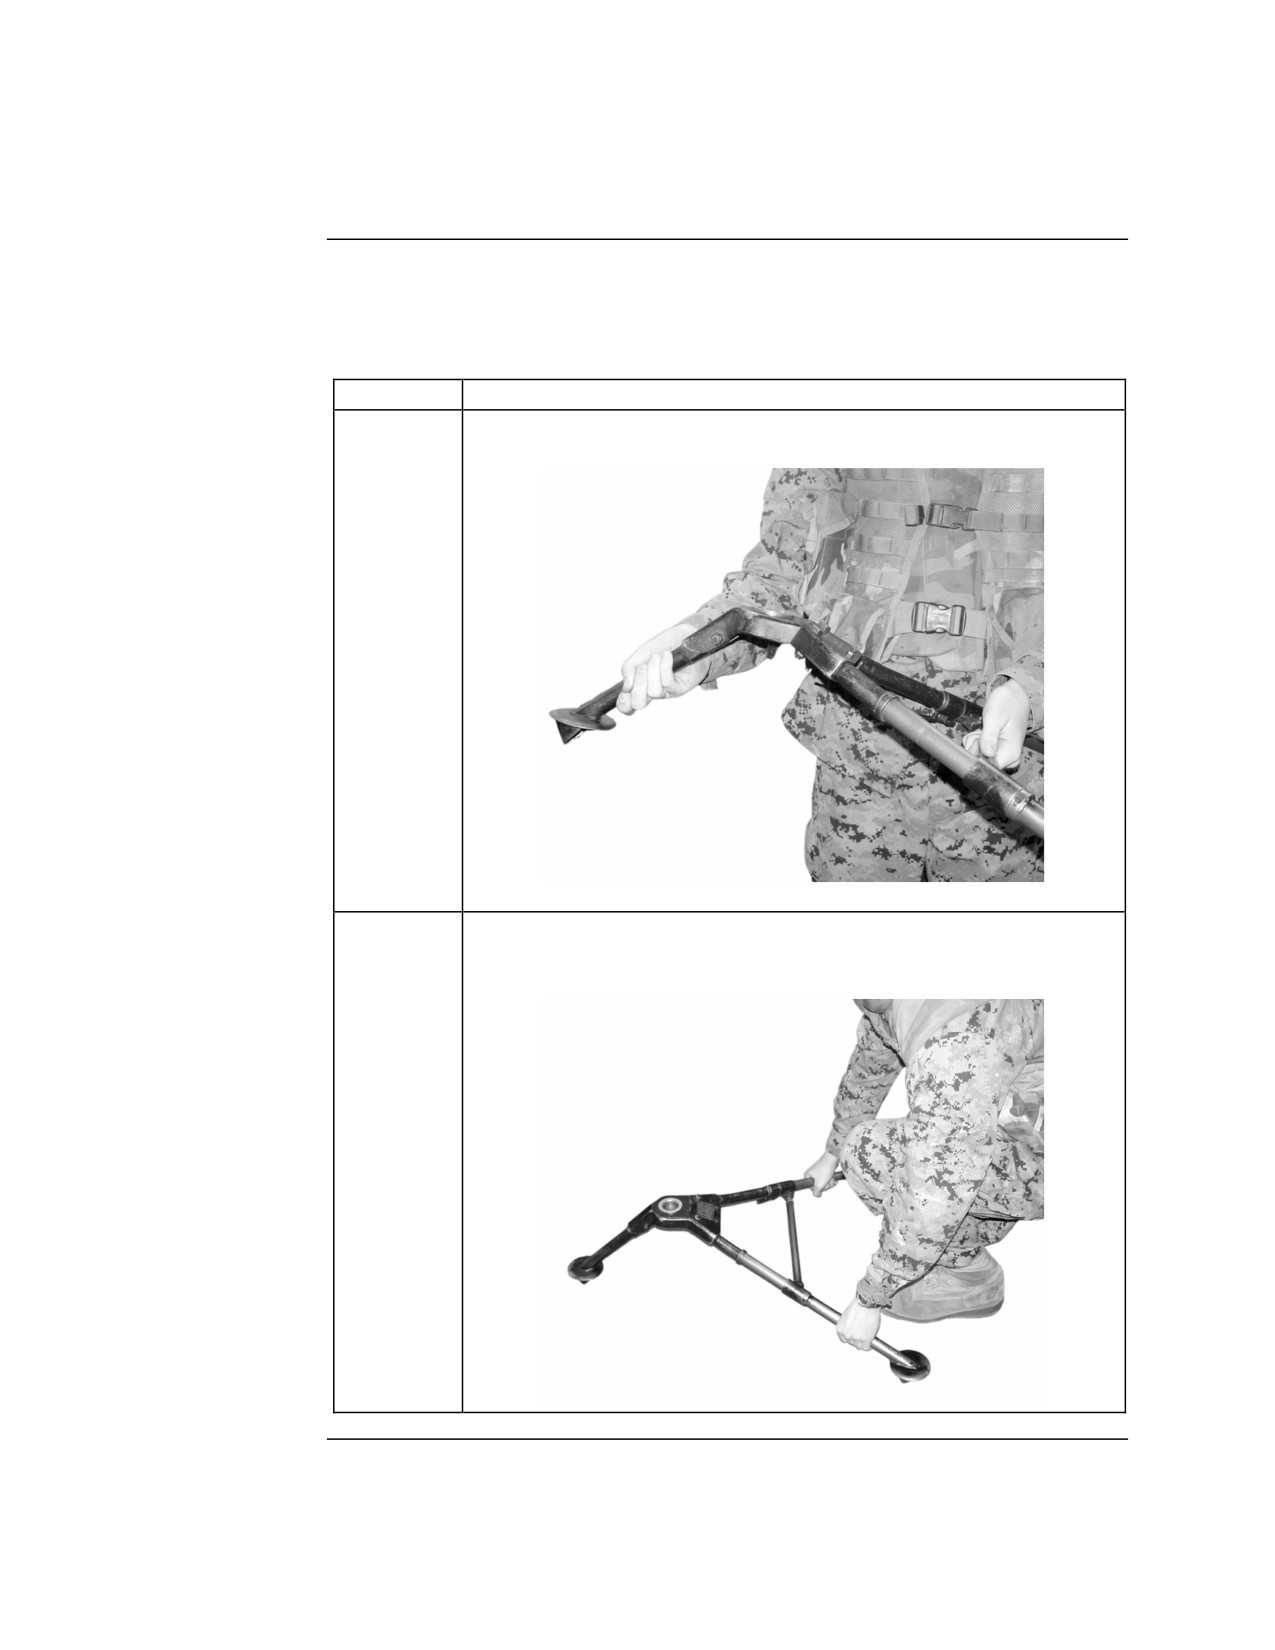
Using the Tripod, Continued
Setting up the
Tripod,
continued
Step
Action
3
Extend the front leg to the open position.
4
Place the tripod on the ground with the front leg point in the
general direction of fire.
Continued on next page
MCI Course 0321B
3-8
Study Unit 3, Lesson 1
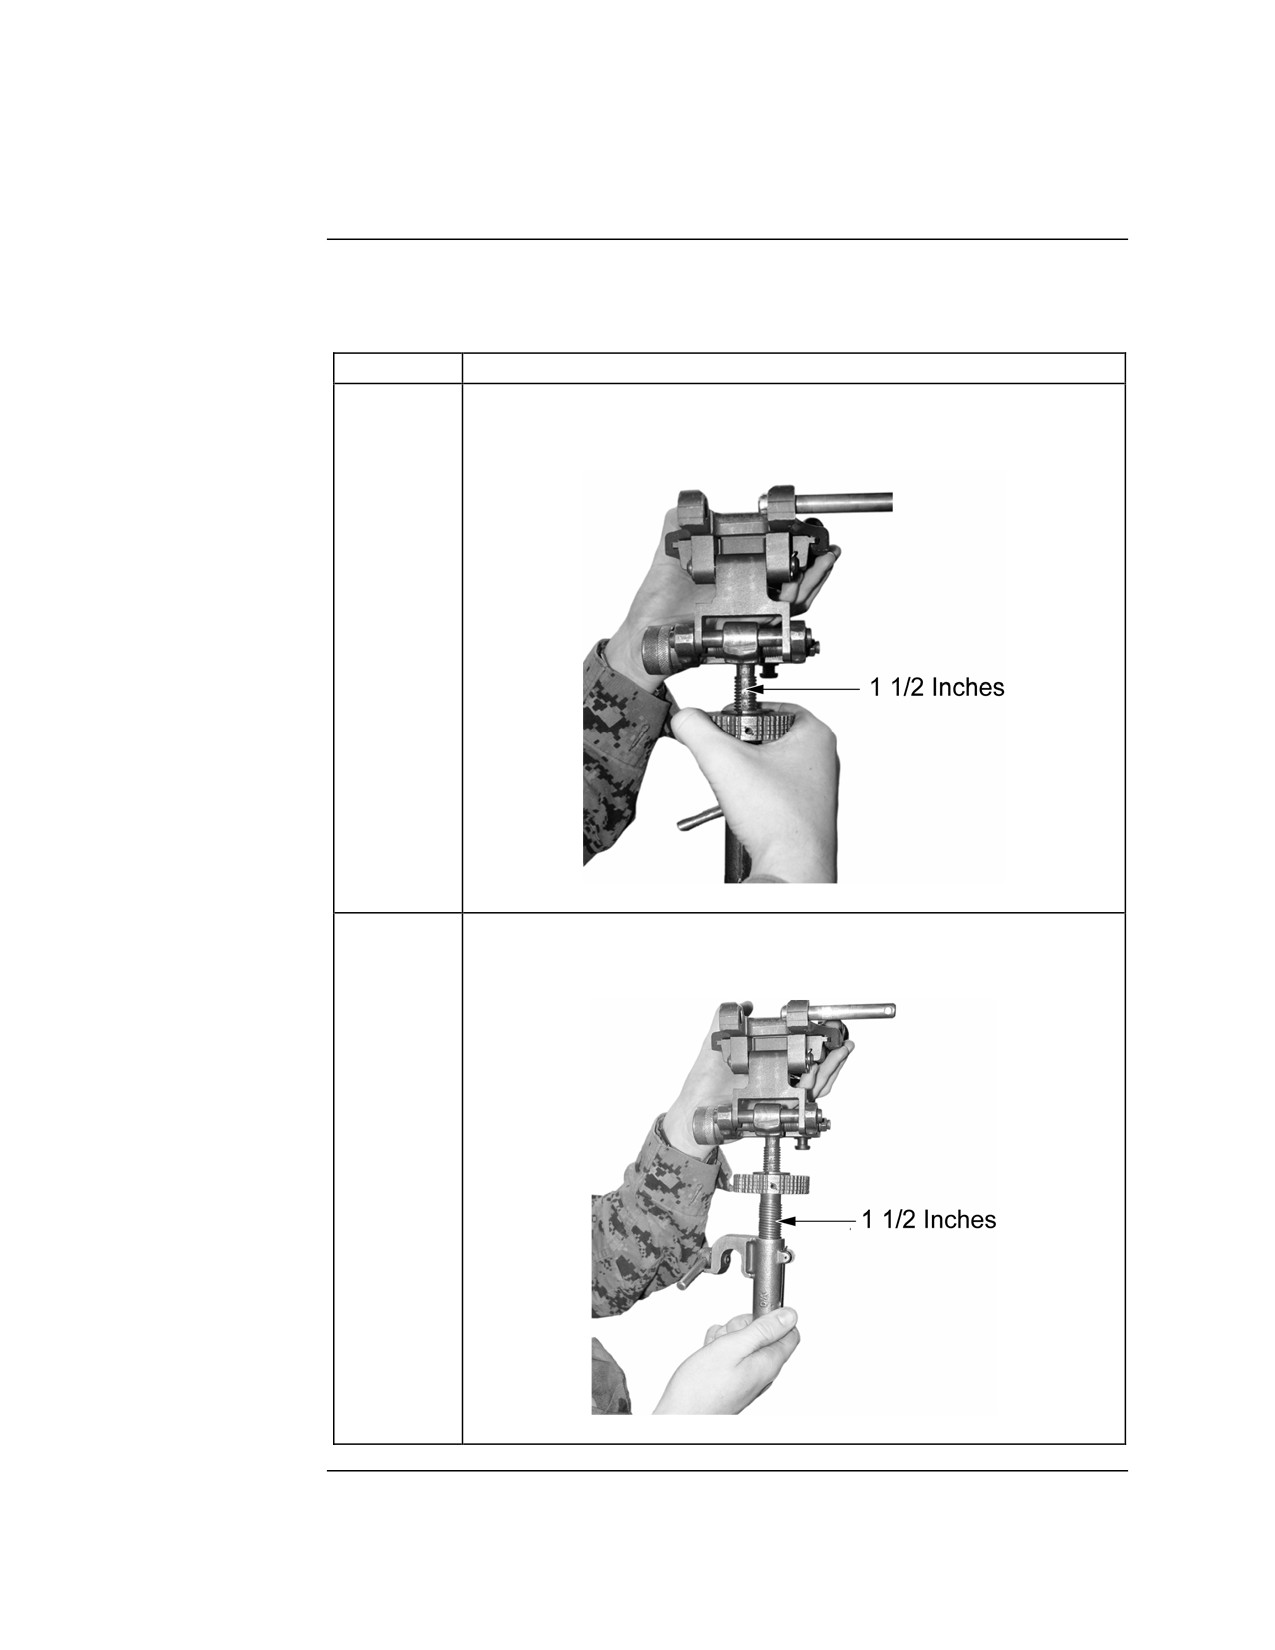
Using the Tripod, Continued
Preparing the
The steps for preparing the T&E are listed in the table below:
T&E
Step
Action
1
Rotate the elevating hand wheel until approximately 1 1/2
inches are visible on the upper elevation screw.
2
Rotate the traversing slide until approximately 1 1/2 inches are
visible on the lower elevation screw.
Continued on next page
MCI Course 0321B
3-9
Study Unit 3, Lesson 1
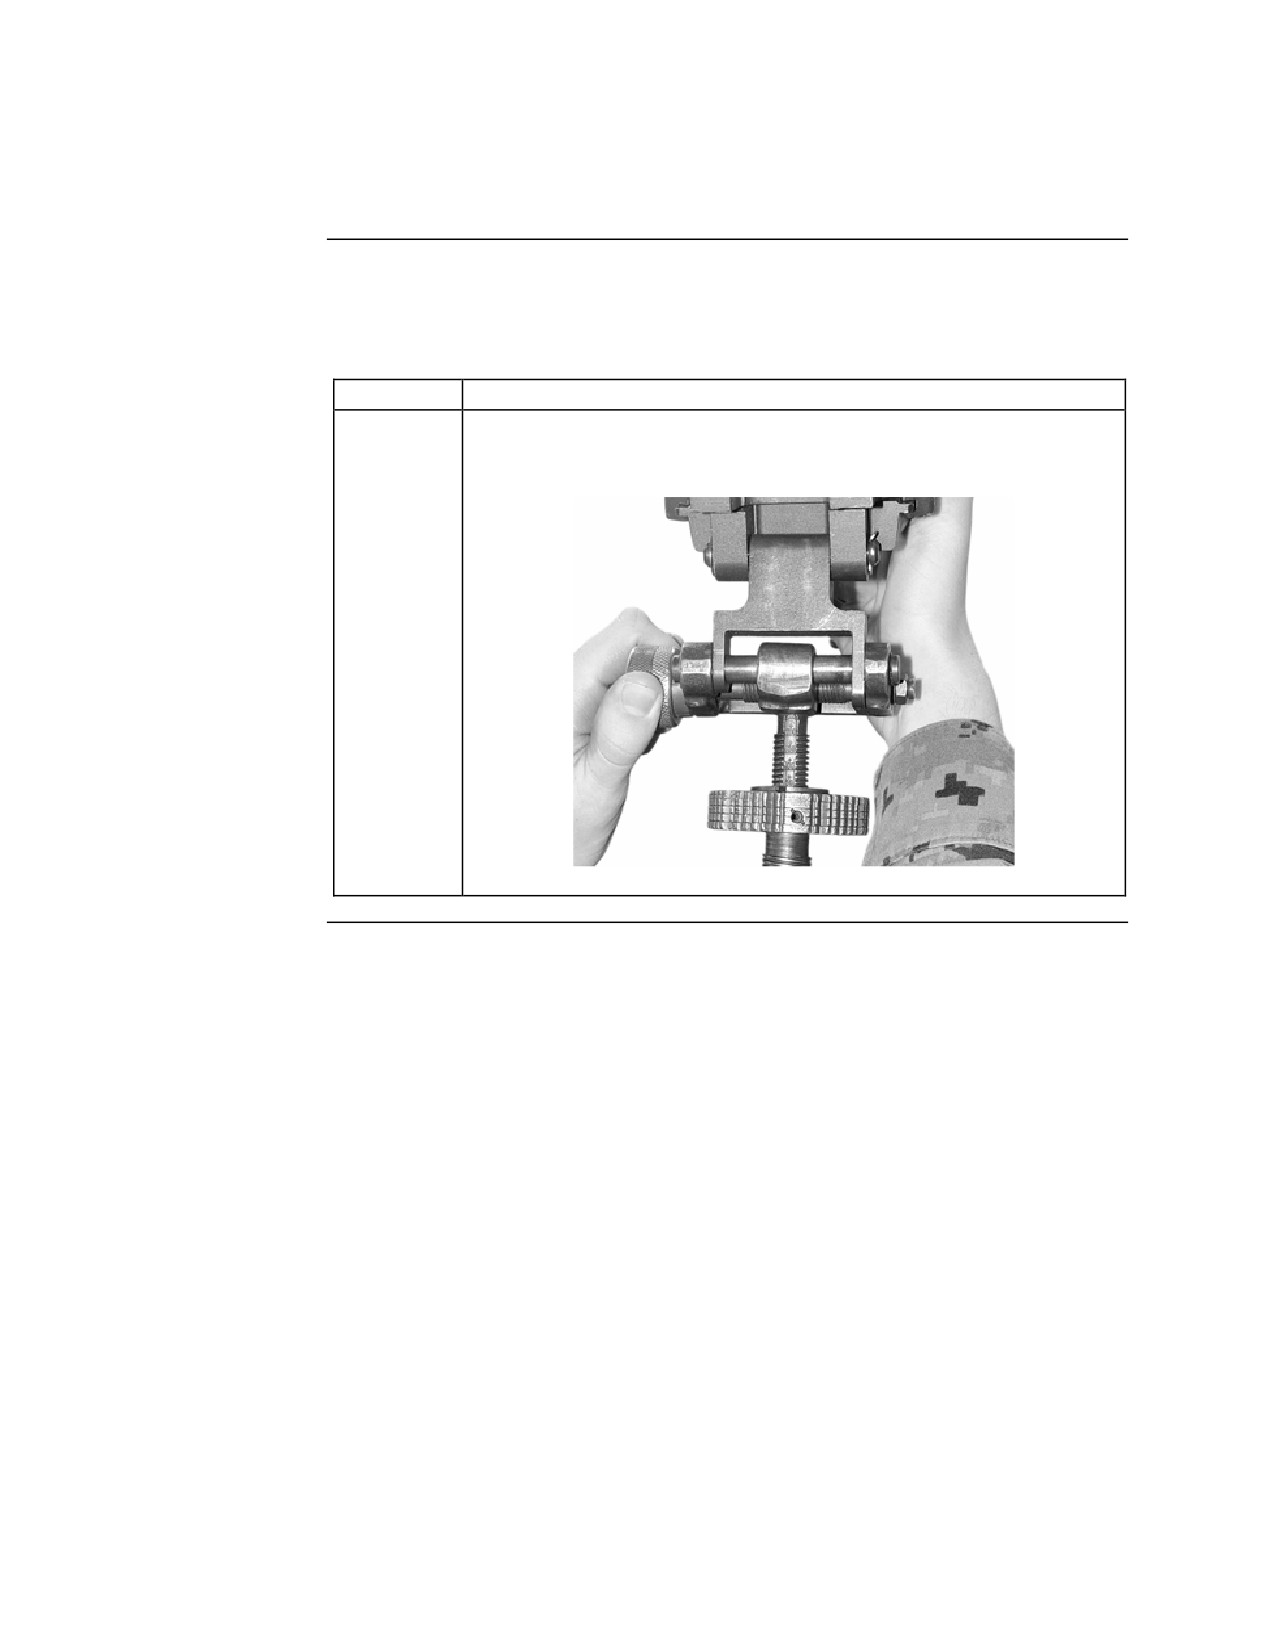
Using the Tripod, Continued
Preparing the
T&E,
continued
Step
Action
3
Rotate the traversing hand wheel until the offset head is
centered on the traversing screw.
Continued on next page
MCI Course 0321B
3-10
Study Unit 3, Lesson 1
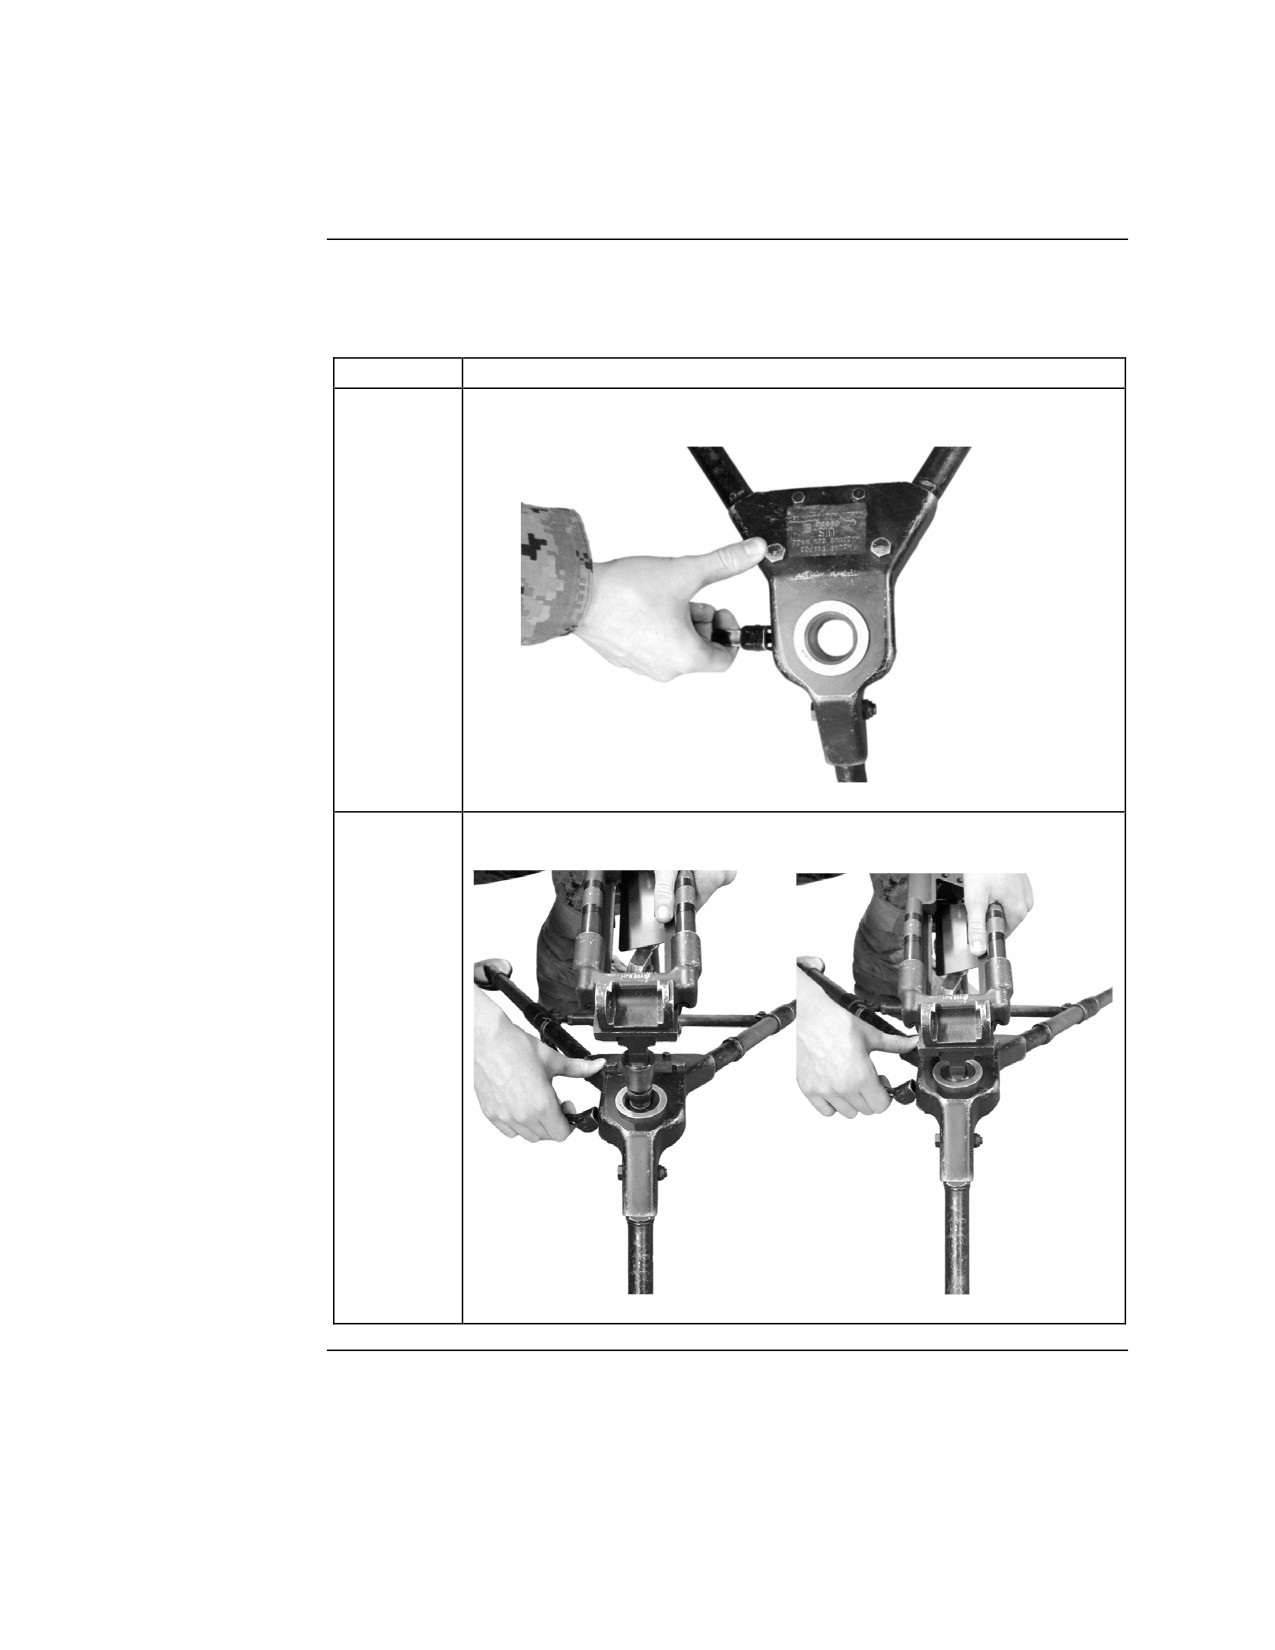
Using the Tripod, Continued
Attaching the
The steps for attaching the flex-mount to the tripod are listed in the table
Flex-Mount
below:
Step
Action
1
Open the pintle locking lever.
2
Insert the flex-mount pintle into the tripod pintle bushing.
Continued on next page
MCI Course 0321B
3-11
Study Unit 3, Lesson 1
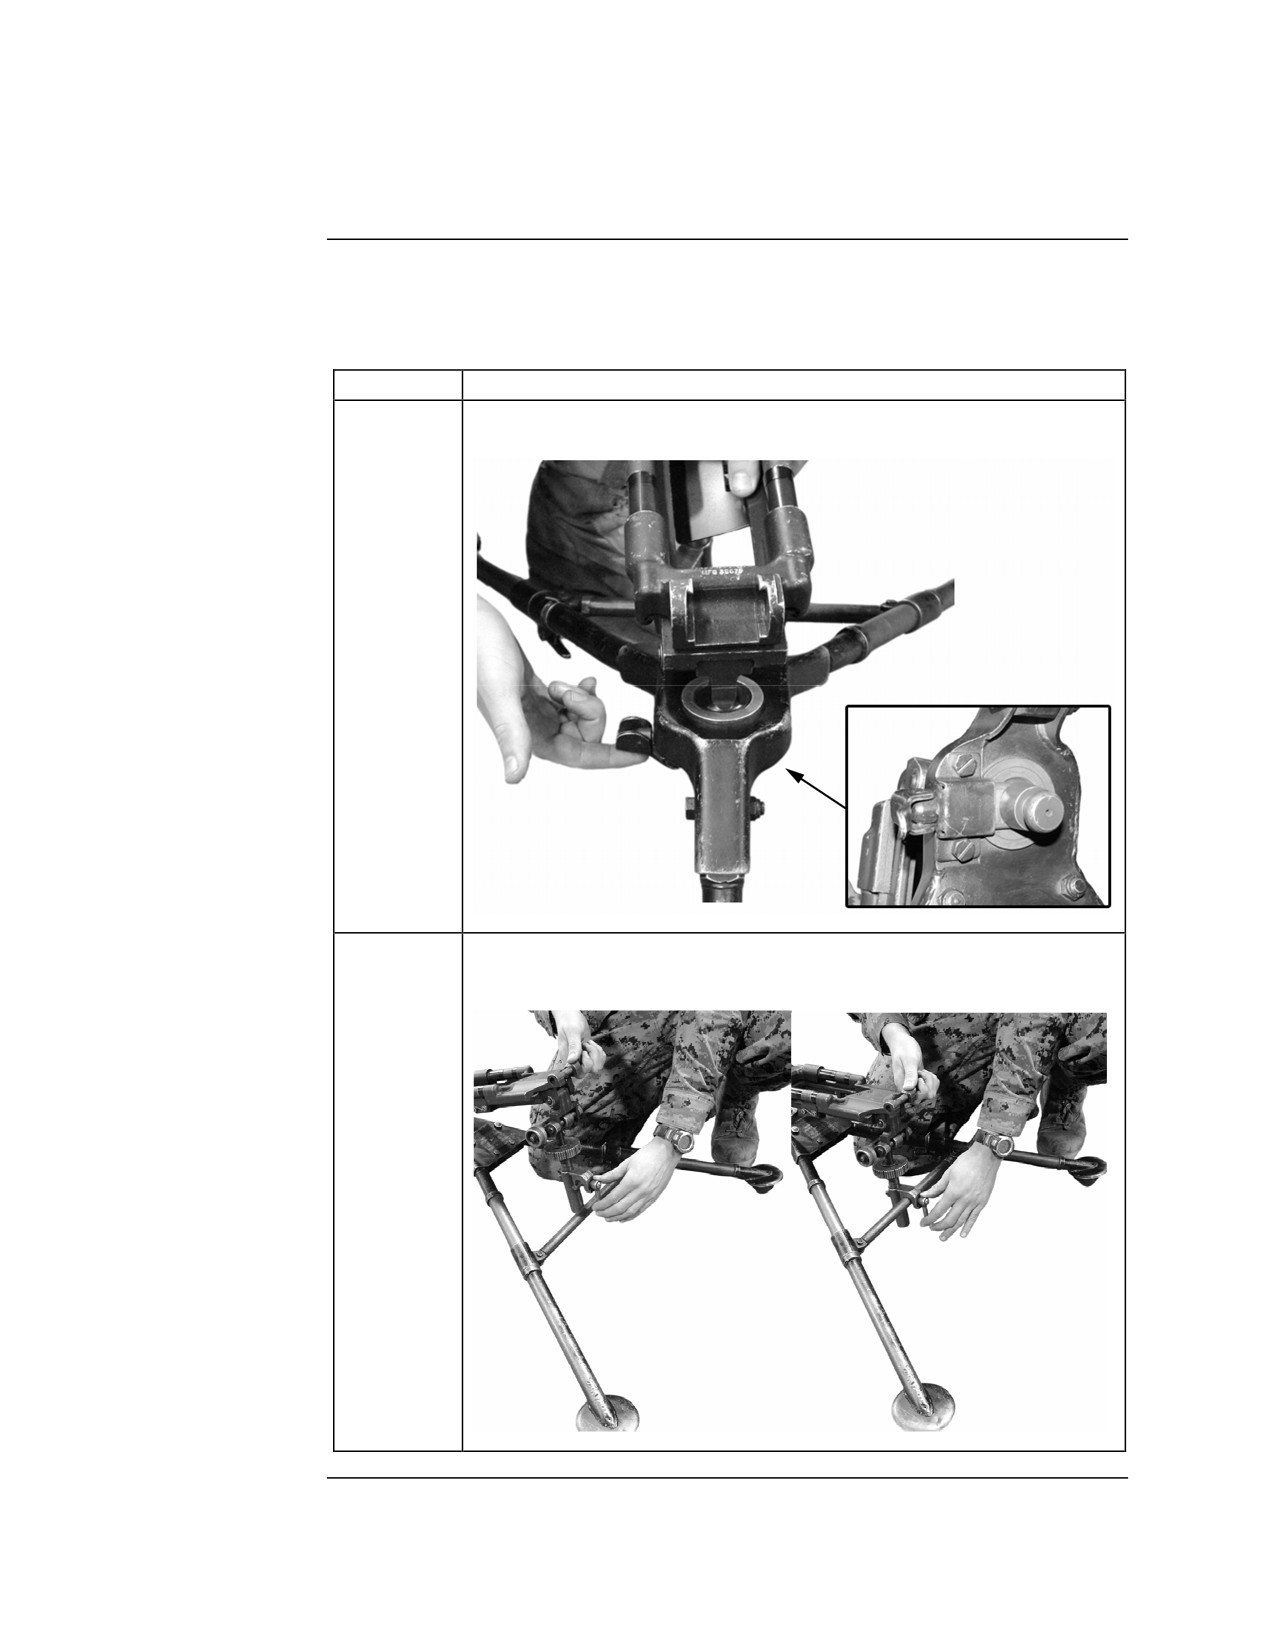
Using the Tripod, Continued
Attaching the
Flex-Mount,
continued
Step
Action
3
Engage the pintle locking lever to lock the pintle in place.
4
Lower the traversing slide over the traversing bar with the
traversing locking lever to the rear.
Continued on next page
MCI Course 0321B
3-12
Study Unit 3, Lesson 1
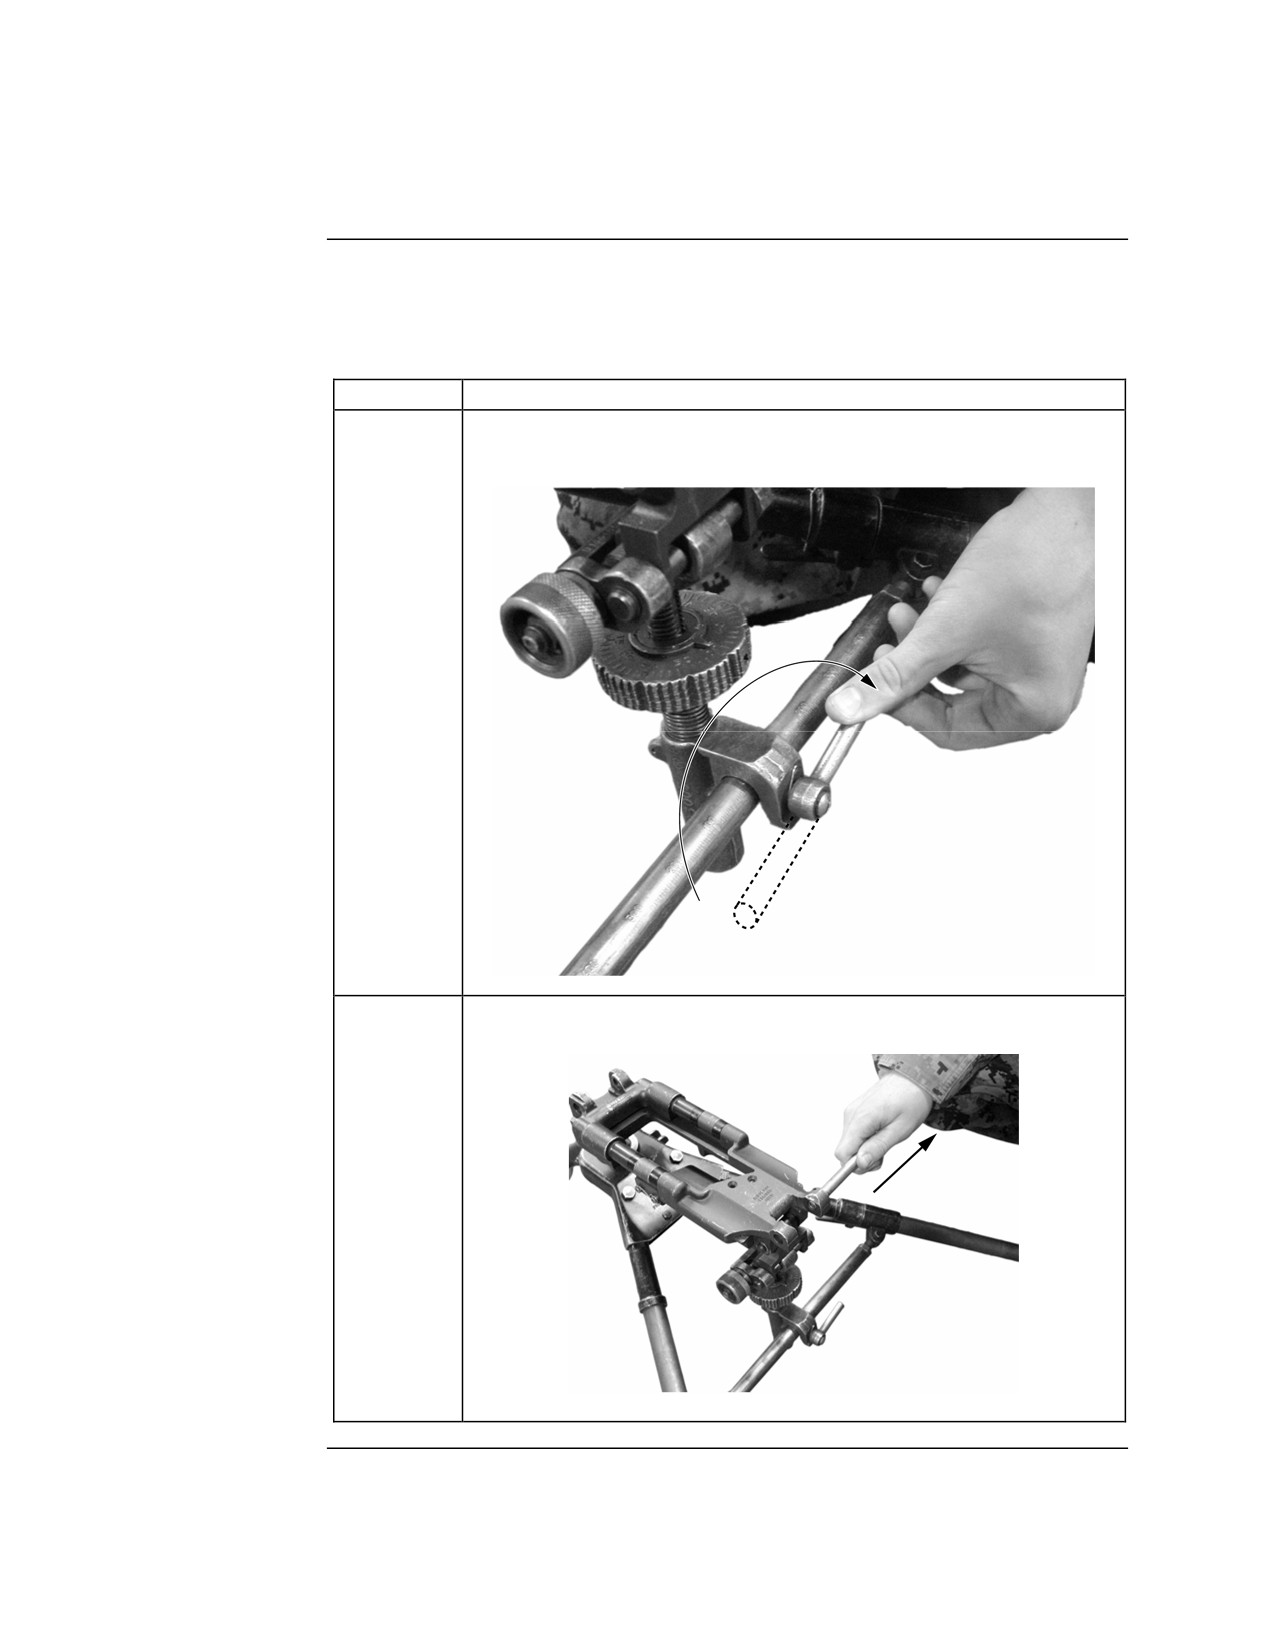
Using the Tripod, Continued
Attaching the
Flex-Mount,
continued
Step
Action
5
Lock the traversing slide in place by turning the traversing
locking lever clockwise.
6
Pull out the retaining pin.
Continued on next page
MCI Course 0321B
3-13
Study Unit 3, Lesson 1
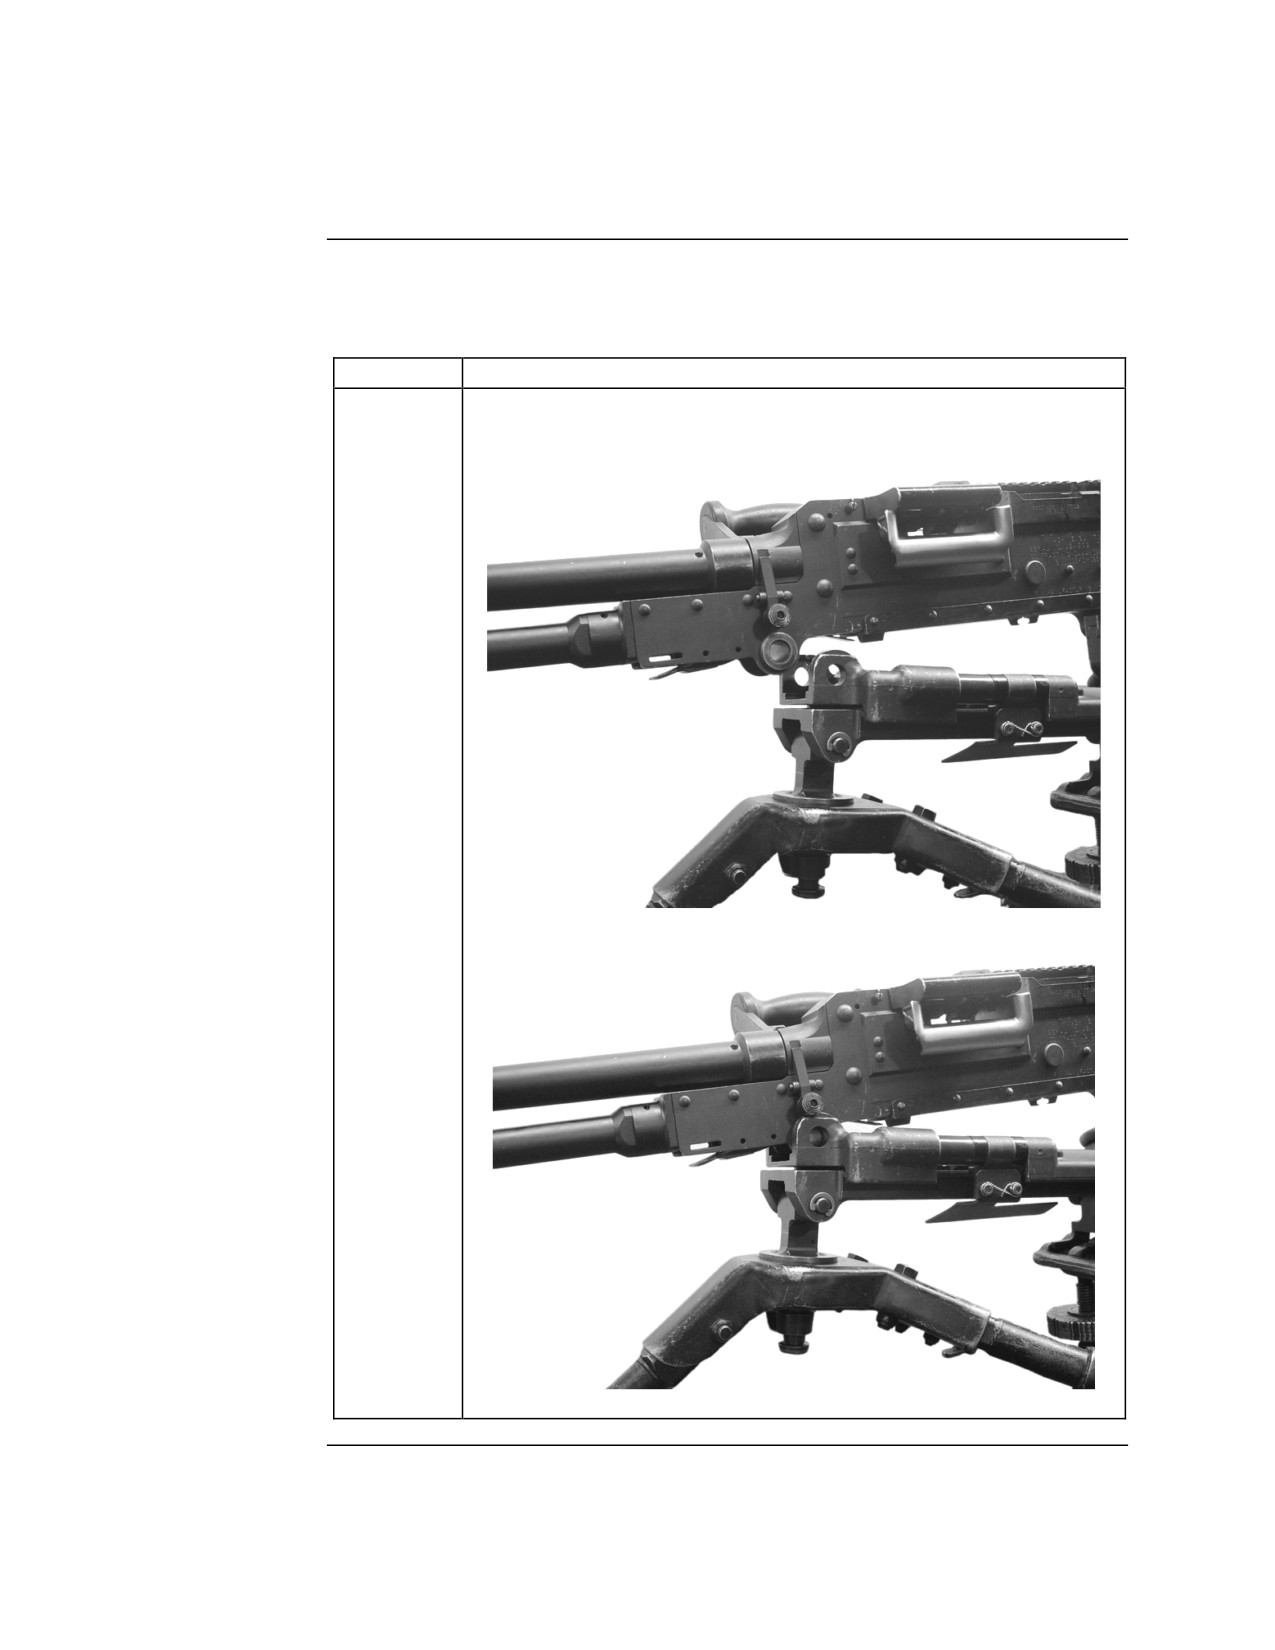
Using the Tripod, Continued
Attaching the
The steps for attaching the M240G to the flex-mount are listed in the table
M240G
below:
Step
Action
1
Slide the recesses on the lower front of the receiver onto the
forward bushings of the flex-mount.
Continued on next page
MCI Course 0321B
3-14
Study Unit 3, Lesson 1
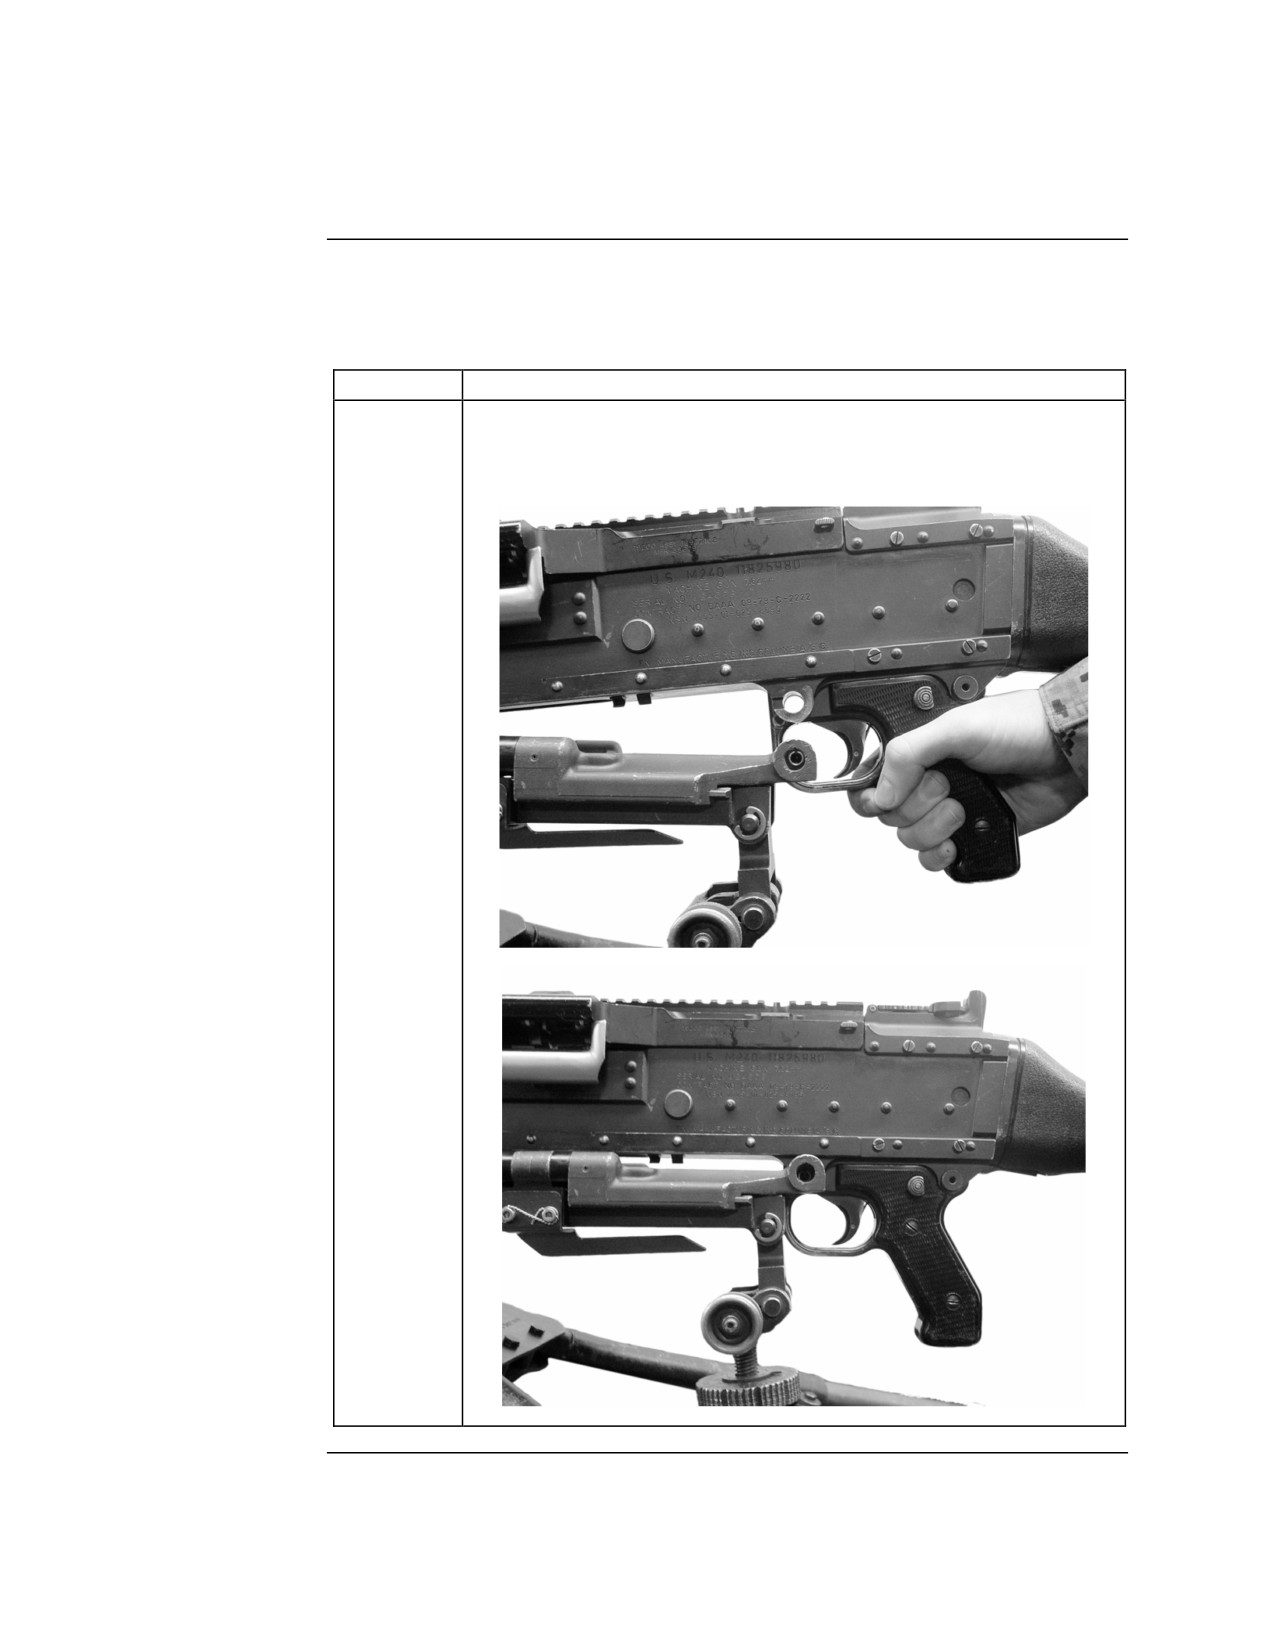
Using the Tripod, Continued
Attaching the
M240G,
continued
Step
Action
2
Rotate the rear of the M240G down onto the flex-mount,
ensuring the holes on the receiver are aligned with the holes on
the flex-mount.
Continued on next page
MCI Course 0321B
3-15
Study Unit 3, Lesson 1
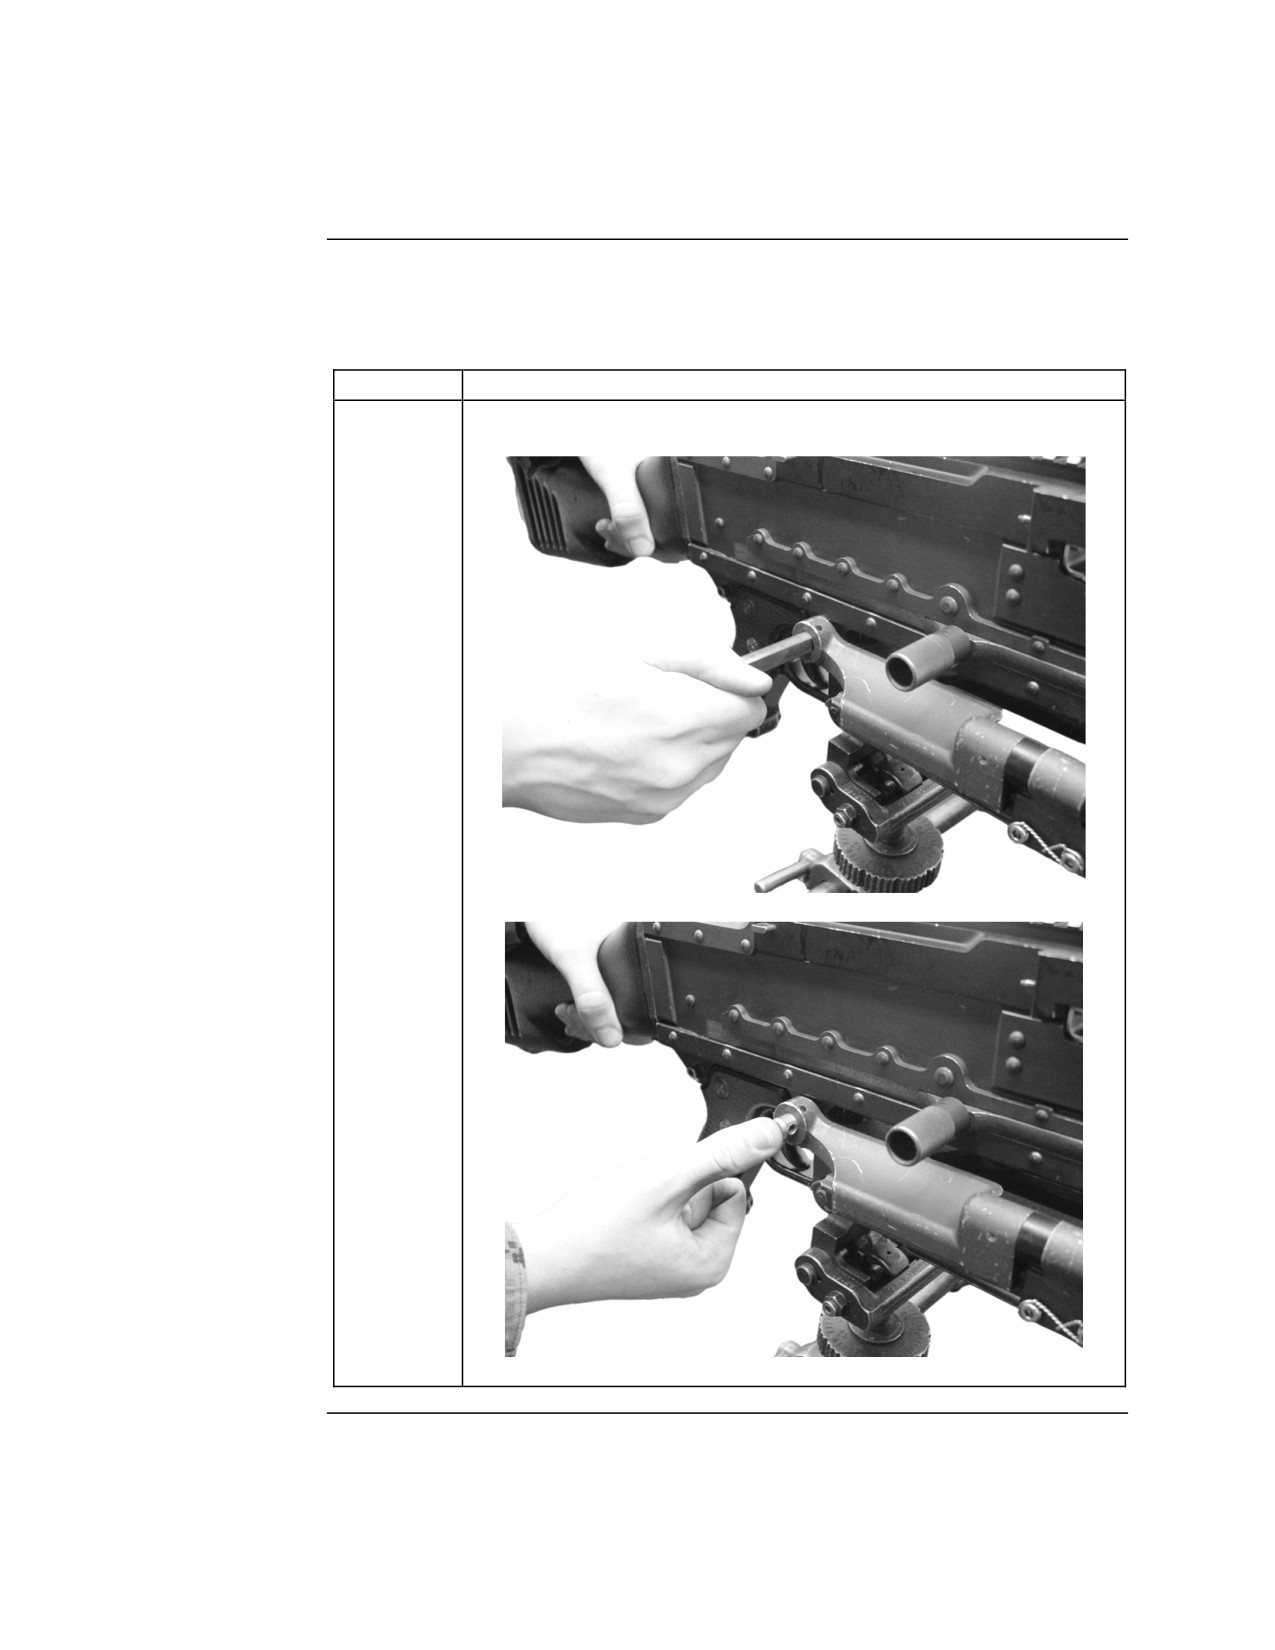
Using the Tripod, Continued
Attaching the
M240G,
continued
Step
Action
3
Insert the retaining pin to lock the M240G onto the flex-mount.
MCI Course 0321B
3-16
Study Unit 3, Lesson 1
//////////////////////////////////////////