Network Intrusions Responder Program (NITRO). Instructor Guide - page 10
LiveWire Investigations
Network Intrusion Responder Program
Current User Activity, continued
Procedure: LiveWire - Current User Activity, continued
Step
Action
9
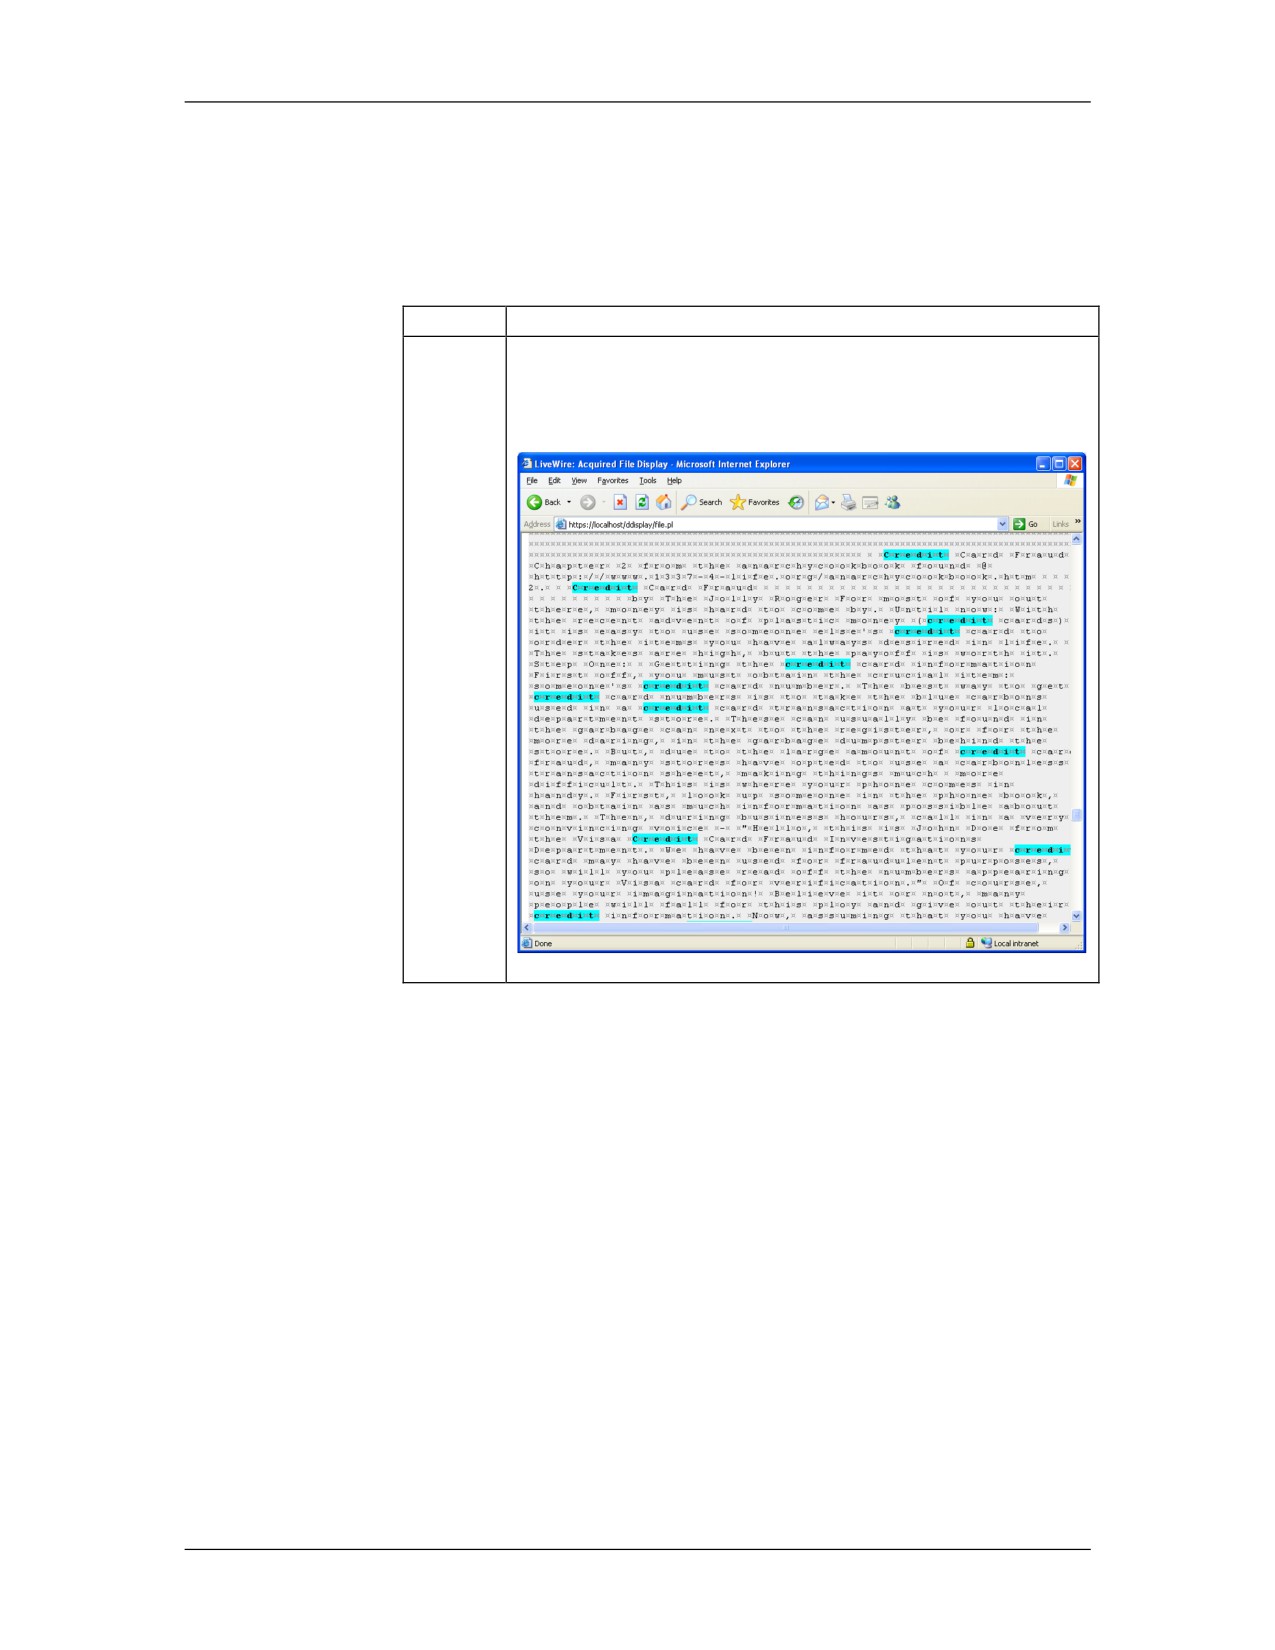
Now let‟s change over to another useful view mode, the
text view mode. At the top of the page, click the link
text beside display as.
12-62
For Official Use Only - Law Enforcement Sensitive
01/09
Network Intrusion Responder Program
LiveWire Investigations
Current User Activity, continued
Procedure:
LiveWire only supports viewing image type files that are acquired.
Viewing Acquired
The acquired files do not retain the file extension in the local file
Files on the Local
system. The following procedure is used to rename acquired files
File System
in order to view them with their native application.
Step
Action
1
Open Windows Explorer and browse to the data
directory at: C:\LiveWire\OnLine\DFS\data.
This folder is where data for each case is stored.
2
Each folder under the data directory is a different case.
Directory names contain the Case Number then Inquiry
Name followed by random characters. Select the current
case folder for the previous lessons and open it.
Example: 12345_VolatileData_Naxpg8Bu
3
Now navigate into the rawdata\files folder.
4
Search through the randomly named folders for the file
that was previously downloaded.
5
Rename the file with the .doc extension.
Note: Renaming a file does not alter its hash value.
6
Double click the file to open it in MS Word or
WordPad.
01/09
For Official Use Only - Law Enforcement Sensitive
12-63
LiveWire Investigations
Network Intrusion Responder Program
Current User Activity, continued
Procedure:
Follow these steps to conduct an analysis of the current user
LiveWire -
activities on the system using LiveWire. This section continues
Display Registry
from the previous section.
Information
Step
Action
1
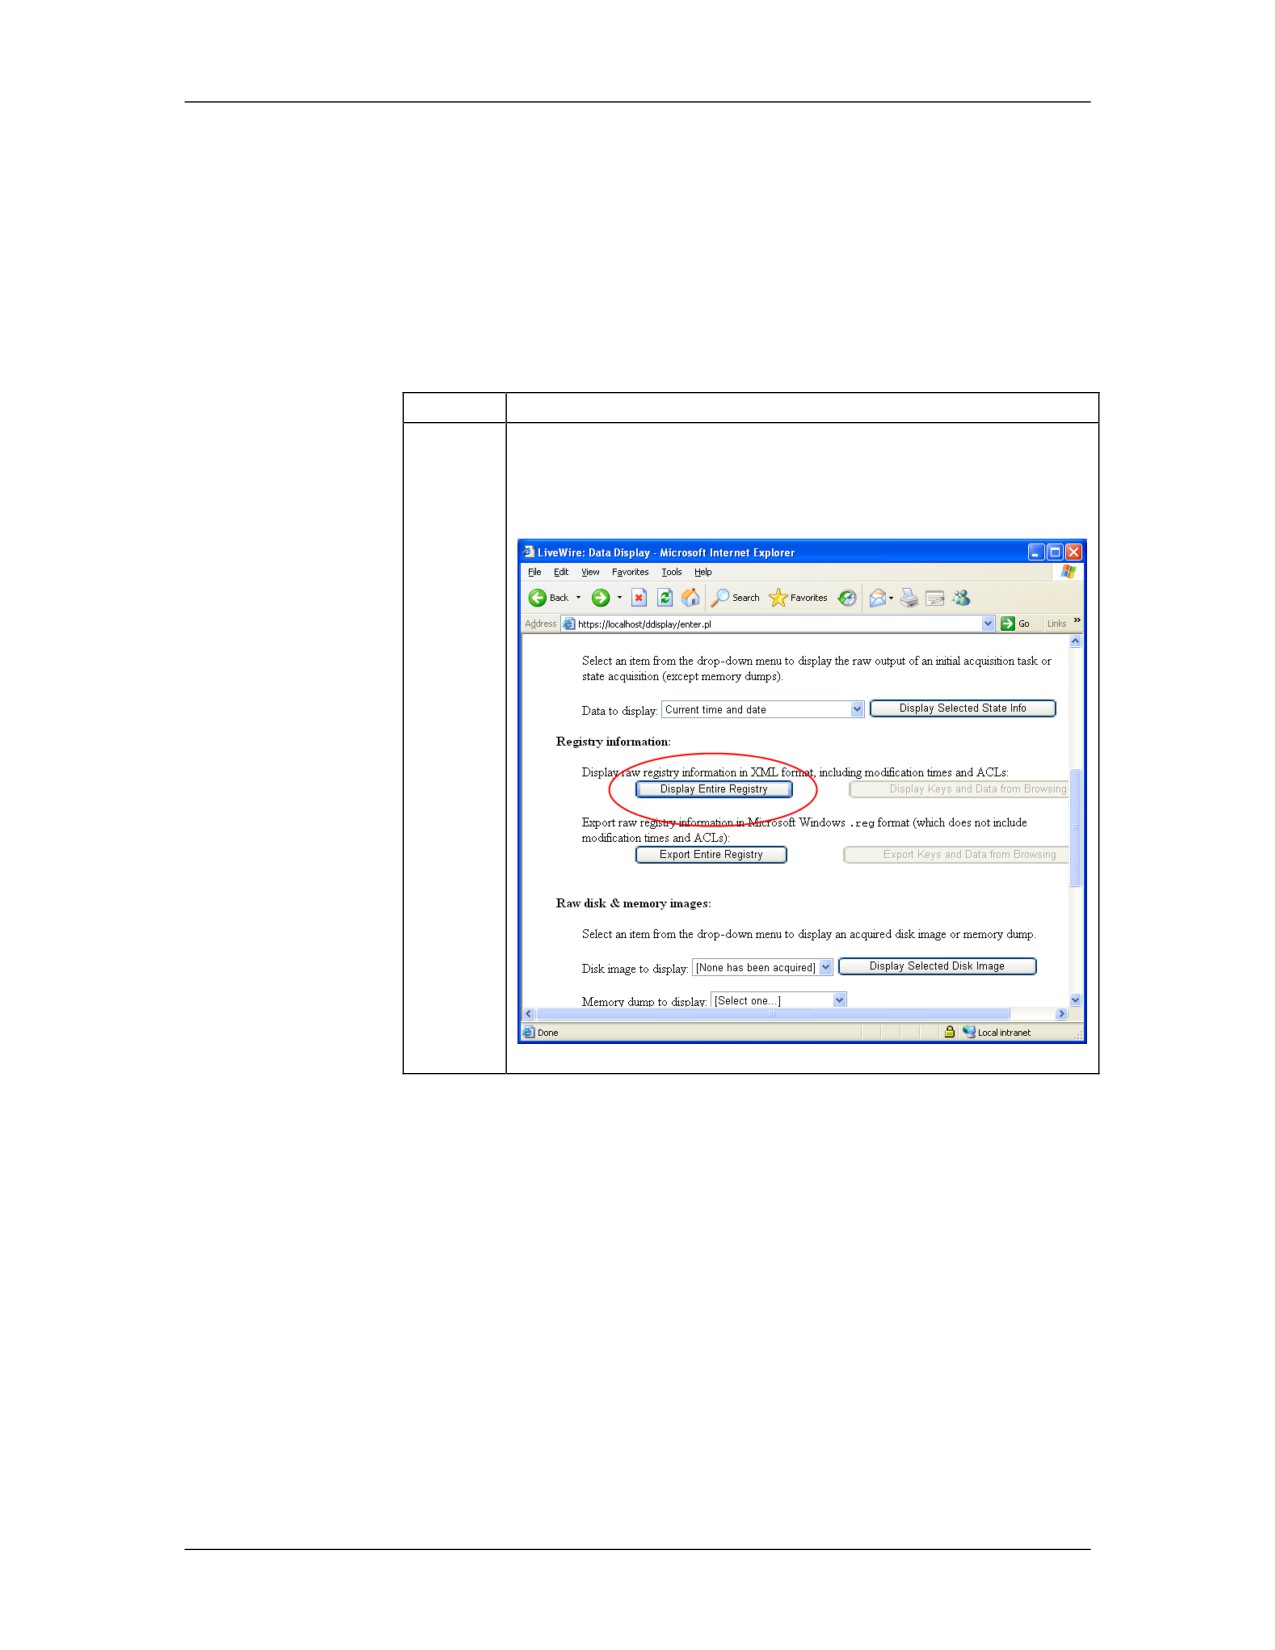
The registry captured in the previous section can also be
examined. Click on Data Display tab, scroll down and
click on Display Entire Registry.
12-64
For Official Use Only - Law Enforcement Sensitive
01/09
Network Intrusion Responder Program
LiveWire Investigations
Current User Activity, continued
Procedure: LiveWire - Display Registry Information, continued
Step
Action
2
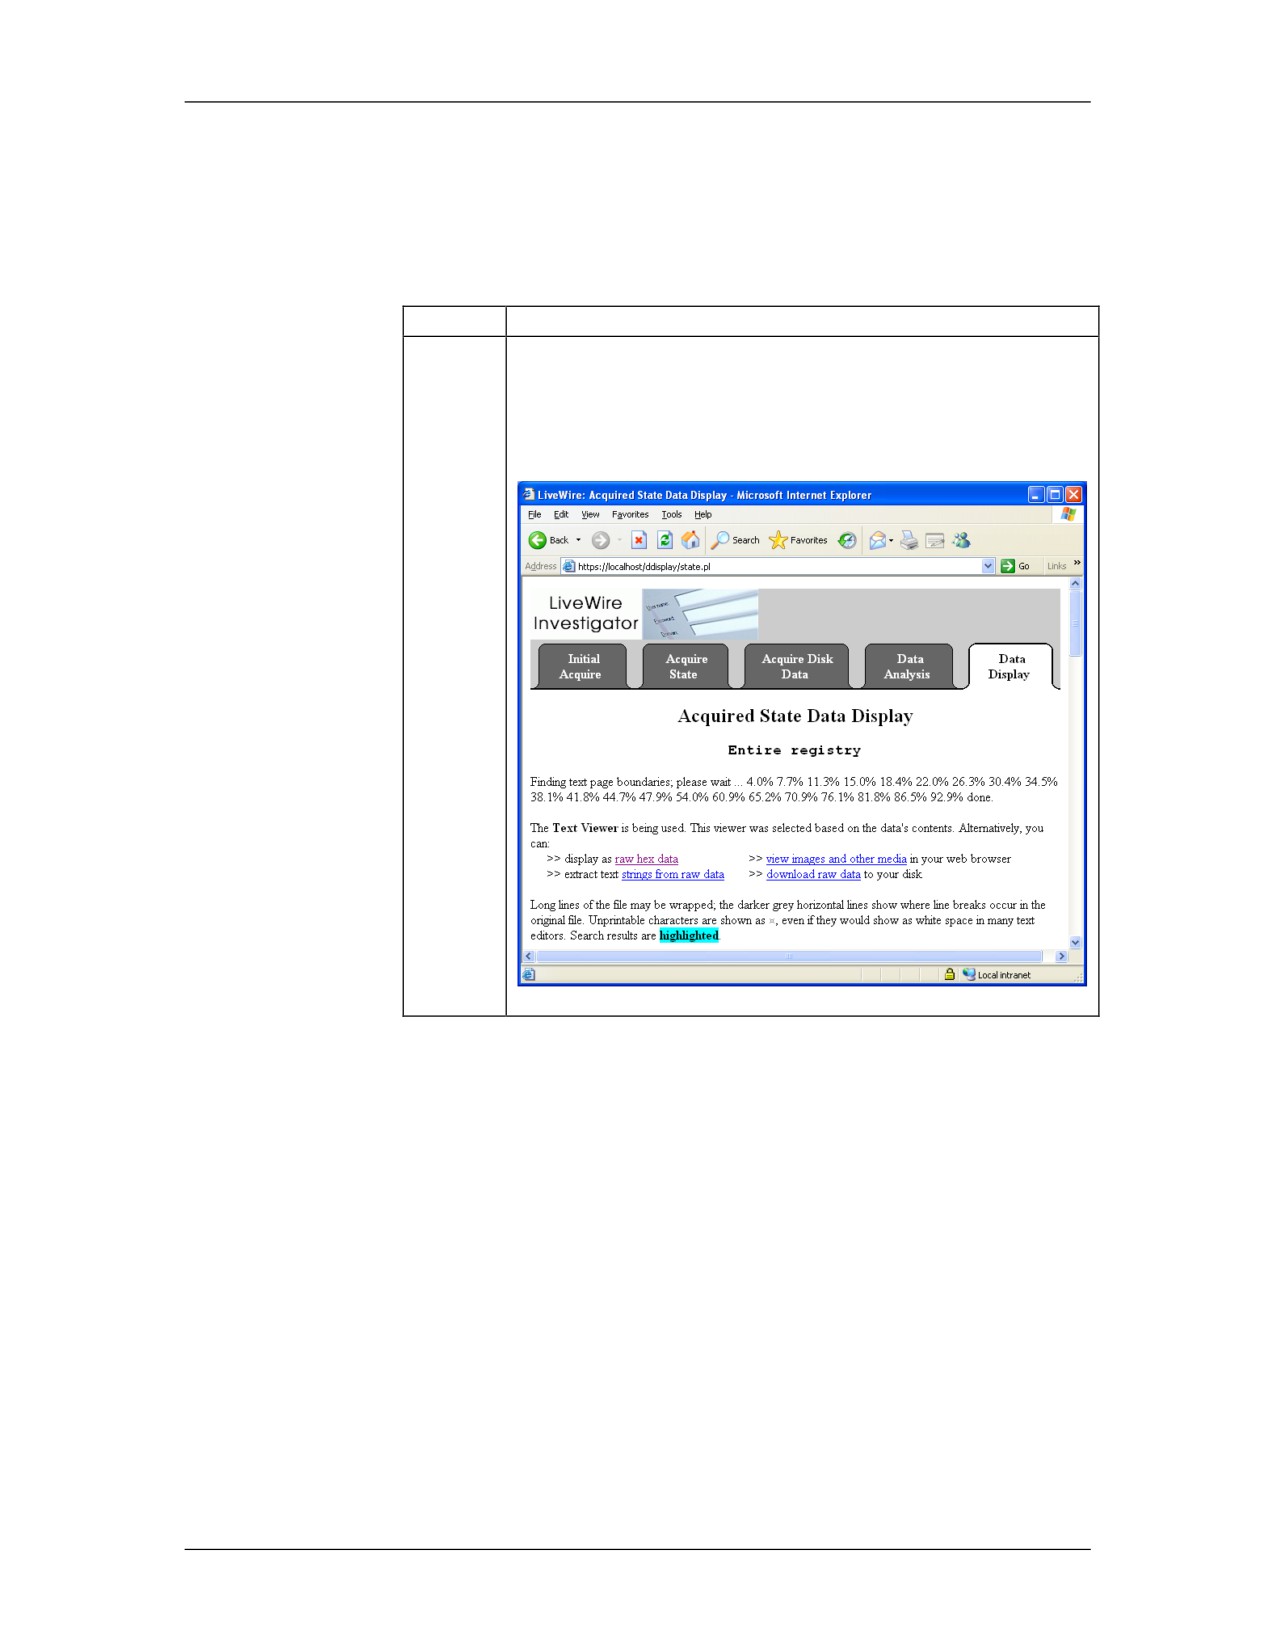
This process may take some time. A screen similar to
the one below will be displayed once completed. The
registry can be searched the same way as previous
exercises.
01/09
For Official Use Only - Law Enforcement Sensitive
12-65
LiveWire Investigations
Network Intrusion Responder Program
Current User Activity, continued
Procedure:
The physical RAM dump can contain some of the most critical
Display Physical
evidence in any case. This section will explain how to open and
RAM Dump
view the physical RAM dump in LiveWire Investigator.
Step
Action
1
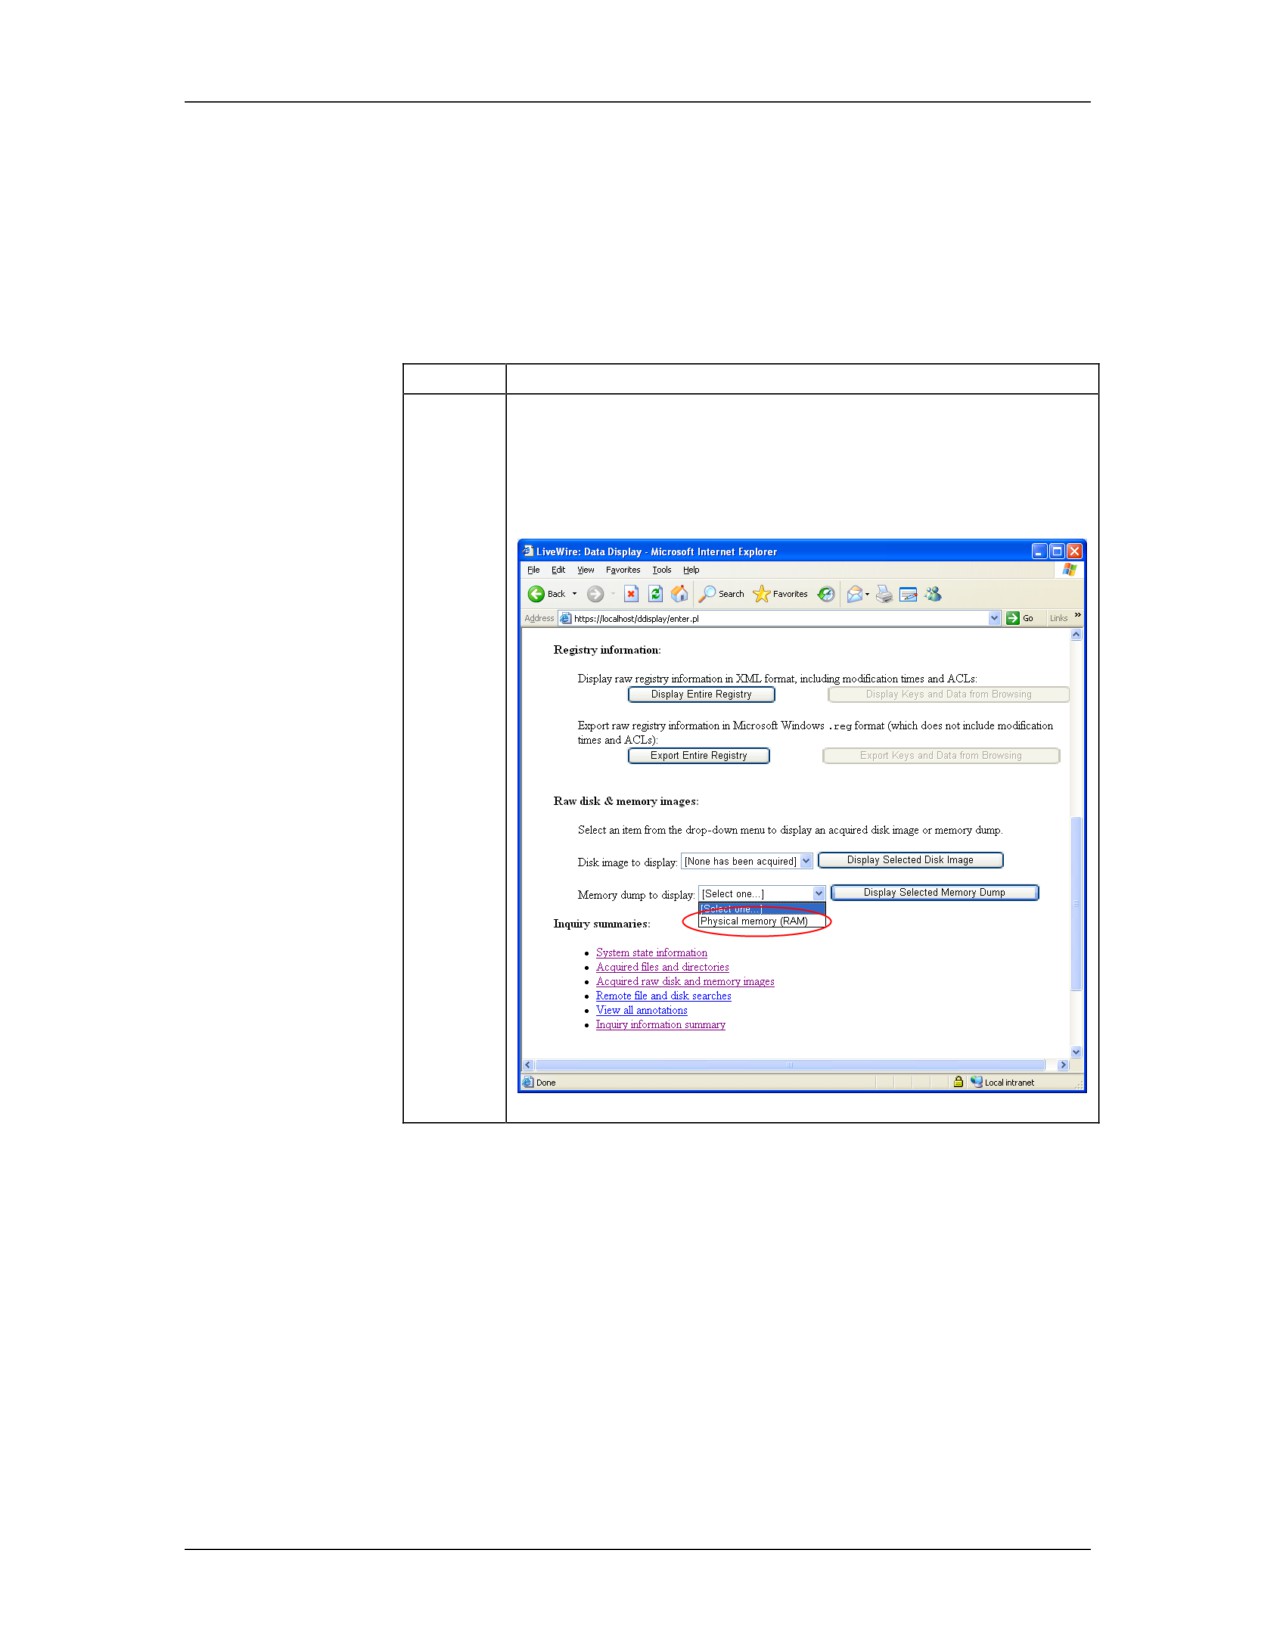
Click on Data Display tab, scroll down to the Memory
dump to display pull-down menu and select Physical
memory (RAM). Click on Display Selected memory
Dump.
12-66
For Official Use Only - Law Enforcement Sensitive
01/09
Network Intrusion Responder Program
LiveWire Investigations
Current User Activity, continued
Procedure: Display Physical RAM Dump, continued
Step
Action
2
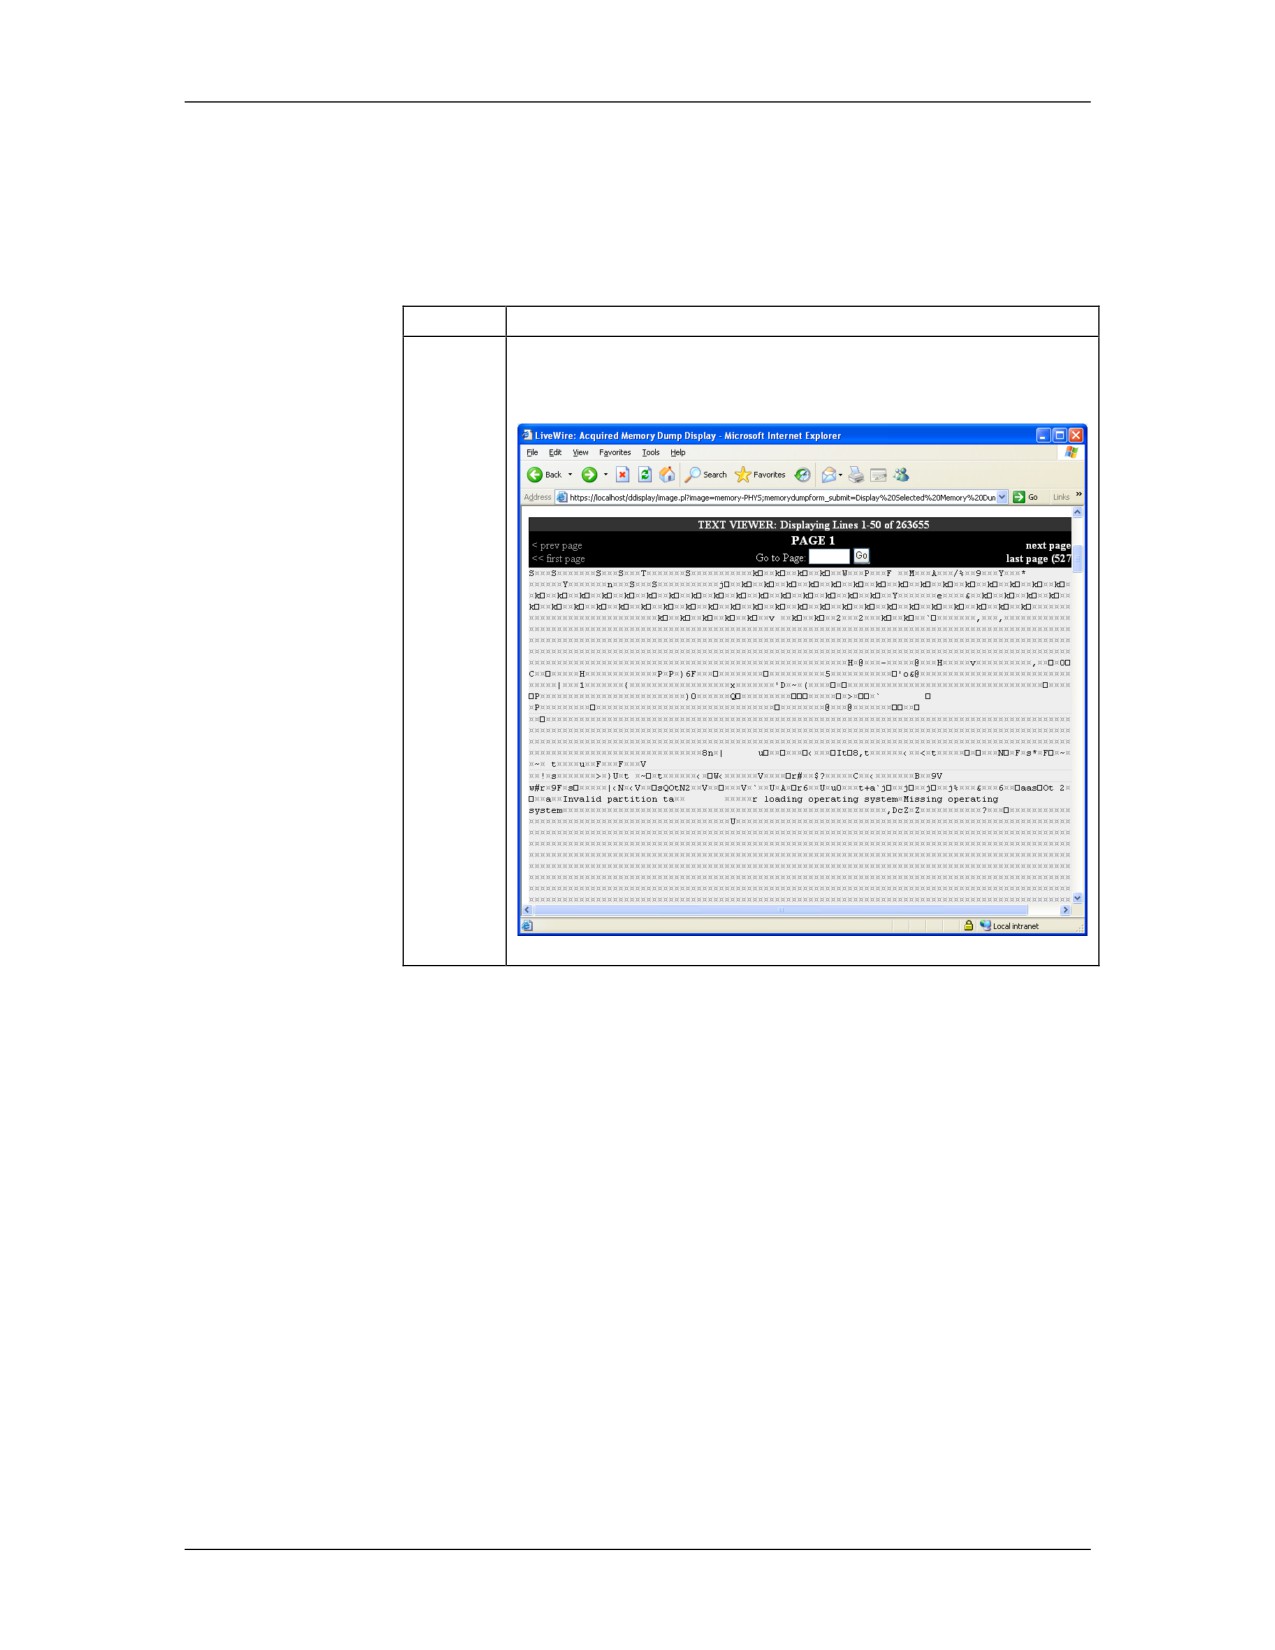
The physical RAM dump can be viewed and searched
like any other piece of evidence.
01/09
For Official Use Only - Law Enforcement Sensitive
12-67
LiveWire Investigations
Network Intrusion Responder Program
Active Network State
Overview
LiveWire Investigator has the ability to save and display the
current state of the network connections and configurations.
Procedure:
This section will explain how to view the different options
Display Captured
available for viewing network details.
Network Details
Step
Action
1
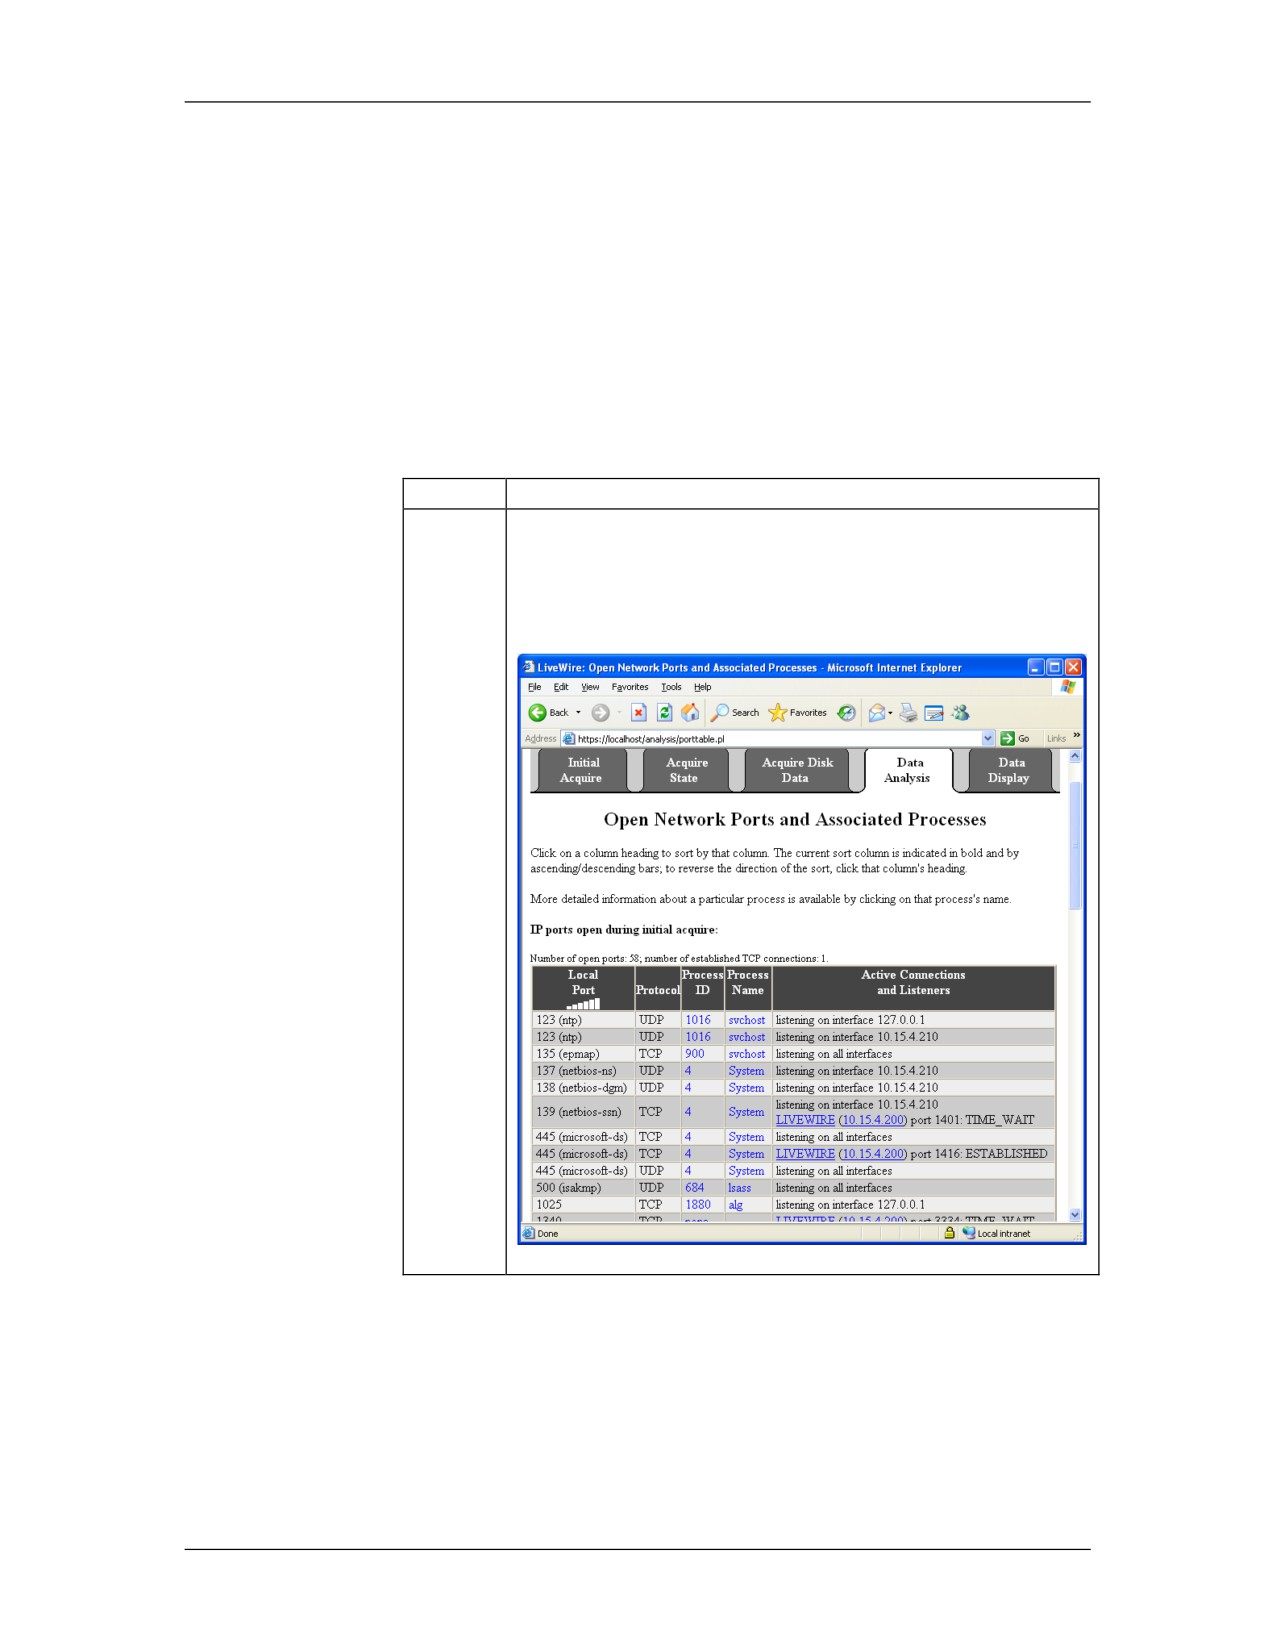
Click on the Data Analysis tab. Then click Open
network ports and associated processes. It should be
known that ports 3334 and 3335 will be included due to
LiveWire connecting to the system to retrieve data.
12-68
For Official Use Only - Law Enforcement Sensitive
01/09
Network Intrusion Responder Program
LiveWire Investigations
Active Network State, continued
Procedure: Display Captured Network Details, continued
Step
Action
2
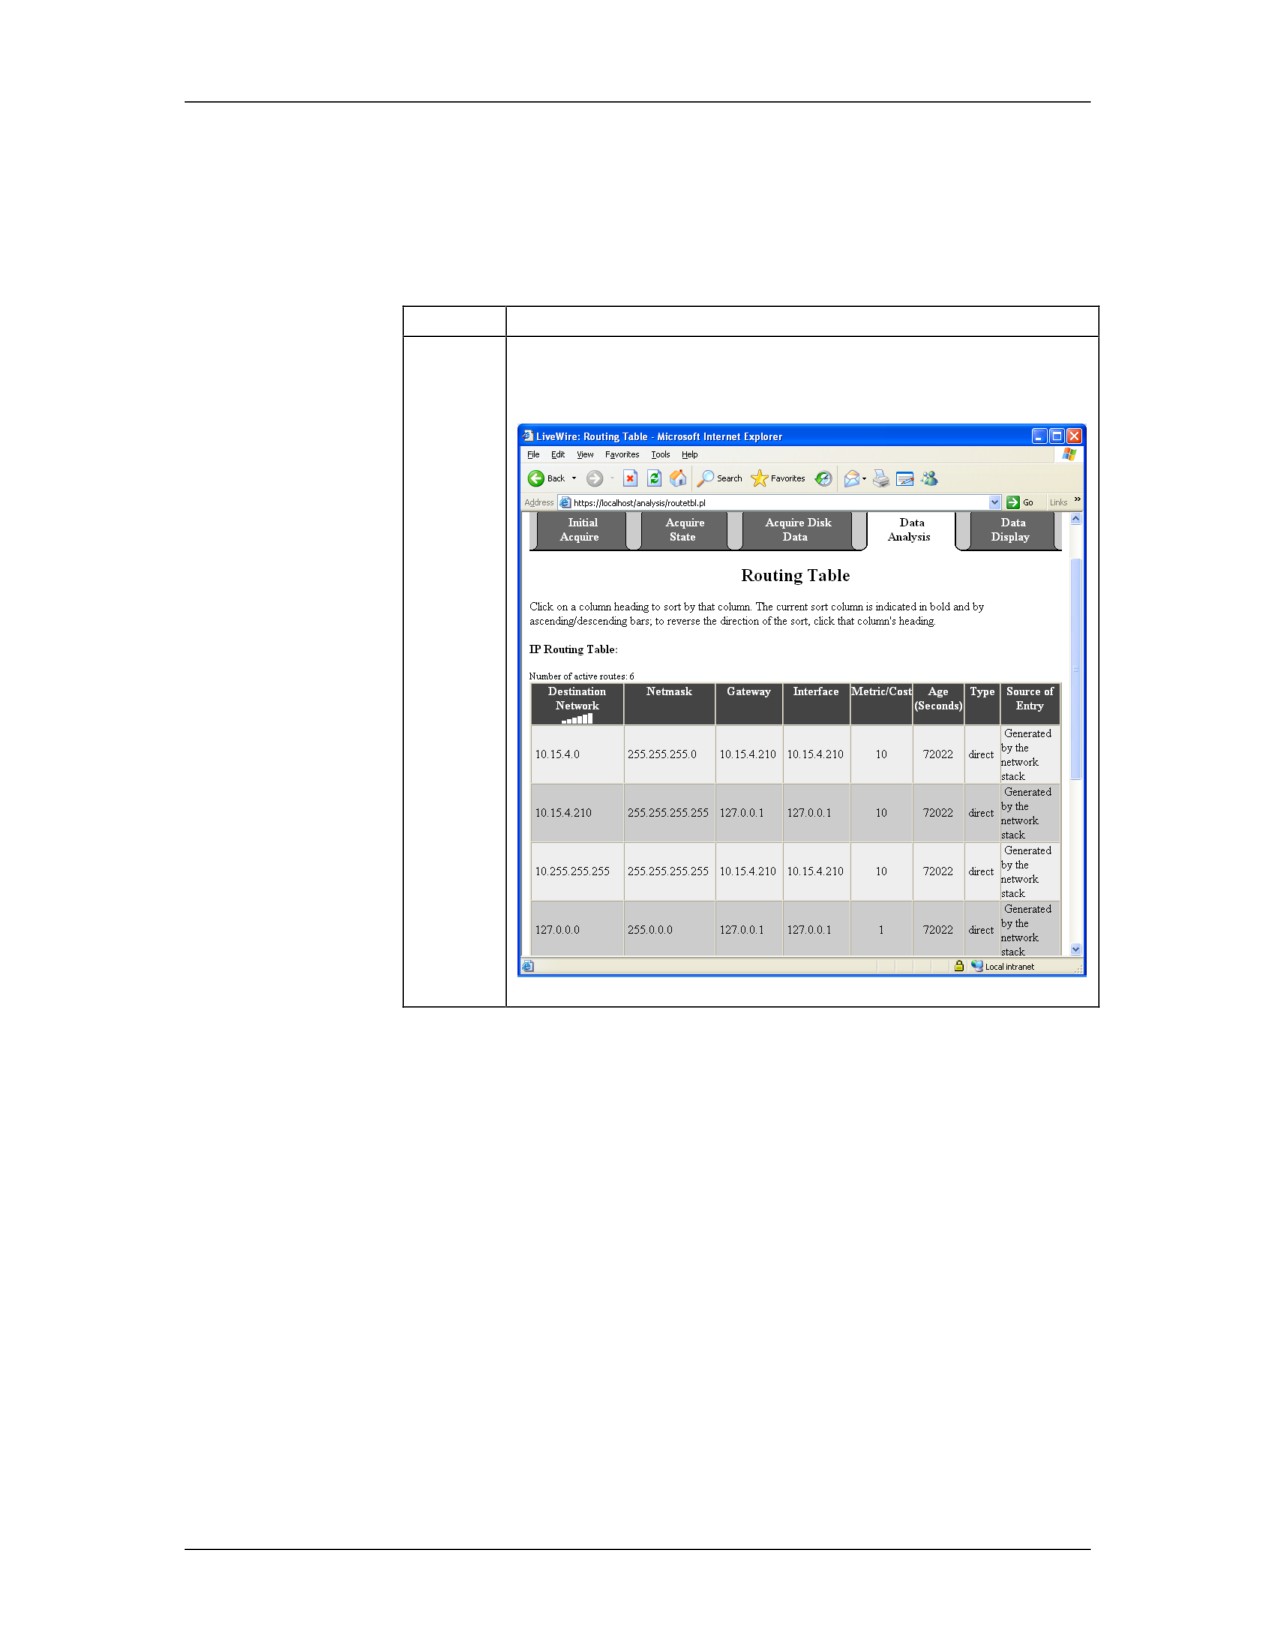
Click on the Data Analysis tab. Then click Routing
table.
01/09
For Official Use Only - Law Enforcement Sensitive
12-69
LiveWire Investigations
Network Intrusion Responder Program
Active Network State, continued
Procedure: Display Captured Network Details, continued
Step
Action
3
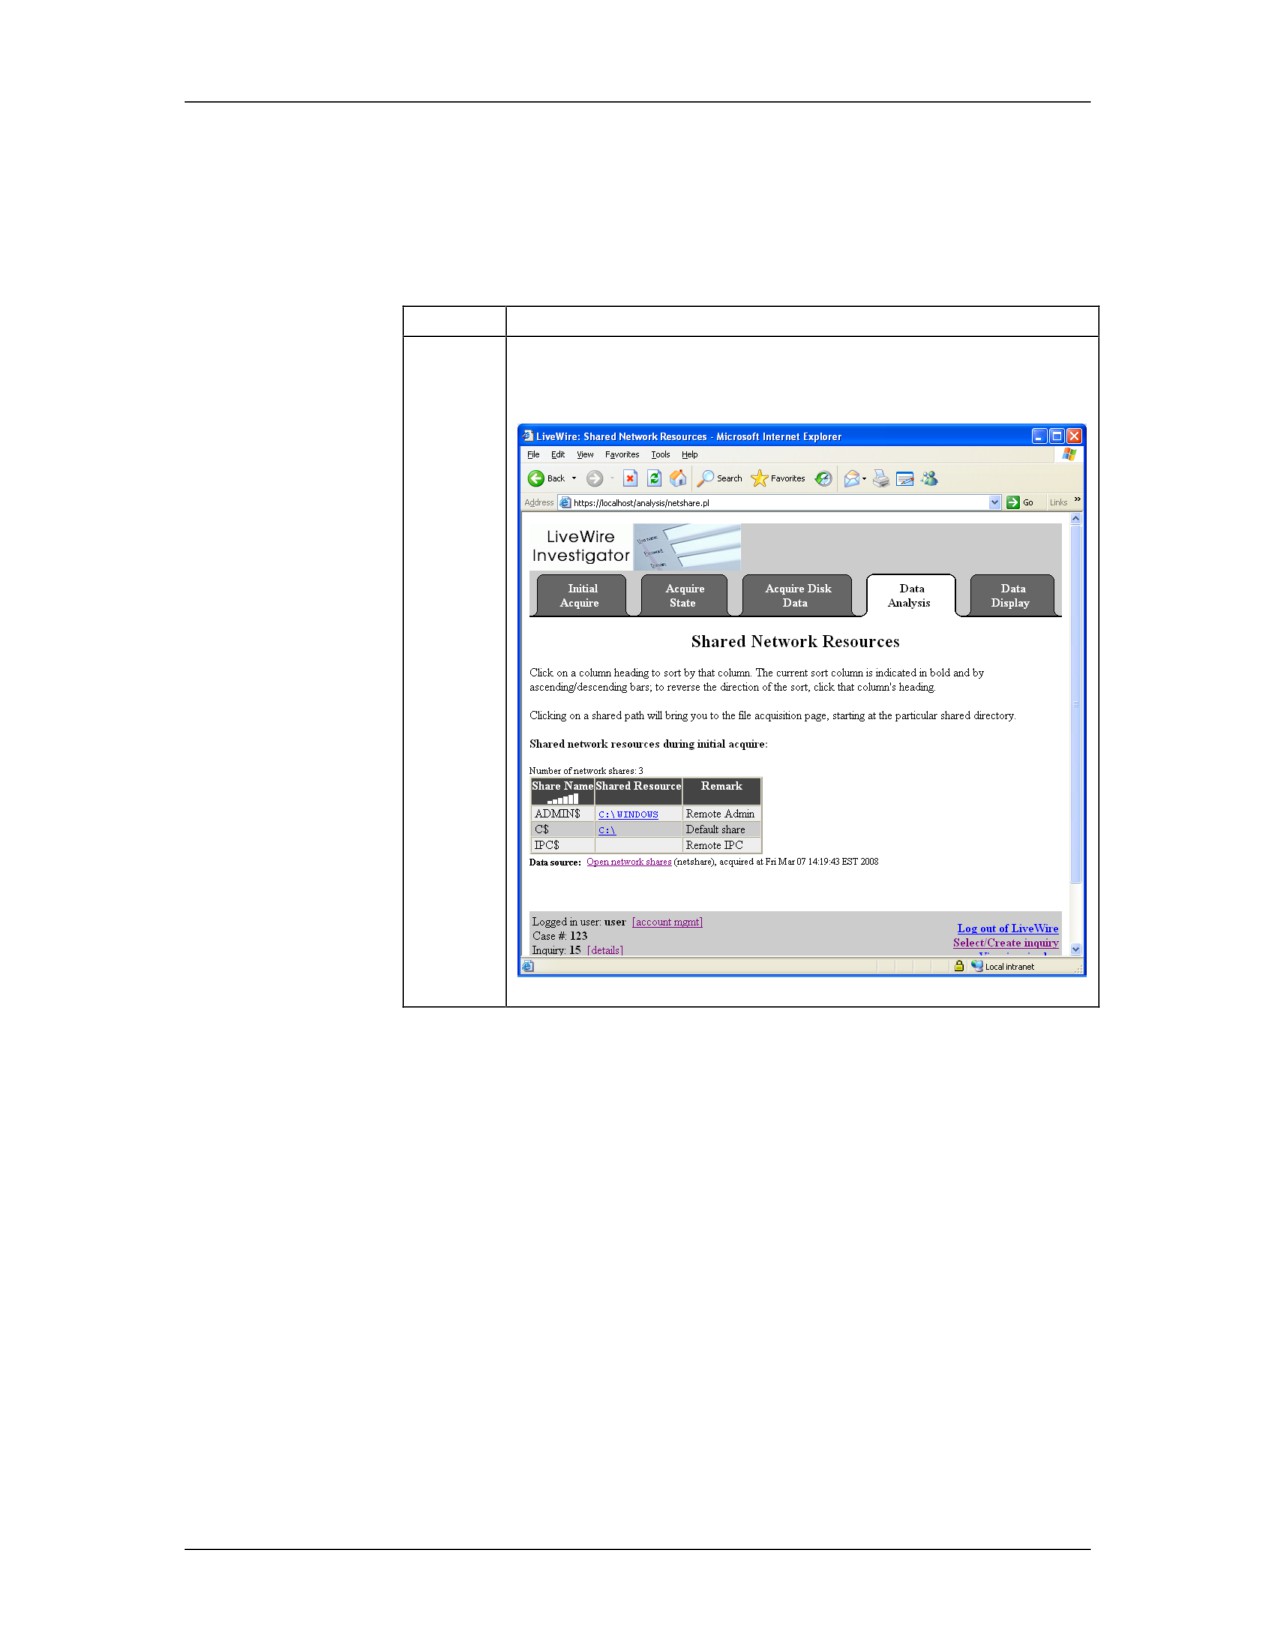
Click on the Data Analysis tab. Then click Shared
network resources.
12-70
For Official Use Only - Law Enforcement Sensitive
01/09
Network Intrusion Responder Program
LiveWire Investigations
Active Network State, continued
Procedure: Display Captured Network Details, continued
Step
Action
4
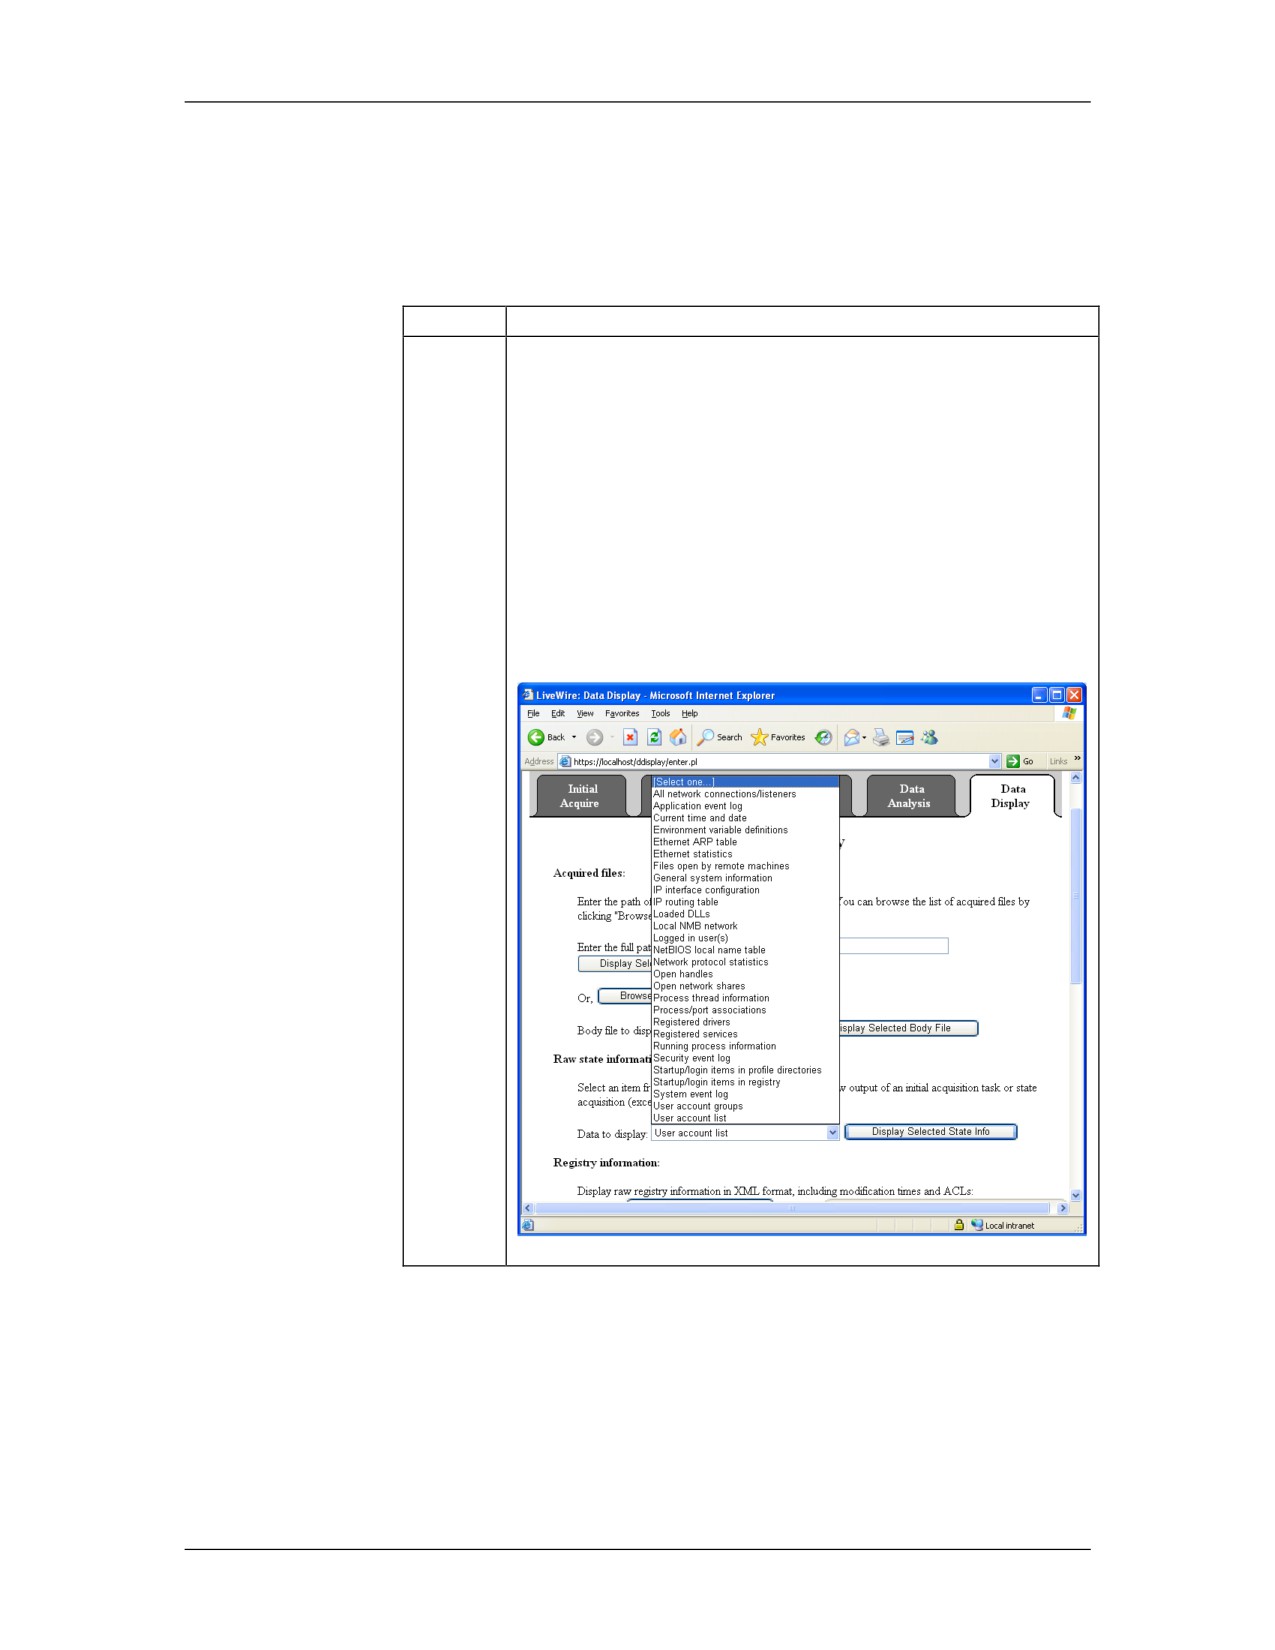
Another way to display network information is in the
data pulled during the initial acquire. Click the Data
Display tab. Under the Raw state information, in the
drop-down menu, select IP interface configuration.
Notice: This is another way to view the same data in
other places.
Example: Click the Data Display tab, and then click
System State Information at the bottom of the page.
This will display this data on a single page.
01/09
For Official Use Only - Law Enforcement Sensitive
12-71
LiveWire Investigations
Network Intrusion Responder Program
Active Network State, continued
Procedure: Display Captured Network Details, continued
Step
Action
5
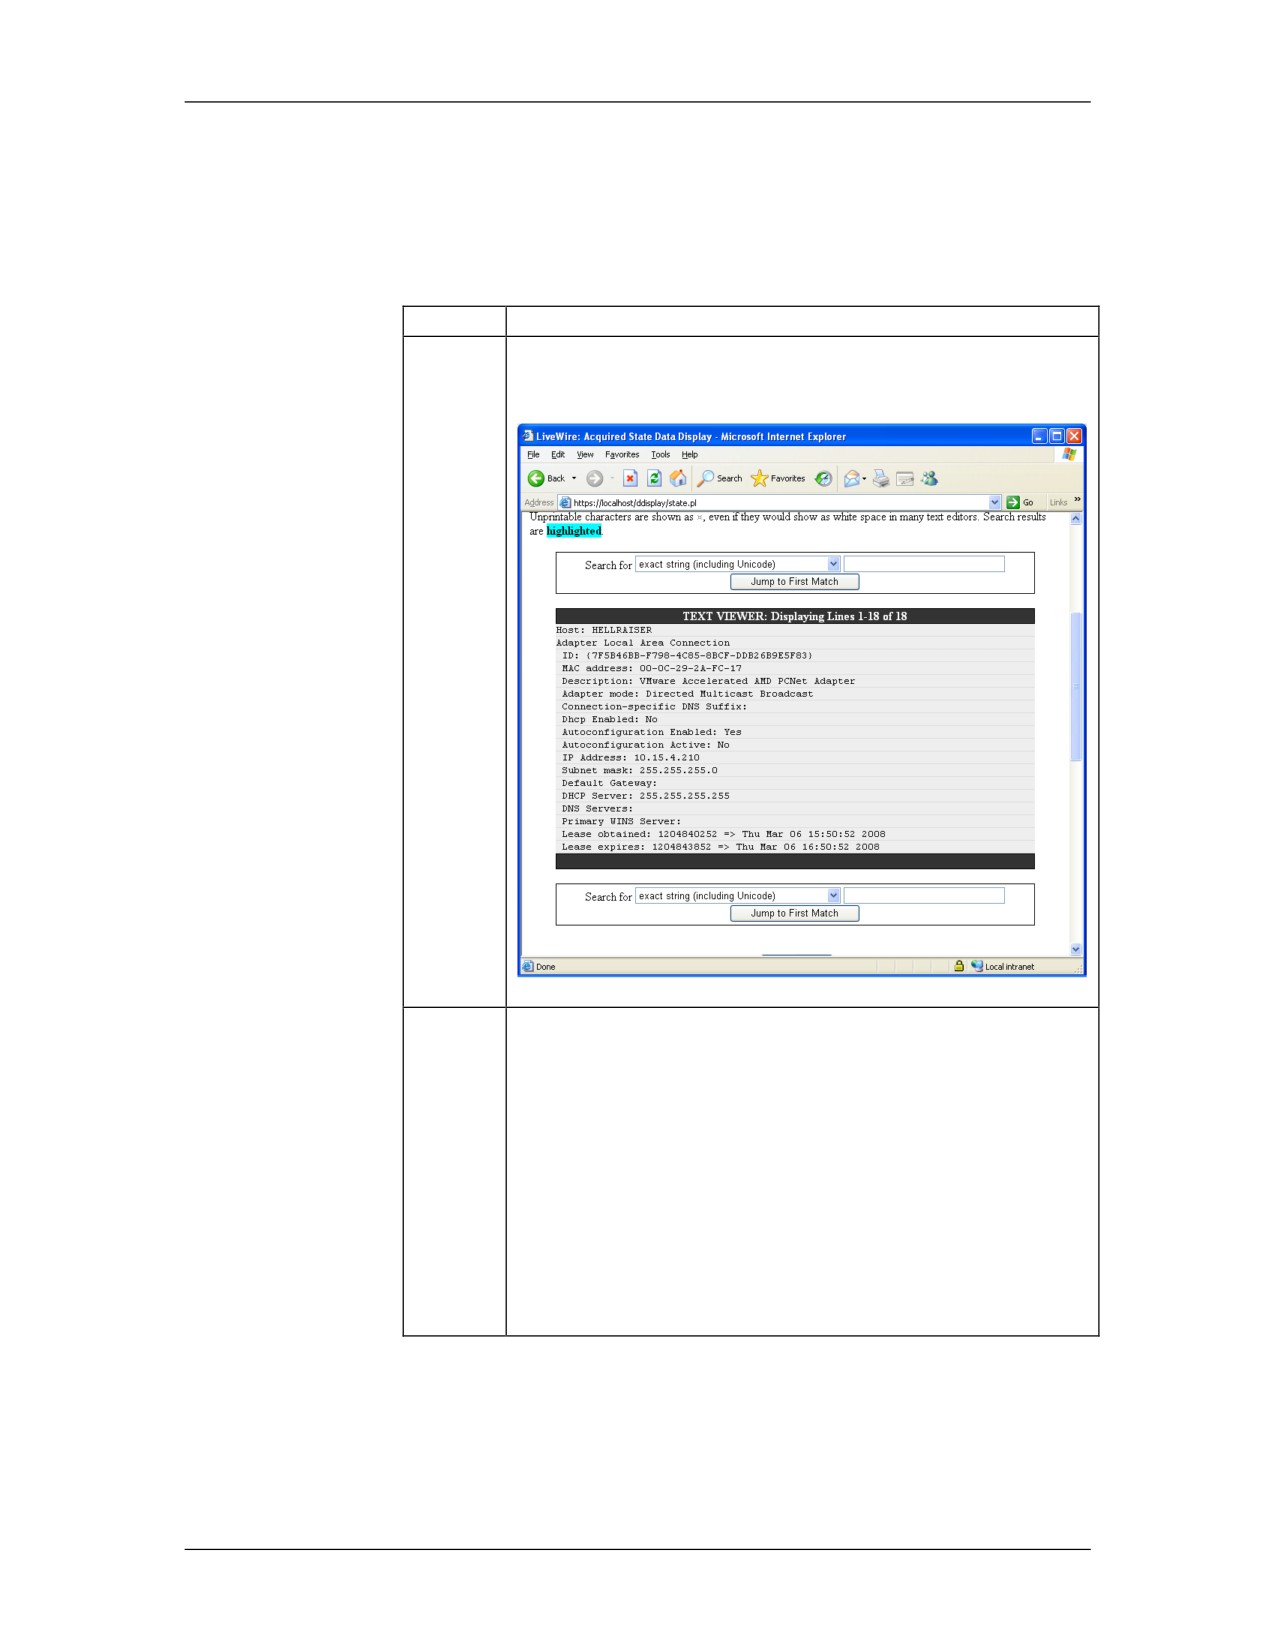
Then click Display Selected State Info to view a
display similar to the one below.
6
Click the Back button or Display Data tab and take a
few minutes to browse around other available options,
such as:
Ethernet ARP table
Ethernet statistics
Local NMB network
NetBIOS local name table
Network protocol statistics
Open network shares
12-72
For Official Use Only - Law Enforcement Sensitive
01/09
Network Intrusion Responder Program
LiveWire Investigations
Lesson 5 - Evidence Collection
Introduction
Gathering evidence and creating disk images are critical to every
investigation. LiveWire allows you to conduct an investigation of
a remote system.
Purpose of this
The purpose of this lesson is to explain how to use LiveWire
Lesson
Investigator to collect evidence from a suspect system.
Objectives
After successfully completing this lesson, you will be able to:
Determine the status of the file system
Generate a disk image
Collect file evidence from the remote system
In this Lesson
The following table shows the contents of this lesson.
Topic
See Page
File System Status
12-74
Physical vs. Logical
12-78
Collection and Preservation
12-84
Hashing
12-88
01/09
For Official Use Only - Law Enforcement Sensitive
12-73
LiveWire Investigations
Network Intrusion Responder Program
File System Status
Overview
In this lesson, you will learn how to examine physical and logical
disk structure. This information can be valuable to the overall
investigation and should be included in the documentation.
Physical Disk Size The physical size of the suspect system is a critical part of any
investigation. The investigator must have forensically clean
storage larger than the suspect system to be able to image the drive
and conduct other valuable analysis.
Procedure:
Follow the procedure below to retrieve information about the disk
Retrieving Disk
drives located on a remote target.
Information
Step
Action
1
Click on the Data Display tab.
2
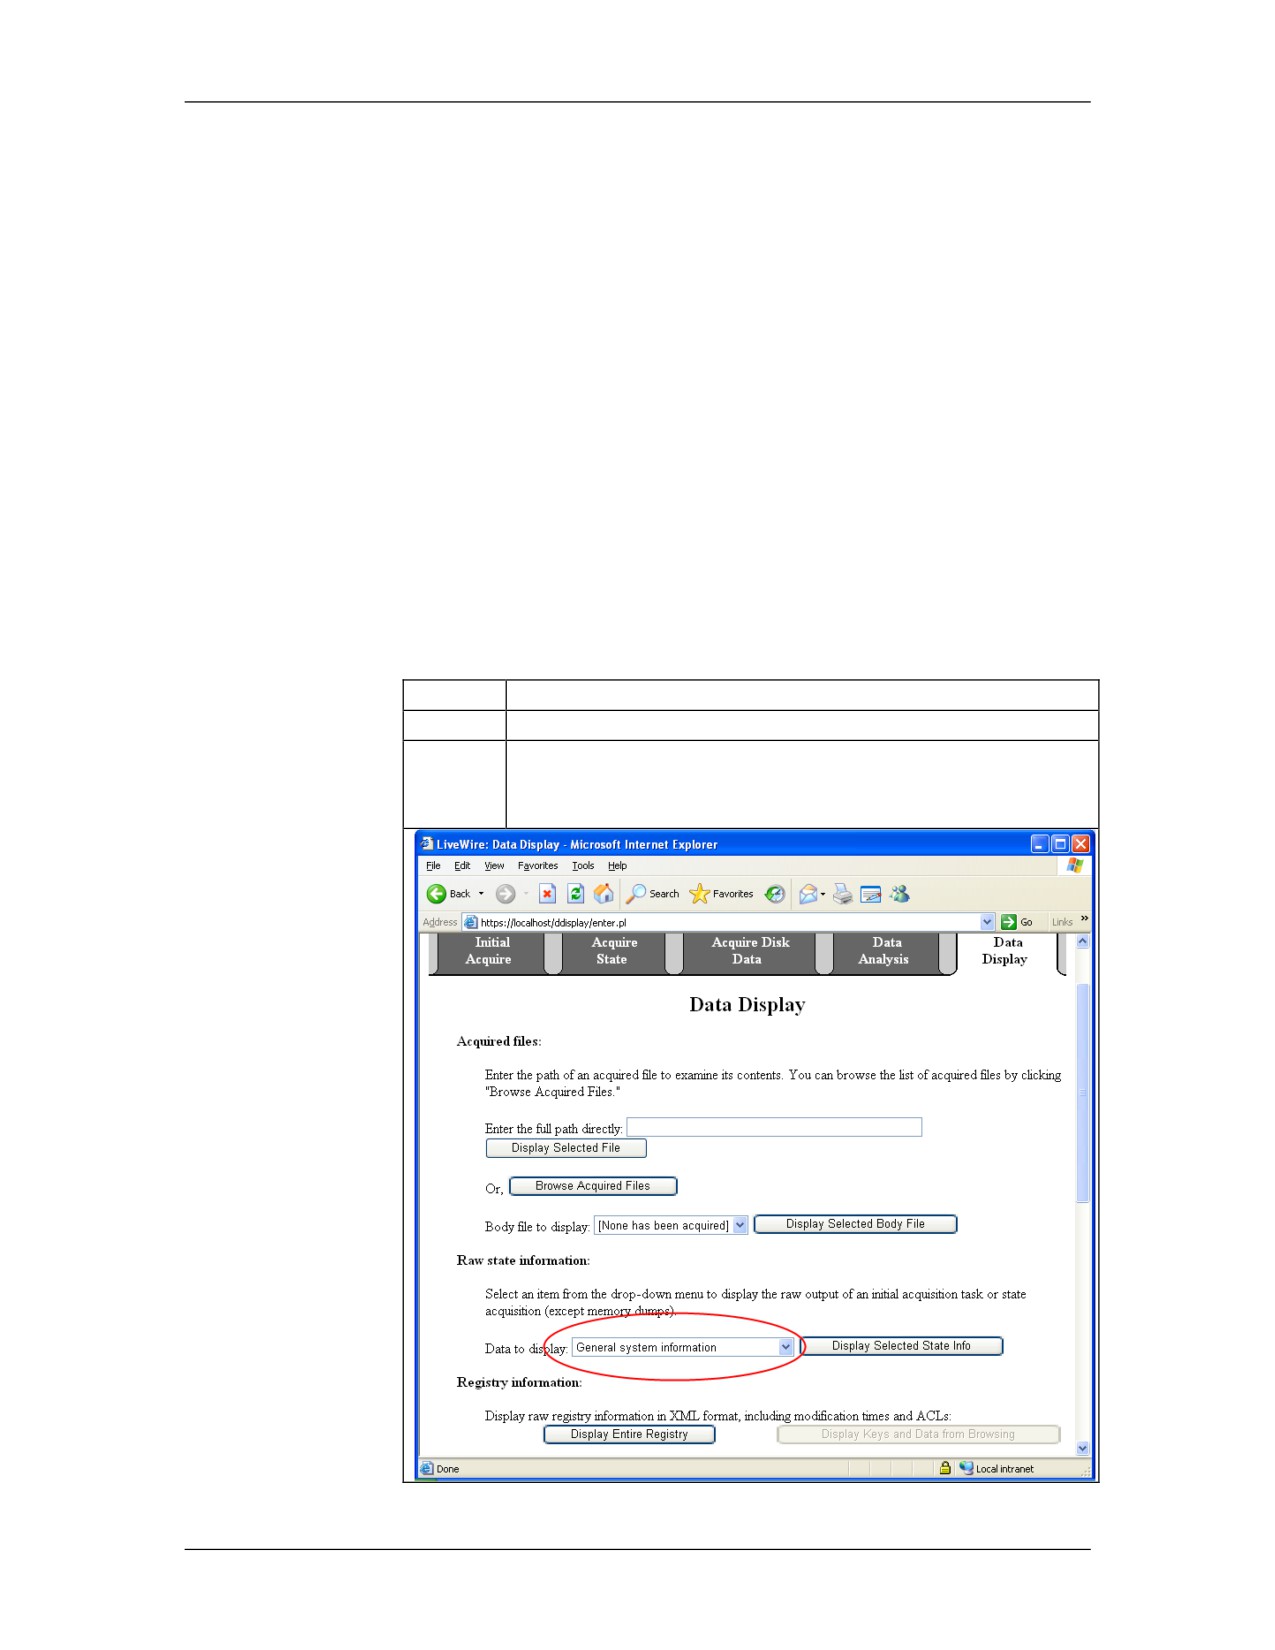
Beside Data to Display, use the pull-down menu to
select General system information. Then click Display
Selected State Info.
12-74
For Official Use Only - Law Enforcement Sensitive
01/09
Network Intrusion Responder Program
LiveWire Investigations
File System Status, continued
Procedure: Retrieving Disk Information, continued
Step
Action
3
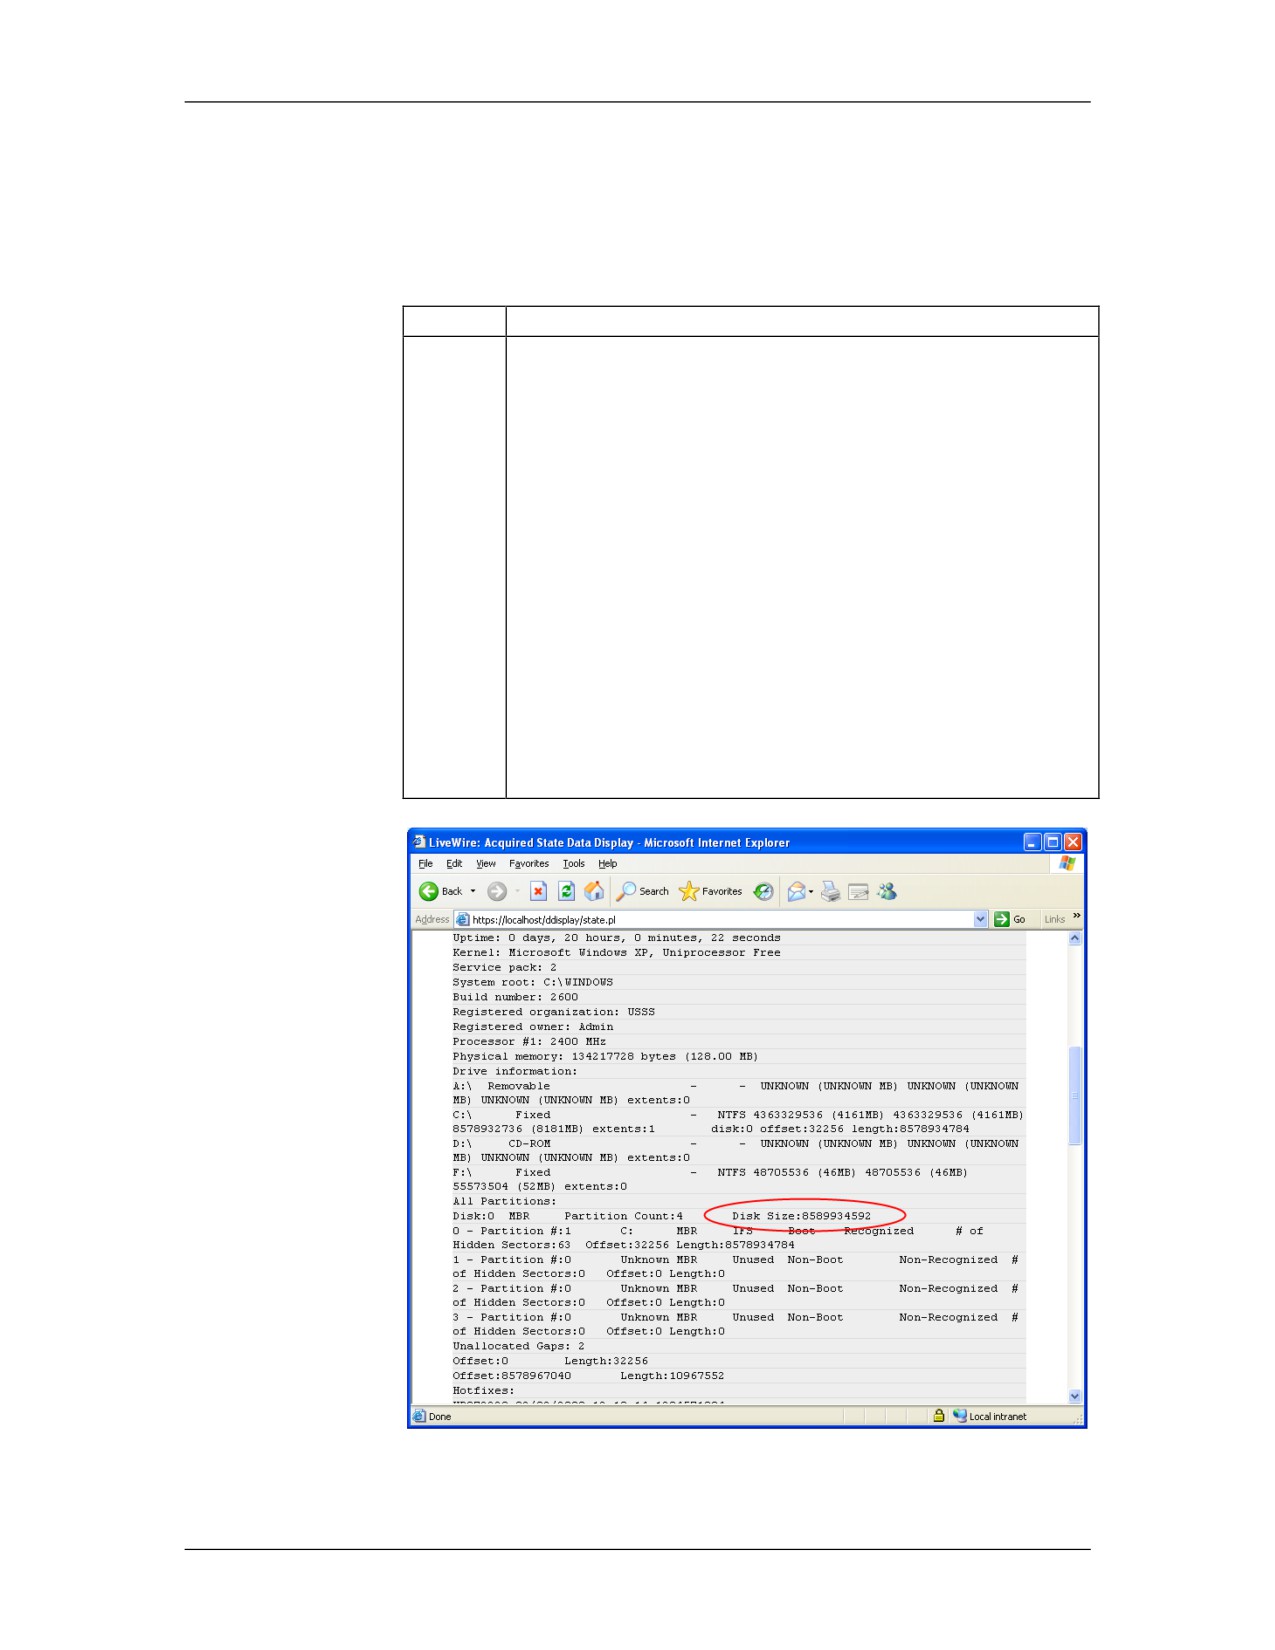
Scroll down to view disk information. You can see that
Disk0 is 8589934952 bytes in size. To convert that into
a recognizable formation, you can use the following
equation:
8589934952 bytes / 1024 / 1024 = 8192 MB
Therefore, disk0 on 10.15.4.210 is 8 GB. Also, notice
the logical disk information and RAM size are recorded.
This information can be used to help determine the next
course of action. Because imaging the entire drive will
take a considerable more amount of time, the
investigator may choose to only retrieve the logical
partition, single files, etc. depending on the details of the
investigation.
01/09
For Official Use Only - Law Enforcement Sensitive
12-75
LiveWire Investigations
Network Intrusion Responder Program
File System Status, continued
Procedure:
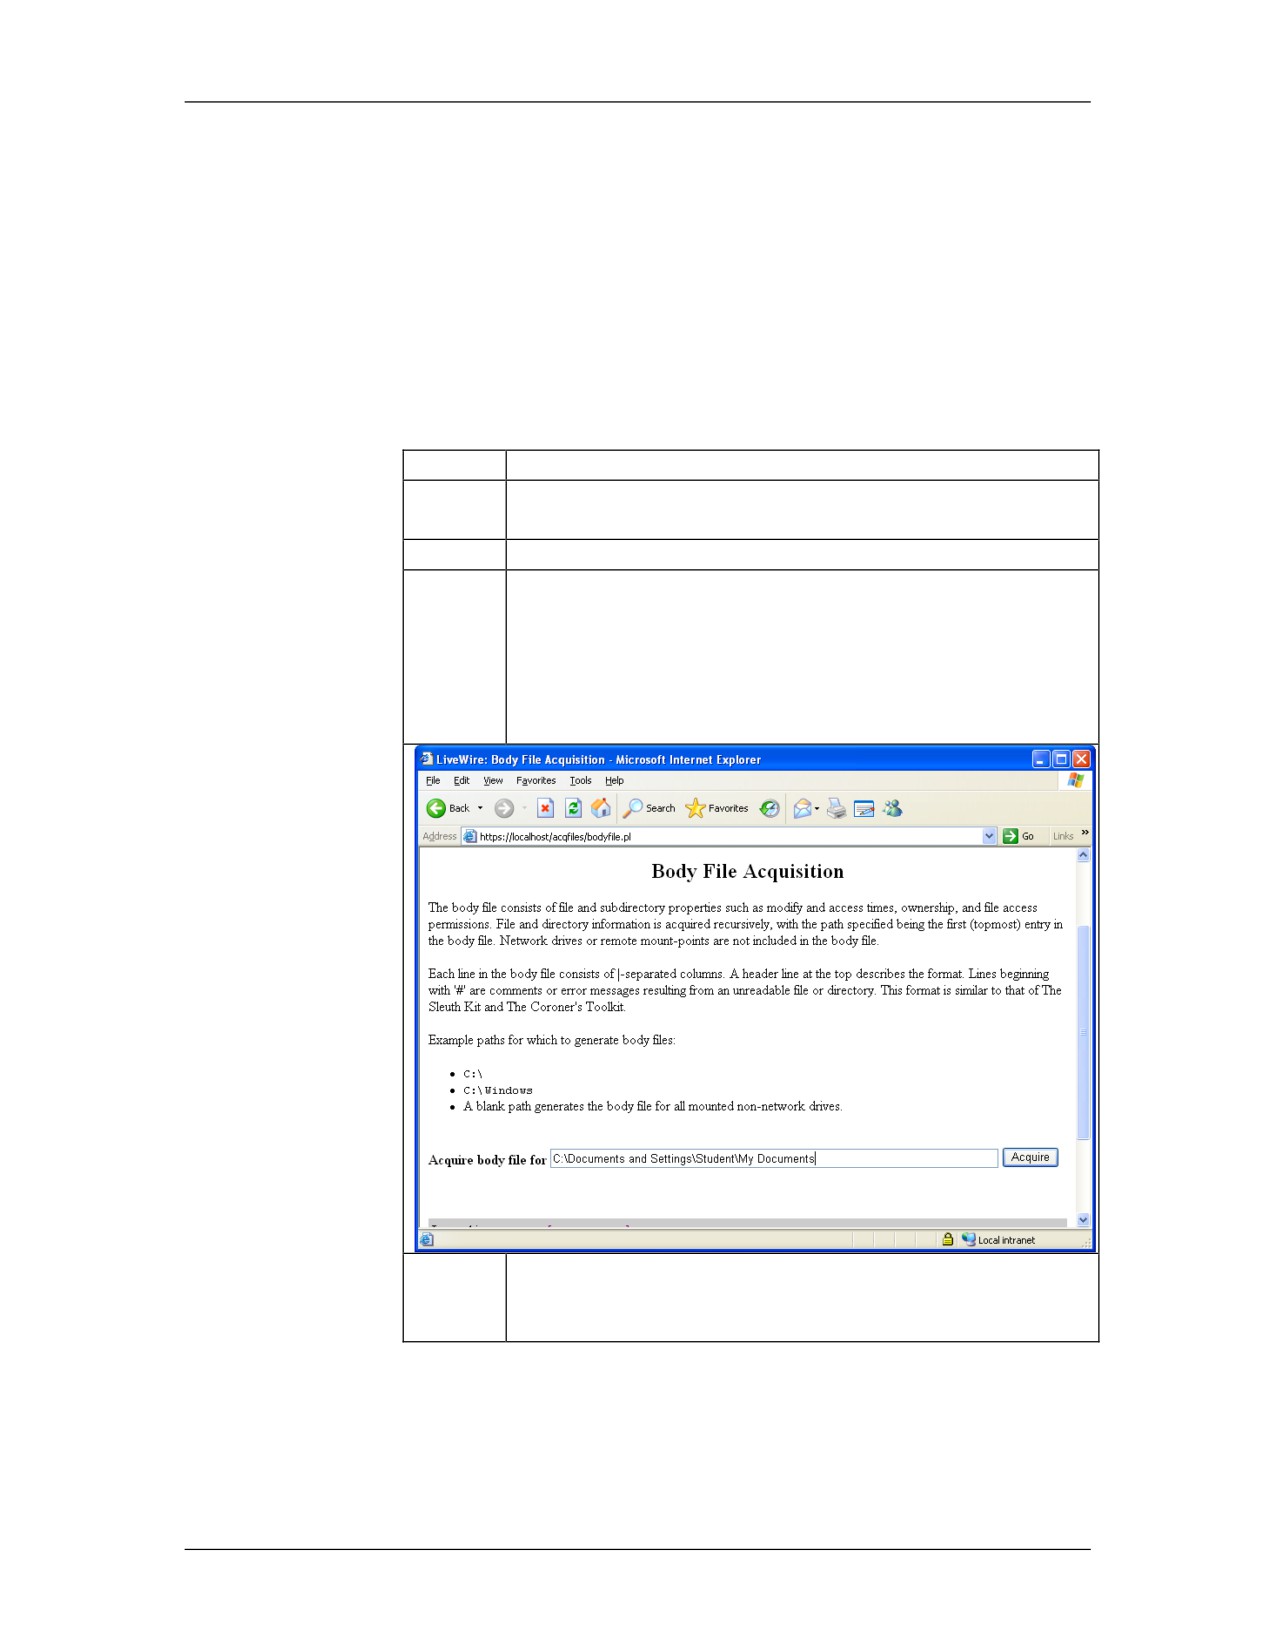
This section explains how to use LiveWire to retrieve information
Body File
about files stored on the remote system. The body file acquisition
Acquisition
gathers data about the files stored on the system, such as file
modify and access times, ownership, permissions, etc. The output
in this section is not easy to read, but could prove to be very
valuable in the investigation and for archive purposes.
Step
Action
1
Click the Acquire Disk Data tab at the top of LiveWire
Investigator.
2
Click Acquire a body file.
3
Input C:\Documents and Settings\Student\My
Documents in the input area.
Even though there are spaces in the path, no quotes are
necessary.
4
Once the acquisition is successfully completed, click
view the body file.
12-76
For Official Use Only - Law Enforcement Sensitive
01/09
Network Intrusion Responder Program
LiveWire Investigations
File System Status, continued
Procedure: Body File Acquisition, continued
Step
Action
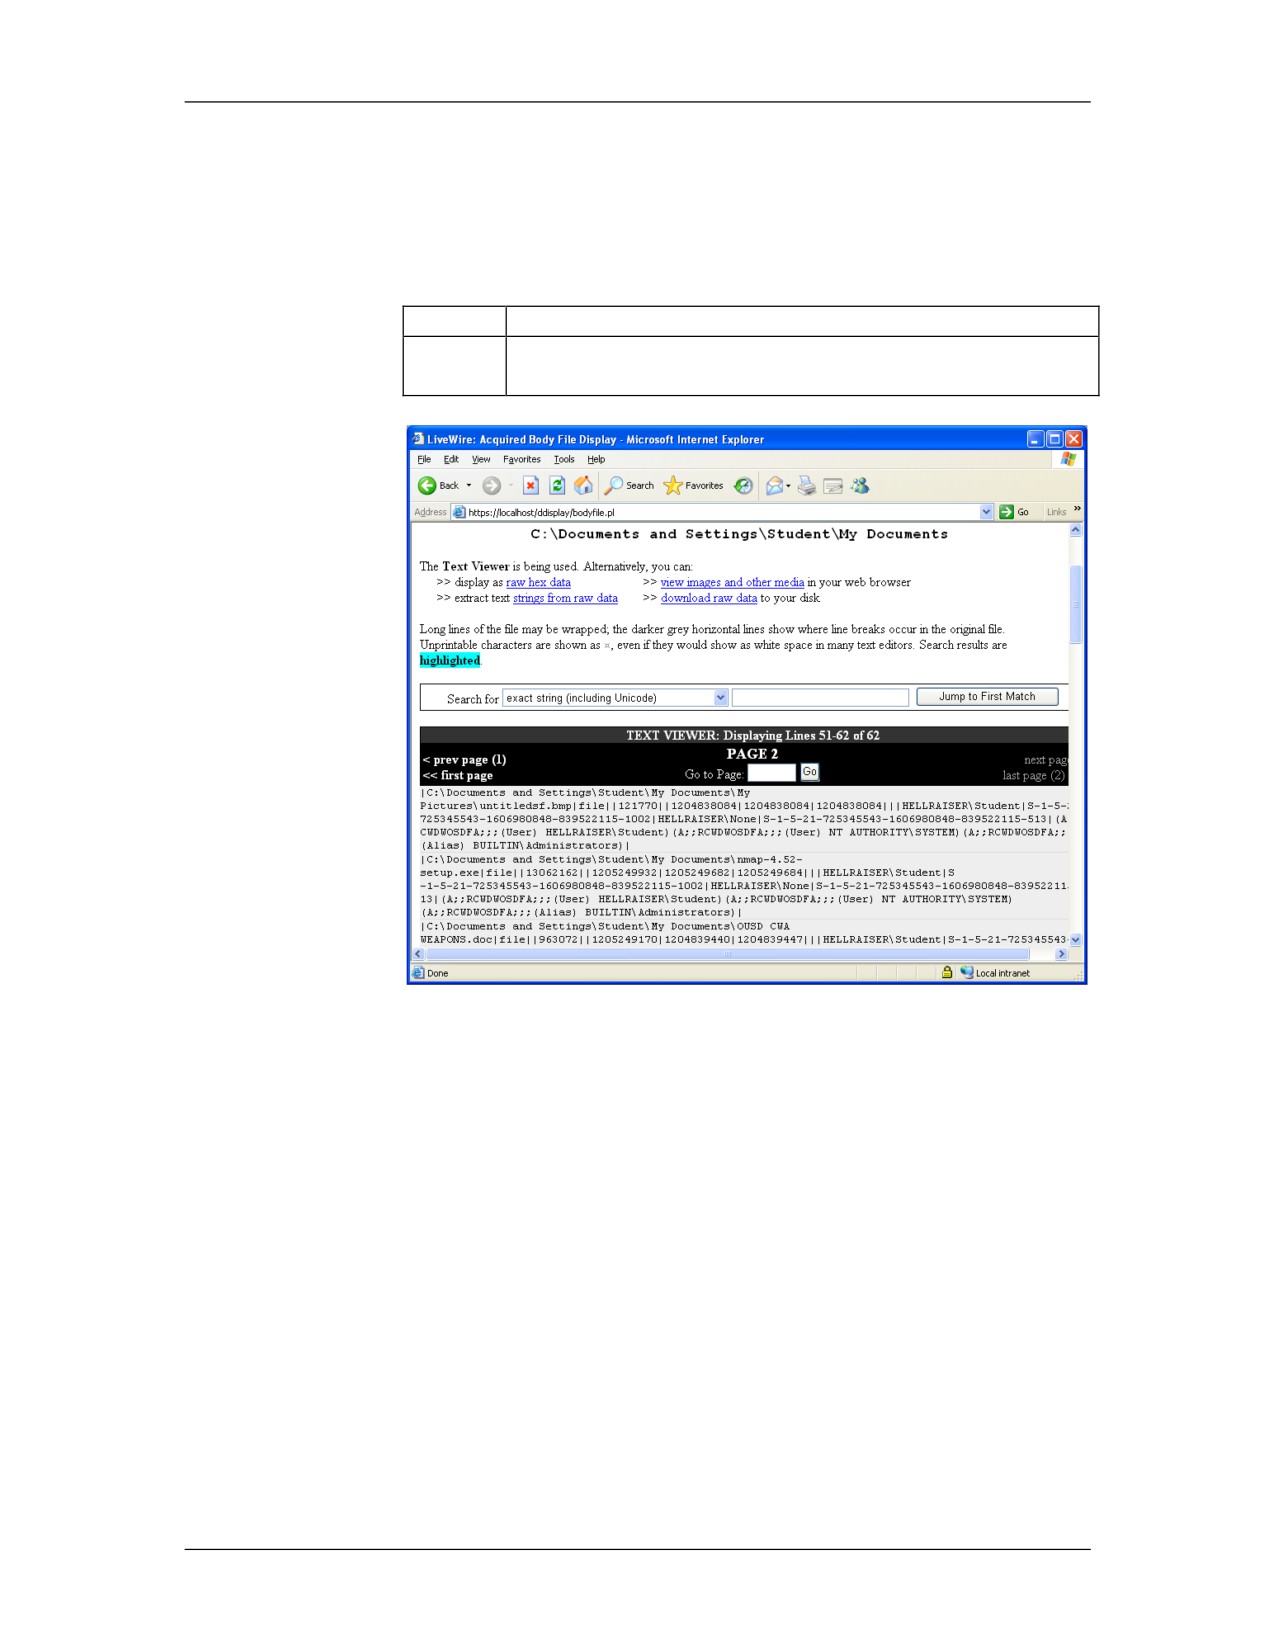
5
A screen similar to the one below should be displayed.
01/09
For Official Use Only - Law Enforcement Sensitive
12-77
LiveWire Investigations
Network Intrusion Responder Program
Physical vs. Logical
Introduction
A physical image, which is used in forensic analysis, is a bit-for-
bit duplicate of the hard drive in a system. In the event that a
physical image cannot be obtained, the investigator collects a
logical image, which only contains data from the active file
system.
Physical Images
From a forensics standpoint, a physical image is preferable to a
logical image because it may contain more evidence. Physical
images:
Contain information from the entire physical device or
designated portion of it
Are not file system-specific
Capture all sectors within a designated area of a device, both in
the system and data areas (including all files, unallocated
space, swap space, etc.)
Are typically placed in an Image file (a logical file that
contains the bit-for-bit copy)
Examples of
Both FTK Imager and the dcfldd utility, which are found on the
Physical Image
Helix response CD, create physical images. These tools enable
Utilities
you to recover for analysis any deleted data or information that
resided in slack space on the original drive. When a file is deleted
and a smaller file is allocated to the same space, file slack may
result. File slack can contain information from whatever
previously occupied that space.
12-78
For Official Use Only - Law Enforcement Sensitive
01/09
Network Intrusion Responder Program
LiveWire Investigations
Physical vs. Logical, continued
Logical Images
In some cases, it may be necessary to collect a logical image
instead of a physical one. You should be aware of limitations of
logical images:
Only contain information from the active file system
Only contain enough information to reproduce logical volumes
or parts of them
Are file system-specific
Allow registry and other system files to be backed up, but only
if specifically requested
Do not capture slack space, free space, or partition information
Do not capture files that are open at the time of the image
Do not capture any files that you do not have access to read
Do not capture temporary files, such as pagefile.sys,
win386.swp, etc.
Example of
Microsoft‟s Windows Backup creates image files of an entire
Logical Image
active file system. Because a logical image only contains active
Utilities
files, it is not possible to recover and analyze deleted files or slack
space.
On-site Imaging
When imaging on a crime scene, the same general principles for
Guidelines
collecting evidence apply. However, you may face considerable
time and material constraints. To add to that, you must also
perform these actions correctly in a strange environment with
unknown equipment.
There will be challenges to accomplishing even simple actions,
such as finding the appropriate settings in the BIOS or gaining
access to the inside of the machine. Good preparation will help
mitigate some of these problems. If you have to deviate from the
general procedures for any reason, document the reasons why in
your notes so that you can later explain in court.
01/09
For Official Use Only - Law Enforcement Sensitive
12-79
LiveWire Investigations
Network Intrusion Responder Program
Physical vs. Logical, continued
Procedure:
LiveWire has the ability to image an entire physical disk or an
Physical Disk
individual partition on that disk. This section will explain how to
Imaging
collect a physical disk image with LiveWire.
Step
Action
1
Click the Acquire Disk Data tab at the top of LiveWire.
2
Under the Raw Partition Data section, click Image a
Physical Disk or Partition.
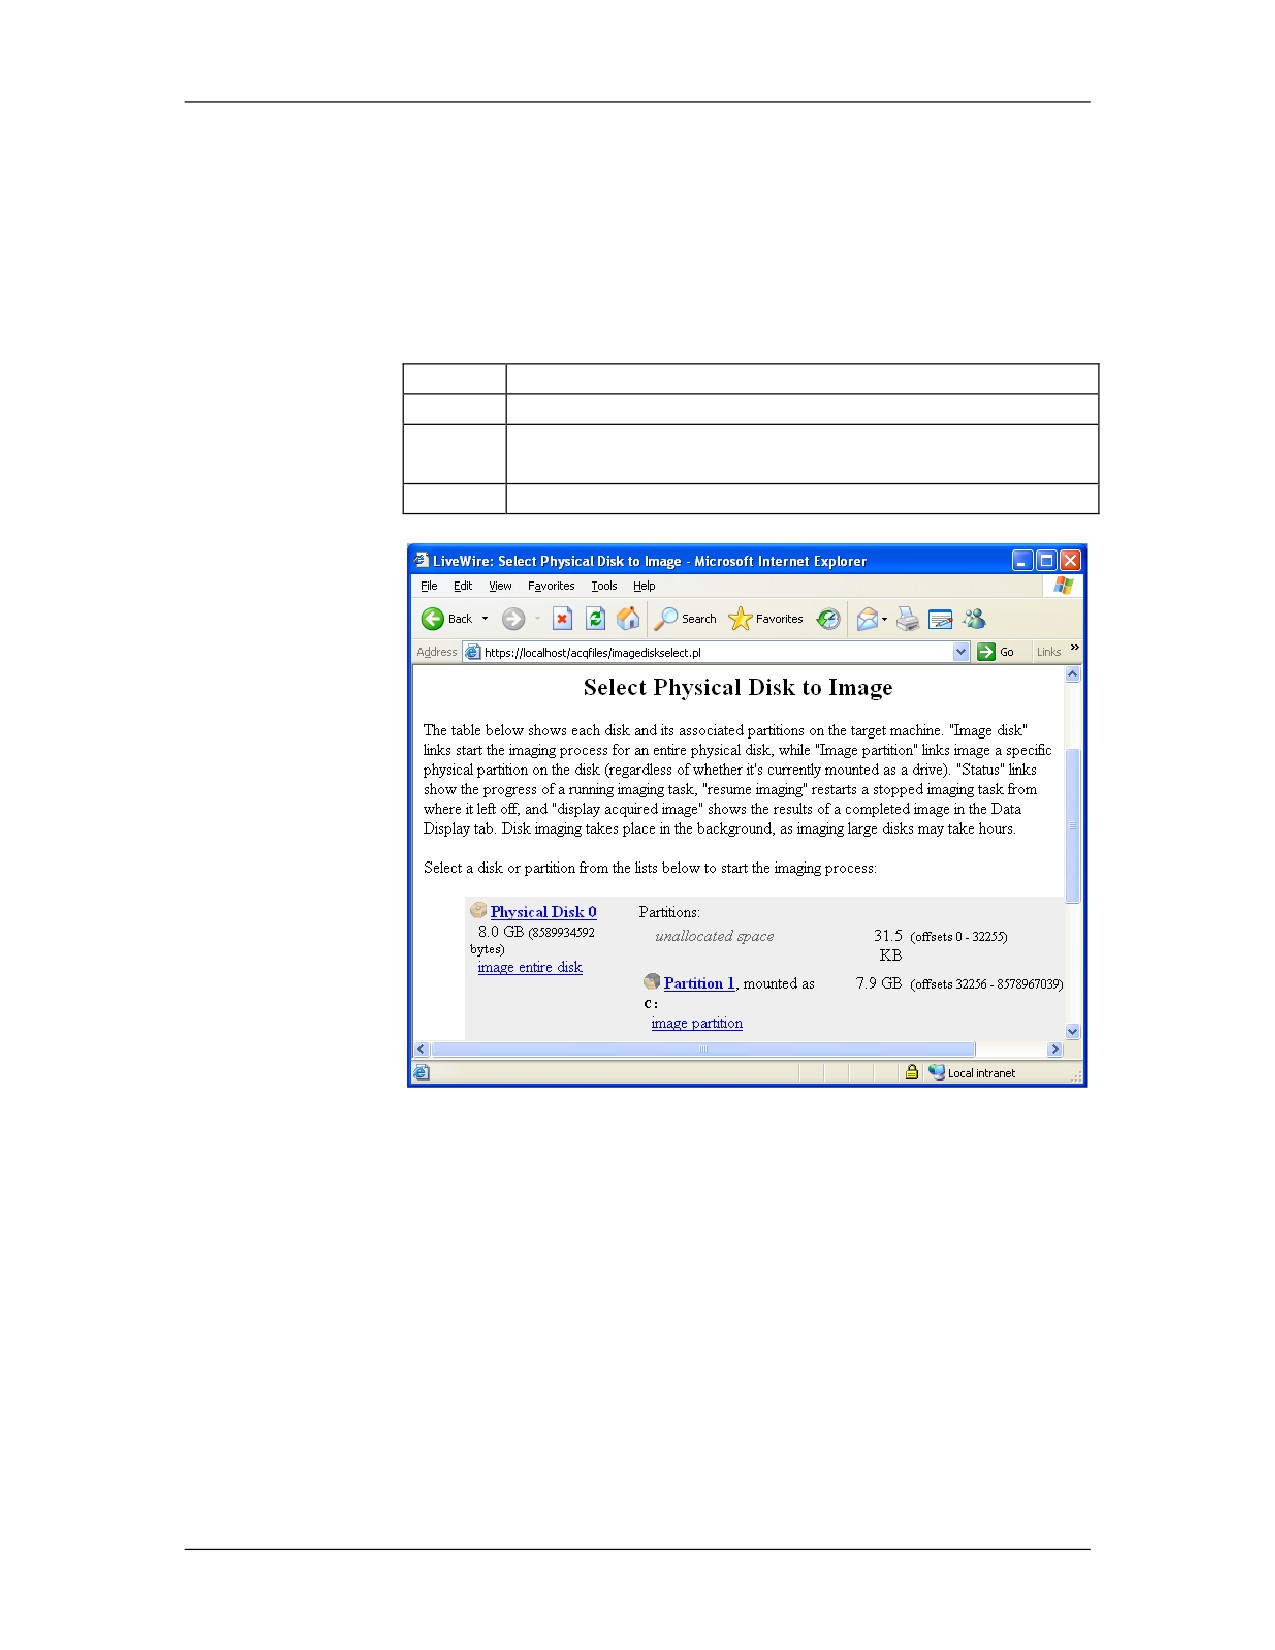
3
Click the Physical Disk0 link to begin imaging the disk.
12-80
For Official Use Only - Law Enforcement Sensitive
01/09
Network Intrusion Responder Program
LiveWire Investigations
Physical vs. Logical, continued
Procedure: Physical Disk Imaging, continued
Step
Action
4
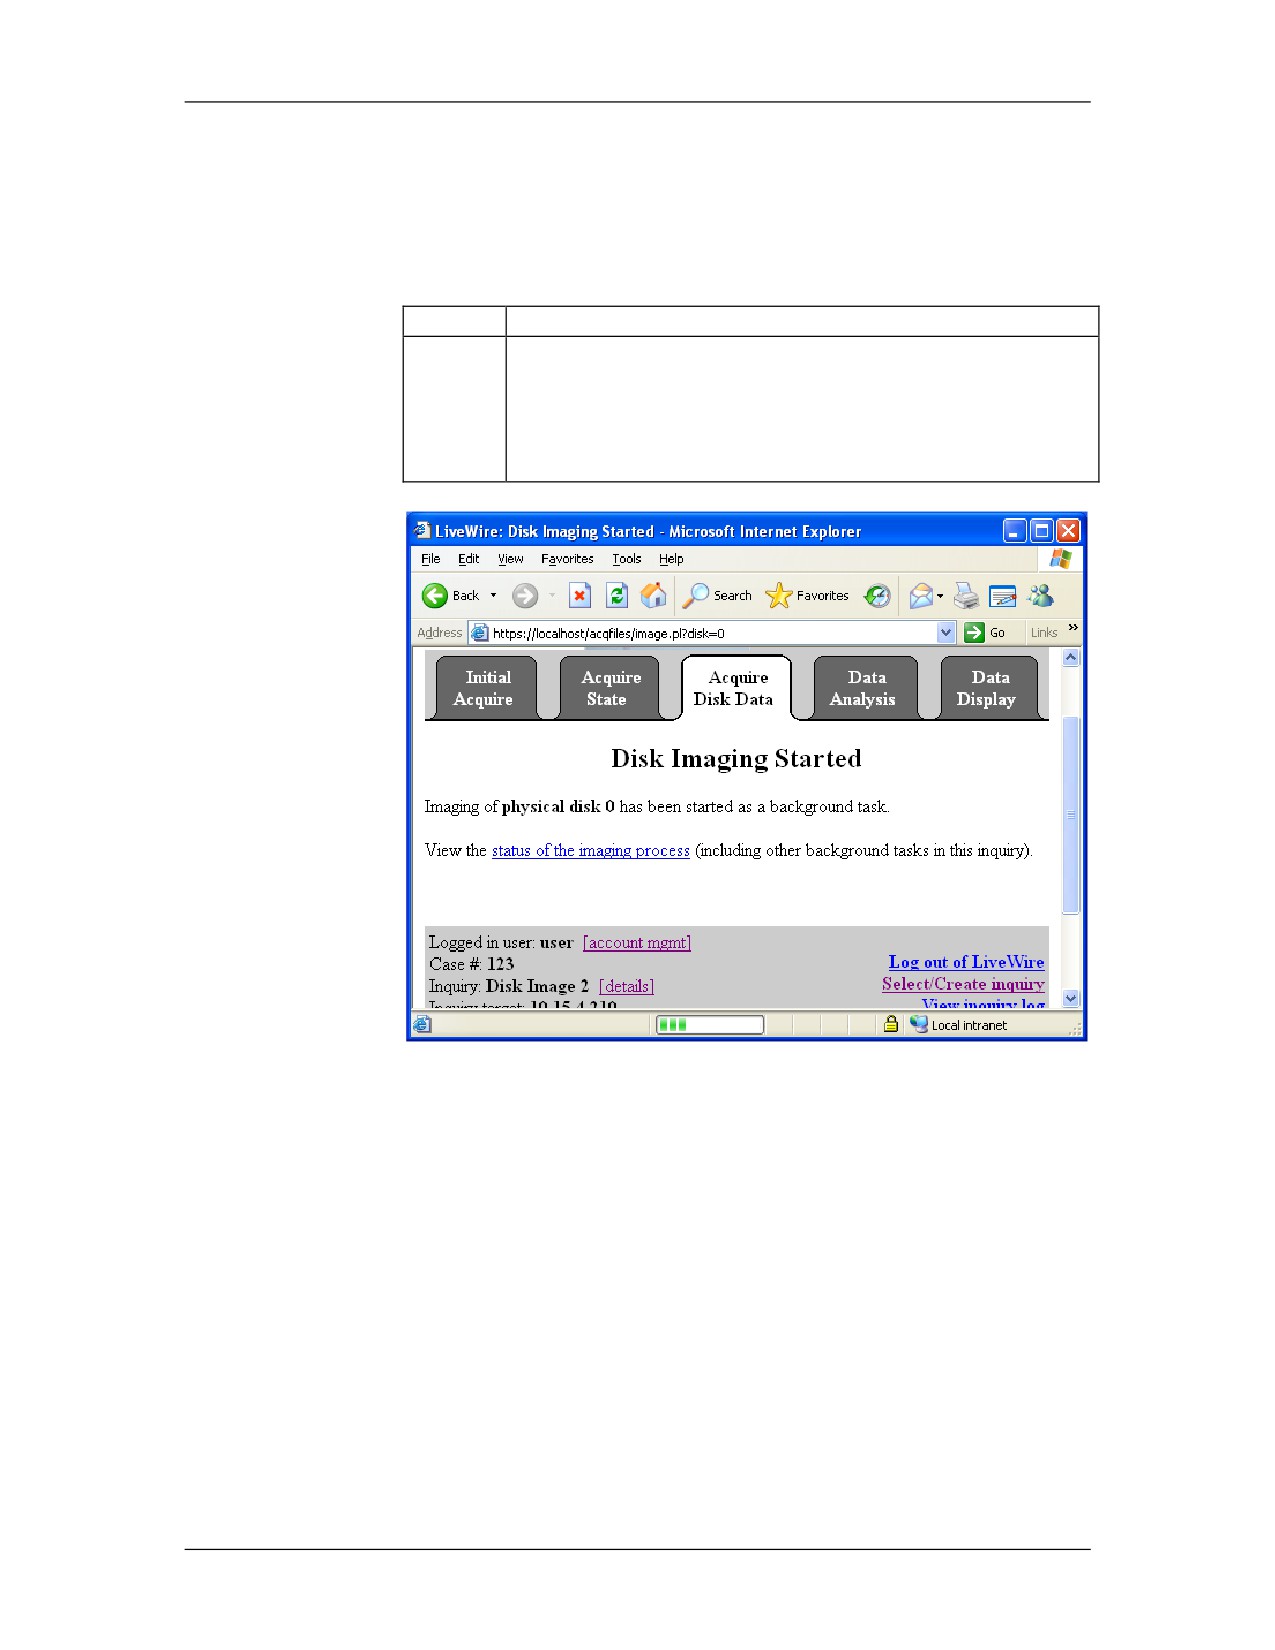
The imaging process could potentially take a very long
time. Therefore, LiveWire runs this process in the
backg0round to allow the investigator to carry out other
tasks. To view the status, click the status of the
imaging process link.
01/09
For Official Use Only - Law Enforcement Sensitive
12-81
LiveWire Investigations
Network Intrusion Responder Program
Physical vs. Logical, continued
Procedure: Physical Disk Imaging, continued
Step
Action
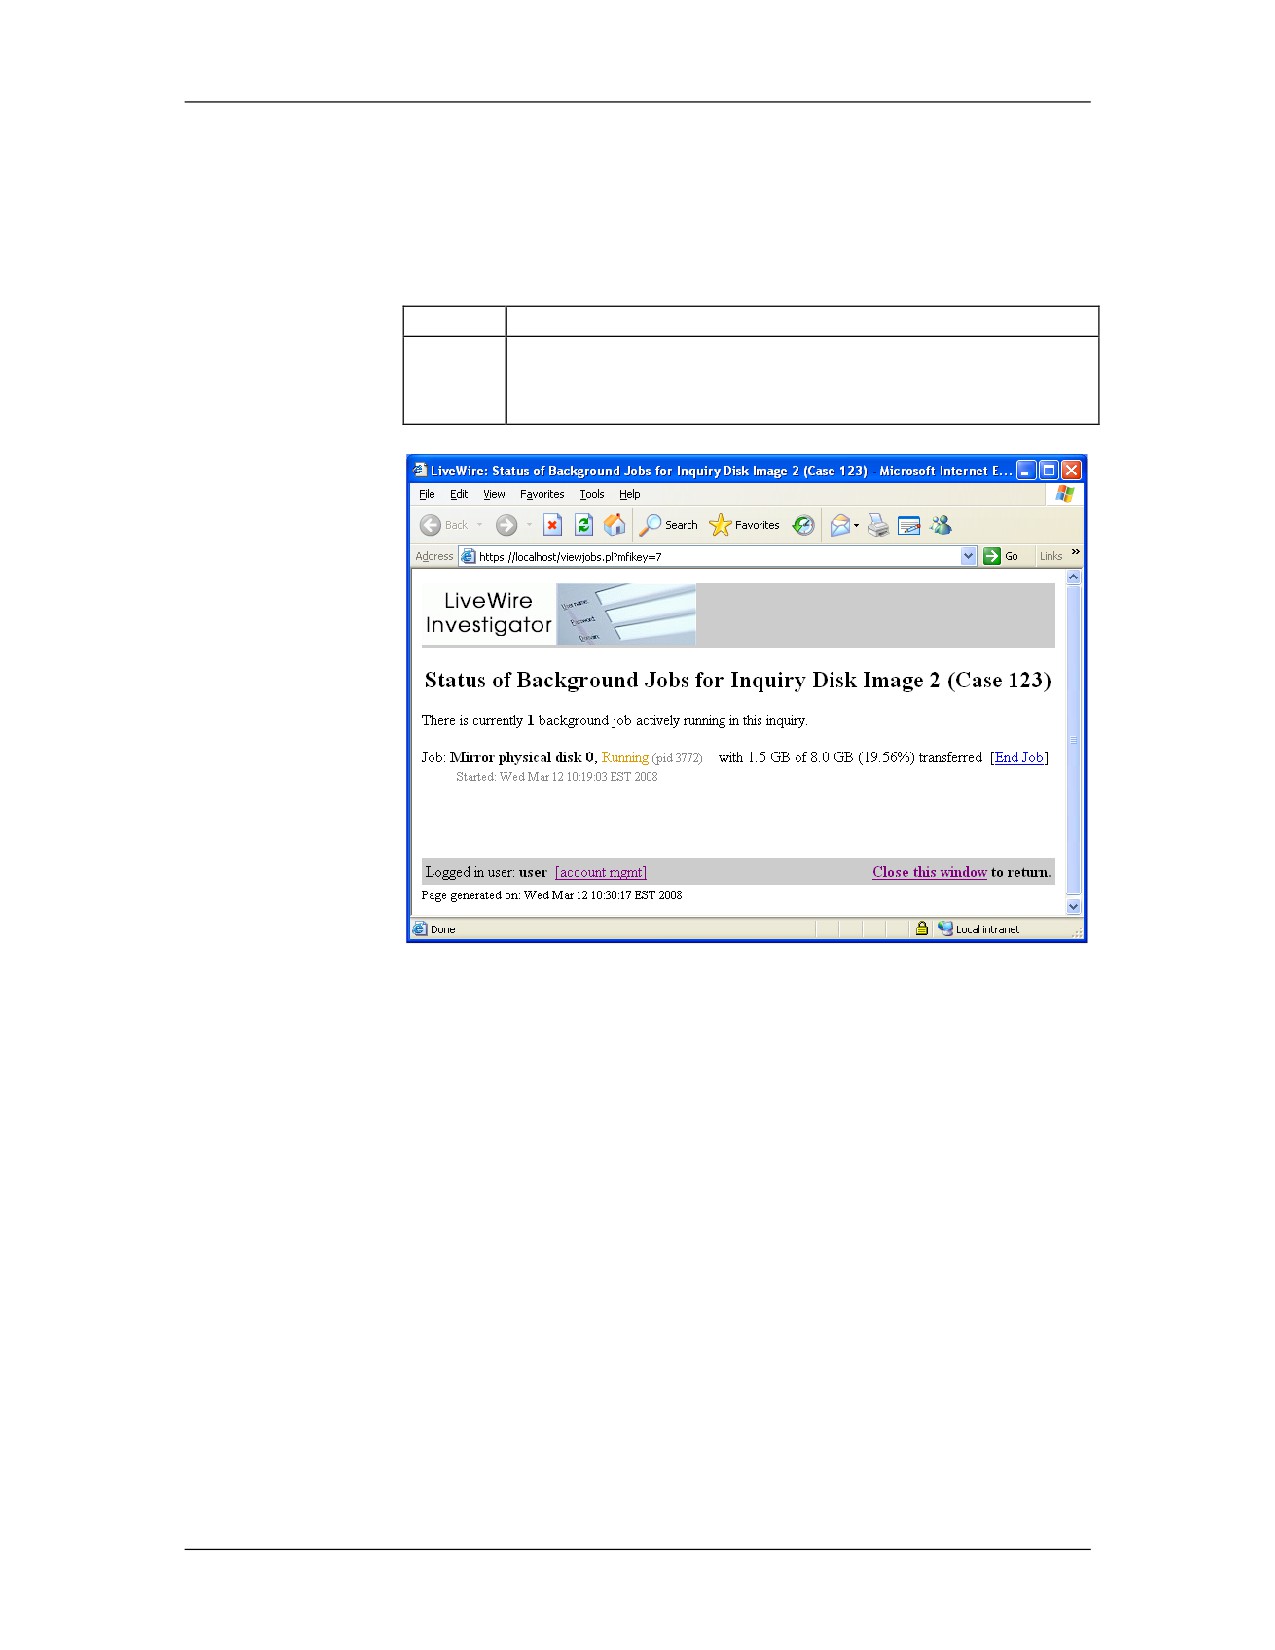
5
A new window opens which displays the progress of the
imaging process with the option to end the job. This
page will automatically refresh and can be closed.
12-82
For Official Use Only - Law Enforcement Sensitive
01/09
Network Intrusion Responder Program
LiveWire Investigations
Physical vs. Logical, continued
Procedure: Physical Disk Imaging, continued
Step
Action
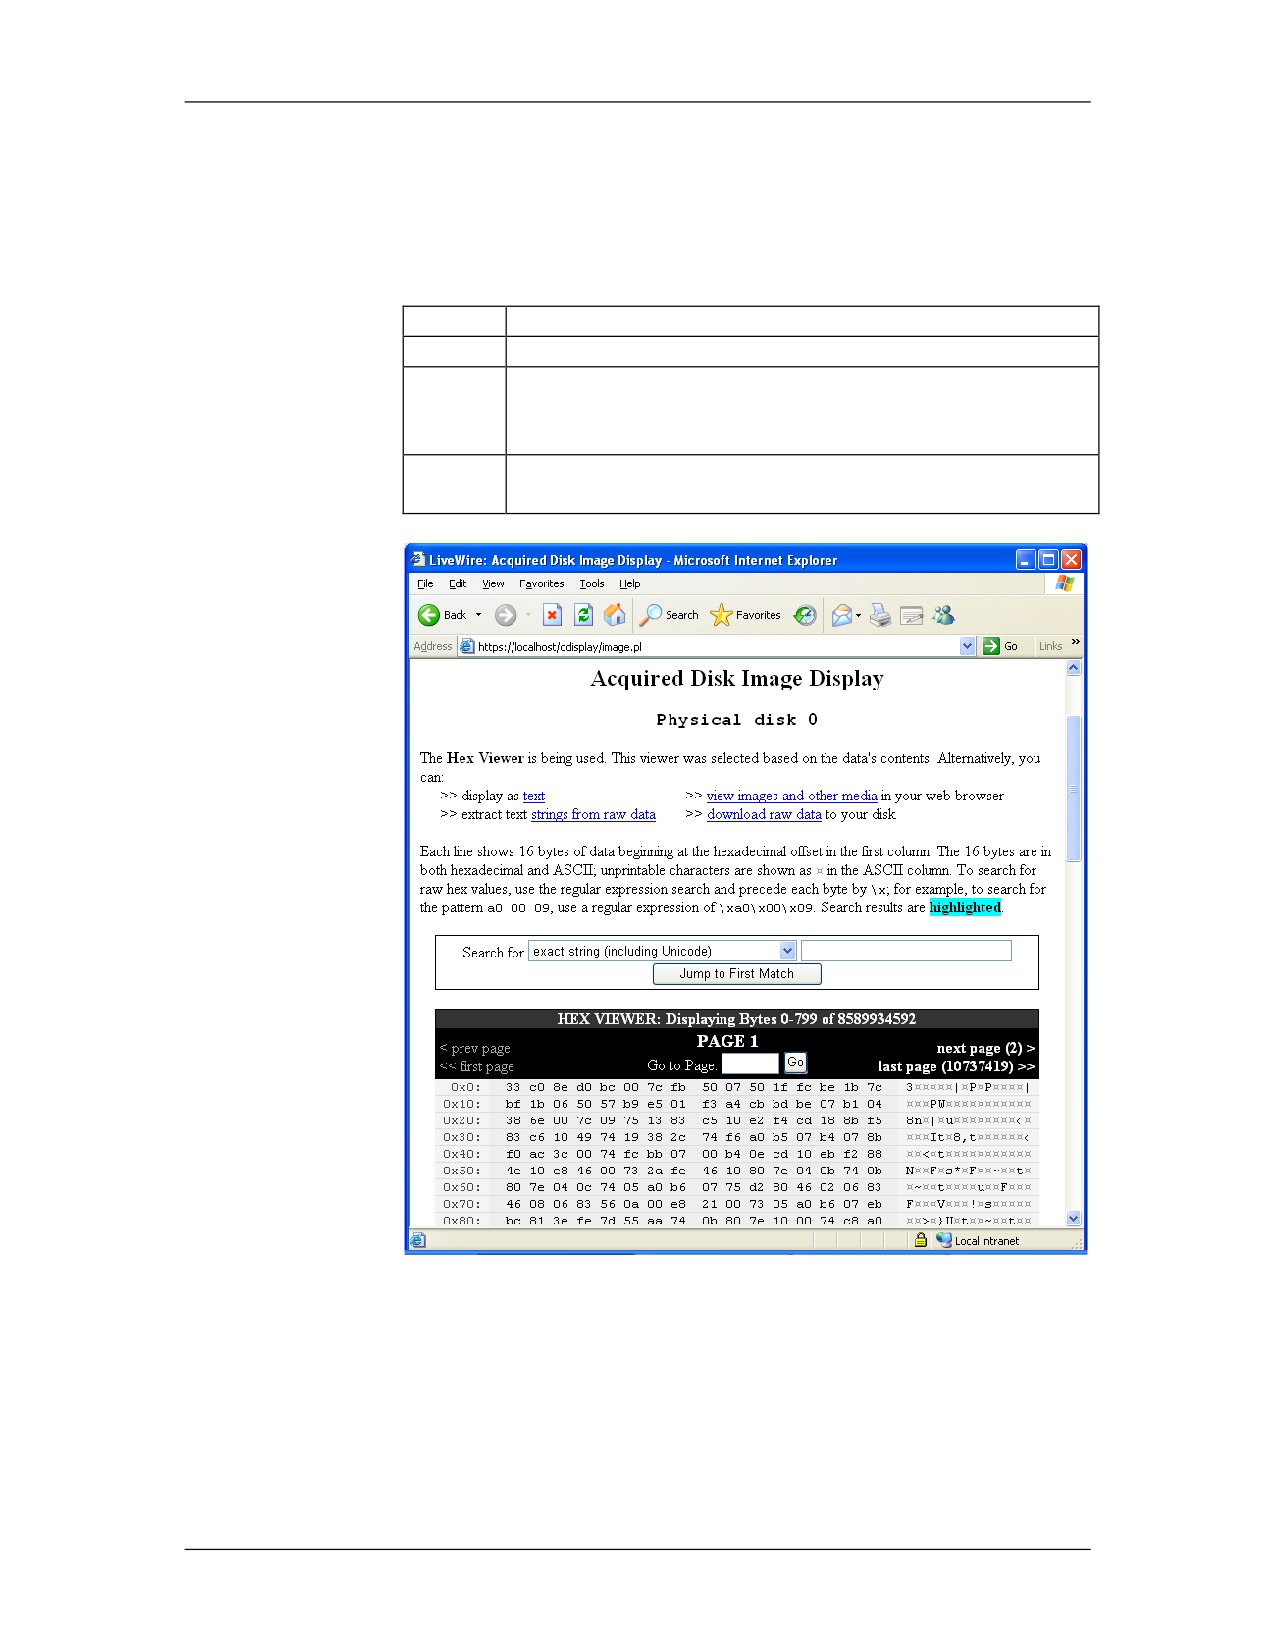
6
To view the disk image, click on the Data Display tab.
7
Scroll down to the “Raw Disk & Memory images”
section. In the pull-down menu, select Physical disk 0
and click Display Selected Disk Image.
8
The disk image will be displayed in the Hex Viewer
with the same search capabilities.
01/09
For Official Use Only - Law Enforcement Sensitive
12-83
LiveWire Investigations
Network Intrusion Responder Program
Collection and Preservation
Overview
Every investigator knows the value of potential evidence and
should be familiar with ways to preserve potential evidence at the
scene. This section will explain how to use LiveWire to collect
files from the remote system.
Preservation
You should alter the system as little as possible during your
investigation by following sound first response principles.
Once on site, you should identify other devices that may have
witnessed or captured information related to your investigation.
Obtain any sniffer, router, firewall, and IDS (or similar) logs that
may have captured traffic to or from the victim machine around
the time of the incident.
Procedure:
Follow these steps to use LiveWire to collect files from the remote
Collecting Files
system. This section continues from the previous section.
Step
Action
1
Click on the Acquire Disk Data tab at the top.
2
Click Browse and acquire files.
12-84
For Official Use Only - Law Enforcement Sensitive
01/09
Network Intrusion Responder Program
LiveWire Investigations
Collection and Preservation, continued
Procedure: Collecting Files, continued
Step
Action
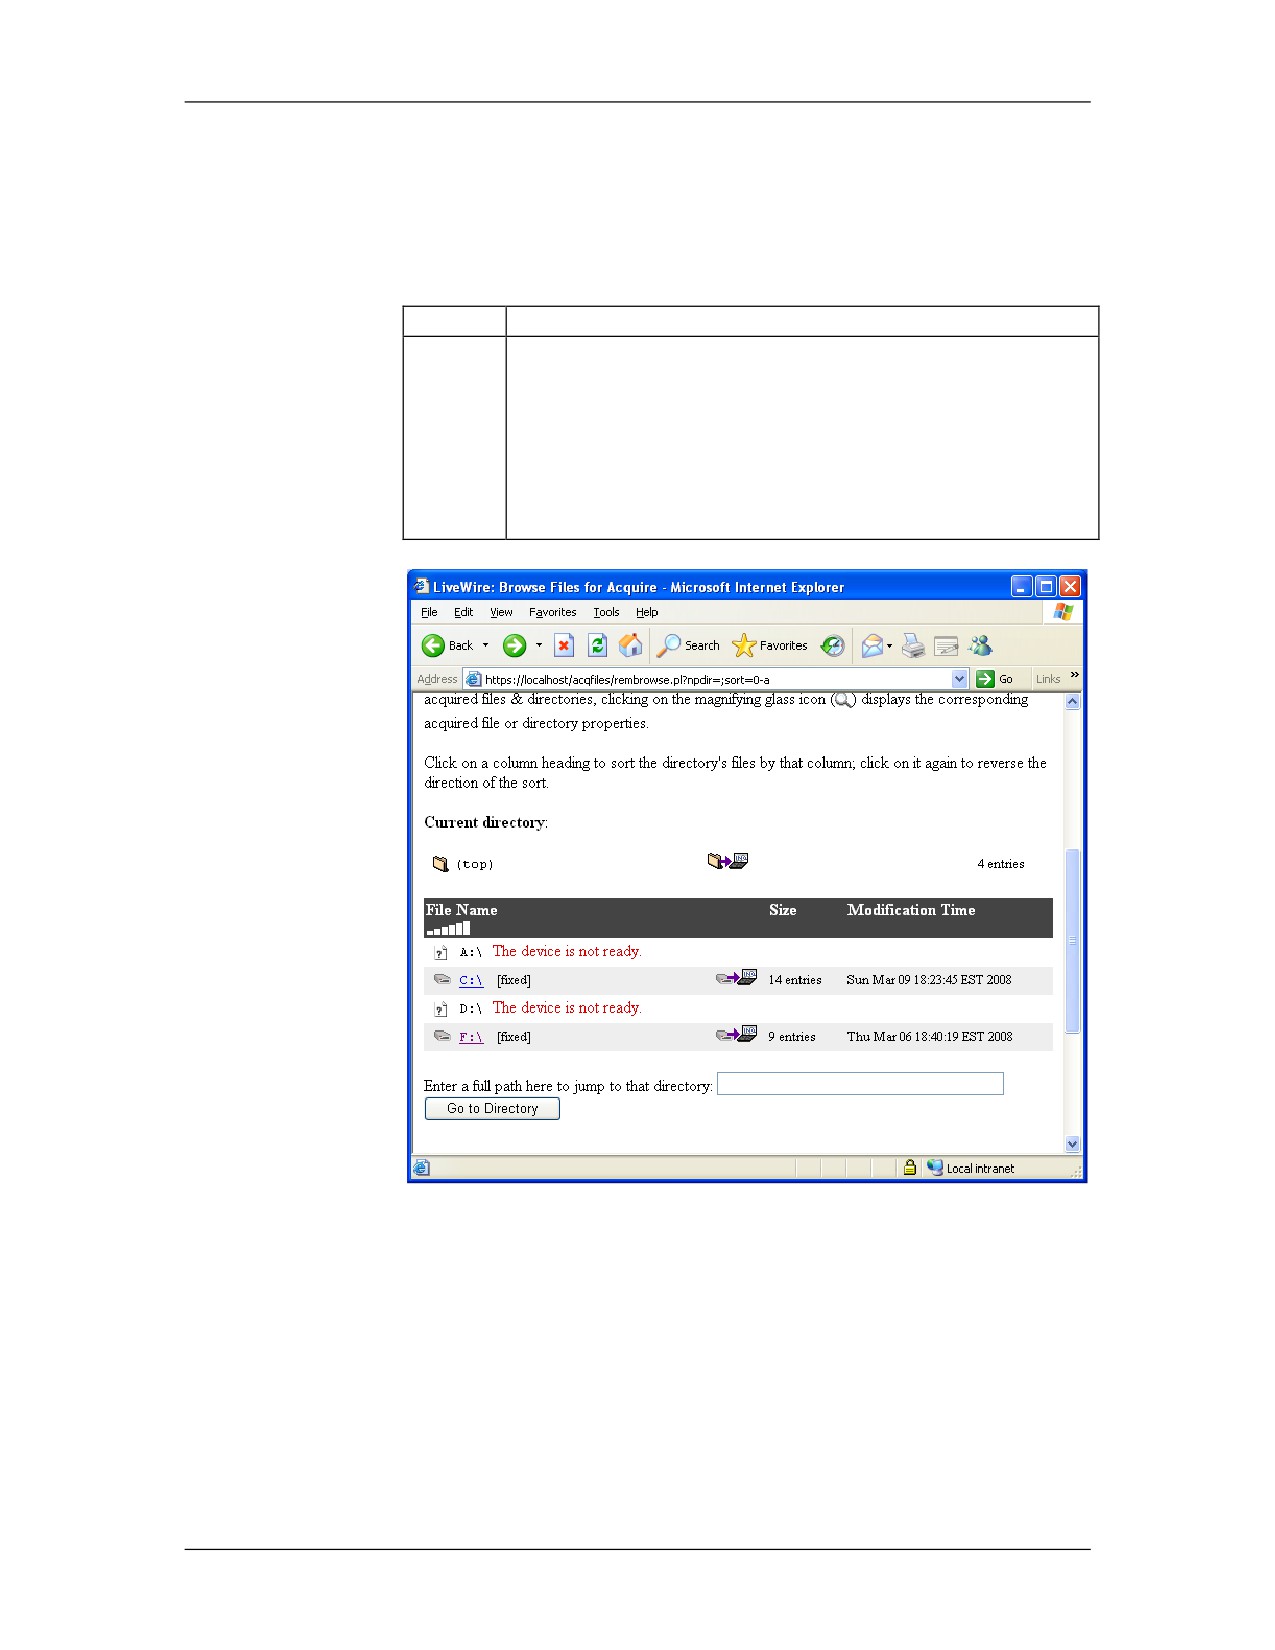
3
This screen allows you to browse through the directory
structure. Click the F:\ link.
If you know the full path of the directory you want to
view, the path can be entered in the area below the
directory list.
01/09
For Official Use Only - Law Enforcement Sensitive
12-85
LiveWire Investigations
Network Intrusion Responder Program
Collection and Preservation, continued
Procedure: Collecting Files, continued
Step
Action
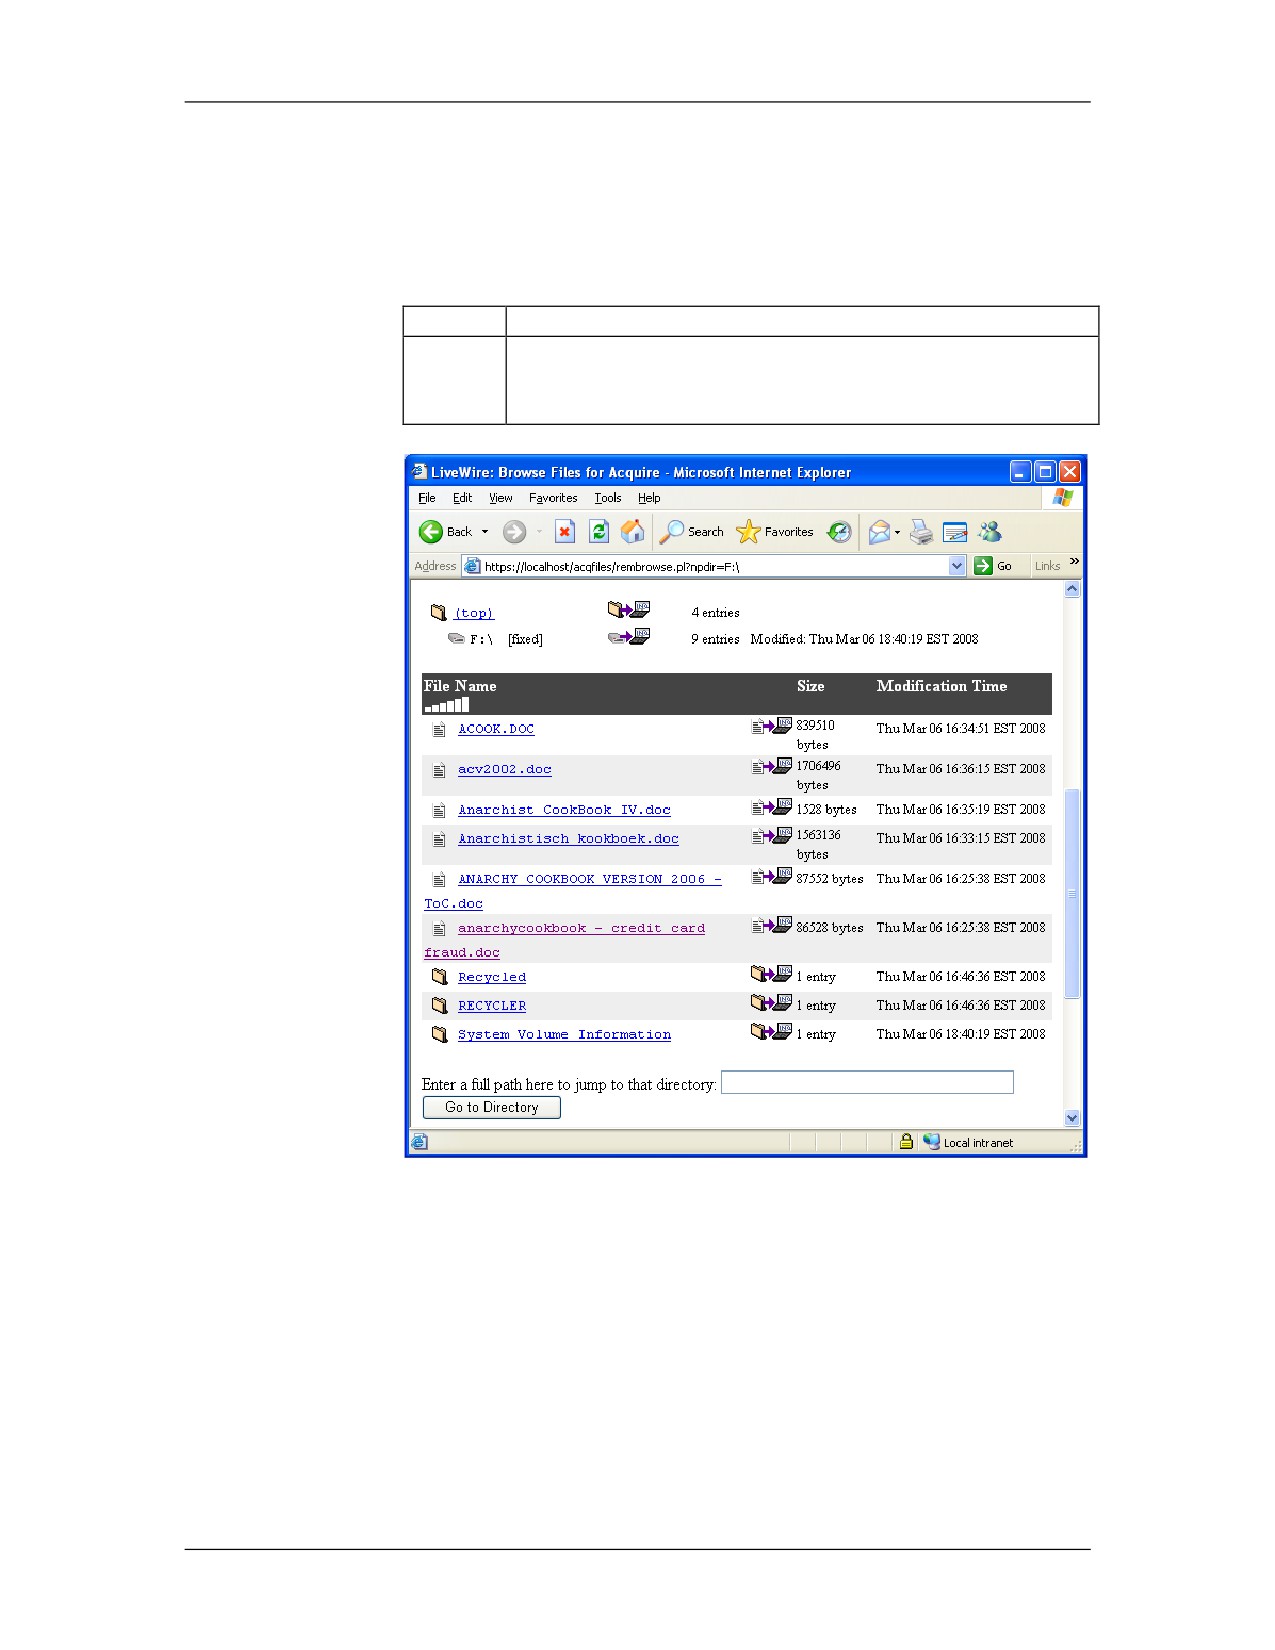
4
This view will show you the contents of the folder.
Click the file Anarchist CookBook IV.doc to acquire
the file.
12-86
For Official Use Only - Law Enforcement Sensitive
01/09
Network Intrusion Responder Program
LiveWire Investigations
Collection and Preservation, continued
Procedure: Collecting Files, continued
Step
Action
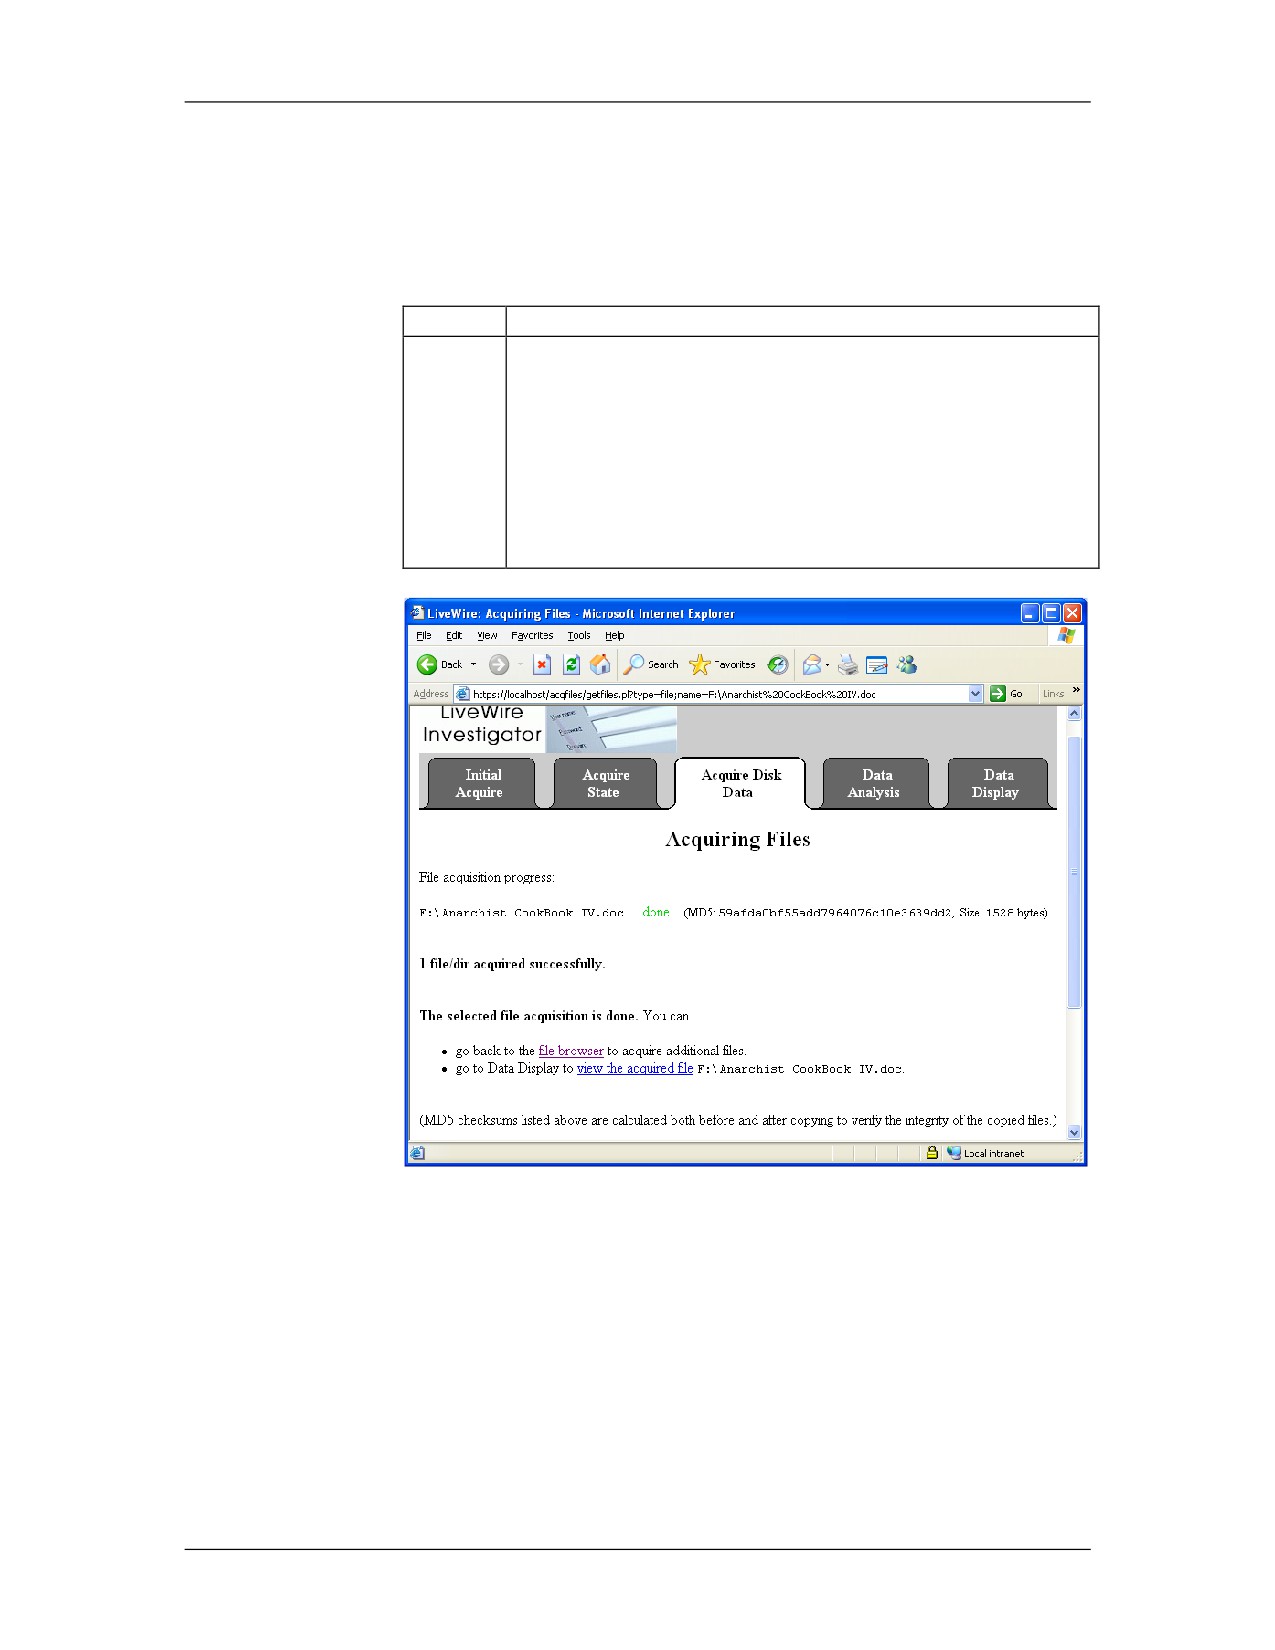
5
The next screen will show the acquisition progress and
automatically hash the file before and after this process.
Two options are provided from this screen.
1. Go back and acquire another file: Click file
browser to return to the previous screen.
2. View the file: Click view the acquired file.
01/09
For Official Use Only - Law Enforcement Sensitive
12-87
LiveWire Investigations
Network Intrusion Responder Program
Hashing
LiveWire Hashing LiveWire uses MD5 (Message Digest 5) for hashing. MD5 creates
a 128-bit message digest that is “unique” to the message. MD5 is
currently the accepted standard for verification by the majority of
the computer forensic community.
What is a Hash?
A hash (or message digest) is a numerical value generated by
applying a mathematical algorithm against a data set. Hashing
algorithms will take variable length input and always output a
“unique” fixed-length result. Essentially, it is analogous to
fingerprinting an individual file.
Once created, a hash value can be used to identify a file no matter
where the file is found. As long as the file‟s data does not change
in any way, the same algorithm can be applied an infinite number
of times and the resulting alphanumeric values will never change.
If the hash value does change, it can be assumed that the file has
been modified. Comparing hash values is an excellent way to
check the integrity of files.
Hashing algorithms are “one-way.” This means that a hash can be
created from file or device data, but you cannot recreate the data
from the hash. Most importantly, it is nearly impossible to find two
different data sets that naturally have the same hash value.
12-88
For Official Use Only - Law Enforcement Sensitive
01/09
Network Intrusion Responder Program
LiveWire Investigations
Hashing, continued
Procedure:
Follow these steps to generate a hash for the inquiry.
Generating Hashes
for the Inquiry
Step
Action
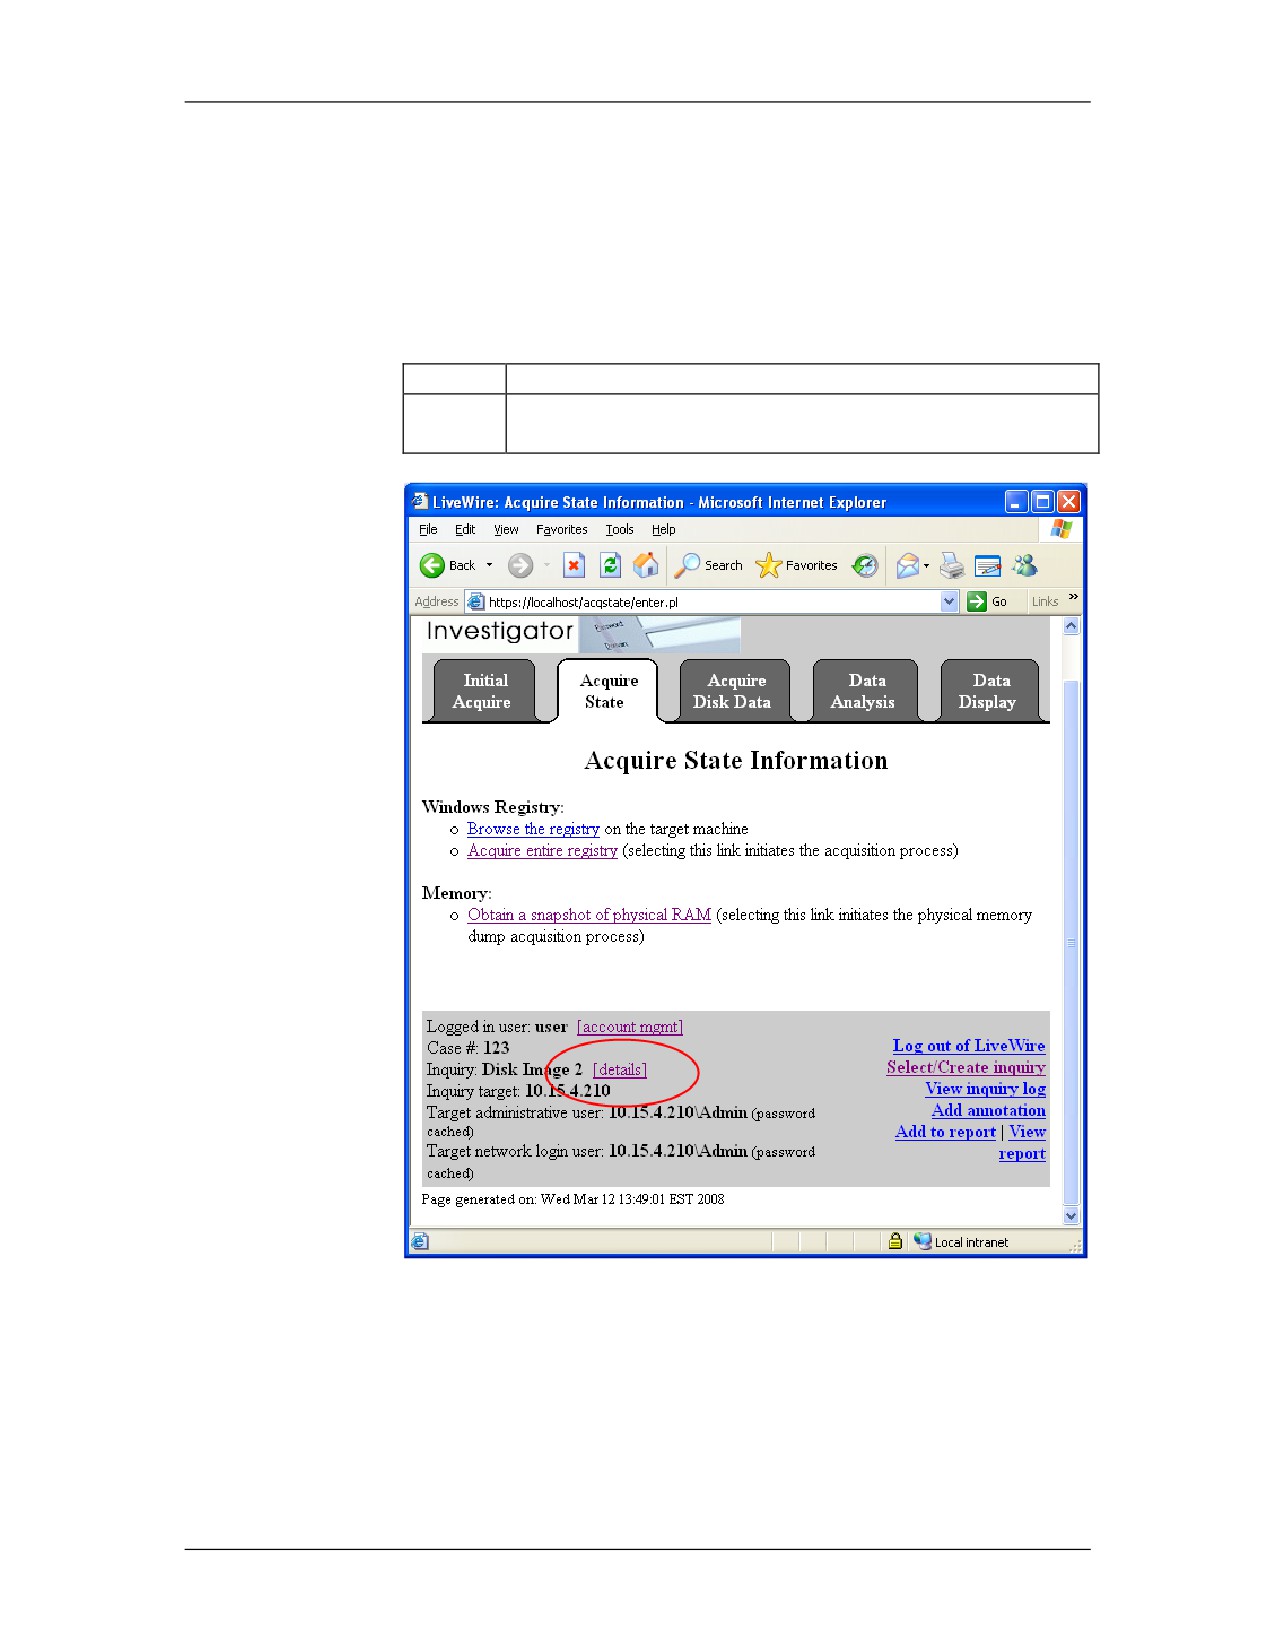
1
At the bottom of the page beside the Inquiry, click the
details link.
01/09
For Official Use Only - Law Enforcement Sensitive
12-89
LiveWire Investigations
Network Intrusion Responder Program
Hashing, continued
Procedure: Generating Hashes for the Inquiry, continued
Step
Action
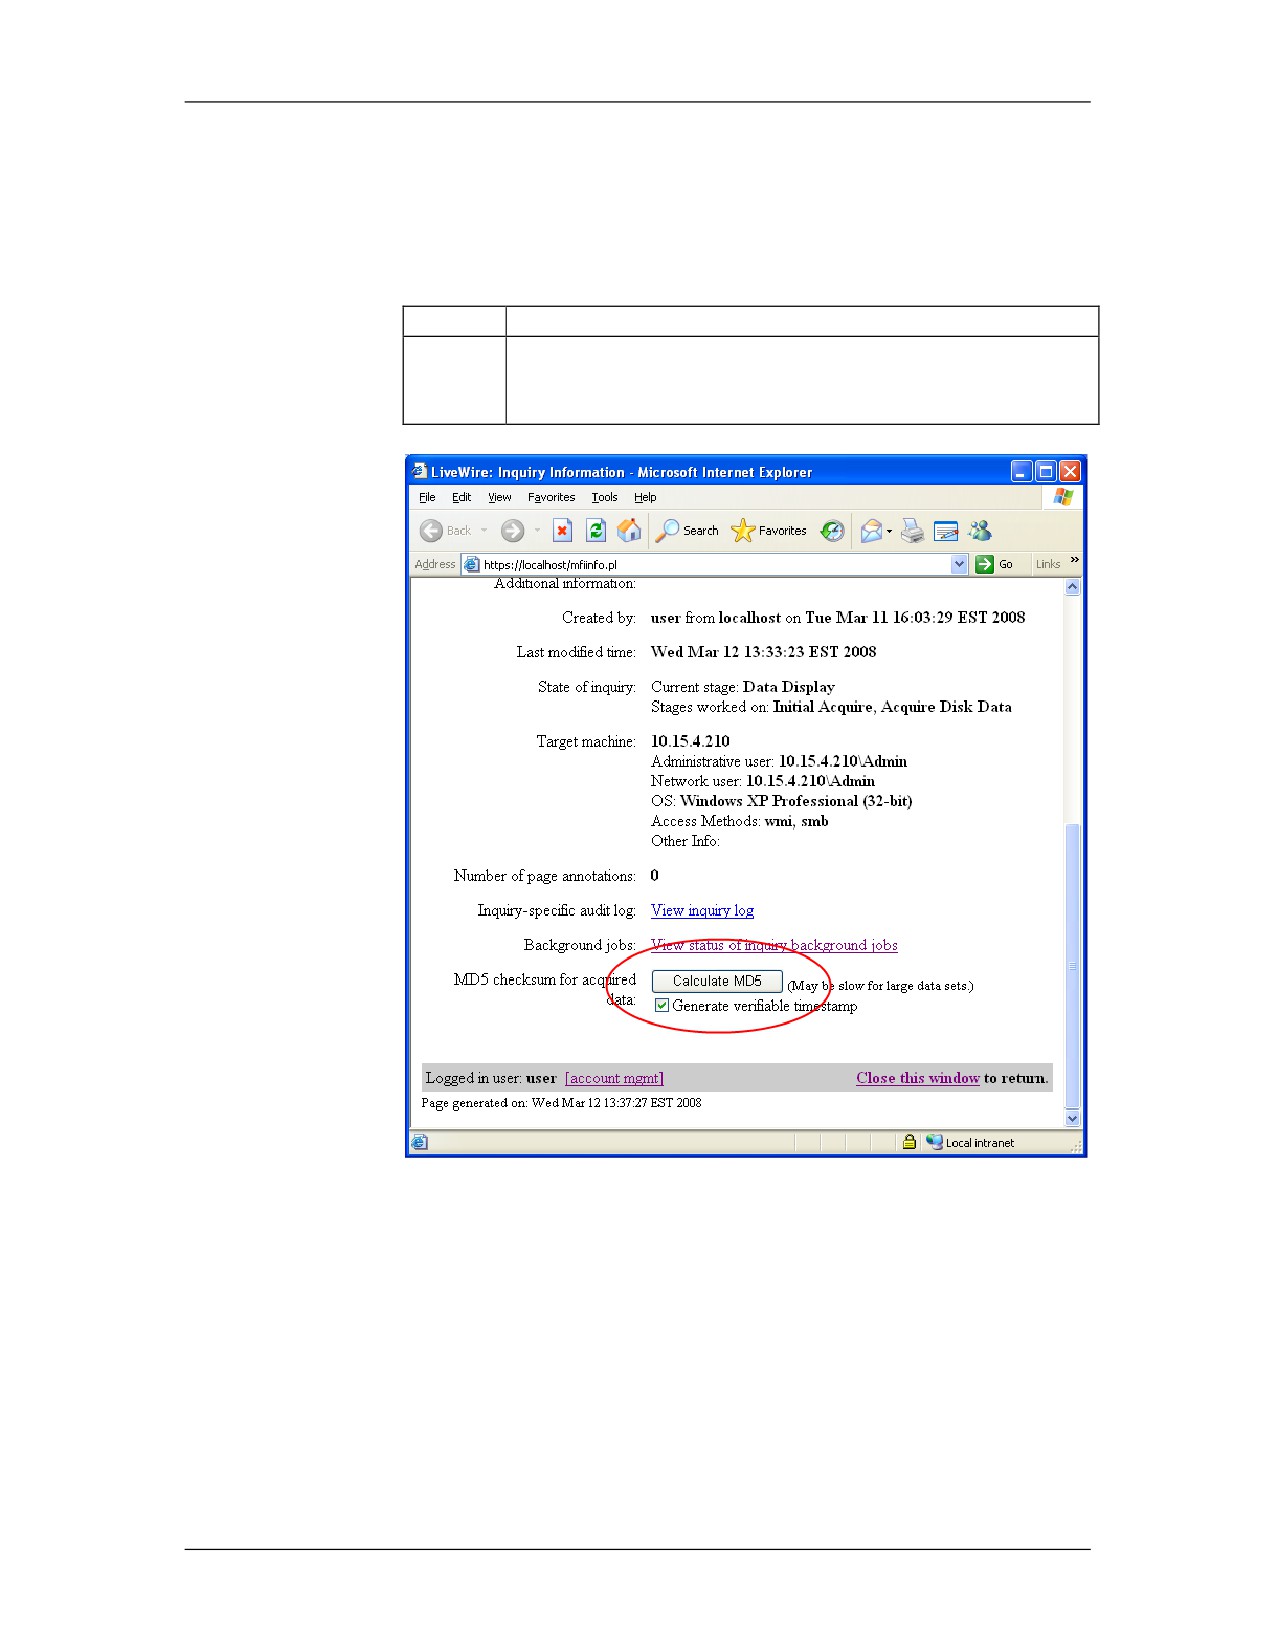
2
Scroll to the bottom of the Inquiry Information page.
Click Calculate MD5 to create hashes for all acquired
data.
12-90
For Official Use Only - Law Enforcement Sensitive
01/09
Network Intrusion Responder Program
LiveWire Investigations
Hashing, continued
Procedure: Generating Hashes for the Inquiry, continued
Step
Action
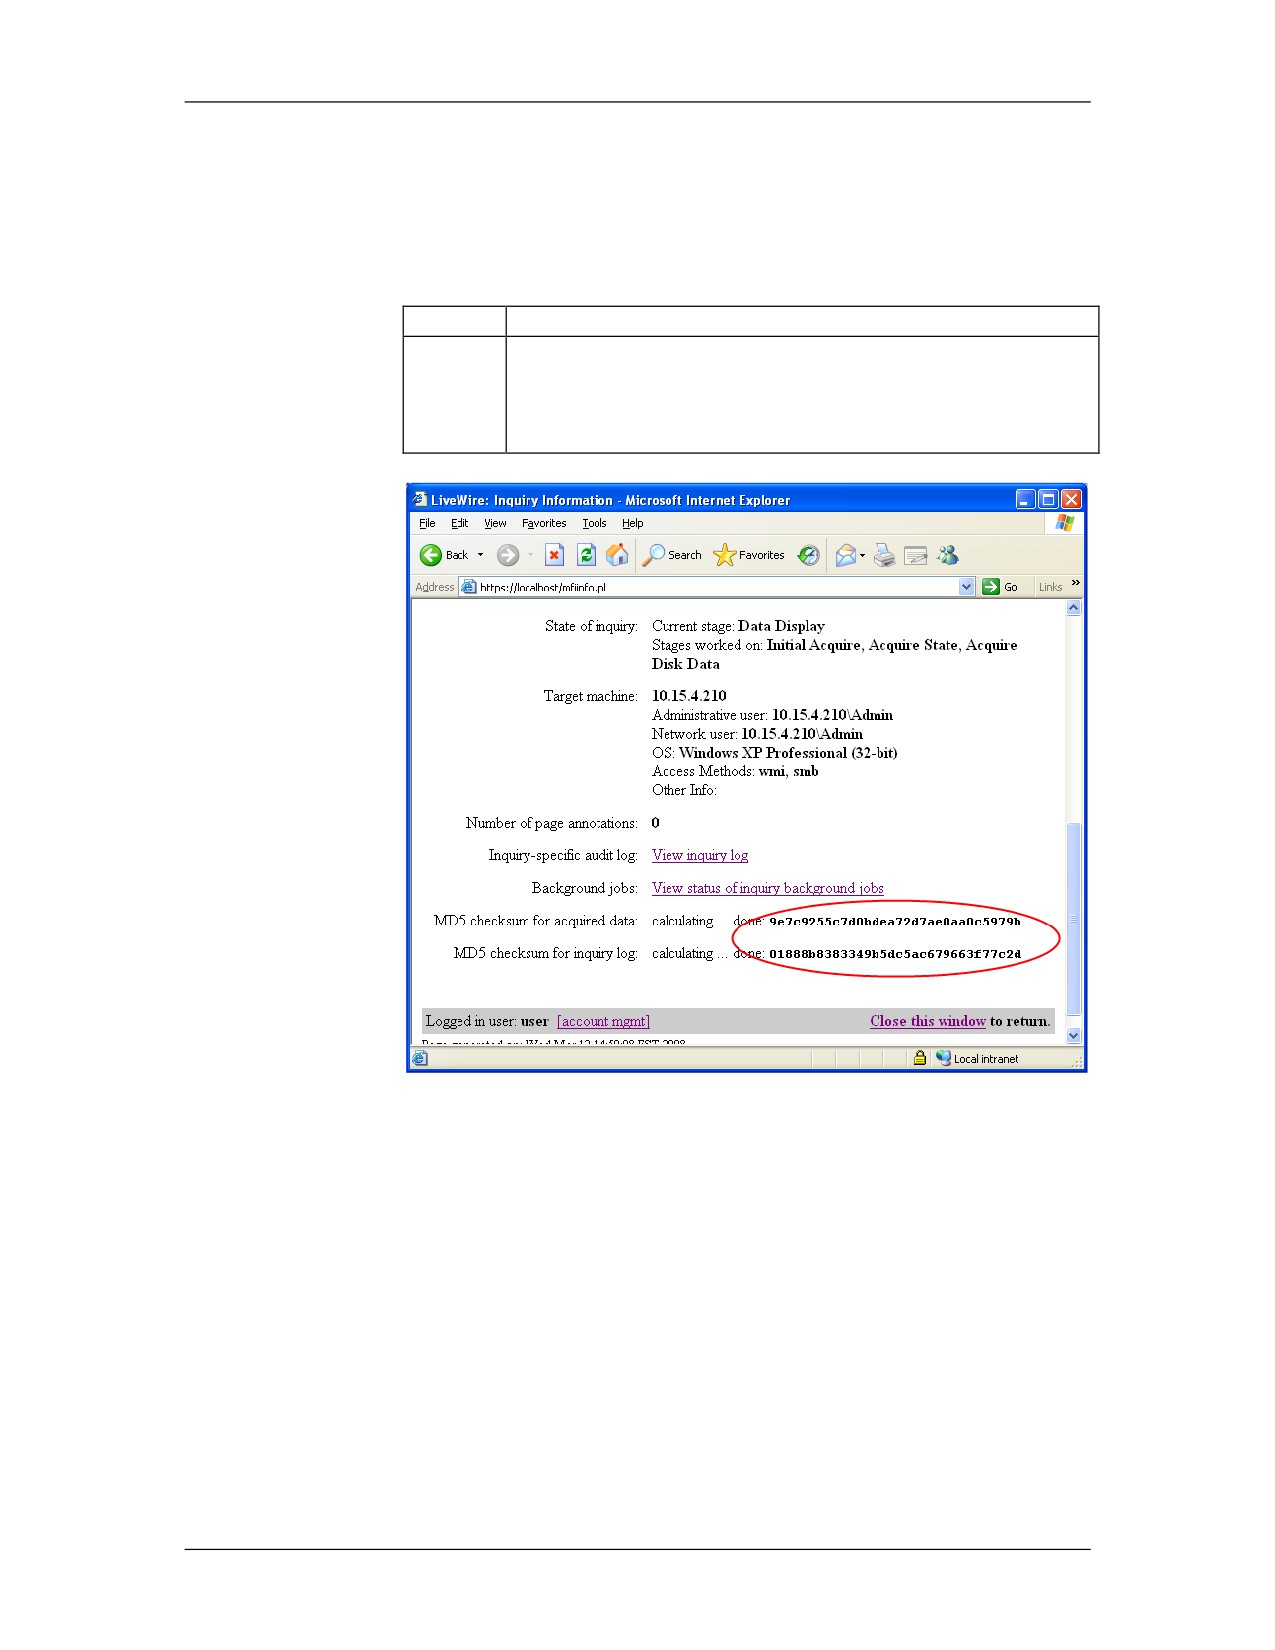
3
The size of the dataset will have a large impact on the
amount of time it takes to complete the calculation.
Once the hashing has completed, the hashes for both the
acquired data and inquiry log will be displayed.
01/09
For Official Use Only - Law Enforcement Sensitive
12-91
LiveWire Investigations
Network Intrusion Responder Program
Hashing, continued
Procedure:
Follow these steps to view the hashes for the files that have been
Viewing Acquired
acquired. These hash values can be compared to the hash values of
File Hashes
the acquired files in the evidence drive to confirm the evidence is
forensically sound.
Step
Action
1
Click the Data Display tab.
2
Click Acquired Files and Directories towards the
bottom of the page.
This will display all the files that have been acquired
from the target system along with their MD5 hash
values.
12-92
For Official Use Only - Law Enforcement Sensitive
01/09
Network Intrusion Responder Program
LiveWire Investigations
Lesson 6 - Malicious Code Analysis
Introduction
Windows systems are extremely vulnerable to attacks from
malicious software known as malware. While some programs may
not have a direct negative impact on the system, the applications
present on a system could provide valuable information about the
role and functionality of a suspect computer.
Purpose of this
The purpose of this lesson is to introduce the malware discovery
Lesson
function that is built into LiveWire.
Objectives
After successfully completing this lesson, you will be able to:
Explain the malware search functions in LiveWire
Conduct a malware analysis of a remote system
In this Lesson
The following table shows the contents of this lesson.
Topic
See Page
Malicious Program Search
12-94
01/09
For Official Use Only - Law Enforcement Sensitive
12-93
LiveWire Investigations
Network Intrusion Responder Program
Malicious Program Search
Overview
This lesson explains how to search for applications that could be
categorized as malicious.
Types of Malicious
There are many different types of malicious programs that may fall
Programs
into any number of categories. Many of these programs may not
necessarily show that the suspect machine was compromised but it
could hint about the interests or the intentions of the user. Finding
out the types of programs a user has on the machine could uncover
what type of user owns the machine. Certain types of applications
could tell the investigator how advanced the user may be which
could guide the investigators search. For instance, if the person
had an encryption program, such as TrueCrypt, that should raise
the concern that there are encrypted volumes that may be hiding
critical evidence.
LiveWire performs malicious software scans by comparing hash
signatures of files on the system against the National Software
Reference Library (NSRL) database. The NSRL is a free database
released by the National Institute of Standards and Technology
(NIST). Using this information, LiveWire has the ability to search
many different categories of malicious code. Some of the these
are:
Anti Forensics
Encryption
Key Loggers
P2P Tools
Password crackers
Rootkits
Steganography
Wireless
12-94
For Official Use Only - Law Enforcement Sensitive
01/09
Network Intrusion Responder Program
LiveWire Investigations
Malicious Program Search, continued
Procedure:
Follow these steps to conduct a malicious program search of the
Conducting a
remote machine. This lesson continues from previous lessons.
Malicious
Program Search
Step
Action
1
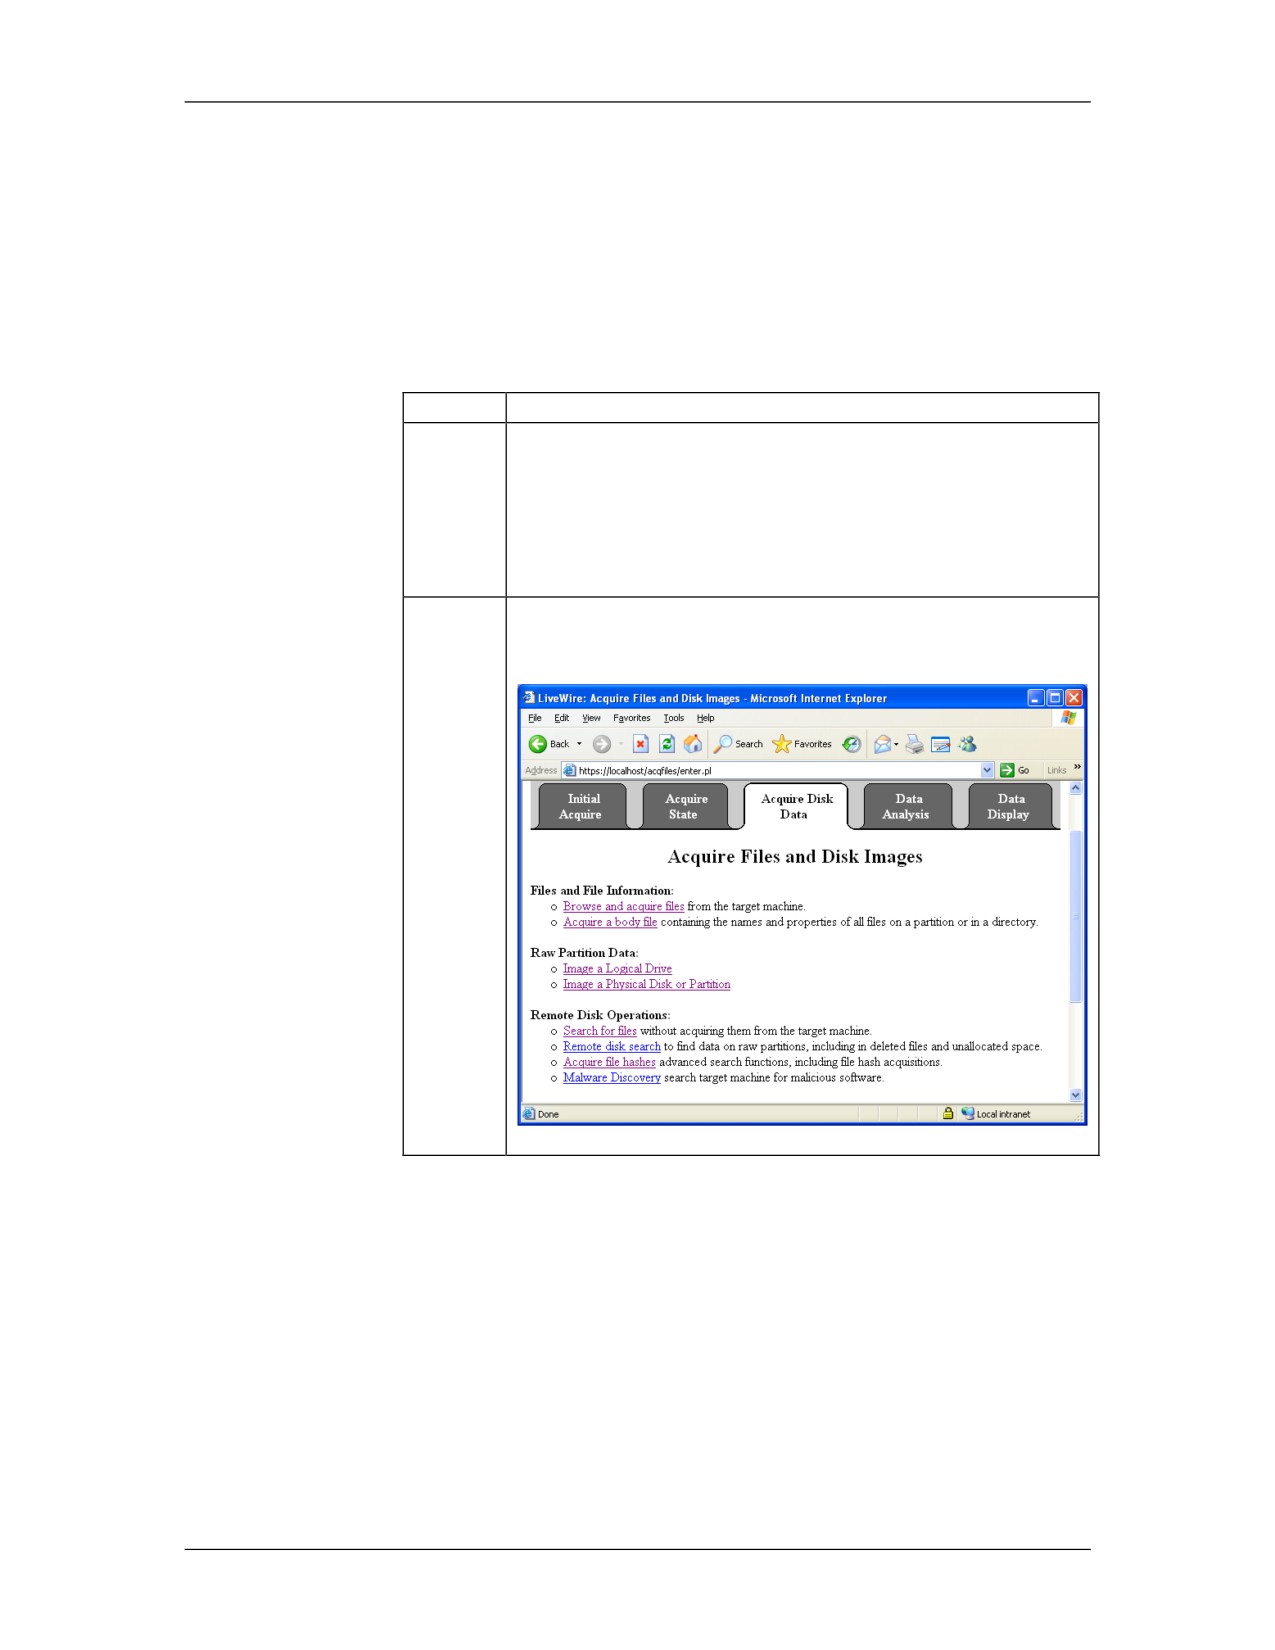
Open the correct inquiry and click on the Acquire Disk
Data tab.
Note: Ensure you click the correct tab and do not get
this confused with the very similar option under
the Data Analysis tab.
2
Click on Malware Discovery towards the bottom of the
page.
01/09
For Official Use Only - Law Enforcement Sensitive
12-95
LiveWire Investigations
Network Intrusion Responder Program
Malicious Program Search, continued
Procedure: Conducting a Malicious Program Search, continued
Step
Action
3
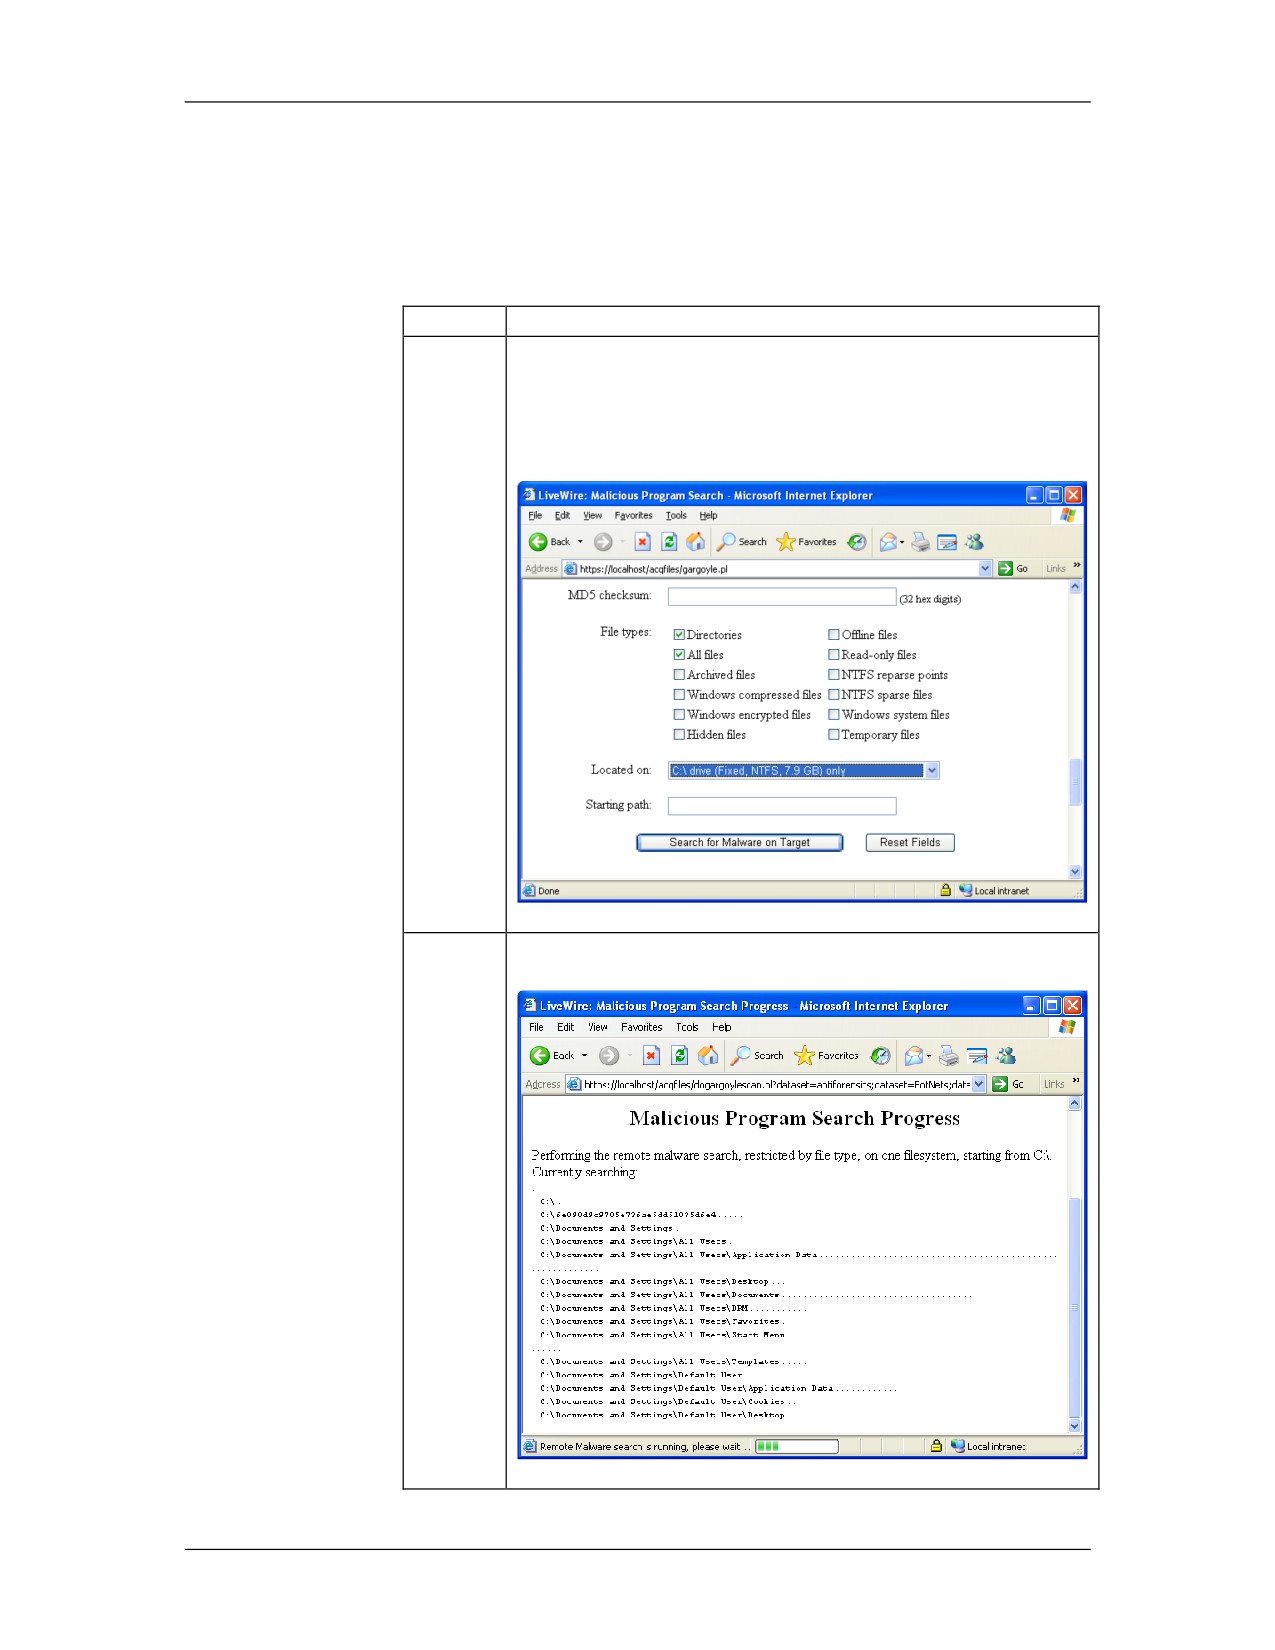
Scroll down to the “located on” section. Select the C:
drive only option. Notice the other options that are
available. Then click Search for Malware on Target.
4
A page similar to the one below will be displayed.
12-96
For Official Use Only - Law Enforcement Sensitive
01/09
Network Intrusion Responder Program
LiveWire Investigations
Malicious Program Search, continued
Procedure: Conducting a Malicious Program Search, continued
Step
Action
5
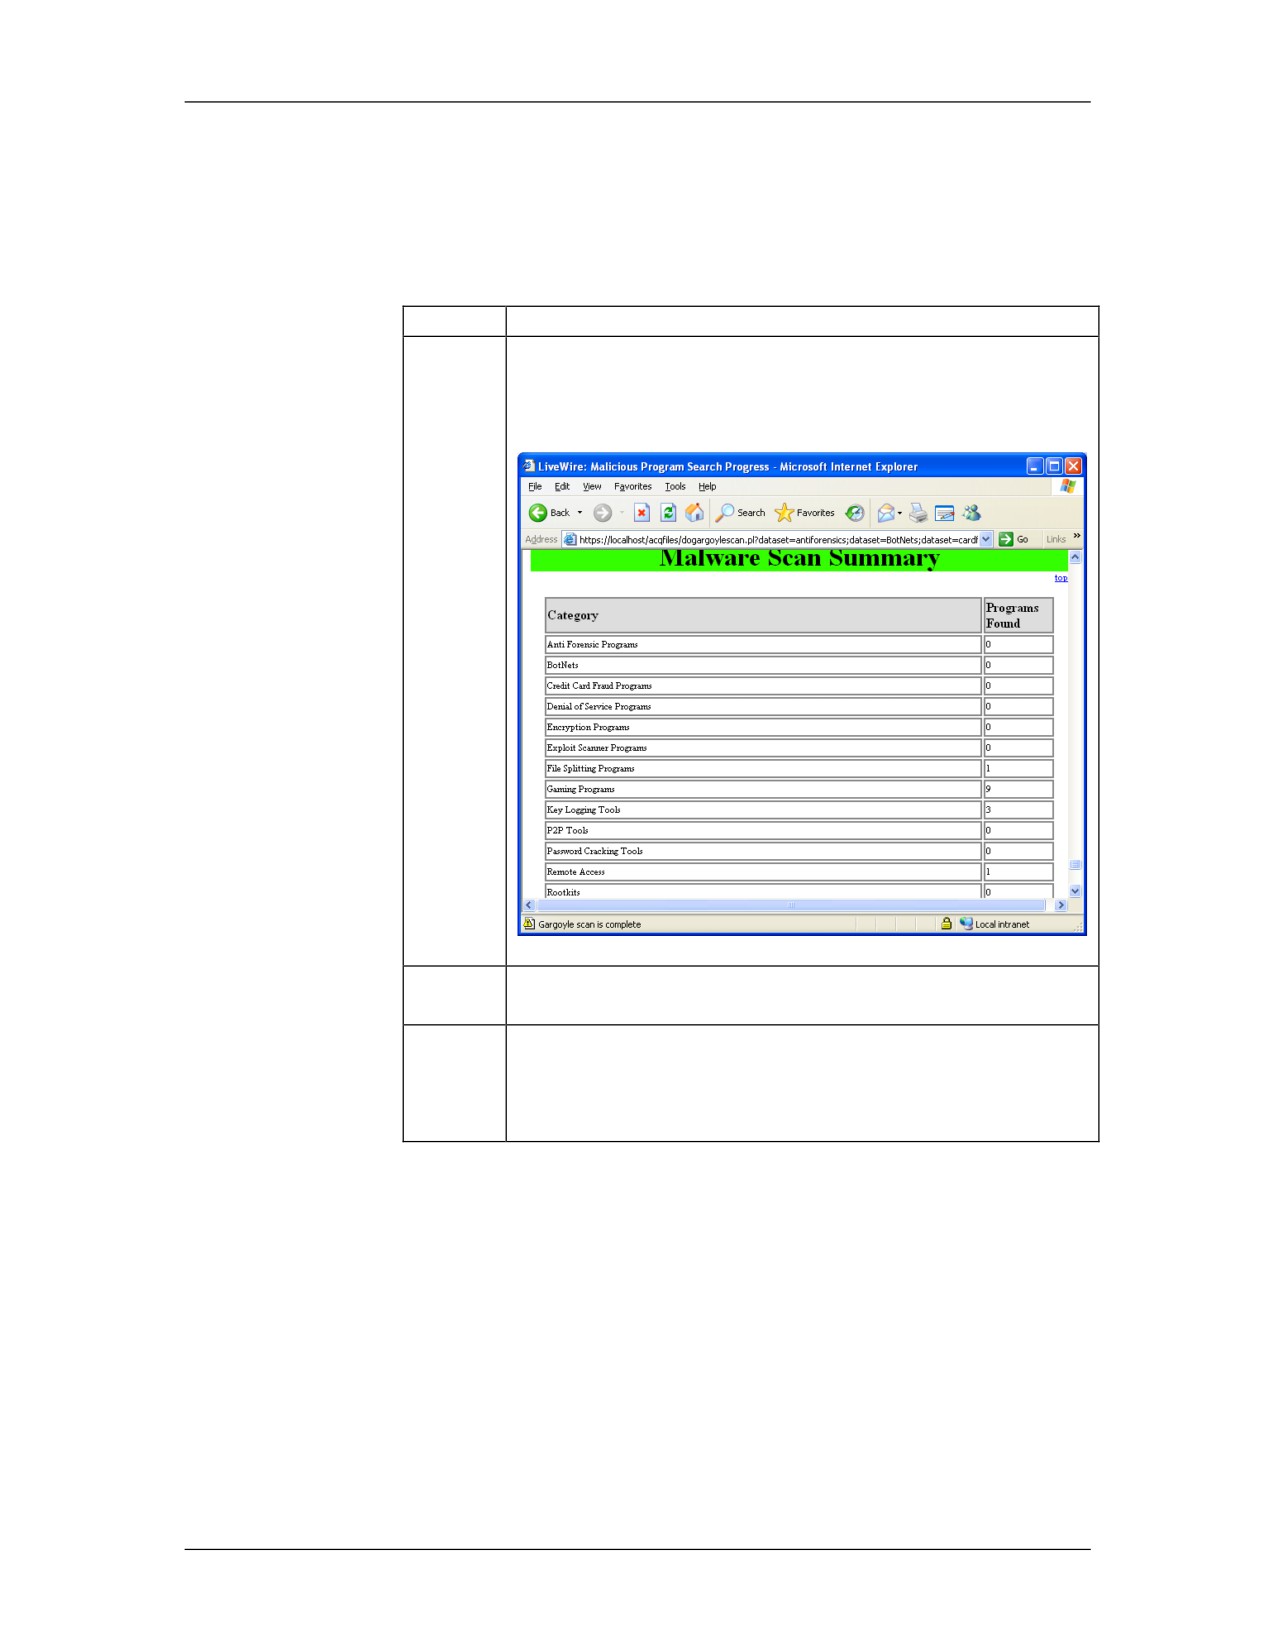
Once the scan has completed, the Malware Scan
Summary will be displayed. Click the View Gargoyle
Report at the bottom of the summary.
6
View the report to see what details it provides. Note
these options can be de-selected on the previous page.
7
If you would like to run the scan again with a different
set of options, click the Data Analysis tab and select
Malware Discovery. This option is only functional after
an initial scan has been completed using the above steps.
01/09
For Official Use Only - Law Enforcement Sensitive
12-97
LiveWire Investigations
Network Intrusion Responder Program
This page intentionally left blank.
12-98
For Official Use Only - Law Enforcement Sensitive
01/09
Network Intrusion Responder Program
LiveWire Investigations
Lesson 7 - Alternate Data Collection Tools
Introduction
Investigators need to be aware of other software that is acceptable
to use during their investigations. In this lesson, you will learn
about alternate data collection tools.
Purpose of this
This lesson introduces alternative tools that could be useful to
Lesson
gathering information during an investigation.
Objectives
After successfully completing this lesson, you will be able to:
Discuss the functions of alternate tools
Explain the functions of the Helix Live CD
In this Lesson
The following table shows the contents of this lesson.
Topic
See Page
Windows Forensic Toolkit
12-100
Helix
12-103
01/09
For Official Use Only - Law Enforcement Sensitive
12-99
LiveWire Investigations
Network Intrusion Responder Program
Windows Forensic Toolkit
Overview
This section will introduce alternative tools that could prove to be
a valuable addition to the investigator‟s toolkit.
Sysinternals -
The Sysinternals utilities, which were developed by Mark
PsTools
Russinovich, are capable of performing many different analysis
functions on local or remote systems. The latest version of this
collection can be downloaded from Microsoft.com.
psinfo.exe
Psinfo.exe will retrieve system information of the target system.
Some of the data displayed is:
Uptime
Kernel version
Product type
Service pack
Kernel build number
Registered organization
Register owner
Install date
IE version
System root
Processors
Processor speed
Processor type
Physical memory
Video driver
psinfo \\10.15.4.210 -u admin -p password
The output of all these commands can be redirected to a file by
using the “>” string. To redirect the output of the psinfo command
to a psinfo.txt file on the local machine:
psinfo \\10.15.4.210 -u admin -p password > psinfo.txt
12-100
For Official Use Only - Law Enforcement Sensitive
01/09
Network Intrusion Responder Program
LiveWire Investigations
Windows Forensic Toolkit, continued
pslist.exe
Pslist.exe will list the process currently running on the remote
system.
pslist \\10.15.4.210
-u admin -p password
psloggedon.exe
Psloggedon.exe will display a list of currently logged on users on
the remote system for both local and remote users.
psloggedon \\10.15.4.210
psexec.exe
Psexec.exe is an advanced utility used to execute commands on a
remote system. It also has the ability to copy a program from the
local system to the remote target and then execute that program
interactively.
This command will connect to 10.15.4.210 using the username
“admin” and the password “password” and then run the “cmd”
command. This connects to the remote system with a terminal
session which will allow you to execute all commands on the
remote system from your local console.
psexec \\10.15.4.210 -u admin -p password cmd
psfile.exe
Psfile.exe is used to view files that are opened remotely on the
target system. This command will not display files that are locally
opened on the target system.
psfile \\10.15.4.210
-u admin -p password
psgetsid.exe
Psgetside.exe will retrieve the SID of the target system.
psgetsid \\10.15.4.210 -u admin -p password
01/09
For Official Use Only - Law Enforcement Sensitive
12-101
LiveWire Investigations
Network Intrusion Responder Program
Windows Forensic Toolkit, continued
psloglist.exe
Psloglist.exe will retrieve the logs from the target system. By
default psloglist.exe will show the contents of the system event
log. The application, security, or other log can be retrieved if
specified.
psloglist \\10.15.4.210
-u admin -p password
psloglist \\10.15.4.210
-u admin -p password application
psloglist \\10.15.4.210
-u admin -p password security
psservice.exe
Psservice.exe will retrieve a list of running services on target
system.
psservice \\10.15.4.210 -u admin -p password
12-102
For Official Use Only - Law Enforcement Sensitive
01/09
Network Intrusion Responder Program
LiveWire Investigations
Helix
Introduction to
Helix, a customized distribution of Knoppix created and
Helix
maintained by e-fense, Inc., is geared toward forensics and
incident response. First released to the public in November 2003,
Helix was first created to be used as an internal tool for incident
response and forensics to create forensically sound images.
The customizations of Helix have been made to forensically
prevent the CD from altering data on the host computer.
Helix has been created with two different operating modes. There
is a Windows mode and a Linux mode.
The latest version of Helix can be downloaded at:
Helix - Windows
The Helix Windows mode is created with Windows executables
Mode
and contains many tools for incident response on a Windows
machine. In this mode, the CD runs standard Windows
applications to gather information from a „Live” running system.
This can be useful where systems cannot be shut down or where
potential evidence would be destroyed by taking the system
offline.
Note: When a system is up and running it is constantly
changing. Running Helix in the live environment will
make changes to the system. It is important to be aware
of this known fact and that it is documented and
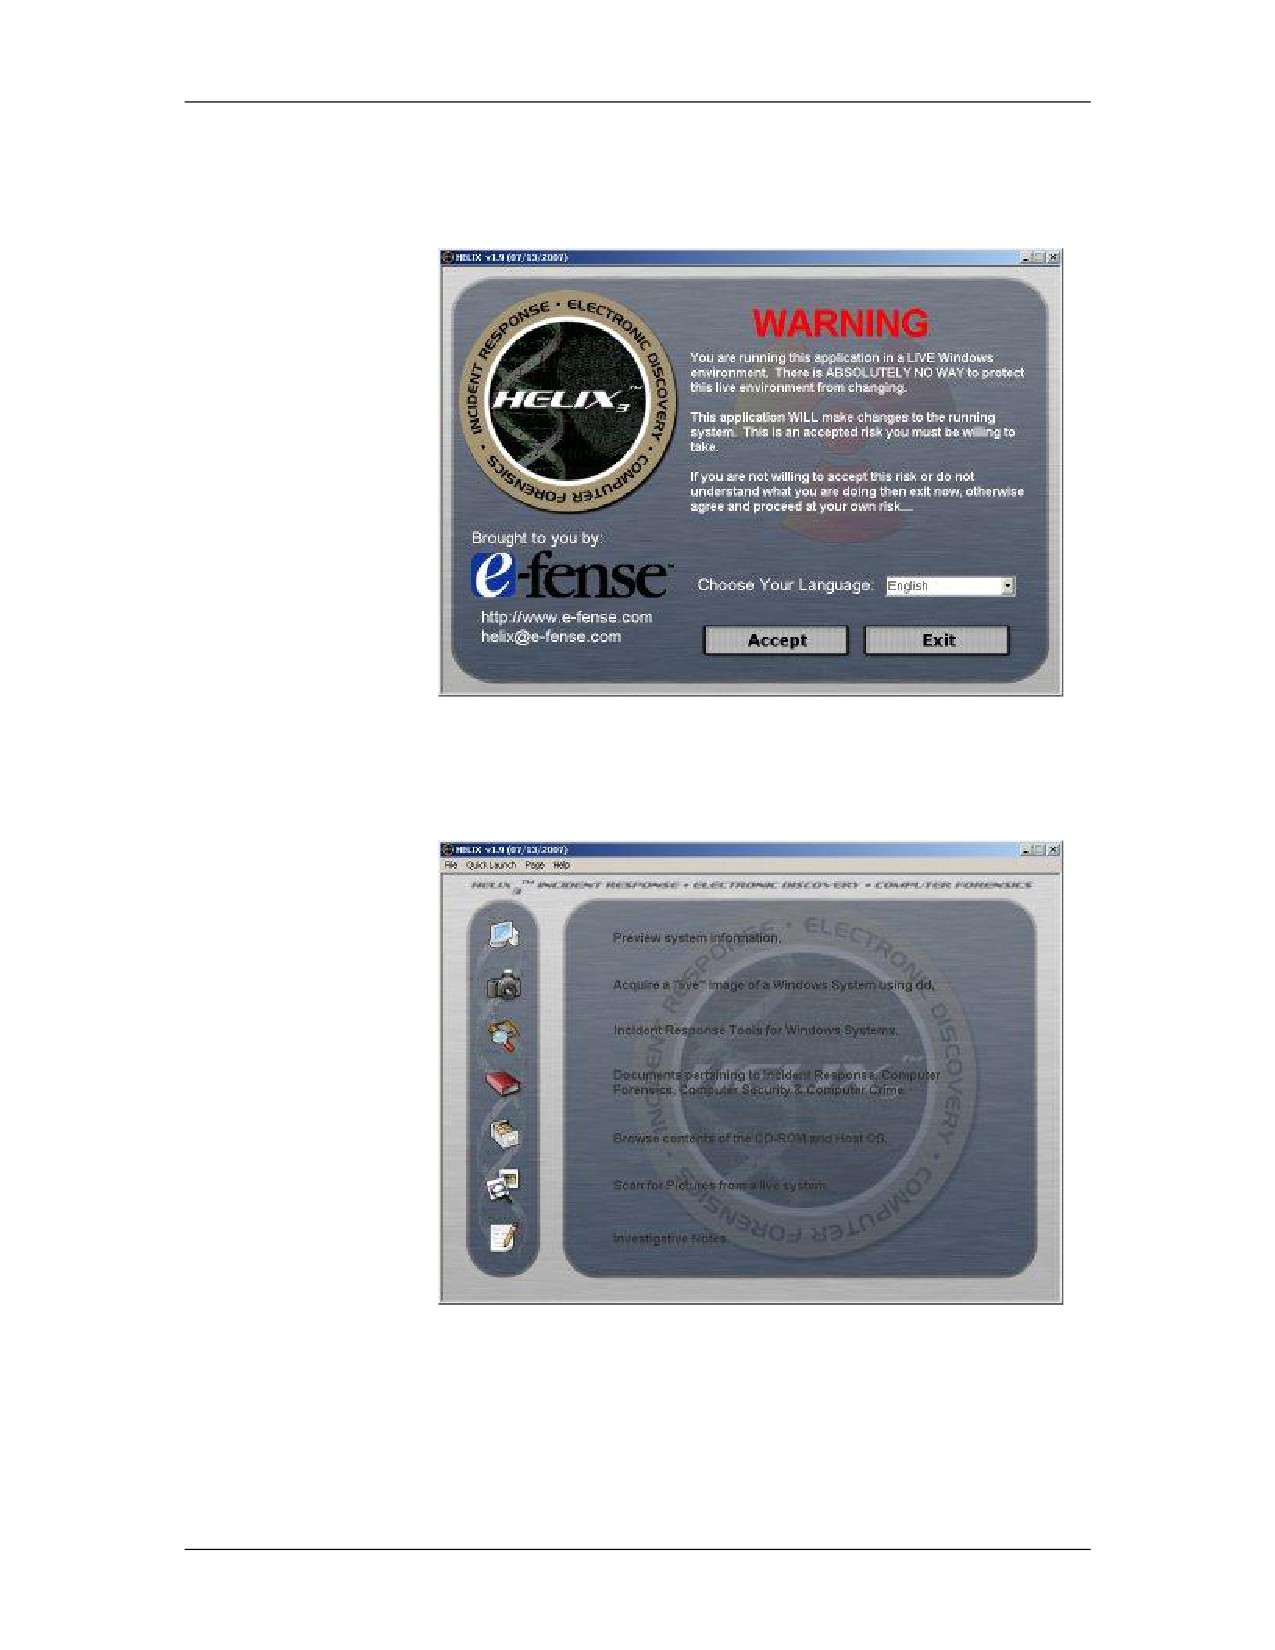
understood. When Helix is first opened, the following
warning message will be displayed. You must click
accept to continue.
01/09
For Official Use Only - Law Enforcement Sensitive
12-103
LiveWire Investigations
Network Intrusion Responder Program
Helix, continued
Helix - Windows
Mode, continued
The next screen is the first default screen that is displayed to the
user. There are many tools located on the CD that can be used to
gather volatile and non-volatile information.
12-104
For Official Use Only - Law Enforcement Sensitive
01/09
Network Intrusion Responder Program
LiveWire Investigations
Helix, continued
Helix - Windows
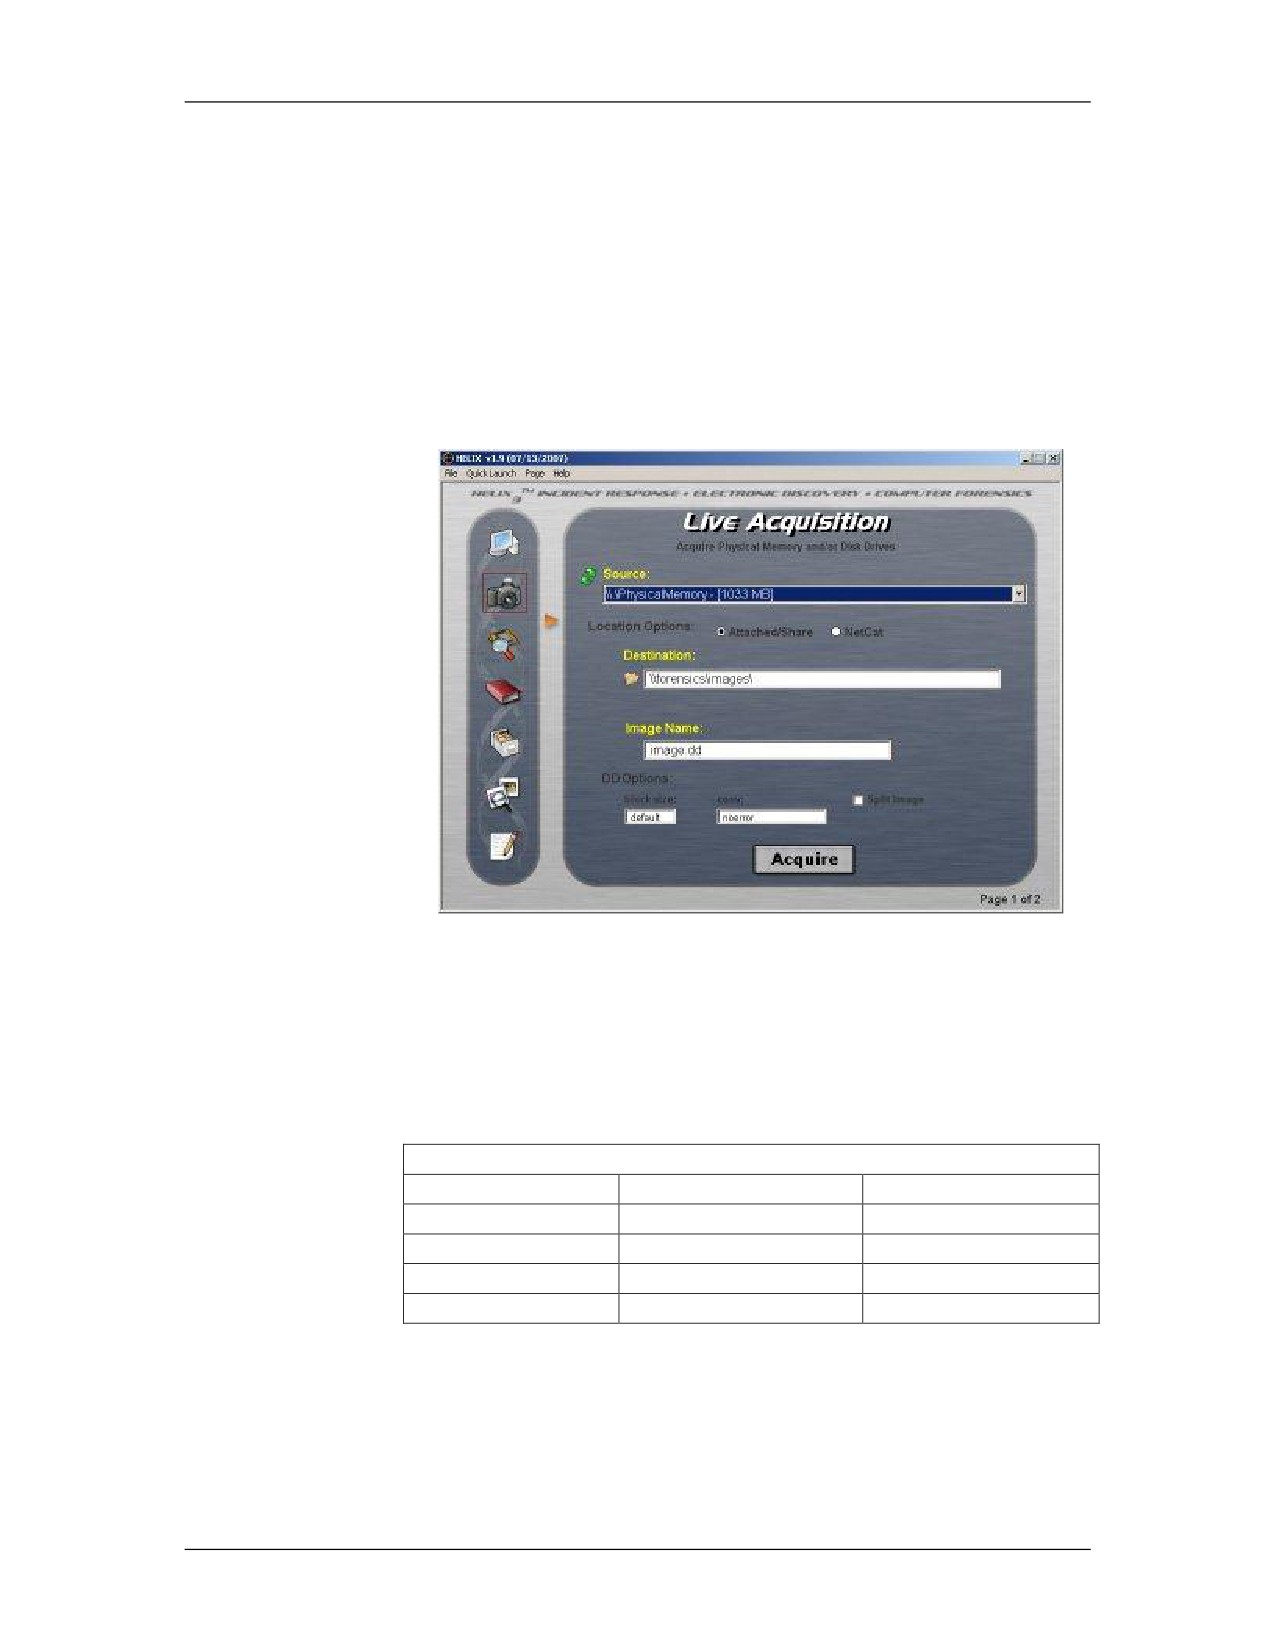
The Windows mode on the Helix Live CD has the ability to
Mode, continued
acquire images of a live system. This can be done using the Live
Acquisition feature of the CD. It is possible to image the physical
memory, physical drive, or logical partitions. The images can be
saved to an attached device, network share or to an evidence
capture machine using NetCat.
FTK Imager is also available on the CD for creating forensic disk
images as well as saving them in different formats, such as raw dd
images and E01 (EnCase) images. It is located on the menu bar
under Quick launch > FTK Imager. FTK Imager also allows for
imaging physical and logical drives.
List of Some Available Tools in Windows Mode
Command Shell
FTK Imager
Sys Info Viewer
Drive Manager
Win Audit
Zero View
Per-Search
WFT
NetCat
VNC Server
PuttySSH
File Recovery
Rootkit Revealer
Screen Capture
Password Viewers
01/09
For Official Use Only - Law Enforcement Sensitive
12-105
LiveWire Investigations
Network Intrusion Responder Program
Helix, continued
Helix - Linux Live The Linux mode of Helix is a pure Live CD that allows for the
CD Mode
“dead box” forensics. This allows the user to investigate a
computer system without forensically changing any data on the
hard drive. Many tasks can be carried out with Helix, such as the
ability to forensically duplicate disks as well as analyze those
forensic disk images.
To start Helix in Linux mode, the system will need to be booted to
the bootable Helix CD. The BIOS on the motherboard must be
correctly configured.
Helix - Linux Live
When Helix is booted into Linux mode, it will automatically
CD Disk Mounting
mount all storage devices in read-only mode. It will also mount
and Imaging
devices with the noatime option, which will prevent any change to
the access times of files stored on the disk. Although Helix will
mount drives as read-only by default, Helix can be forced to mount
devices as read-write by typing:
mount -rw <device> <mount point>
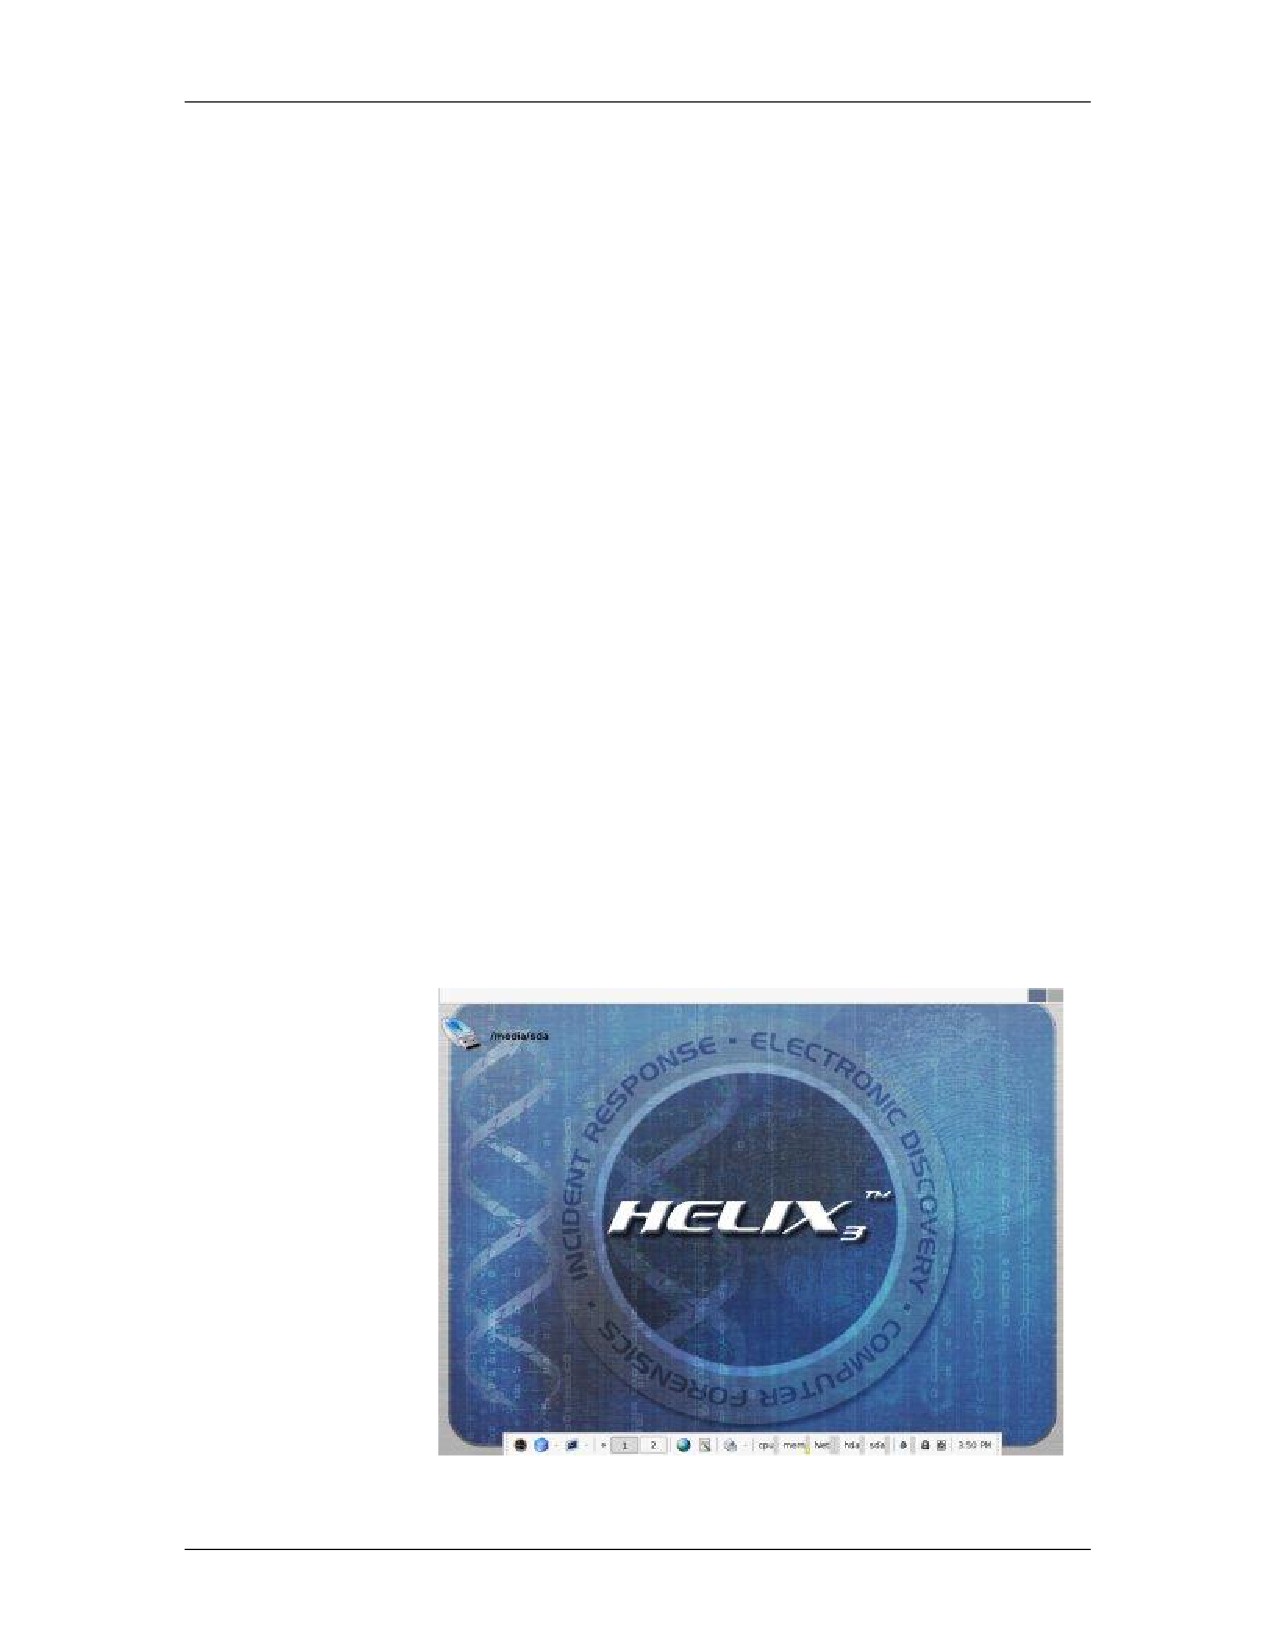
Once Helix has fully booted, the screen will appear similar to the
image below. It will show a list of all storage media mounted on
the left side of the screen. The taskbar is located at the bottom of
the screen and the “Start” menu is an icon on the Helix CD cover.
12-106
For Official Use Only - Law Enforcement Sensitive
01/09
Network Intrusion Responder Program
LiveWire Investigations
Helix, continued
Helix - Linux Live
Several GUI utilities, such as Adepto, Air, and Linen, are included
CD Disk Mounting
on the disk for creating forensically sound images.
and Imaging,
continued
These tools can be used to create and store those images in various
locations, such as a network share, locally attached storage drives,
and even across the network to an evidence collection machine.
This provides many options for data collection. In order to ensure
you do not overwrite your evidence media, always be aware of
exactly what drives are being imaged and where they are being
imaged to.
01/09
For Official Use Only - Law Enforcement Sensitive
12-107
LiveWire Investigations
Network Intrusion Responder Program
Helix, continued
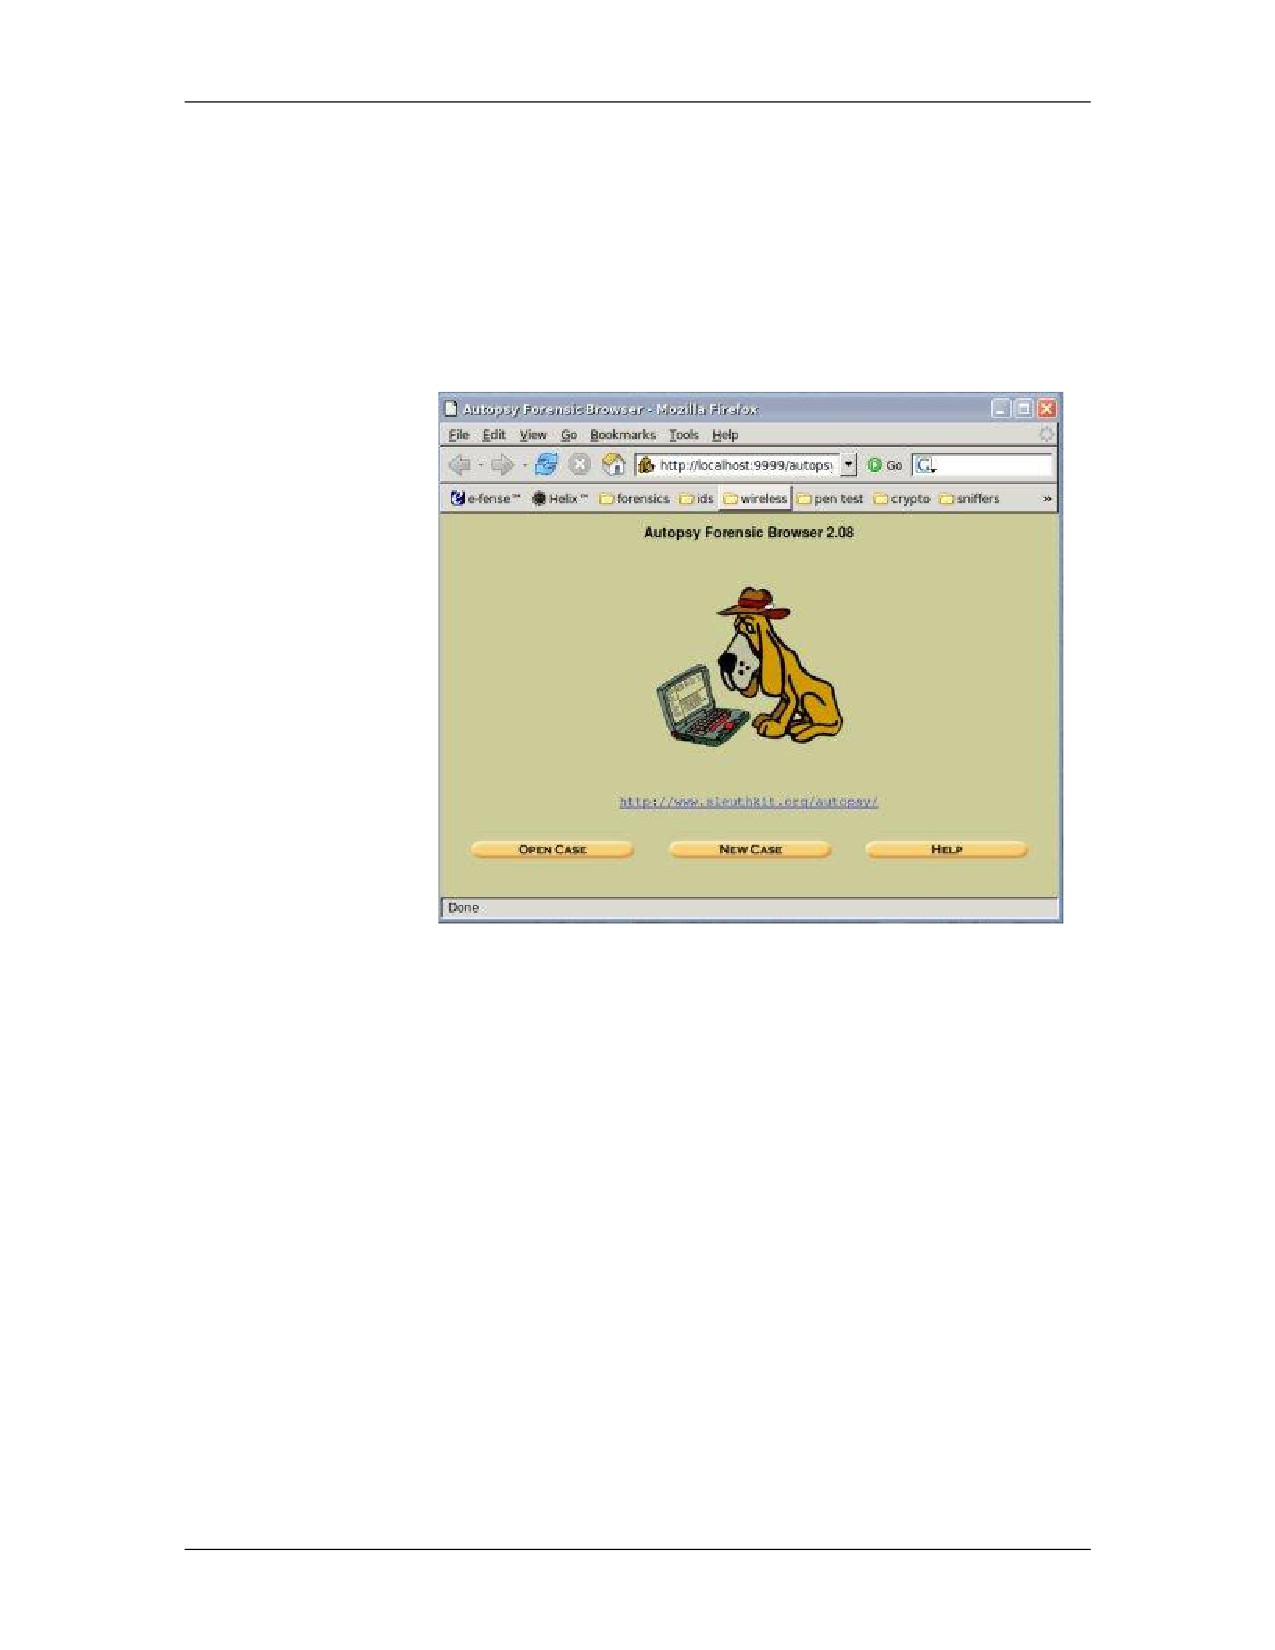
Helix - Linux Live Helix also provides tools for investigating collected disk images.
CD Forensic Tools Autopsy, as shown in the image below, is a popular Linux tool for
viewing and searching images. Autopsy is the GUI interface to a
suite of command line forensic tools named The Sleuth Kit.
12-108
For Official Use Only - Law Enforcement Sensitive
01/09
Network Intrusion Responder Program
LiveWire Investigations
Helix, continued
Helix - Linux Live
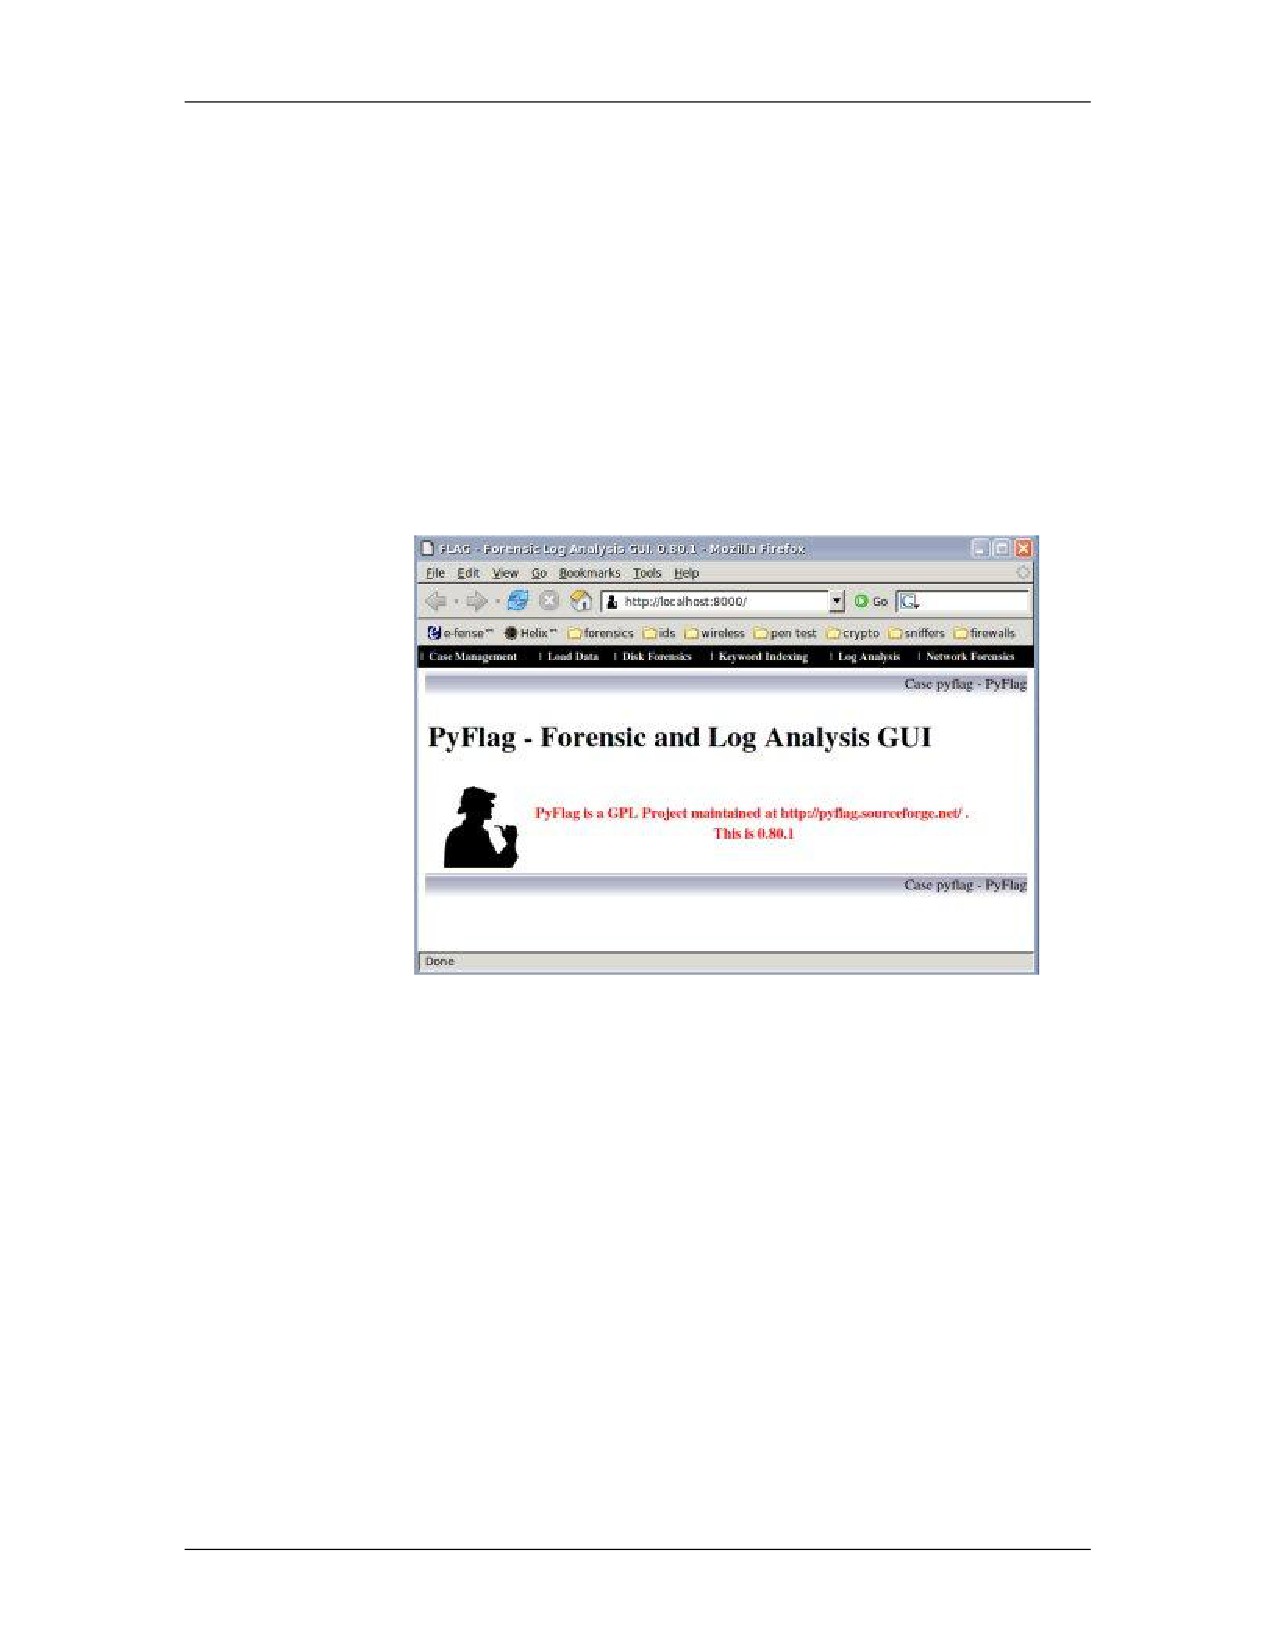
PyFlag, a forensic and log analysis application created by the
CD Forensic
Australian Department of Defense, is also available on the Helix
Tools, continued
disk. PyFlag uses a backend database to assist managing large
amounts of data. This tool is Web driven and can be deployed on a
central server, which allows several users to use the tool at the
same time.
PyFlag is able to examine forensic evidence from disk images,
logs, and network captures.
Live CD Benefits
Live CDs can be very useful for testing, evaluating, or learning
without the need of dedicated hardware. Many Linux distributions
are available as Live CDs and can be freely downloaded from the
Internet. Each is designed with a specific task in mind.
Helix is just one great example of a feature-rich Live CD created
for forensics and incident response. Helix provides multiple
options for investigations whether the suspect machine is turned
off or is up and running.
01/09
For Official Use Only - Law Enforcement Sensitive
12-109
LiveWire Investigations
Network Intrusion Responder Program
This page intentionally left blank.
12-110
For Official Use Only - Law Enforcement Sensitive
01/09
Appendix A
Network Intrusion Responder Program
Appendix A - Intrusion Report Template
Introduction
Responding to a network incident is usually a very complex and
intricate experience. For even the smallest of incidents, there is a
large amount of information that needs to be collected and
documented to successfully analyze the incident. The United
States Secret Service has released a standardized network incident
report template to expedite the collection of network intrusion
information.
Purpose of this
The purpose of this appendix is to introduce you to the United
Appendix
States Secret Service’s Network Intrusion Report template which
can be used to document an ongoing network intrusion response.
You will learn about the benefits of using this template as well as
where to find it.
Objectives
After completing this appendix, you will be able to:
Explain the usefulness and need for an intrusion report
Download the States Secret Service’s Network Intrusion
Report template
In this Appendix
The following table shows the contents for this appendix.
Topic
See Page
USSS Electronic Crimes Network Incident Report
A-2
01/09
For Official Use Only - Law Enforcement Sensitive
A-1
Network Intrusion Responder Program
Appendix A
USSS Electronic Crimes Network Incident Report
Overview
Many inexperienced responders simply do not know the full extent
of information to collect or to request from witnesses on the scene.
To alleviate many of these problems, the United States Secret
Service has released a standardized network incident report
template.
This template can be found at the Forward Edge II Web site,
http://www.forwardedge2.com. More specifically, the actual form
can be downloaded at:
Filling Out Report The Network Incident Report is used to request assistance in a
network incident from a local USSS Electronic Crimes Task Force
(ECTF). By filling out the report in completion, a responder can
frame the full extent of a network crime to ensure that the proper
support is provided.
However, the use of this form does not obligate the responder to
request for assistance. The standardized approach to the Network
Incident Report allows for it to be used as a guideline for current
and future incidents. It acts as an aid to the incident responder to
ensure that all information is collected and filled out accordingly.
A-2
For Official Use Only - Law Enforcement Sensitive
01/09
Appendix B
Network Intrusion Responder Program
Appendix B - Volatile Data Collection
Introduction
This appendix introduces the collection of volatile data and
focuses specifically on the collection of data from a Windows
system. Not all forensic tools will work exactly the same on all
versions of Windows. Service packs, updates and security features
may impact how tools interact with the system. However, the
forensic methodology will remain the same no matter what system
you are examining.
Purpose of this
The purpose of this lesson is to provide investigators with the
Appendix
ability to retrieve volatile data before shutting down a live system.
Objectives
After completing this lesson, you will be able to:
Explain the importance of the collection of volatile data
Use the Helix disk to collect information
In this Appendix
The following table shows the contents of this appendix.
Topic
See Page
Overview of Volatile and Non-Volatile Data
B-2
Introduction to Helix Live CD
B-3
Collecting Volatile Information
B-5
Imaging Encrypted Volumes
B-12
01/09
For Official Use Only - Law Enforcement Sensitive
B-1
Network Intrusion Responder Program
Appendix B
Overview of Volatile and Non-Volatile Data
Introduction
Before pulling the plug and imaging physical drives, there are
times when it might be beneficial to gather data from a live system.
This data includes:
Volatile data: Data that would be otherwise lost when the
system is shut down
Non-volatile data: Data such as the size and number of
volumes in the system.
What is Volatile
Volatile information is data that will be gone once power is
Data?
removed from the system. Among other things data can include:
Current network sessions
Current ports and services open on the system
Current processes running on the system
What is Non-
There is some information that you might want to collect and view
Volatile Data?
onsite to help determine the best way to image the system. This
information is non-volatile and can include:
Size of the victim hard drives, hence helping you decide if you
need to image a disk drive per partition or the whole drive at
once
Number of disk drives on the victim machine to ensure that all
are imaged
B-2
For Official Use Only - Law Enforcement Sensitive
01/09
Appendix B
Network Intrusion Responder Program
Introduction to Helix Live CD
Introduction to
Helix is a customized distribution of Knoppix geared toward
Helix
forensics and incident response. Created and maintained by
e-fense, Inc., Helix was first created to be used as an internal tool
for incident response and forensics to create forensically sound
images. Helix was first released to the public in November 2003.
The customizations of Helix have been made to prevent the CD
from altering data on the host computer.
Helix has been created with two different operating modes: a
Windows mode and a Linux mode.
Helix - Windows
The Helix Windows mode is created with Windows executables
Mode
and contains many tools for incident response on a Windows
machine. In this mode, the CD runs standard Windows
applications to gather information from a “live” running system.
This can be useful where systems cannot be shut down or where
potential evidence would be destroyed by taking the system
offline.
Note: When a system is up and running it is constantly
changing. Running Helix in the live environment will
make changes to the system. It is important to be aware
of this fact and that it is documented and understood.
01/09
For Official Use Only - Law Enforcement Sensitive
B-3
Network Intrusion Responder Program
Appendix B
Introduction to the Helix Live CD, continued
Helix - Windows
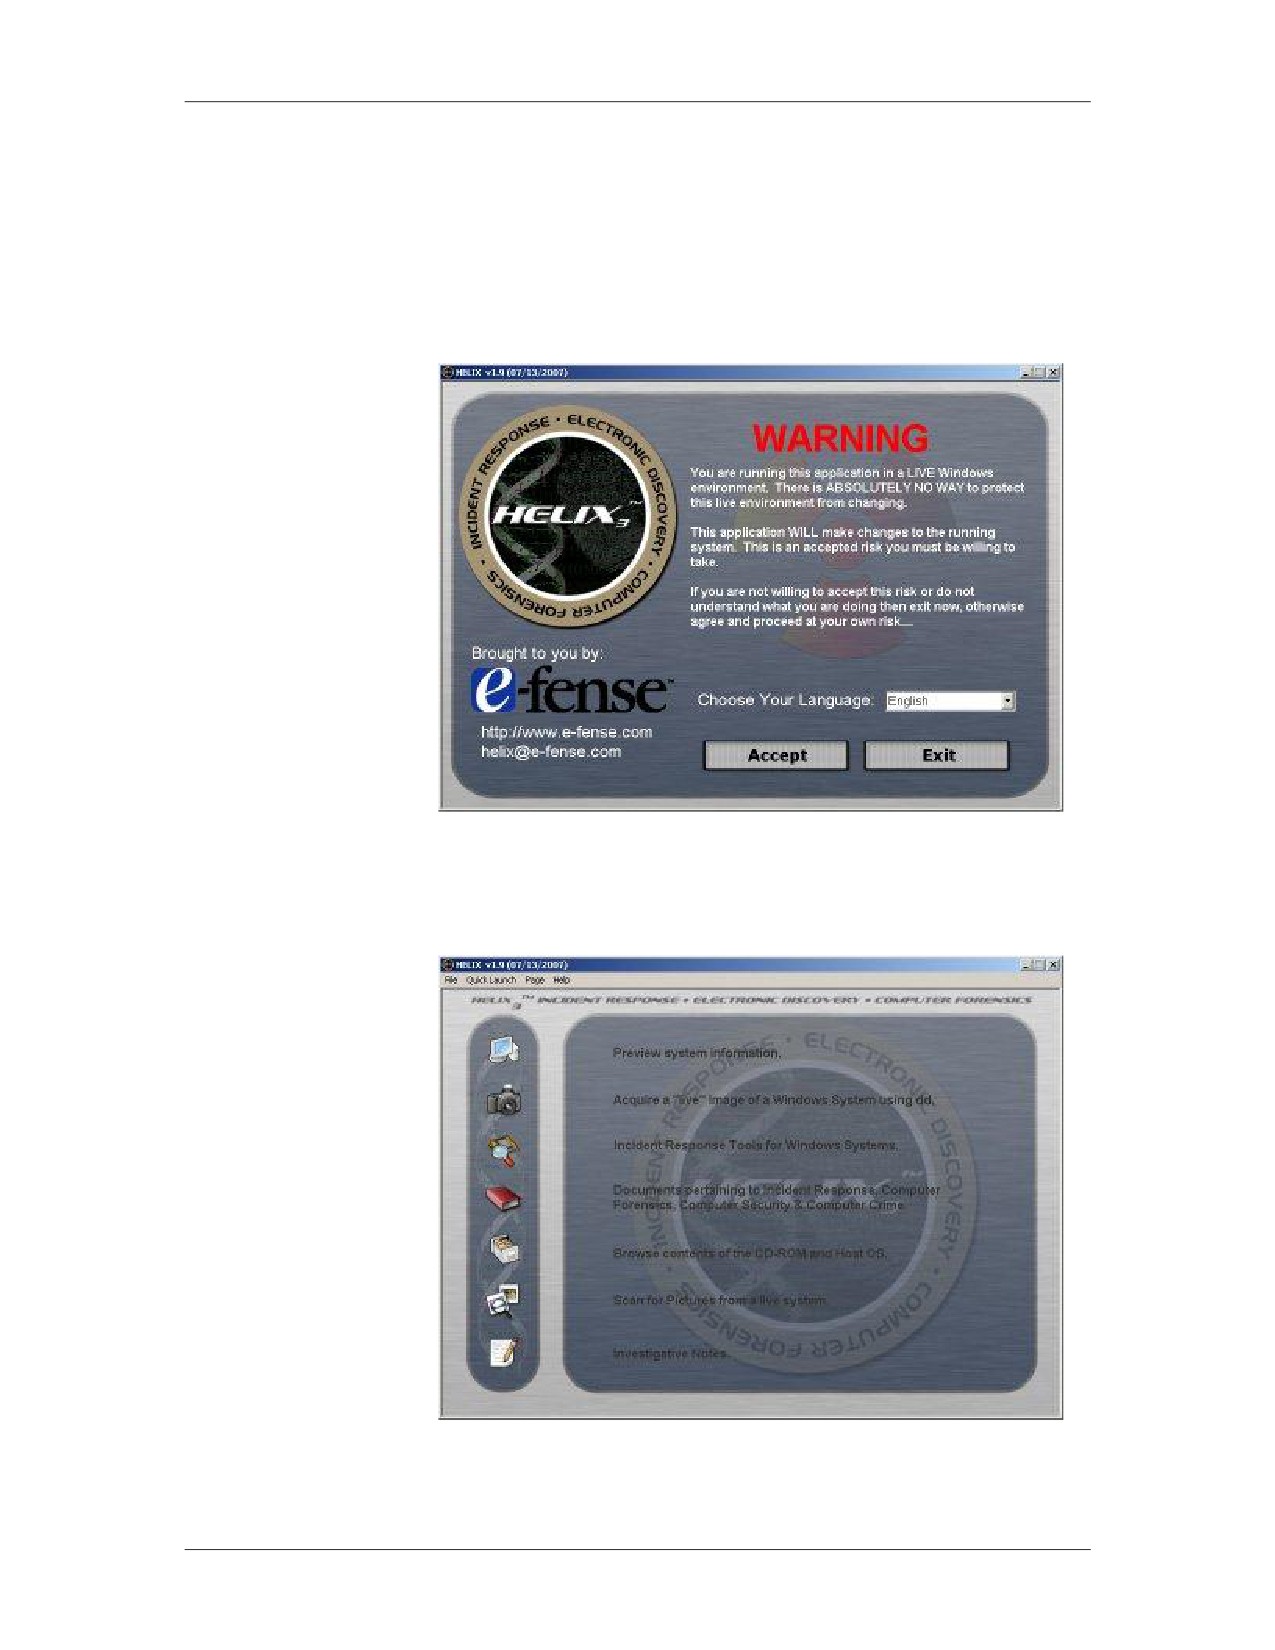
To use Helix, place the disk in the target system. The first screen
Mode, continued
that will appear will be the Warning screen as depicted below. You
must click accept to continue.
The next screen displays a number of options in the form of icons
on the left side of the screen from which the user may choose.
There are also options available on the toolbar.
B-4
For Official Use Only - Law Enforcement Sensitive
01/09
Appendix B
Network Intrusion Responder Program
Collecting Volatile Information
Imaging RAM
While many volatile data collection commands will retrieve
obvious bits of information, they only grab small portions of what
is available from within the computer’s memory. They will not
grab other evidentiary items that may be in memory, such as
information found on open Web pages and running within open
applications.
You should image the RAM of a computer early in the volatile
data collection process. As additional commands and processes are
run later, the data from these commands and processes can
overwrite critical information contained in RAM. Imaging the
RAM beforehand ensures that the information collected is the
same as its original state.
Using a variety of methods, it is possible to image the complete
contents of a system’s memory for later analysis. There is no best
way to imaging RAM; every method has issues. One of the ways
to completely grab all memory is to initiate a system crash, which
dumps all of the RAM’s contents into a local dump file.
Obviously, as this method actually crashes the computer, it is not a
preferred method for responders. Instead, you can use the dd utility
to image the physical memory. The only negative aspect to this
method is that RAM will be continually changing and updating
during the imaging process.
Procedure:
Following the steps below to image the system’s physical memory
Imaging RAM
using the dd command found within Helix.
Step
Action
1
From the Helix main menu, use the pull-down menus to
select Quick Launch > Command Shell.
2
From the newly opened command line terminal, image
the RAM by typing the following command line in one
line, replacing “D:\” with the drive and folder of your
evidence repository:
dd if=\\.\PhysicalMemory of=D:\RAM.dd
conv=noerror
3
The process will take a number of minutes to completely
image all of the memory. You will occasionally see
error messages stating that physical memory ranges
could not be read. These refer to memory ranges that are
locked, and can be disregarded.
01/09
For Official Use Only - Law Enforcement Sensitive
B-5
Network Intrusion Responder Program
Appendix B
Collecting Volatile Information, continued
Helix - Windows
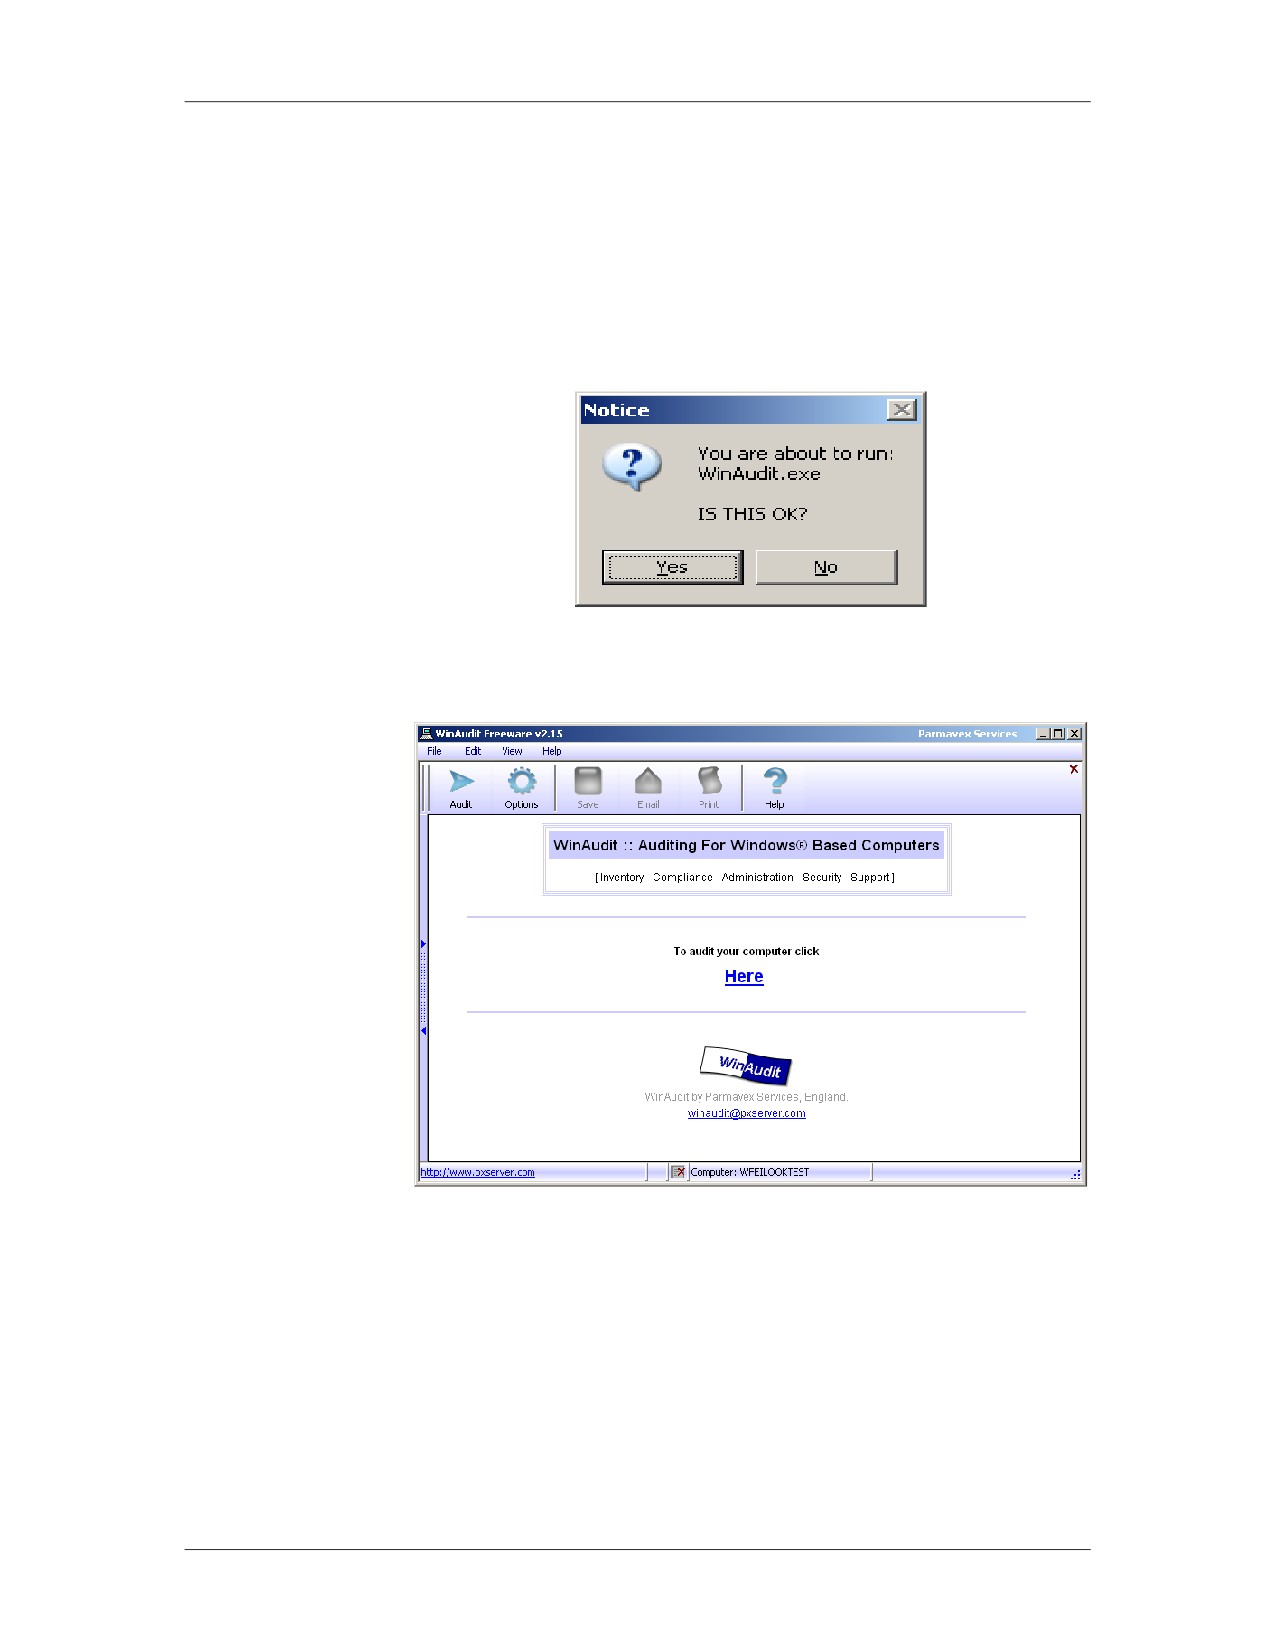
To acquire information on a Windows system in a quick and easy
Mode, continued
manner while limiting the impact on the target system, select the
Quick Launch option on the toolbar. From the drop-down menu
select Win Audit. The following window will display.
Click Yes to execute the program. The following screen will be
displayed.
Click on the Here link to start acquiring data.
B-6
For Official Use Only - Law Enforcement Sensitive
01/09
Appendix B
Network Intrusion Responder Program
Collecting Volatile Information, continued
Helix - Windows
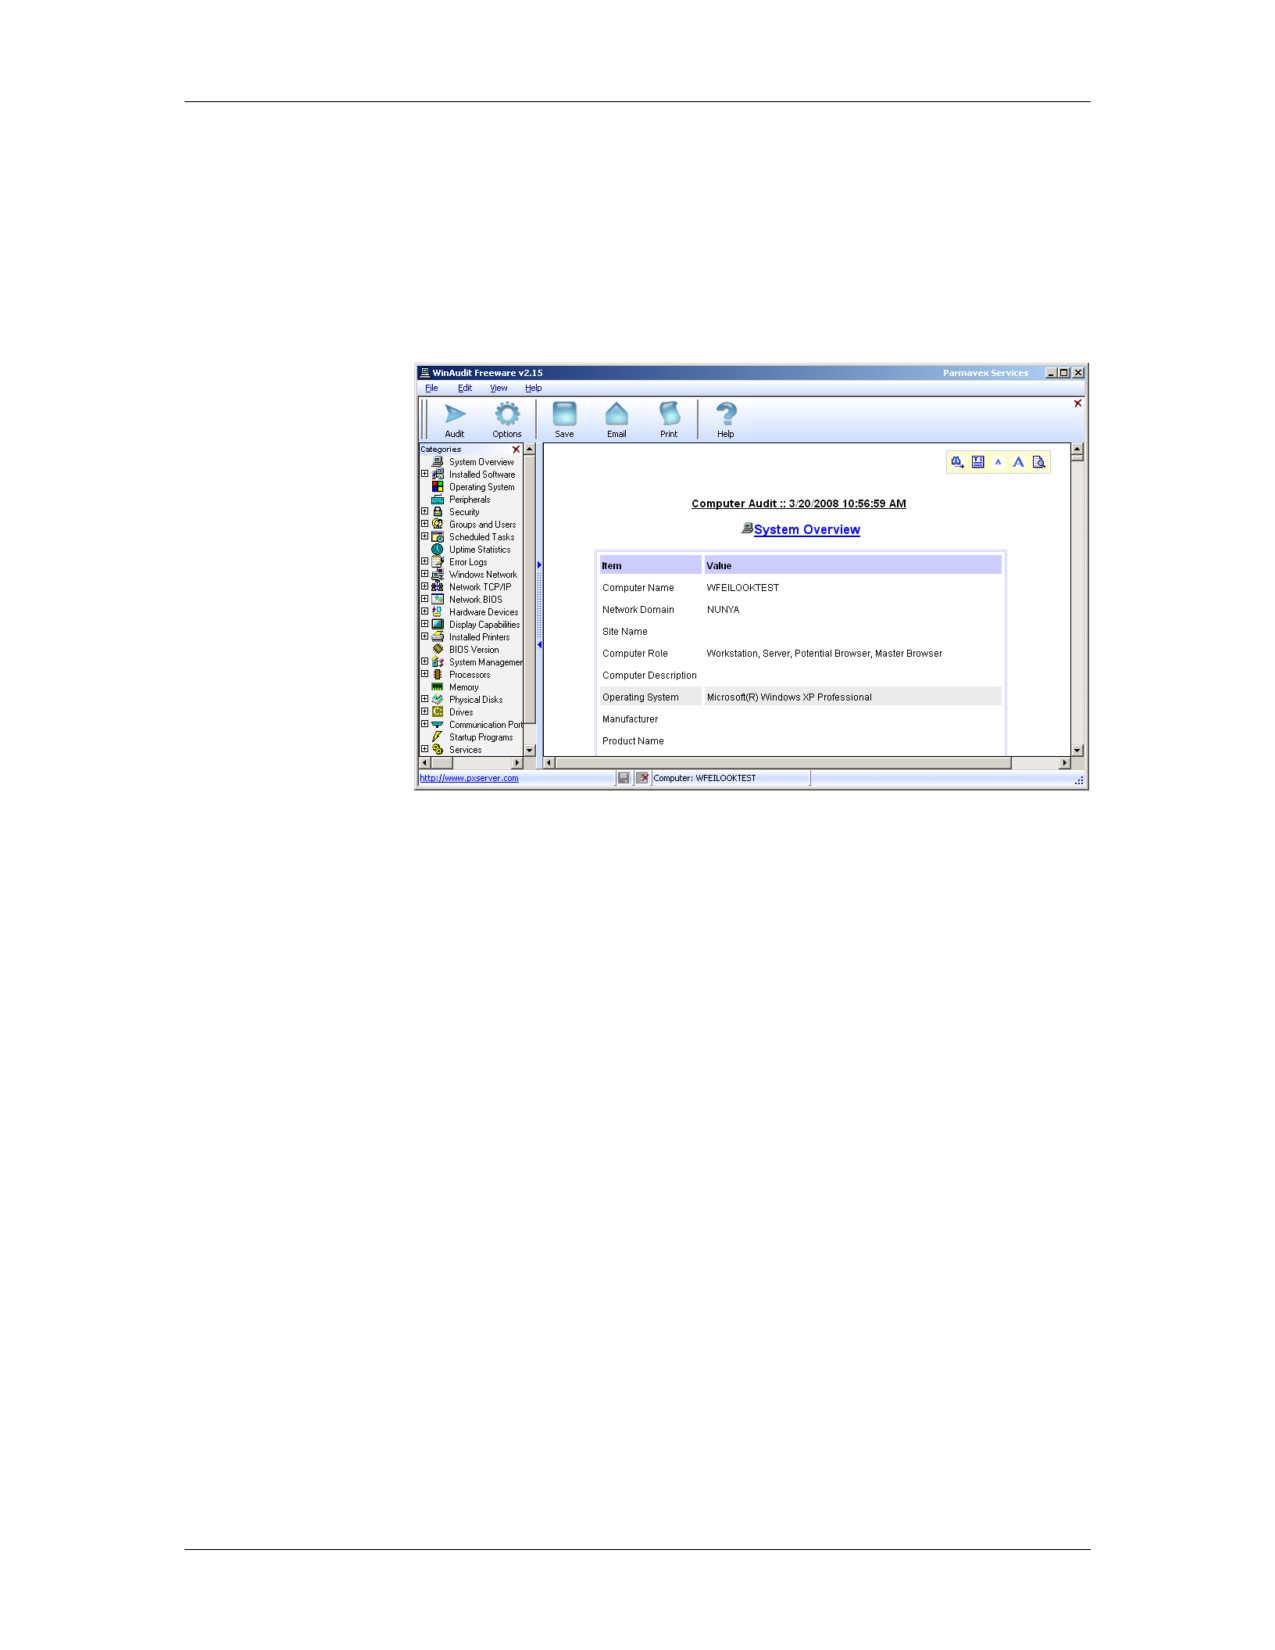
The program should take just a few moments to query the target
Mode, continued
system for information. Once it completes a screen similar to the
following will be displayed.
Two clearly distinguishable panes will be evident. The left pane is
labeled “Categories.” In that pane will be a number of options that
when selected will display corresponding information in the right
pane. For instance, the first option in the left pane is System
Overview. By default, it is selected when the window is first
displayed. As can be seen in the screenshot above, the
corresponding information is available for scrutiny in the right
pane.
Information acquired during the audit will be placed in one of the
categories depending on to what it pertains and from where it was
obtained.
01/09
For Official Use Only - Law Enforcement Sensitive
B-7
Network Intrusion Responder Program
Appendix B
Collecting Volatile Information, continued
Helix - Windows
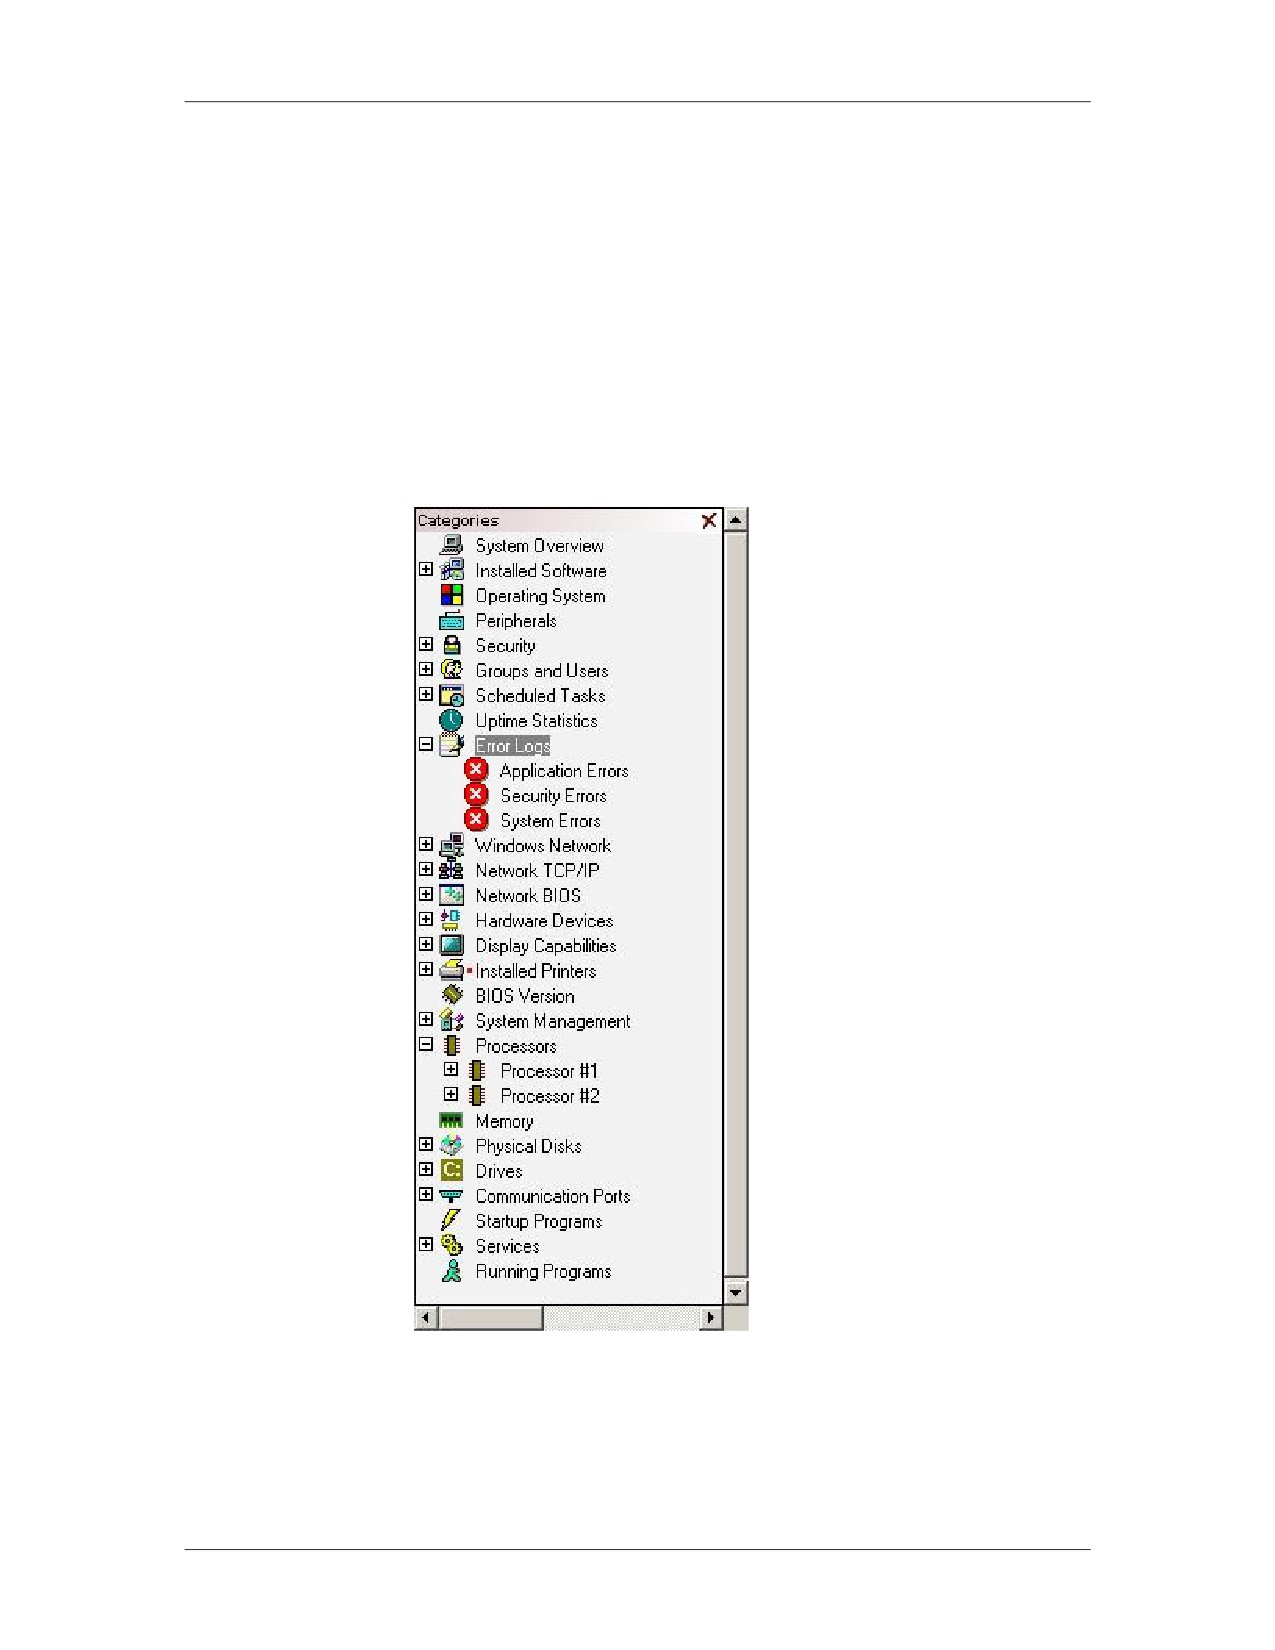
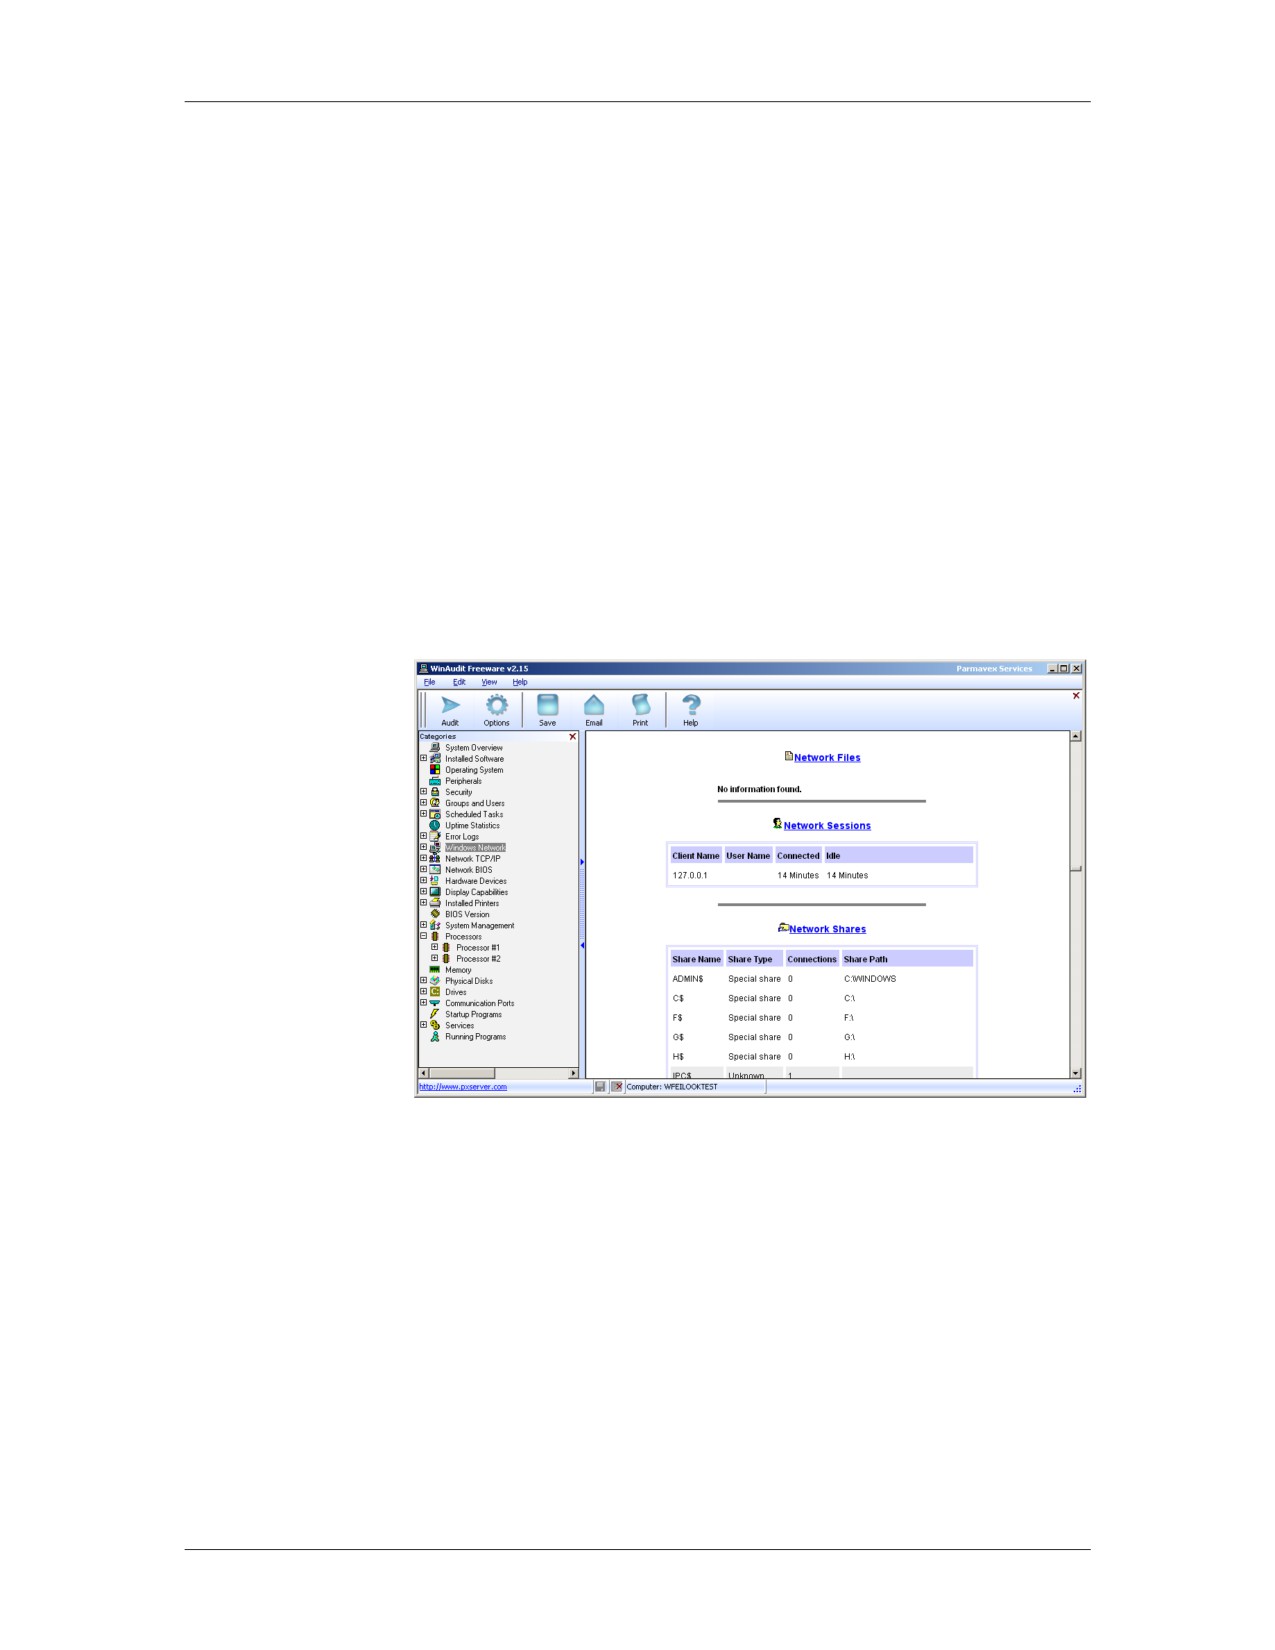
The following screenshot depicts the categories created from
Mode, continued
running Win Audit.
Many of the categories in the left pane can be expanded to provide
access to additional information. As seen in the example below,
the Error Logs option, when expanded, will display three
additional options, one each for the System, Application and
Security event logs.
Again, when a category is selected in the left pane the
corresponding information will be displayed in the right pane.
B-8
For Official Use Only - Law Enforcement Sensitive
01/09
Appendix B
Network Intrusion Responder Program
Collecting Volatile Information, continued
Helix - Windows
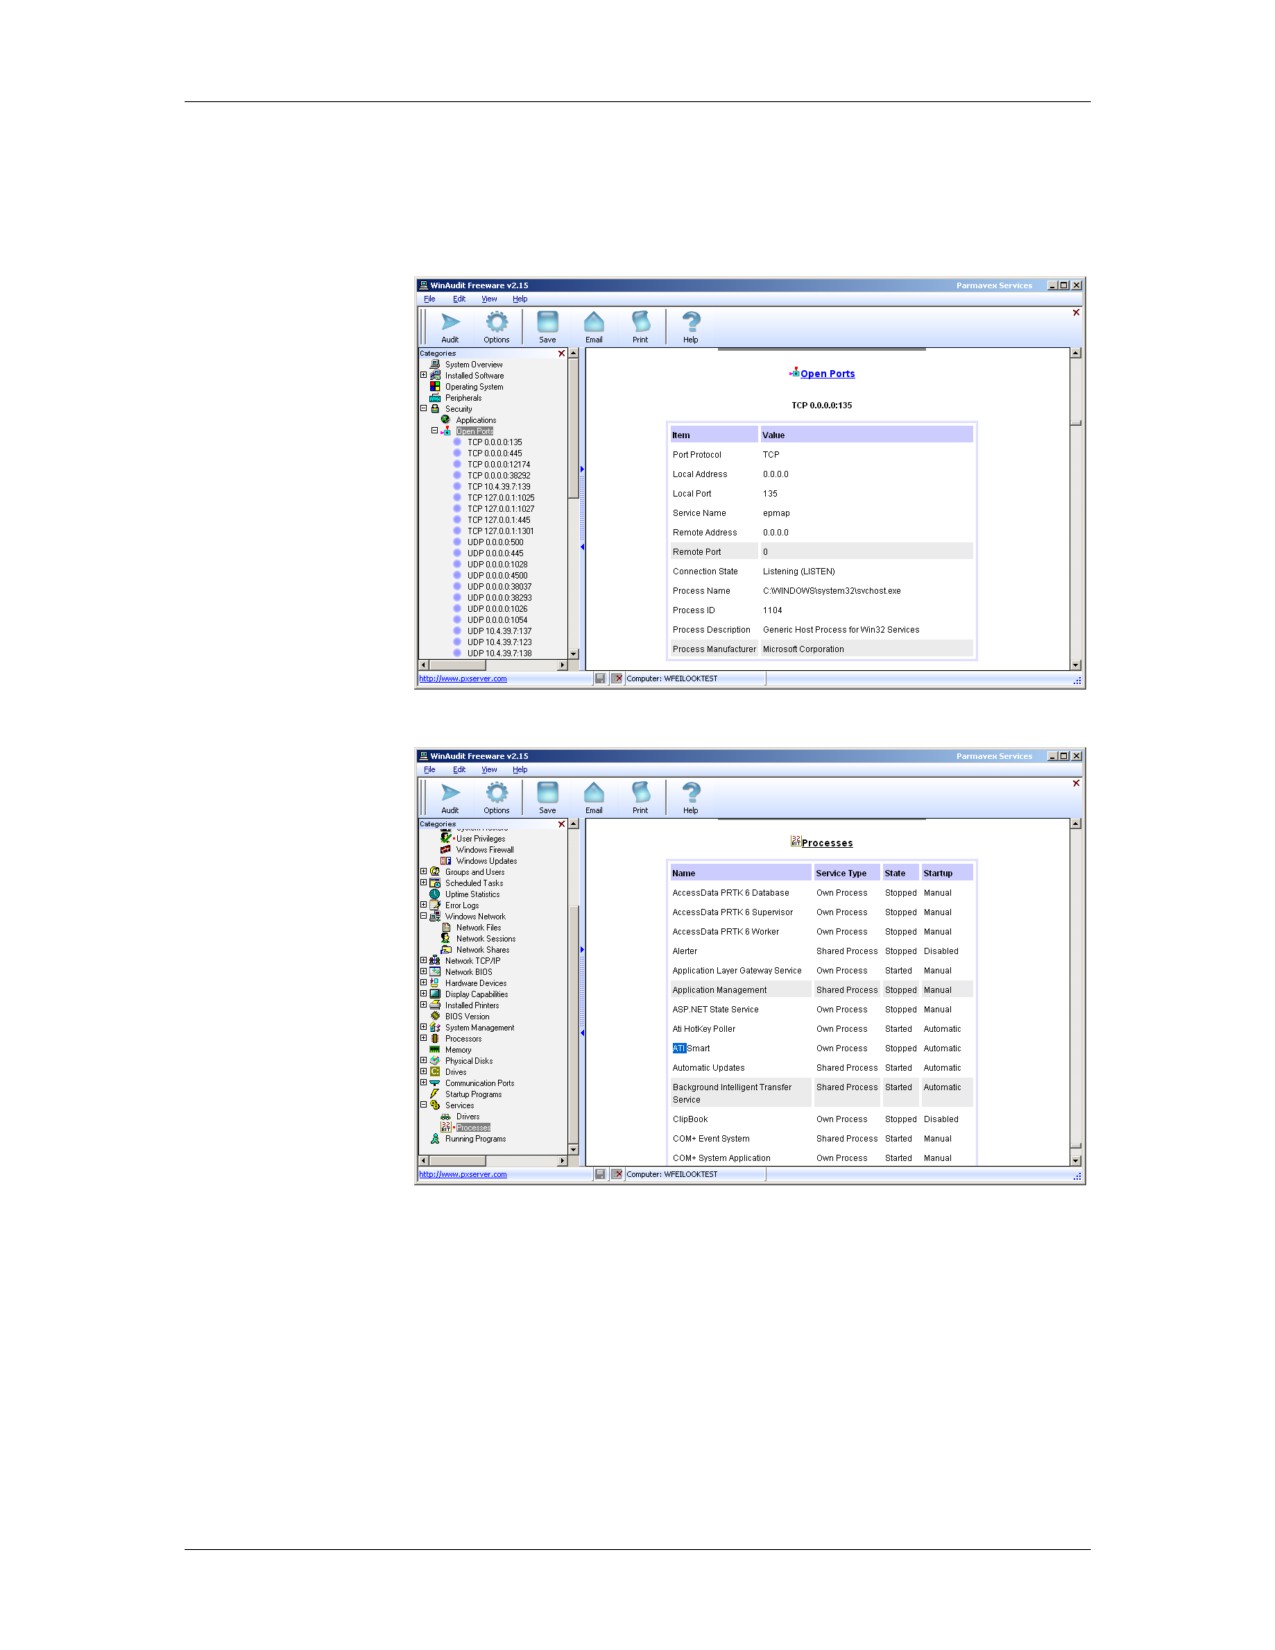
The application acquires some of the most commonly sought
Mode, continued
information during an initial or first response. Among other
information, this includes:
Current network sessions
Open files
Open ports
Active processes
Running programs
The following screenshots illustrate some of these categories as
displayed in Helix.
Current network sessions
01/09
For Official Use Only - Law Enforcement Sensitive
B-9
Network Intrusion Responder Program
Appendix B
Collecting Volatile Information, continued
Helix - Windows
Open ports
Mode, continued
Active processes
B-10
For Official Use Only - Law Enforcement Sensitive
01/09
Appendix B
Network Intrusion Responder Program
Collecting Volatile Information, continued
Helix - Windows
Once acquired, the information can be saved to whatever location
Mode, continued
is desired for the storage of evidential items. In order to do so,
click on the File option on the toolbar, go to a storage directory
and save the output.
By default, Helix saves the output in HTML format. It creates
three HTML files. One of the files contains information from both
panes of the main Win Audit screen. The other two HTML files
contain only information relating to either the categories (left)
pane, or the information displayed in the main display (right) pane
of the Win Audit window. This affords the examiner three
different options for analyzing the output. The examiner can select
whichever option is most convenient or appropriate depending on
requirements.
Output can be saved in other formats, including PDF, text and as a
database file. Additionally, there is also an option available
through the File option on the toolbar for sending the output to
another location via e-mail. This could be extremely advantageous.
For instance, suppose the situation is one in which an intrusion is
suspected but it has not yet been confirmed. An initial responder
who is not experienced with intrusion detection could respond and
use Helix to collect data. It could then be e-mailed to an
experienced examiner who could make a decision as to whether or
not it would be beneficial to image the entire system. This could
save time and resources.
Helix provides automated tools that require little experience or
expertise to run. As you become more familiar with forensic
methodologies, you may choose to create your own forensic tool
kits and use less intrusive methods to acquire volatile data. The
primary goal is to acquire the desired data in the least intrusive
manner.
01/09
For Official Use Only - Law Enforcement Sensitive
B-11
Network Intrusion Responder Program
Appendix B
Imaging Encrypted Volumes
Overview
In recent years, the frequency of encrypted volumes has grown in
both the consumer and corporate environments. Numerous user-
friendly applications are available to create an encrypted volume
for mounting at any time. One such program is TrueCrypt.
TrueCrypt allows users to create a large, encrypted image file
which can be mounted to store files.
When in use, the encrypted file is mounted as a new drive letter
accessible by all users. A password must first be entered to open
the image file, but afterwards it is completely open to the entire
system for access. When the encrypted file is not in use, then all of
the data remains secure within the encrypted volume.
When responding to a live machine and performing volatile data
analysis, it is important to determine if a volume encryption
application is active and running on the system. If so, care should
be taken to identify if any encrypted volumes are open on the
system.
If encrypted volumes are open on the system, the logical volume
should be imaged to your evidence repository. Failure to do so will
prevent an investigator from ever being able to access the file
without the volume’s password.
Procedure:
Follow the steps below to image a logical volume of the local
Imaging a Logical
system to your evidence repository.
Volume
Step
Action
1
From the Helix main menu, use the pull-down menu to
select Quick Launch > Command Shell.
2
From the newly opened command line terminal, image
the RAM by typing the following command line,
replacing “G:” with the drive letter of the logical volume
and “D:\” with the drive and folder of your evidence
repository:
dd if=\\.\G: of=D:\VolumeG.dd conv=noerror
B-12
For Official Use Only - Law Enforcement Sensitive
01/09
Appendix C
Network Intrusion Responder Program
Appendix C
Understanding Computer Hardware
Overview
This module explains the procedures necessary for safe handling
of computers. Students will learn the primary hardware
components that power the data processing and storage functions
of every computer. An understanding of motherboards, CPUs,
memory, and bus is essential to knowing how a computer system
works.
Purpose of this
The purpose of this module is to provide students with an
Module
understanding of primary computer hardware components.
Objectives
After successfully completing this module, you will be able to:
Practice safety procedures when handling computer equipment
Identify major computer components
Identify and explain motherboard types
Recognize individual motherboard components including
chipsets, jumpers and switches, power supply and connections
Define Basic Input/Output System (BIOS)
Recall CPU functions and memory
In this Module
The following table shows the contents of this module.
Topic
See Page
Lesson 1 - Safety Briefing
C-3
Lesson 2 - Overview of Computers
C-5
Lesson 3 - Motherboards and Components
C-17
Lesson 4 - CPU and Memory
C-39
01/09
For Official Use Only - Law Enforcement Sensitive
C-1
Network Intrusion Responder Program
Appendix C
This page intentionally left blank.
C-2
For Official Use Only - Law Enforcement Sensitive
01/09
Appendix C
Network Intrusion Responder Program
Lesson 1 - Safety Briefing
Introduction
To ensure the well being of each student, a safety briefing is given
before students begin using the classroom computers.
Purpose of this
You will learn the procedures necessary for safe handling of
Lesson
computers.
Objectives
After successfully completing this lesson, you will be able to:
Identify the steps to take to protect yourself from injury when
using a computer
Explain how to protect computer components and stored data
In this Lesson
The following table shows the contents of this lesson:
Topic
See Page
Safety Briefing
C-4
01/09
For Official Use Only - Law Enforcement Sensitive
C-3
Network Intrusion Responder Program
Appendix C
Safety Briefing
The Need for
During the NITRO course, you will perform several practical
Safety Procedures
exercises involving the disassembly and reassembly of computer
components. Therefore, it is imperative that you follow the safety
procedures presented here. You will be given a wrist grounding
strap and electrostatic mat to use in the classroom.
Warning All electrical devices contain components that may
injure or kill people who do not take proper safety
precautions.
Step-by-Step
Step 1: Turn off power and disconnect main power cables.
Safety Procedures
Before opening a computer or handling any component, always
ensure that all computer devices are turned off and the main power
cables are disconnected.
Warning To avoid death or serious injury, never open a power
supply or monitor chassis. Capacitors inside a
monitor hold electrical charges even when the
monitor is unplugged. Therefore, it is important not
to open a monitor chassis. If a problem exists with
either device, take it to a professional.
Step 2: Use a wrist grounding strap and electrostatic mat.
Static electricity can damage or destroy most computer circuitry,
cards, and memory. To protect against static discharge, use a wrist
grounding strap and an electrostatic mat when handling computer
equipment. If a strap is unavailable, first touch a metal object prior
to handling computer components.
Step 3: Remove all jewelry from hands.
Before handling the computer, remove all jewelry from your hands
including watches, rings and bracelets. Objects like watches, rings,
and bracelets are good electrical conductors. Jewelry may also get
caught in computer components and ruin them.
C-4
For Official Use Only - Law Enforcement Sensitive
01/09
Appendix C
Network Intrusion Responder Program
Lesson 2 - Overview of Computers
Introduction
This lesson presents the key components of the computer, history
of computing, and basic terminology. Computer components are
identified and their roles are reviewed in relation to the computer
system as a whole.
Purpose of this
You should be familiar with the history of computing, know the
Lesson
basic computer components, and understand the terminology used
to describe system components.
Objectives
After successfully completing this lesson, you will be able to:
Identify the basic computer components
Define basic computer terminology
Explain the history of the modern computer
In this Lesson
The following table shows the contents of this lesson.
Topic
See Page
Introduction
C-6
History of Computers
C-9
Basic System Components
C-12
01/09
For Official Use Only - Law Enforcement Sensitive
C-5
Network Intrusion Responder Program
Appendix C
Introduction
What is a
A computer is a machine that performs high-speed operations and
Computer?
processes data. In its simplest form, a computer is a large
collection of electronic switches, or transistors, operating very
quickly in a specific order. Programs tell transistors how, when,
and in what order to turn on and off. These on and off actions are
equated to the binary system of numbers 1 (On) and 0 (Off). These
1s and 0s are stored in computer systems as bits and make up the
building blocks of all data and information. A set of 8 bits is used
to create a single byte of information, such as a character or
number.
Computer programs consist of streams of bits, each bit indicating
on or off. These streams are called a data stream or a bit stream.
Computers can only recognize information in bits called machine
language. Software and hardware translate these numerical streams
into a human readable format.
Computers range in function from the general purpose desktop PC
to massive mainframes to specialized chips in children’s toys. The
most prevalent is the PC, which usually consists of a case that sits
on the floor or desk, a monitor, a keyboard, and various
peripherals like printers.
PC functions range from general purpose, stand-alone systems to
specialized servers that perform networking functions.
C-6
For Official Use Only - Law Enforcement Sensitive
01/09
Appendix C
Network Intrusion Responder Program
Introduction, continued
Laptop and
Laptop and notebook computers are designed to be portable. Early
Notebook
models were heavy, slow, and did not have the same storage
Computers
capacity as their desktop counterparts. Today, these systems rival
the performance of most desktop PCs.
Laptops: Laptops typically weigh seven pounds or less and are
approximately 9x12x2 inches in size. They are powered by
rechargeable batteries and AC adapters. Laptops can offer high
performance and multimedia capabilities. A docking station
can be added to enable connectivity to networks, regular
monitors, keyboards, and other peripherals.
Notebooks: Notebooks are smaller and lighter than a laptop. In
general, they lack the high-end multimedia functions of the
laptop. Yet, many notebooks have comparable hard drive and
memory configurations and are equipped with sound and CD-
ROM drives.
Personal Digital
PDAs, also known as palm pilots, IPAQs, and pocket PCs meet the
Assistants (PDAs)
demand for a reduced-function portable computer. PDAs enable
users to manage files and to swap data with a desktop computer.
Most are used to maintain contact lists and to track appointments.
Current models can help manage e-mail, paging, and faxes. Some
have wireless connectivity to other devices using infrared
connections. Others can connect to the Internet through wireless
modems. Many can hold removable flash memory cards. Some
even double as cell phones.
Most PDAs are intended to synchronize with home or office
workstations so they usually cannot permanently store data. They
may lose any data stored in memory if they lose battery power.
Rechargeable batteries typically provide power. Therefore, a
battery charger is essential to safeguarding stored data.
01/09
For Official Use Only - Law Enforcement Sensitive
C-7