Network Intrusions Responder Program (NITRO). Instructor Guide - page 9
Network Intrusion Responder Program
Log Analysis
Network Log Analysis using Sawmill, continued
The Report
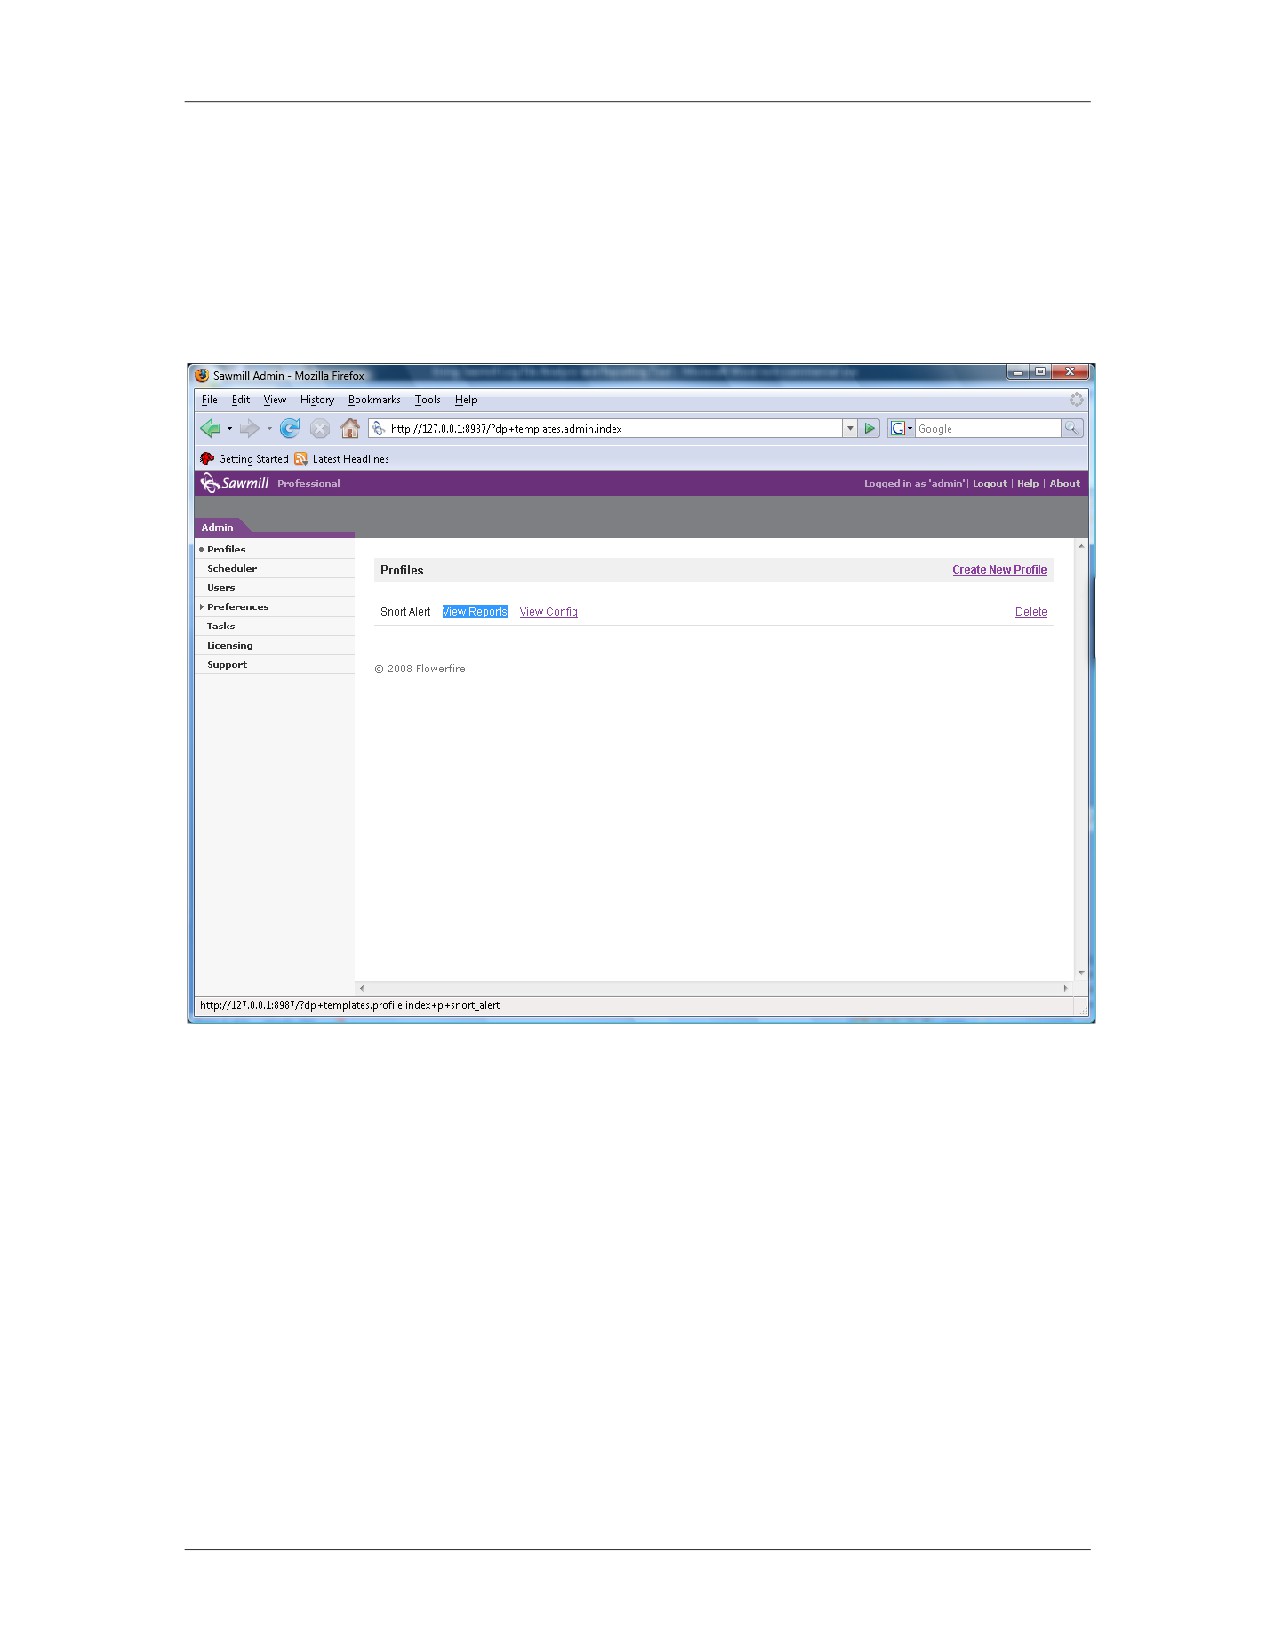
Once a report profile has been generated, you can load the selected
Environment
report by selecting “View Reports” from the Administrative
screen.
11-42
For Official Use Only - Law Enforcement Sensitive
01/09
Log Analysis
Network Intrusion Responder Program
Network Log Analysis using Sawmill, continued
Report Header
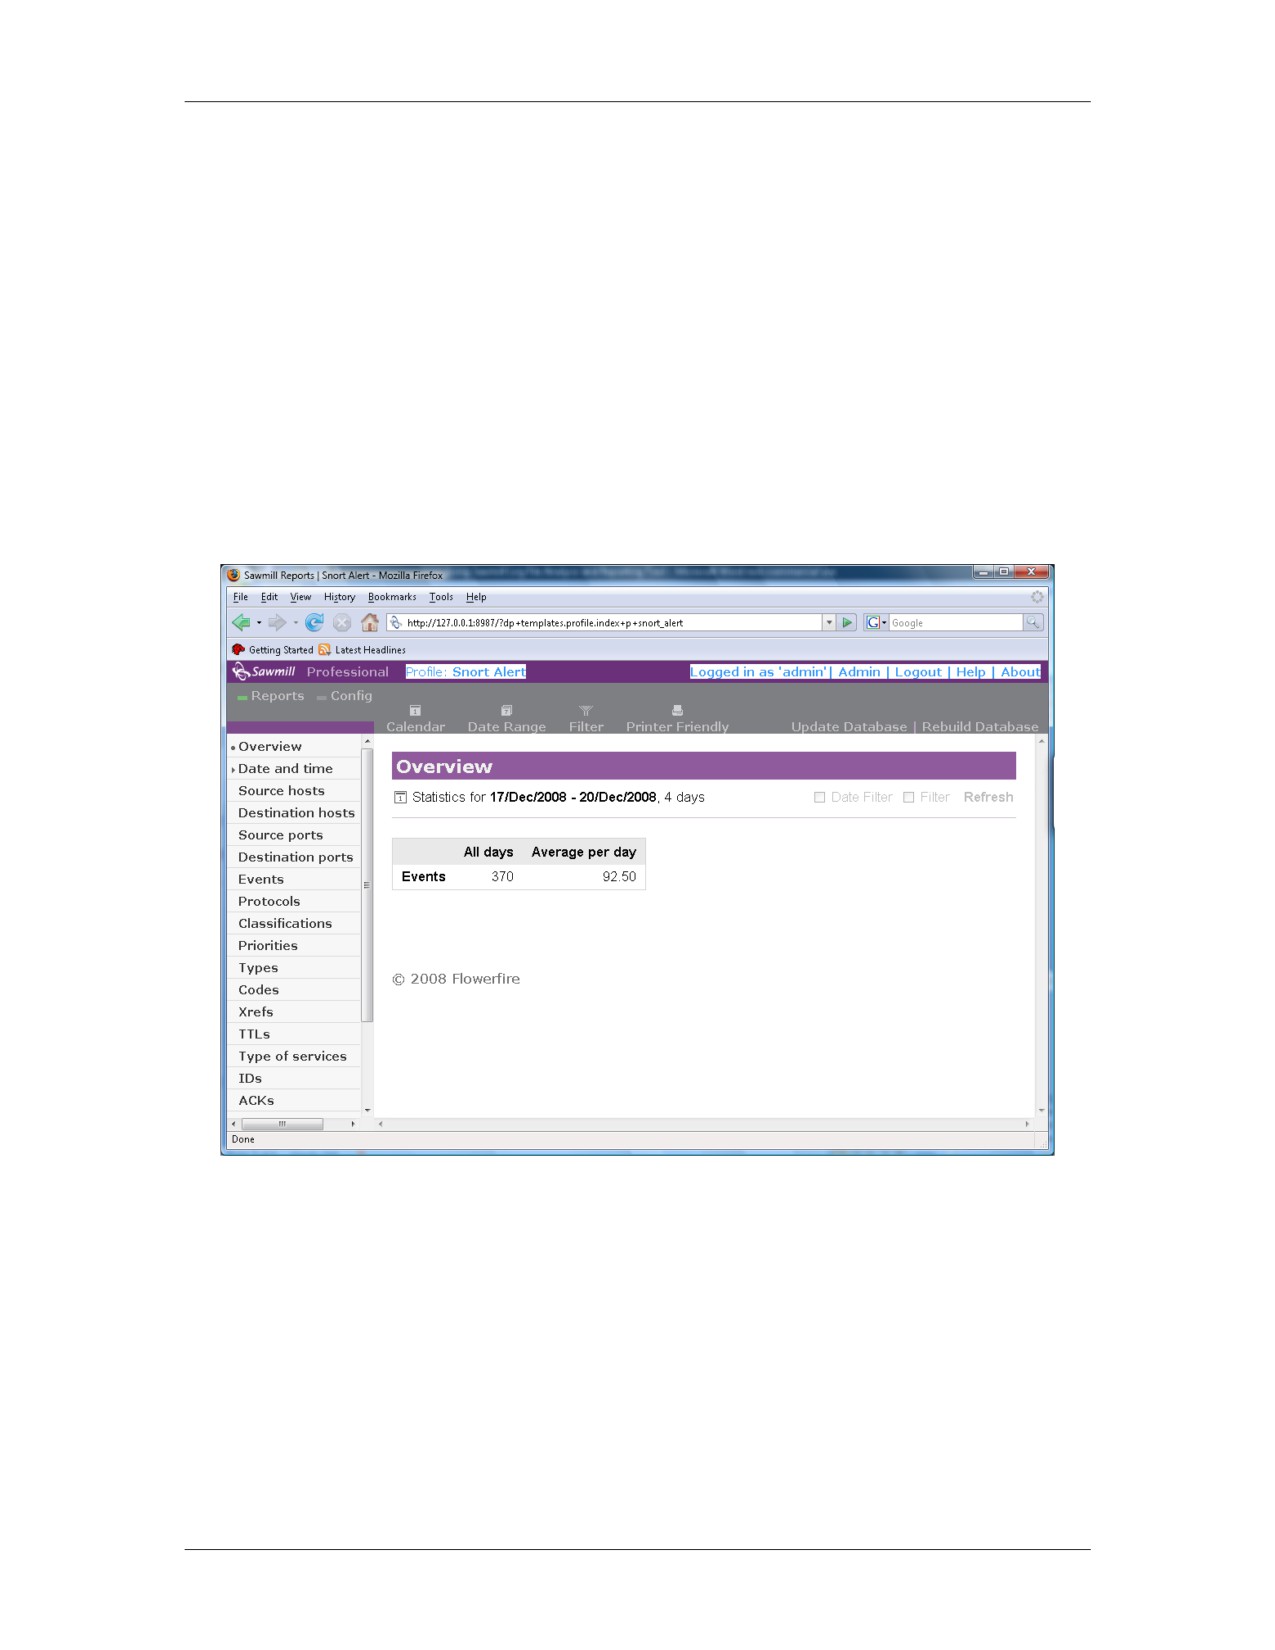
The header of the report contains the following information:
Profile name - The name of the active profile which is being
displayed
Admin link - Link to the administrative functions, such as
profile lists
Logout - A link to log out of Sawmill
Help - Help documentation
01/09
For Official Use Only - Law Enforcement Sensitive
11-43
Network Intrusion Responder Program
Log Analysis
Network Log Analysis using Sawmill, continued
Report Toolbar
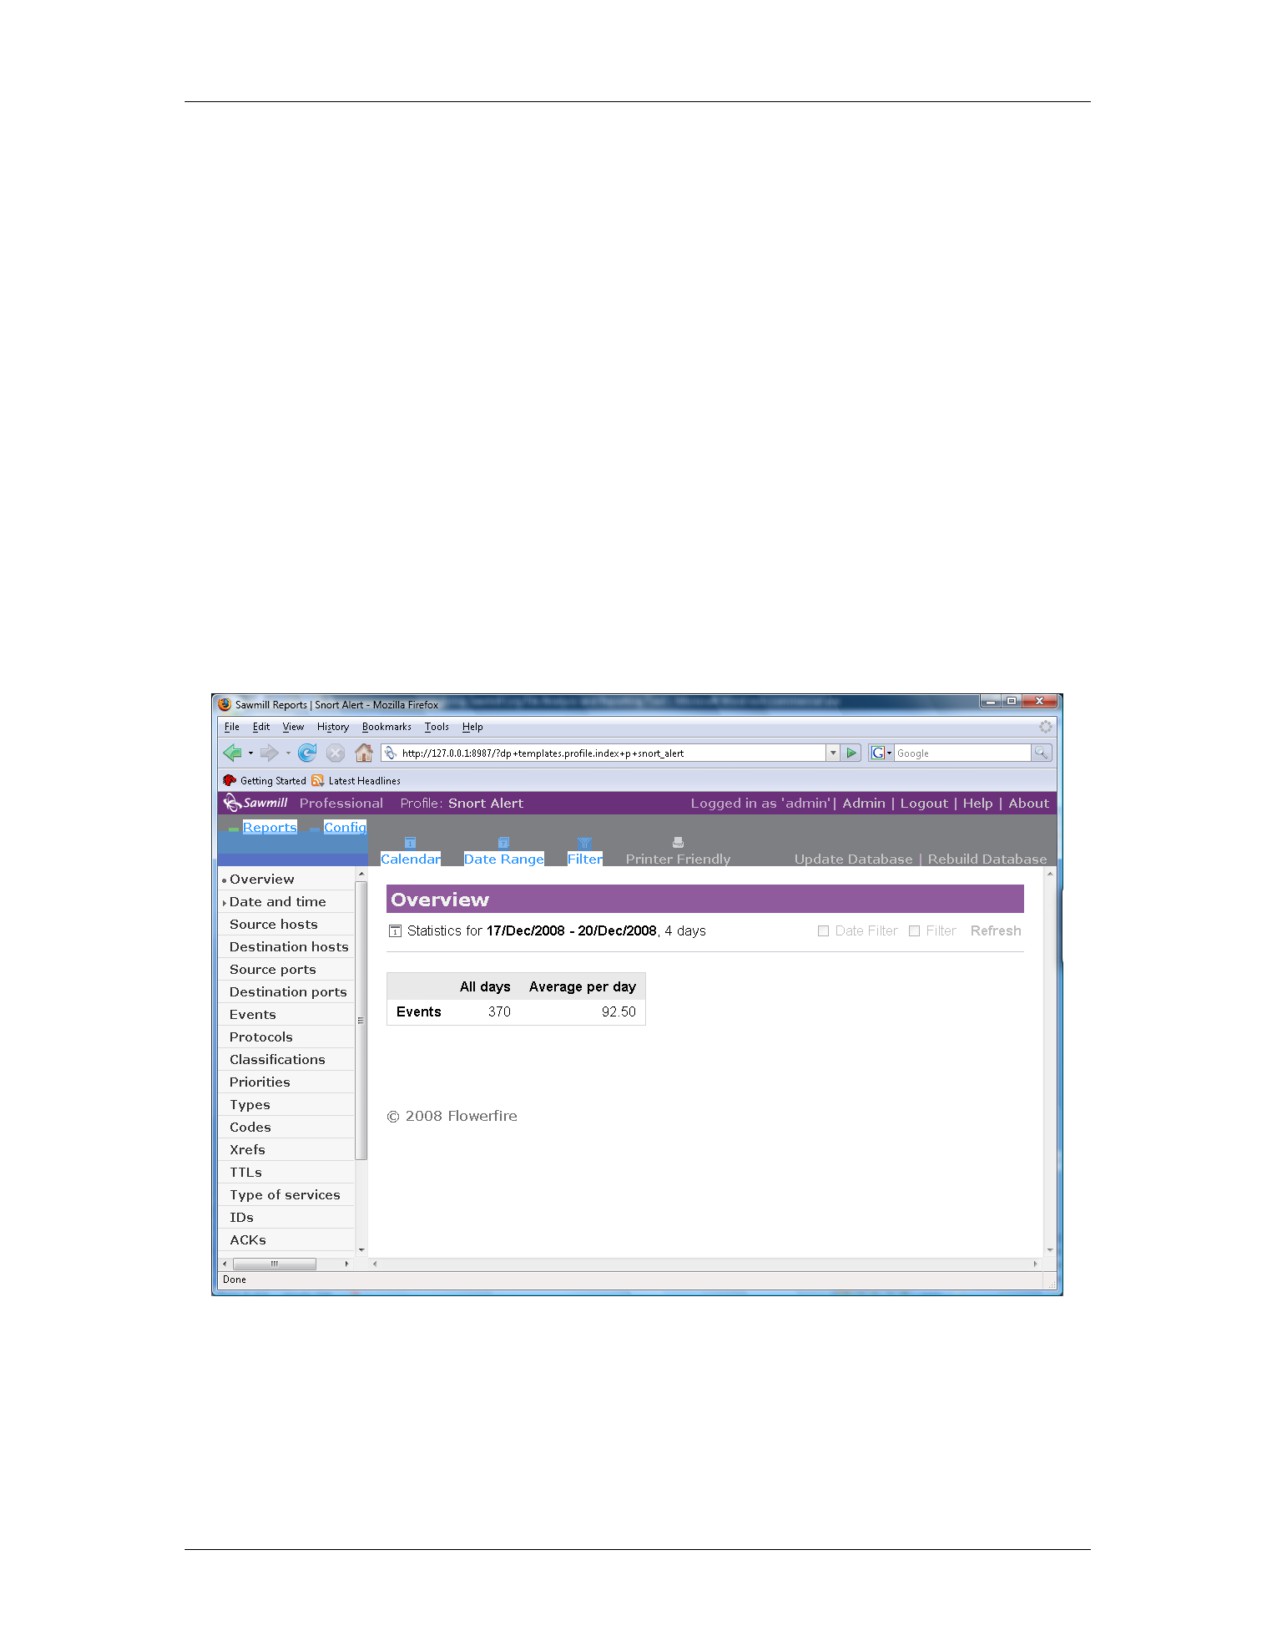
Below the report’s header is the report’s toolbar. This toolbar
contains the following links:
Reports - Used to access other loaded reports from the current
reports view
Config - Allows you to change profile options
Calendar - Date/time filter can be set to view a single day,
month or year
Date Range - A range of days can be selected to use as the
date/time filter
Filter - Used to configure global filter options for any of the
report fields. These filters dynamically affect all reports.
11-44
For Official Use Only - Law Enforcement Sensitive
01/09
Log Analysis
Network Intrusion Responder Program
Network Log Analysis using Sawmill, continued
Report Menu
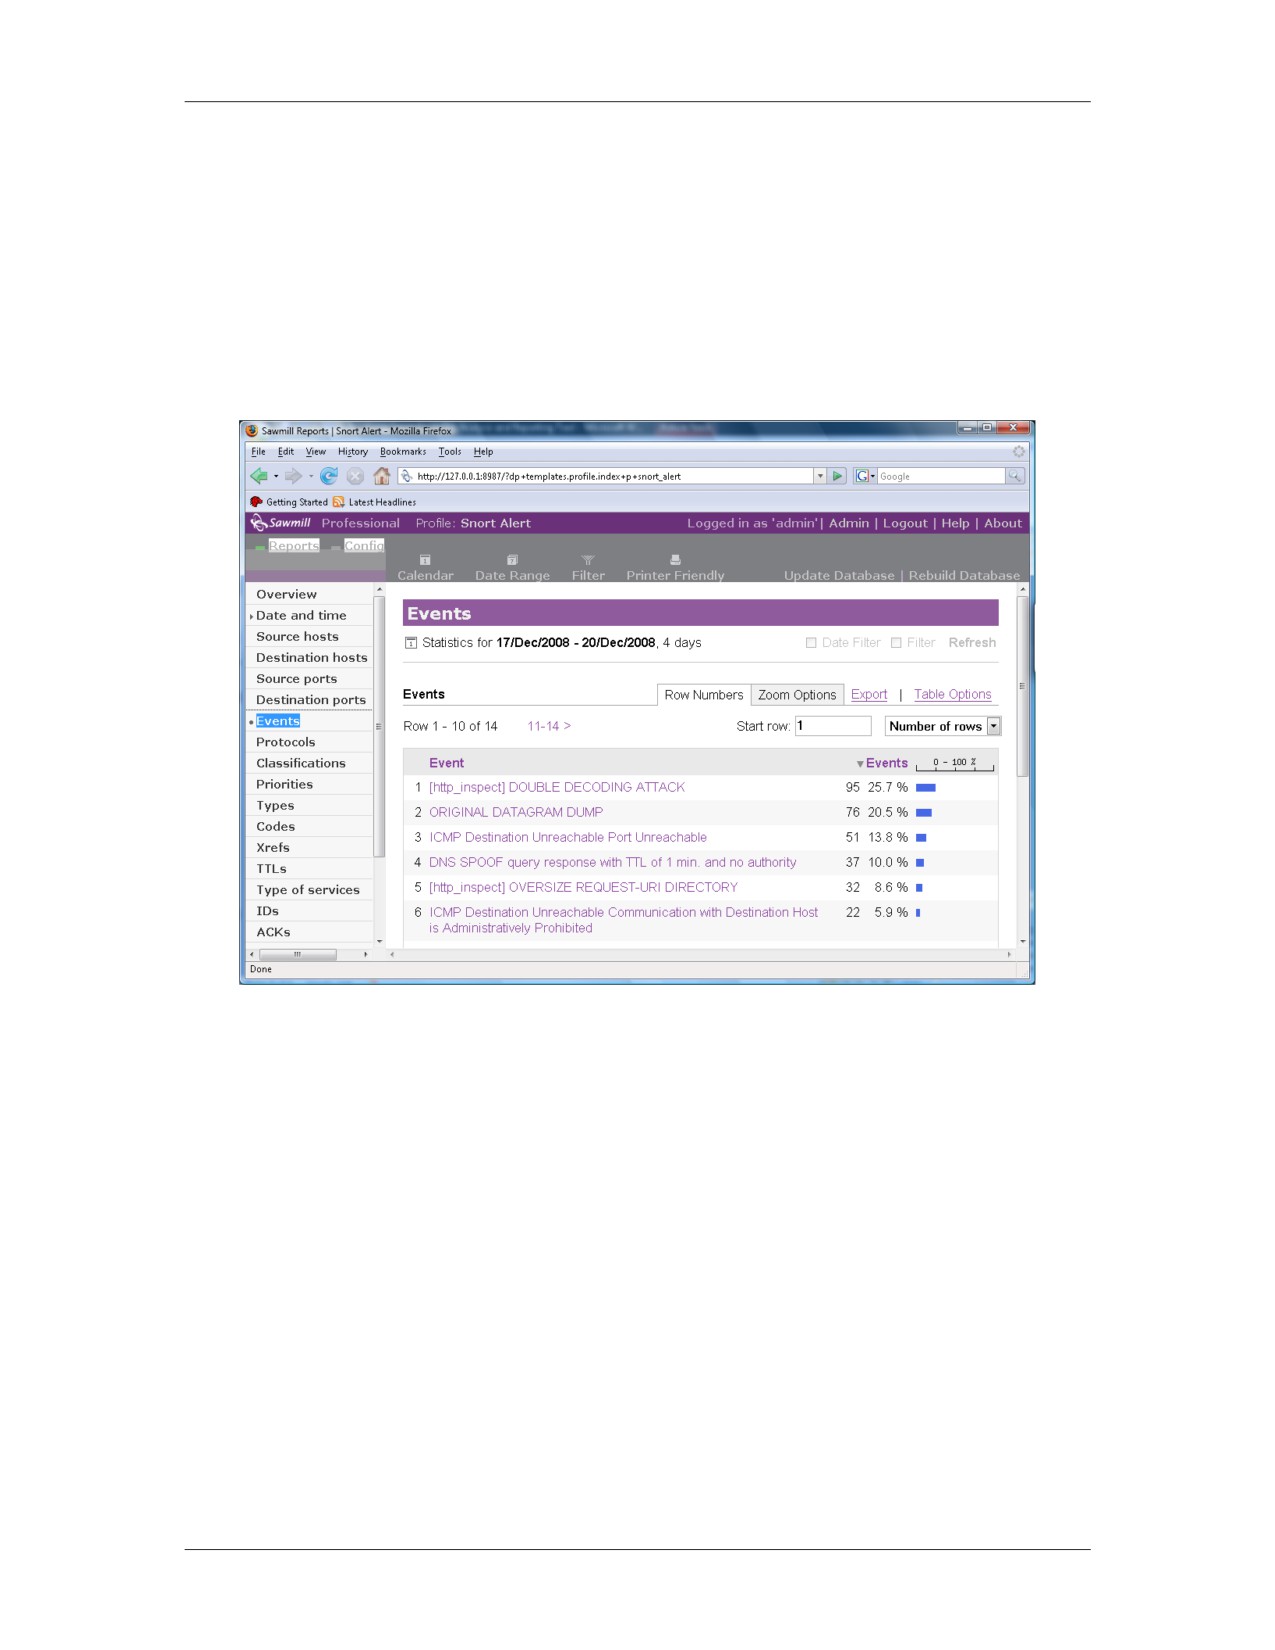
At the left of the selected report is the report’s menu which lets
you select different attributes of the report to view. Clicking on a
report category expands or collapses the category and allows the
report to zoom in on and display the selected category.
Note: In the above example, the Events attribute was selected to display
all events.
01/09
For Official Use Only - Law Enforcement Sensitive
11-45
Network Intrusion Responder Program
Log Analysis
Network Log Analysis using Sawmill, continued
Zoom To Filters
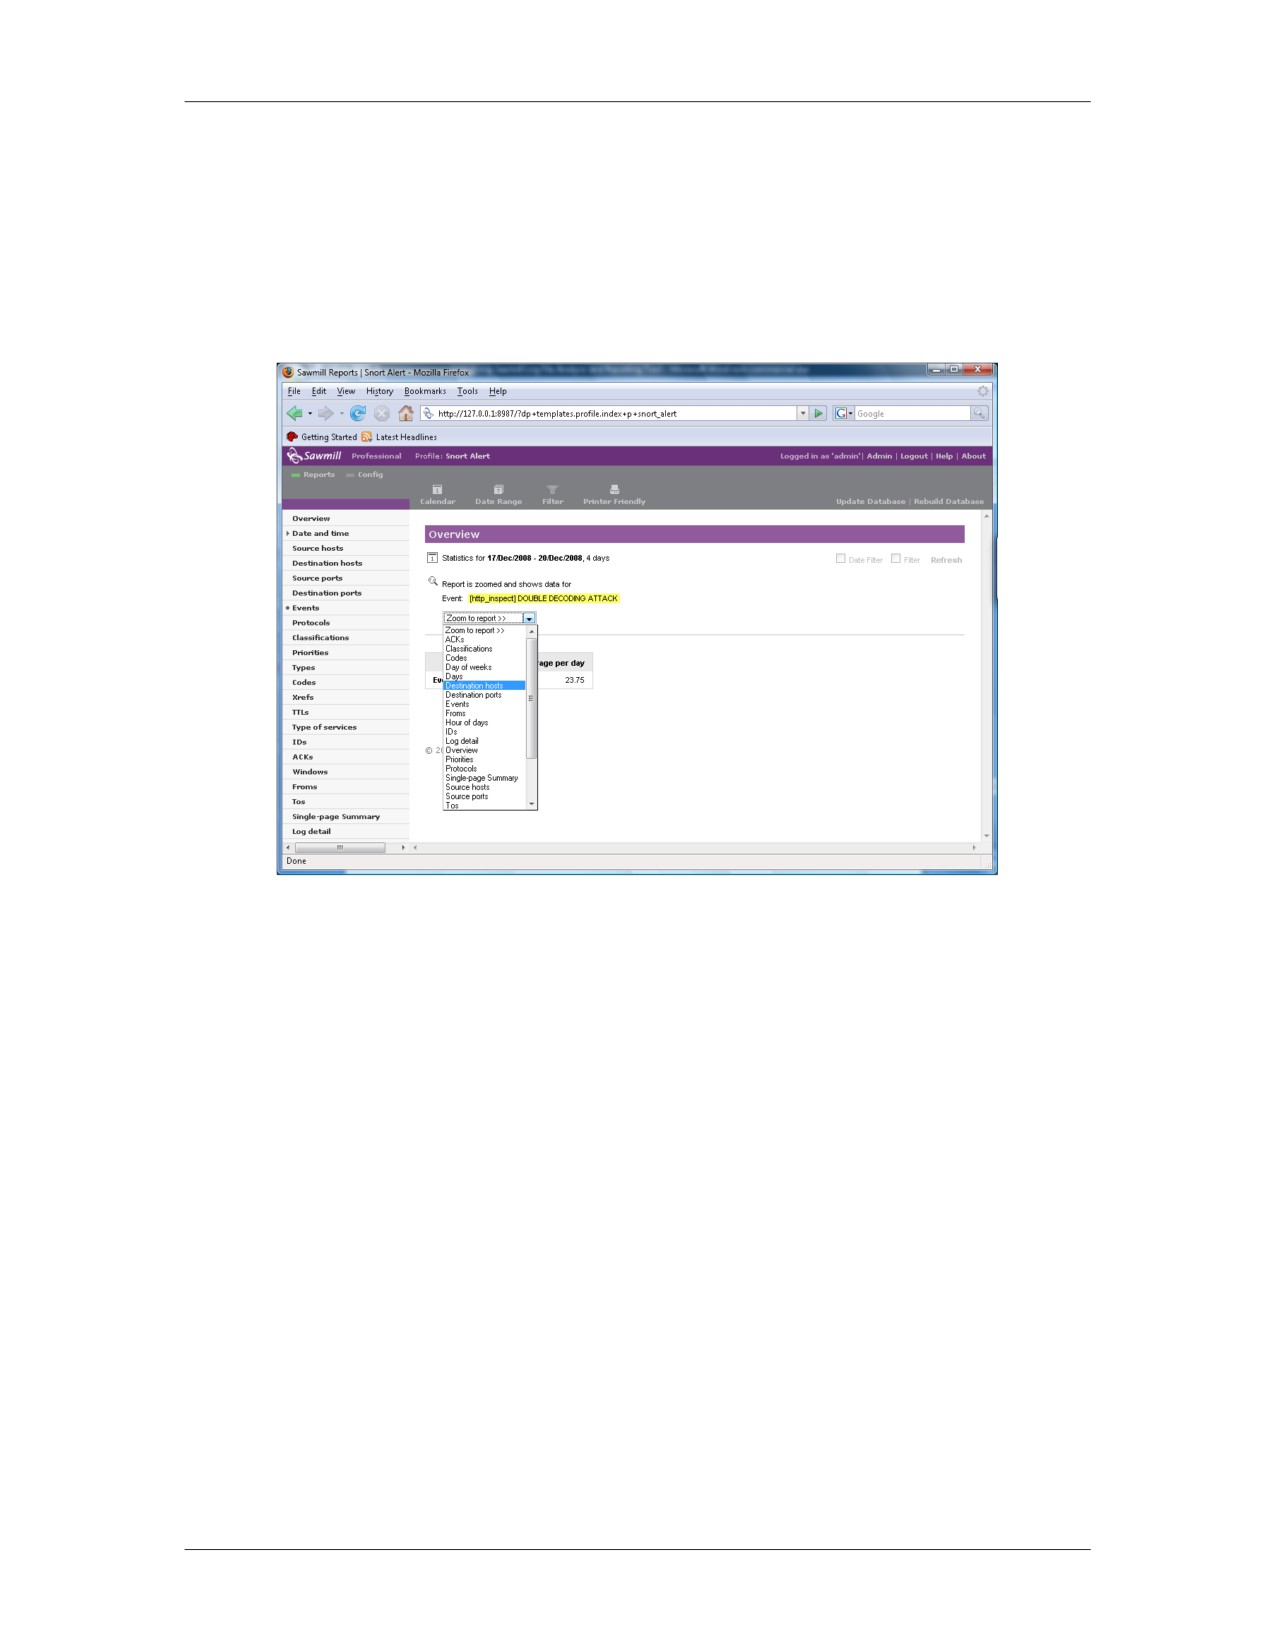
Once a report attribute is selected from the report’s menu, the
report display can be filtered using the Zoom to Report feature.
Note: In the above example, the “Destination host” zoom filter is
selected. Continuously selecting Zoom to Report filters would
narrow the intended search.
11-46
For Official Use Only - Law Enforcement Sensitive
01/09
Log Analysis
Network Intrusion Responder Program
Network Log Analysis using Sawmill, continued
Final Output
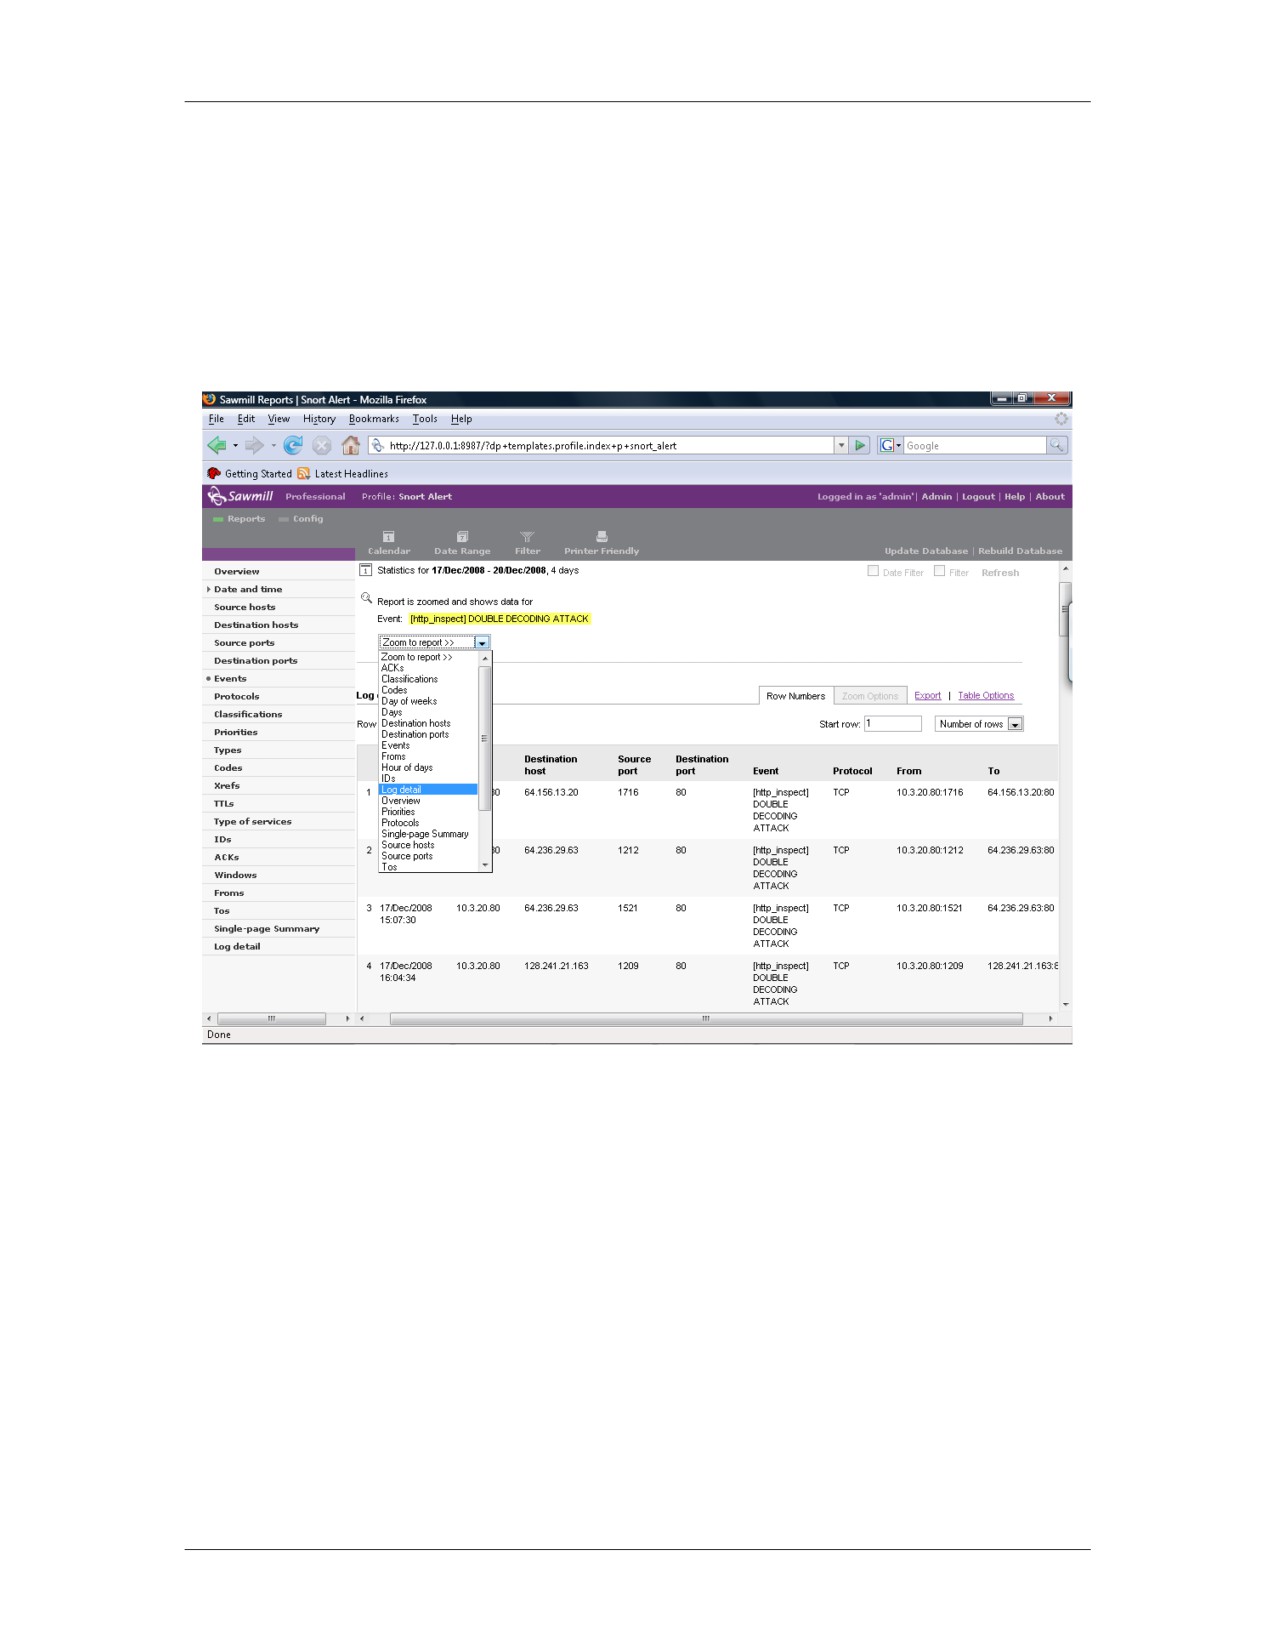
Once all filters have been applied to the report, a final log detail
Report
can be generated to display all of the set attributes. To do this,
(Log Detail)
click on “Log Detail” from the Zoom To Report filter box.
01/09
For Official Use Only - Law Enforcement Sensitive
11-47
Network Intrusion Responder Program
Log Analysis
Network Log Analysis using Sawmill, continued
Final Output
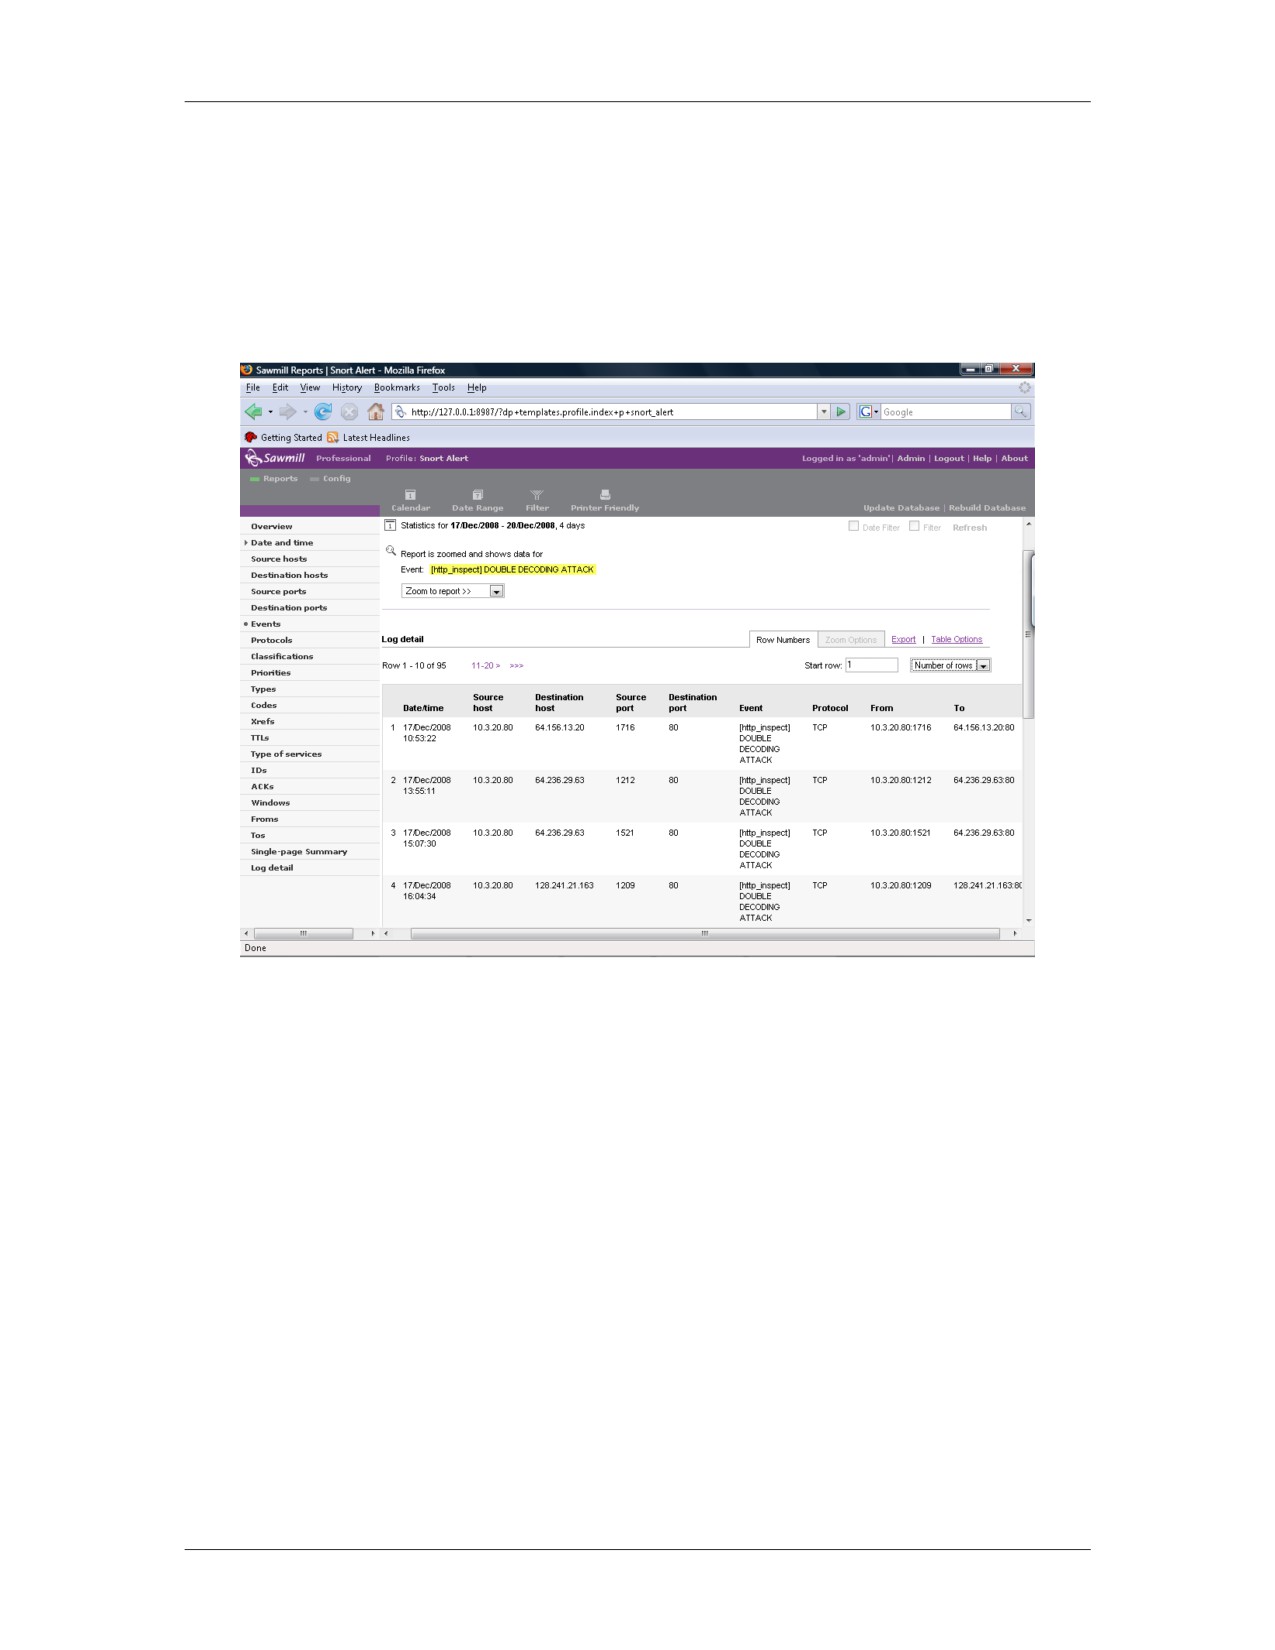
Here is the screen of the final sorted output.
Report, continued
11-48
For Official Use Only - Law Enforcement Sensitive
01/09
Log Analysis
Network Intrusion Responder Program
Network Log Analysis using Sawmill, continued
Single Page
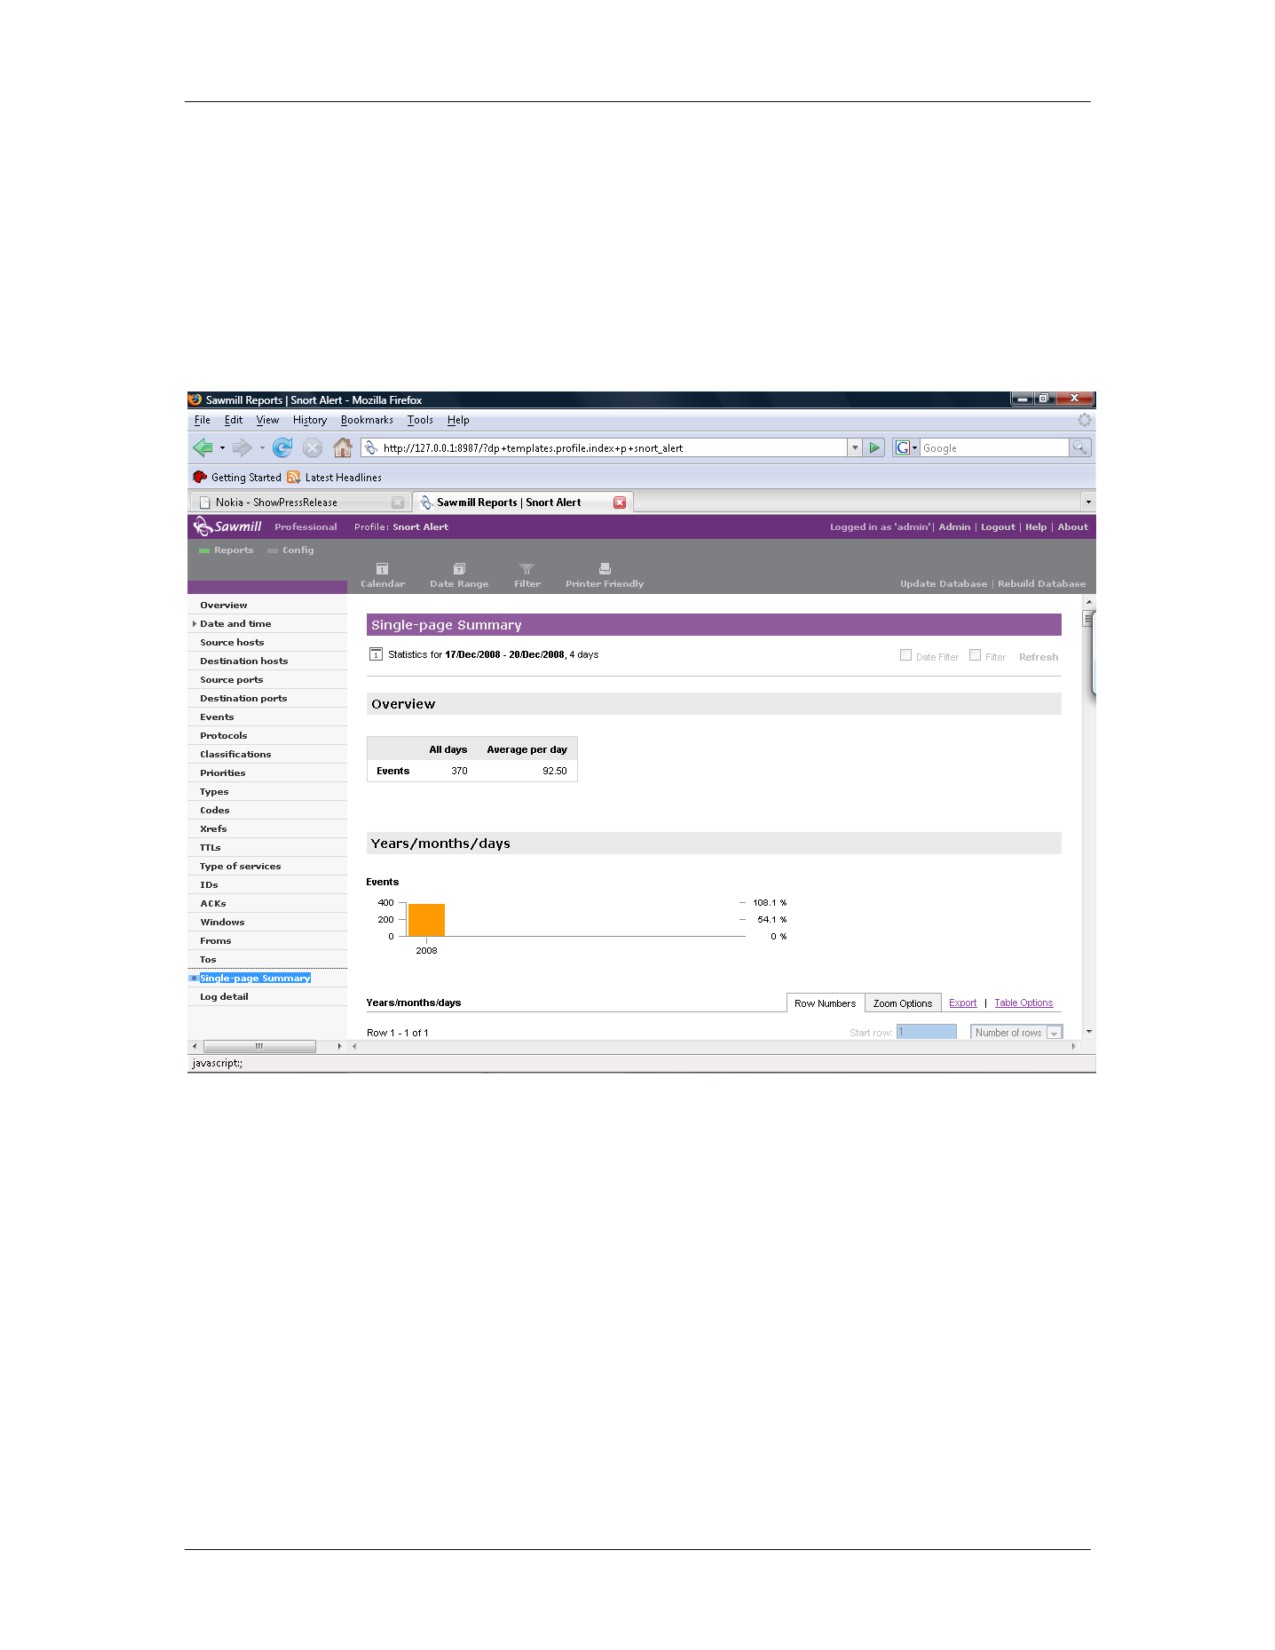
You can generate a single page summary containing all log
Summary
attributes using the “Single Page Summary” category located in
the report’s menu. Here is an example of a single page summary.
01/09
For Official Use Only - Law Enforcement Sensitive
11-49
Network Intrusion Responder Program
Log Analysis
This page intentionally left blank.
11-50
For Official Use Only - Law Enforcement Sensitive
01/09
Network Intrusion Responder Program
LiveWire Investigations
Module 12
LiveWire Investigations
Introduction
This module will introduce you to the Wetstone LiveWire
Investigator tool, commonly referred to as LiveWire. The tool is
used to conduct live digital investigations. Other tools used in this
module include additional Wetstone tools and open source tools
that can be used during live investigations.
Purpose of this
The purpose of this module is to show you how to setup your
Module
workstation. You will learn how to install and use tools used in
live digital investigations.
Objectives
After successfully completing this module, you will be able to:
Properly prepare for a live digital investigation
Use live digital investigation tools
In this Module
The following table shows the contents of this module.
Topic
See Page
Lesson 1 - Data Collection
12-3
Lesson 2 - Introduction to LiveWire
12-9
Lesson 3 - LiveDiscover
12-31
Lesson 4 -Volatile Data Analysis
12-39
Lesson 5 - Evidence Collection
12-73
Lesson 6 - Malicious Code Analysis
12-93
Lesson 7 - Alternate Data Collection Tools
12-99
01/09
For Official Use Only - Law Enforcement Sensitive
12-1
LiveWire Investigations
Network Intrusion Responder Program
This page intentionally left blank.
12-2
For Official Use Only - Law Enforcement Sensitive
01/09
Network Intrusion Responder Program
LiveWire Investigations
Lesson 1 - Data Collection
Introduction
When collecting data for any investigation it is vital that the data
collection is conducted correctly. This information may contain the
only source of evidence in an investigation and should be collected
accurately and correctly to be admissible in court.
Purpose of this
This lesson will discuss the importance of collecting data in the
Lesson
proper manner.
Objectives
After completing this lesson, you will be able to:
Discuss locating physical devices in a network environment
Explain how to collect data to forensically clean media
In this Lesson
The following table shows the contents of this lesson.
Topic
See Page
Locating Physical Devices
12-4
Attaching Storage Equipment
12-6
01/09
For Official Use Only - Law Enforcement Sensitive
12-3
LiveWire Investigations
Network Intrusion Responder Program
Locating Physical Devices
Network
When trying to locate a particular server, the logical topology map
Architecture
shows how things are connected logically, but not necessarily
physically. A logical map details how data flows across a network,
but not how it is physically wired. Network architecture indicates
where devices are physically located.
Network devices that provide a possible path for the incident are
considered to be “in-line” to the investigation. As these devices
have carried traffic relating to the incident, they may hold crucial
information and should be properly located and analyzed.
Logical
Logical assessment involves obtaining any network topologies to
Assessment
get a rough estimate of where sensors can be placed for an
investigation. The network topologies may not exist or be severely
outdated. An investigator can update the topology through
interviews or by performing a physical assessment.
Physical
Physical assessment includes tracing wire and cable to physical
Assessment
components on the network to create a wiring diagram. A wiring
diagram shows the physical connections between devices onsite
and can help determine the accuracy of the logical assessment. An
investigator can use several cable testing devices, like a tone
generator, to verify cable locations.
In large network environments, servers and network devices are
assigned some form of inventory control, such as a bar code or
unique name. It may be necessary to search through rows of server
racks to locate an identification tag on the server of interest.
Performing a
You need to examine the physical site to determine the physical
Physical Site
data paths and their relationship to the overall physical
Examination
environment. Understanding these relationships provides a basis
for determining what is or is not physically possible on the
network. A physical site examination includes the following tasks:
Physically locate the target host
Physically locate the device to which the target host is
connected
Physically locate devices that fall into the path of the
investigation
Verify the network documentation (if available)
12-4
For Official Use Only - Law Enforcement Sensitive
01/09
Network Intrusion Responder Program
LiveWire Investigations
Locating Physical Devices, continued
Verifying the
When encountering an unfamiliar network, an investigator needs a
Network
starting point to verify the network setup and the actual location of
Configuration
network devices. Almost every network has a connection to the
Internet or some external network. This external link is typically
the best starting point to begin tracing wire.
Tracing wire is a technique used to determine how devices are
physically connected to each other. If a wire cannot be traced
because it is tightly bound to other cables or travels into a wall,
other devices like a network tone generator can be used to
determine its termination location. However, the use of some of
these devices could require unplugging the cable and severing any
existing connections, which could alert the suspect(s) of your
presence.
Physically
To physically locate the target host, you must collect all
Locating the
identifying information regarding the device from your review of
Target Host
the network documentation and interview with the system
administrator. Use this information and your physical assessment
of the network to locate the device.
Physically
Locate the hub or switch to which the target host is connected.
Locating the
This can be found by:
Nearest Device
Using the identifying information that you obtained during
your review of the network documentation
Recording the termination location for each network-capable
cable connected to the machine. This could be an RJ45 or
RJ11 socket on the nearest wall, a hub or switch, or some other
device. If the cable terminates at a wall socket, record that
socket‟s ID number and locate it on the patch panel that
aggregates cables for that area of the facility.
01/09
For Official Use Only - Law Enforcement Sensitive
12-5
LiveWire Investigations
Network Intrusion Responder Program
Attaching Storage Equipment
Data Storage
Many investigations result in large evidence files that must be
collected to the investigator‟s computer. Sufficient data storage to
copy and preserve evidence files is imperative to a successful
investigation.
Whenever data is retrieved from the suspect machine, the data
should always be redirected to a forensically clean evidence
collection drive. The investigator must be sure to never save the
output of an investigation to the local system‟s hard drive, as it
may compromise the evidence as well as potentially fill the
computer‟s disk space.
The storage equipment can connect to the collection machine by
many different connection types. Some of the most common types
are: USB, FireWire, and eSATA. External hard drives with these
configurations come in many different capacities, and the general
rule is to allocate as much disk space as possible for each
investigation.
Wiping and
When collecting evidence from any system, the data should be
Verification
stored on a forensically clean drive. In order to be forensically
clean, the evidence storage drive must be thoroughly wiped.
Wiping is the process of overwriting every bit on the drive using a
known character or set of characters. Once the storage drive is
completely overwritten the process should be verified to ensure its
success. Failure to properly complete this process can result in
claims of contaminated evidence, which may jeopardize the
credibility of your evidence.
Why Wipe Disks? Wiping utilities allow you to wipe an entire hard drive so that no
data is left on the drive. Wiping does not simply delete the data; it
overwrites every sector on your drive with a hex character. This
eliminates any possibility of previous data from another case
contaminating the current case.
12-6
For Official Use Only - Law Enforcement Sensitive
01/09
Network Intrusion Responder Program
LiveWire Investigations
Attaching Storage Equipment, continued
Wiping Guidelines Regardless of the tool used, always adhere to the following
guidelines:
1. Clearly identify media to be wiped and segregate it from other
media.
2. Have only essential media in the system during wiping
operations.
3. Ensure the correct media has been selected before executing
any wipe utility.
4. Remove wiped media from the machine immediately after
wiping and store separately.
5. Annotate in your case notes that you wiped the media prior to
its use.
6. Label media with software version and command line used
(with all options).
01/09
For Official Use Only - Law Enforcement Sensitive
12-7
LiveWire Investigations
Network Intrusion Responder Program
This page intentionally left blank.
12-8
For Official Use Only - Law Enforcement Sensitive
01/09
Network Intrusion Responder Program
LiveWire Investigations
Lesson 2 - Introduction to LiveWire
Introduction
Unlike traditional dead box investigations, live digital
investigations blur the line between network intrusions and
evidence collection.
Purpose of this
The purpose of this lesson is to prepare you for a live
Lesson
investigation. You will learn the terms and concepts associated
with a live investigation and prepare a system to conduct live
investigations of a networked system.
Objectives
After successfully completing this lesson, you will be able to:
Explain the basic concepts of a live digital investigation
Install, update, and setup LiveWire Investigator
Install and update LiveDiscover
In this Lesson
The following table shows the contents of this lesson.
Topic
See Page
Live Digital Investigations
12-10
LiveWire Installation
12-13
LiveDiscover Installation
12-14
Updating LiveWire
12-16
Updating LiveDiscover
12-17
LiveWire Initial Setup
12-19
01/09
For Official Use Only - Law Enforcement Sensitive
12-9
LiveWire Investigations
Network Intrusion Responder Program
Live Digital Investigations
Definition
When performing traditional computer seizures and then
examining the media from a system that has had power removed,
you are investigating only the data at rest on the media prior to the
power being removed. This is also known as dead box forensics.
Live digital investigations are performed on running systems prior
to the removal of power.
Why Live?
An increasing amount of memory resident programs and utilities
revert to an obfuscated or encrypted state at power off. Therefore,
it is sometimes necessary to seize information from the volatile
areas of a computer before the plug is pulled.
If you are dealing with a time-sensitive case, you may also want to
perform a live digital investigation in order to gather information
and evidence as quickly as possible.
If you can connect to the system via a network and have sufficient
access to the system in question, it is possible that you can capture
the memory contents, process list, and other volatile resources
before pulling the plug
Here are some possible reasons for choosing to perform a live
investigation:
Rapid response requires remote investigation
Network size limits flexibility
Encrypted file system requires live capture
System of interest is mobile
Commercial system cannot be shutdown
12-10
For Official Use Only - Law Enforcement Sensitive
01/09
Network Intrusion Responder Program
LiveWire Investigations
Live Digital Investigations, continued
How It Works
LiveWire is a complex series of scripts, programs and tools that
combine to give you insight into a network and the various
machines on that network.
At a deeper level, LiveWire uses a customized version of Apache
Web server on your investigation system to provide you menus,
displays and reports in a graphic user interface.
Additionally, LiveWire includes an embedded version of Gargoyle
malware detection software, also a product of Wetstone.
Note: The use of LiveWire requires an account on a target system
with administrative privileges to access and retrieve data.
LiveWire uses a Connect-Act-Disconnect model for
communicating with a host on the network. For example, if you
want to view all running processes on the system, LiveWire will
use the administrative account and password you supplied by a
local administrator when starting the investigation. The software
will log into the system, obtain a list of the running processes and
log out of the system.
Risks
If you are trying to access a system covertly, you should be aware
that some tasks performed by LiveWire can be resource intensive
and thereby noticed if a user is on the system at the time.
In some cases, the user may think that the network is slow and
ignore the change in machine behavior, or if the user is fairly
computer literate, he or she may be able to detect the activity by
monitoring the Task Manager. Some users react negatively to such
activity and may pull the network connector and start hiding
evidence.
It is often said that if you are investigating a live machine
clandestinely you should wait until the suspect is away from the
system before running most queries in order for your activities to
remain unnoticed.
01/09
For Official Use Only - Law Enforcement Sensitive
12-11
LiveWire Investigations
Network Intrusion Responder Program
Live Digital Investigations, continued
Workstation Setup You will want a reasonable quality system for performing live
investigations. As with any forensic examination, ensure that any
media onto which you save evidence is forensically wiped prior to
use.
The minimum system requirements for LiveWire are:
Microsoft Windows XP
100 MB of free disk space
128 MB RAM
Pentium 300 Mhz
Network Interface Card
CD-ROM Drive for installation
VGA Resolution Monitor
Mouse
Choosing
For a computer system used for investigative purposes, bigger and
Hardware
faster is almost always the best choice. You should try to
determine the scope of the investigation and allocate storage and
processor space that will meet or exceed the expected results.
12-12
For Official Use Only - Law Enforcement Sensitive
01/09
Network Intrusion Responder Program
LiveWire Investigations
LiveWire Installation
Installation
Before an application can be used on any system, it must first be
Overview
successfully installed.
Procedure:
Use the following steps to install LiveWire onto a system running
LiveWire
the Windows XP operating system.
Installation
Step
Action
1
Insert the LiveWire Investigator CD into the CD/DVD
tray. Browse to its designated drive letter to view the
contents of the CD.
2
Double click the livewireinstaller.exe file to execute the
file, and click Next.
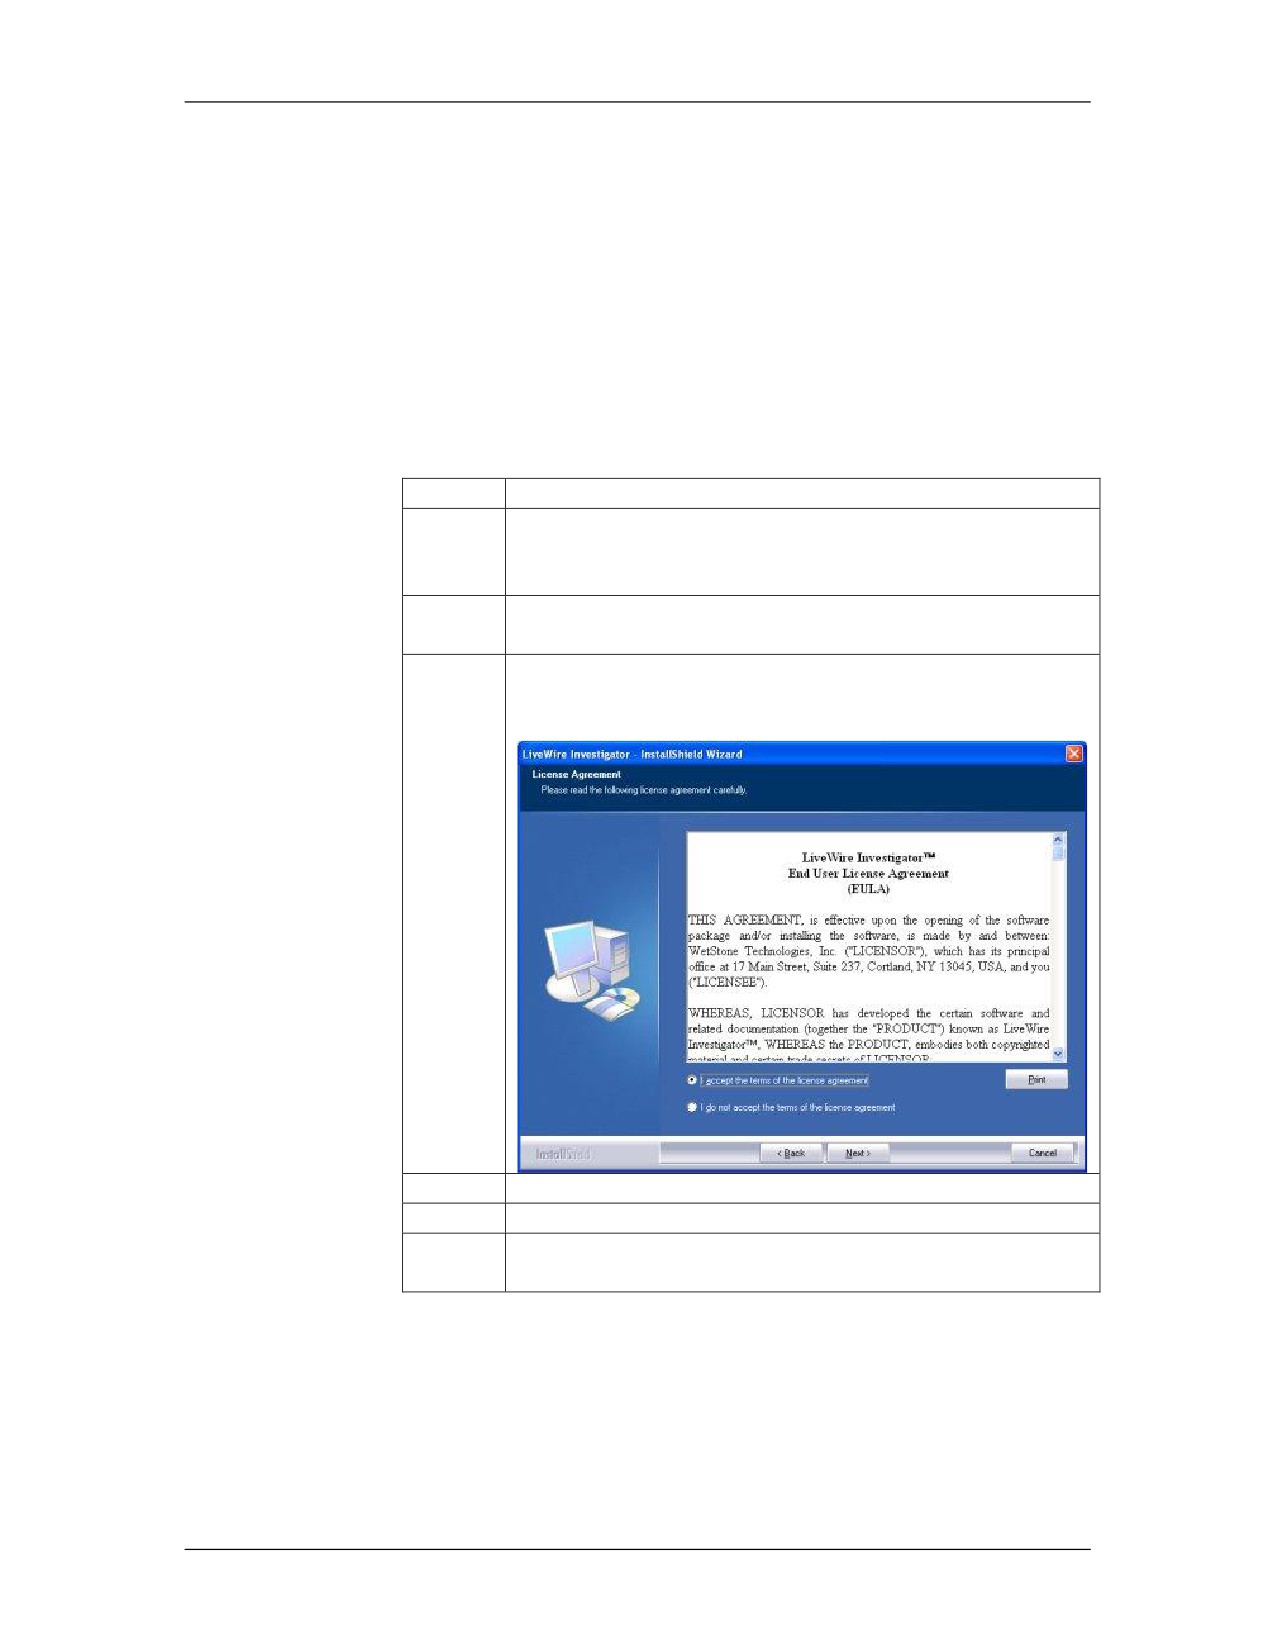
3
Read the EULA carefully and select “I accept the terms
of the license agreement.” Click Next to continue.
4
Click Install to begin installation.
5
Click Finish to complete the installation process.
6
Remove the LiveWire Investigator Install CD from the
CD/DVD drive tray.
01/09
For Official Use Only - Law Enforcement Sensitive
12-13
LiveWire Investigations
Network Intrusion Responder Program
LiveDiscover Installation
Procedure:
Use the following steps to install LiveDiscover onto a system
Installation of
running the Windows XP operating system.
LiveDiscover
Step
Action
1
Insert the LiveDiscover CD into the CD/DVD tray.
Browse to its designated drive letter to view the contents
of the CD.
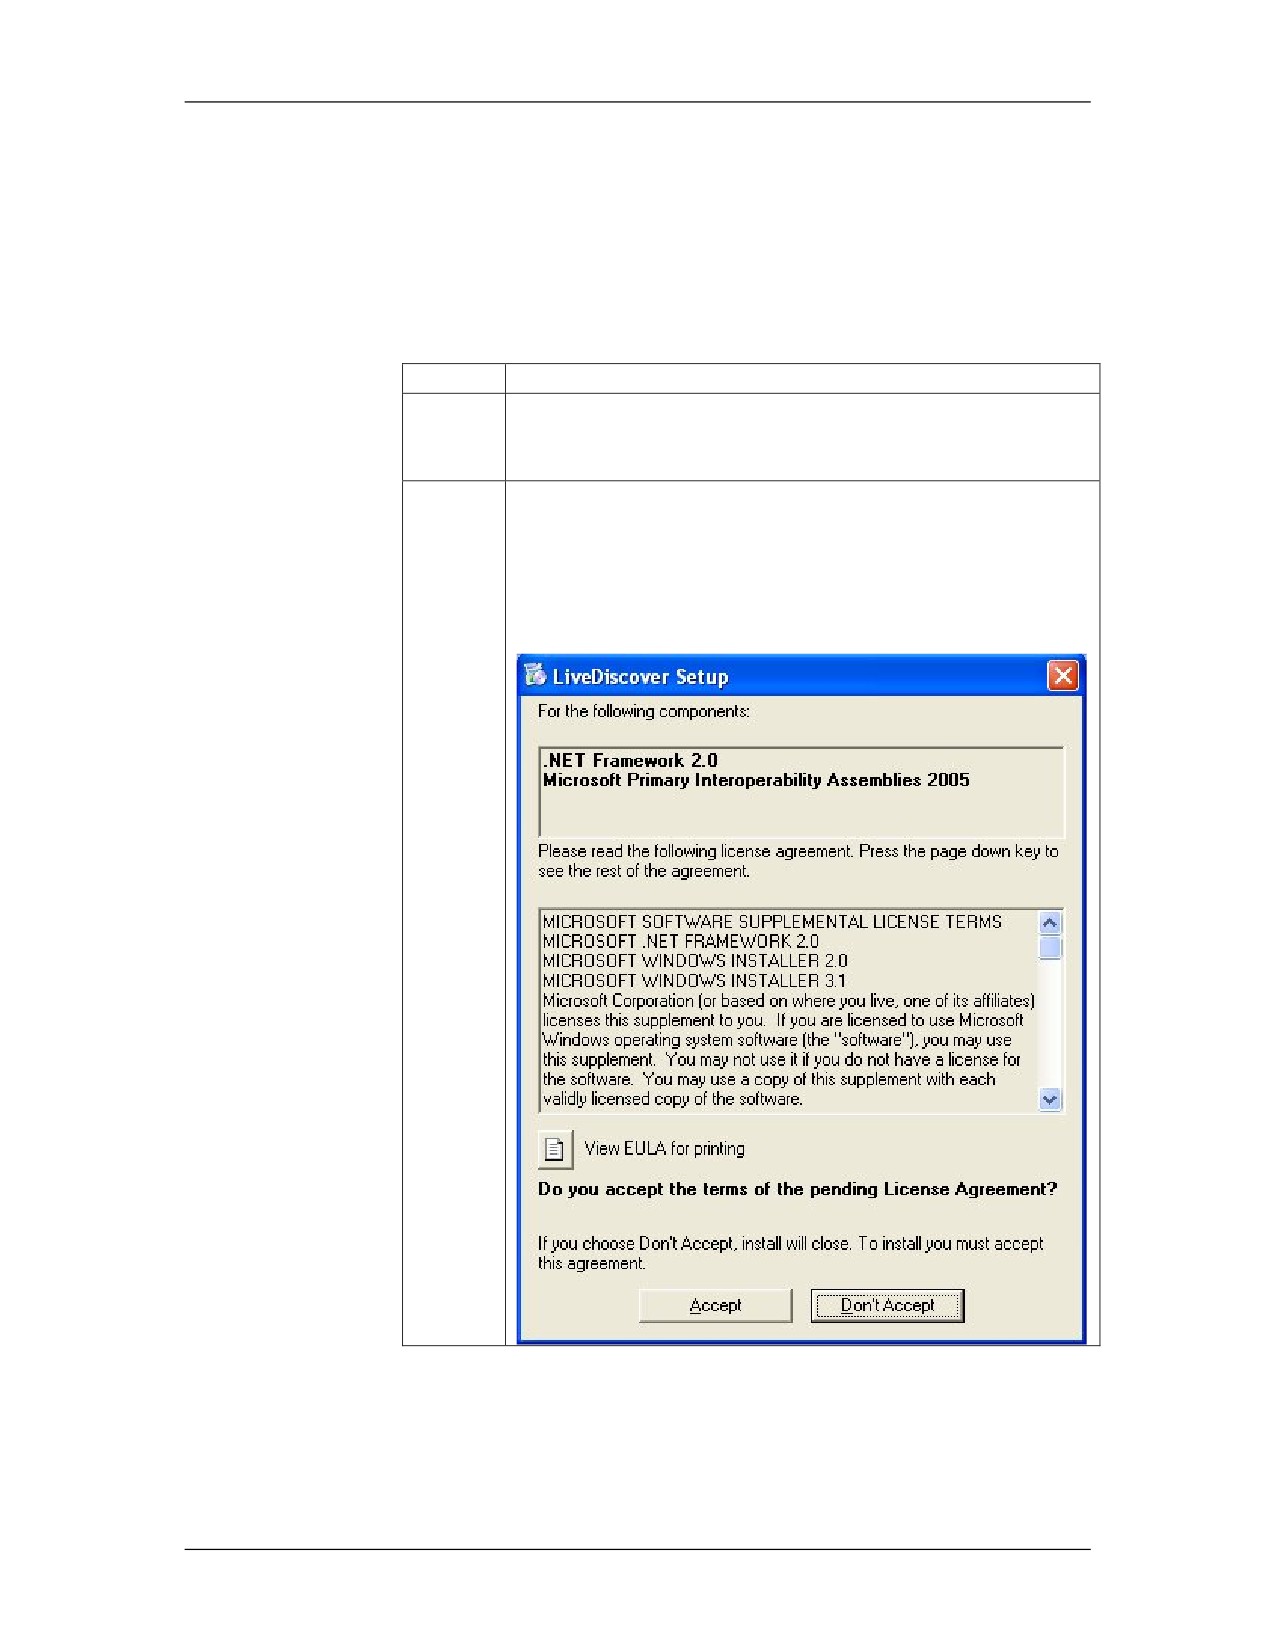
2
Double click the setup.exe file to execute the file. A
EULA for the .NET Framework 2.0 and Microsoft
Primary Interoperability Assemblies 2005 will be
displayed. Carefully read the agreement, and then click
Accept to continue.
12-14
For Official Use Only - Law Enforcement Sensitive
01/09
Network Intrusion Responder Program
LiveWire Investigations
LiveDiscover Installation, continued
Procedure: Installation of LiveDiscover, continued
Step
Action
3
Next, the Microsoft .NET Framework 2.0 will be
installed. The process will continue after the installation
is complete.
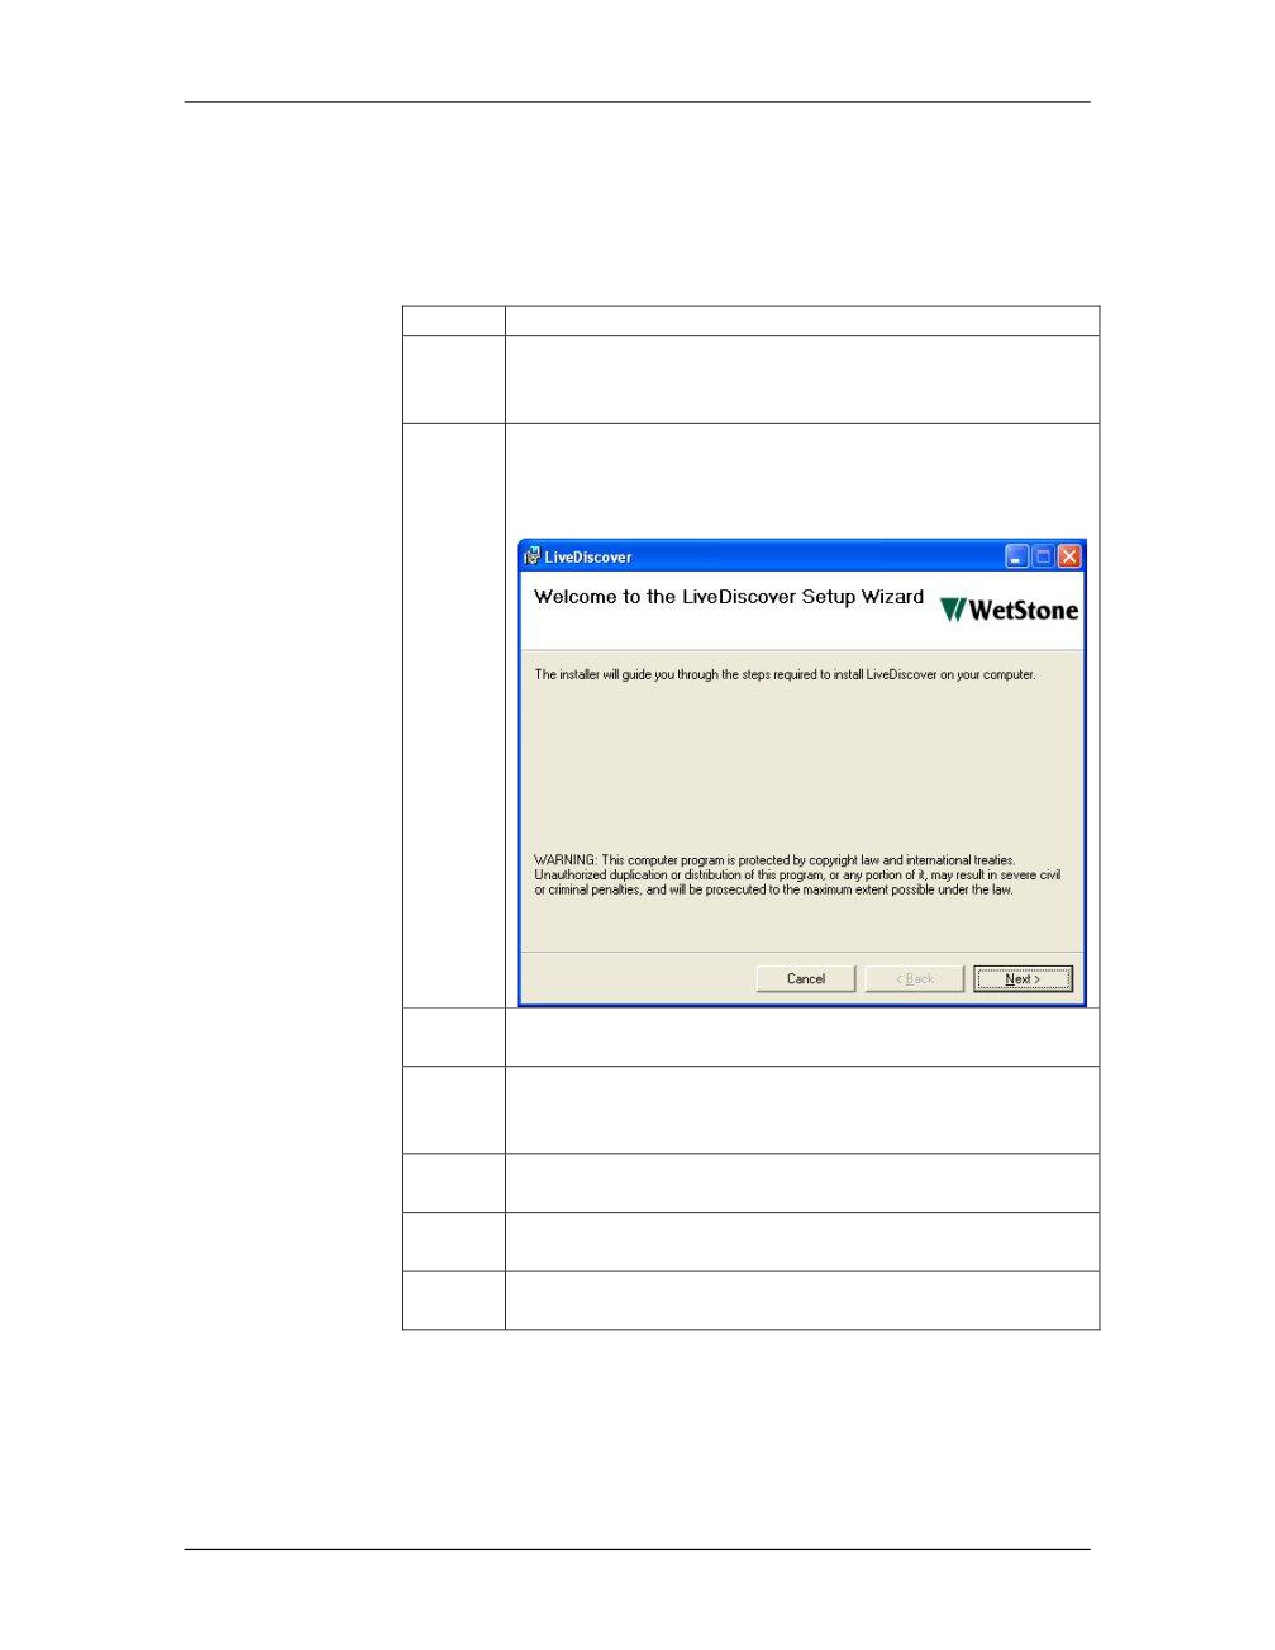
4
After the .NET Framework is completed, the
LiveDiscover setup wizard will be displayed. Click
Next.
5
Read the license agreement carefully. Select “I Agree”
and click Next to continue.
6
Next, you will have the opportunity to select an
installation directory. Click Next to accept the default
settings.
7
Confirm Installation Page. Click Next to begin
installation.
8
Once installation has completed, click Close to exit
installer.
9
Remove the LiveDiscover media from the CD/DVD
drive tray.
01/09
For Official Use Only - Law Enforcement Sensitive
12-15
LiveWire Investigations
Network Intrusion Responder Program
Updating LiveWire
Procedure:
Use the following steps to update the LiveWire application.
Updating
LiveWire
Step
Action
1
Obtain the LiveWire update files on CD or other source.
Click the Livewireintaller.exe to begin the update.
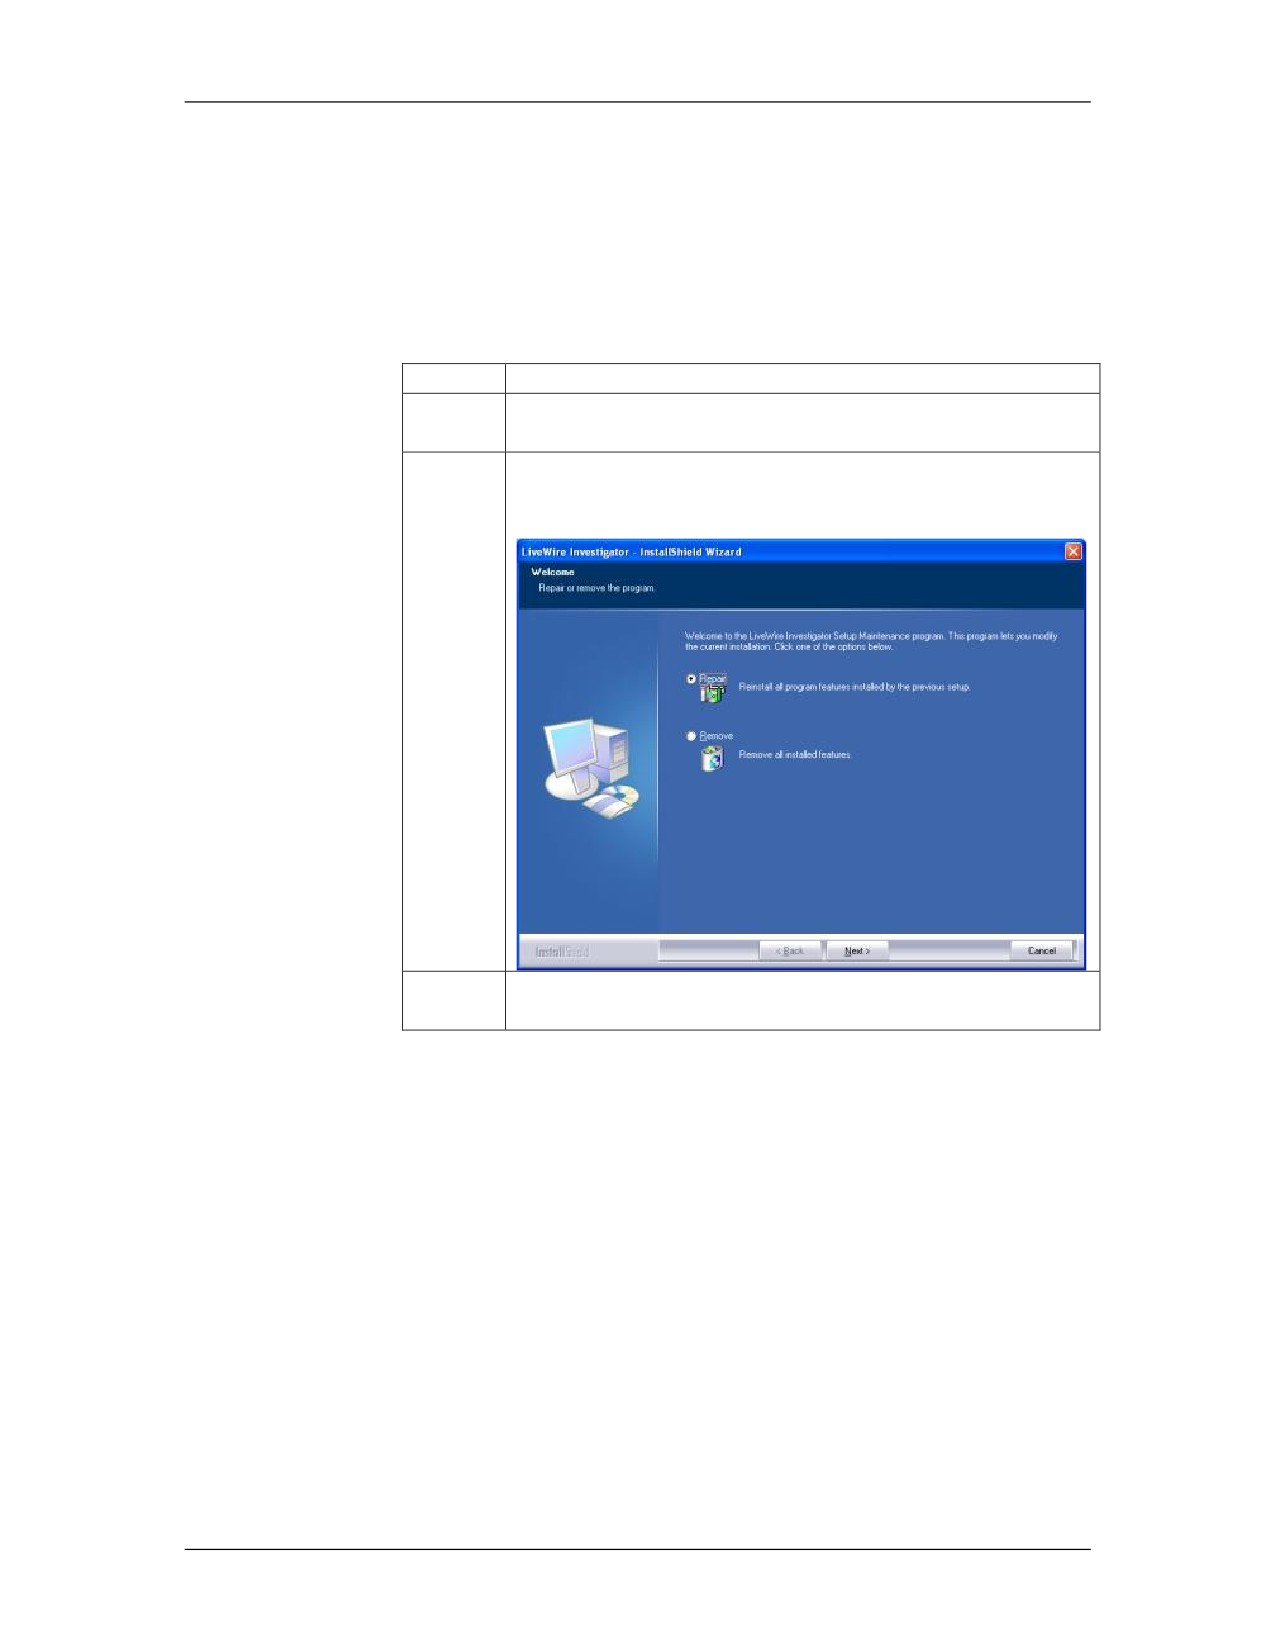
2
You will be prompted to repair or remove. Choose
Repair, and click Next to begin the update.
3
Once the update has completed, click Finish to exit
installation wizard.
12-16
For Official Use Only - Law Enforcement Sensitive
01/09
Network Intrusion Responder Program
LiveWire Investigations
Updating LiveDiscover
Procedure:
Use the following steps to update the LiveDiscover application.
Updating
LiveDiscover
Step
Action
1
Obtain the LiveWire update files on CD or other source.
Click the Setup.exe.
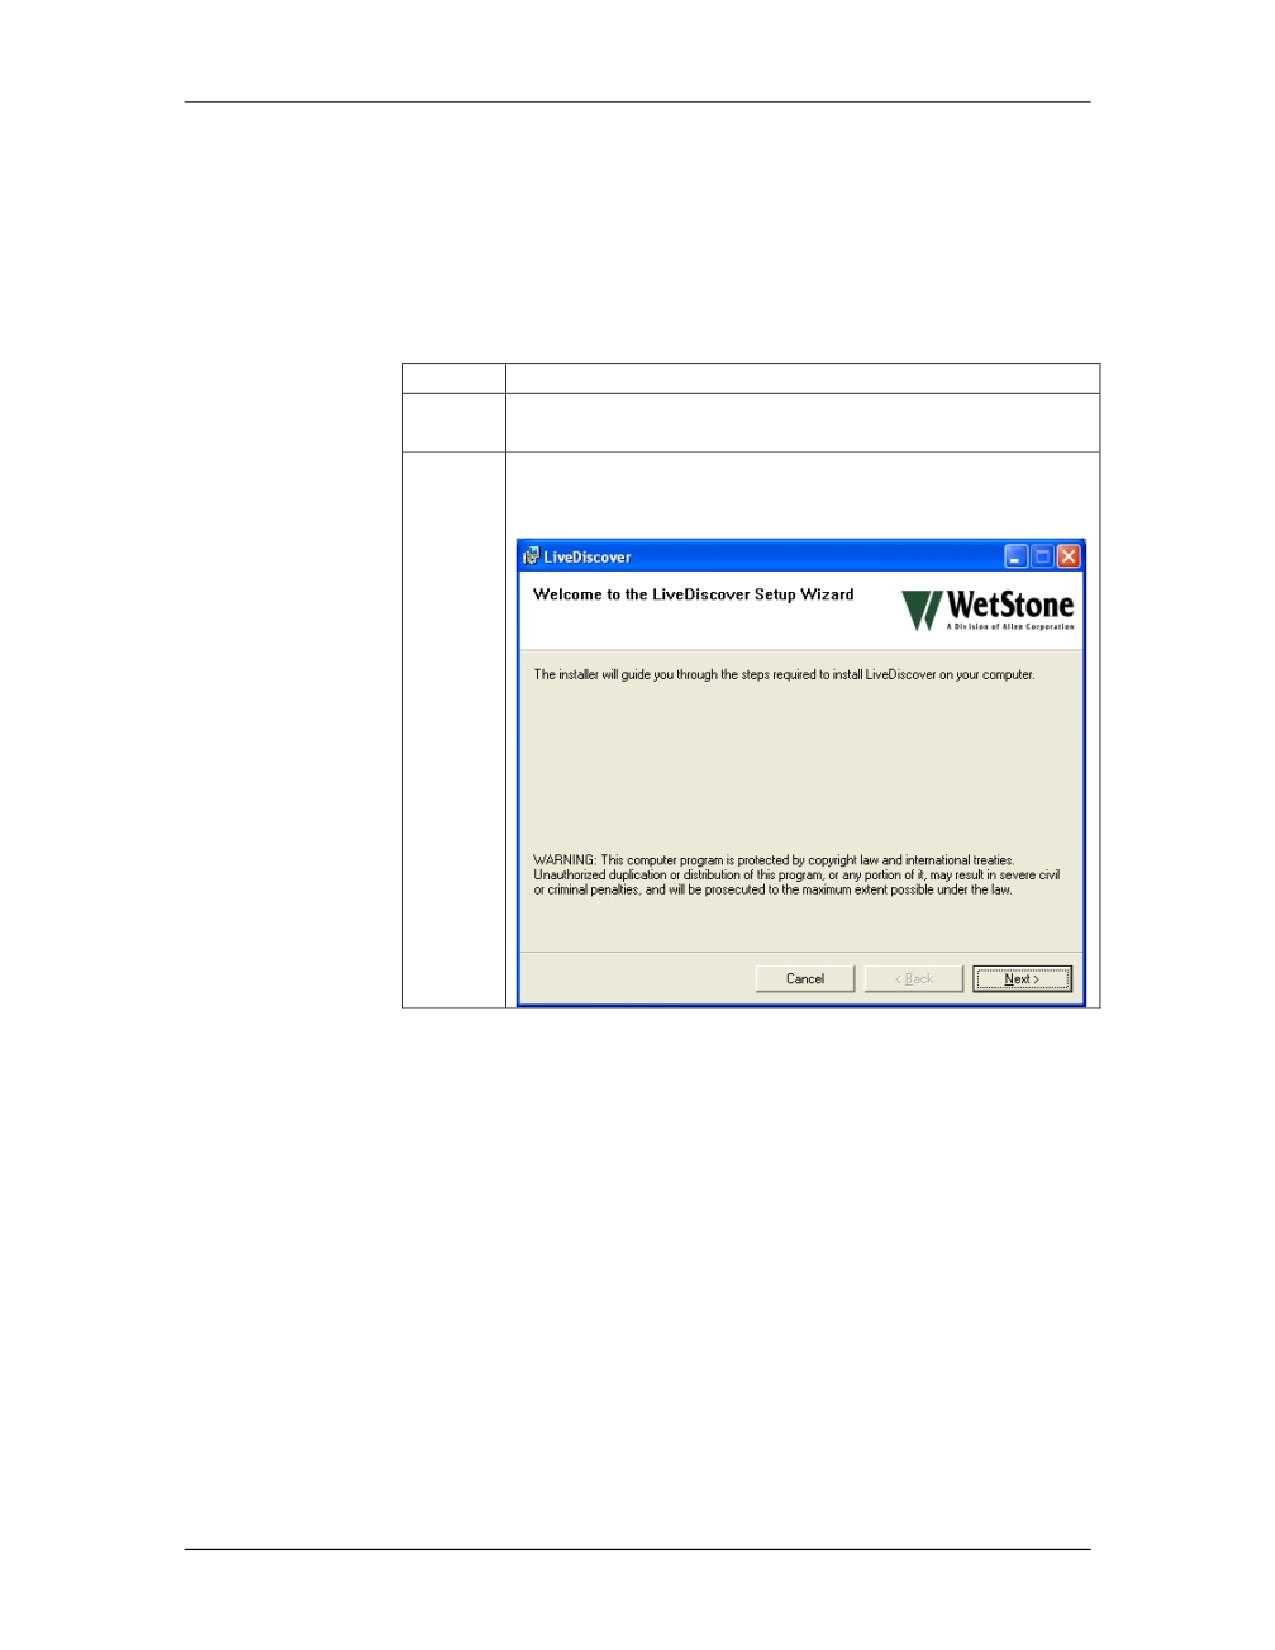
2
When the Welcome screen is displayed, click Next to
continue.
01/09
For Official Use Only - Law Enforcement Sensitive
12-17
LiveWire Investigations
Network Intrusion Responder Program
Updating LiveDiscover, continued
Procedure: Updating LiveDiscover, continued
Step
Action
3
Review the licensing agreement, and select “I Agree.”
Click Next to continue.
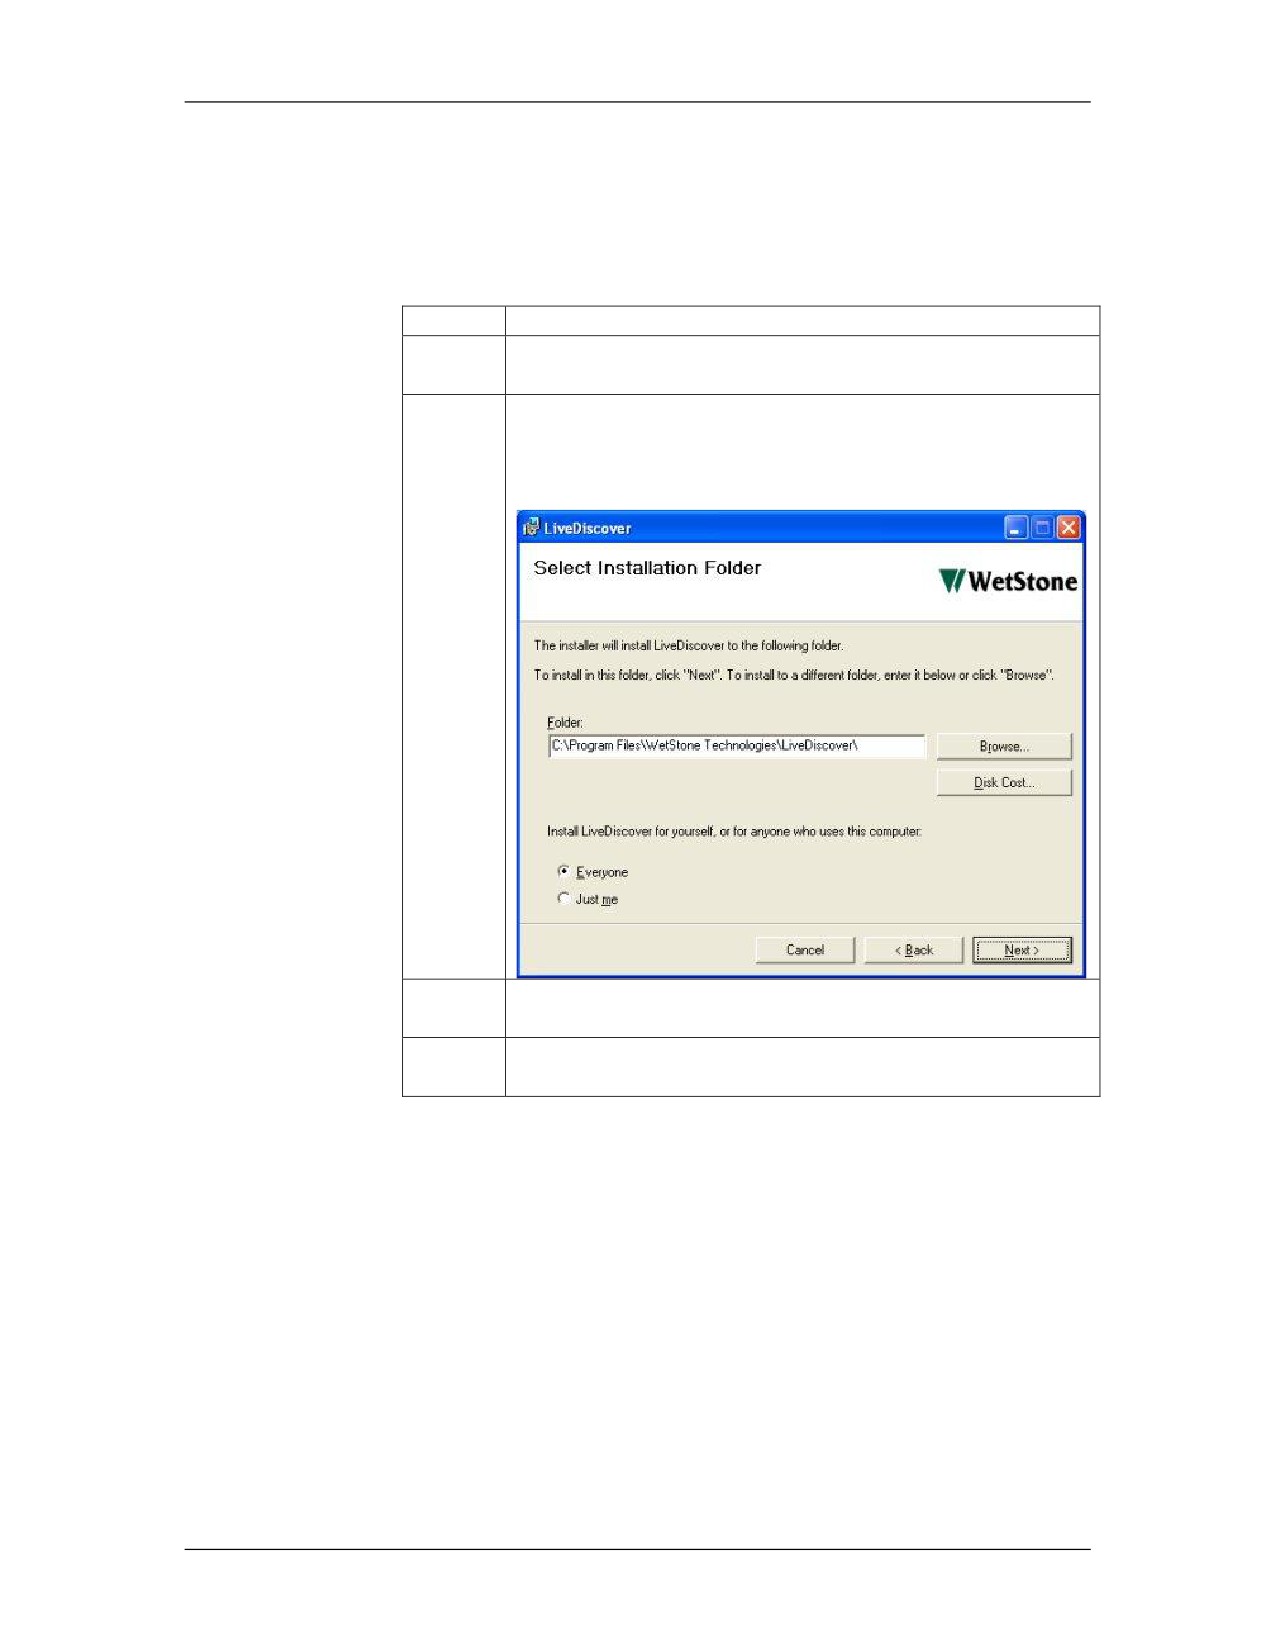
4
Verify that the installation directory is the current
location of the LiveDiscover install directory. Click
Next.
5
Confirm Installation Page. Click Next to begin
installation.
6
Once installation has completed, click Close to exit
installer.
12-18
For Official Use Only - Law Enforcement Sensitive
01/09
Network Intrusion Responder Program
LiveWire Investigations
LiveWire Initial Setup
Introduction
Before an investigation can be performed with LiveWire
Investigator, it must be properly setup. This includes setting up the
Administrator account and creating an Investigator account. The
Administrator account is used to manage the investigator accounts.
The investigator accounts are used to conduct the actual
investigation.
Procedure:
Use the following steps to prepare LiveWire Investigator.
LiveWire Setup
Step
Action
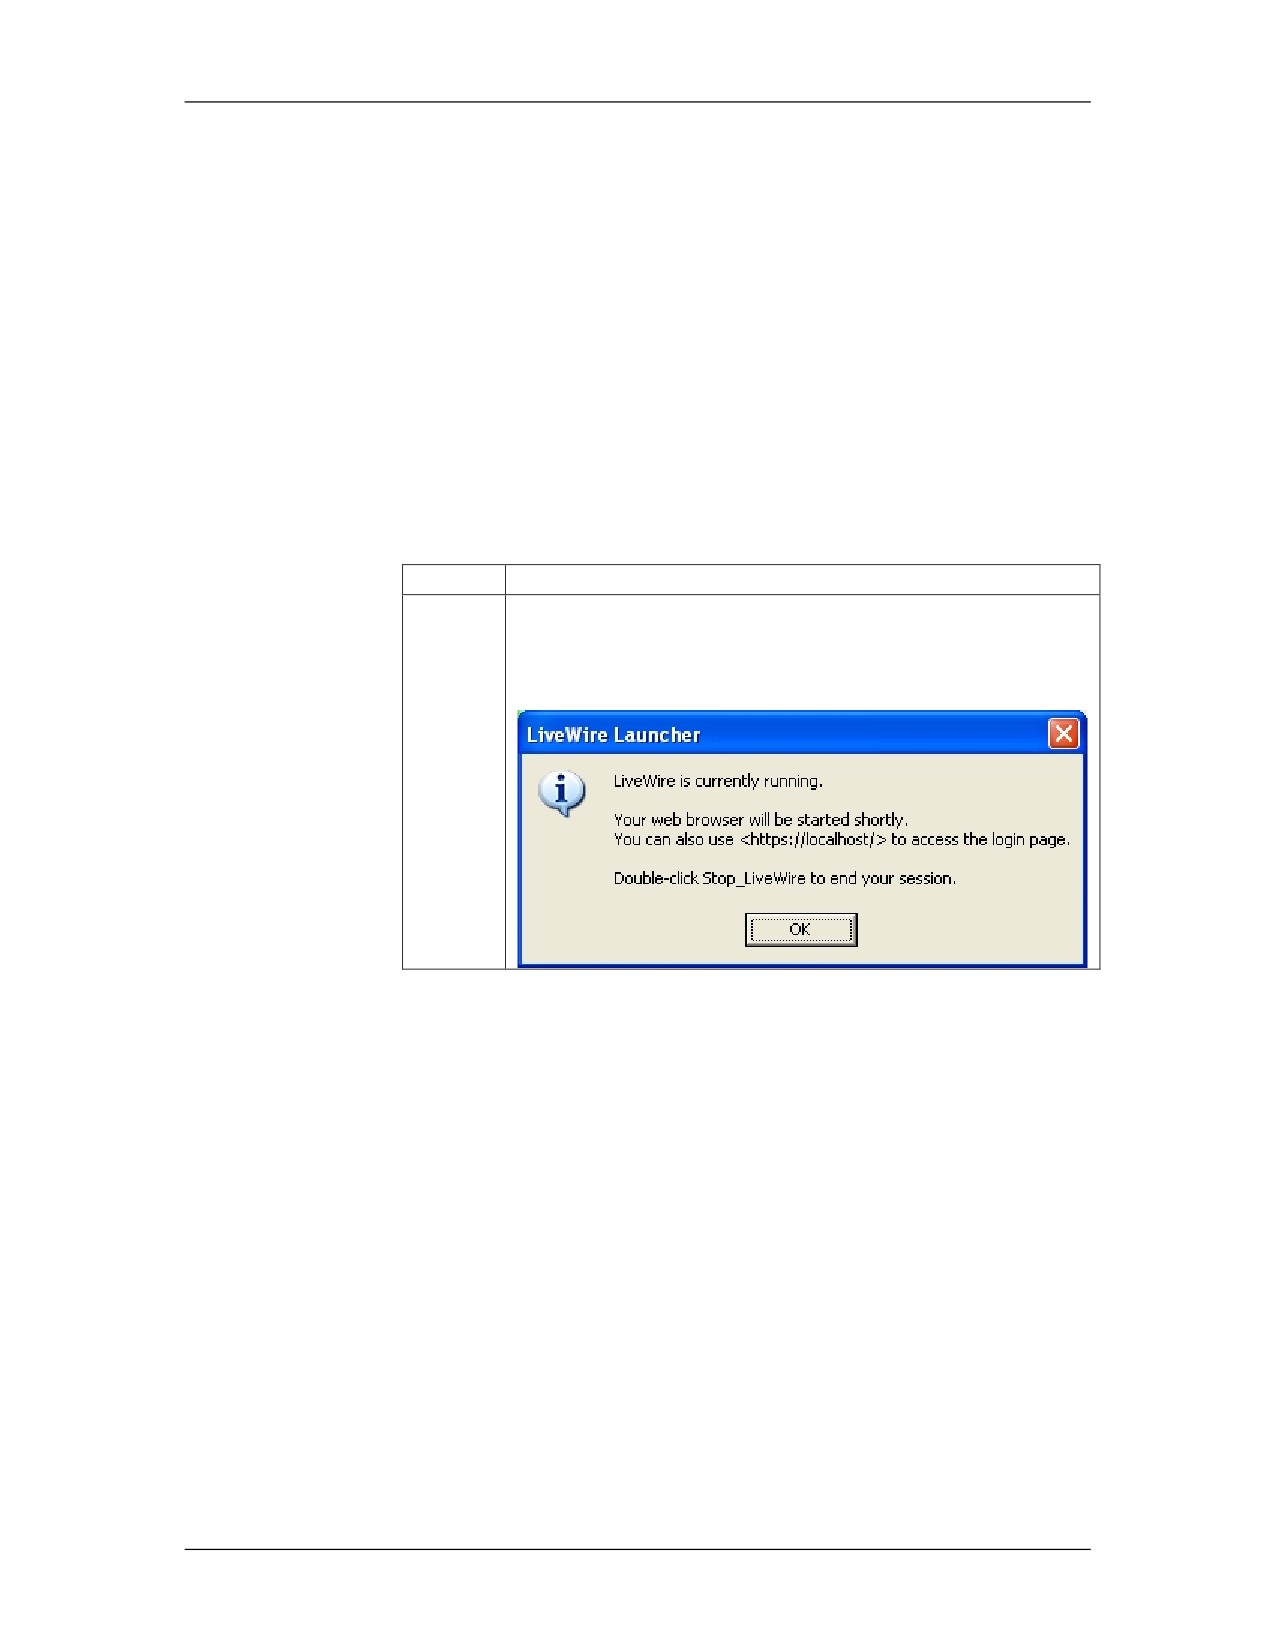
1
To start the LiveWire services choose: Start > All
Programs > LiveWire > Launch LiveWire. A box will
pop up to verify that the services are starting.
01/09
For Official Use Only - Law Enforcement Sensitive
12-19
LiveWire Investigations
Network Intrusion Responder Program
LiveWire Initial Setup, continued
Procedure: LiveWire Setup, continued
Step
Action
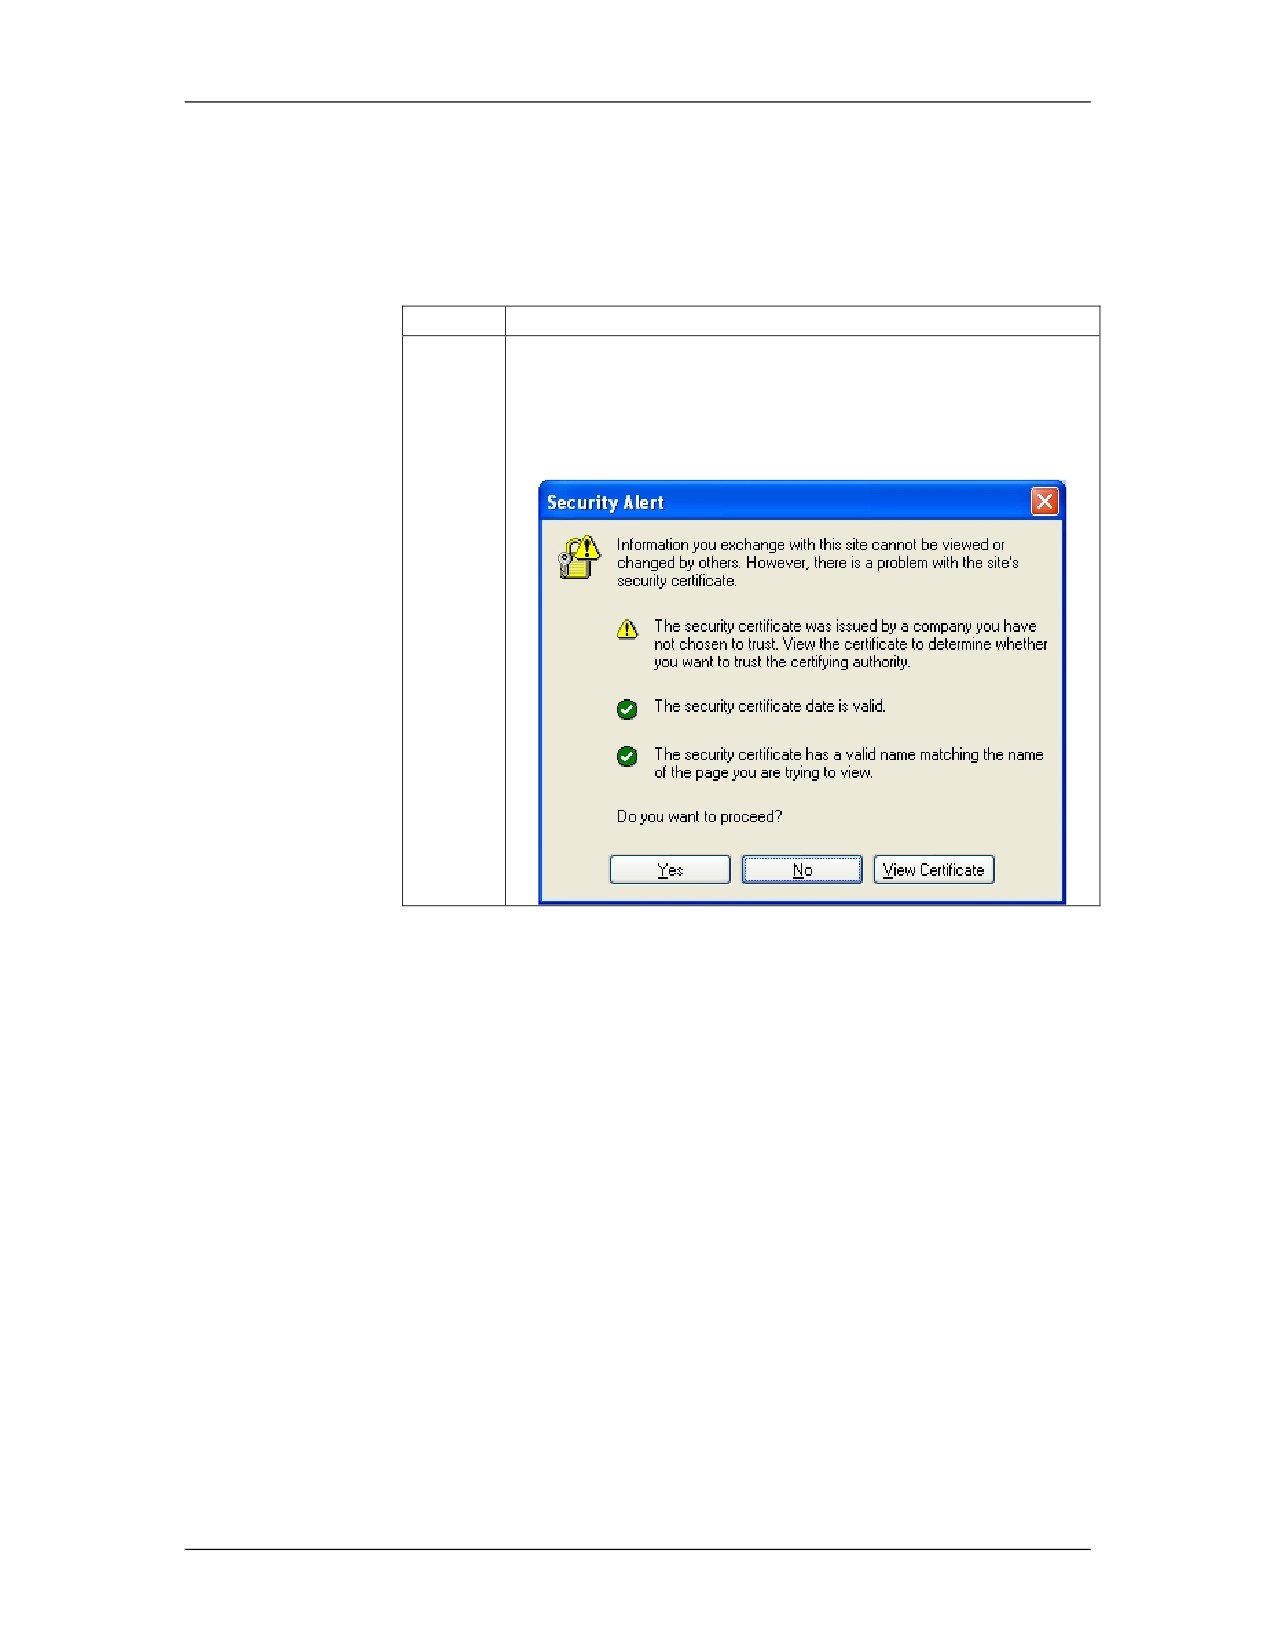
2
Once the services are started a new browser window will
be opened to the address https://localhost/. This may
cause a Security Alert box to be displayed. Click Yes to
proceed.
12-20
For Official Use Only - Law Enforcement Sensitive
01/09
Network Intrusion Responder Program
LiveWire Investigations
LiveWire Initial Setup, continued
Procedure: LiveWire Setup, continued
Step
Action
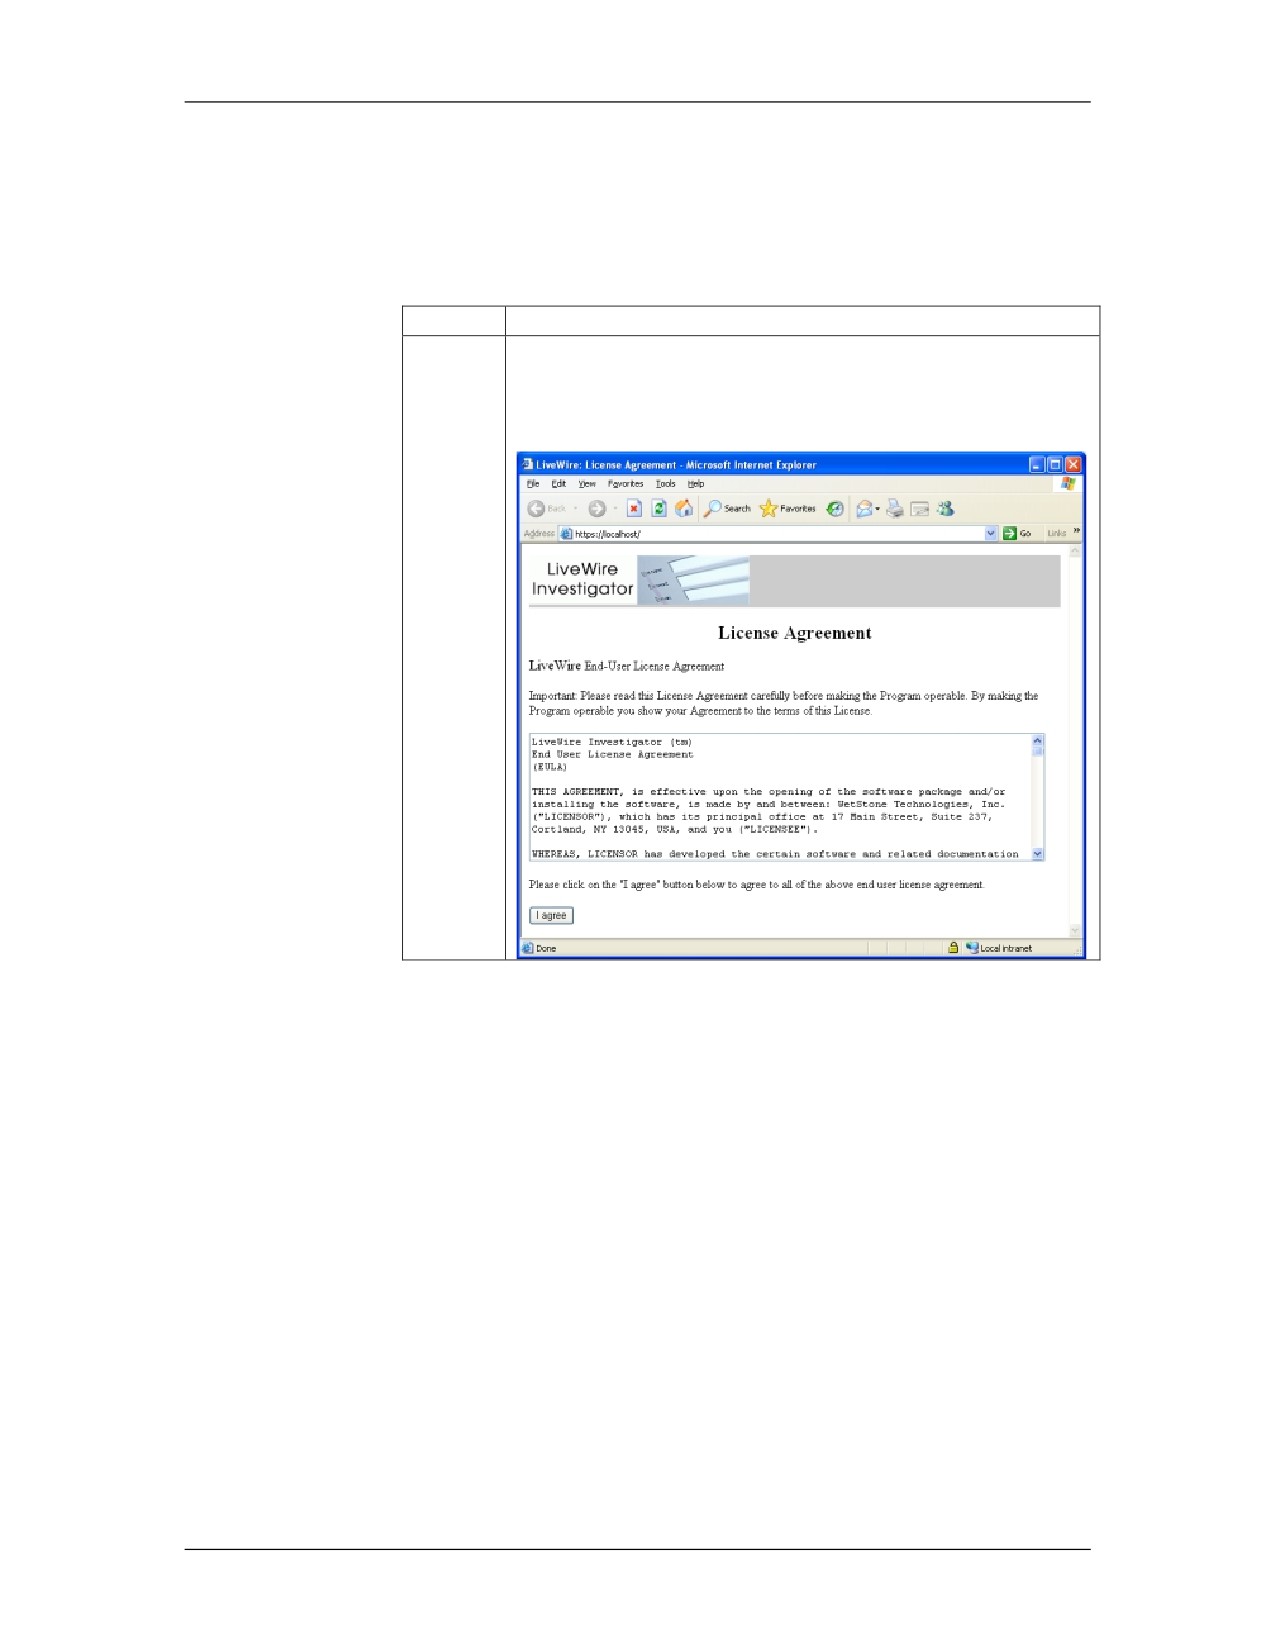
3
The first page to open will be the license agreement
page. Read the agreement and click “I Agree” to
continue.
01/09
For Official Use Only - Law Enforcement Sensitive
12-21
LiveWire Investigations
Network Intrusion Responder Program
LiveWire Initial Setup, continued
Procedure: LiveWire Setup, continued
Step
Action
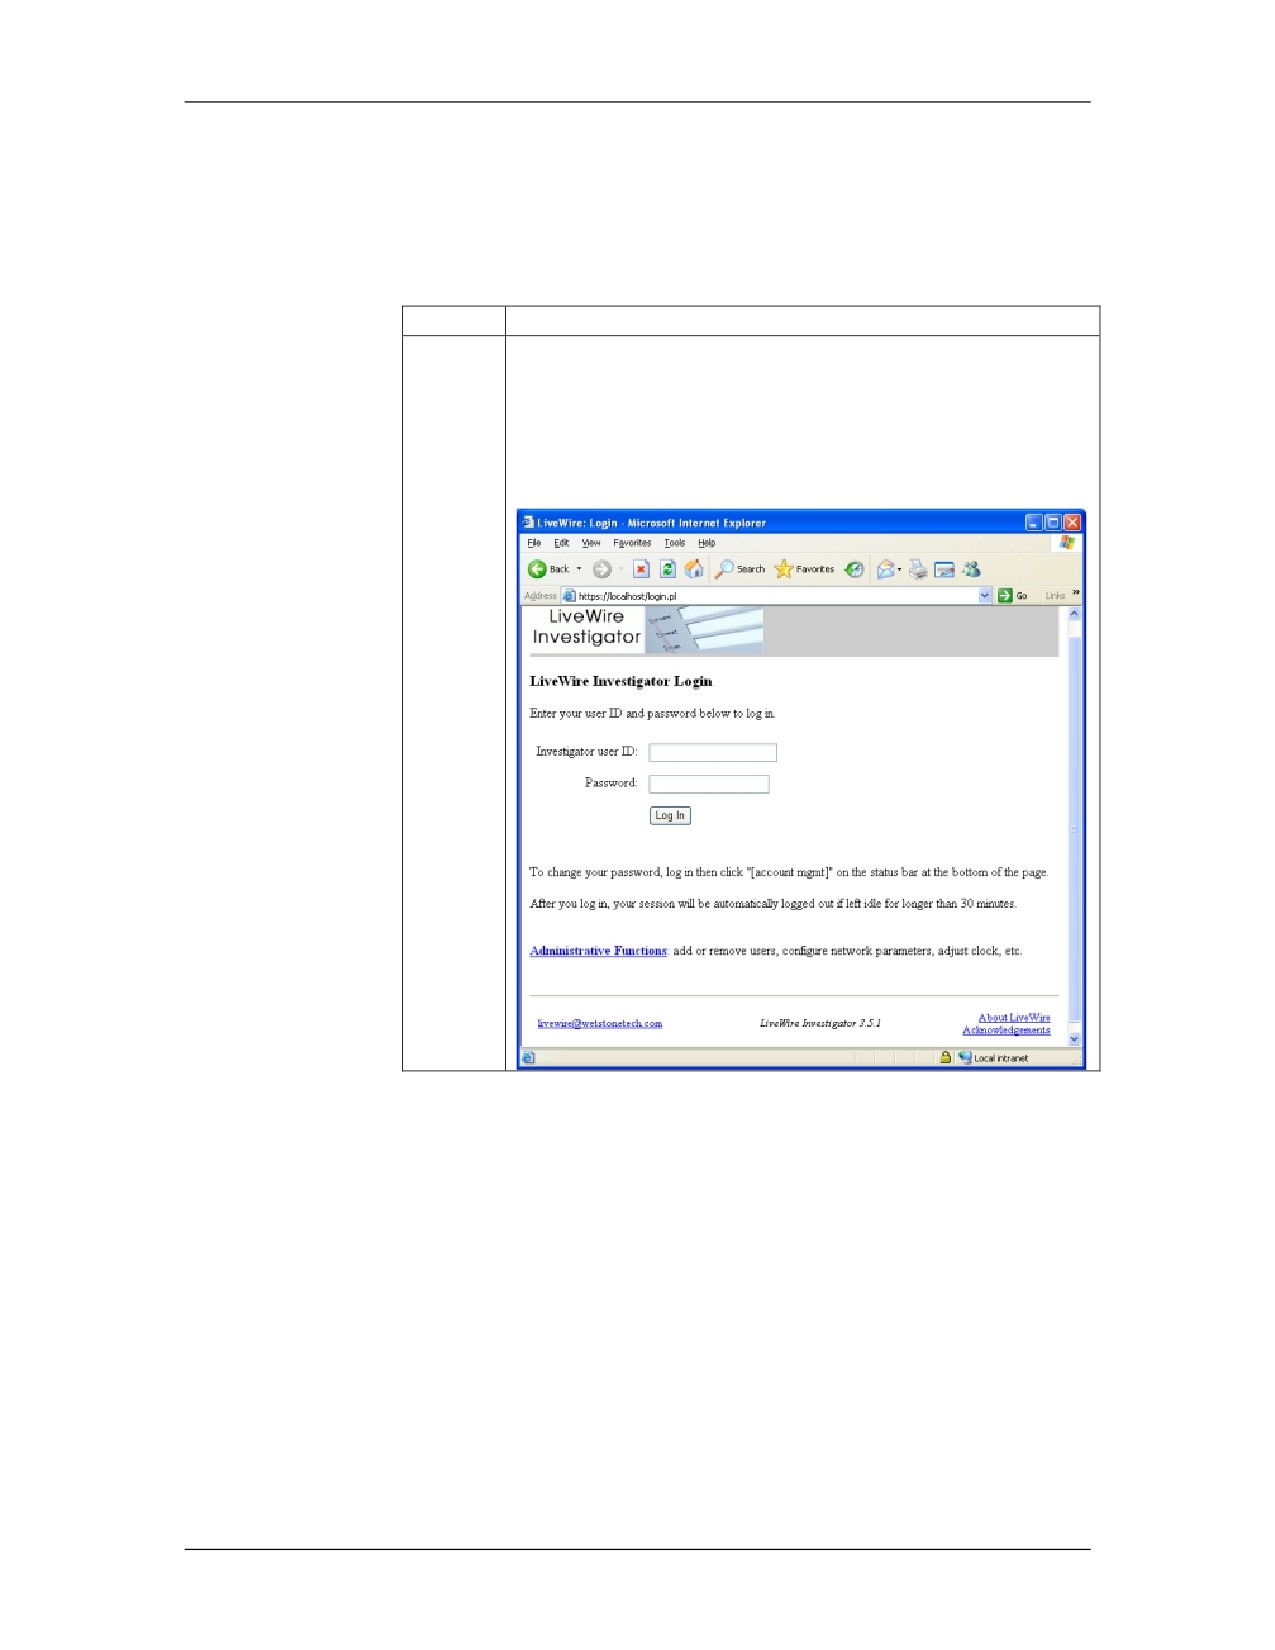
4
The default LiveWire Investigator Login screen will be
displayed. An investigator user account must be created
the first time LiveWire is run. To create the account,
click on Administrative Functions at the bottom of the
page.
12-22
For Official Use Only - Law Enforcement Sensitive
01/09
Network Intrusion Responder Program
LiveWire Investigations
LiveWire Initial Setup, continued
Procedure: LiveWire Setup, continued
Step
Action
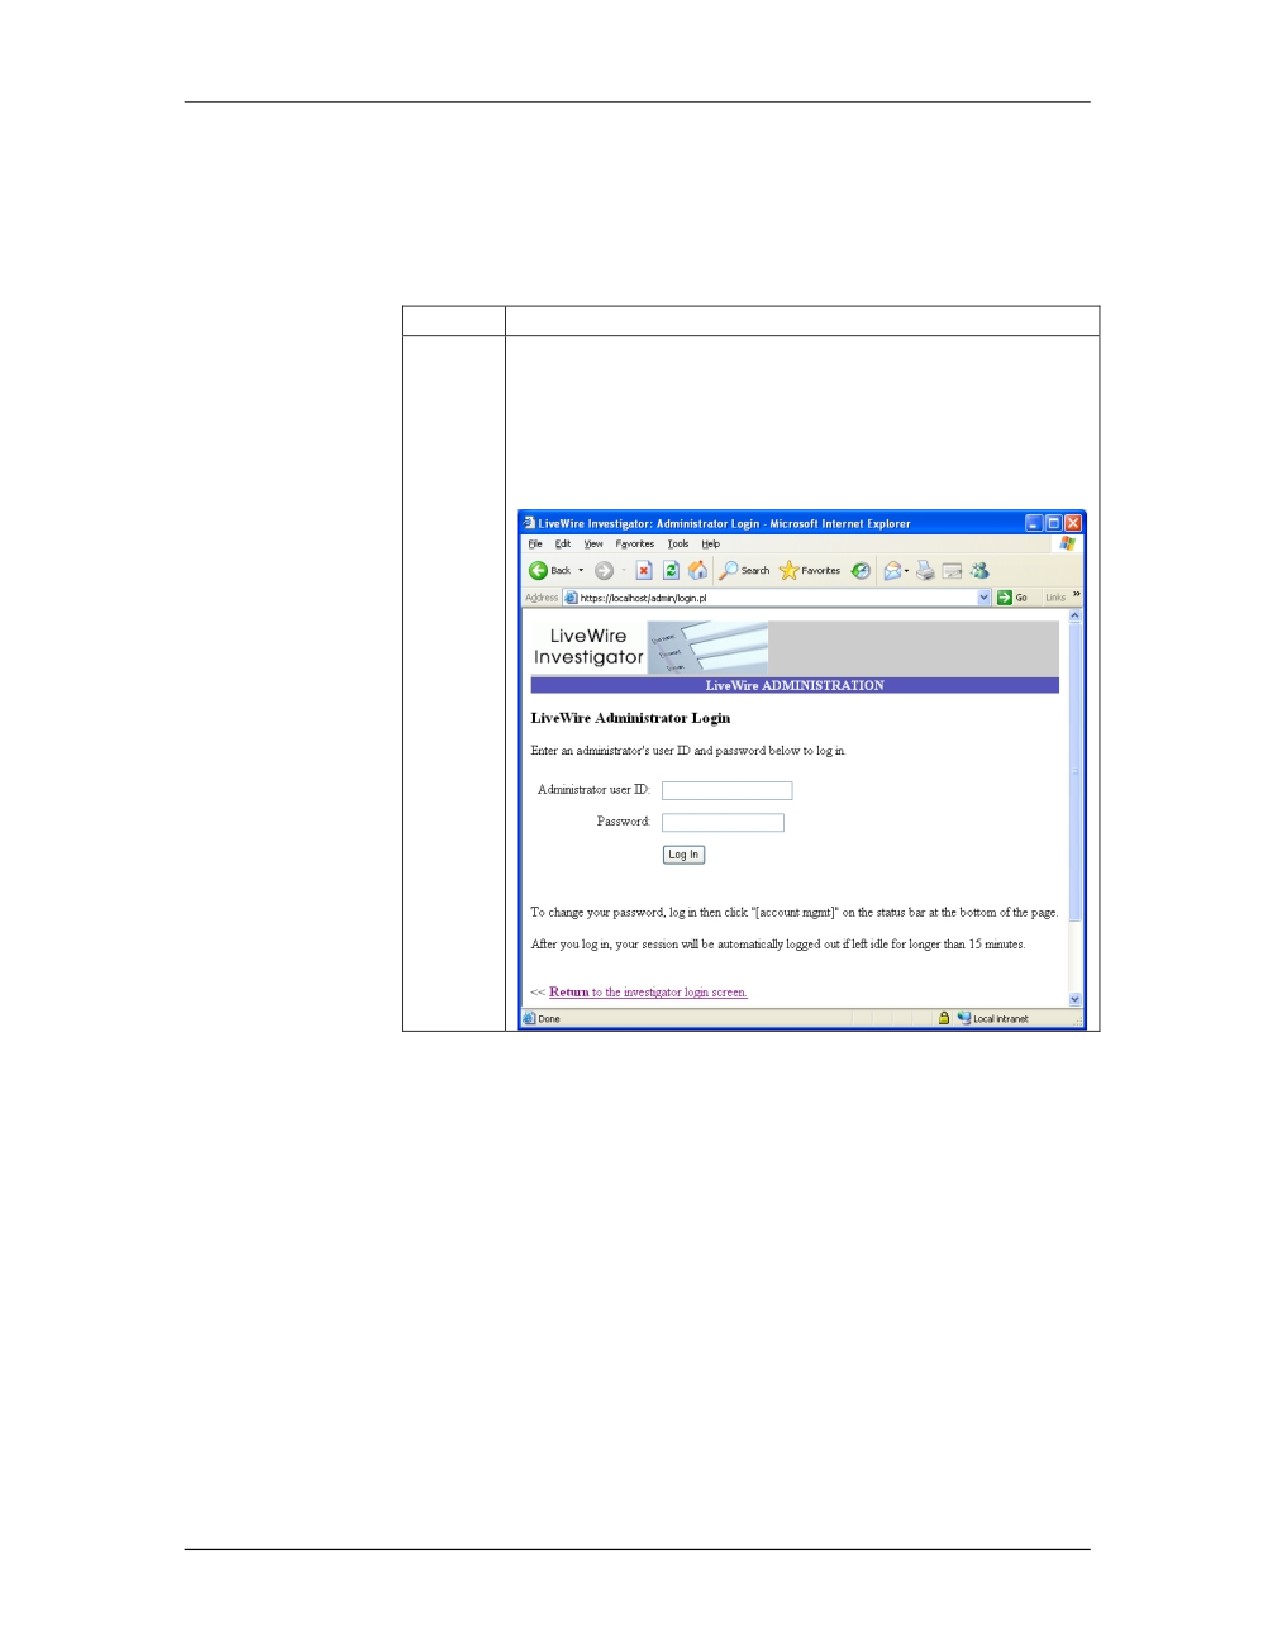
5
The next screen will be the Administrator Login page.
Login with the default setting:
Administrative user ID: admin
Password: wetstone
01/09
For Official Use Only - Law Enforcement Sensitive
12-23
LiveWire Investigations
Network Intrusion Responder Program
LiveWire Initial Setup, continued
Procedure: LiveWire Setup, continued
Step
Action
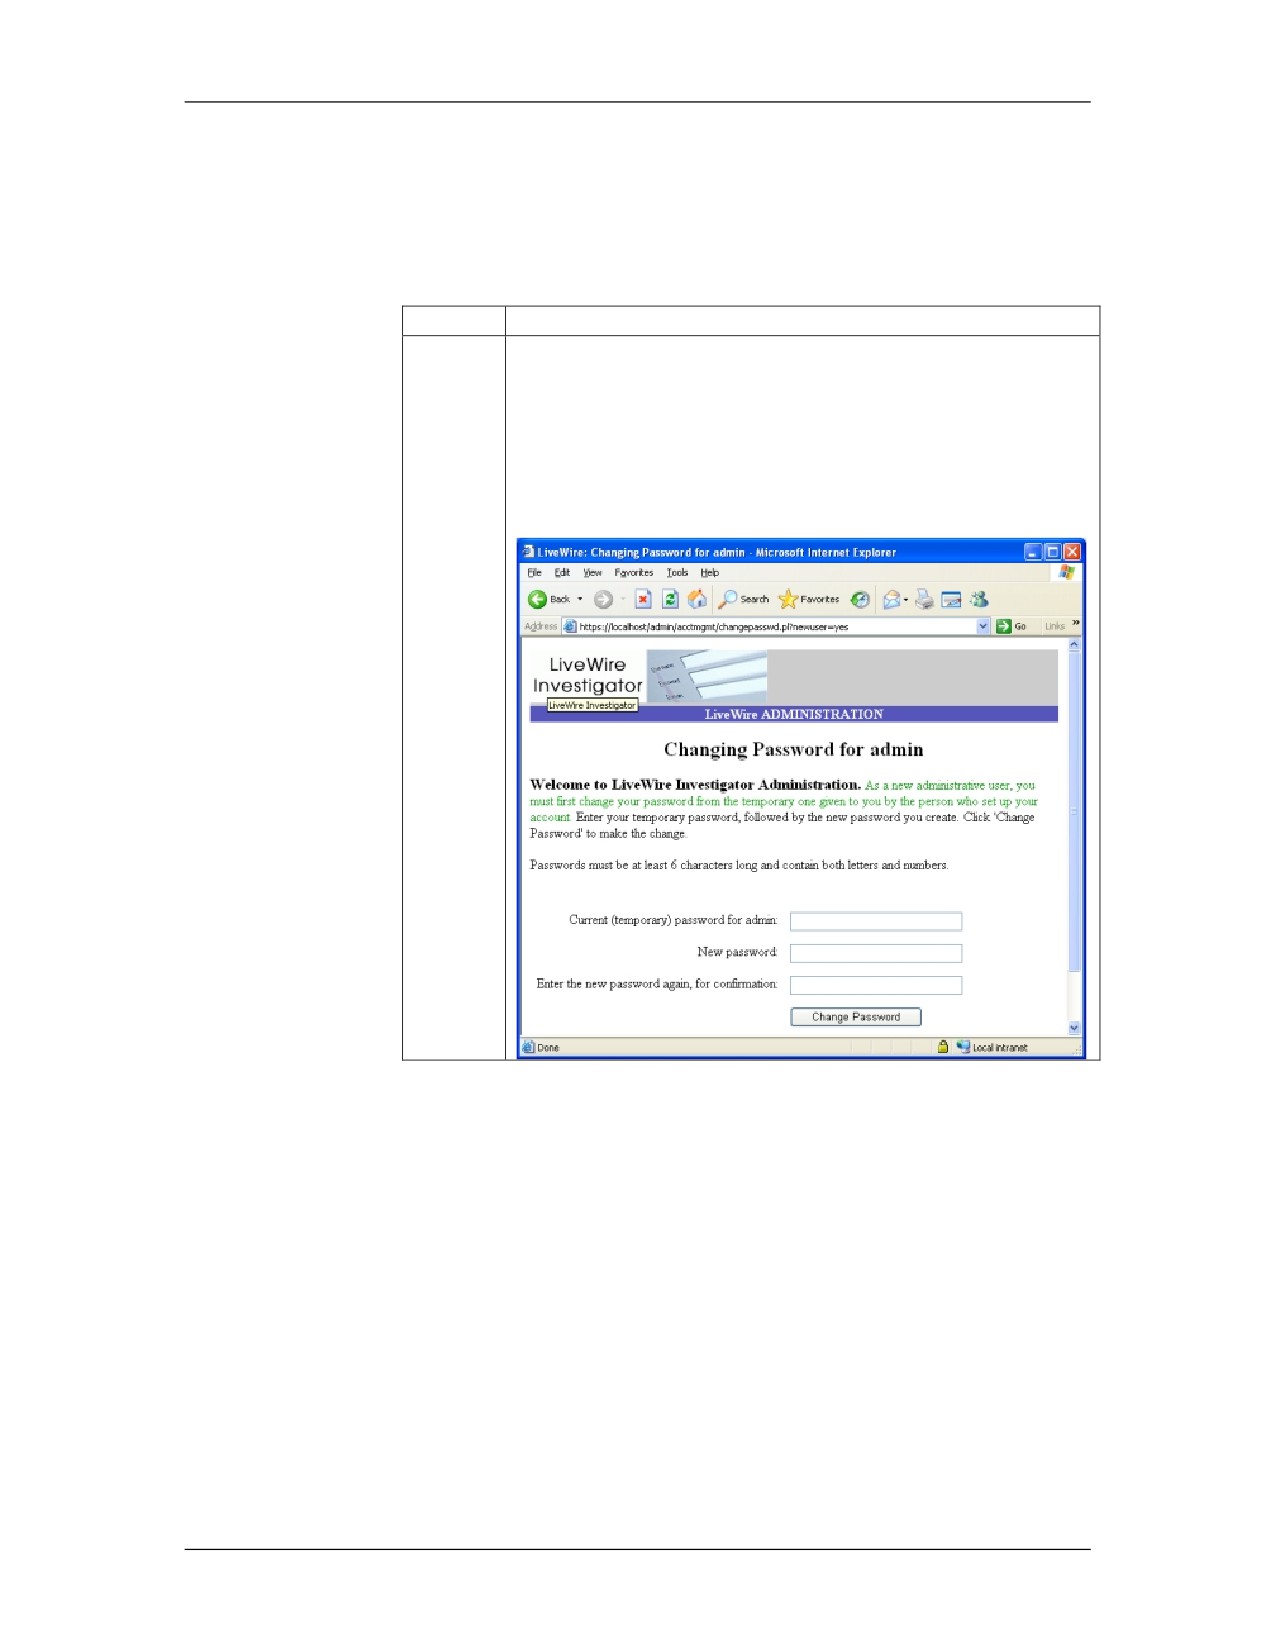
6
The first time the administrator logs in, the password
must be changed. The password must meet certain
criteria. It must contain letters and numbers or other
symbols. Input the current password of “wetstone” and
then enter a new password. Then click on Change
Password.
12-24
For Official Use Only - Law Enforcement Sensitive
01/09
Network Intrusion Responder Program
LiveWire Investigations
LiveWire Initial Setup, continued
Procedure: LiveWire Setup, continued
Step
Action
7
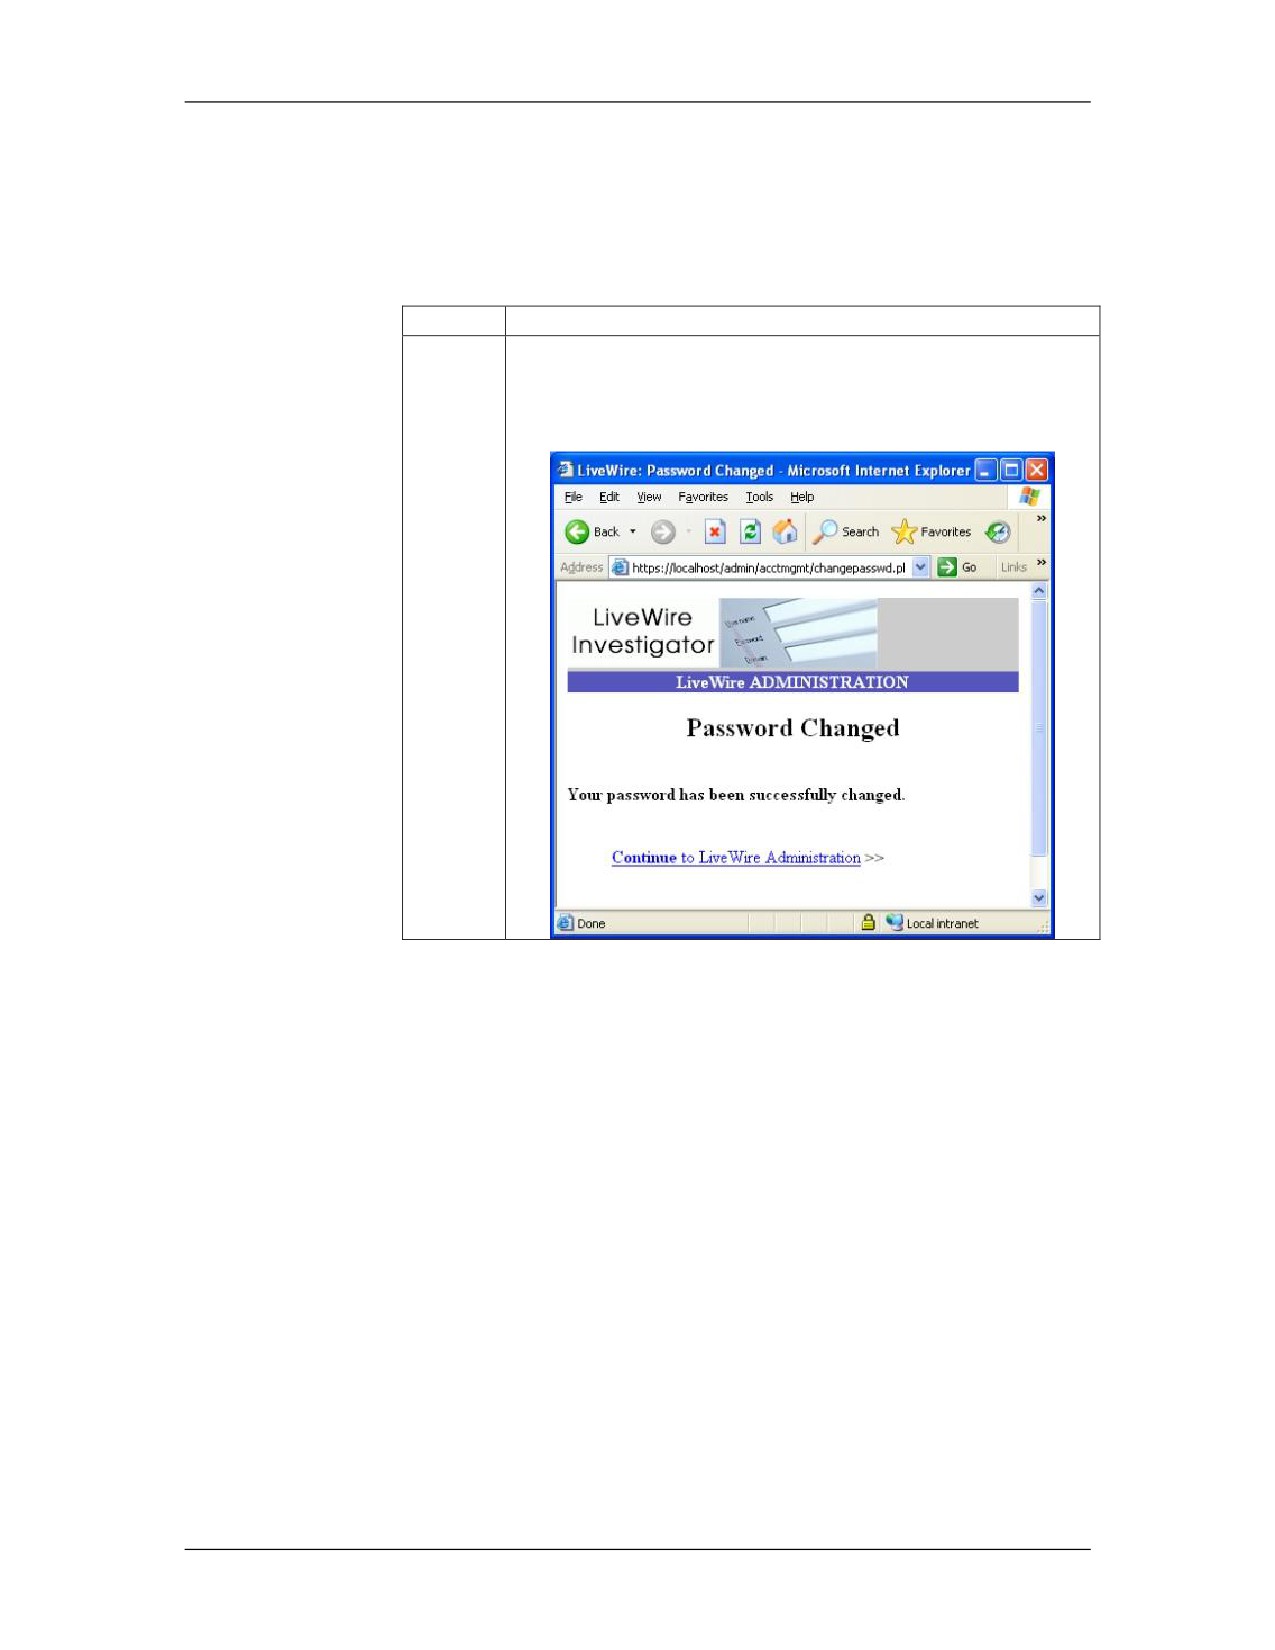
Once a successful password has been set, a success
verification page will be displayed. Click Continue to
LiveWire Administration.
01/09
For Official Use Only - Law Enforcement Sensitive
12-25
LiveWire Investigations
Network Intrusion Responder Program
LiveWire Initial Setup, continued
Procedure: LiveWire Setup, continued
Step
Action
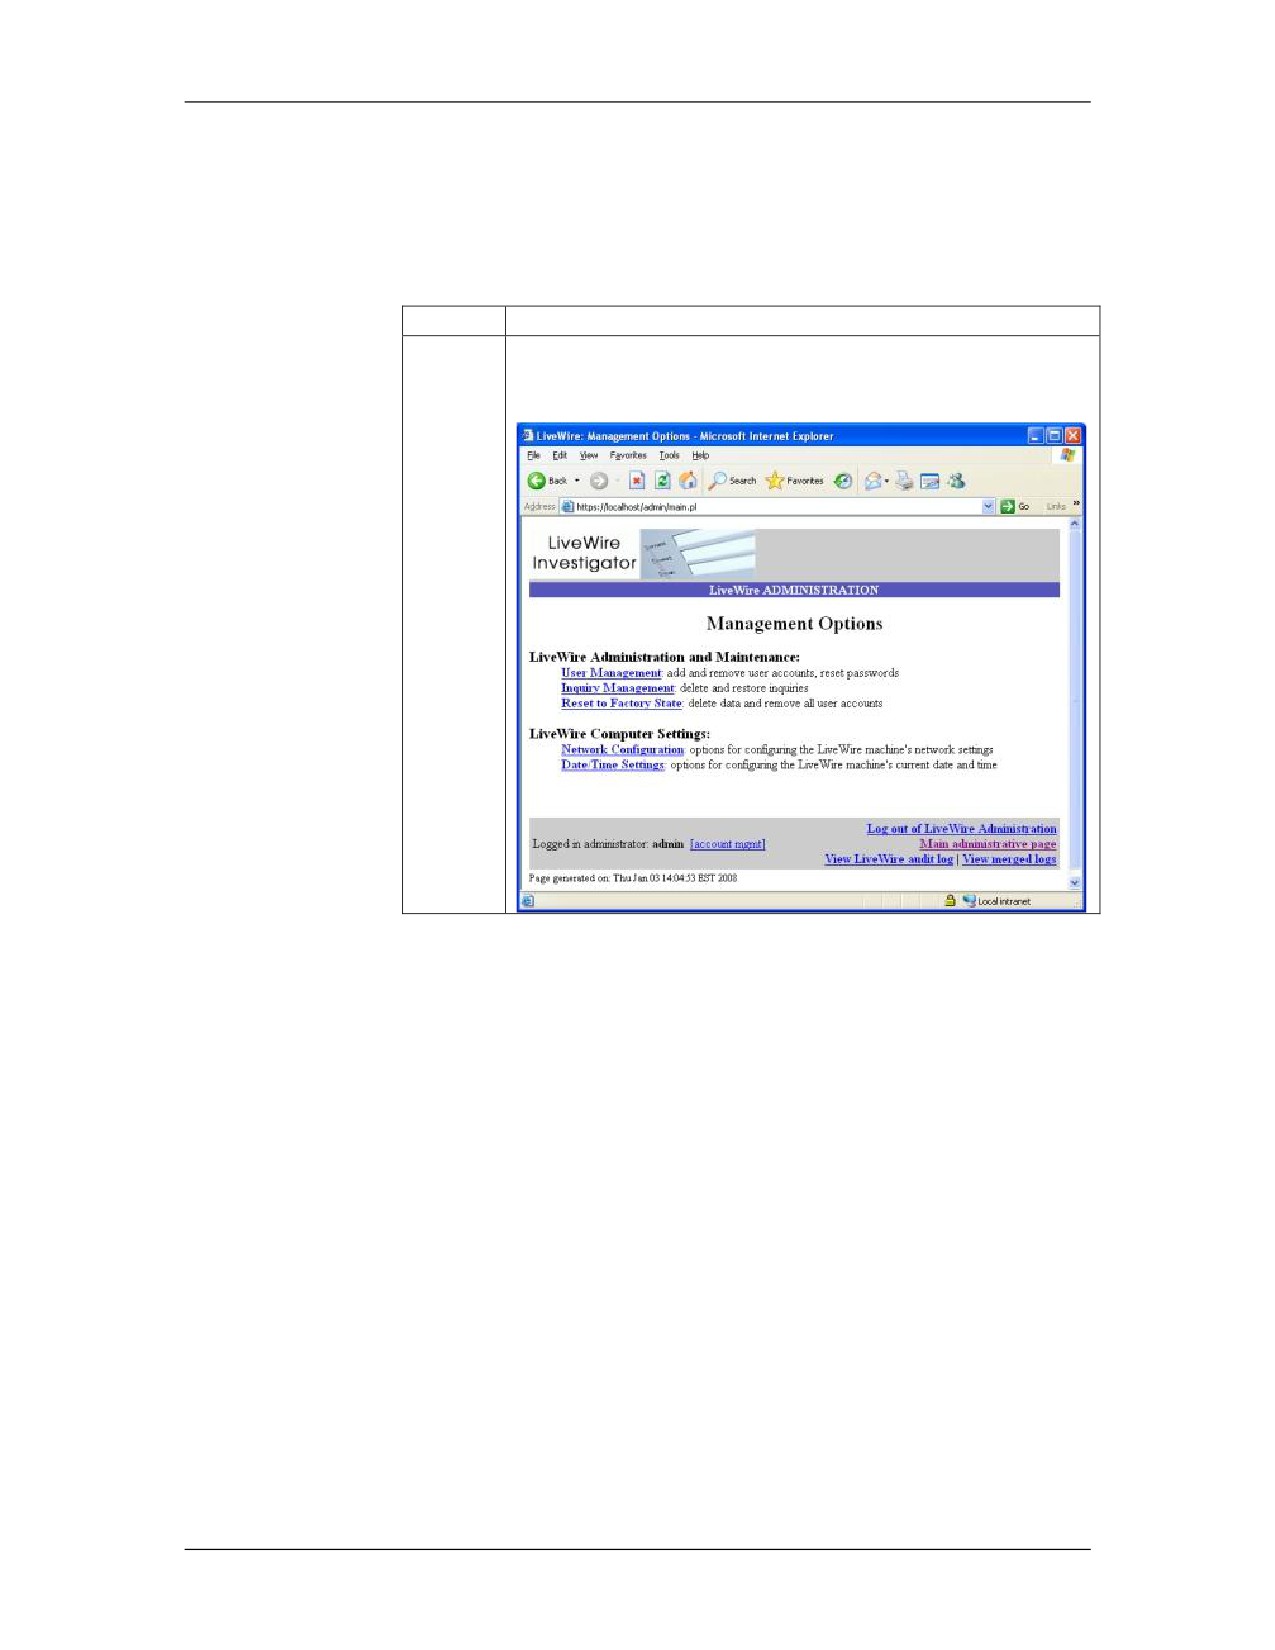
8
The Management Options page will be displayed. Click
“User Management” to continue.
12-26
For Official Use Only - Law Enforcement Sensitive
01/09
Network Intrusion Responder Program
LiveWire Investigations
LiveWire Initial Setup, continued
Procedure: LiveWire Setup, continued
Step
Action
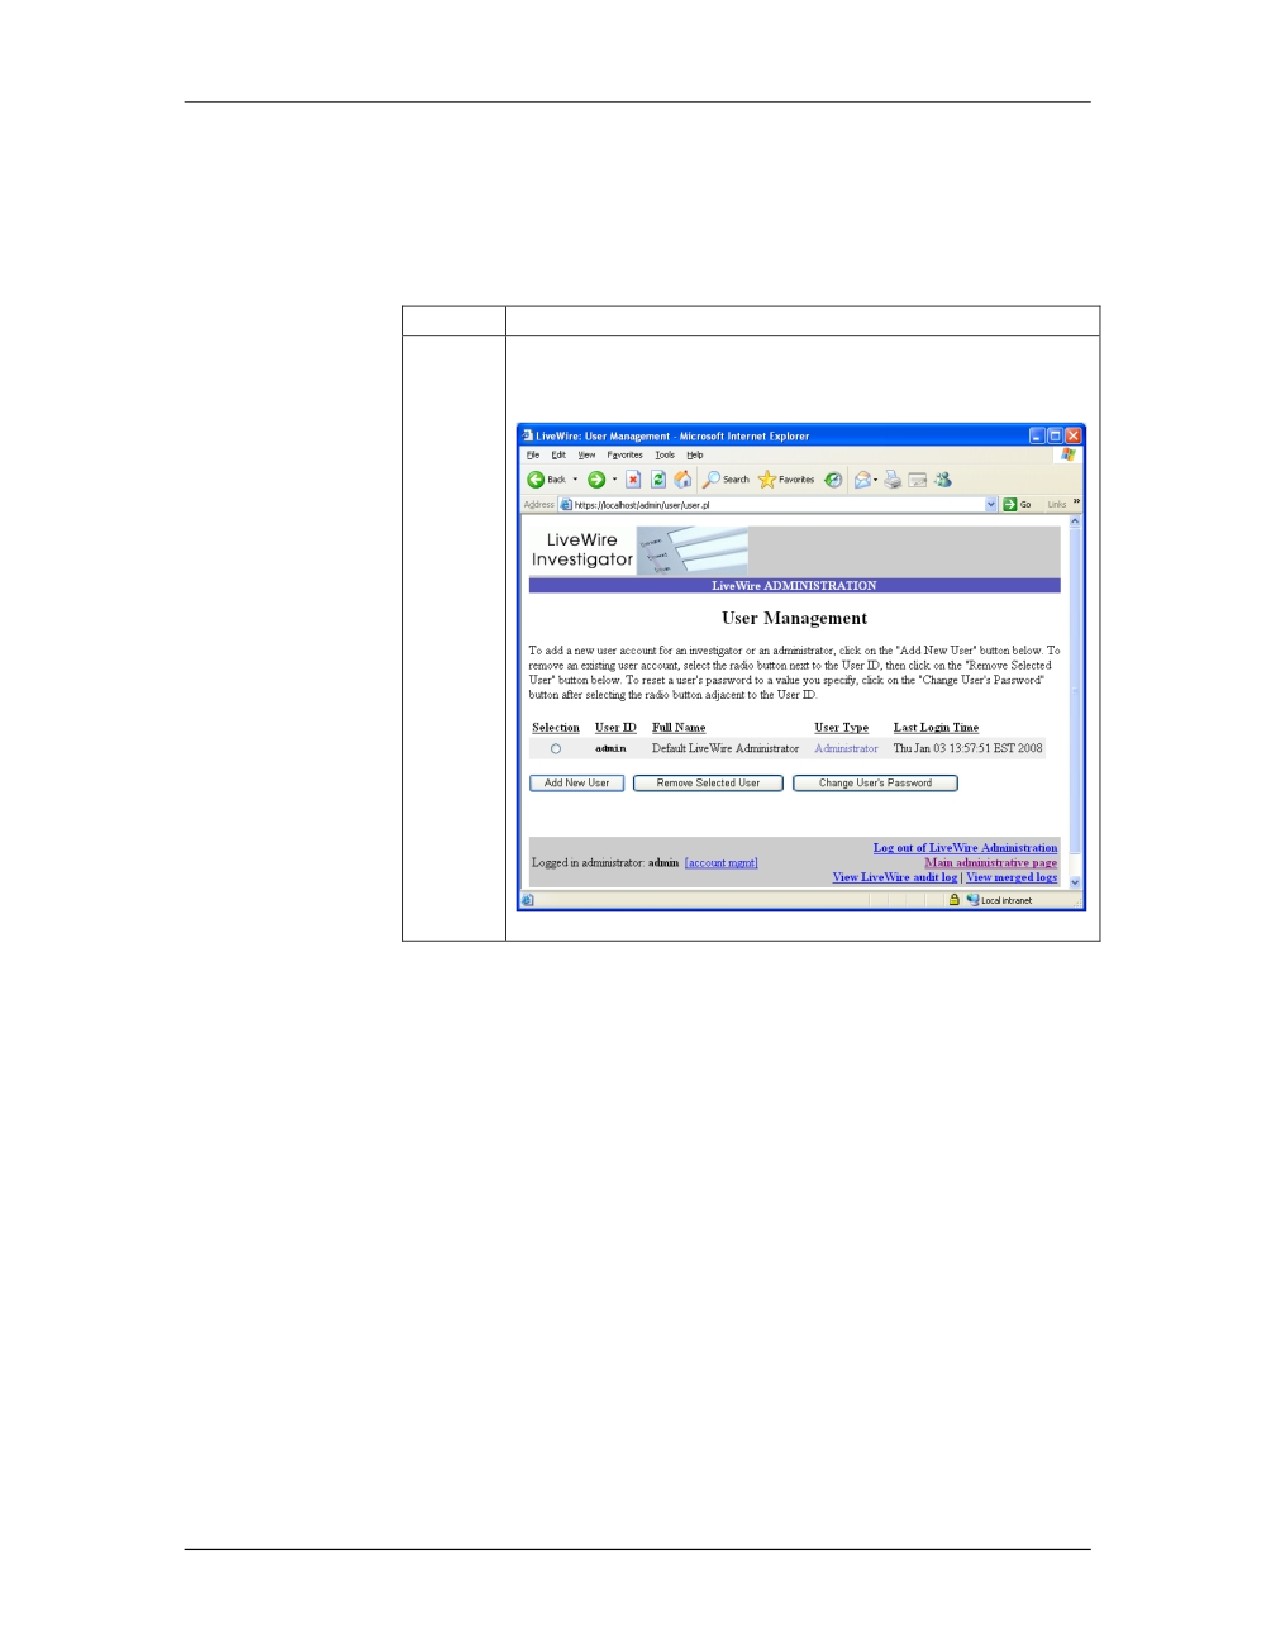
9
The User Management page can be used to Add/Remove
users or reset passwords. Click “Add New User”.
01/09
For Official Use Only - Law Enforcement Sensitive
12-27
LiveWire Investigations
Network Intrusion Responder Program
LiveWire Initial Setup, continued
Procedure: LiveWire Setup, continued
Step
Action
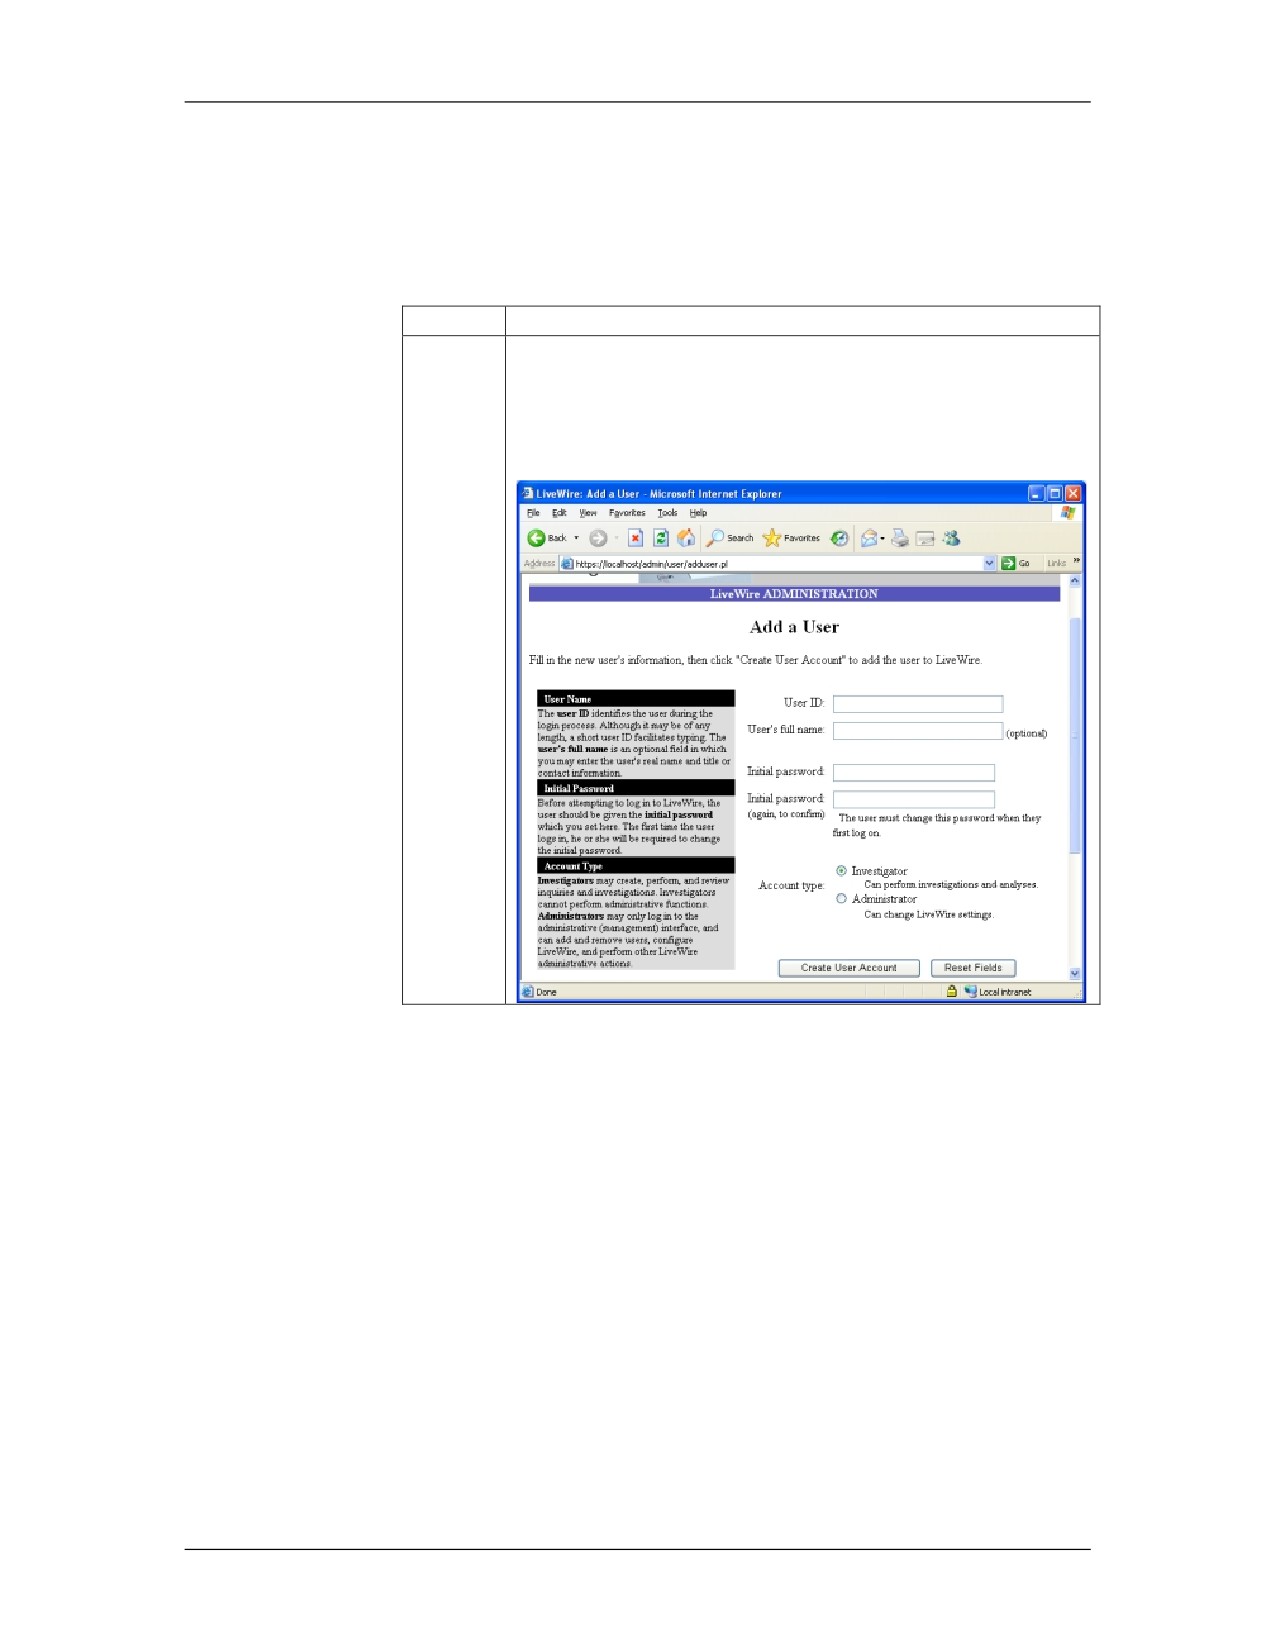
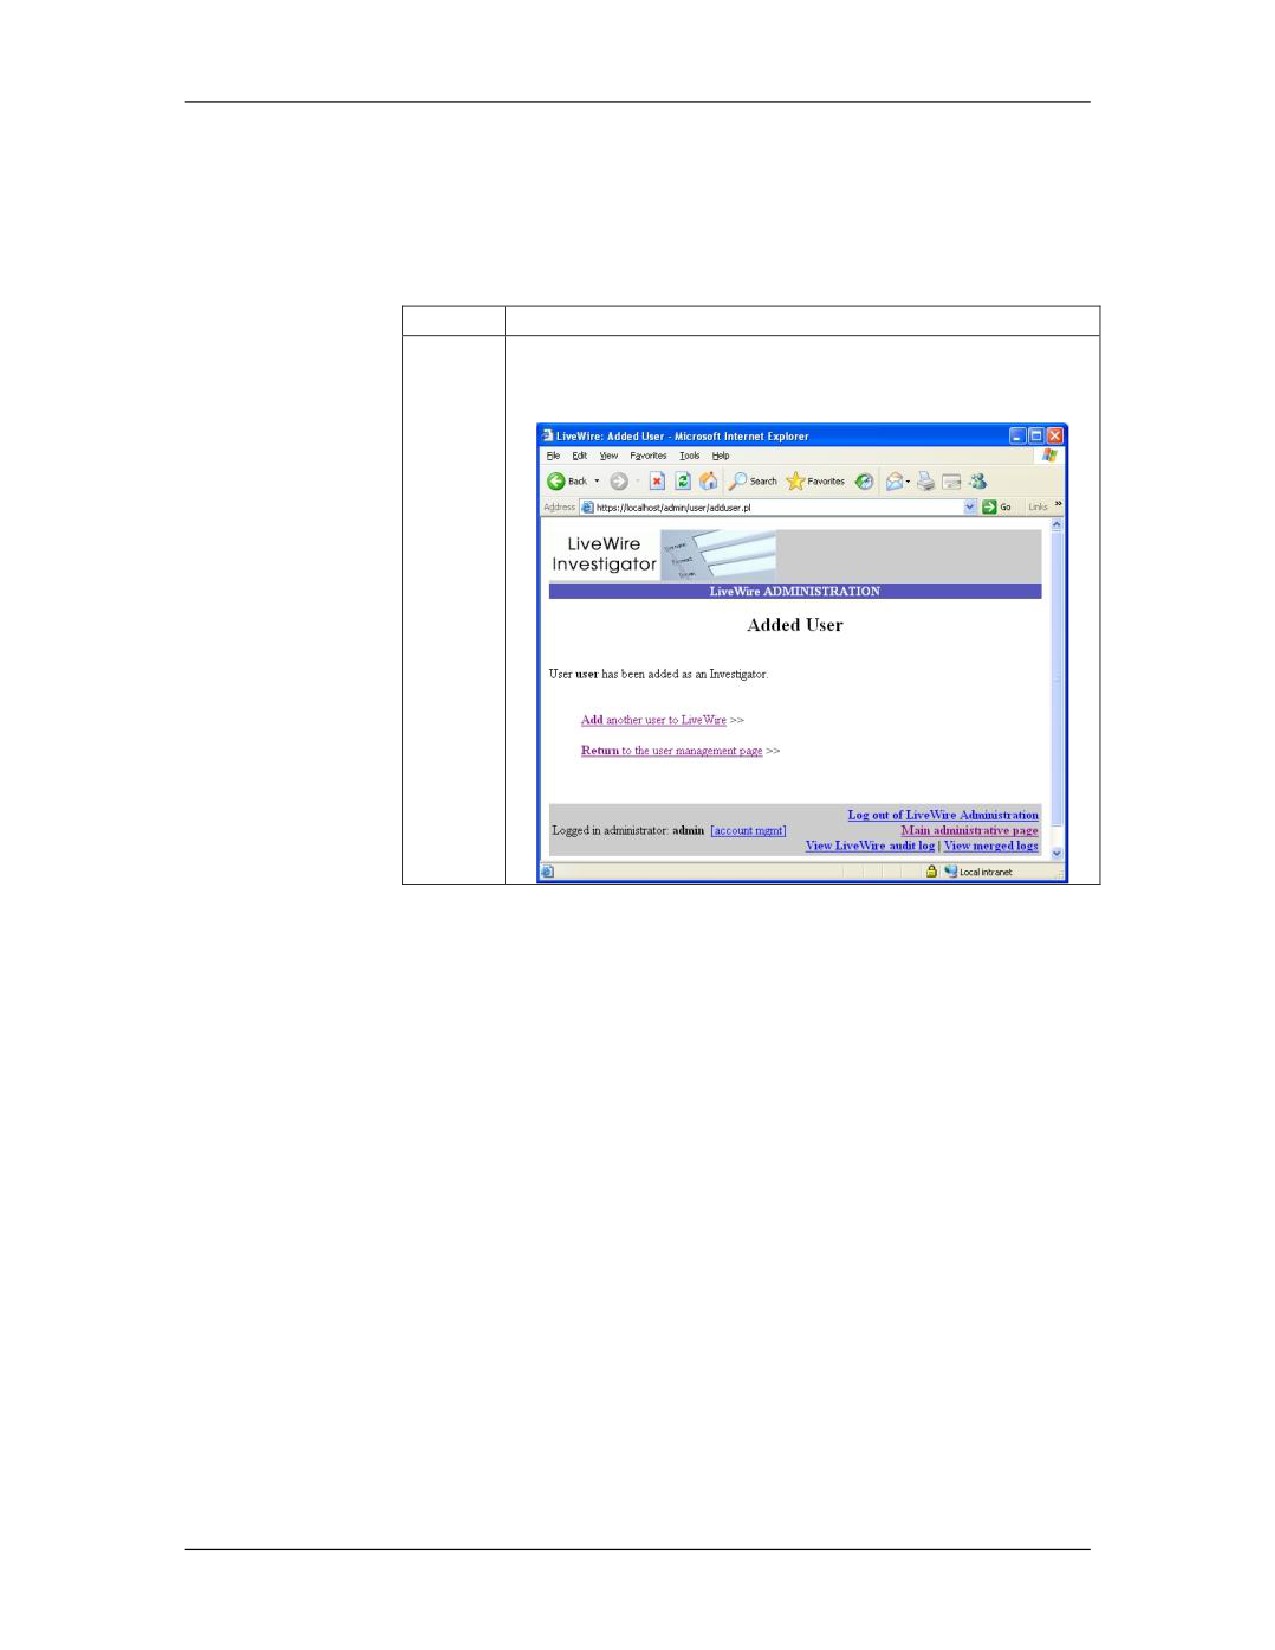
10
To be able to use LiveWire for an investigation, there
must be at least one investigator account. Fill in the
appropriate user information, verify the account type as
“Investigator” and click “Create User Account.”
12-28
For Official Use Only - Law Enforcement Sensitive
01/09
Network Intrusion Responder Program
LiveWire Investigations
LiveWire Initial Setup, continued
Procedure: LiveWire Setup, continued
Step
Action
11
Now the user that was created can log into LiveWire and
begin performing investigations.
01/09
For Official Use Only - Law Enforcement Sensitive
12-29
LiveWire Investigations
Network Intrusion Responder Program
This page intentionally left blank.
12-30
For Official Use Only - Law Enforcement Sensitive
01/09
Network Intrusion Responder Program
LiveWire Investigations
Lesson 3 - LiveDiscover
Introduction
In live network investigations, it is important to be able to
effectively scan and identify the network for devices.
LiveDiscover is a tool that you can use to do this.
Purpose of this
The purpose of this lesson is to introduce you to the LiveDiscover
Lesson
tools.
Objectives
After successfully completing this lesson, you will be able to:
Discuss important functions of LiveDiscover
Scan a network
Identify devices found on the network
In this Lesson
The following table shows the contents of this lesson.
Topic
See Page
LiveDiscover Network Scanning
12-32
01/09
For Official Use Only - Law Enforcement Sensitive
12-31
LiveWire Investigations
Network Intrusion Responder Program
LiveDiscover Network Scanning
Introduction
LiveDiscover is a tool used to rapidly identify and assess resources
on the network. With the information you gather from
LiveDiscover, you can use LiveWire tools to perform a live
analysis of a machine across the network.
LiveDiscover is able to quickly scan a range of IP addresses. You
can perform an in-depth scan that reports the vulnerabilities
systems. Each individual scan is stored and saved in its own
database. These scans can be single targets or a whole range of IP
addresses.
All information contained in LiveDiscover is stored within a
database. When LiveDiscover is first started, the user can open an
existing database or create a new one. To create a new database,
the user simply has to provide a name that does not already exist.
LiveDiscover
LiveDiscover provides a tabbed interface for navigation. The
Interface
primary tabs are displayed horizontally across the top of the page.
Each page displays information or options pertaining to the
specific details or configurations.
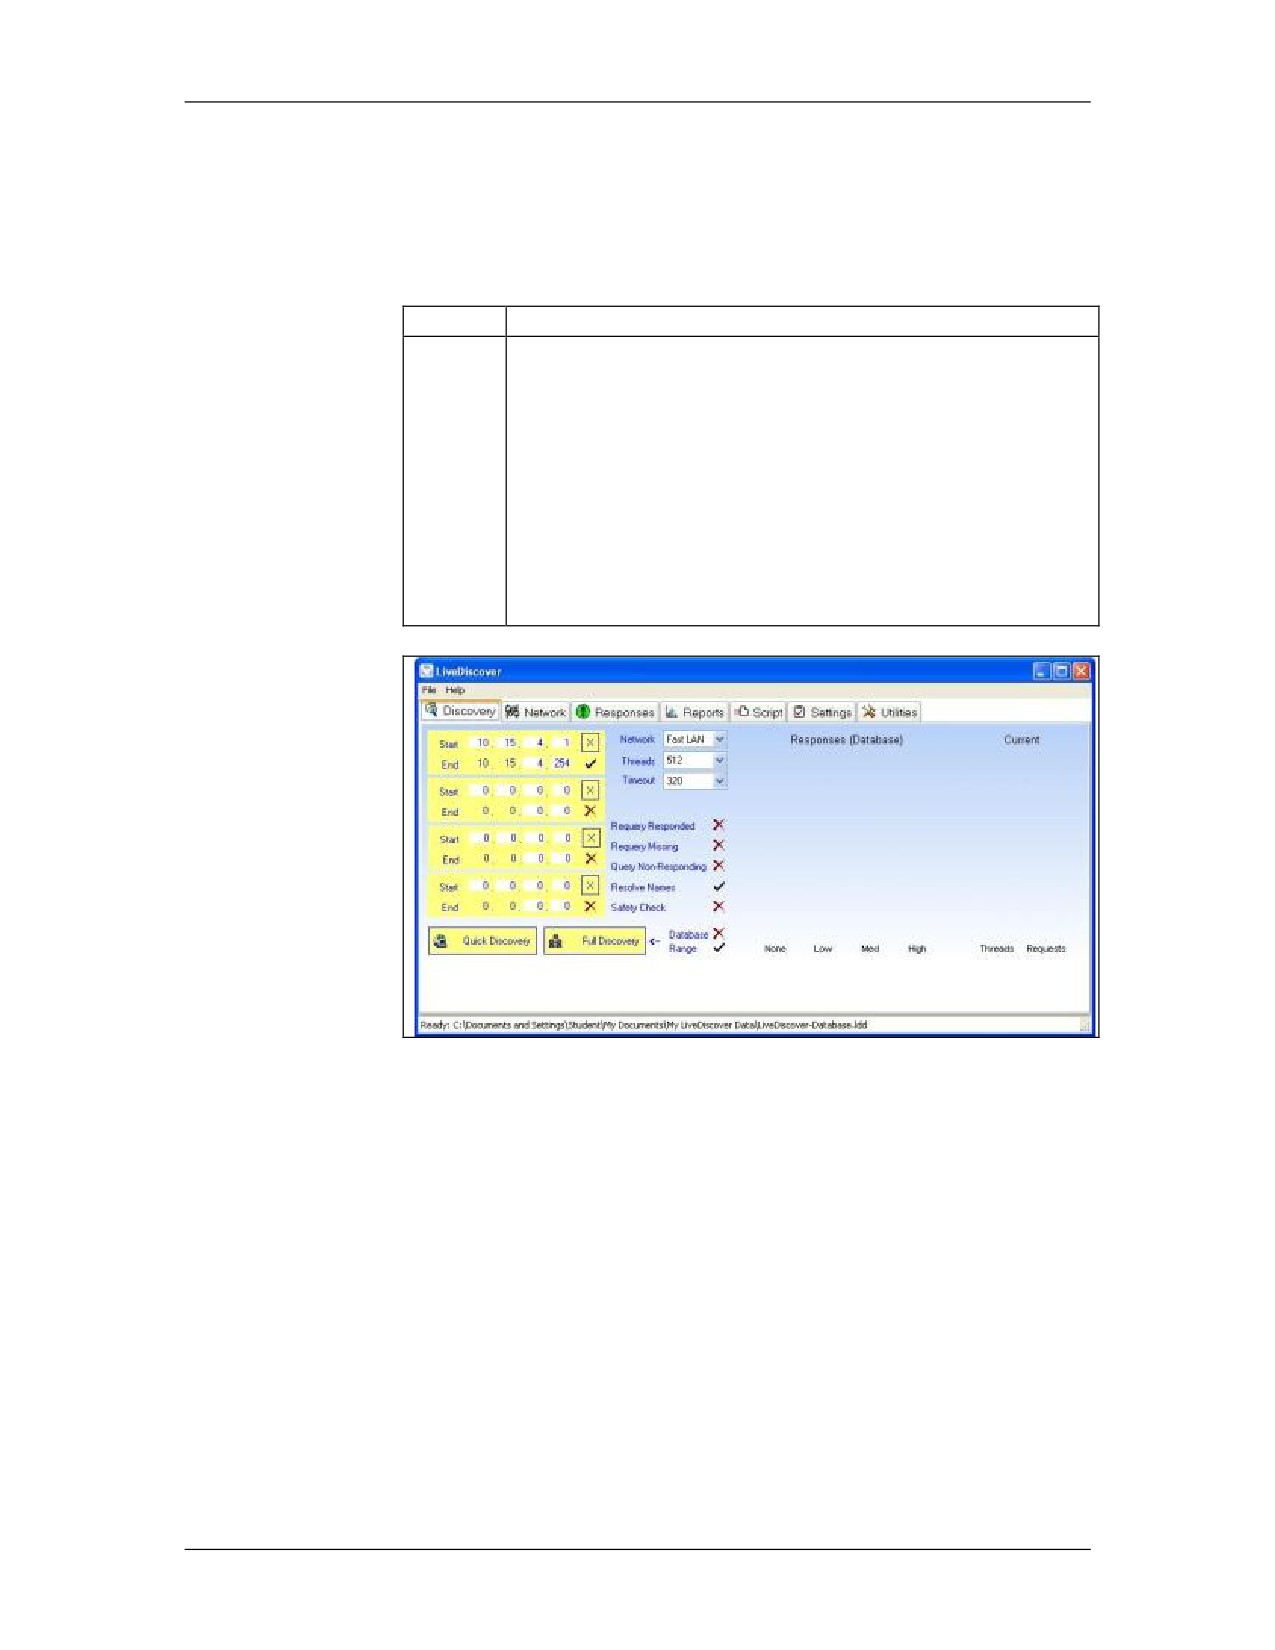
The Discover tab is where the investigator enters the addresses he
plans to scan. Up to four different network ranges can be scanned
at the same time.
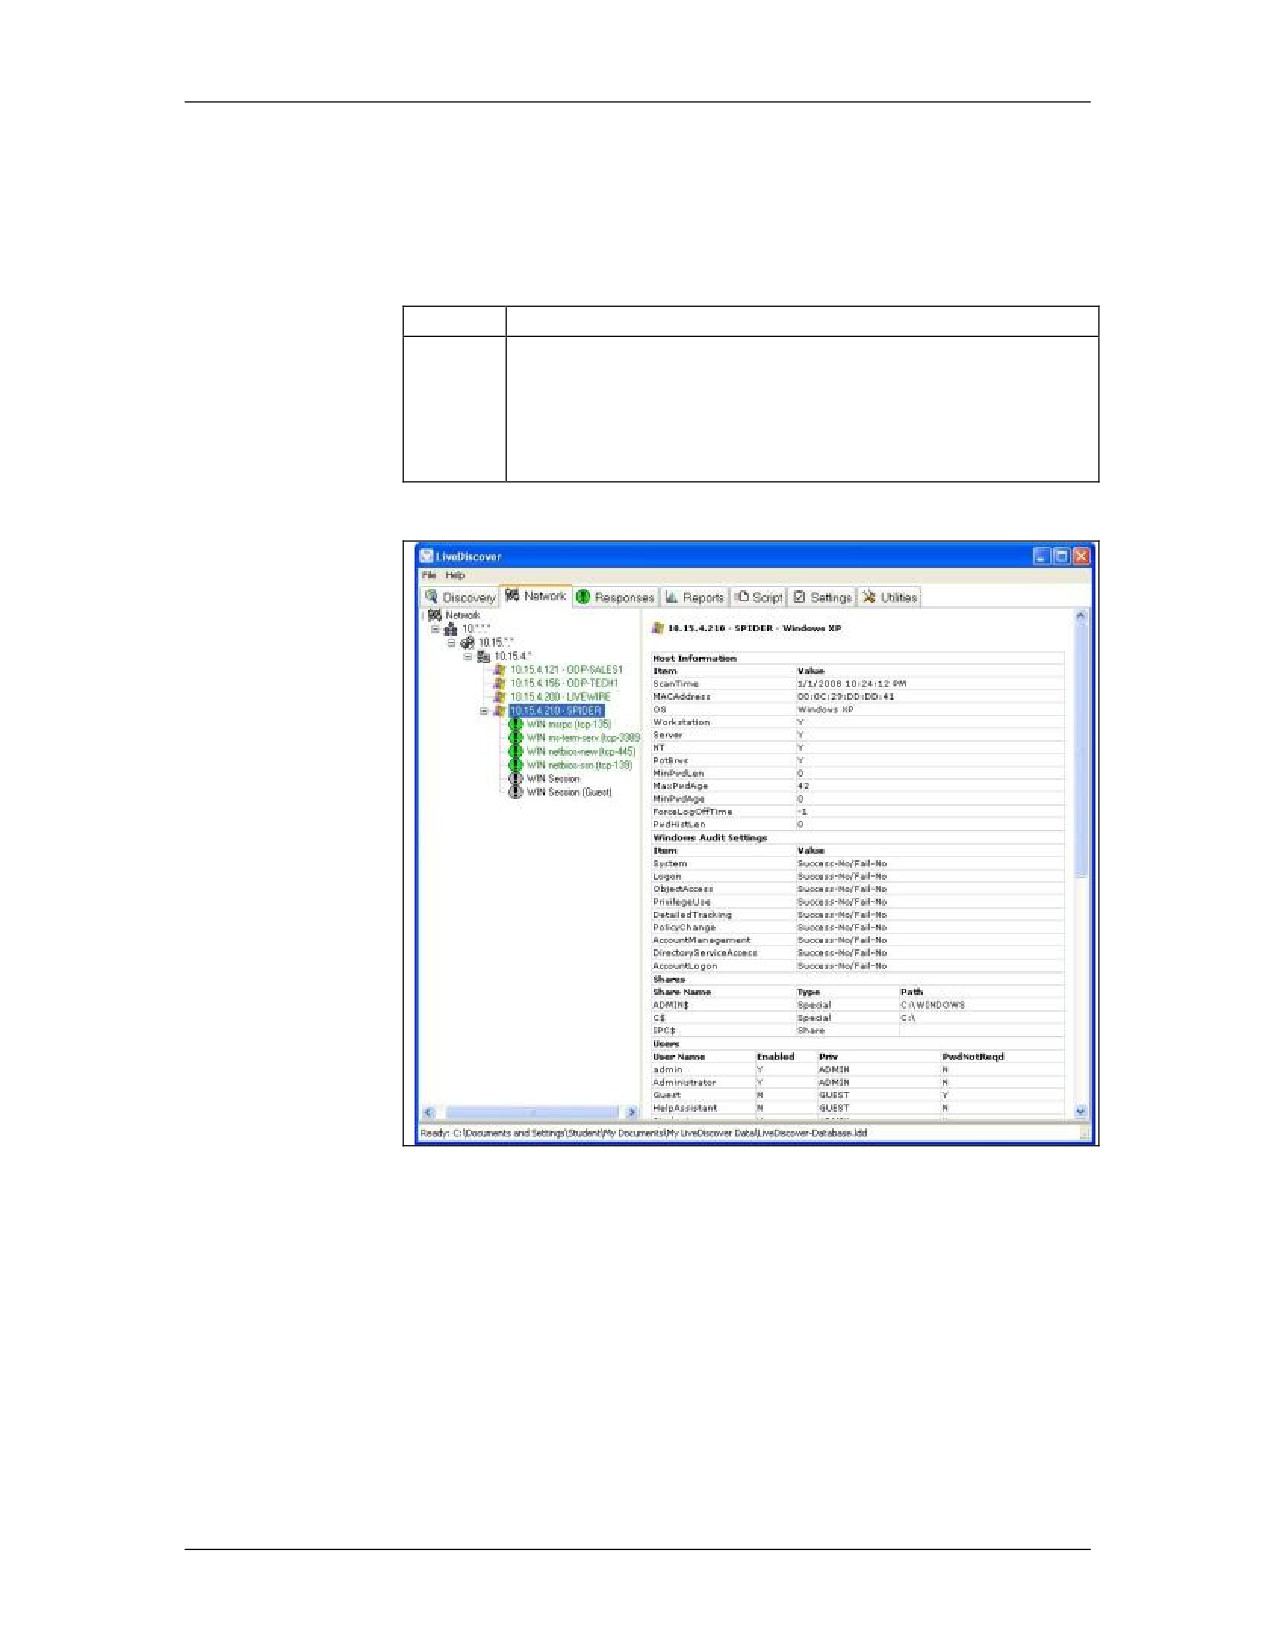
In the Network tab, a tree structure will be created showing the
different devices that were discovered for that subnet as well as
detailed information gathered about each of those devices.
The Responses tab displays the discovered data grouped together.
Selecting any of the options will display all the items found
matching that criteria.
12-32
For Official Use Only - Law Enforcement Sensitive
01/09
Network Intrusion Responder Program
LiveWire Investigations
LiveDiscover Network Scanning, continued
LiveDiscover
Interface,
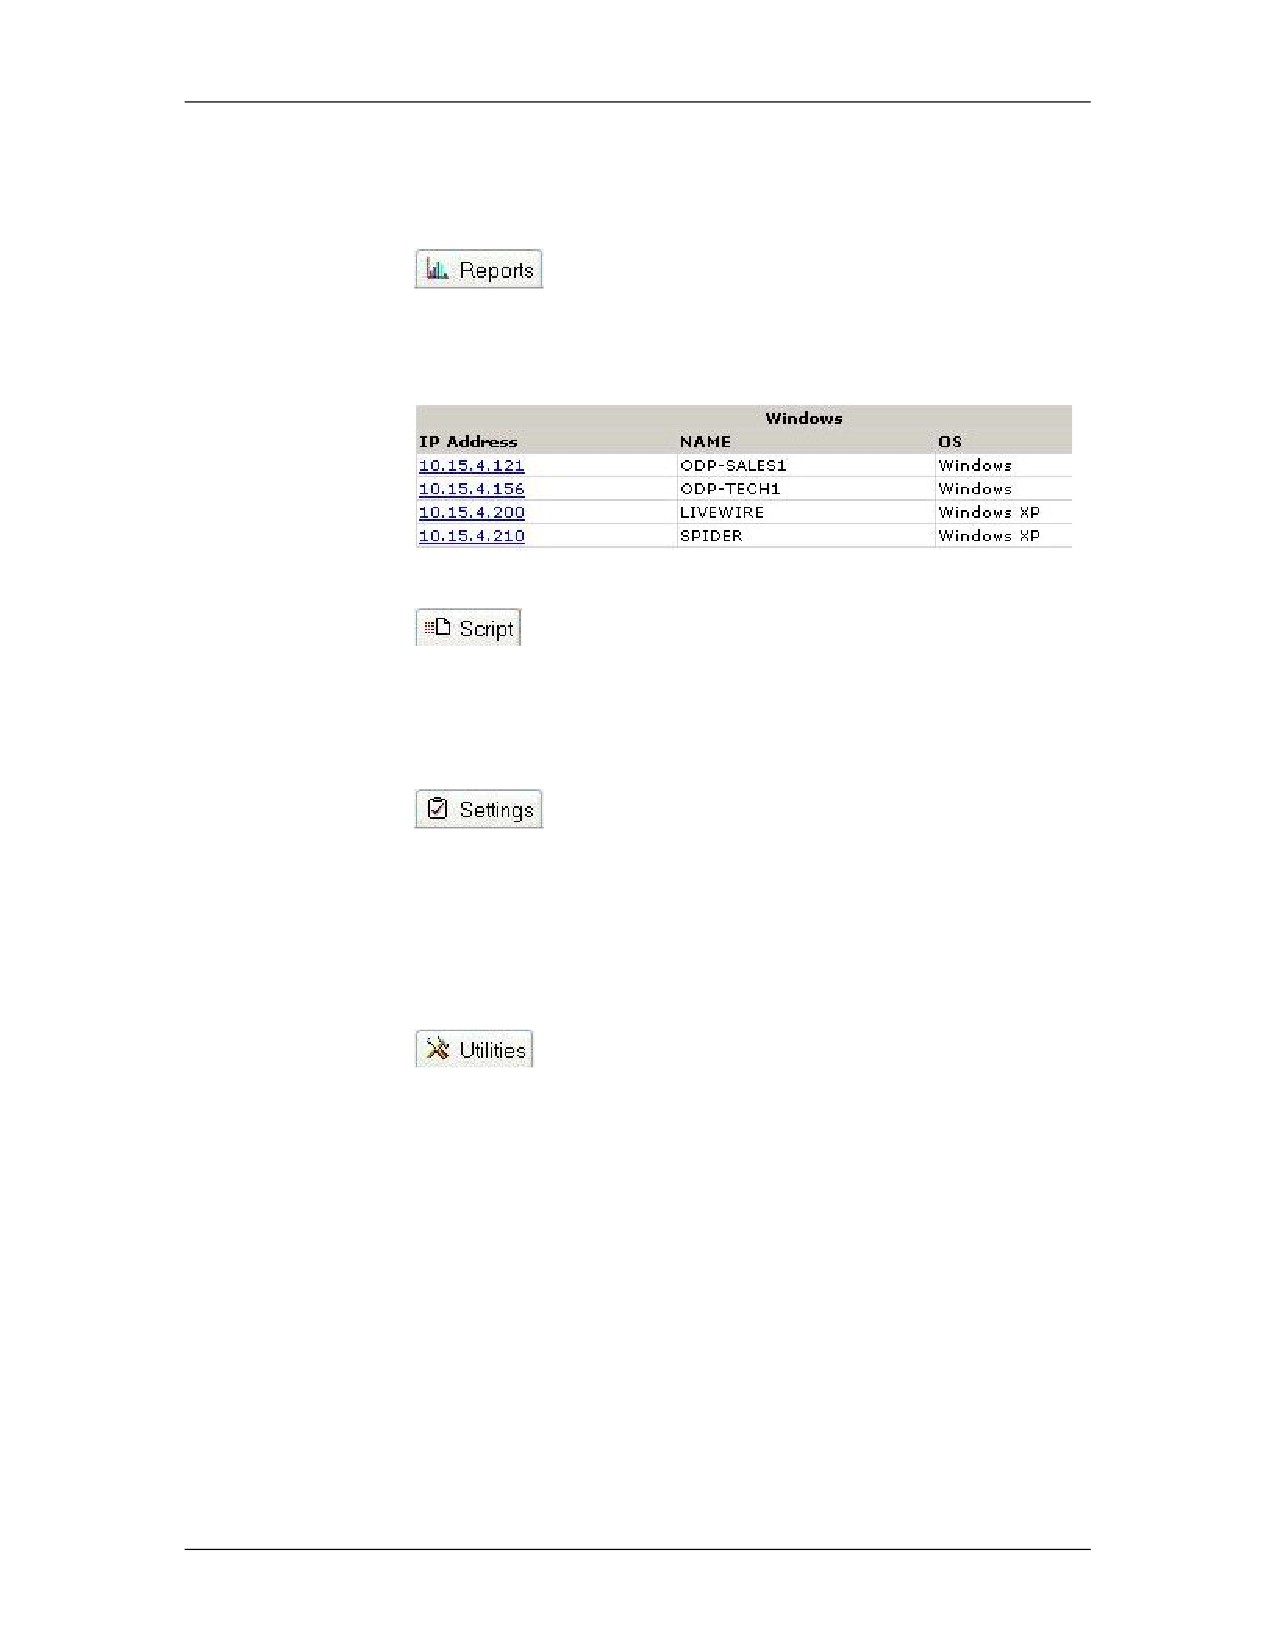
The Reports tab allows for the generation of many different report
continued
display formats. Individual types of information can be viewed in
several ways. Reports can contain text as well as colored graphs.
The Script tab is where all the different pre-built discovery scripts
are stored in the database. Customized scripts can be added to the
database at any time.
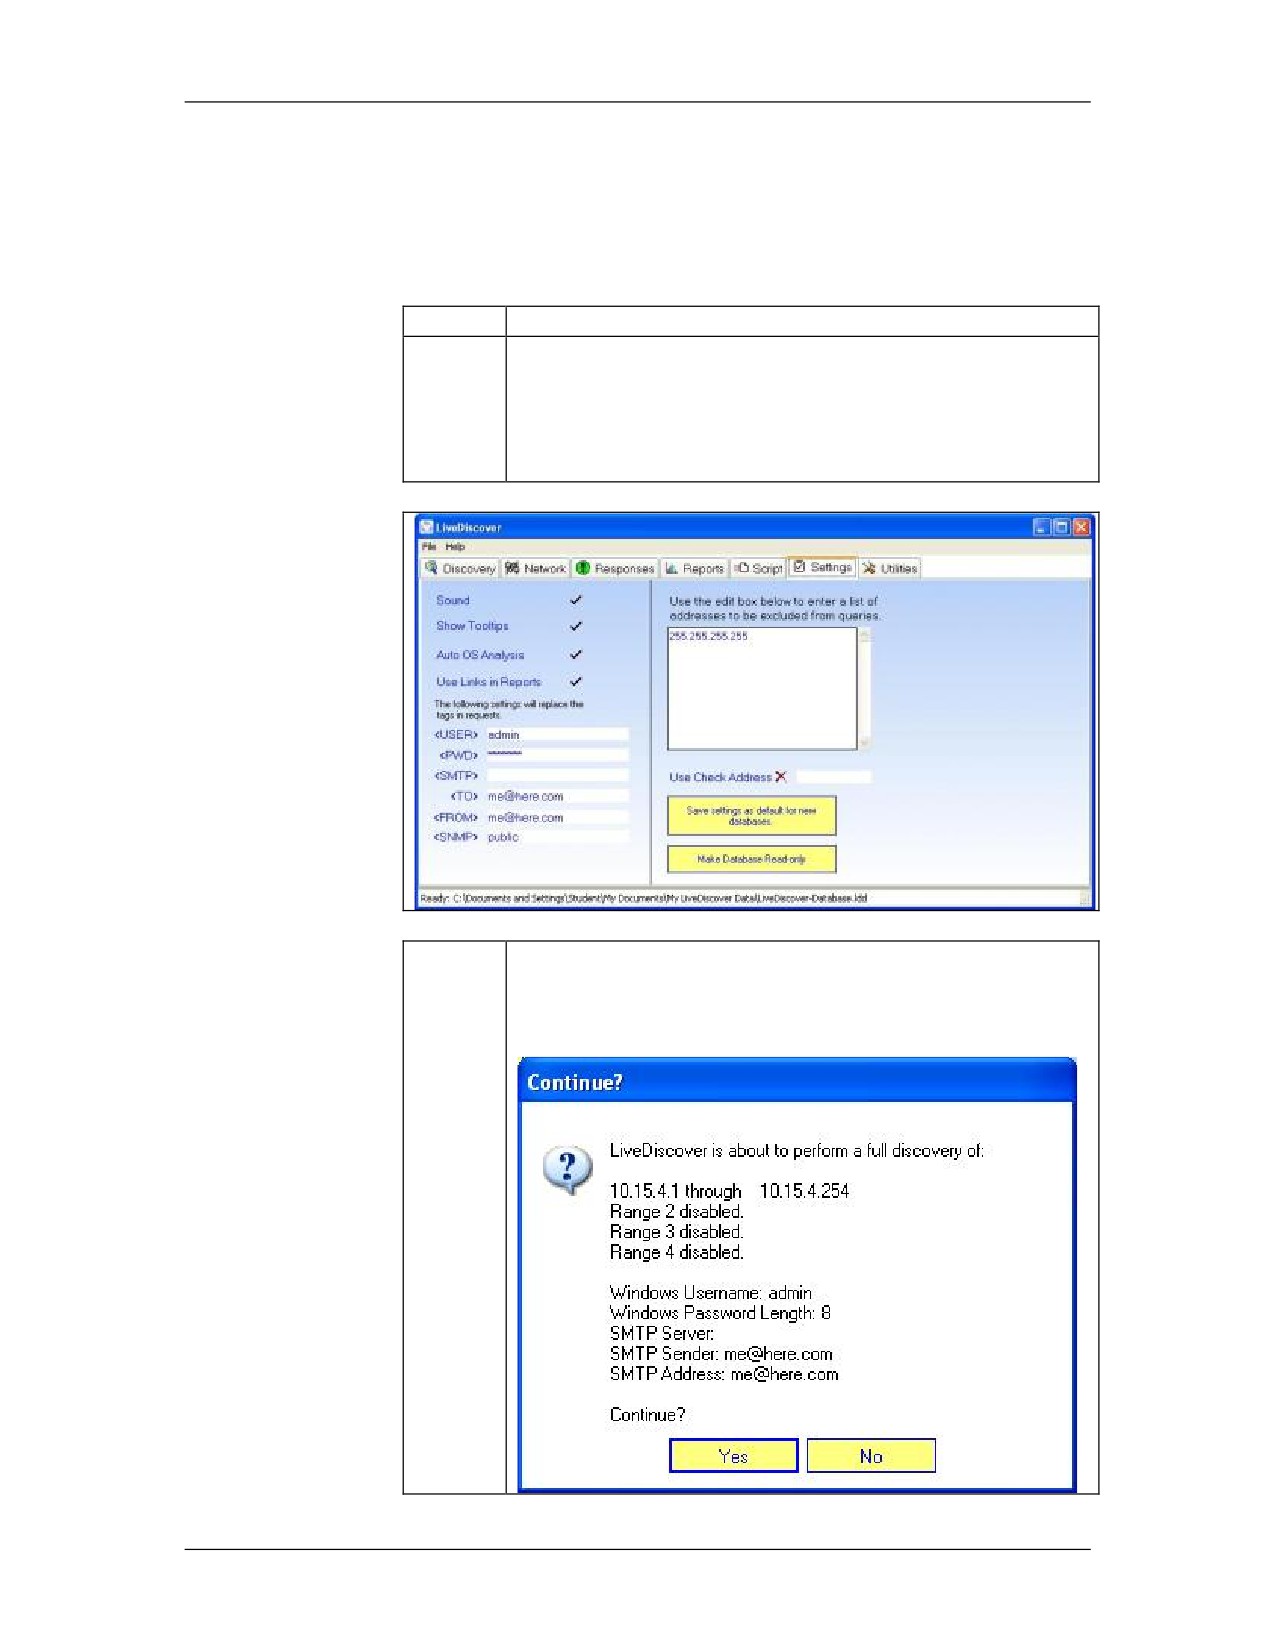
The Settings tab contains the configurations to use during the live
discovery process. The username and password used in this tab
should be an account that has administrative rights to that device.
You can also configure the SMTP setting and e-mail address to
automatically have an e-mail sent once the scan is completed.
The Utilities tab offers options for scripts and results from other
scans to be imported into the current database. Scripts can also be
exported to be used in other scans.
01/09
For Official Use Only - Law Enforcement Sensitive
12-33
LiveWire Investigations
Network Intrusion Responder Program
LiveDiscover Network Scanning, continued
Procedure:
In this section, you will scan a subnet to determine information
Performing a
needed to assist with the LiveWire investigation.
LiveDiscover
Network Scan
Step
Action
1
Open the LiveDiscover application by navigating to:
Start > All Programs > LiveDiscover > LiveDiscover.
2
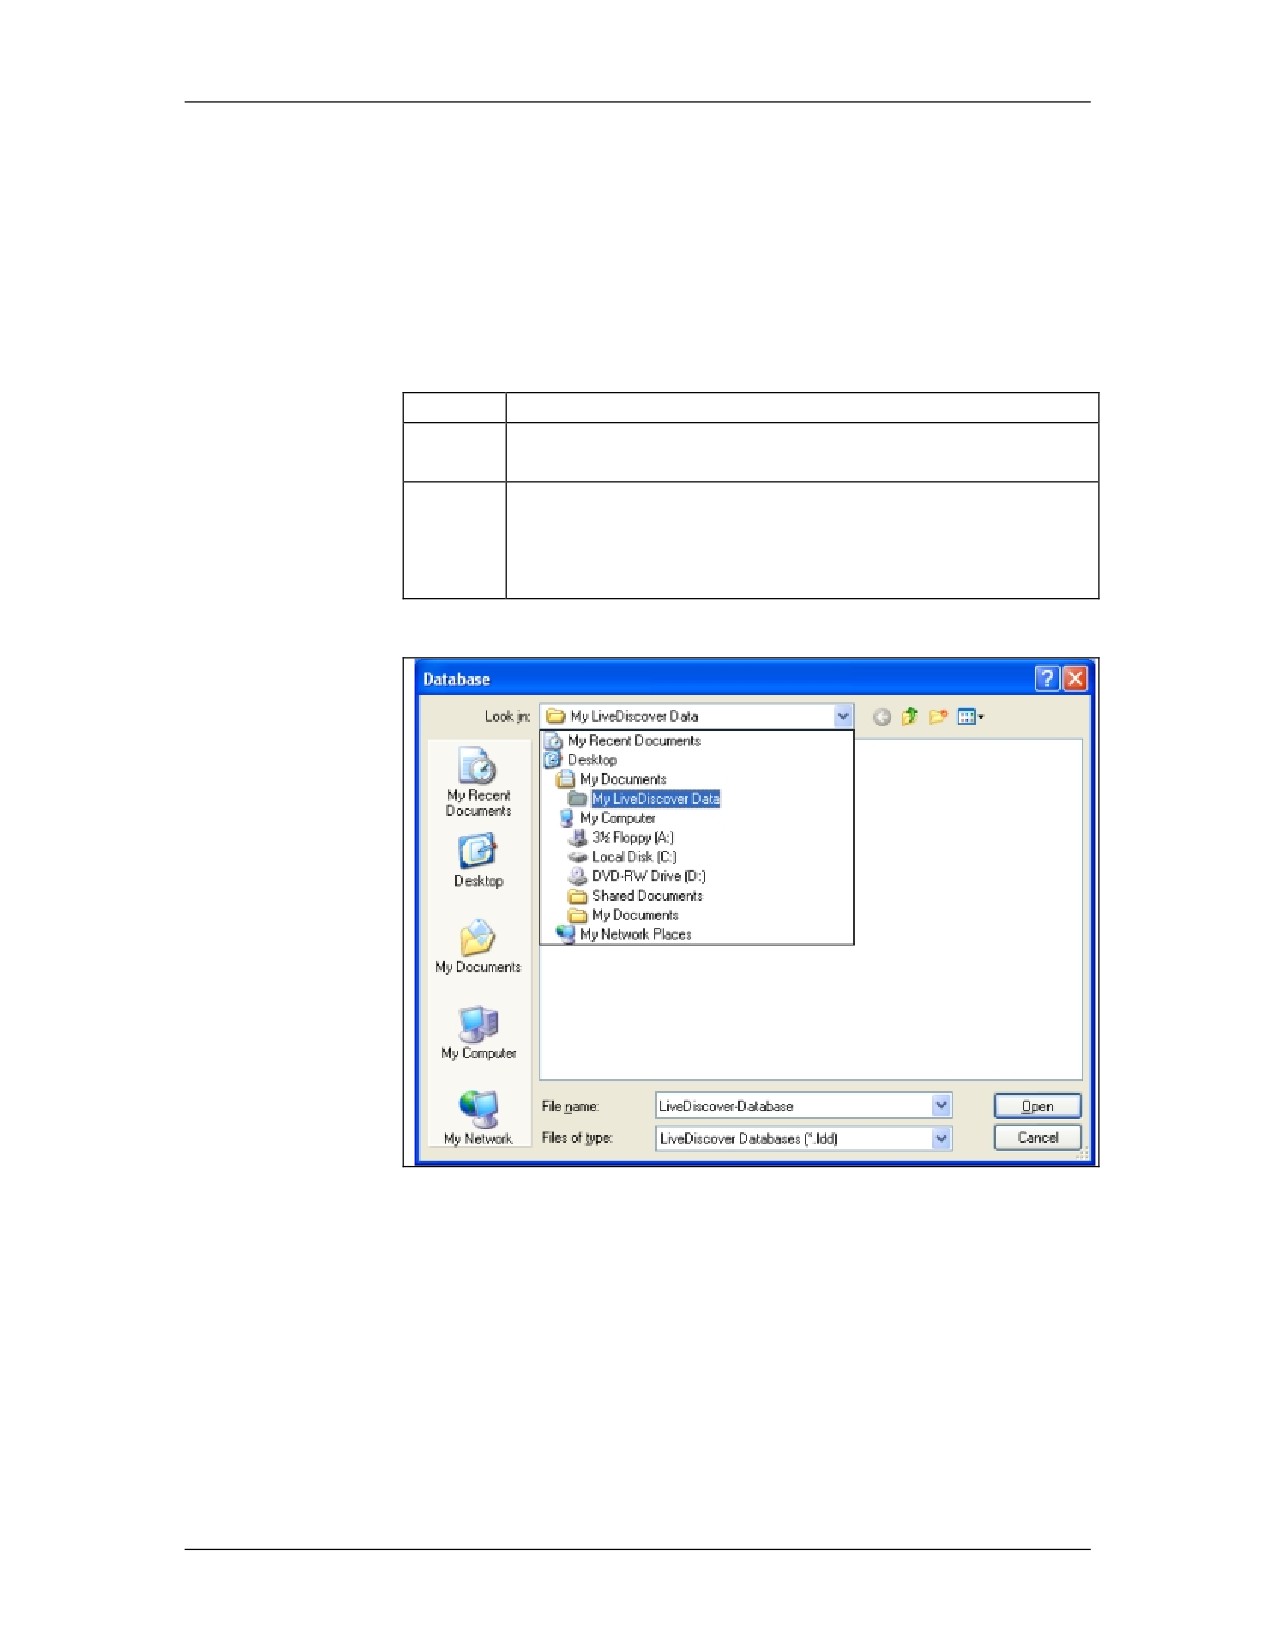
You will be prompted to open a current database, or
create a new database by typing in a file name. Type a
name for the new database, such as
“LiveDiscoverDatabase.” Then click Open.
12-34
For Official Use Only - Law Enforcement Sensitive
01/09
Network Intrusion Responder Program
LiveWire Investigations
LiveDiscover Network Scanning, continued
Procedure: Performing a LiveDiscover Network Scan, continued
Step
Action
3
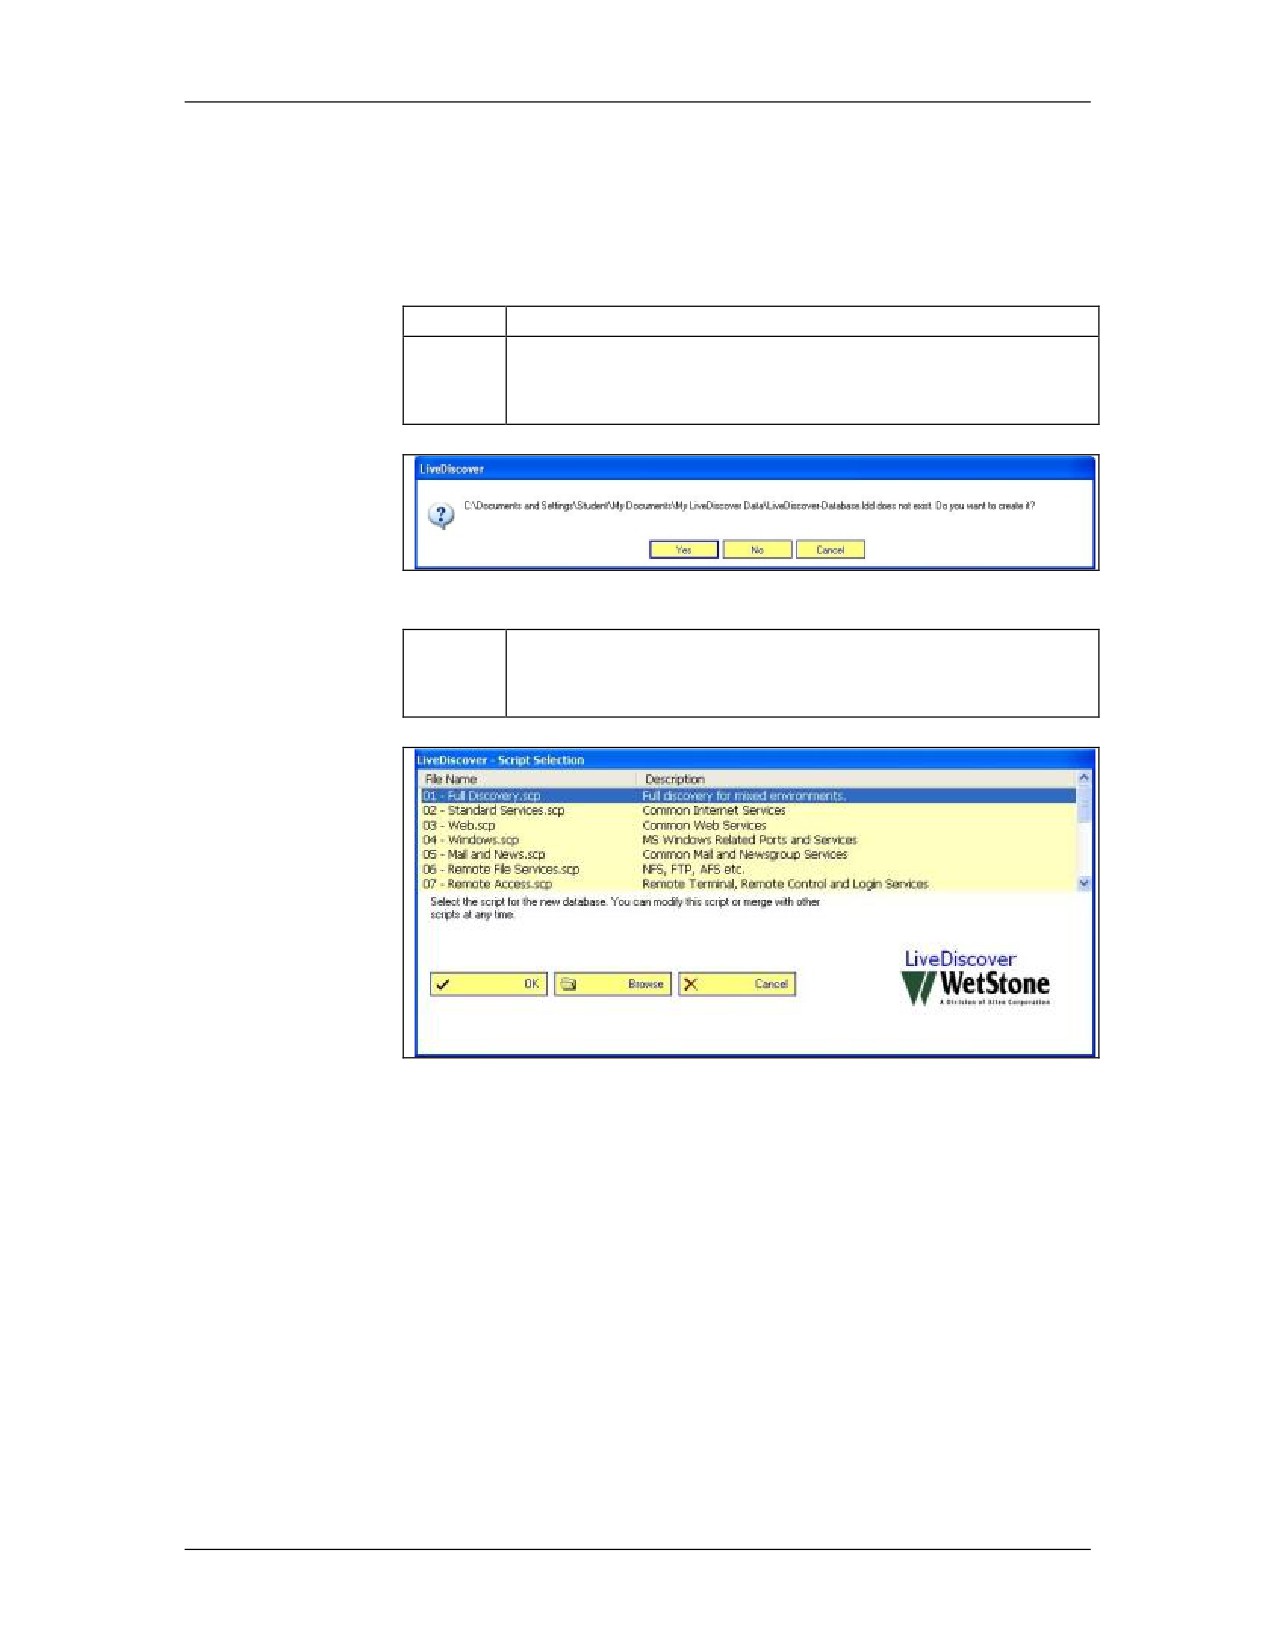
Because the new database name does not already exist,
the user will be prompted to verify the creation of a new
database. Select Yes to create the new database.
4
LiveDiscover comes with many scripts to identify
devices and resources on the network. Highlight “01 -
Full Discovery.scp” and click OK.
01/09
For Official Use Only - Law Enforcement Sensitive
12-35
LiveWire Investigations
Network Intrusion Responder Program
LiveDiscover Network Scanning, continued
Procedure: Performing a LiveDiscover Network Scan, continued
Step
Action
5
The standard LiveDiscover page is displayed. Change
the network setting to Fast LAN. Then enter in the upper
box the IP address range to scan. This information will
be provided by your instructor, but it will normally be
an entire network range, such as the values below:
Start IP: 10.15.4.1
End IP: 10.15.4.254
Beside Full Discovery, click on Range to activate
scanning the desired network range.
12-36
For Official Use Only - Law Enforcement Sensitive
01/09
Network Intrusion Responder Program
LiveWire Investigations
LiveDiscover Network Scanning, continued
Procedure: Performing a LiveDiscover Network Scan, continued
Step
Action
6
Click on the Settings tab and enter the following
information:
<User>: admin
<PWD>: password
7
Go back to the Discovery tab and click Full Discovery.
Click Yes to verify the information entered is correct
and to begin the discovery scan.
01/09
For Official Use Only - Law Enforcement Sensitive
12-37
LiveWire Investigations
Network Intrusion Responder Program
LiveDiscover Network Scanning, continued
Procedure: Performing a LiveDiscover Network Scan, continued
Step
Action
8
Once the scan has successfully completed, click on the
Network tab. Expand the network tree until the details of
the computer Spider is displayed. The information on
the right verifies the operating system is a Windows XP
machine.
12-38
For Official Use Only - Law Enforcement Sensitive
01/09
Network Intrusion Responder Program
LiveWire Investigations
Lesson 4 - Volatile Data Analysis
Introduction
Volatile data on a system can be very valuable to an investigation.
This information typically holds information regarding activity
that is occurring during the investigation, but can be completely
lost when the system is powered off.
Purpose of this
The purpose of this lesson is to introduce you to the functionality
Lesson
of LiveWire Investigator.
Objectives
After successfully completing this lesson, you will be able to:
Conduct an initial inquiry of a system
View the current open files on a system
View the current network connections and configurations
Image RAM over the network
In this Lesson
The following table shows the contents of this lesson.
Topic
See Page
LiveWire Initial Inquiry
12-40
System State
12-49
Current User Activity
12-55
Active Network State
12-68
01/09
For Official Use Only - Law Enforcement Sensitive
12-39
LiveWire Investigations
Network Intrusion Responder Program
LiveWire Initial Inquiry
Initial Inquiry
When performing an investigation or analysis of a system using
LiveWire the first part of the process is the initial inquiry. This
will retrieve information from the remote computer that is
available at the current time. It must be noted that all live systems
are dynamic; therefore, if information is gathered at a later time it
may be very different. If an individual workstation is being
monitored for illicit activities, the initial inquiry must be
performed as those activities are occurring.
The initial inquiry and other intensive analyses do have the
potential to degrade the performance of the suspect machine.
Therefore, it may be possible for the user to become alerted of
suspicious activity that affects his or her machine. An advanced
user with authenticated credentials to the local machine may be
able to determine that the analysis is taking place. These concerns
must be addressed depending on the circumstances of each
individual investigation.
12-40
For Official Use Only - Law Enforcement Sensitive
01/09
Network Intrusion Responder Program
LiveWire Investigations
LiveWire Initial Inquiry, continued
Procedure:
Follow these steps to begin an initial inquiry of a Windows XP
LiveWire - Initial
machine using LiveWire.
Inquiry
Step
Action
1
Open LiveWire from the Windows Start Menu by
selecting: “Start > All Programs > LiveWire > Launch
LiveWire.” Login with the Investigator ID and password
created in a previous lesson.
2
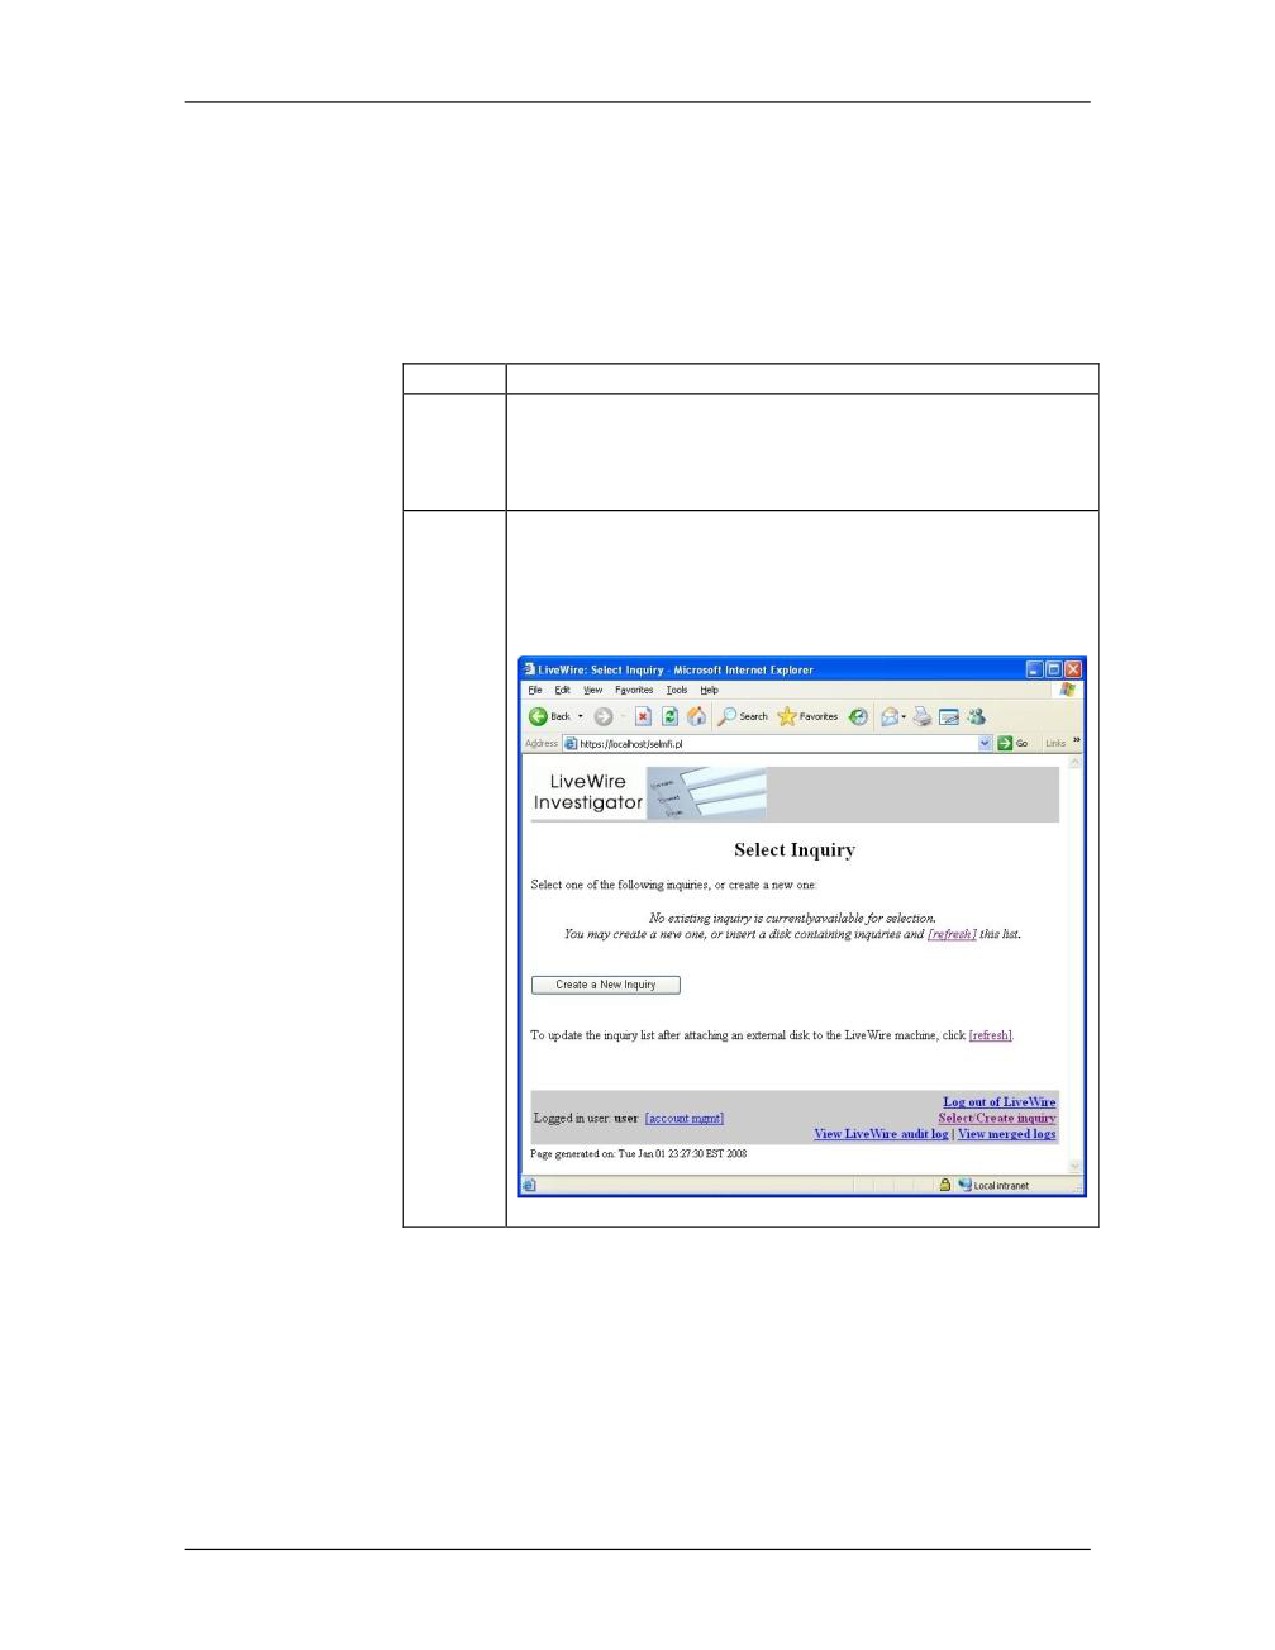
To begin an investigation an Inquiry must be created.
On the Select Inquiry page click Create a New Inquiry.
If other inquiries already exist on the system, you would
have the option to go to an existing inquiry.
01/09
For Official Use Only - Law Enforcement Sensitive
12-41
LiveWire Investigations
Network Intrusion Responder Program
LiveWire Initial Inquiry, continued
Procedure: LiveWire - Initial Inquiry, continued
Step
Action
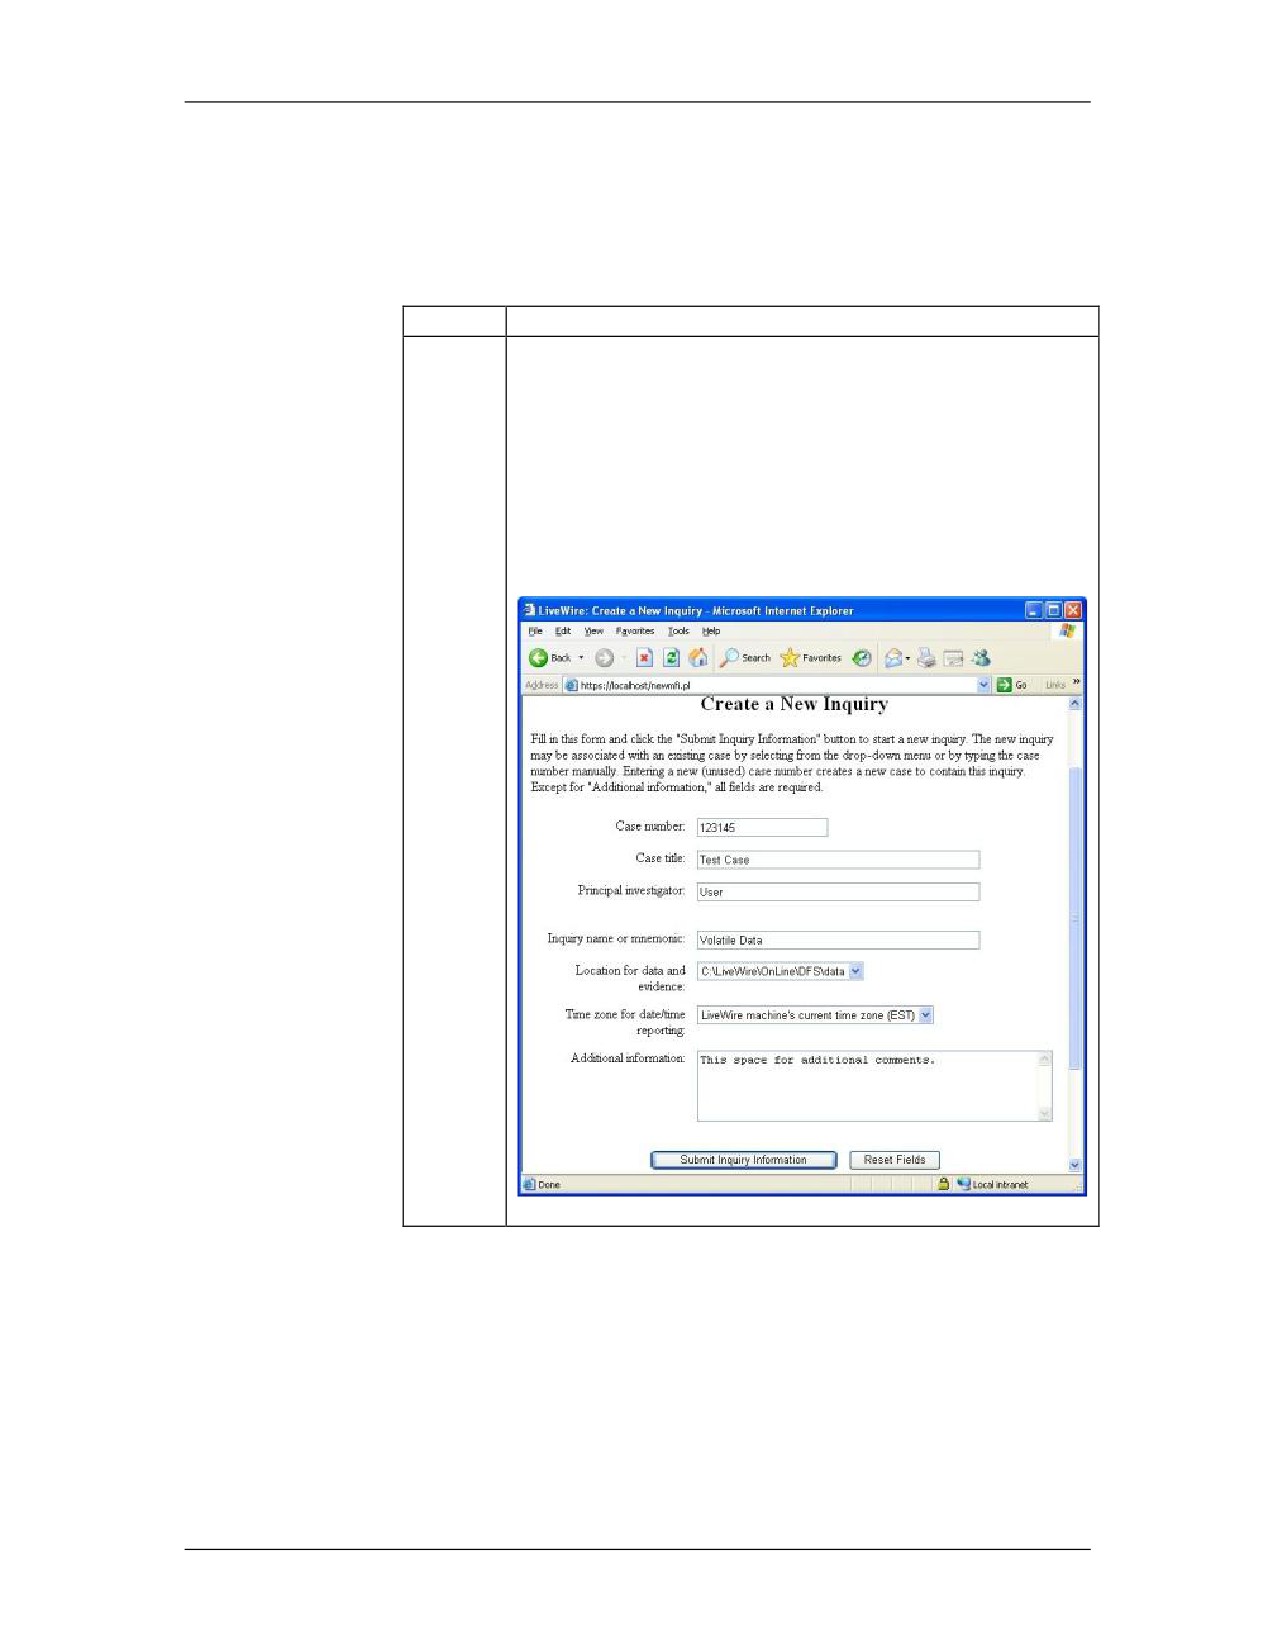
3
Complete the inquiry information as needed, and then
click Submit Inquiry Information.
Notice that for these lessons we will be saving the data
to the default data location. If data needs to be
preserved as evidence, it’s always best practice to save
it to a forensically clean location, such as an external
wiped drive.
12-42
For Official Use Only - Law Enforcement Sensitive
01/09
Network Intrusion Responder Program
LiveWire Investigations
LiveWire Initial Inquiry, continued
Procedure: LiveWire - Initial Inquiry, continued
Step
Action
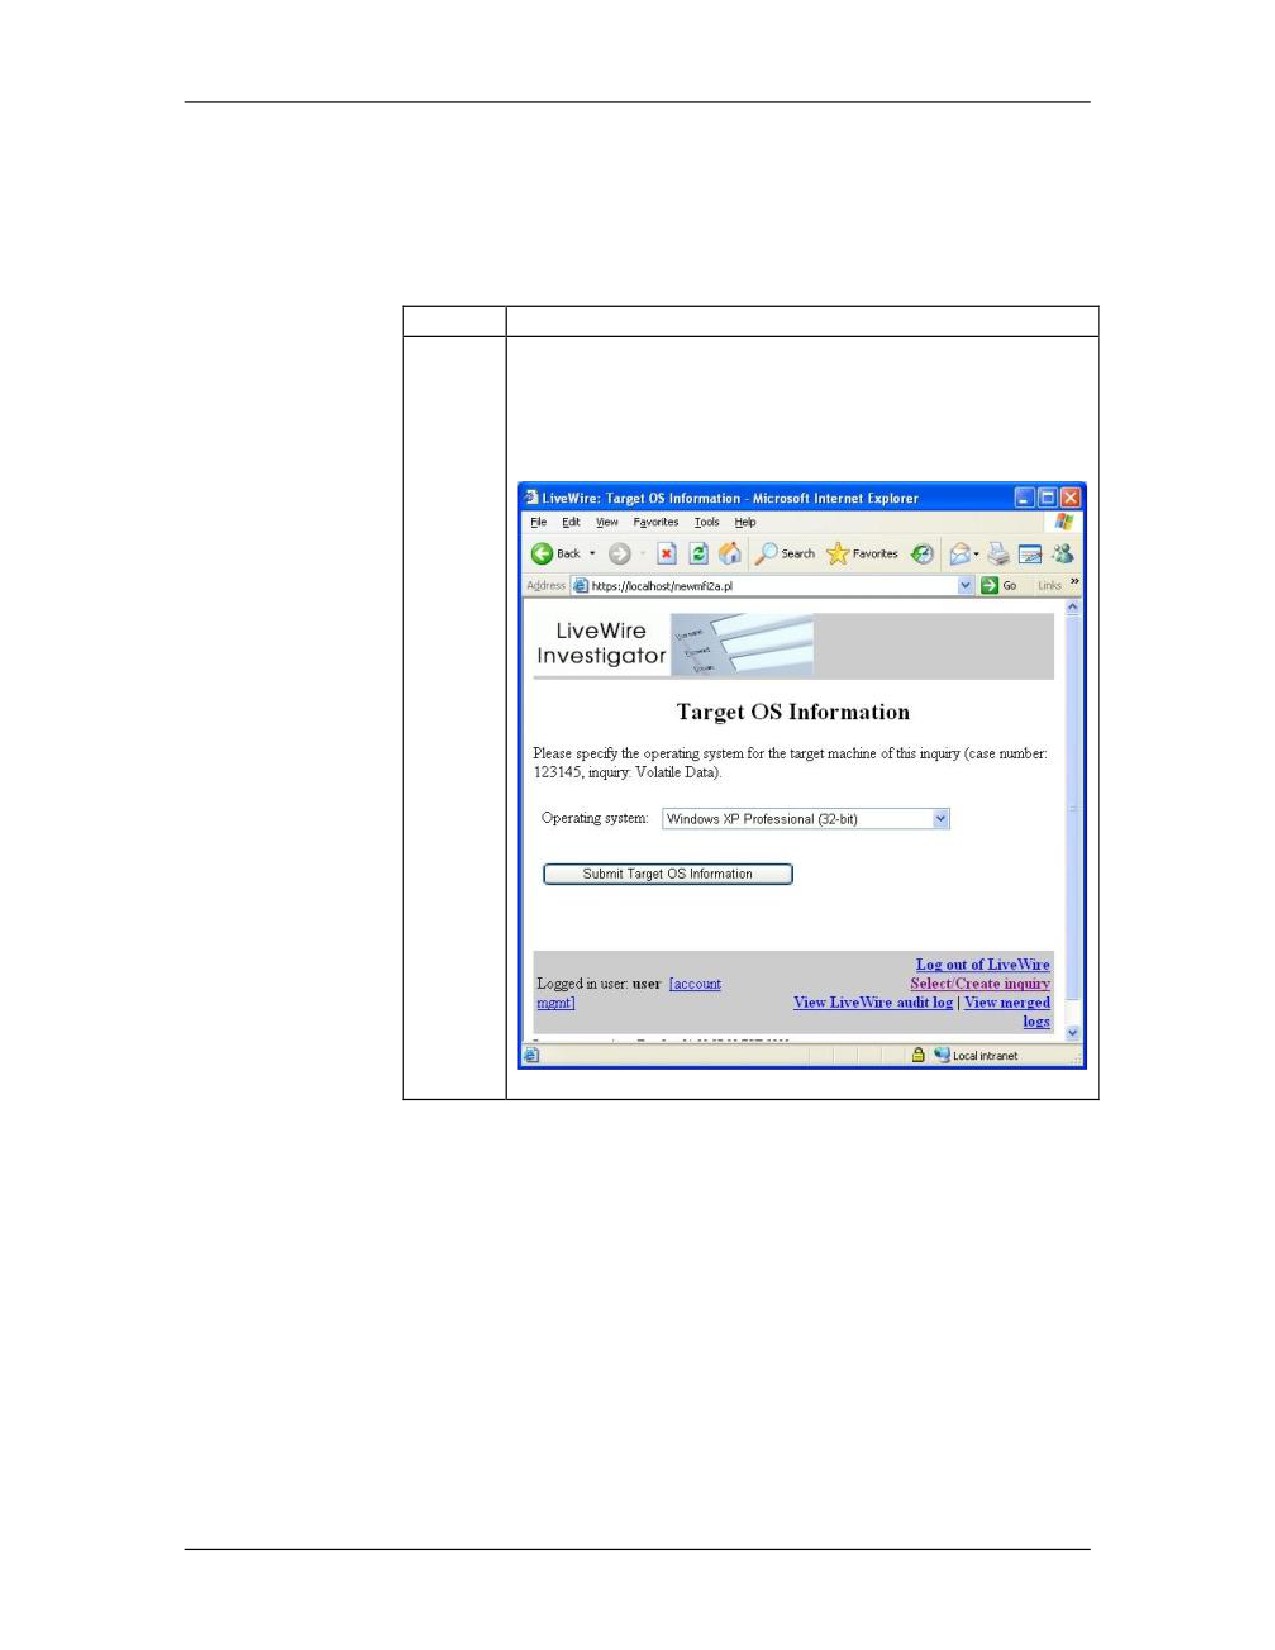
4
Next, the target OS must be specified. Select Windows
XP Professional from the drop-down list. Then click
Submit Target OS Information. This information was
gathered from the earlier LiveDiscover lesson.
01/09
For Official Use Only - Law Enforcement Sensitive
12-43
LiveWire Investigations
Network Intrusion Responder Program
LiveWire Initial Inquiry, continued
Procedure: LiveWire - Initial Inquiry, continued
Step
Action
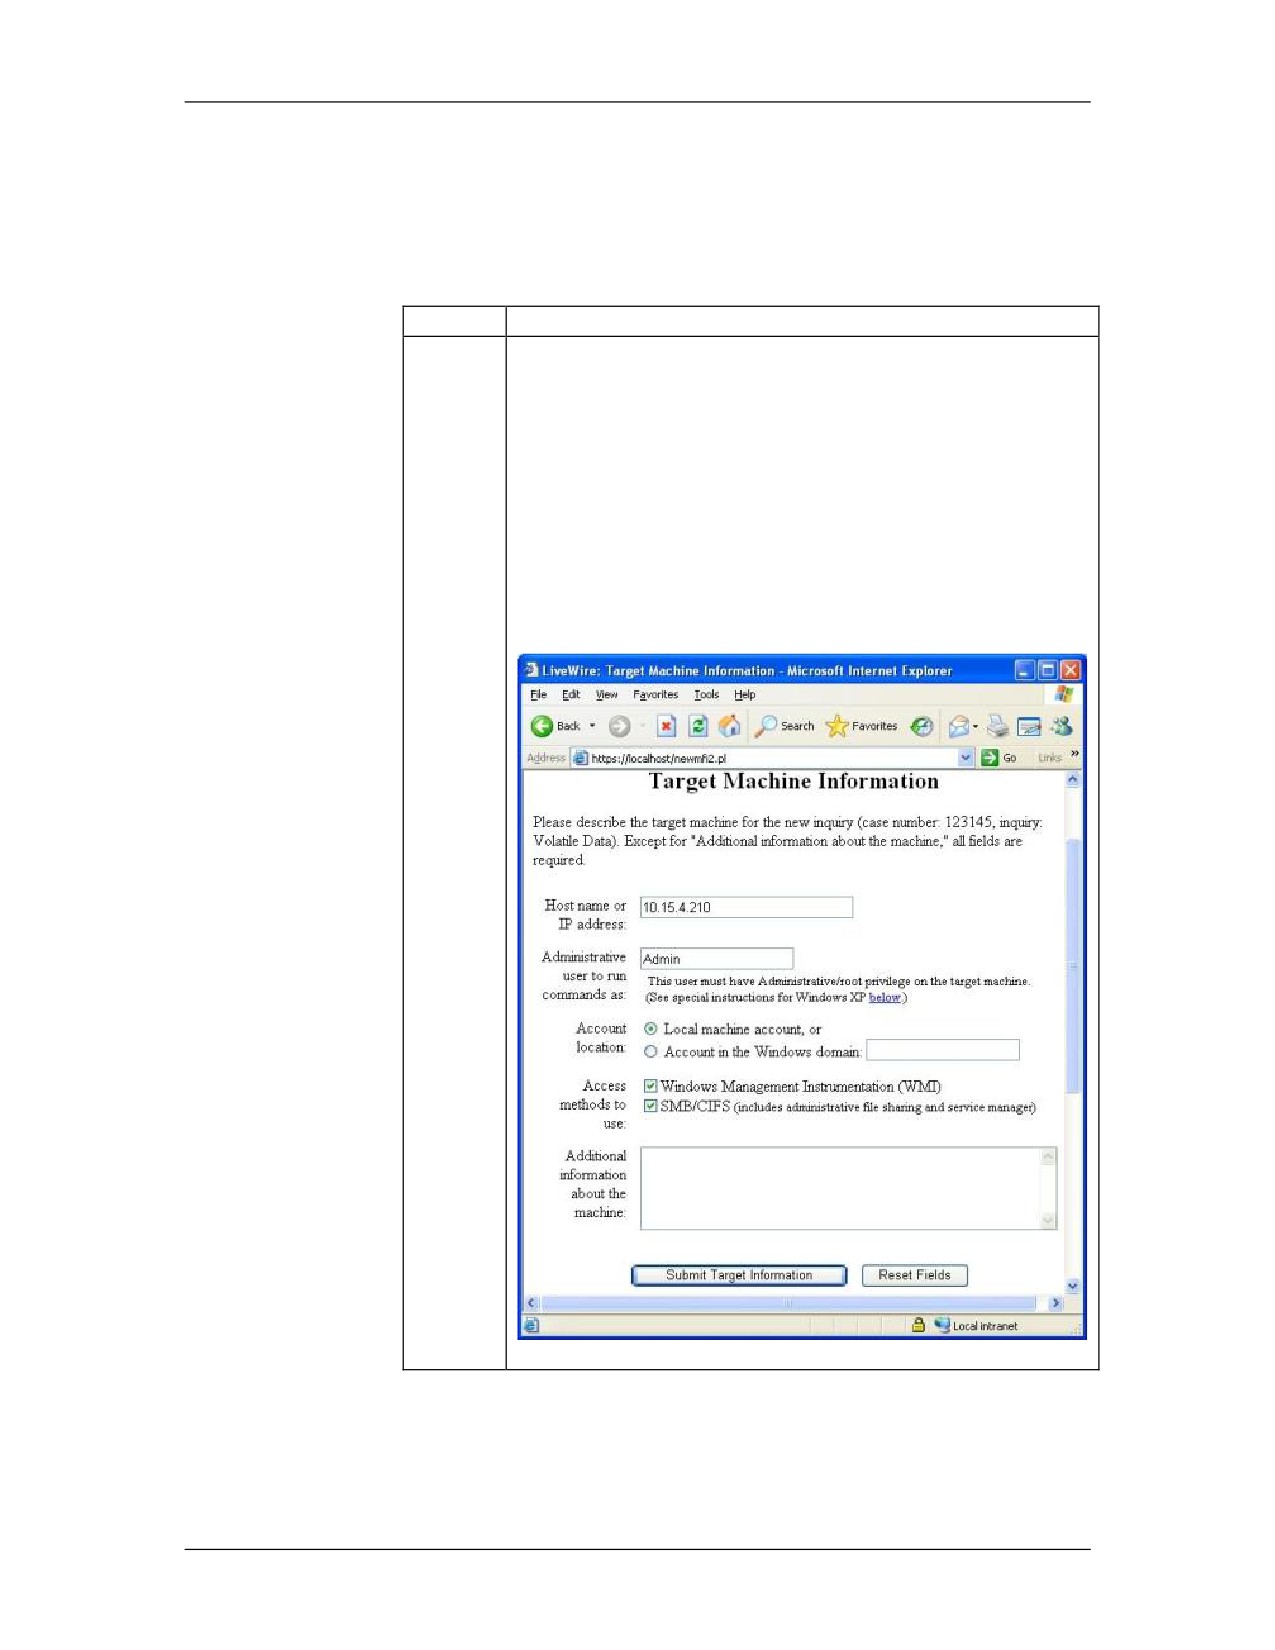
5
The Target machine Information page is displayed.
Using data gathered in the Discovery lesson, enter the
following information into the boxes and click Submit
Target Information.
For classroom purposes, the IP address will be provided
by your instructor.
For the Administrative user to run commands as use:
Admin
12-44
For Official Use Only - Law Enforcement Sensitive
01/09
Network Intrusion Responder Program
LiveWire Investigations
LiveWire Initial Inquiry, continued
Procedure: LiveWire - Initial Inquiry, continued
Step
Action
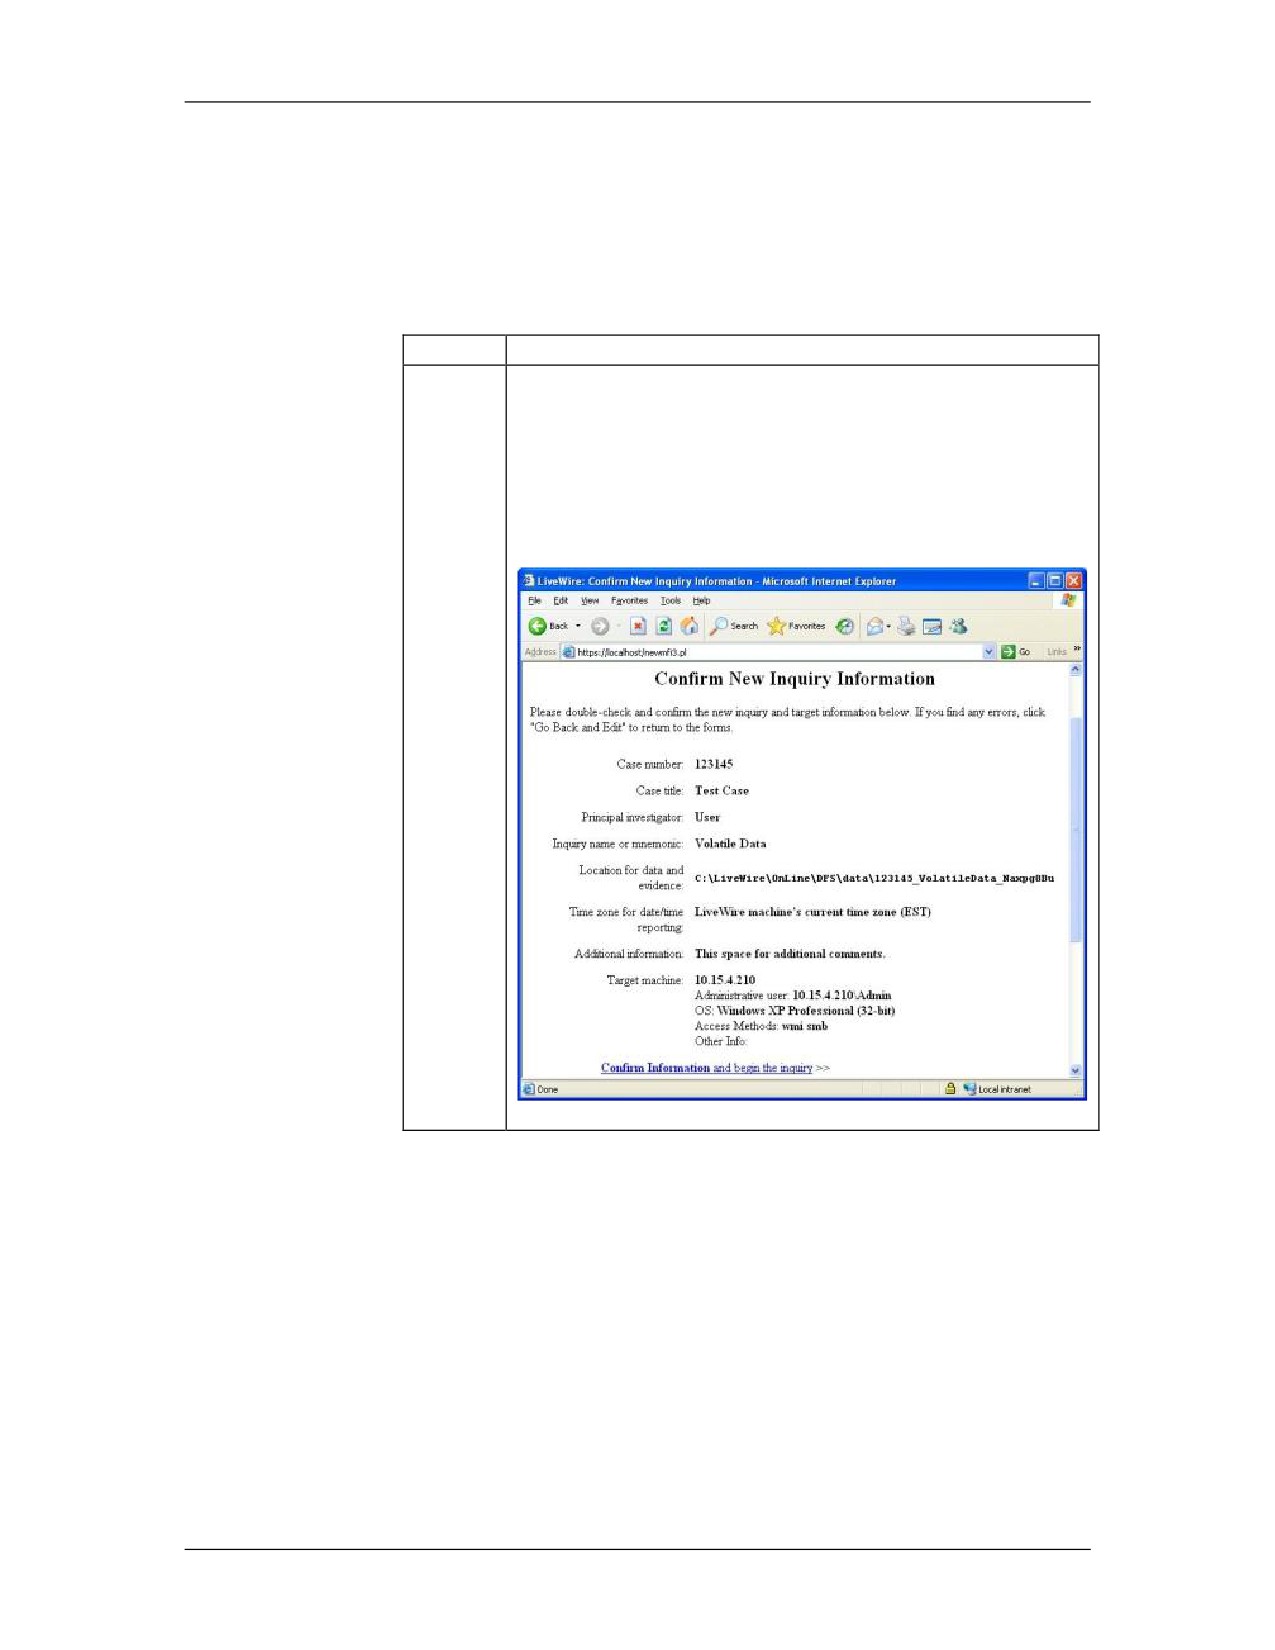
6
The next page you to review the information entered
before creating the new inquiry. Check the data and
click Confirm Information and begin the inquiry to
continue. Once the information has been confirmed, it
can not be edited. If the information is incorrect, a new
inquiry must be created with the correct information.
01/09
For Official Use Only - Law Enforcement Sensitive
12-45
LiveWire Investigations
Network Intrusion Responder Program
LiveWire Initial Inquiry, continued
Procedure: LiveWire - Initial Inquiry, continued
Step
Action
7
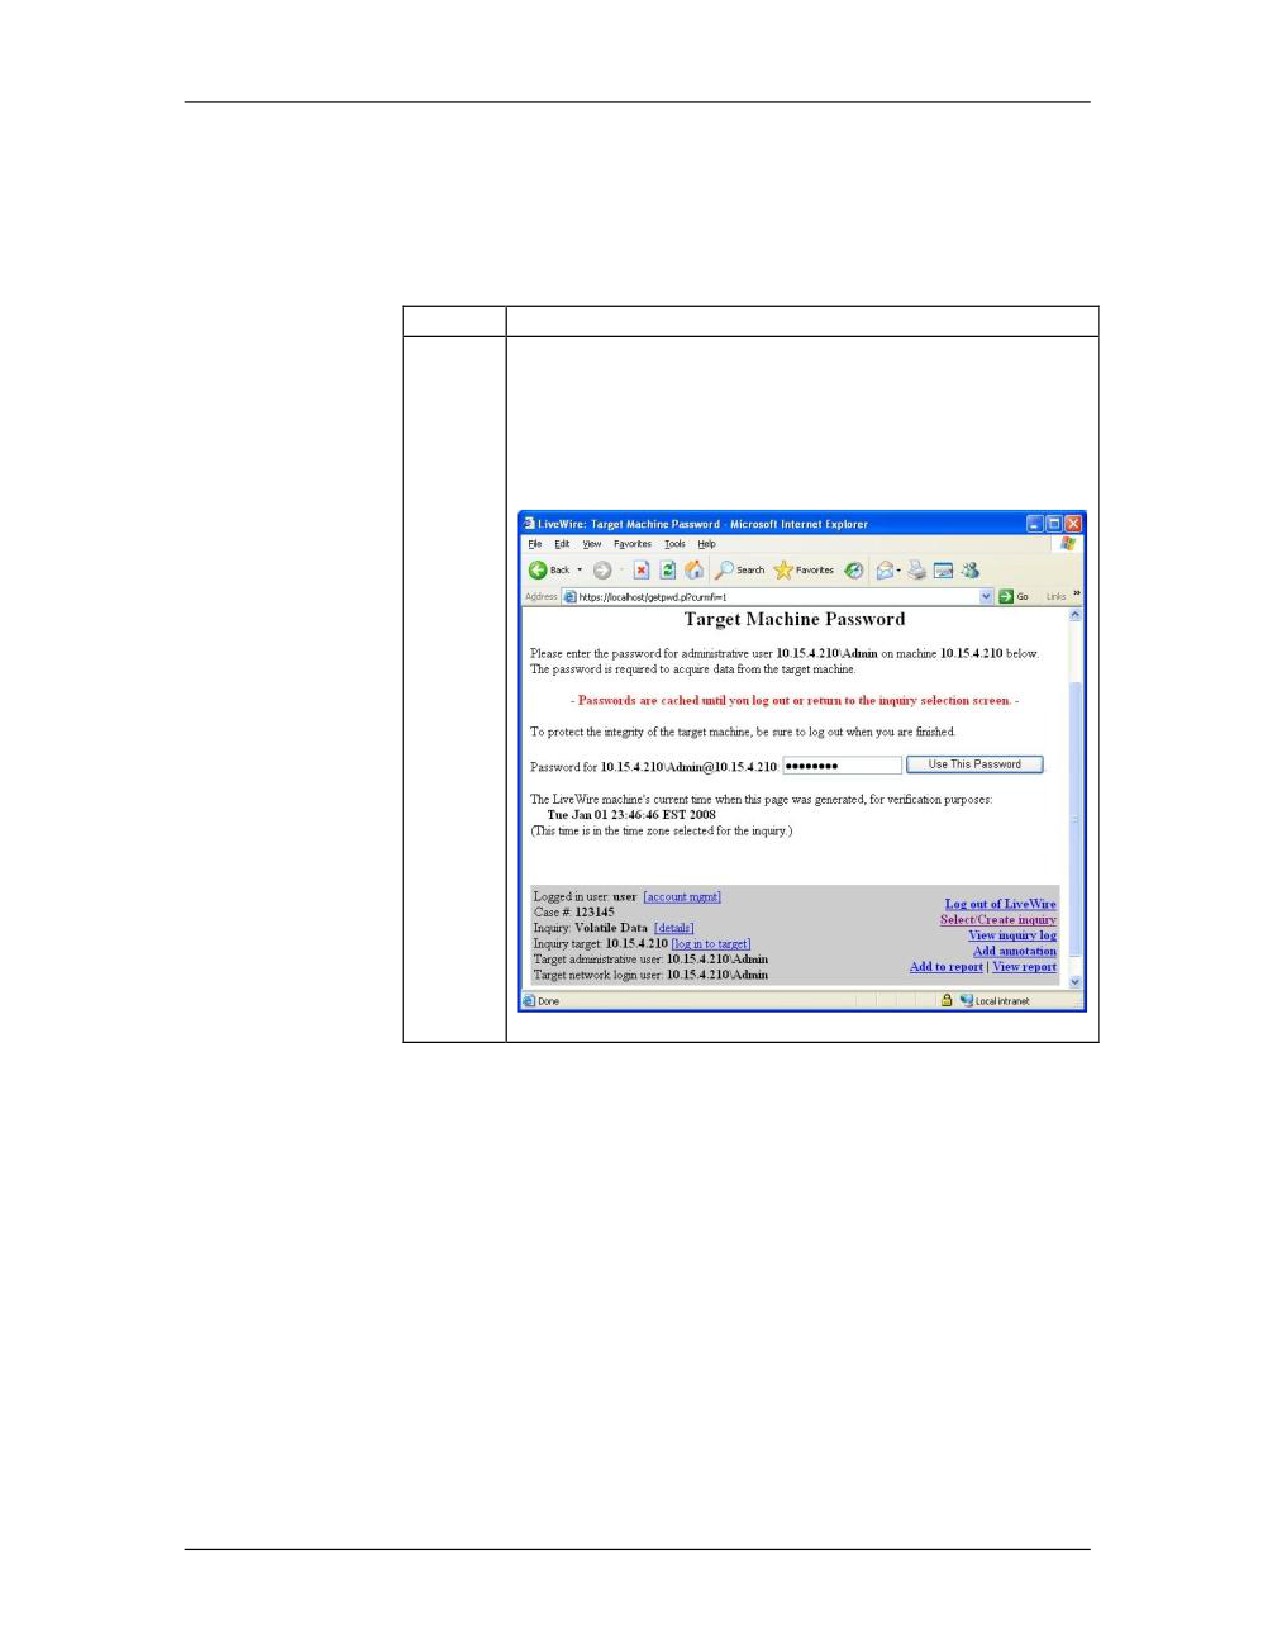
Enter the password for the user on the machine that has
administrative rights to the victim/suspect machine and
click Use This Password.
For classroom purposes, use the password: password
12-46
For Official Use Only - Law Enforcement Sensitive
01/09
Network Intrusion Responder Program
LiveWire Investigations
LiveWire Initial Inquiry, continued
Procedure: LiveWire - Initial Inquiry, continued
Step
Action
8
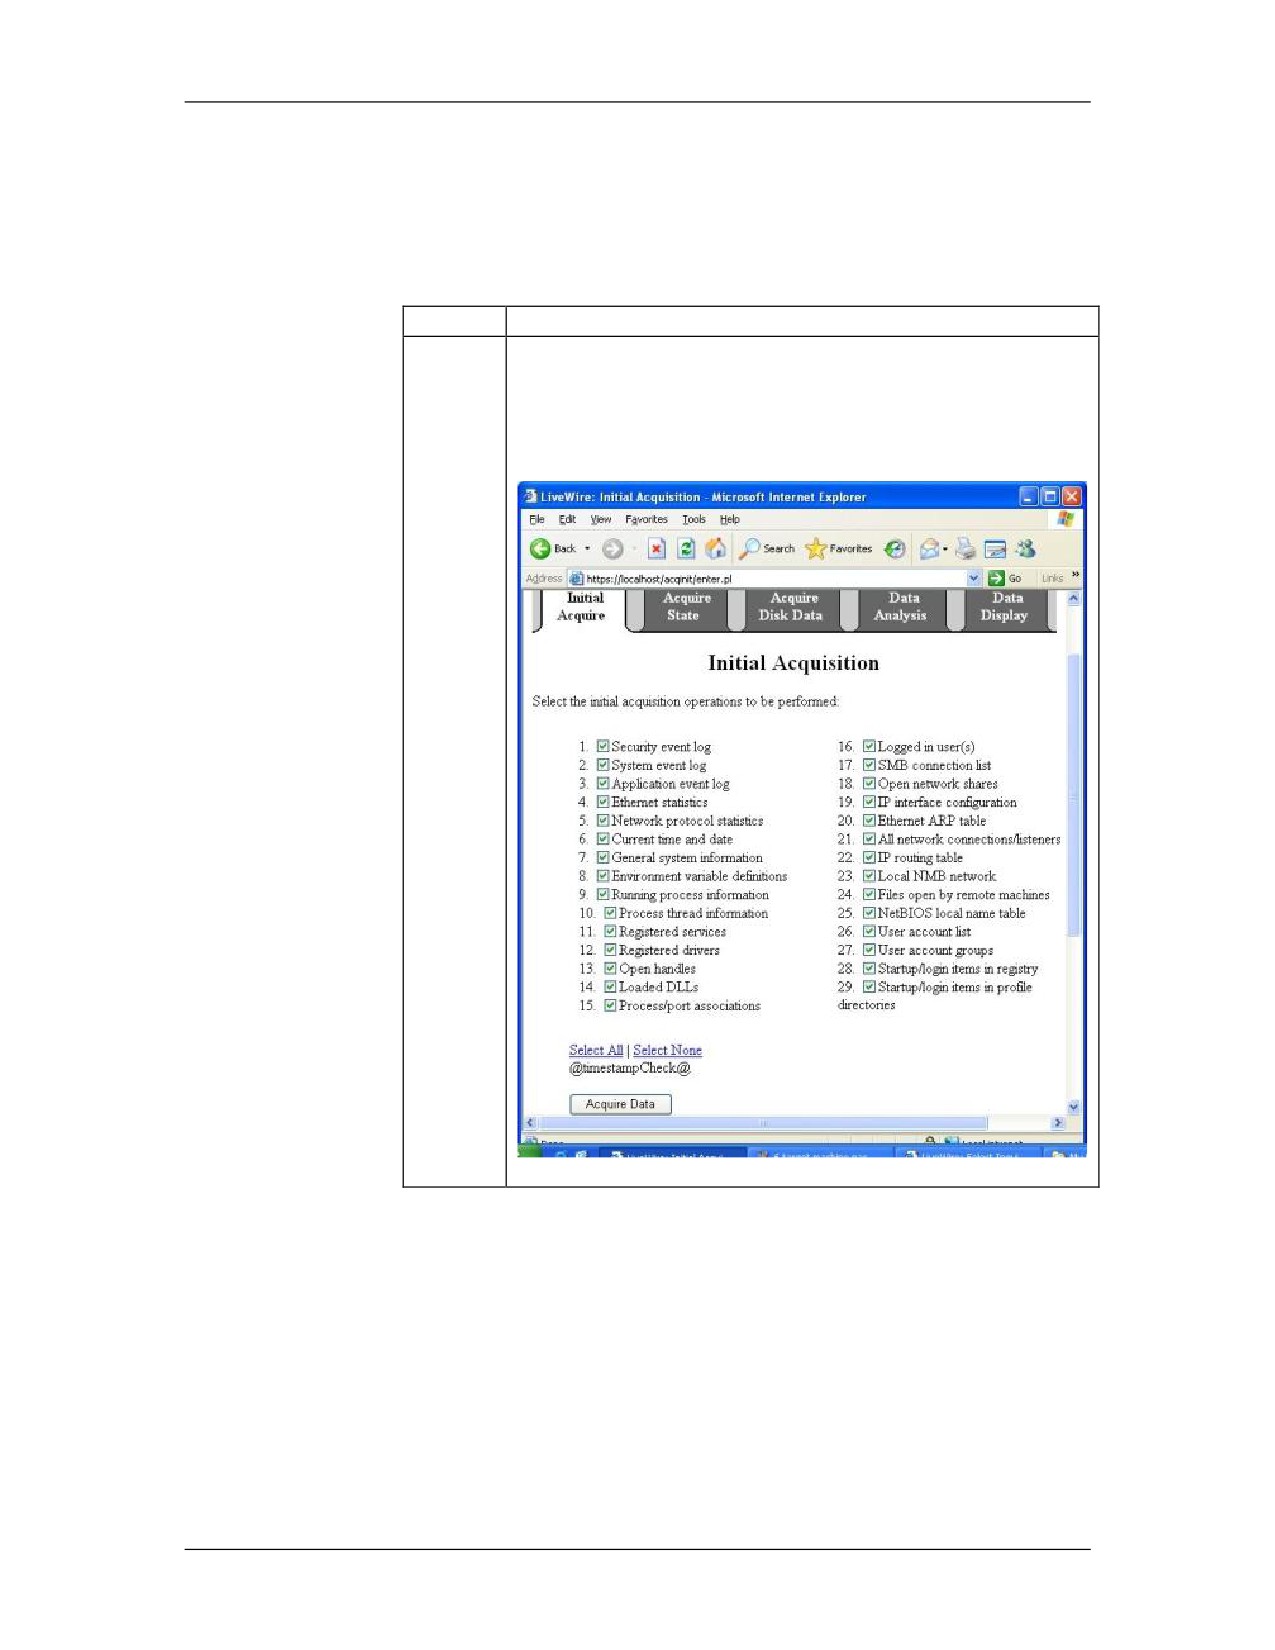
The next phase is to begin the initial acquisition. This
phase allows you to select all the data you wish to
retrieve for analysis. Verify that all boxes are checked
and click Acquire Data.
01/09
For Official Use Only - Law Enforcement Sensitive
12-47
LiveWire Investigations
Network Intrusion Responder Program
LiveWire Initial Inquiry, continued
Procedure: LiveWire - Initial Inquiry, continued
Step
Action
9
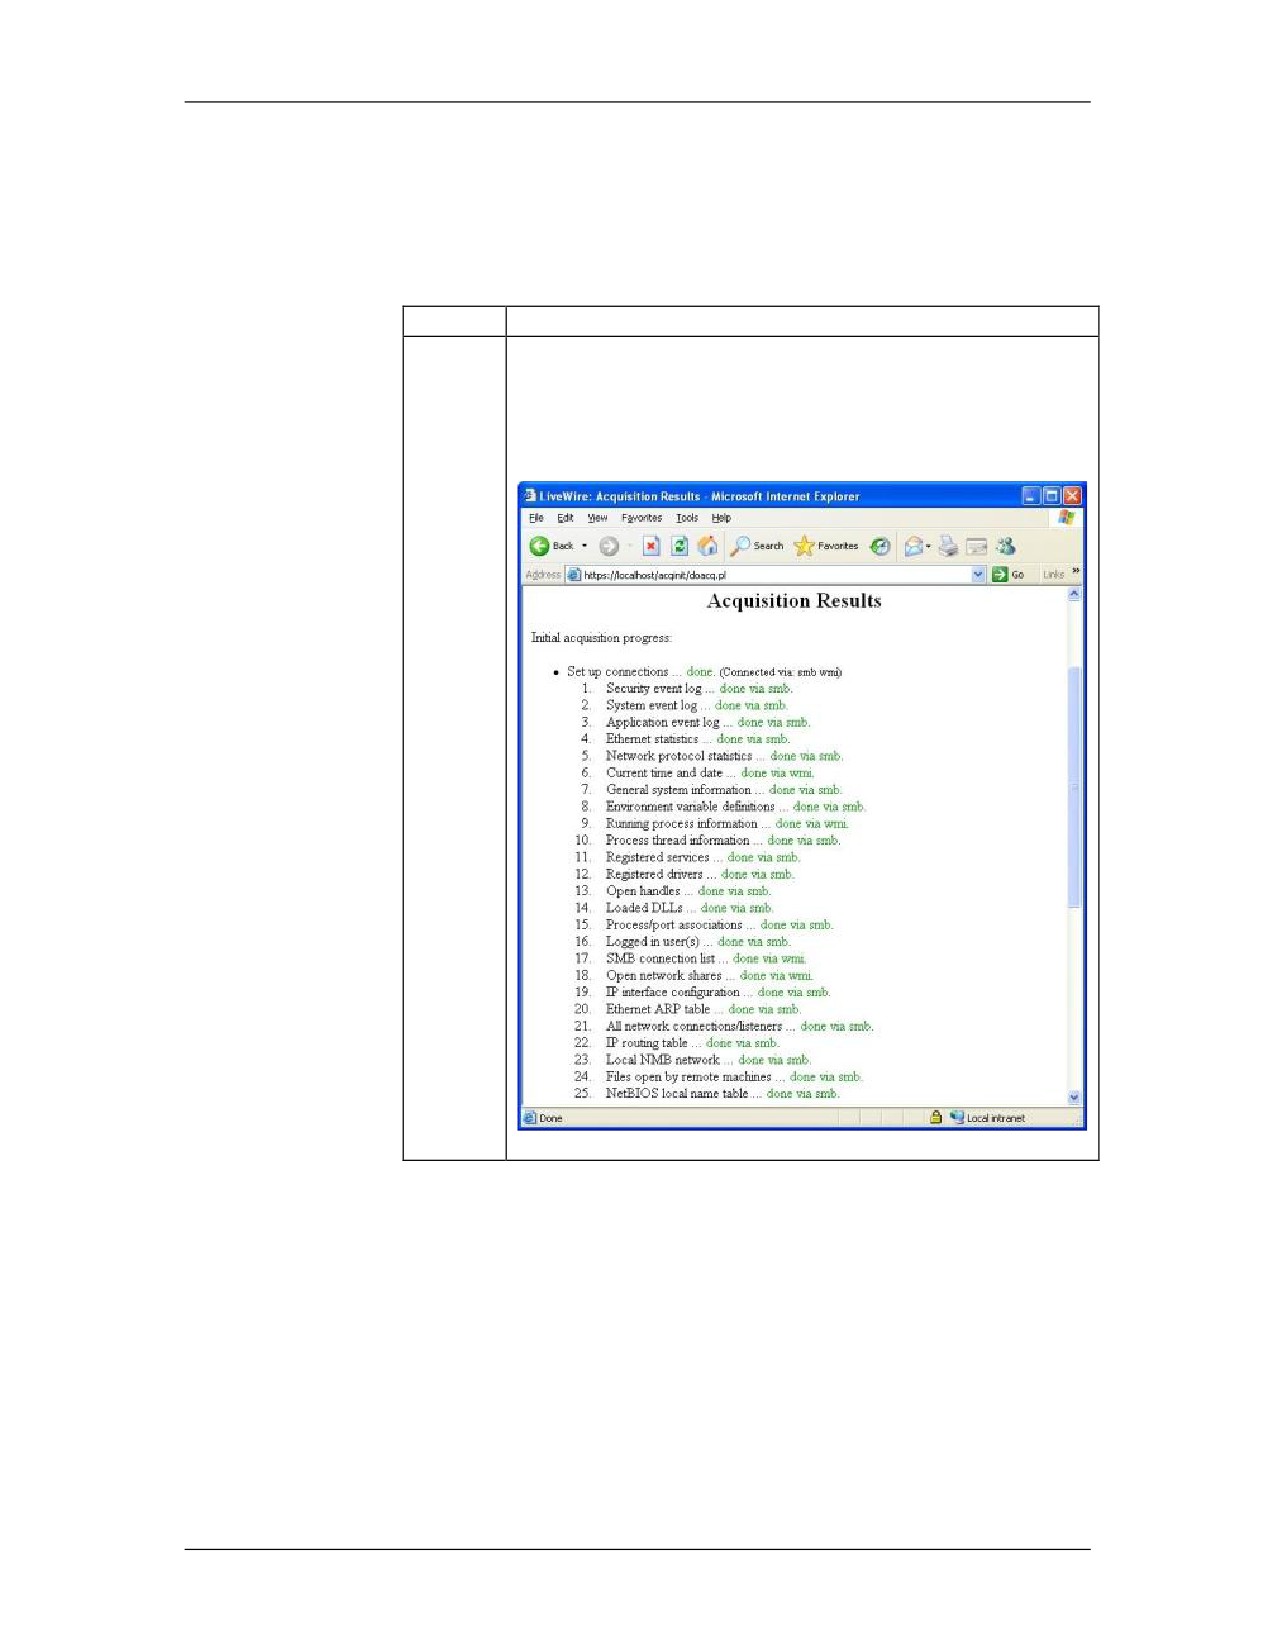
Once the acquisition has completed, a page similar to
the following will be displayed. This will allow you to
verify that the information was retrieved from the
suspect machine successfully.
12-48
For Official Use Only - Law Enforcement Sensitive
01/09
Network Intrusion Responder Program
LiveWire Investigations
System State
Overview
The previous section explained how to conduct the LiveWire
initial inquiry on the system for analysis. This section will
continue to explain how to capture volatile data on a system in
order for the data to be analyzed.
Procedure:
Use these steps to view the acquired system state summary. This
LiveWire -
section continues from the previous section.
Display Acquired
System State
Summary
Step
Action
1
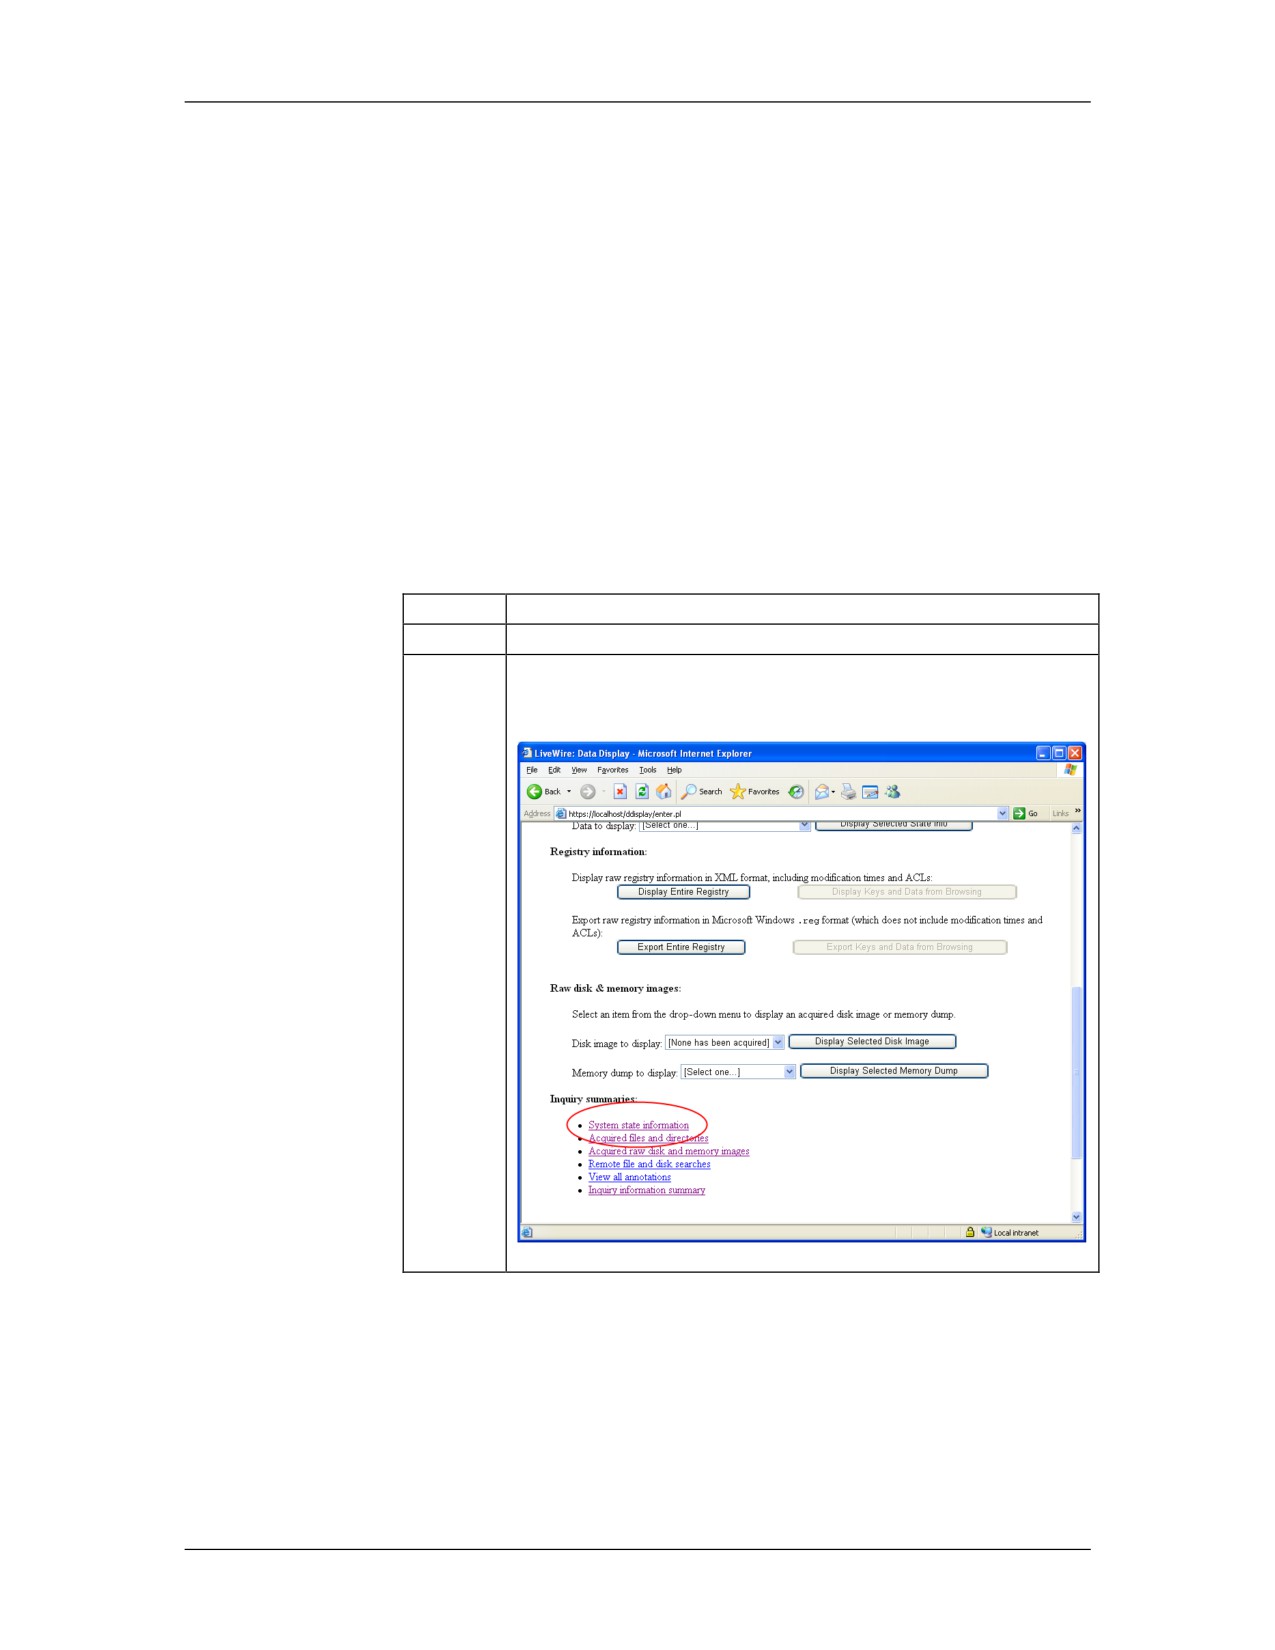
Click the Data Display tab.
2
Scroll down the Inquiry Summaries section. Click the
System state information link.
01/09
For Official Use Only - Law Enforcement Sensitive
12-49
LiveWire Investigations
Network Intrusion Responder Program
System State, continued
Procedure: LiveWire - Display Acquired System State Summary, continued
Step
Action
3
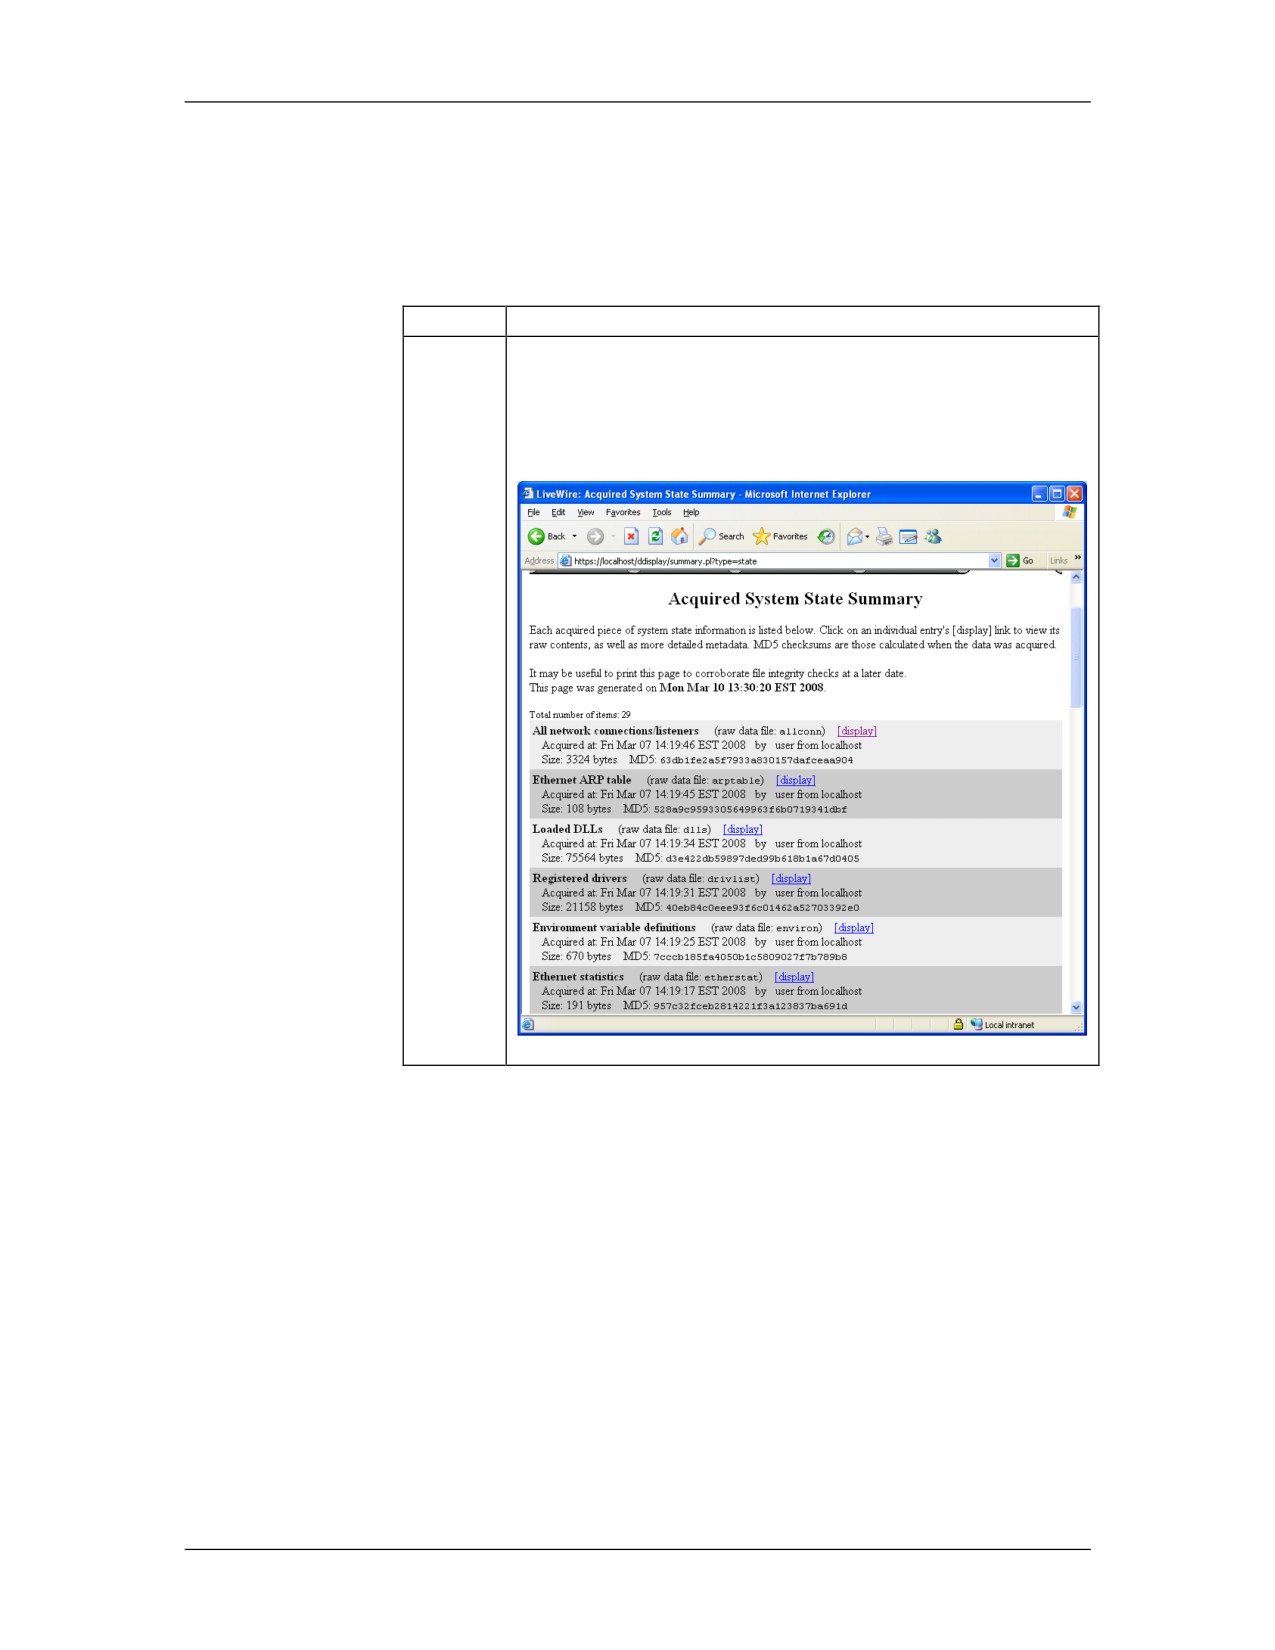
The acquired system state summary page will be
displayed. Links for details about each item is available
for all items. You may analyze information gathered by
selecting the [display] link next to each item.
12-50
For Official Use Only - Law Enforcement Sensitive
01/09
Network Intrusion Responder Program
LiveWire Investigations
System State, continued
Procedure:
Follow these steps to use LiveWire Investigator to acquire a
LiveWire -
snapshot of the RAM and acquire entire system registry. It is
Acquire Physical
always best practice to acquire the most volatile data prior to
RAM and the
collecting other less volatile types of data.
Registry
This section continues from the previous section.
Step
Action
1
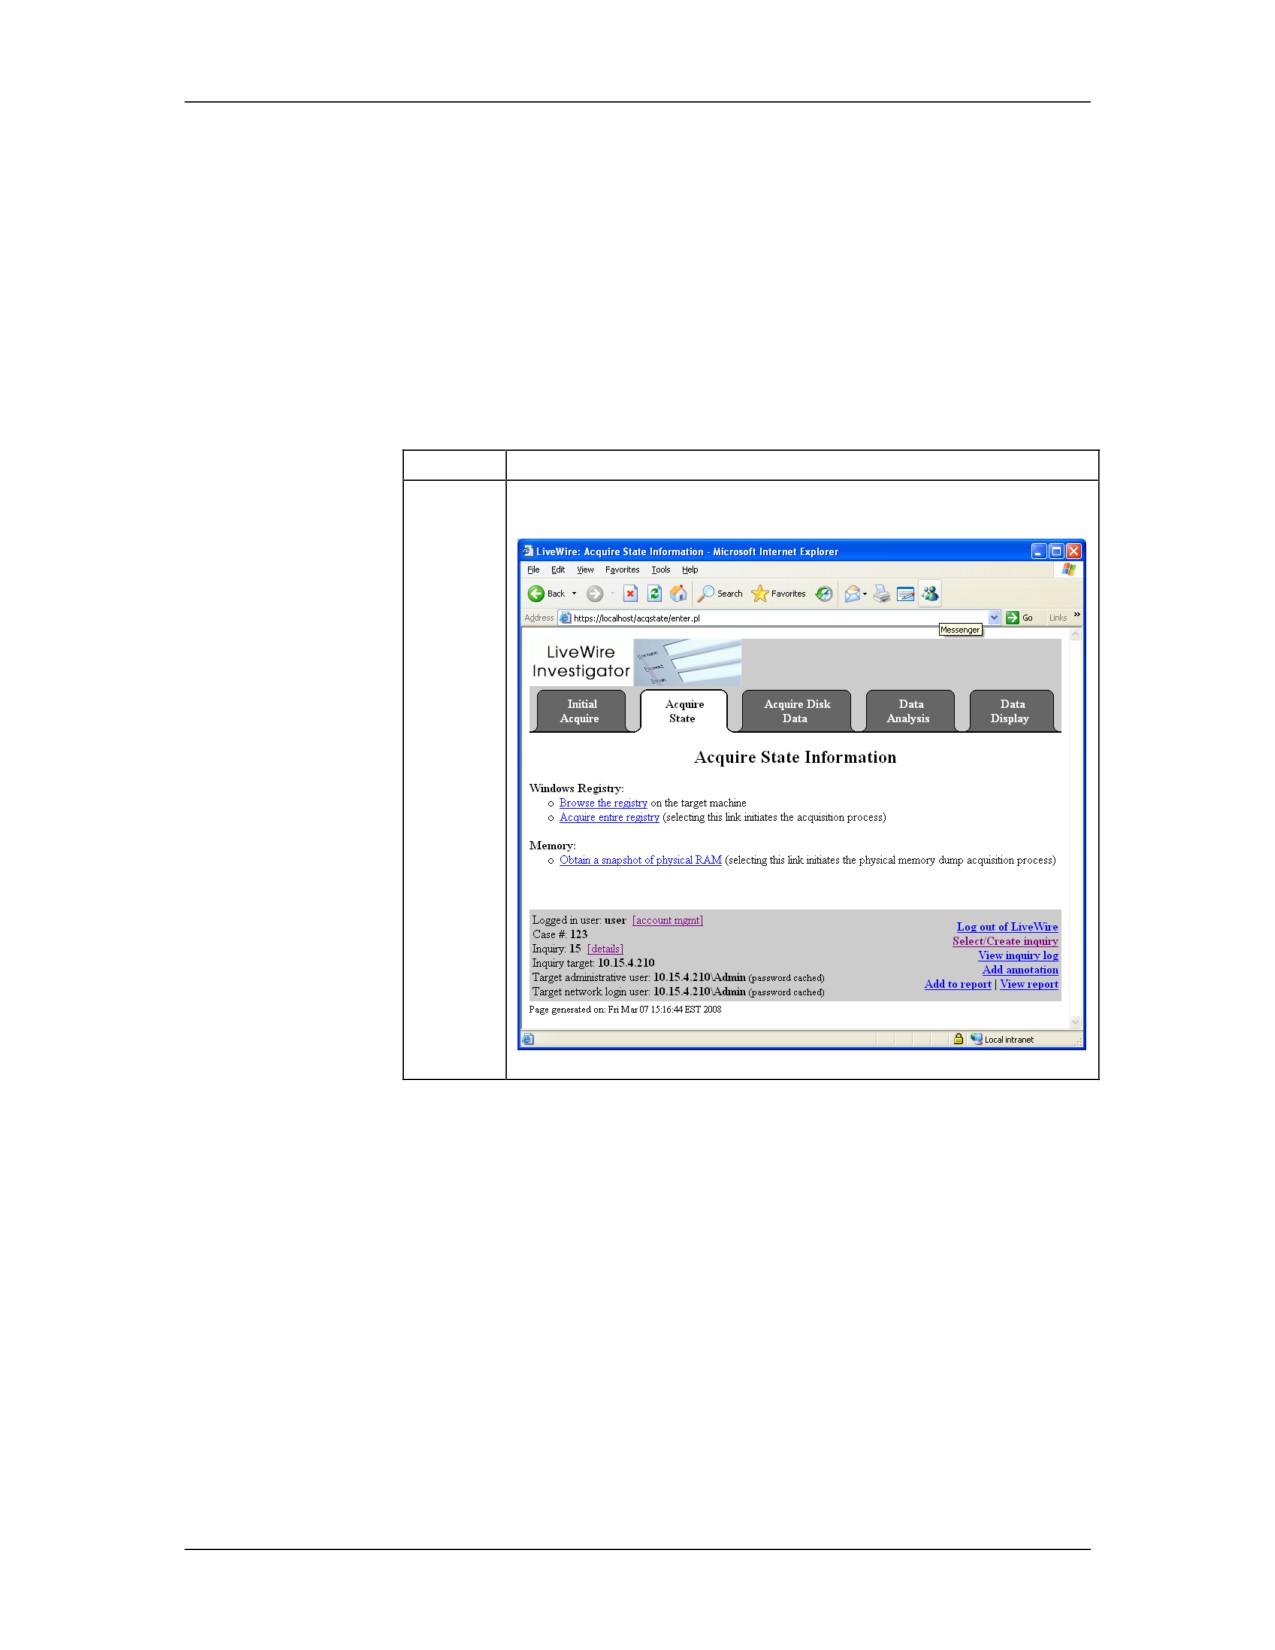
In the tab area at the top, click the Acquire State tab.
01/09
For Official Use Only - Law Enforcement Sensitive
12-51
LiveWire Investigations
Network Intrusion Responder Program
System State, continued
Procedure: LiveWire - Acquire Registry and Physical RAM, continued
Step
Action
2
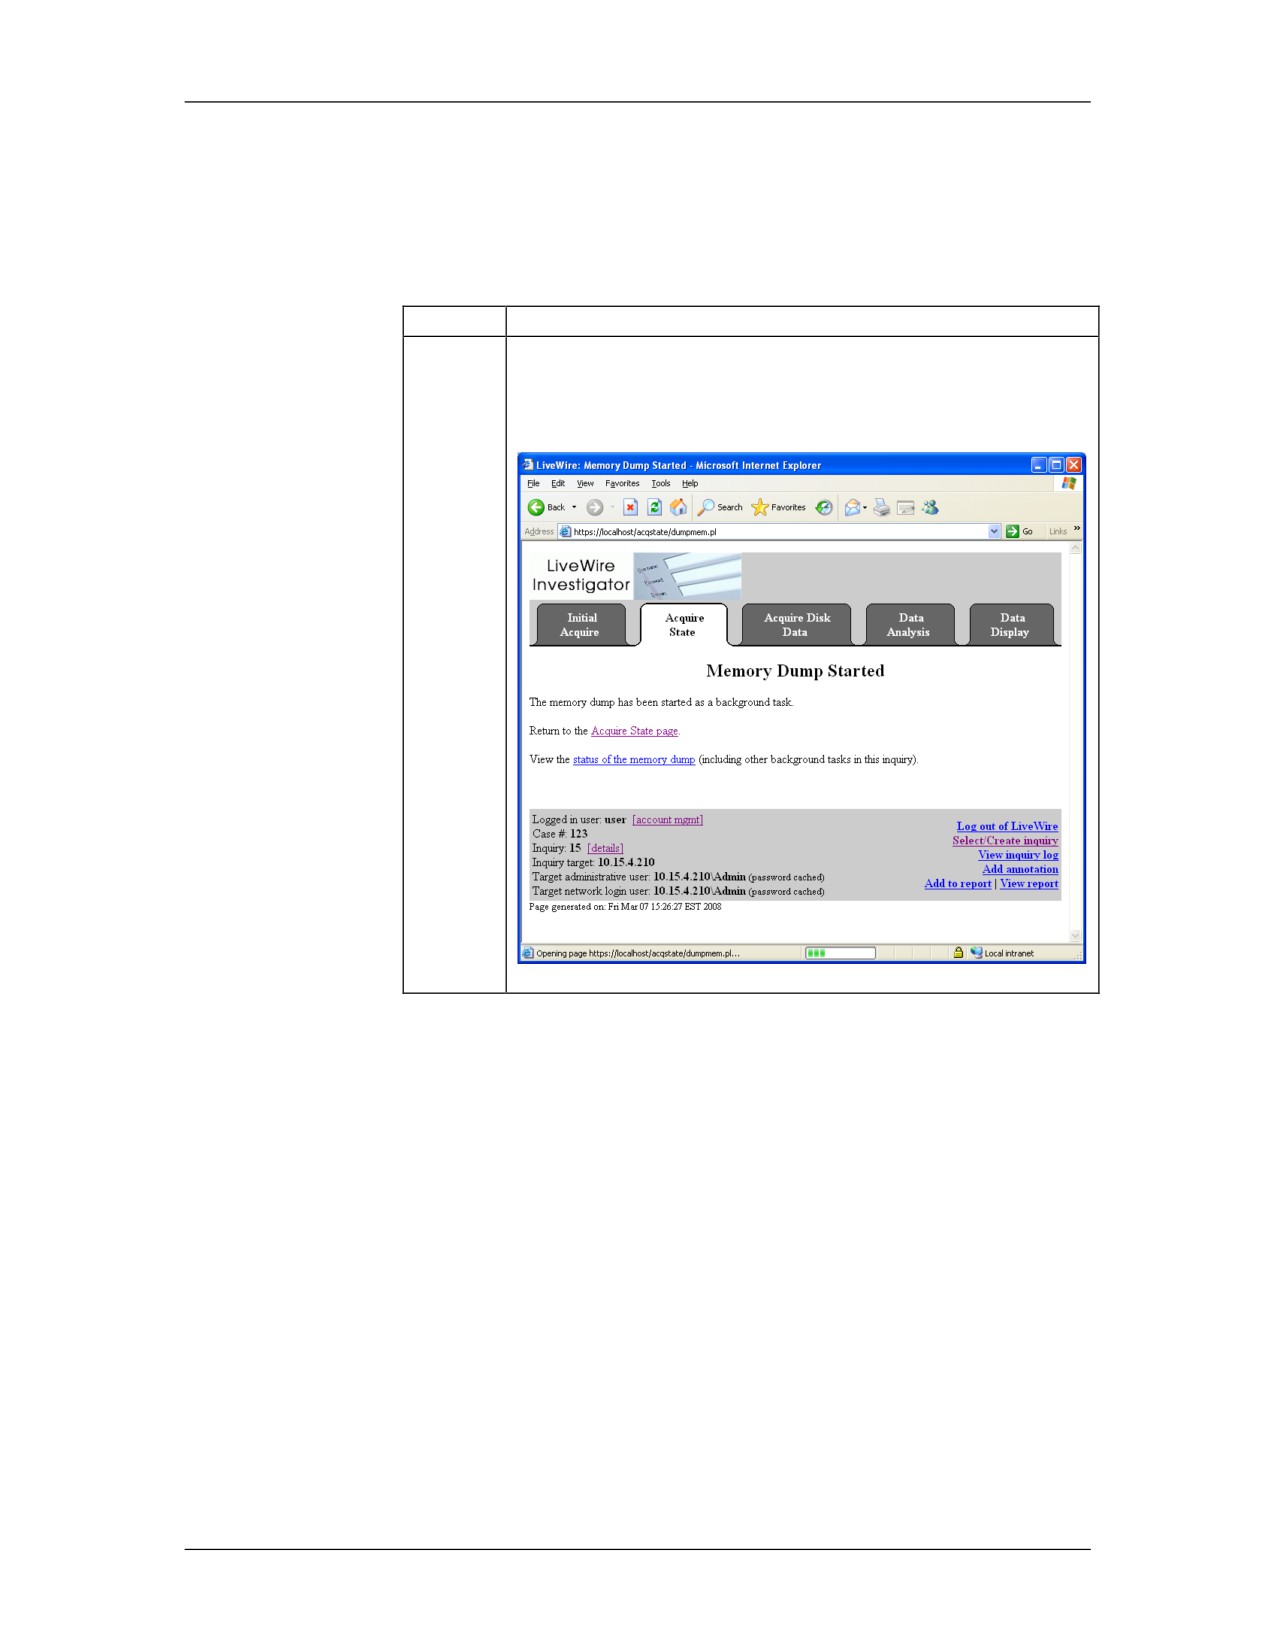
Click Obtain a snapshot of physical RAM. This may
take a few minutes depending on the size of RAM and
current load on the system.
12-52
For Official Use Only - Law Enforcement Sensitive
01/09
Network Intrusion Responder Program
LiveWire Investigations
System State, continued
Procedure: LiveWire - Acquire Registry and Physical RAM, continued
Step
Action
4
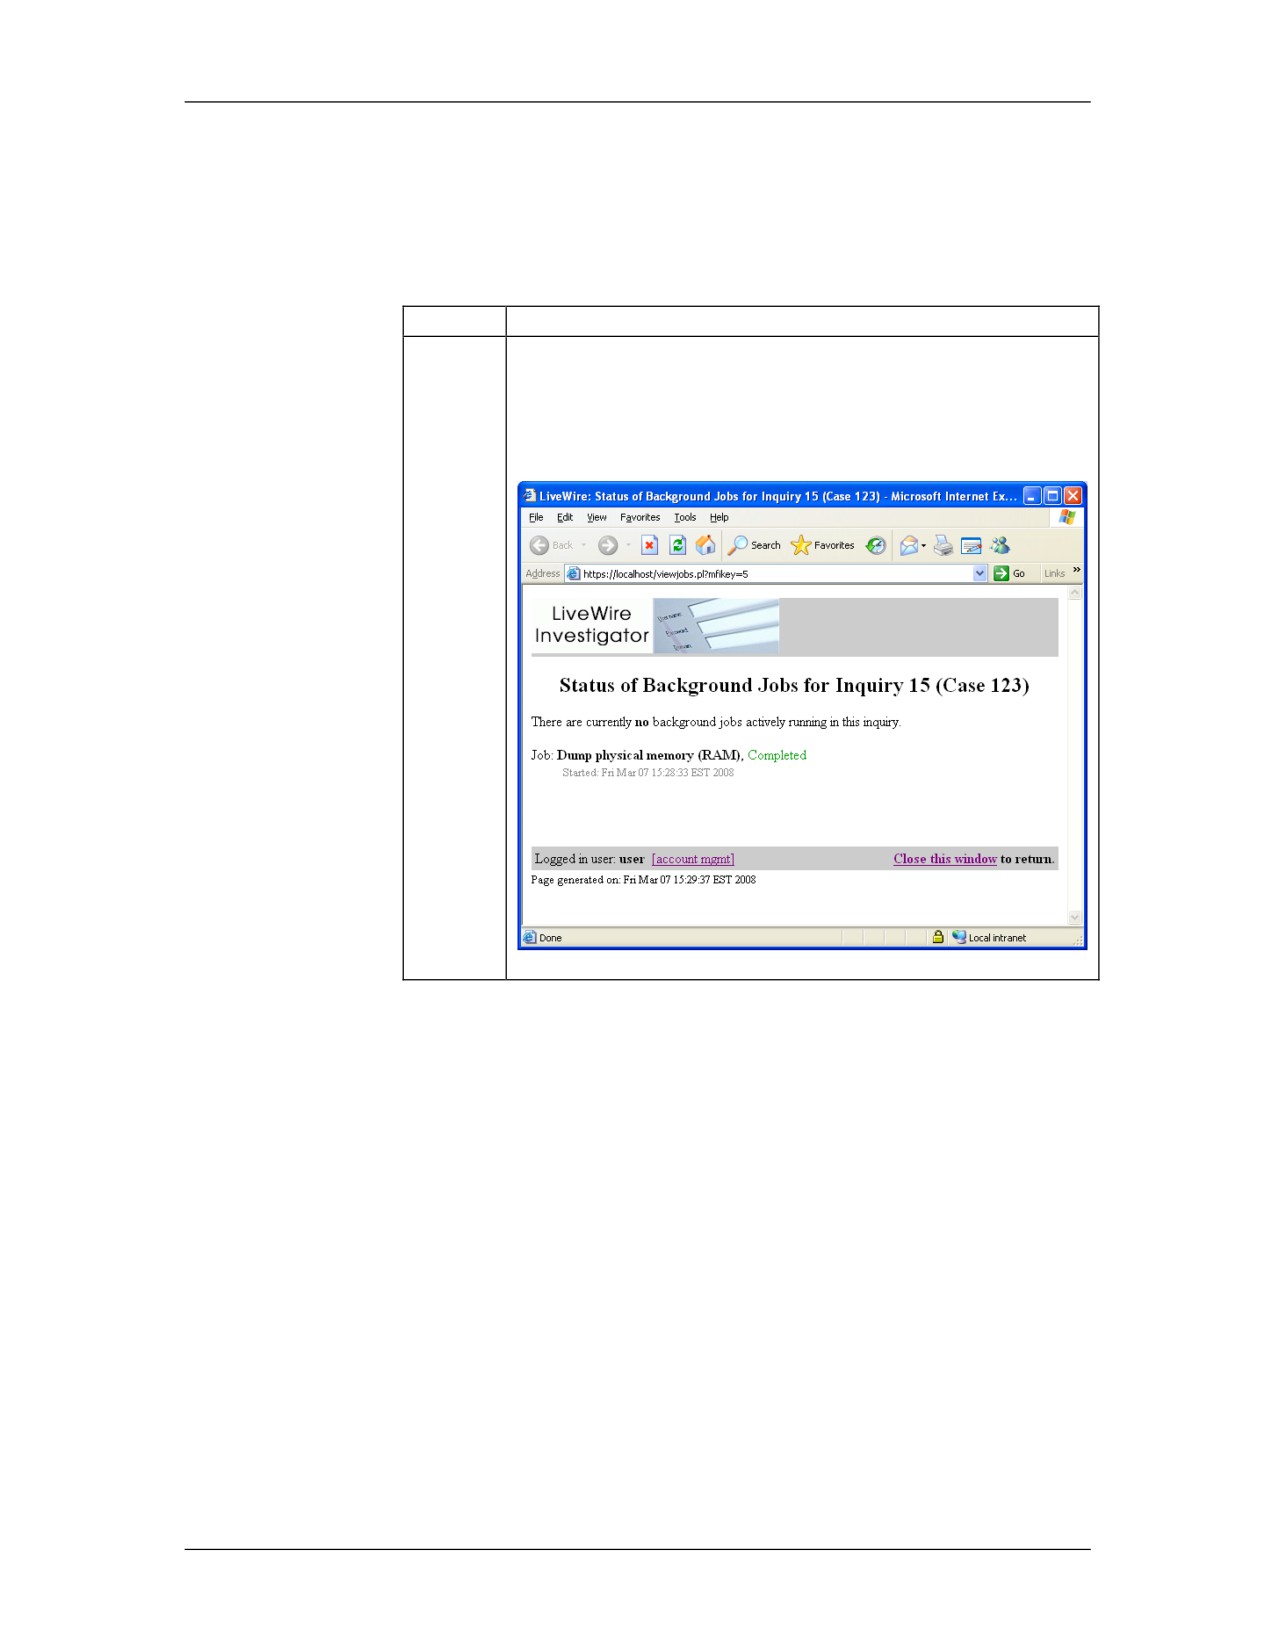
Because it may take a few minutes to complete, the
Investigator can click Status of the memory dump to
view the physical memory dump status as it is being
captured.
01/09
For Official Use Only - Law Enforcement Sensitive
12-53
LiveWire Investigations
Network Intrusion Responder Program
System State, continued
Procedure: LiveWire - Acquire Registry and Physical RAM, continued
Step
Action
4
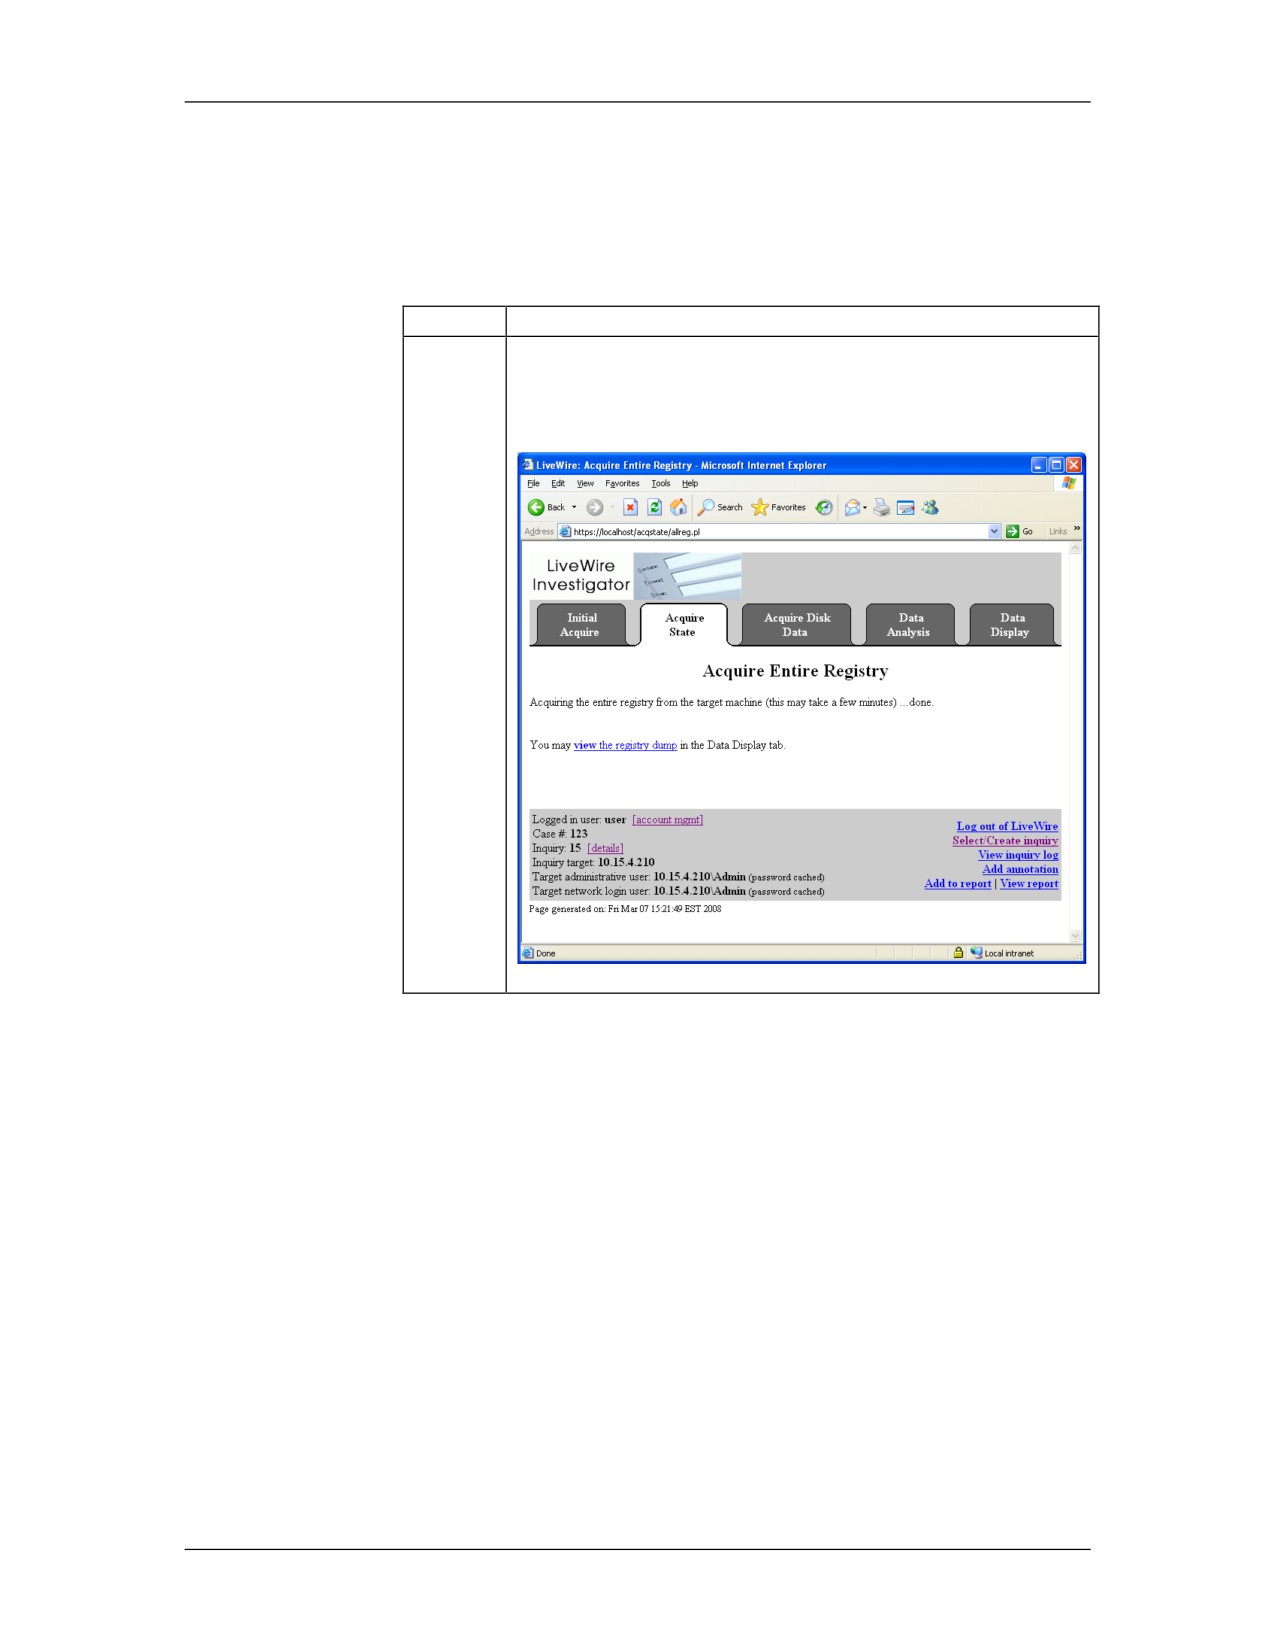
Click the Acquire Tab, and then click Acquire Entire
Registry. This process may take a few minutes to
complete.
12-54
For Official Use Only - Law Enforcement Sensitive
01/09
Network Intrusion Responder Program
LiveWire Investigations
Current User Activity
Overview
The previous section explained how to gather the current
information about the system. This section will continue to explain
how to examine the gathered data to see what the current user‟s
activities are by looking at what is currently open and running on
the system.
Procedure:
Follow these steps to conduct an analysis of the current user
LiveWire -
activities on the system using LiveWire. This section continues
Current User
from the previous section.
Activity
Step
Action
1
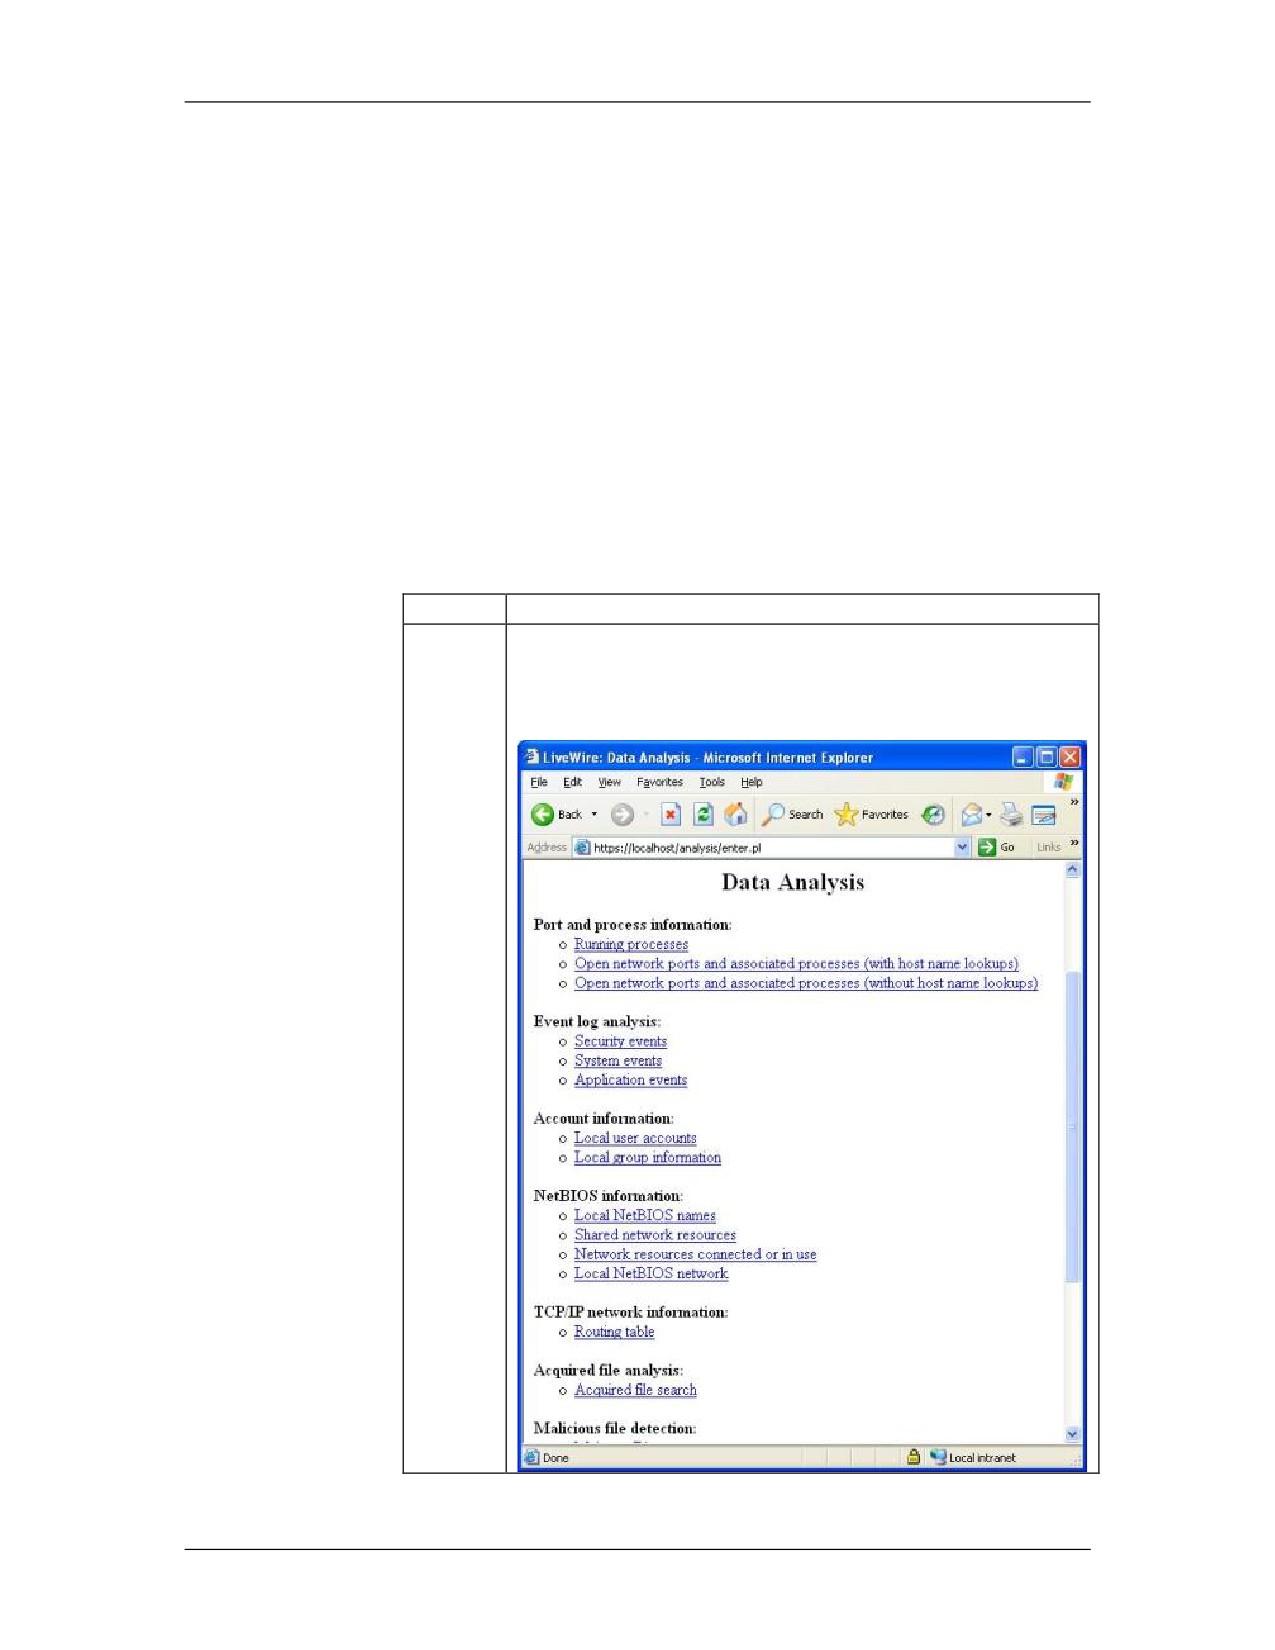
Click on the Data Analysis tab to display the following
page. This page contains links to view the various types
of information previously gathered.
01/09
For Official Use Only - Law Enforcement Sensitive
12-55
LiveWire Investigations
Network Intrusion Responder Program
Current User Activity, continued
Procedure: LiveWire - Current User Activity, continued
Step
Action
2
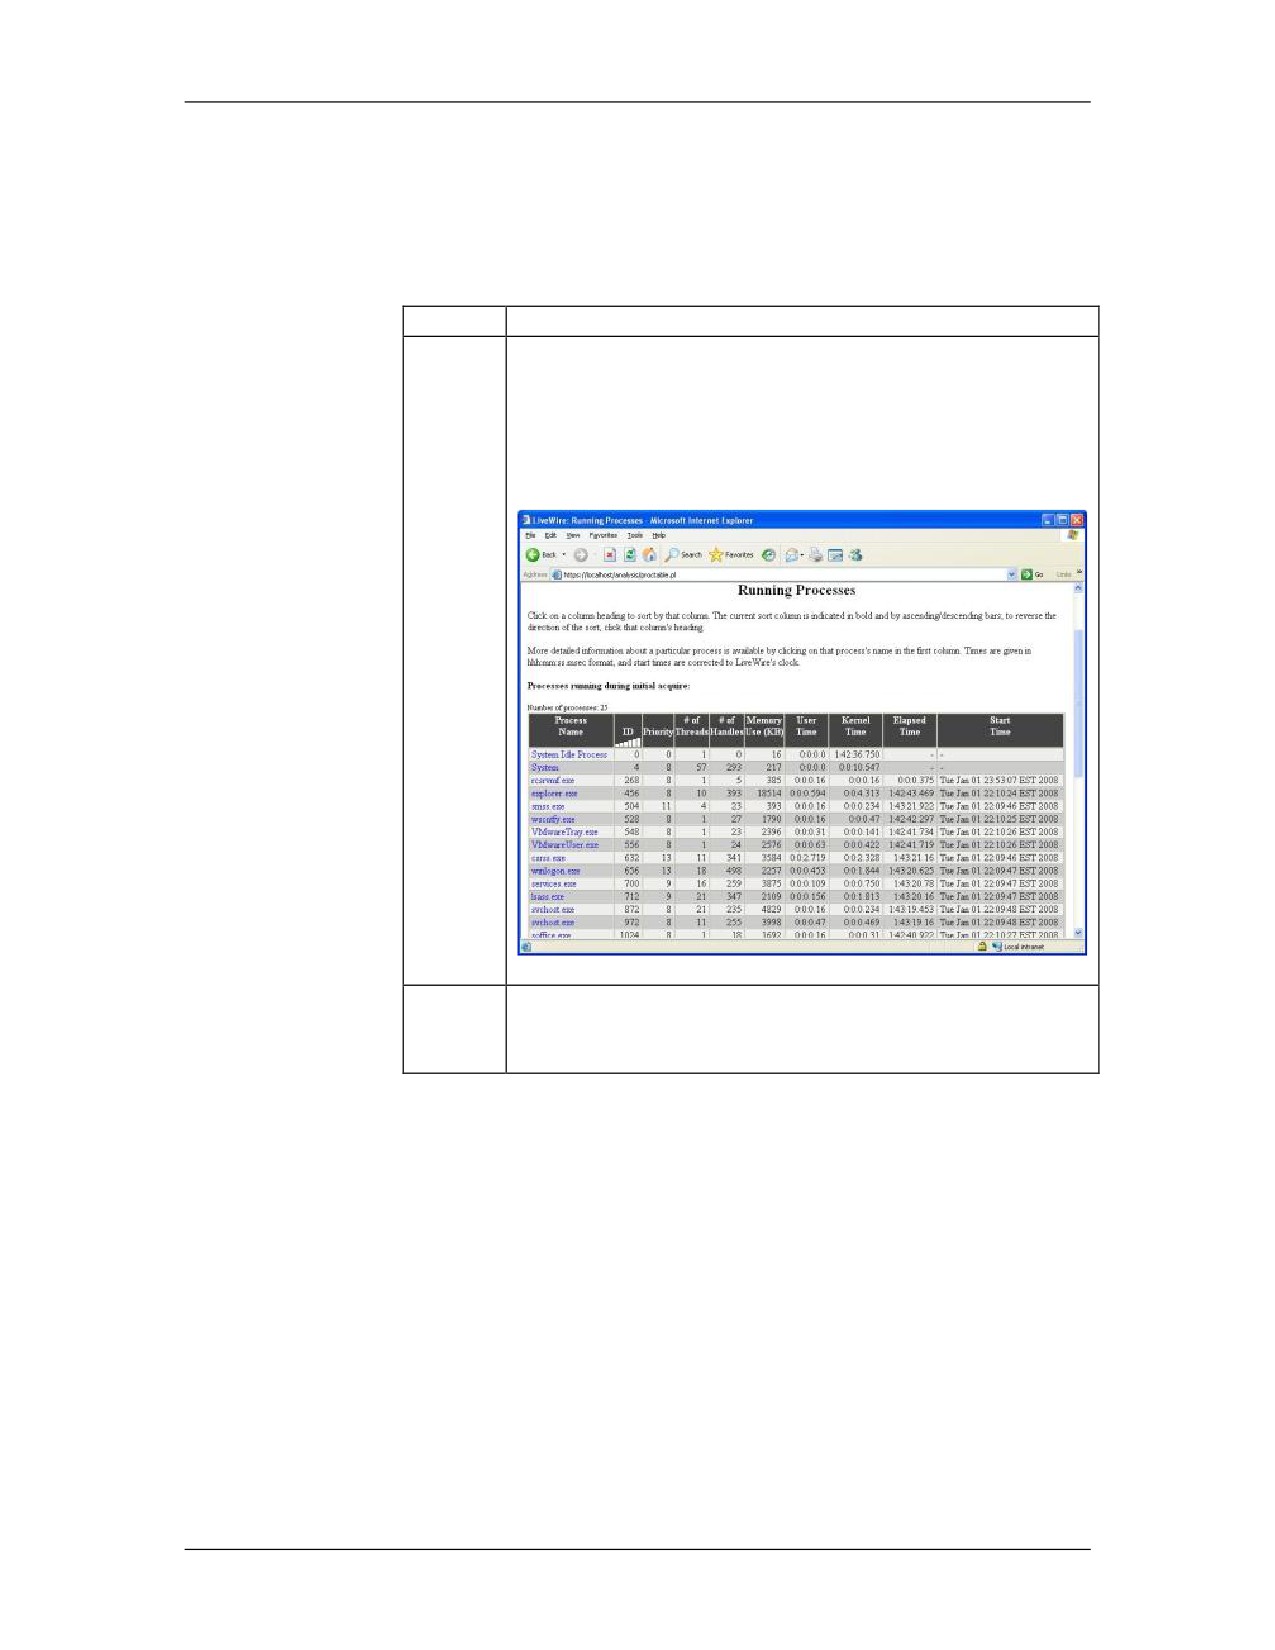
Click the Running Processes link to view the active
process currently running on the machine. Notice that
some of the process running is TrueCrypt.exe,
soffice.exe and soffice.bin. This tells us a little bit about
what the current user is doing on the system at this time.
3
All the items under the Process Name are currently
running on the system. Click on soffice.bin to see what
is associated with that active process.
12-56
For Official Use Only - Law Enforcement Sensitive
01/09
Network Intrusion Responder Program
LiveWire Investigations
Current User Activity, continued
Procedure: LiveWire - Current User Activity, continued
Step
Action
4
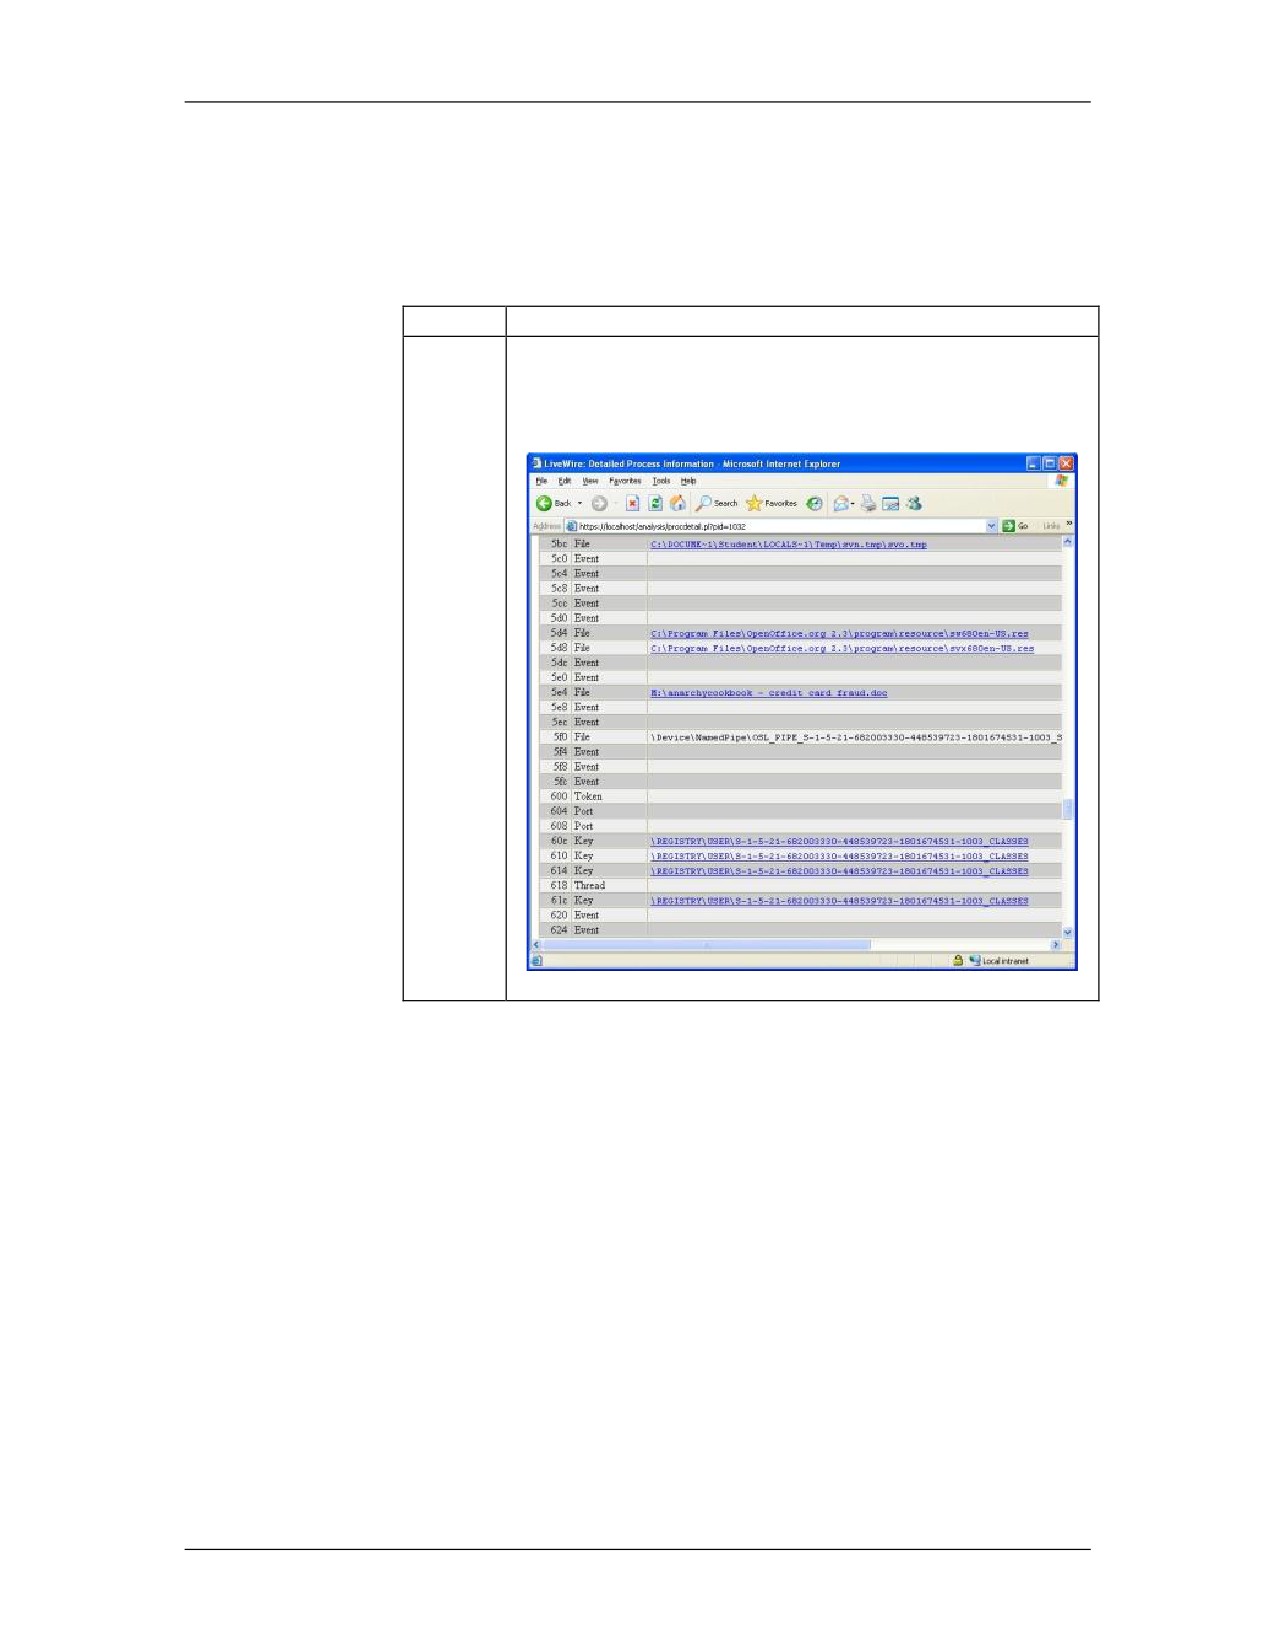
Scroll down to see what .doc file is currently opened by
the soffice.bin process. Click on the link
M:\anarchycookbook - credit card fraud.doc.
01/09
For Official Use Only - Law Enforcement Sensitive
12-57
LiveWire Investigations
Network Intrusion Responder Program
Current User Activity, continued
Procedure: LiveWire - Current User Activity, continued
Step
Action
5
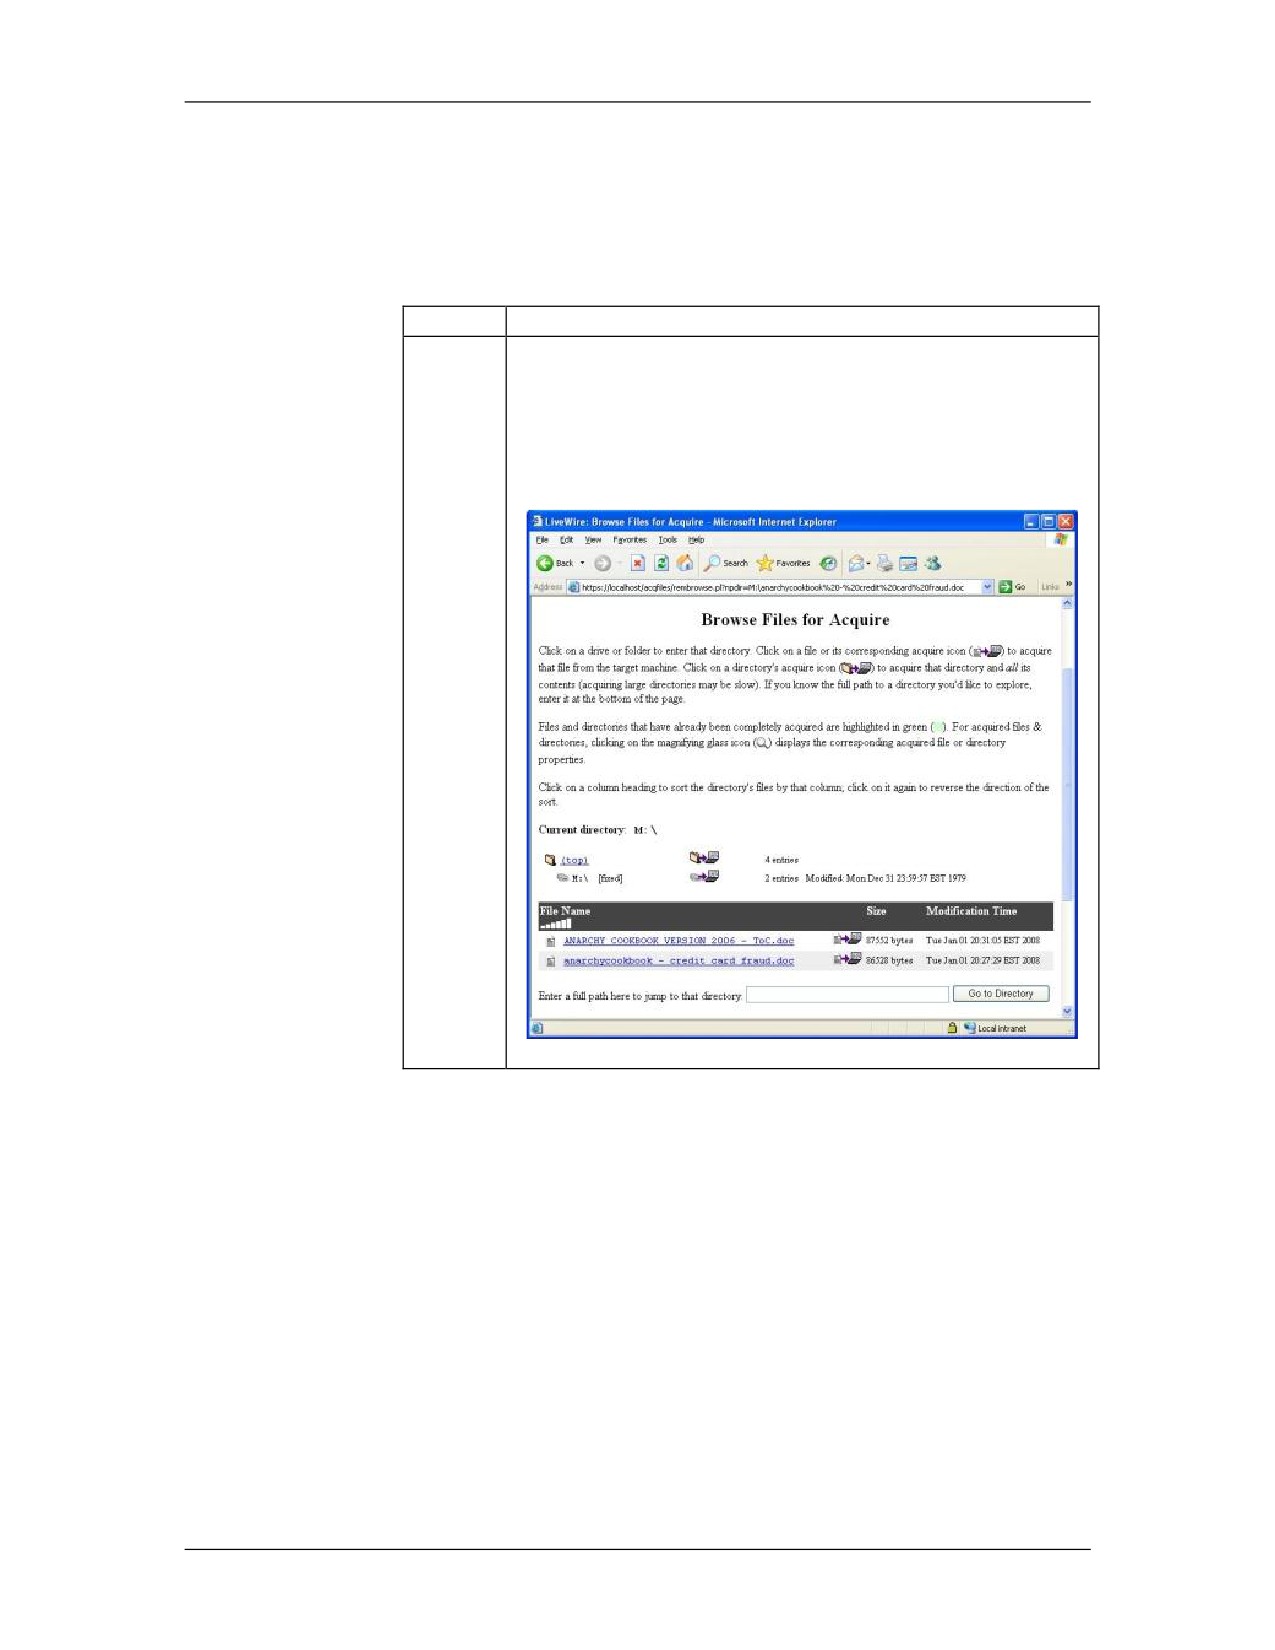
The location of that file opens and you can view details
about the file. This also allows you to view what other
files are stored in that directory. Click on
anarchycookbook - credit card fraud.doc to acquire
the file.
12-58
For Official Use Only - Law Enforcement Sensitive
01/09
Network Intrusion Responder Program
LiveWire Investigations
Current User Activity, continued
Procedure: LiveWire - Current User Activity, continued
Step
Action
6
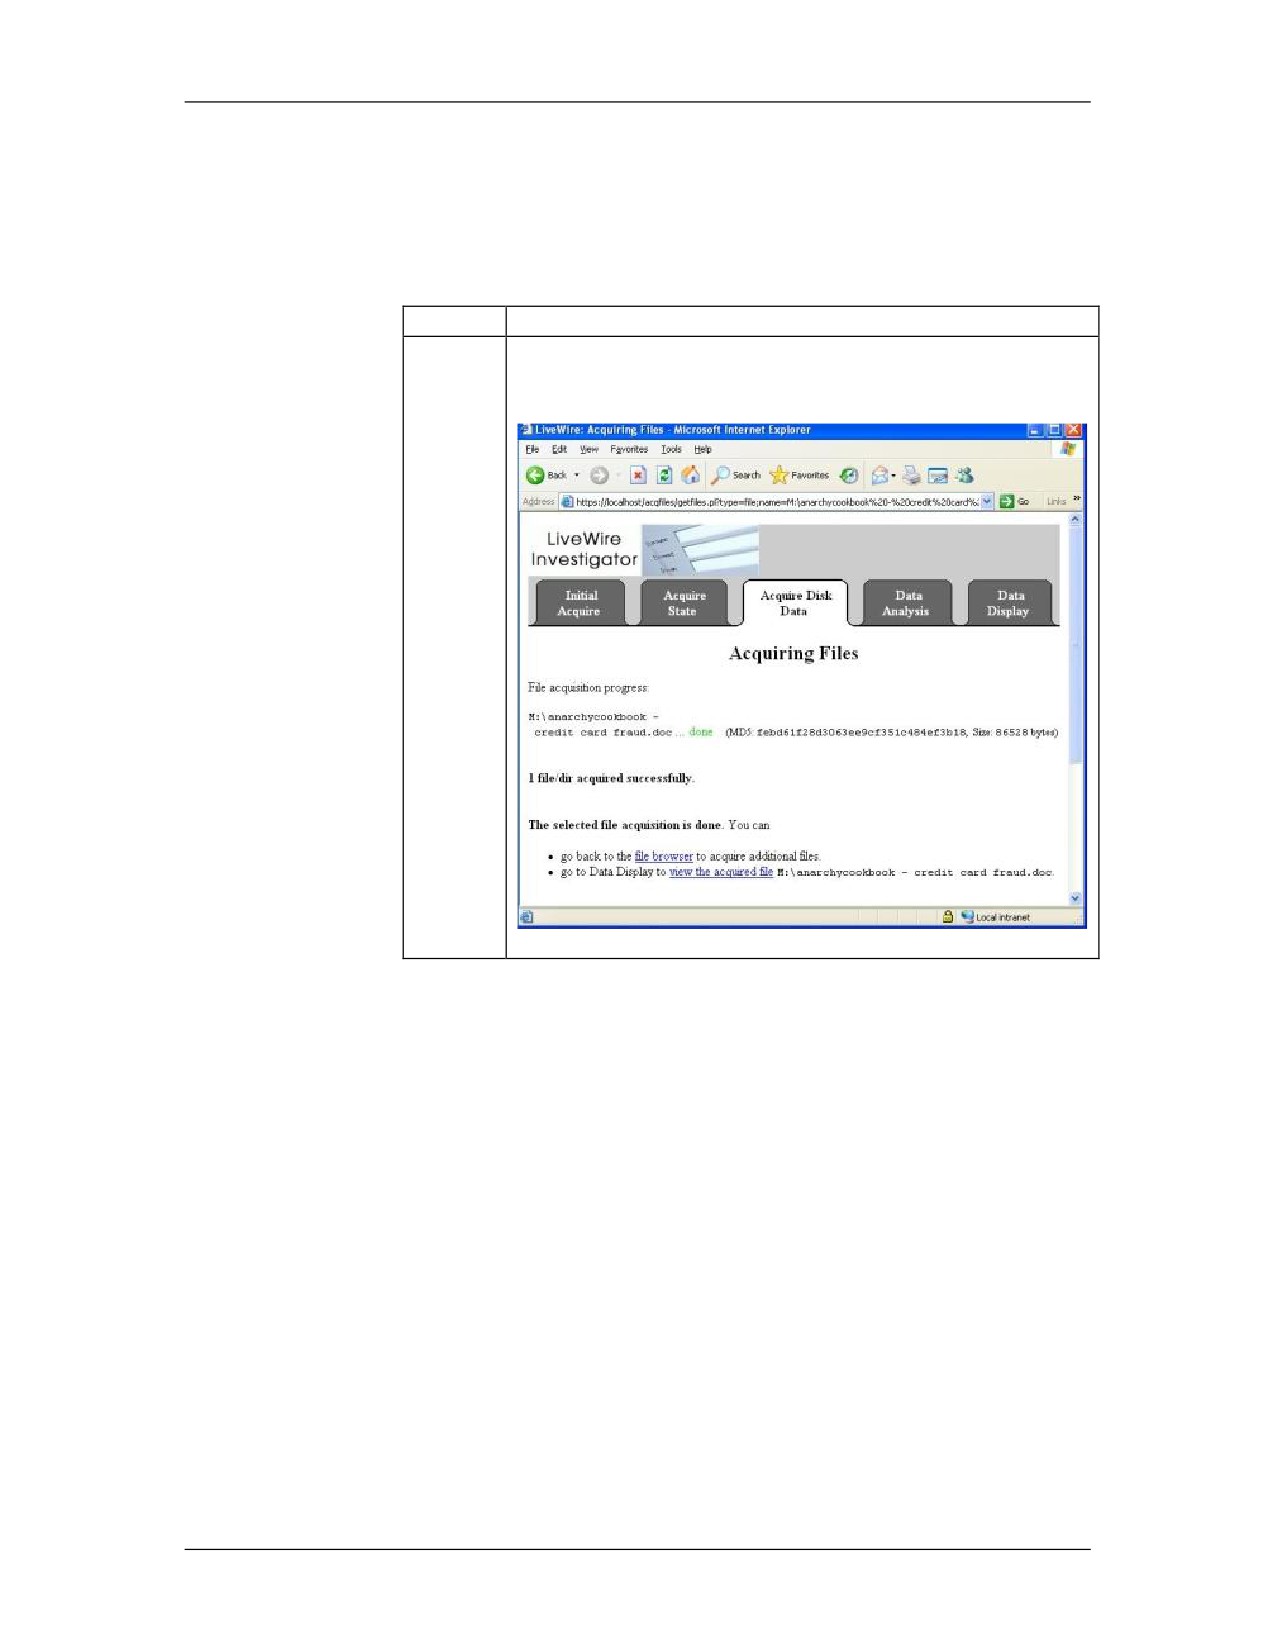
Now the file has been successfully acquired. To view
the file in the hex viewer, click view the acquired file.
01/09
For Official Use Only - Law Enforcement Sensitive
12-59
LiveWire Investigations
Network Intrusion Responder Program
Current User Activity, continued
Procedure: LiveWire - Current User Activity, continued
Step
Action
7
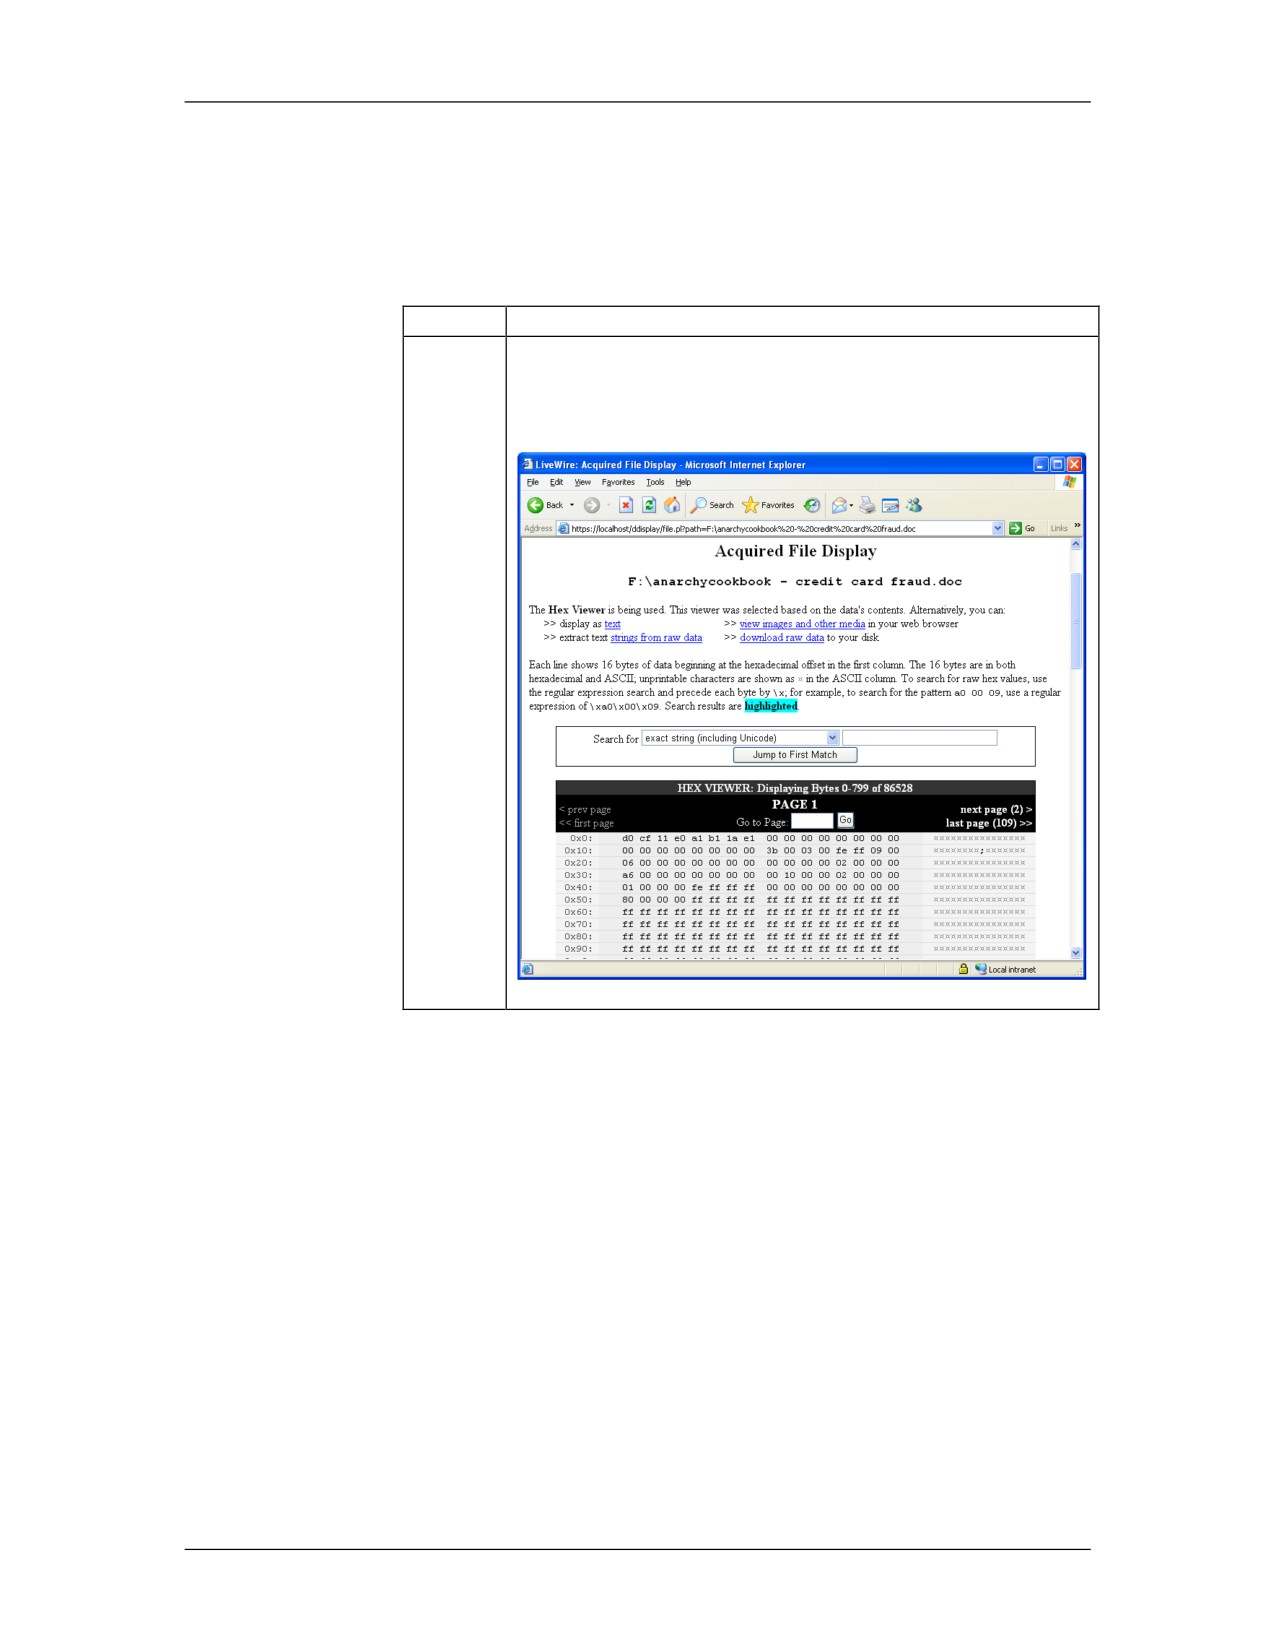
The Hex Viewer is the default view mode. You can
search by keywords or browse around the file in this
mode.
12-60
For Official Use Only - Law Enforcement Sensitive
01/09
Network Intrusion Responder Program
LiveWire Investigations
Current User Activity, continued
Procedure: LiveWire - Current User Activity, continued
Step
Action
8
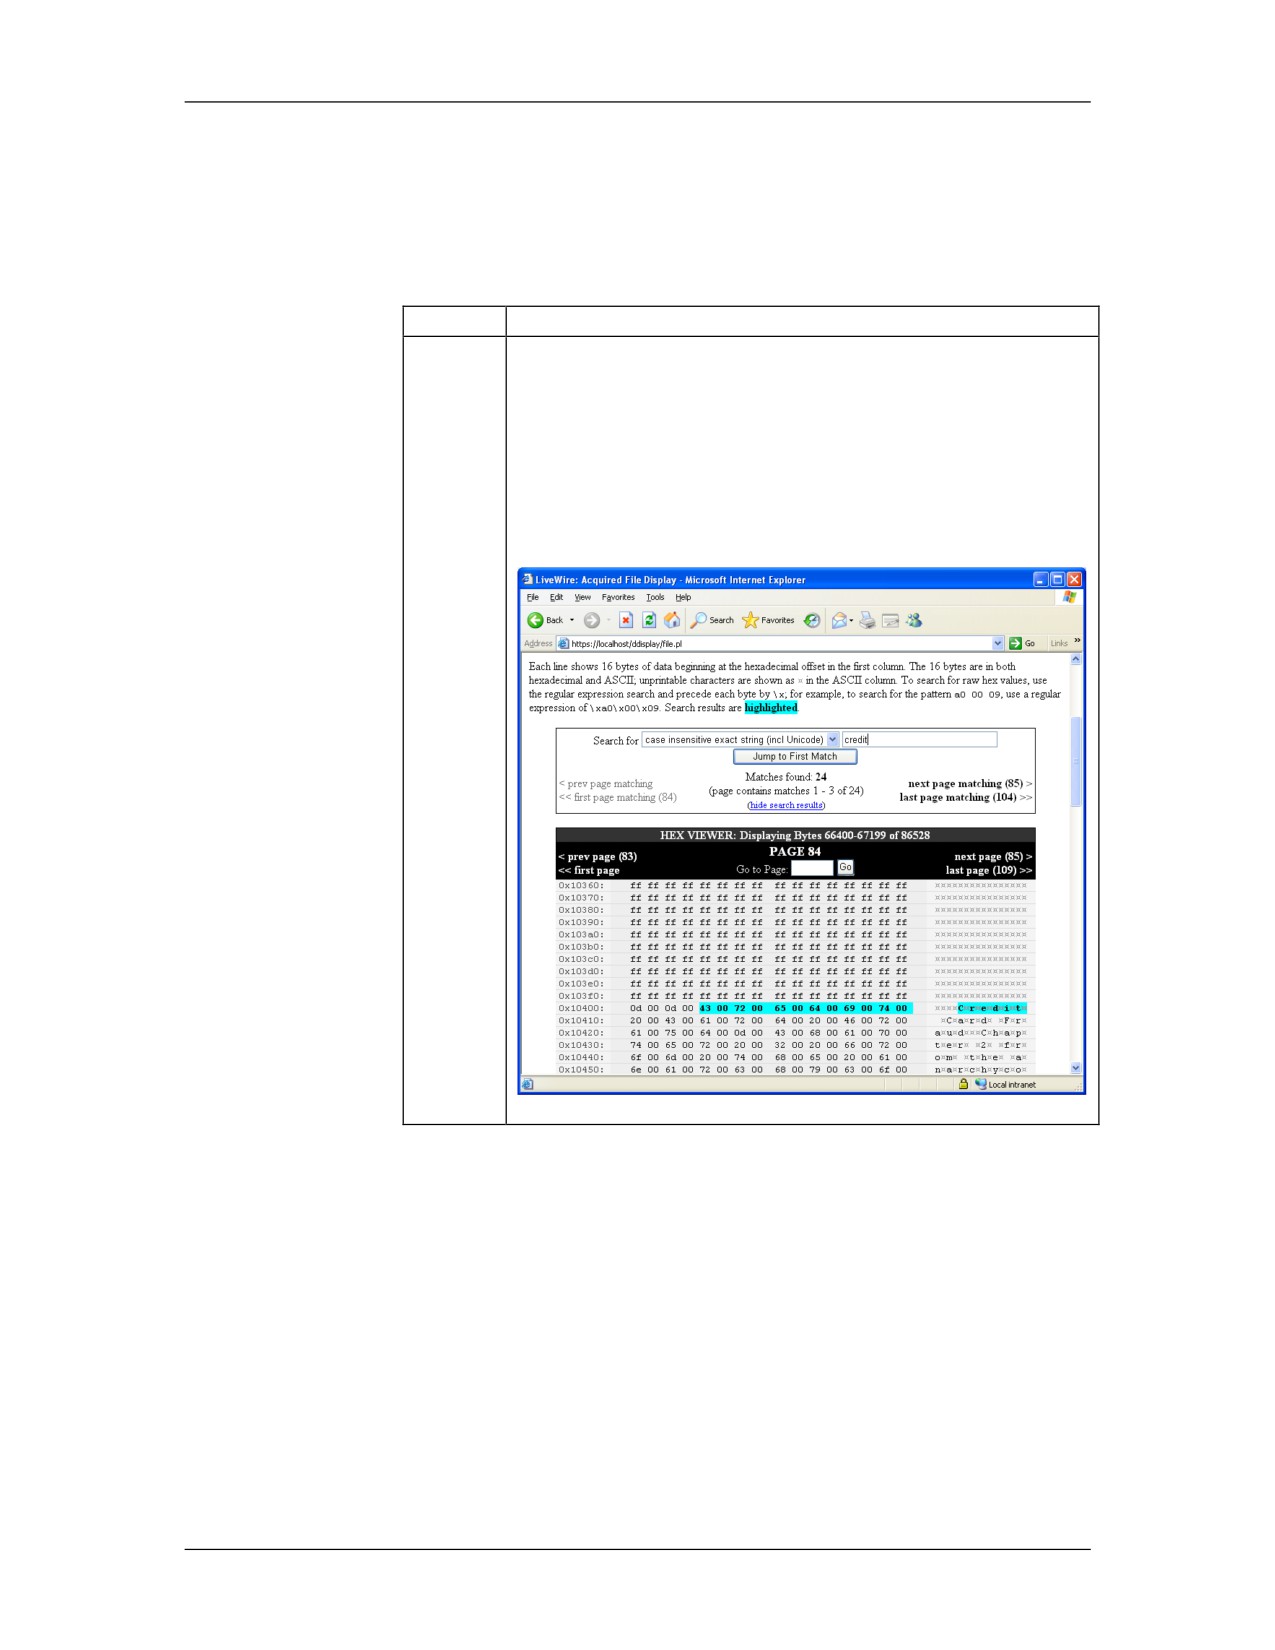
In the Search for pull-down menu, select case
insensitive exact string (include Unicode). Then input
the word credit as the string. Click Jump to First
Match.
How many matches where found?
The first match was on what page?
01/09
For Official Use Only - Law Enforcement Sensitive
12-61