GENERATOR DIESEL ENGINE DP158LCF/LCS/LDF/LDS, DP180LBS/LAS/LBF/LAF, DP222LAS/LBF/LBS/LCF/LCS. Maintenance Manual - page 5
 

  Index      Manuals     GENERATOR DIESEL ENGINE DP158LCF/LCS/LDF/LDS, DP180LBS/LAS/LBF/LAF, DP222LAS/LBF/LBS/LCF/LCS. Maintenance Manual


Search            copyright infringement  


Content      ..     3      4      5     


GENERATOR DIESEL ENGINE DP158LCF/LCS/LDF/LDS, DP180LBS/LAS/LBF/LAF, DP222LAS/LBF/LBS/LCF/LCS. Maintenance Manual - page 5


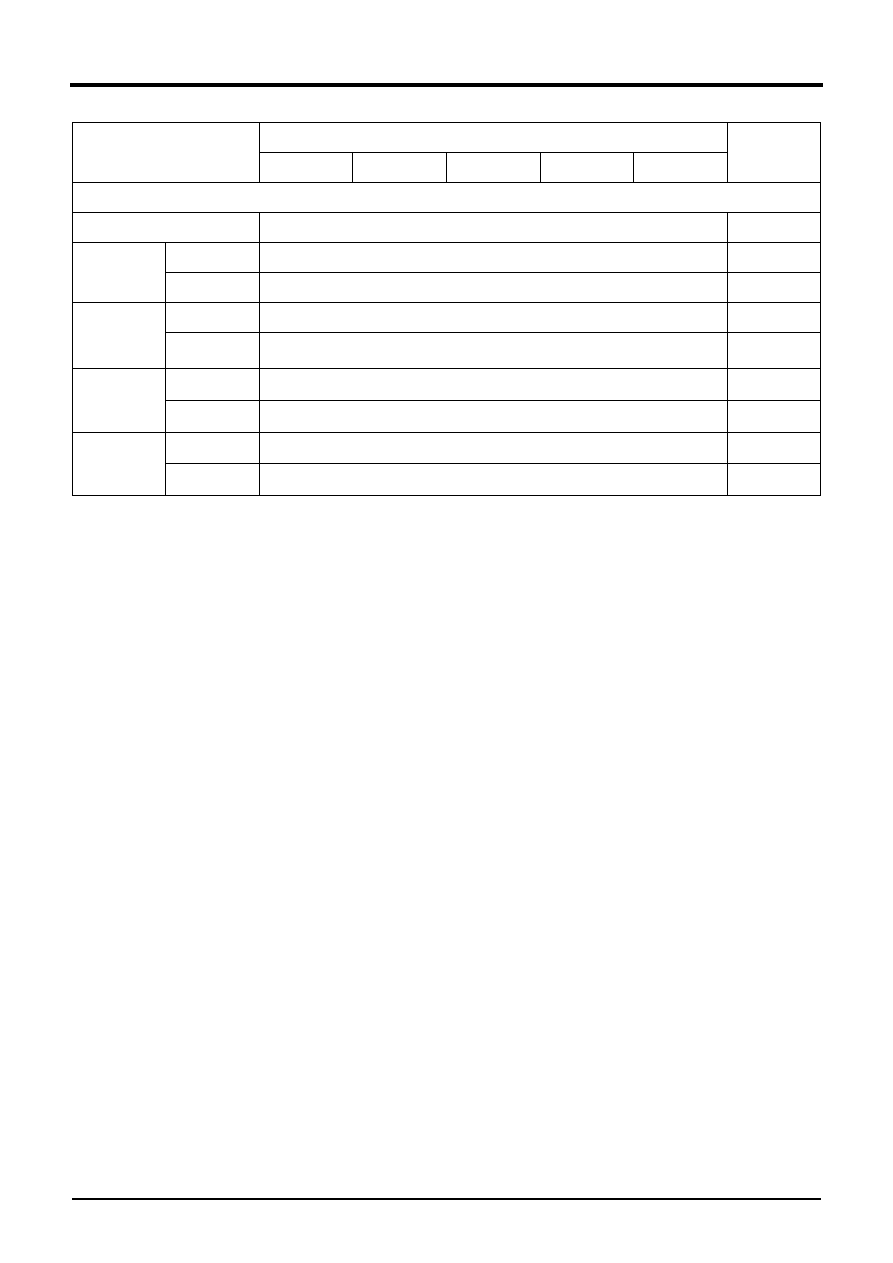
10. Cylinder block/head

 170

Item

DP222L

Remarks

DP222LAS

DP222LBS

DP222LBF

DP222LCS

DP222LCF

Cylinder block/head

Valve system type

Overhead valve type

No. of valve 
(per cylinder)

Intake

1

Exhaust

1

Valve lashes 
(at cold) 
(mm)

Intake

0.25

Exhaust

0.35

Intake valve 

(

°

)

Opening

24

°

 (BTDC)

Close

36

°

 (ABDC)

Exhaust 

valve (

°

)

Opening

63

°

 (BBDC)

Close

27

°

 (ATDC)

10. Cylinder block/head

 171

Cylinder block

Check of Cylinder Block

1. Cleanse the cylinder block and check if there is any

cracked or damaged part with naked eye.

2. Replace the cylinder block if it is seriously cracked or

damaged. Repair tiny cracks if existing.

3. Check if the oil path or coolant path is clogged or

corroded.

4. Perform the hydrostatic test to check whether there is

a crank or an air leakage.

5. Block the discharging outlets of the cooling water path

and the oil path of the cylinder block and put pressure

of 4 kg/cm

2

 on the inlet. Then sink the cylinder block

in the 70 

°

C water for 1 minute and check if air leaks.

Measurement of Cylinder Liner

1. Assembly the cylinder liner at the cylinder block and

measure inner diameter at upper, middle, lower that

is, 3 step by 45° interval.

DV2213111A

2. Calculate the average values after eliminating the

maximum and minimum values.

3. If the measured values are very close to the limit

value or beyond, replace it.

Standard

Limit

Ø

127.990 ~ 

Ø

128.010mm

0.15mm

10. Cylinder block/head

 172

Cylinder head

Measurement of Cylinder Liner

1. Remove the cotter pin pressing the valve spring by

means of a special tool.

DV2213112A_E

2. Remove out the valve stem seal.

3. Remove the intake valve and the exhaust valve.

4. Remove the valve guide from the cylinder head

combustion with the special tool.

DV2213113A

Assembly of Cylinder Head

1. Clean the cylinder head.

2. Apply engine oil on the valve stem and the valve

guide, and then attach the valve.

3. Replace the new valve stem seal and then attach the

stem seal to the valve guide of the cylinder head with

the special tool.

4. Attach the valve spring washer to valve guide.

5. Put in the inner and outer spring and then attach the

valve spring plate on the springs.

6. Attach the valve cotter with the valve spring compress

tool.

7. Check if the valve cotters have been positioned

correctly with the plastic hammer after completing

attaching them.

DV2213114A

Check of Cylinder Head

1. Checking cylinder head

1) Check cracks or damage of the cylinder head.

2) Remove carbon from the bottom surface of the

cylinder head. Here, be careful not to scratch the

valve seat surface.

CAUTION

Be careful not to damage the cylinder gasket.

Valve Spring 

C

ompression Tool

CAUTION

Be careful not to damage the valve stem seal.

CAUTION

The yellow mark on the valve spring is upward.

CAUTION

Be careful not to scratch the valve seat surface.

10. Cylinder block/head

 173

3) For cracks or damage which cannot be checked with

the naked eye, perform the hydrostatic test or the

magnetic particle testing.

Note) Hydraulic test is same as for cylinder block.

2. Distortion at the lower face

DV2213115A

DV2213116A

1) Measure the amount of distortion using a straight

edge and a feeler gauge at six positions as shown in

the figure.

2) If the measured value exceeds the maximum allow-

able limit, replace the cylinder head.

Standard

Limit

Below 0.05mm

0.2mm

10. Cylinder block/head

 174

Valve

General Information

The overhead valves are actuated via chilled cast iron 

tapets, push rods and rocker arms from the camshaft.

Check of Valve

After cleaning the valves with clean diesel oil, measure 

the valve as follow.

1. Measure the valve stem’s outside diameter at upper,

middle, and lower to determine the wears and when

the wear limit is more than limit, replace the valves.

DV2213117A_E

2. inspect the scratch and wear of valve stem seal

contacting face, and if necessary correct with the

grinding paper but if severe replace it.

3. if valve head thickness becomes less than limit,

replace the valve.

DV2213118A

Check of Valve Guide

1. Inser the valve into valve guide and measure the

clearance between valve and valve guide by the

shaking degree of valve. If the clearance is bigger,

measure the valve and then replace the more worn

valve guide.

DV2213119A_E

2. If the valve guide has already been replaced, measure

the center with valve seat if it deviates or not and if

abnormal it must be corrected.

Note) Simultaneously be processed when in guide reamer 

process.

Item

Standard

Limit

In.

Ø

11.969 ~ 

Ø

11.980mm

Ø

11.830mm

Ex.

Ø

11.945 ~ 

Ø

11.955mm

Ø

11.805mm

Item

Standard

Limit

In.

2.6 ~ 3.0mm

1.6mm

Ex.

1.9 ~ 2.3mm

1.3mm

CAUTION

If the damage is severe, replace new one.

Valve stem

Item

Standard

Limit

In.

0.020 ~ 0.049mm

0.20mm

Ex.

0.045 ~ 0.074mm

0.25mm

Measure
location

10. Cylinder block/head

 175

Valve Seat

1. Visual inspection: Inspect the damage and wear of

valve seat and if necessary replace.

2. Valve seat thickness and angle: Assemble the valves

at the cylinder head and using the measuring instru-

ment from the lower face, measure the projection

amount of valve. If the measured value is more than

the use limit, replace the valve seat.

DV2213120A

DV2213121A

3. The disassembly of valve seat cam be pulled out by

means of a special tool with the arc welding done at

two points of valve seat rotating tool or valve seat.

DV2213122A_E

4. Regarding the valve seat assembling, shrink the valve

seat by putting it in the dry ices for about 1 hour or

so, and then press it into the cylinder head by means

of a special tool.

5. After coating the grinding powder paste on valve head

contacting face of valve seat, and after executing a

sufficient lapping operation with the rotating and

grinding motion of valve, wipe off the grinding agent

thoroughly.

Valve Spring

1. Visual inspection: Check if the exterior of the valve

spring is damaged with the naked eye. Replace it with

a new one if required.

2. Fee length of valve spring: Measure the free length

of the valve spring with the vernier clipers. If the

reading is larger than the specified valve, replace the

valve spring.

Item

Standard

Limit

Valve seat thickness

(at cylinder head sur-

face)

0.65 ~ 0.95mm

2.5mm

Item

Limit

Valve seat angle

In. Valve

30

°

Ex. Valve

45

°

10

20

30

40

50

60

70

80

90

0

45

Item

Limit

Fee length of valve spring

Inside

65.5mm

Outside

64mm

Cy

lin

d

er hea

d

Valve sheet

Wel

d

 bea

d

10. Cylinder block/head

 176

DV2213123A

3. Squareness of valve spring: Measure the sequareness

of the valve spring with the surface plate and the

right-angle square. If the reading exceeds the toler-

ance limit, replace the valve spring.

DV2213124A_E

4. Tension of valve spring: Measure the tension of a

valve spring by using a spring tester. If the reading

is below the tolerance limit, replace the valve spring.

DV2213125A_E

Item

Standard

Squareness of valve spring

Below 1.0mm

Item

Standard

Inside

at weight condition 15~17kg

46.3mm

Outside

at weight condition 37~41kg

46.3mm

Squareness

Squareness

Free length

tape

Spring tester

10. Cylinder block/head

 177

Rocker arm

Disassembly Rocker Arm

1. Remove the snap ring on both sides of the rocker

arm shaft using snap ring plier.

2. Remove the washer and rocker arm.

3. Remove the rocker arm bush using press.

DV2213126A

Assembly Rocker Arm

1. Check if here is foreign substance in the oil delivery

hole of the rocker arm shaft, and clean it, if any.

2. Attach the rocker arm in the reverse order of

assembly.

Check of Rocker Arm

1. Rocker arm bracket (Single unit type with a shaft):

Measure the outer diameter of rocker arm bracket with

outside micrometer at the position that the rocker arm

is installed, and in case that it exceeds the limit value,

replace.

DV2213127A_E

2. Rocker arm: Inspect the rocker arm surface that

contacts with the valve stem for any scratch, step

wear and correct the minor degree of wear with an

oil stone or the fine grinding paper and replace if they

are severe.

CAUTION

Be careful not to change the rocker arm position or 

assemble it in a reverse order.

Item

Standard

Limit

Bush Inner Dia.

Ø

25.005 ~ 

Ø

25.035

Ø

25.055

Shaft Outer Dia.

Ø

24.967 ~ 

Ø

24.990

Ø

24.837

Clearance

0.015 ~ 0.068mm

0.25mm

CAUTION

If the wear is severe, replace new one.

Outsi

d

d

iameter

10. Cylinder block/head

 178

Tappet and push rod

Tappet Clearance

Measure the outer diameter of a tappet and the inner 

diameter of the tappet bore. If the reading exceeds the 

tolerance limit, replace the tappet.

Visual inspection of tappet

Inspection if the tappet surface which contacts the 

camshaft has damage like crack or scratch. If the 

damage is small, correct it with oil stone or fine grinding 

paper, if excessive, replace it.

DV2213128A_E

Warpage of Push Rod

Put the push rod on a surface plate, and measure the 

warpage with a feeler gauge shile spinning it. If the 

reading exceeds the tolerance limit, replace it.

DV2213129A_E

Standard

Limit

0.035mm ~ 0.077mm

0.25mm

Limit

Below 0.3mm

normal

abnormal

abnormal

abnormal

abnormal

(crack)

(irregularit

y

)

Feeler gauge

10. Cylinder block/head

 179

Camshaft

Camshaft End Play

Measure the camshaf’st axial end play.

1. Push the camshaft toward the pulley side.

2. Place a dial gauge onto the camshaft gear.

DV2213130A

3. Measure the camshaft’s axial end play, moving the

camshaft gear by means of driver.

4. If excessive end play, assembly it by means of other

thrust washer.

DV2213131A

Check of Cam

1. Visual check: With inspecing the cam surface for any

damage with naked eyes and correct any minor

scratches by means of an oil stone grinding and if

severe, replace it.

2. Cam lobe height: Use a micrometer to measure the

cam lobe height and journal diameter. If the measured

number is less than the specified limit, the camshaft

must replaced.

DV2213132A

Check of camshaft

1. Camshaft bearing outer diameter: Using an outer

diameter micrometer, measure the outer diameter of

the camshaft bearing.

DV2213133A

Limit

Below 0.2 ~ 0.9mm

Item

Standard

Limit

Cam lobe height(C)

47.7mm

46.5mm

Cam bearing outside 

(A,B)

Ø

56.0mm

Ø

55.6mm

Item

Standard

Camshaft bearing outer 

diameter

Ø

69.91 ~ 

Ø

69.94mm

C

A

A

B

B

D

I II

I II

10. Cylinder block/head

 180

2. Camshaft bearing inner diameter of cylinder block:

Using a cylinder inner gauge, measure the inner diam-

eter of the camshaft bearing.

DV2213134A_E

3. Clearance between camshaft and bearing: Compare

the inner diameter of the camshaft bearing with the

outer diameter value of the camshaft to determine the

clearance. If the reading exceeds the tolerance limit,

replace the camshaft bearing.

4. Camshaft bearing replacement: Replace the camshaft

bearing with a special tool.

DV2213135A

5. Warpage of camshaft: Place the camshaft on 2 V

blocks, and inspect the warpage of the camshaft by

using a dial gauge to correct it. if excessive, replace

the camshaft.

DV2213136A

Item

Standard

Camshaft bearing inner 

diameter of cylinder block

Ø

70.077 ~

Ø

70.061mm

Item

Limit

Clearance between cam-

shaft and bearing

0.18mm

C

am shaft bearing

Item

Limit

Warpage of camshaft

0.1mm

 181

11. Electric system

General information

 . . . . . . . . . . . . . . . . . . . . . . . . . . . . . . . . . . . . . . . . . . . . . . . . . . . . . 183

Specification

. . . . . . . . . . . . . . . . . . . . . . . . . . . . . . . . . . . . . . . . . . . . . . . . . . . . . . . . . . 183

Electrical Wiring diagram

. . . . . . . . . . . . . . . . . . . . . . . . . . . . . . . . . . . . . . . . . . . . . . . . . 184

Switches and sensors

 . . . . . . . . . . . . . . . . . . . . . . . . . . . . . . . . . . . . . . . . . . . . . . . . . . . 185

Temperature Switch

 . . . . . . . . . . . . . . . . . . . . . . . . . . . . . . . . . . . . . . . . . . . . . . . . . . . . 185

Temperature Sensor

. . . . . . . . . . . . . . . . . . . . . . . . . . . . . . . . . . . . . . . . . . . . . . . . . . . . 185

Pressure Sensor & Switch

 . . . . . . . . . . . . . . . . . . . . . . . . . . . . . . . . . . . . . . . . . . . . . . . 185

Magnetic Pick-up

 . . . . . . . . . . . . . . . . . . . . . . . . . . . . . . . . . . . . . . . . . . . . . . . . . . . . . . 186

Starter

 . . . . . . . . . . . . . . . . . . . . . . . . . . . . . . . . . . . . . . . . . . . . . . . . . . . . . . . . . . . . . . . 187

General Information

 . . . . . . . . . . . . . . . . . . . . . . . . . . . . . . . . . . . . . . . . . . . . . . . . . . . . 187

Specification

. . . . . . . . . . . . . . . . . . . . . . . . . . . . . . . . . . . . . . . . . . . . . . . . . . . . . . . . . . 187

Views

 . . . . . . . . . . . . . . . . . . . . . . . . . . . . . . . . . . . . . . . . . . . . . . . . . . . . . . . . . . . . . . 188

Wiring Diagram

 . . . . . . . . . . . . . . . . . . . . . . . . . . . . . . . . . . . . . . . . . . . . . . . . . . . . . . . 189

Resistance

. . . . . . . . . . . . . . . . . . . . . . . . . . . . . . . . . . . . . . . . . . . . . . . . . . . . . . . . . . . 189

Alternator

 . . . . . . . . . . . . . . . . . . . . . . . . . . . . . . . . . . . . . . . . . . . . . . . . . . . . . . . . . . . . . 190

General Information

 . . . . . . . . . . . . . . . . . . . . . . . . . . . . . . . . . . . . . . . . . . . . . . . . . . . . 190

Views

 . . . . . . . . . . . . . . . . . . . . . . . . . . . . . . . . . . . . . . . . . . . . . . . . . . . . . . . . . . . . . . 190

Wiring Diagram

 . . . . . . . . . . . . . . . . . . . . . . . . . . . . . . . . . . . . . . . . . . . . . . . . . . . . . . . 191

Specification

. . . . . . . . . . . . . . . . . . . . . . . . . . . . . . . . . . . . . . . . . . . . . . . . . . . . . . . . . . 191

Performance

. . . . . . . . . . . . . . . . . . . . . . . . . . . . . . . . . . . . . . . . . . . . . . . . . . . . . . . . . . 191

Abnormally Charging

. . . . . . . . . . . . . . . . . . . . . . . . . . . . . . . . . . . . . . . . . . . . . . . . . . . . 191

11. Electric system

 183

General information

Specification

Item

DP158L

Remarks

DP158LCS

DP158LCF

DP158LDS

DP158LDF10

Electrical System

Alternator voltage - capacity (V - 
A)

27.5 - 45

Voltage regulator

Built-in type IC regulator

Starting motor voltage - capacity 
(V - kW)

24 - 7.0

Battery capacity

2-200Ah (recommended)

Item

DP180L

Remarks

DP180LBS

DP180LBF

DP180LAS

DP180LAF

Electrical System

Alternator voltage - capacity (V - 
A)

27.5 - 45

Voltage regulator

Built-in type IC regulator

Starting motor voltage - capacity 
(V - kW)

24 - 7.0

Battery capacity

2-200Ah (recommended)

Item

DP222L

Remarks

DP222LAS

DP222LBS

DP222LBF

DP222LCS

DP222LCF

Electrical System

Alternator voltage - capac-
ity (V - A)

27.5 - 45

Voltage regulator

Built-in type IC regulator

Starting motor voltage - 
capacity (V - kW)

24 - 7.0

Battery capacity

2-200Ah (recommended)

11. Electric system

 184

Electrical Wiring diagram

DV2213212A

C

1

S1

O

N

ST

A

RT

B

ACC

B

R

C

F1

L

P1

P2

P3

Bat

.-

+

-

+

-

S

S

8

4

3

0.85R

0.85R

0.85

B

0.85

0.5WR

0.85

7

3.0Y

5

A

3.0Y

0.5G

0.5L

Control

  U

nit


Ass

'

y

65.11220-7011/7012

0.85

0.85

1.25

1.25

C

D

A

B

G

M

F

F2

10

A

2.0R

2.0R

E

2

1

O

FF - RUN


O

N - IDL

E

SWIT

C

H

O

N-

O

FF

CO

NTR

O

L UNIT

IDL

E

-RUN 

o

v

er


spee

d

S

t

. +

Alternator

B

+

0.85

B

L

R

P

S1.

ACC

(1.25W

)

0.5W

B

0.85

BrB

S2

H6

-

0.5GY

-

+

H7

+

0.5WR

H9

-

0.5L

Y

+

H8

-

+

Battery

S

tarter

+

-

S

ensor

W

ater


temp

.

P

ic

k-

up

S

pee

d

-

+

Bat

.-

S

ensor

Engine


oil

G

G

P

ic

k-

up

S

pee

d

Actuator

-

+

Bat

.-

Bat

.-

D1

-

+

WK

W

ater


temp

.

Sw

itc

h

103°

C

T

W

D1

87

a

30

2.0R

0.5

P

bar

B

GND

(U

ser

  S

upply)

(U

ser

  S

upply)

5K

J

R

E

GIST

E

R

SP

EE

D TRIM

K

L

O

FF - ST

A

ND

A

RD


O

N - DR

OO

P

SWIT

C

H

DR

OO

P

L

R

N

T

P

r

G

M

°

C

PU

PU

11. Electric system

 185

Switches and sensors

Temperature Switch

DV2213141A

Temperature Sensor

DV2213142A

Pressure Sensor & Switch

DV2213143B

1. Output characteristic

2. Warning output: switch(WK) to GND at 0.5bar 

±

0.2bar

3. Max. pressure: 30 bar (momentary 2sec)

4. Operating temperature: -30

°

C ~ 100

°

C (Max. 120

°

C,

1h)

Operation Temperature

ON: 103

°

C ± 3

°

C, OFF: 

96

°

C

Current Capacity

DC12V, 9A

TYPE

Normal Open

Insulation Resistance

more than 10M

Temperature 

(°C)

50

80

100

120

Resistance 

(

)

153.9

47.5~58.0

26.2~31.3

16.1

M16x1

.

5

M16x1

.

5

Pressure (bar)

Resistance (

)

0

10

-5

 ~ 10

+3

(1.5)

31 

±

 4

2

52 

±

 4

(3)

70 

±

 4

4

88 

±

 4

(5)

106 

±

 5

6

124 

±

 5

(7)

140 

±

 10

(8)

155

-10

 ~ 155

+15

(9)

170 

±

 25

(10)

184 

±

 30

G

W

K

NPTF 1/8-27

11. Electric system

 186

Magnetic Pick-up

DV2213146B

1. Operating temperature: -40

°

C ~ 120

°

C

2. Output Volt (P-P)

3. DC resistance: 1.8k


±

 15%

4. Inductance: 3.1H 

±

 25%

5. Insulation Resistance: 10M

 or more at 500V DC

6. Resistance (B ~ Y): 350


±

 10%

above 14V

above 7V

Gear

Module M=3, 

Teeth Z=32

M=3, Z=32

Clearance

1.0 

±

 0.1mm

1.0 

±

 0.1mm

Revolution

1,000 ± 20 RPM

1,000 ± 20 RPM

Load

Open

5k

 Resistive

K

ET

:

MG640322-5

SW 19

Lock Nut

M16x1

.

5

0

.

5 B

GND

0

.

Y

SIGNAL

11. Electric system

 187

Starter

General Information

The starter is attached to the back of the flywheel 

housing. When disassembling the engine, immerse the 

pinion gear and ring gear of the starter in fuel, brush 

them, and then apply greases to them in order to prevent 

rust.

Specification

CAUTION

Starter should be protected from humidity all the

time.

Before working on the electric system, be sure to

disconnect the ground wire("-" minus wire) of the

battery. Short circuit may occur while working on

the electrical system. Connect the ground wire

last after completing all of work.

Specification

NOMINAL OUTPUT

24V, 7.0kW

ENGAGEMENT SYSTEM

AUXILIARY ROTATION SYSTEM/SOFT START

Max. RATED TIME

30 SEC

ROTATION

CLOCKWISE VIEWED FROM THE PINION

SWITCH HOLD-IN CURRENT

MAGNETIC SWITCH

2.3A

SOLENOID SWITCH

15A

11. Electric system

 188

Views

DV2213139A

“Groun

d

” Terminal

M10X1

.

5

“Switch” Terminal (Rela

y

)

M5X0

.

8

“Batter

y

” Terminal

M10X1

.

25

Solenoi

d

Rela

y

Motor

“Switch” Terminal
    (Solenoi

d

)

M Terminal

11. Electric system

 189

Wiring Diagram

DV2213140A

Resistance

“Batter

y

” Terminal

Rela

y

Solenoi

d

Motor

M

“Groun

d

” Terminal

“Switch” Terminal

M Terminal

Item

+

-

Spec.

Relay

Switch Terminal

Relay Case

23.5k

± 2.35

Solenoid

Switch Terminal

M Terminal

0.124

± 5%

11. Electric system

 190

Alternator

General Information

The alternator is fitted with integral silicon redtifiers. A 

transistorized requlaor mounted on the alternator body 

interior limits the alternator voltage. The alternator should 

not be operated except with the regulator and battery 

connected in circuit to avoid damage to the rectifier and 

regulator.The alternator is maintenance-free, nevertheless, 

it must be protected against dust and, above all, against 

moisture and water.

Views

DV2213137A

T

y

pe


“3V-2”


V-Belt

“P”


Terminal

K

E

Y:

GP


890545

Frequnc

y=

RPM/10

Pulle

ratio


244

:

85


“L”


Terminal

“R”


Terminal

“B”


Terminal


M6x1

.

0

Housing

:K

ET


MG


620042

Terminal

:K

ET


ST


740254

11. Electric system

 191

Wiring Diagram

DV2213138A

Specification

Performance

Abnormally Charging

1. Measuring the voltage between the terminal and the

alternator body when operating.

Note) Measuring the voltage in order to check the wire 

condition needs only the terminal when the engine 

is stopped.

1) During operation

0

.

5 MFD

B

+

P

Termianl

Regulator

R

L

B

+

R

   =

150~250

OHM

L

Specification

RATING

Continuous rating

ROTATION DIRECTION

Clockwise

BATTERY VOLTAGE

24V

TURN ON RPM

Max. 1,050 RPM

SPEED IN USE

1,000 ~ 8,000 RPM

MAX. INLET AIR TEMP

105

°

C

POLARITY

SET.VOLT.

27.5V

TEMP.GRAD

10

±

3mV/

°

C

Performance

Voltage 

(V)

Output current (A)

Speed

(RPM)

COLD

HOT

27.5V

(22)

17.5

1,800

(48)

45

5,000

11. Electric system

 192

2) During Stop

2. Check of a voltage regulators: Mearsuring the resis-

tance between the terminals.

1) The resistance value between the voltage regulators.

Position

Voltage

Terminal B - Body

About DC27V ~ 29.5V

Terminal L - Body

About DC27V ~ 29.5V

Terminal R - Body

About DC3V ~ 5V

Position

Voltage

Terminal B - Body

About DC22V ~ 27V

Terminal L - Body

About DC22V ~ 27V

Terminal R - Body

0

Terminal

Resistance

+

-

L

Body

4 ~ 4.5 k

R

Body

110 ~ 180 k

Body

R

110 ~ 180 k

L

R

110 ~ 180 k

 193

12. Others/driving system

General information

 . . . . . . . . . . . . . . . . . . . . . . . . . . . . . . . . . . . . . . . . . . . . . . . . . . . . . 195

General Information

 . . . . . . . . . . . . . . . . . . . . . . . . . . . . . . . . . . . . . . . . . . . . . . . . . . . . 195

Crankshaft

 . . . . . . . . . . . . . . . . . . . . . . . . . . . . . . . . . . . . . . . . . . . . . . . . . . . . . . . . . . . . 196

Measurement of Crankshaft

 . . . . . . . . . . . . . . . . . . . . . . . . . . . . . . . . . . . . . . . . . . . . . . 196

Measurement of Crankshaft Bearing and Connecting Rod Bearing

 . . . . . . . . . . . . . . . . . . 197

Piston

. . . . . . . . . . . . . . . . . . . . . . . . . . . . . . . . . . . . . . . . . . . . . . . . . . . . . . . . . . . . . . . . 199

Disassembly of Piston

 . . . . . . . . . . . . . . . . . . . . . . . . . . . . . . . . . . . . . . . . . . . . . . . . . . 199

Assembly of Piston

. . . . . . . . . . . . . . . . . . . . . . . . . . . . . . . . . . . . . . . . . . . . . . . . . . . . . 199

Piston Inspection

 . . . . . . . . . . . . . . . . . . . . . . . . . . . . . . . . . . . . . . . . . . . . . . . . . . . . . . 199

Piston Ring and Ring Groove

. . . . . . . . . . . . . . . . . . . . . . . . . . . . . . . . . . . . . . . . . . . . . 200

Piston pin

 . . . . . . . . . . . . . . . . . . . . . . . . . . . . . . . . . . . . . . . . . . . . . . . . . . . . . . . . . . . 200

Connecting rod

. . . . . . . . . . . . . . . . . . . . . . . . . . . . . . . . . . . . . . . . . . . . . . . . . . . . . . . . . 202

Inspecting the connecting rod

. . . . . . . . . . . . . . . . . . . . . . . . . . . . . . . . . . . . . . . . . . . . . 202

Others

 . . . . . . . . . . . . . . . . . . . . . . . . . . . . . . . . . . . . . . . . . . . . . . . . . . . . . . . . . . . . . . . 203

Engine Timing

 . . . . . . . . . . . . . . . . . . . . . . . . . . . . . . . . . . . . . . . . . . . . . . . . . . . . . . . . 203

12. Others/driving system

 195

General information

General Information

The forged crankshaft has screwed-on dounterweights. 

Radial seals with replaceable wearing rings on crankshaft 

and flywheel are provided to seal the crankcase penetra-

tions. 

The connecting rods are die-forged, diagonally split and 

can be removed through the top of the cylinders together 

with the pistons. Crankshaft and connecting rods run in 

steel-backed lead bronze ready-to-fit bearings.

12. Others/driving system

 196

Crankshaft

Measurement of Crankshaft

1. Inspection and measurement

1) Visually inspect whether there is any crack or scratch

on the journal and pins of the crankshaft.

2) Perform the magnetic particle testing or the liquid

penetrant testing (color check) to check the cracks on

the crankshaft. If cracks are found, replace the crank-

shaft with a new one.

2. Measuring journal and pin diameter

1) Using an outer diameter micrometer, measure the

crankshaft journals and pins toward the direction as

shown in the figure to determine the amount of wear.

DV2213147A

DV2213148A

2) If the amount of wear exceeds the tolerance limit,

grind the crankshaft and assemble an under-size

bearing.

3) There are 4 kinds as below, and the crankshaft also

can be used by regrinding as below.

Standard

0.25 (Inside diameter 0.25 mm less than standard)

0.50 (Inside diameter 0.50 mm less than standard)

0.75 (Inside diameter 0.75 mm less than standard)

1.00 (Inside diameter 1.00 mm less than standard)

4) “R” part standard value

Crank pin "R": 3.5 ~ 4.0

Crank journal "R": 3.5 ~ 4.0

DV2213149A_E

3. Warpage of crankshaft

1) Put the crankshaft on the V block.

2) Put the dial gauge on the surface plate and measure

the warpage of the crankshaft as spinning the crank-

shaft.

Item

Standard

Crankshaft journal’s outer 

diameter

Ø

103.98 ~ 

Ø

104.00mm

Crankshaft pin’s outer 

diameter

Ø

89.98 ~ 

Ø

90.00mm

A

A

B

B

1

1

2

2

3 4

3 4

CAUTION

In case of crankshaft regrinding, the “R” part at the 

end of bearing must accurately be ground without 

fail and should avoid any processed jaw or coarse 

surface.

Normal

Abnormal

Normal

12. Others/driving system

 197

DV2213150A

Measurement of Crankshaft Bearing and 
Connecting Rod Bearing 

1. Visual inspection

Visually inspect the crankshaft bearing and connecting 

rod bearing for scratch, unusual wear or damage.

2. Oil clearance between crankshaft and bearing (Method

1: Dial gauge)

1) Assemble the main bearing to the cylinder block,

tighten the bearing cap to the specified torque.

2) Measure the inner diameter.

DV2213151A

3) Assemble the bearing to the connecting rod, tighten

the bearing cap to the specified torque.

4) Measure the connecting rod bearing journal inner

diameter.

DV2213152A

5) if the cleanrance exceeds the tolerance limit, grind the

crankshaft journal and pin, and assemble under size

bearing.

3. Oil cleanrance between crankshaft and bearing.

(Method 2: Plastic gauge)

1) Assemble the crankshaft to the cylinder block.

2) Place the plastic gauge on the crankshaft journal and

pan.

3) Assemble the bearing cap and tighten the bolt to the

specified torque.

4) Loosen the bolt, remove the bearing cap.

5) Measure the width of the plastic gauge at the widest

point using the ruler for plastic gauge measurement.

This is the oil clearance.

6) Measure the oil clearance of connecting rod as the

same procedure.

4. End play

1) Assemble the crankshaft in the cylinder block.

2) Install the dial gauge, and measure the end play of

crankshaft by pushing the crankshaft to axial direction.

Item

Standard

Limit

Warpage of crankshaft

0.06mm

0.4mm

Item

Standard

Tightening torque

First 30 kgf

·

m + 90

°

Item

Standard

Journal’s inner diameter

Ø

104mm

Item

Standard

Tightening torque

First 30 kgf

·

m + 90

°

Item

Standard

Inner diameter

Ø

90.00

Item

Standard

Limit

Clearance

0.066~0.132mm

0.166mm

A

8

8

Section

A-B

B

1

2

3

10

10

12. Others/driving system

 198

DV2213153A

Item

Standard

Limit

Axial end play

0.190~0.322mm

0.452mm

12. Others/driving system

 199

Piston

Disassembly of Piston

1. Pull out the snap ring for piston pin and with a pair

of snap ring pliers.

DV2213154A

2. With a round bar, remove the piston pin.

3. With a pair of pliers, remove the piston rings.

DV2213155A

4. Clean the piston thoroughly.

Assembly of Piston

1. Heat the piston at the piston heater for about 5

minutes (120 ~ 150

°

C).

DV2213156A

2. By aligning the piston pin hole with the pin hole of

connecting rod’s smaaler end, insert the oil coated

piston pin.

3. With the snap ring plier, inser the snap rings of the

piston pin.

4. With confirming the upper side indication of piston

ring, after assembling the ring in the piston ring

groove, inspect if the movement of ring is smooth.

Piston Inspection

1. Visual inspection

1) Visually check the piston for crack, scratch, wear, etc.

Specially, check the wear status of the ring groove.

2. Piston outside diameter inspection

1) With the outside micrometer, measure the outside

diameter.

2) The measuring position is 71.5mm from the piston

lower end, and the direction of measurement must be

perpendicular to the piston pin direction.

CAUTION

Confirm the direction of connecting rod and 

assemble.

CAUTION

Arrange the assembled piston in order as the 

cylinder number.

12. Others/driving system

 200

DV2213157A

Piston Ring and Ring Groove

1. In case of piston ring’s wear, damage or engine over-

haul, replace piston rings.

2. Piston ring gap clearance: measure the piston ring cut

part.

1) Insert the piston ring at the cylinder liner’s upper part

perpendiculary.

2) With a feeler gauge, measure the gap clearance of

piston ring.

DV2213158A_E

3) If the measured value exceeds the limit value, replace

it.

DV2213159A_E

Piston pin

1. Wear

1) Measure the wear amount of the piston pin with a

outside micrometer.

2) If the reading exceeds the tolerance limit, replace the

pin.

DV2213160A

2. Clearance

1) Measure the clearance between the piston pin and

connecting rod bush.

Item

Standard

Piston outside diameter

Ø

127.739~ 

Ø

127.757mm

CAUTION

By comparing the measured value of the piston 

outside diameter with the cylinder liner inside diam-

eter, the bigger clearance is replaced.

Gap gauge

Item

Standard

Limit

Top ring

0.35 ~ 0.55mm

1.5mm

2nd ring

0.50 ~ 0.82mm

1.5mm

Oil ring

0.30 ~ 0.62mm

1.5mm

Item

Standard

Limit

Outside diameter

Ø

45.994~

Ø

46.000mm

Ø

45.983mm

Gap gauge

12. Others/driving system

 201

2) If the reading exceeds the tolerance limit, replace the

one which are worn more.

DV2213161A

Item

Standard

Clearance

0.003 ~ 0.015mm

12. Others/driving system


http://www./equipment/ctm/400/

Connecting rod

Inspecting the connecting rod

1. Measure the parallelism between the connecting rod

small end’s bush hole and the large end bearing hole.

Here, use both the connecting rod measuring device

and feeler gauge.

DV2213162A_E

Item

Standard

Limit

Degree of parallelization

0.02mm

0.2mm

Piston
Burners

12. Others/driving system


http://www./equipment/ctm/400/ 

Others

Engine Timing

DV2213204A

5

2

6

1

3

4

1

. C

rankshaft gear

2

.

Oil pump 

d

rive gear

3

.

Oil pump impeller gears

4

. C

amshaft 

d

rive gear

5

.

Injection pump 

d

rive gear


Content      ..     3      4      5