DB2 Server for VSE. Operations Guide / Handbooks (2004-2007) - page 29
Proportion of Index to Data and Header Pages
The amount of space you reserve for index pages, depends on how many indexes
you expect to create and on the number and size of columns included in the
indexes. You can use the following as a guideline:
Read-Only Data
Since many indexes are recommended for read-only data, you should
reserve at least the default of 33% and as much as 50% for the pages in a
dbspace for index pages.
Update Intensive Data
You can reserve less than the default of 33% of the pages in a dbspace for
index pages, since you may not use as many indexes for this type of data.
(It is expensive to update indexes every time data is updated, so it is
suggested that you use fewer indexes with this data.)
If you are unsure whether your data is read-only or update intensive, use the
default of 33% index pages.
Tuning Parameter (PCTINDEX): You can set the proportion of index to data and
header pages in a dbspace when you acquire it using the PCTINDEX parameter.
For example, the following statement acquires a dbspace and reserves 50% of its
pages as index pages:
ACQUIRE PUBLIC dbspace NAMED test_dbspace (PCTINDEX=50)
Performance Indicator (PCTINDX): To determine the current percentage of
reserved index pages in a dbspace, look in the PCTINDX column of the
SYSTEM.SYSDBSPACES catalog table for your dbspace.
Free Space in Data Pages
You can reserve a percentage of each data page for updates that make the changed
row longer than it was before. This free space is not used for inserts. You can
reclaim the free space for inserts through an ALTER DBSPACE statement. The
percentage of free space you choose will depend on the type of activity being
carried out on the data in the dbspace:
High Insert/Low Update Activity
This is the situation where there will be few updates, or all columns are
fixed length and non-nullable in the tables. Here, you would set the
percentage of free space to a high value before loading the data; then lower
it to a low value. The difference between the original value and the final
value can then be used by insert activity.
Low Insert/High Update Activity
In this situation, PCTFREE should be set to a low to medium value,
depending on the likelihood of updated rows increasing in length.
(Increase PCTFREE in proportion to the likelihood of increasing row
length.) The space saved by PCTFREE will be used by the update activity
only if the update increases the size of the row and the free space will
accommodate the new row.
Low Insert/Low Update Activity Or Read-Only Data
Read-only data is data that is loaded into a dbspace and then never
modified or updated, only retrieved using query statements. In this
situation, set PCTFREE to a low value or zero, before you load any data
into the dbspace.
Chapter 3. Managing Storage and Configuring the Operating System
61
High Insert/High Update Activity
In this situation, set PCTFREE to a high value while you load data into the
database and then lower it. This would allow space for use by both update
and insert activities.
One purpose of PCTFREE is to minimize overflow because of row expansion.
When UPDATE commands are executed on an existing row and the length of the
row increases, the row could expand into the free space reserved with PCTFREE. If
the expansion exceeds the free space, the page becomes full, and it causes an
overflow. The row is relocated to a new page and a pointer chaining to the new
location is set in the old page. If the row has to be moved again, the pointer is set
to mark the newest location. Therefore, the database manager never reads more
than two pages for one row.
The other purpose of PCTFREE is to reserve space on a page when data is loaded.
After loading, PCTFREE can be lowered to allow the free space to be used for
inserts (to help keep the data clustered).
Tuning Parameter (PCTFREE): You can set the percentage of space on each page
that is kept free when data is inserted in the dbspace, when you acquire it using
the PCTFREE parameter. For example, the following statement acquires a dbspace
and reserves 20% of the space on each page for inserts:
ACQUIRE PUBLIC dbspace NAMED test_dbspace (PCTFREE=20)
You need to know the PCTFREE setting for a dbspace before you can calculate the
number of rows you can effectively store on a single data page. For a complete
description of how to calculate this, refer to “Estimating the Number of Data Pages
Required” in the DB2 Server for VSE & VM Database Administration manual.
Performance Indicator (FREEPCT): To determine the current percentage of space
on each page that is kept free when data is inserted in the dbspace, look in the
FREEPCT column of the SYSTEM.SYSDBSPACES catalog table for your dbspace.
Performance Indicator (AVGROWLEN): To determine average length of the rows
in a table, look in the AVGROWLEN column of the SYSTEM.SYSCATALOG catalog
table.
Performance Indicator (NOVERFLOW): To determine how many rows are
overflowing onto new pages, look in the NOVERFLOW column of the
SYSTEM.SYSCATALOG catalog table. As a rule of thumb, if the number of
overflow rows in a table (NOVERFLOW) exceeds 5% of the total number of rows
in the table (ROWCOUNT), it is probably time to reorganize the table. Refer to
“Reorganizing Data” on page 70.
If you decide to reorganize the table because of this, you may also want to alter
the dbspace to give it a larger PCTFREE value.
Free Space in Index Pages
You can reserve a percentage of space in each index page for future index entries,
which allows index maintenance to take place without splitting of index pages. Its
default is 10 percent, which is a good value for most purposes. If you expect much
insert or update activity after the creation of the index, you might want to override
the default by setting the percentage to a higher value. If you expect no insert or
update activity after the creation of the index, you might want to override the
62
Performance Tuning Handbook
default by setting the percentage to zero. Usually, a low value (5% to 10%) is a
good choice when creating an index, as this allows enough room to accommodate
a low level of maintenance.
Tuning Parameter (PCTFREE): You can set the percentage of space in each index
page for future index entries, when you create it using the PCTFREE parameter.
For example, the following statement creates an index and reserves 20% of the
space on each page for future entries:
CREATE INDEX test_index ON test_table (test_column) PCTFREE=20
You can change a current PCTFREE value by either dropping the index and
recreating it with a new PCTFREE, or you can reorganize it with the DBS Utility.
For example, the following command will reorganize index index_number_one
created by smith and give it a PCTFREE value of 50:
REORGANIZE INDEX (smith.index_number_one) PCTFREE=50
For more information on reorganizing indexes, refer to “Reorganizing Fragmented
Indexes” on page 73.
Performance Indicator (IPCTFREE): To determine the current percentage of space
in each index page for future index entries, look in the IPCTFREE column of the
SYSTEM.SYSINDEXES catalog table for your index.
Shadow Pages
Shadow pages are used whenever you make changes to your database. They use
space in a storage pool that is only released during a checkpoint. If you are not
careful to leave enough free space in your pools, shadow pages can fill them before
the space is reclaimed at the next checkpoint. This is true even if you are only
modifying rows and not adding new ones.
Each permanent (not internal) dbspace page has two entries in the page map table.
One points to the current page while the other points to the shadow page. The
current page contains any updates made to the page since the last checkpoint. The
shadow page contains the original page as it was at the time of that checkpoint.
(See “Choosing the Checkpoint Interval” on page 104 for a discussion of
checkpoints.) If there have been no changes to the table since the last checkpoint,
both entries point to the current page.
The database manager uses this system to reconstruct changes to the database after
a system failure. When the database manager is restarted after a system failure, it
will use the page map table entries that point to the shadow pages. This effectively
resets the database to its state at the last checkpoint. The LOG is then used to
re-apply updates for LUWs committed after the last checkpoint.
When the database manager updates a page the following occurs:
1. A new physical page is allocated from a storage pool. This uses one physical
4KB page in a storage pool. It does not deplete the available data pages of the
dbspace.
2. The current page map table entry is set to the new page location.
3. The new page is created in the local buffer pool.
At the next checkpoint the following occurs:
1. The new page in the buffer pool is written to the new physical location in a
storage pool and the buffer page is released for reuse.
Chapter 3. Managing Storage and Configuring the Operating System
63
2. The shadow page map entries are set equal to the current page map entries,
and the physical pages in the shadow page map entries that have been changed
are released.
Note: Do not confuse shadow page recovery with rollback work processing.
Shadow pages are NOT released during a ROLLBACK. During a rollback
the contents of the log are read and any changes to the database are undone.
For example the database manager will undo a CREATE TABLE with a
DROP TABLE. If a ROLLBACK were accomplished by falling back on
shadow pages, you could not recover if a system failure occurred during
ROLLBACK processing.
Determining the Number of Shadow Pages in Use: If you want to know how
many pages are used by a specific update transaction, you can compare the
number of PAGES USED (SHOW POOL) before and after the transaction. For
example, consider a storage pool with two dbextents. Force a checkpoint (drop a
dbspace created for the purpose), and then enter a SHOW POOL command:
show pool
POOL NO.
1:
NUMBER OF EXTENTS = 2
EXTENT TOTAL
NO. OF
NO. OF
NO. OF
%
NO.
PAGES PAGES USED FREE PAGES RESV PAGES USED
1
855
245
610
28
2
855
0
855
0
TOTAL
1710
245
1465
20
14
ARI0065I Operator command processing is complete.
This pool has 245 PAGES USED. This total includes data, header, and pages index.
However, since you have just forced a checkpoint it does not include any shadow
pages.
If you now perform a transaction (for example an UPDATE statement) you can
determine how many shadow pages it uses by reissuing the SHOW POOL
operator command. For example, enter another SHOW POOL after the checkpoint:
show pool
POOL NO.
1:
NUMBER OF EXTENTS = 2
EXTENT TOTAL
NO. OF
NO. OF
NO. OF
%
NO.
PAGES PAGES USED FREE PAGES RESV PAGES USED
1
855
249
606
29
2
855
0
855
0
TOTAL
1710
249
1461
20
14
ARI0065I Operator command processing is complete.
This time the pool has 249 PAGES USED. This means that your transaction used 4
shadow pages (249-245).
If you force another checkpoint, the database manager will now release all the
shadow pages in the pool and reclaim the space. (There will be 245 PAGES USED and
610 FREE PAGES.)
64
Performance Tuning Handbook
Note: The above procedure will not be accurate if the transaction performs enough
database modifications to cause a checkpoint to occur.
Running out of Dbspace Pages
If you have run out of pages in a dbspace it is because of one of two conditions,
either the logical dbspace is full or the storage pool to which is assigned no longer
has any unallocated physical pages.
Storage Pool Full: If all the pages in a storage pool have been allocated, you can
reorganize the dbspaces allocated to it by dropping and recreating (reorganizing)
them. This will reclaim space wasted because of fragmentation, refer to
“Reorganizing Data” on page 70. You can also run a utility to free up the empty
pages. In VM, the utility is invoked via the SQLRELEP EXEC. In VSE, it is invoked
by starting the server with STARTUP=P. For more information, refer to the DB2
Server for VSE & VM Database Administration manual.
If neither or these methods reclaims enough space, you must add a dbextent to the
pool. For instruction on how to do this, refer to the DB2 Server for VM System
Administration or the DB2 Server for VSE System Administration manuals.
You cannot make more pages available by deleting tables or rows in another
dbspace using the same pool. Deleted data pages are not returned to their pool.
After a data page in a storage pool has been assigned to a specific dbspace, it
cannot be used by another dbspace using the same pool until the entire dbspace is
dropped or the release empty pages utility is run.
You can use the SHOW DBEXTENT operator command (refer to page 25) to
monitor the storage available in each storage pool, and you can use the SHOW
POOL operator command (refer to page 26) to monitor the number of pages
available in each dbextent in the pool.
Dbspace Full: A dbspace cannot be extended after it is defined (either during
initial database generation or when it is added to a storage pool). Your only
choices are to delete rows or tables in the dbspace itself, or unload the contents of
the dbspace and reload them into a new dbspace that is larger than the original.
Alternatively, just over allocate the dbspace when you acquire it (refer to the
ACQUIRE dbspace command in the DB2 Server for VSE & VM SQL Reference
manual). A dbspace is only a logical allocation of space in the form of directory
page tables. You will not actually consume the total number of pages in the storage
pool that you defined for all the dbspaces in the pool. Define the size of dbspace
based on how large they may become, but define the size of the storage pool based
on how much storage you need right now, which includes shadow pages. As your
tables grow and you need more pages, just add dbextents to the pool.
Note: The amount of storage you need right now includes space for shadow
pages.
You can use the SHOW DBSPACE operator command (refer to page 25) to monitor
the number of header, data, and index pages allocated to the dbspace and the
percentage of each actually in use.
Shadow Pages: You may find that even though you have not added a significant
number of new rows to a dbspace it may become full. This occurs because every
time you modify a existing index or data page (or create a new one) a shadow page
is created. These pages require additional storage that is not reclaimed until the
Chapter 3. Managing Storage and Configuring the Operating System
65
next checkpoint, refer to “Shadow Pages” on page 63. To avoid this problem,
ensure that there is enough free space in your storage pools to accommodate
shadow pages. You will usually require between 15% and 25% free space measured
immediately after a checkpoint. For example:
show dbextent
POOL
TOTAL
NO. OF
NO. OF
NO. OF
%
NO. OF
NO.
PAGES PAGES USED FREE PAGES RESV PAGES USED
EXTENTS SOS
1
1710
1410
300
20
83
2
FREE
268626
ARI0065I Operator command processing is complete.
This dbextent has 17% free space (100-83). You may want to add space to ensure
that shadow pages will not become a storage problem.
Ever Increasing Index: One reason for running out of index pages is that you are
using an “ever increasing index”. For example, consider a table where you only
keep data for three months. Every month you delete any rows that were created
more than three months earlier. To keep track of the creation dates, you use a date
column, or timestamp and create an index on that column.
Unfortunately in this example, even though you delete old rows, the pages that
contain their index keys remain allocated to the table. They are not released for
reuse. They also remain allocated to the same range of values (or dates), so in this
example, they may never be reused. For example, if one index page contained keys
for a range of dates from March 1, 1996 to April 14, 1996, it will only ever be
reused for that range.
If you have this type of index, you must constantly monitor the percentage of free
index pages in the dbspace. You can use the SHOW DBSPACE operator command,
refer to “Proportion of Available Pages” on page 25.
To recover the wasted storage used by an ever increasing index, you must
reorganize it. Refer to “Reorganizing Fragmented Indexes” on page 73.
Data Clustering
Clustered Indexes
You can say that an index is clustered if the data is logically stored in an order
which closely matches the sequence of the index. That means that, ideally, when
you retrieve the rows following the order of a clustered index, the database
manager can do so by looking at a minimum number of pages.
Consider the following; all the rows in a table are retrieved in the sequence of an
index. As the database manager retrieves each row, it counts the number of times it
needs to access a different page than the one it is currently using.
In the best case, the number of pages accessed is exactly equal to the number of
pages occupied by that table within the dbspace. A data page is read, all the rows
of the subject table in that page are retrieved, and then the next page is read. In
this case, the pages are read sequentially - each page read only once.
Remember that saying an index is clustered really means that the table is clustered
relative to the index. If the database manager can use the index to sequentially
66
Performance Tuning Handbook
retrieve the rows in the table by looking at a minimal number of data pages, the
index is clustered. Another index acting on the same data may or may not be
considered clustered.
The Clustering Index
The first index created on a table is, by default, the clustering index. It inserts new
rows into data pages so that as many pages as possible are clustered relative to the
clustering index, refer to “Clustered Indexes” on page 66.
Default Clustering versus Clustering Index Strategy: When data is inserted into
a table, there are two strategies for finding a place for the data in the dbspace:
default logic and clustering index logic. Essentially the default logic places any
new rows at the end of the table, while the clustering index logic places a new row
in index sequence, as much as possible. While the clustering strategy tries to keep
a clustering index clustered, the only way to ensure that it is completely clustered
is to reorganize the data, refer to “Reorganizing Data” on page 70.
The default logic strategy is used if a clustering index is not available (indicated
by a “D” in the CLUSTERTYPE column in SYSTEM.SYSCATALOG for the table).
This strategy uses the value in the CLUSTERROW column in
SYSTEM.SYSCATALOG for the table to determine the starting point to look for
available space for the insert. The value in CLUSTERROW is a pointer to the end
of the table. If the value in CLUSTERROW is significantly incorrect, the database
manager has to do extra work to find a page that has sufficient free space to hold
the row to be inserted. The value of CLUSTERROW can be significantly incorrect if
UPDATE STATISTICS has not been executed recently or an application program
that is doing the insert has not been preprocessed (prepped) recently. Because a
preprocessed program that inserts with the default logic stores the value of
CLUSTERROW in the package, you must periodically preprocess this kind of
program to update the CLUSTERROW value in the package.
The clustering index strategy is used if a clustering index is available (indicated
by a “I” in the CLUSTERTYPE column in SYSTEM.SYSCATALOG for the table).
This strategy attempts to place the new row on the same page as rows with similar
key values. This determines the starting point to look for available space for the
insert. If there is no available space on the pages at or near this starting point then
the database manager must do additional work to find a page that has sufficient
free space to hold the row to be inserted. Insufficient free space can occur because
no free space was established for the dbspace or because inserts have used all the
free space. If you reorganize the dbspace, refer to “Reorganizing all the Tables in a
Dbspace” on page 71, you can establish free space for inserts.
When you create a table, CLUSTERTYPE is set to “D” and CLUSTERROW is set to
zero. When you create the first index on a table, CLUSTERTYPE is set to “I”. If
you reorganize the clustering index (refer to “Reorganizing Fragmented Indexes”
on page 73) it will remain the clustering index. If you drop the clustering index,
CLUSTERTYPE is set back to “D”. To establish a different index as the clustering
index you usually drop all indexes on the table, create the new clustering index as
the first index, and then create any other indexes. Refer to “Reorganizing a Single
Table” on page 71 and “Reorganizing all the Tables in a Dbspace” on page 71. You
can also change the clustering index by updating the SYSTEM.SYSINDEXES
catalog table, refer to “Changing the Clustering Index without Dropping Indexes”
on page 72.
How Indexes Become Unclustered
Indexes become unclustered when:
Chapter 3. Managing Storage and Configuring the Operating System
67
v A significant number of rows were added to a table since the clustering index
was first created or since the data was last reorganized
v And there was insufficient free space available to put the rows into their optimal
locations.
You can increase the number of rows that you can add before the index becomes
unclustered by increasing the PCTFREE setting when you reorganize your data.
Refer to “Reorganizing a Single Table” on page 71.
Identifying Unclustered Indexes
Deciding whether an index is clustered requires some judgement. First, you need
to execute an UPDATE STATISTICS statement against the table the index belongs
to. Second, you need to look at the CLUSTERRATIO and the CLUSTER column in
the SYSTEM.SYSINDEXES catalog table.
The CLUSTERRATIO value is used by the optimizer to choose a suitable index for
access path selection. This value represents a percentage, with the two decimal
places implied. The value is calculated by:
ROWCOUNT - PAGE JUMPS
CLUSTERRATIO = 10000 * ---------------------
ROWCOUNT - PAGE COUNT
where: PAGE COUNT = the number of pages the table occupies
PAGE JUMPS = the number of times a different data page is
referenced to access all the data in the table
in index order
The CLUSTERRATIO value ranges between 0 and 10000, and indicates the
percentage of time that the table’s row, when retrieved using that index, are in
logical page sequence.
The CLUSTER value, in addition to giving a general idea about whether the index
is clustered, is also used to identify the clustering index for the table.
Table 2. CLUSTER values
CLUSTER Value
Clustered
Clustering
F
Yes
Yes
C
Yes
No
W
No
Yes
N
No
No
The CLUSTER column will show that an index is not clustered if the following is
true:
PAGE JUMPS
110% <
----------- x 100
PAGE COUNTS
(The number of jumps per page is greater than 1.1.)
Clustering VIEW: You can include all the important information about clustering
and indexes in one VIEW. For example, the VIEW should contain the following
information:
v The name of the index and its creator
v The CLUSTERRATIO of the index
68
Performance Tuning Handbook
v The CLUSTER value of the index
v The number of rows in a table that the index acts on
v The number of pages in the table that the index acts on
For example:
SELECT i.iname,
i.clusterratio,
i.cluster,
t.rowcount,
t.npages
FROM system.sysindexes i, system.syscatalog t
WHERE t.tname = i.tname and
t.creator = i.creator
to help you determine if your index is clustered, your view should also include:
v The number of jumps
v The number of jumps per page.
While the CLUSTERRATIO and CLUSTER values are very useful in determining
how clustered a index is, you may find it useful to see how many jumps the
database manager makes for each page it reads. Remember each additional jump
per page represents an unnecessary I/O. You may also want to compare the
number of jumps per page to the number of rows per page. Unfortunately there is
no concrete rule you can use to decide when an index is unclustered. However, the
more information you have available the better you will be able to get a “feel” for
the state of the index.
To calculate the number of jumps, rearrange the clusterratio calculation to solve for
jumps instead of clusterratio. For example:
CLUSTERRATIO
PAGE JUMPS = ROWCOUNT - ------------- X ( ROWCOUNT - PAGE COUNT)
10000
If the page jumps calculation was included in a SELECT with the name of the
index, the SELECT would look like this:
SELECT i.iname,
(t.rowcount-( i.clusterratio/10000.0*(t.rowcount-t.npages)))
FROM system.sysindexes i, system.syscatalog t
WHERE t.tname = i.tname and
t.creator = i.creator
The following SELECT statement:
v Combines the previous two SELECT statements and adds the jumps per page
ratio.
v Orders the results by the jumps per page ratio, so you can see the indexes with
the worst ratio first
v Excludes indexes created against empty tables.
Chapter 3. Managing Storage and Configuring the Operating System
69
SELECT i.iname,
i.clusterratio,
i.cluster,
t.rowcount,
t.npages,
(t.rowcount-(i.clusterratio/10000.0*(t.rowcount-t.npages))),
((t.rowcount-(i.clusterratio/10000.0*(t.rowcount-t.npages))))/t.npages
FROM system.sysindexes i, system.syscatalog t
WHERE t.tname = i.tname and
t.creator = i.creator and
t.npages > 0 and
t.rowcount > 0
ORDER BY 7 desc
Reorganizing Data
You should reorganize data for one of four reasons:
v A table’s clustering index has become unclustered. Refer to “Identifying
Unclustered Indexes” on page 68.
v The number of overflow rows in a table (NOVERFLOW) exceeds 5% of the total
number of rows in the table (ROWCOUNT). Refer to “Free Space in Data Pages”
on page 61.
v To change which index acts as the clustering index.
v To return once populated but now empty data pages to the storage pool, refer to
“Storage Pool Full” on page 65.
The first two conditions indicate that the rows can no longer be efficiently
retrieved.
Essentially, reorganizing involves unloading the data and reloading it. Unload the
data, making sure that the clustering index exists. If a clustering index is available,
the data is unloaded following its sequence. Drop the clustering index and reload
the data (it will be reloaded in the order of the clustering index). Then recreate the
clustering index. This reclusters the data according to the clustering index, and
reclaims space that was lost because of row overflow.
The following instructions assume that you are using the DBS utility to unload and
reload tables. For more information on its use, refer to the DB2 Server for VSE &
VM Database Services Utility manual.
There are several questions you need to ask before you choose a way to reorganize
your data.
v If you are reorganizing all the tables in a dbspace at once and there are not
many tables in that dbspace with field procedures), and it is not difficult for you
to recreate all the indexes, referential constraints, and unique keys in that
dbspace, follow the instructions in “Reorganizing all the Tables in a Dbspace” on
page 71. While this set of instructions requires you to recreate the entire
dbspace, the actual process of reloading the data is faster than the following
alternative.
v If you only need to reorganize one or two tables or if your table contains
columns with field procedures, or if it is too much work to recreate all their
indexes, referential constraints, and unique keys, follow the instructions in
“Reorganizing a Single Table” on page 71. However, if you also want to change
which index acts as the clustering index, you will have to drop and recreate all
the table’s indexes.
70
Performance Tuning Handbook
v If you only want to change the clustering index in a single table that uses
several other indexes, follow the instructions in “Changing the Clustering Index
without Dropping Indexes” on page 72. Unlike the previous procedure, this set
of instructions does not require you to drop and recreate all the table’s indexes.
Reorganizing a Single Table
The following method reorganizes a single table. It uses the DBS Utility RELOAD
PURGE command. While it is not as fast as the RELOAD NEW command, you do
not need to manually drop and recreate any indexes, referential constraints, and
unique keys (unless you want to change the clustering index).
1.
If you want to change which index acts as the clustering index, do the
following:
a. Drop all indexes for the table by issuing a DROP INDEX statement for each
one.
b. Create a new index (using the CREATE INDEX statement). This index will
act as the clustering index.
2.
Unload the table (usually to tape), by issuing a DBS Utility UNLOAD TABLE
command. The rows are automatically unloaded in the key sequence of the
clustering index.
3.
Set the PCTFREE value of the dbspace to a high enough value to allow space
on pages for future clustered insertion of rows.
4.
Set UPDATE STATISTICS ON if you want to automatically collect statistics
during the RELOAD, or set it OFF if you plan to UPDATE ALL STATISTICS
after the RELOAD. Refer to “Automatic Statistics Collection” on page 114.
5.
Reload the table by issuing a DBS utility RELOAD command with the PURGE
option specified.
During RELOAD command processing with the PURGE option specified, all
rows of the specified table are deleted. As part of the PURGE, the DBS utility
drops the clustering index, deactivates any active primary keys, active foreign
keys, and active unique keys, and deletes all indexes on the table before
deleting and reloading the data. After the table has been reloaded, the DBS
utility recreates the clustering index, primary key, and unique keys, and
recreates the remaining indexes. It then reactivates all the foreign keys it
dropped. Since packages are invalidated because of table index deletions, they
are dynamically repreprocessed the next time someone attempts to execute the
package.
6.
Reduce PCTFREE to make the free space available for use on normal INSERT
activity.
7.
If you set UPDATE STATISTICS OFF, collect statistics for all columns by issuing
the UPDATE ALL STATISTICS command.
8.
If you changed which indexes acts as the clustering index, recreate the other
table indexes required, using CREATE INDEX statements. The definition of all
indexes on a table can normally be determined by querying the
SYSTEM.SYSINDEXES system catalog table, as long as the length of the column
names on which the index is defined is less than 100 characters.
Reorganizing all the Tables in a Dbspace
The following method reorganizes all the tables in a dbspace.
1. Record any index, referential constraint, unique key definitions, or field
procedures authorizations in the dbspace.
2. If you want to change which index acts as the clustering index for any tables
in the dbspace, do the following for those tables:
Chapter 3. Managing Storage and Configuring the Operating System
71
a. Drop all indexes for the table by issuing a DROP INDEX statement for
each one.
b. Create a new index (using the CREATE INDEX statement). This index will
act as the clustering index.
3.
Unload the dbspace (usually to tape), by issuing a DBS Utility UNLOAD
DBSPACE command. The tables will be unloaded in the order of the
clustering index.
4.
Drop and recreate the dbspace.
5.
Set the PCTFREE value of the dbspace to a high enough value to allow space
on pages for future clustered insertion of rows.
6.
Set UPDATE STATISTICS ON if you want to automatically collect statistics
during the RELOAD, or set it OFF if you plan to UPDATE ALL STATISTICS
after the RELOAD. Refer to “Automatic Statistics Collection” on page 114.
7.
Reload the dbspace by issuing a DBS Utility RELOAD DBSPACE command
with the NEW option specified.
The NEW option assumes that none of the tables you are reloading currently
exist in the dbspace. A program that accesses a table, the index of which was
dropped, is re-preprocessed when it is next executed, which ensures that it
takes advantage of the new clustering properties.
If a table in the dbspace has field procedures associated with it, the table
should be dropped and recreated to include the field procedures and reloaded
using the PURGE parameter. It is not necessary to unload the table again, as
the table can be reloaded from the unloaded dbspace file.
8.
Recreate the clustering index.
9.
Reduce PCTFREE to make the free space available for use on normal INSERT
activity.
10.
If you set UPDATE STATISTICS OFF, collect statistics for all columns by
issuing the UPDATE ALL STATISTICS command.
11.
Recreate the other table indexes, any referential constraints and any unique
keys.
Changing the Clustering Index without Dropping Indexes
The following method reorganizes a single table, and changes which index will act
as the clustering index. It eliminates the need to individually drop and recreate all
indexes on the table. (The steps can be performed in a single execution of the DBS
Utility.)
1. On the SYSTEM.SYSINDEXES table entry for the original clustering index,
update the CLUSTER column value of “F” or “W” to “N”.
2. Change the value in the CLUSTERRATIO column to 1000 (10.00%).
3. If the new clustering index does not exist, create it with a CREATE INDEX
statement.
4. On the SYSTEM.SYSINDEXES catalog table entry, update the CLUSTER column
for the new clustering index to the value “W”.
5. Change the value in the CLUSTERRATIO column to 7500 (75.00%).
6. Unload the table by issuing a DBS Utility UNLOAD TABLE command.
7. Set UPDATE STATISTICS ON if you want to automatically collect statistics
during the RELOAD, or set it OFF if you plan to UPDATE ALL STATISTICS
after the RELOAD. Refer to “Automatic Statistics Collection” on page 114.
8. Reload the table by issuing a DBS Utility RELOAD command with the PURGE
option specified.
72
Performance Tuning Handbook
During RELOAD command processing with the PURGE option specified, all
rows of the specified table are deleted and the table index (if one exists) is
dropped and recreated. A program that accesses a table, the index of which was
dropped, is re-preprocessed when it is next executed, which ensures that it
takes advantage of the new clustering properties.
9. If you set UPDATE STATISTICS OFF, collect statistics for all columns by issuing
the UPDATE ALL STATISTICS command.
Index Fragmentation
A fragmented index is characterized by excessive amounts of free space in the
index pages, which usually is spread unevenly among the pages. Free space
distributed unevenly implies that index keys are also distributed unevenly. Indexes
can become fragmented by insert, delete, and update activity on the table.
To help prevent index fragmentation, indexes should be created after the data has
been loaded into the table, and an adequate PCTFREE value should be specified
for the index.
If the index is created before the data is loaded, page splits occur and the index
becomes fragmented when the data is loaded. In fact, if the data is loaded in
clustering order, each index page of the clustering index has 50% free space.
If a sufficient PCTFREE value is specified for the index when it is created,
subsequent inserts do fit on the existing index page, avoiding index page splits.
Indexes must either be reorganized or dropped and recreated to correct the
fragmentation. If they are dropped and recreated, any packages with dependencies
on them are marked invalid. In addition, if a clustering index is dropped, it no
longer functions as the clustering index if there are other indexes on the table. In
this case, all indexes would have to be dropped, the clustering index recreated, and
then the rest of the indexes recreated. If indexes are reorganized, dependent
packages are not marked invalid, and the clustering properties do not change.
Reorganizing Fragmented Indexes
To determine whether an index should be reorganized, enter the SHOW DBSPACE
operator command to see how many index pages are occupied in the dbspace, and
what the actual percentage of free space in the occupied pages is. Next, determine
the expected percentage of free space by averaging the PCTFREE settings of all the
indexes. If the actual free space is appreciably higher than the expected amount,
index fragmentation or skewed index values are the likely cause.
There are two ways to reorganize an index. One is to obtain all index definitions
from the catalog tables, drop the index with the DROP INDEX statement, then
recreate it with the CREATE INDEX statement.
The other is to enter the following DBS Utility command:
REORGANIZE INDEX (index-name)
You must be the owner of the index or have DBA authority.
The advantages of the REORGANIZE INDEX utility are:
v A dbspace scan is not required to retrieve the rows of the table.
v A sort of the index key columns is not required.
Chapter 3. Managing Storage and Configuring the Operating System
73
v Dependent packages are not invalidated and therefore do not require
re-preprocessing.
v The clustering property of a clustering index is not lost. (If there is more than
one index on a table, and a clustering index is reorganized by being dropped
and re-created, it is no longer the clustering index.)
For more information on the REORGANIZE INDEX utility, see the DB2 Server for
VSE & VM Database Services Utility manual.
Notes:
1. You must use the ALTER TABLE statement to reorganize an index that was
created by the database manager to enforce the uniqueness of a primary key or
a unique constraint (see the DB2 Server for VSE & VM Database Administration
manual).
2. A different utility is provided to reorganize the catalog table indexes (see the
DB2 Server for VSE & VM Database Administration manual.).
3. Reorganizing an index is not a solution for an unclustered index. To correct an
unclustered index, you must reorder the data to match the index sequence,
refer to “Reorganizing Data” on page 70. In addition, issuing the
REORGANIZE INDEX command does not return freed pages to the storage
pool. The freed pages are only returned to the storage pool if you drop the
dbspace.
Invalid Indexes
An index can become invalid in the following ways.
v During a ROLLBACK or UNDO operation, if the database manager requires a
free index page but is unable to reclaim any, the index is marked invalid. More
than one index can become invalid during the LUW. Rollback, UNDO, or REDO
processing continues, but no updates are made to invalid indexes, and thus they
no longer reflect the data. These indexes cannot be used until they have been
reorganized, or, dropped and recreated.
v An index can be marked invalid if duplicates have occurred in a unique index.
This can only happen if:
- a checkpoint occurs during a searched UPDATE deferring checking of
uniqueness,
- a system failure occurs before the end of the statement, and
- the database is started with an empty log.
At the end of initialization, any unique indexes that contain duplicates are
marked invalid.
v An index can also be marked invalid if the following events occur in order:
- A checkpoint occurs during a CREATE or REORGANIZE INDEX.
- A system failure occurs before the database manager can complete the
CREATE or REORGANIZE statement.
- The application server is restarted with an empty log.
When an index is marked invalid, packages that use that index are not marked
invalid; however, the packages will become invalid if the index is dropped. If the
index is reorganized, the packages will remain valid.
Additional details about invalid indexes can be found under the SHOW INVALID
command in the DB2 Server for VSE & VM Operation manual.
Transient Indexes
An index can be marked transient in the following ways.
74
Performance Tuning Handbook
v An index is marked transient during a CREATE INDEX statement or
REORGANIZE INDEX command. In this case, the index remains transient for
the duration of the statement. When the index has been created or reorganized
successfully, the index is marked valid.
v A unique index can be marked transient during a searched UPDATE statement
where uniqueness checking is being deferred. In this case, the index remains
transient for the duration of the LUW. The index is marked transient when the
first duplicate is inserted. When the statement is completed, if duplicates still
exist SQLCODE -803 (SQLSTATE 23505) is issued, and the UPDATE statement is
rolled back. The index is marked valid at the end of the LUW.
Additional details about transient indexes can be found under the SHOW
INVALID command in the DB2 Server for VSE & VM Operation manual.
Reorganizing an Invalid Index
Use the SHOW INVALID operator command to display all invalid indexes in the
database, as well as the reason why each index is invalid.
Use the REORGANIZE INDEX utility to revalidate an invalid index that is invalid
because you encountered a NO ROOM IN THE STORAGE POOL message.
If the invalid index was created to support a primary key or a unique constraint, it
can be reorganized with the ALTER TABLE table_name ACTIVATE key_name
command.
When reorganizing an invalid index, the database manager must scan the dbspace
and sort the index keys, because the invalid index may not contain all the keys.
You cannot use the REORGANIZE INDEX utility to revalidate a unique index that
contains duplicates causing it to be marked invalid. You must drop this index,
remove the duplicates, and re-create it. If the index was created to support a
primary key or a unique constraint, you must deactivate the primary key or
unique constraint with the ALTER TABLE table_name DEACTIVATE key_name
command, remove the duplicates, and reactivate the primary key or unique
constraint with the ALTER TABLE table_name ACTIVATE key_name command.
DASD Balancing
How well you balance the demand for DASD I/O across several DASD volumes
can affect how fast the database manager can retrieve information from DASD.
Do not spend a lot of time and effort balancing the utilization of your DASD
channels and controller. Instead, concentrate on balancing the utilization of your
DASD volumes. You can then simply allocate an even number of volumes to each
controller.
Evenly Distributing Workload across Physical Volumes
Moving Dbextents
To evenly distribute your workload across all volumes of DASD, use the following
method as a guide:
1. Measure the current utilization of your DASD volumes.
2. Select the highest utilized volume. While DASD balancing based on utilization
may not necessarily give optimal performance (it assumes all your volumes
perform equally well), it is an excellent place to start. (You can also select a
Chapter 3. Managing Storage and Configuring the Operating System
75
volume based on average service time. Choose the volume with the highest
average service time. Balancing this way ensures that you will drive faster
DASD harder.)
3. If there is more than one dbextent on the volume, move one dbextent to the
lowest utilized volume. In VM use DDR, and in VSE use VSAM backup and
restore. (While you can use the copy dbextent facility that is supplied with the
DB2 Server for VSE & VM product to move a dbextent, DDR and VSAM are
much faster.)
4. If there is only one dbextent, examine the assignment of dbspaces to pools to
dbextents. Refer to “Reassigning Dbspaces.”
5. Measure the current utilization of your DASD volumes again.
a. If you find a significant improvement, return to step 2.
b. If you do not find a significant improvement, return to step 3 and select a
different dbextent to move.
c. If there is no significant difference between the utilization of the highest and
the lowest utilized volumes they are balanced. Occasionally, measure the
utilization of your DASD volumes to ensure that they are still balanced.
Reassigning Dbspaces
To reassign your dbspaces, first determine which storage pool the dbextent belongs
to, then choose one of the following options:
v Move a dbspace from one storage pool to another.
v Move a table from one dbspace to another. This choice is not valid if this is
already the only table in the dbspace. Also make sure that if you move the table
you do not put more than one highly used table in the same dbspace.
v Change the dbextent(s) in the storage pool to which the dbspace is allocated.
Moving Dbspaces:
1. Select a dbspace to move. While you can use the SHOW DBSPACE operator
command to see how many pages from the storage pool have been allocated to
a dbspace, you cannot easily determine how utilized the dbspace is. You must
rely on your knowledge of how the table(s) in the dbspace are used.
2. Unload all the tables in that dbspace.
3. Acquire a dbspace in a new storage pool. This storage pool should have
dbextents on the lowest utilized volumes. To accomplish this, you may have to
add a dbextent or dbspace or both.
4. Reload the tables.
5. If a table in the dbspace has field procedures associated with it, the table
should be dropped and recreated to include the field procedures and reloaded
using the PURGE parameter.
6. Drop the old dbspace.
7. Recreate the indexes, views, and authorities.
8. Recreate any referential integrity constraints.
Moving Tables:
1. Select a table to move. While you can use the NPAGES column in the
SYSTEM.SYSCATALOG table to see how many pages from the dbspace have
been allocated to a table, you cannot easily determine how utilized the table is.
You must rely on your knowledge of how the table(s) in the dbspace are used.
2. Unload the table.
3. Select a dbspace in a new storage pool.
76
Performance Tuning Handbook
4. If the table has field procedures associated with it, recreate the table to include
the field procedures.
5. Reload the tables.
6. Drop the old table.
7. Recreate the indexes, views, and authorities.
8. Recreate any referential integrity constraints.
Change Dbextents: You can either let the database manager do most of the work
for you, or you can do it yourself:
Let the Database Manager Do it
1. Add dbextents to the storage pool until there is more free space in the
pool than on the dbextent to be deleted (allowing sufficient space for
shadow pages and an adequate SOSLEVEL).
2. Delete the dbextent on the most used volume. The database manager
will automatically move data from the extent to be deleted onto the
remaining dbextents in the pool.
Do it Yourself
1.
Unload all the tables in all the dbspaces in a storage pool.
2.
Drop all the dbspaces in the storage pool.
3.
Re-assign dbextents to the storage pool.
v One simple technique is to split one dbextent into two smaller
dbextents on two separate volumes. One dbextent remains on the
highly utilized volume and the other is allocated to a low utilized
volume. You cannot use the DB2 Server for VSE & VM copy dbextent
facility to do this.
v Unless you are using the DB2 Server DSS Feature with striping
turned on, do not just add a new dbextent to the pool. That will not
result in any usage of the new dbextent until the previous dbextents
are full.
4.
Acquire dbspaces in the storage pool.
5.
Reload the tables.
Note: Unless you are using striping, data is added to the dbextents in
the order that they were created. The database manager will fill
the first dbextent before it proceeds to the next one.
6.
If a table in the dbspace has field procedures associated with it, the
table should be dropped and recreated to include the field procedures
and reloaded using the PURGE parameter.
7.
Recreate the indexes, views, and authorities.
8.
Recreate any referential integrity constraints.
General Considerations
There are other things to consider when you organize your dbspaces, storage
pools, dbextents and physical DASD.
Place the database catalog tables into their own pool. At database generation time,
the catalog is placed in pool number one. All other, non-catalog tables, should be
moved to different pools.
Place internal dbspaces in their own pool. Performance should benefit greatly for
large complex queries if you use data spaces with this pool. Assign the pool to a
set of dbextents that includes a virtual disk. Refer to “Virtual Disk Support for
Chapter 3. Managing Storage and Configuring the Operating System
77
VSE/ESA for Internal Dbspaces” on page 48 or to “Virtual Disk Support for
VM/ESA for Internal Dbspaces” on page 54. In VM/ESA, if you have DB2 VM
Data Spaces Support, use unmapped data spaces support for internal dbspaces.
Refer to Chapter 6, “Data Spaces Support for VM/ESA,” on page 157.
Caching is best used where data is frequently reused. For example, the database
directory is primarily read from and will benefit from caching, while the log is
primarily written to and will not benefit from it. Any highly utilized dbextent disk
that contains tables that are primarily used for read only transactions will benefit
from caching.
Attention: The amount of frequently-reused-data should not exceed the size of the
cache.
If you have faster storage devices available, use them for your highest utilized
dbextents.
Place the database directory on a separate volume from your storage pool
dbextents. Because you may use all of these at the same time, if you do not
separate them you may create a bottleneck. You can place the directory and the
log(s) in the same volume, but it is better to separate them. If you use dual
logging, be sure to put each log on a different physical device (and controller and
channel, if possible).
If you are using the DB2 Server DSS Feature with striping turned on, make sure
that each dbextent in a storage pool is on a separate volume. Refer to “Striping” on
page 198.
If you are not using DB2 Server DSS striping, place dbextents consecutively on the
same physical volume. This avoids unnecessary head movement. In a VM system,
you can control exactly where a minidisk is placed. However, if you want to place
dbextents consecutively in a VSE system, you need to backup all VSAM datasets
on a particular disk and then reallocate them consecutively.
VM Specifics
Fair Share Scheduling
VM was originally designed to support a large number of equally important
virtual machines. To ensure that each user receives an equal allotment of its
resources, VM’s scheduler attempts to give each machine in the system a fair share
of the processor’s time.
However, if you are only using one or two database machines that use most of
your system’s resources, fair share scheduling may keep them from receiving the
processor time they need. The database and user machines may receive
approximately the same resources to perform their tasks. However because the
database machines are performing work for many users they may need much more
resource than the users. The database machines may become a bottleneck, because
the user machines are spending more time waiting for them than for processor
time.
Fortunately, there are several parameters that let you shift fair share scheduling in
the database machine’s favor. Use these carefully. It is easy to over adjust them and
virtually lockout all other users in your system.
78
Performance Tuning Handbook
SET SHARE
You can use the SET SHARE command or the SHARE directory statement
to control the percentage of system resources a virtual machine receives.
These resources include processors, real storage, and paging I/O capability.
A virtual machine receives a proportion of any scarce resource according to
its share setting.
You can use this command to ensure that a database machine receives an
absolute minimum share of system resources and that the remaining
resources are divided among the rest of the user machines. (However,
remember that by allocating an absolute share of system resources to a
single machine, you will also limit its share to that amount.
If the database machine is not the only multiple user server on the system,
give it a relative (instead of absolute share).
SET QUICKDSP
You can use either the SET QUICKDSP command or the QUICKDSP
operand of the OPTION directory statement to designate virtual machines
that will not wait in the eligible list when they have work to do. Instead, a
virtual machine with a quick dispatch setting (QUICKDSP) is added to the
dispatch list immediately without first waiting in the eligible list.
You should always use this command to ensure that a database machine
never waits longer than absolutely necessary for another machine when it
has work to do.
For more information on either QUICKDSP or SHARE, refer to the VM/ESA:
Planning and Administration manual.
VSE Specifics
Dispatching Priority
The database partition should be configured according to the following guidelines:
v Set its priority lower than any CICS partitions that are accessing it.
v Set its priority immediately below the CICS partition with the lowest priority
that is accessing it.
v Set its priority higher than any batch partitions accessing it.
v Do not include it in a partition balancing pool.
Fast CCW Translation
Do not use fast CCW translation (FASTTR job control option) in the database or
CICS partitions. Include the following option card in the application server start up
job:
// OPTION NOFASTTR
With DB2 Server for VSE, the VSAM I/O buffer address normally changes every
time it does an I/O, hence will suffer from using FASTTR. It performs I/O directly
from its local buffer.
Virtual Addressability Extension (VAE)
While there is a performance advantage to placing the database partition and the
CICS partition in the same address space, it is nearly impossible. Instead, place the
database partition and the CICS partition in separate address spaces. This will
Chapter 3. Managing Storage and Configuring the Operating System
79
increase the contention between these two partitions and introduce additional
overhead for address space switching. However, you will have a significant
amount of space for:
v Additional agent structures
v Larger buffer pools
v More locks
v A larger package cache
All of these will improve your server’s performance if you have enough main
storage to avoid increased paging.
31 Bit Addressing
You can use 31 bit addressing to increase the database partition size above the
normal 16MB limit (refer to “Storage Above 16MB (31 Bit Addressing)” on page
47). However, because only one partition in the address space can use storage
above the 16MB line, it is still impractical to place CICS and the database partition
in one address space. Fortunately, with 31 bit addressing the cost of address space
switching becomes a relatively minor performance concern.
Compile Partition Size
Ensure that the partition you intend to use to compile application programs is
large enough. Preprocessing tends to produce relatively large source programs, and
compiles can take as much as ten times longer than necessary if your partition is
too small. Start with a partition size of 1.2MB and expand it if necessary.
CICS Specifics
AMXT/MXT
If you are adding DB2 Server for VSE work to an existing CICS environment,
consider increasing the CICS DFHSIT macro AMXT value. The optimal level of
CICS subtasking may now be higher than it was. Each active ISQL user requires
two active tasks within CICS. If the AMXT limit is reached, response time is
adversely affected.
Note: If you are using the new CICS Transaction Server under VSE/ESA 2.4, the
DFHSIT AMXT parameter is obsolete. Please see the CICS TS documentation
for more information.
ISQL
Transaction Name
Use transaction name ISQ2 rather than CISQ for ISQL. The ISQL transaction will
attempt to start a second transaction called ISQ2. If it cannot find ISQ2 it will look
for the CISQ transaction. Using the name ISQ2 avoids the additional processing
involved in searching for both ISQ2 and CISQ. (The ISQL transaction first looks for
a second transaction whose name is constructed by replacing the last character of
the first transaction ID with 2. In this case it would be ISQ2.)
Number of Concurrent Users
Consider limiting the number of concurrent ISQL users. If the database manager is
only used from the CICS environment through ISQL, you can limit the number of
concurrent users by limiting the number of links to the application server when
you start the DB2 Server for VSE online support (CIRB transaction).
80
Performance Tuning Handbook
If you plan to use the database manager from the CICS environment through both
ISQL and preplanned transactions, you can do this using the CICS CMXT
parameter. This is done by assigning the CISQ transaction to its own CICS class
and setting CMXT for that class to the desired limit.
Do not place a CMXT limit on the ISQL transaction ID. It may cause problems
with long queries. The ISQL transaction will temporarily end in the middle of a
long query, leaving the CISQ transaction active while it waits for a reply from the
application server. If more ISQL users logon, the number of ISQL transactions can
reach the CMXT limit. When the CISQ transaction eventually gets a reply from the
server, it try’s to restart its partner ISQL transaction. This will fail if the CMXT
limit has been reached.
You can use CMXT to allocate CICS-DB2 Server for VSE links for CICS production
work that requires access to DB2 Server for VSE data. For example, if 6 CICS-DB2
Server for VSE links are defined, and CMXT limits the number of ISQL users to 4,
at least 2 links are always available for other DB2 Server for VSE requests.
Instead of limiting the total number of ISQL users, you can also limit the number
of ISQL users by group. For more information refer to the DB2 Server for VSE
System Administration manual.
Temporary storage
Auxiliary versus Main
Consider using AUXILIARY storage if you expect to run large routines. All ISQL
routines are read into CICS temporary storage (either MAIN or AUXILIARY)
before the first command in the routine is run. Using MAIN temporary storage
improves performance but uses more virtual storage. Using AUXILIARY temporary
storage slightly degrades performance, but reduces the amount of virtual storage
required.
To use MAIN storage, code TSP=1$ on the CICS SIT or to use AUXILIARY storage,
code TSP=2$.
Guest Sharing with VSE under VM
VSE users can access a VM application server if the VSE system is running as a
second level guest under VM. While all the tuning suggestions for a native VSE
application server also apply to a second level guest, there is an additional
consideration. The VM system must be tuned to provide sufficient resources to
both the VSE guest and the database server.
Distributed Configuration Considerations
DB2 Server for non-DRDA Requestors can access:
v DB2 Server for VM Servers on the local processor or on a processor within a
TSAF collection
v DB2 Server for VM Servers on a remote processor in an SNA network
DB2 Server for VM non-DRDA Servers can be accessed by:
v DB2 Server for VM non-DRDA Requestors on the local processor or on a
processor within a TSAF collection
Chapter 3. Managing Storage and Configuring the Operating System
81
v DB2 Server for VM non-DRDA Requestors on a remote processor in an SNA
network
v DB2 Server for VSE non-DRDA Requestors in a VSE guest machine in the local
VM processor or on a processor within a TSAF collection (guest sharing)
v DB2 Server for VSE non-DRDA Requestors in a VSE guest machine on a remote
processor in an SNA network (guest sharing to remote VM)
DB2
Server for VM DRDA Requestors can access:
v DB2 Server for VM DRDA Servers on the local processor or on a processor
within a TSAF collection
v DB2 Server for VM DRDA Servers on a remote processor in an SNA network
v DB2 Server for VM DRDA Servers in an SNA network or in a TCP/IP network
v DB2 Server for VSE DRDA Servers in an SNA network (via the CICS AXE
transaction) or in a TCP/IP network
v non-DB2 Server for VSE & VM DRDA Servers in an SNA network or in a
TCP/IP network
DB2
Server for VM DRDA Servers can be accessed by:
v DB2 Server for VM DRDA and non-DRDA Requestors on the local processor or
on a processor within a TSAF collection
v DB2 Server for VM DRDA Requestors on a remote processor in an SNA network
or in a TCP/IP network
v DB2 Server for VSE non-DRDA Requestors in a VSE guest machine in the local
VM processor or on a processor within a TSAF collection (guest sharing)
v DB2 Server for VSE Online (CICS) DRDA Requestors in an SNA network or in a
TCP/IP network
v DB2 Server for VSE Batch DRDA Requestors in a TCP/IP network
v non-DB2 Server for VSE & VM DRDA Requestors in an SNA network or in a
TCP/IP network
DB2
Server for VSE non-DRDA Requestors can access:
v DB2 Server for VSE DRDA and non-DRDA Servers on the local processor
v DB2 Server for VM DRDA and non-DRDA Servers via guest sharing from a VSE
guest machine on the local processor or on a processor within a TSAF collection
DB2
Server for VSE non-DRDA Servers can be accessed by:
v DB2 Server for VSE non-DRDA Online (CICS) Requestors on the local processor
v DB2 Server for VM non-DRDA Batch Requestors on the local processor
DB2
Server for VSE DRDA Online (CICS) Requestors can
access:
v DB2 Server for VSE DRDA and non-DRDA Servers on the local processor
v DB2 Server for VSE & VM DRDA Servers in an SNA network or in a TCP/IP
network
v non-DB2 Server for VSE & VM DRDA Servers in an SNA network or in a
TCP/IP network
82
Performance Tuning Handbook
DB2 Server for VSE DRDA Batch Requestors can access:
v DB2 Server for VSE DRDA and non-DRDA Servers on the local processor
v DB2 Server for VSE & VM DRDA Servers in a TCP/IP network
v non-DB2 Server for VSE & VM DRDA Servers in a TCP/IP network
DB2 Server for VSE DRDA Servers can be accessed by:
v DB2 Server for VSE DRDA and non-DRDA Requestors on the local processor
(Online and Batch)
v non-DB2 Server for VSE & VM DRDA Requestors in an SNA network (via the
CICS AXE transaction)
v non-DB2 Server for VSE & VM DRDA Requestors in a TCP/IP network
Performance Implications
How you configure a distributed system can have a significant impact on the
performance of all the processors in the network. While this guide cannot describe
all possible distributed installations, nor can it suggest the best possible installation
for you, it does include some basic guidelines and several simple examples.
See the VM/ESA: Connectivity Planning, Administration, and Operation manual for
your operating system for details on optimizing performance in a TSAF collection
or SNA network. For information on both SNA networks and the connectivity
issues that are relevant in IBM distributed database systems, see the Distributed
Relational Database Connectivity Guide manual.
Applications Planning
If your application program needs to interact with a remote processor, there are
several things that you can do to minimize the communication traffic between the
requester and the server.
Fetch and Insert Blocking
Blocking groups multiple row insertions or retrievals into one request. Instead of
sending a separate instruction for each insert or fetch done by a cursor, instructions
are grouped together and sent in one communication block. This reduces message
traffic and overhead. (However, it is not supported in single user mode, or with
DRDA.) For more information, refer to “Fetch and Insert Blocking” on page 110.
Hold File
The creation of hold files is a technique allowing you to save the results of a query
(database information) in CMS or CICS files. Subsequent requests for this
information are satisfied by retrieving it from the CMS or CICS files.
Local Copy
If your application requires information from a database on another processor that
is not periodically updated, consider copying the information into temporary tables
in a local database. For example, if you need access to a monthly sales summary,
simply unload the summary data from the remote server once a month and load it
into your local server.
Stored Procedures
Your applications can use stored procedures on the remote server. This can reduce
the amount of data that must be moved over the network. For more information,
see the DB2 Server for VSE & VM Application Programming and DB2 Server for VSE
& VM Database Administration manuals.
Chapter 3. Managing Storage and Configuring the Operating System
83
84
Performance Tuning Handbook
Chapter 4. Configuring the Application Server and Requester
Database Manager Storage
Database I/O
Before a page of data can be used by the database manager, it must be located in
its data page buffers. The buffers are two areas of storage in your database machine
or partition, which are allocated when you start the database manager. One area
called the directory buffer pool is reserved for pages from the DB2 Server for VSE &
VM directory disk. The size of the pool is determined by the NDIRBUF
initialization parameter. The other area called the local buffer pool is reserved for
pages from the storage pools. Its size is determined by the NPAGBUF initialization
parameter.
When the database manager needs a page, it looks for it in its buffer pool. If it
does not find it there, it uses a service (IUCV *BLOCKIO or paging in VM, and
VSAM in VSE) to read the page from DASD into a free space in its pool.
Since the buffer pools are part of a primary address space, the operating system
treats them like part of the database manager code. If a buffer page is not
referenced frequently, it may be moved out to system paging DASD by the VM or
VSE paging system. In VM the page may also be moved out to expanded storage if
it is available. (Refer to “Auxiliary Storage” on page 43.)
85
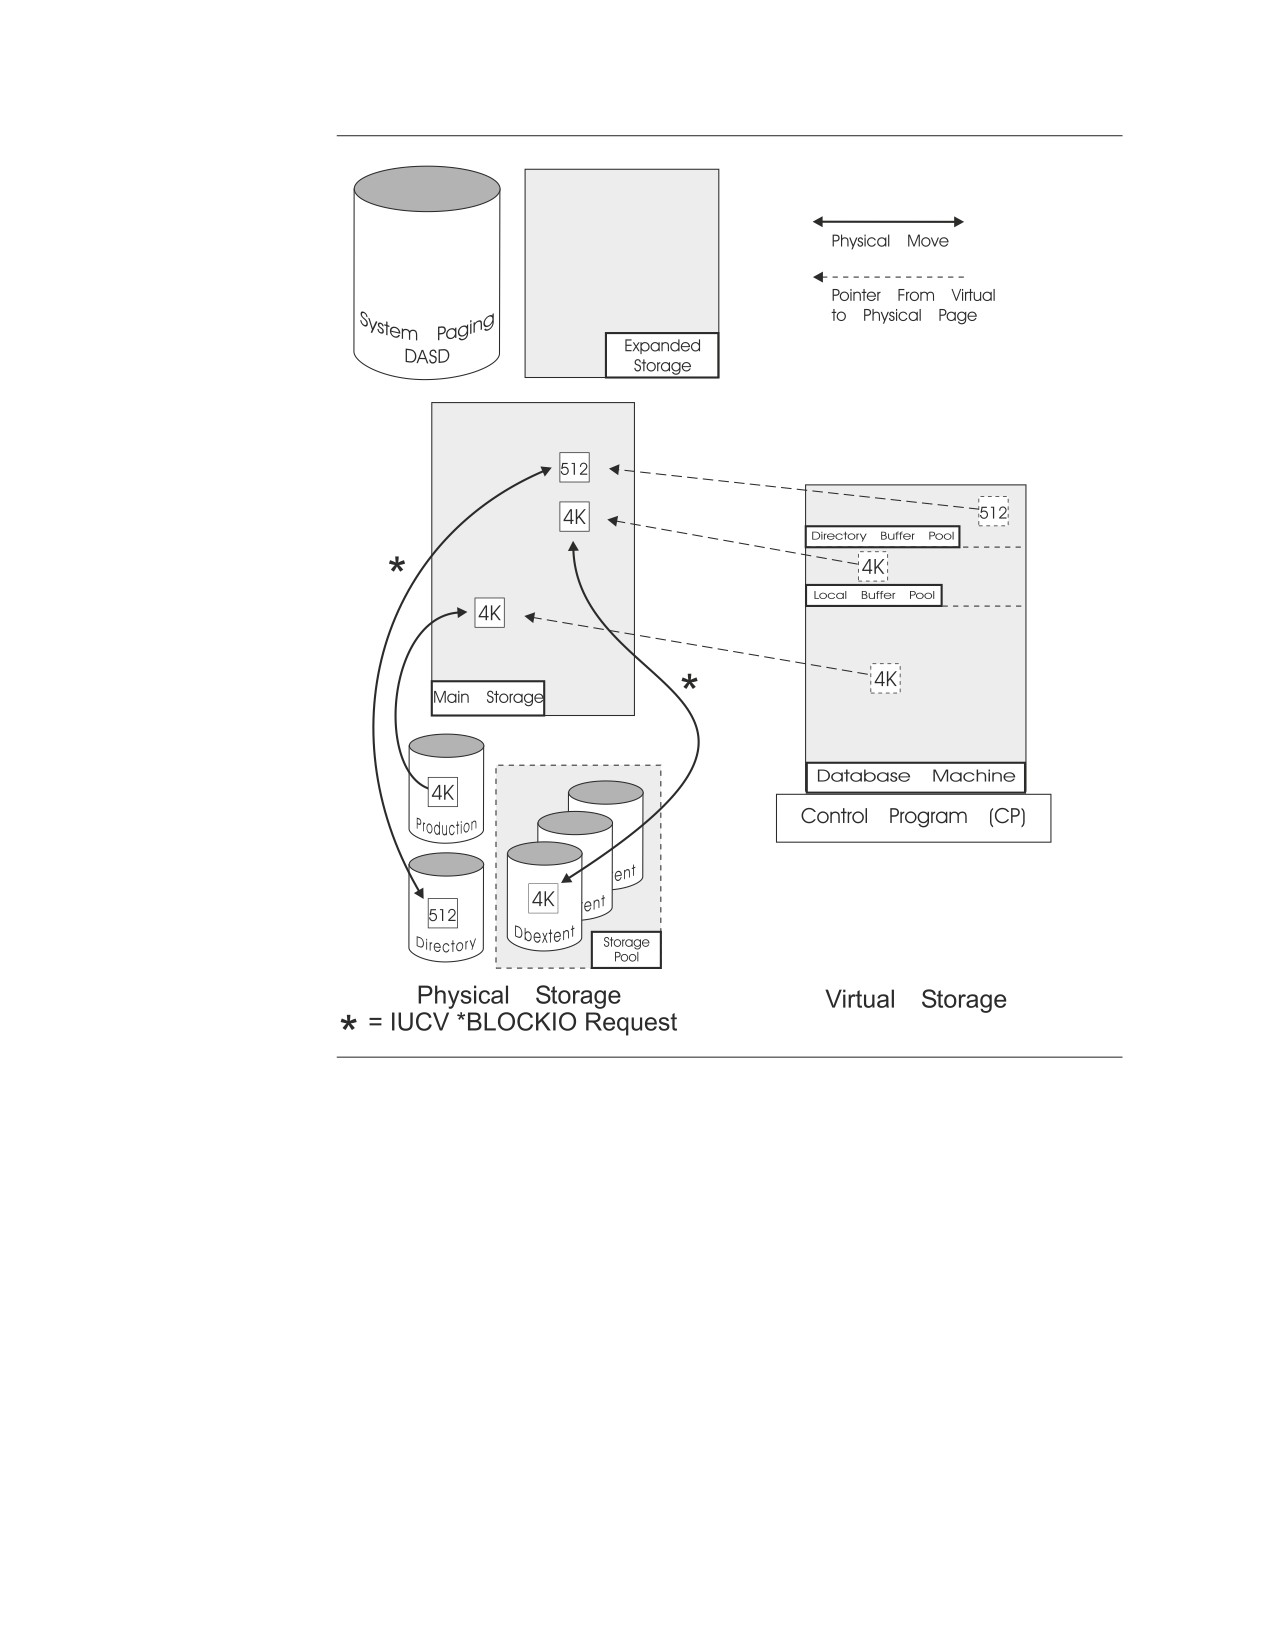
Figure 12. The Standard DB2 Server for VM DASD I/O System. The database manager
explicitly directs the operating system to move pages to and from DASD. Once database
machine pages are in main storage, they may be moved out to system paging DASD by the
paging system. In VSE, pages are moved by VSAM and the database machine is a database
partition.
When the database manager needs a buffer for another page, it overwrites the
“oldest” unmodified page in the pool with a new page. This is referred to as
releasing a page or stealing a buffer.
While a page is in the buffer pool, the database manager may modify it. To ensure
the integrity of your data, a modified page will not be released until it has been
written back to DASD. If the database manager needs a buffer occupied by a
modified page, it first writes the page to DASD, then loads the buffer with a new
page.
86
Performance Tuning Handbook
Tuning Parameters
The sizes of these buffer pools are among the more important factors determining
performance. You can significantly improve performance by optimizing these
values. Unless your system’s main storage is extremely constrained, the default
values are probably too low.
Buffer pool sizes are set by initialization parameters:
v NDIRBUF, which is the number of 512-byte blocks in the directory buffer pool
v NPAGBUF, which is the number of 4KB pages in the local buffer pool.
The optimal buffer pool size is governed by the trade-off between database I/O
and system paging I/O (refer to “Auxiliary Storage” on page 43). In general, an
increase in the buffer pool sizes improves performance only if the resulting
increase in system paging is small. Stated another way, the buffer pools should be
backed up by a corresponding amount of available main storage.
Using a Large Buffer Pool: The database manager is designed to efficiently
manage its buffer pools no matter how large they are. Very large buffer pools can
be an excellent tuning choice if sufficient virtual and real storage is available.
Using a Small Buffer Pool: At the other extreme, if your environment is
characterized by limited real storage and a relatively high paging rate, consider
using smaller buffer pool sizes. Avoid extremely small buffer pools: they increase
the likelihood that work has to be backed out because of buffer pool contention.
Twenty buffer pages per real agent (20*NCUSERS) is an absolute minimum, and is
usually too low for most applications.
Performance Indicator
The performance information available through the COUNTER operator command
is helpful in guiding the selection of buffer pool sizes. Two especially useful
measurements are the local buffers effective use and the directory buffer effective
use values. (Refer to “COUNTER Operator Command” on page 22.)
There are no fixed guidelines as to what constitutes a good or bad value, because
this depends upon the availability of main storage to back up the buffer pools, as
described above. Of more interest are their relative values under different
conditions. For example, before and after observations can be used to find out how
effective an increase in the buffer pool size was in reducing database I/O. A large
decrease in I/O indicates that the change was effective, whereas a small increase
would suggest that the change was not worthwhile. Alternatively, calculate your
buffer hit ratios (see “Measurements” on page 6) before and after your change.
Because directory buffers are eight times smaller than the local buffer pages, you
can afford to be much more generous with them. Consider increasing NDIRBUF
enough to cause the directory read rate (DIRREAD/sampling interval) to be very
low. On a well tuned system, the directory pool effective use tends to be much
higher than the local buffer effective use.
Using Virtual Disks
Your internal dbspaces can use a virtual disk to improve their performance. Virtual
Disk Support lets you use a data space as a virtual disk. A virtual disk is much
faster than a conventional disk because it uses main storage instead of DASD. A
virtual disk appears to any program or job as just another disk, only faster. Refer
to “Virtual Disk Support for VSE/ESA for Internal Dbspaces” on page 48 and 54.
Chapter 4. Configuring the Application Server and Requester
87
Package Cache
The package cache works much the same as the buffer pools, except that instead of
storing data pages, the package cache stores packages. When a package is loaded
into the database machine’s virtual storage, users can use it consecutively without
reloading it each time. Unfortunately, separate users cannot use the same package
at the same time. If a package is already in use when a user requests it, an
additional copy will be loaded.
You need to trade-off the advantage of reducing your DASD I/O by having a large
cache capable of storing a large number of packages, against the storage the
packages consume.
Tuning Parameters
The package cache has a series of slots that contains information about the
packages loaded into the database machine or partition. One slot is used for each
package. The total number of slots available is determined at application server
startup by two initialization parameters:
v NPACKAGE, which defines the maximum number of packages available for
each real agent.
v NCUSERS, which is the number of real agent structures.
The number of slots in the package cache is calculated as follows:
NPACKAGE X NCUSERS
For example, if NPACKAGE is 10 and NCUSERS is 5, the number of slots in the
cache is 50 (10X5). While NCUSERS is part of the calculation, do not use it to tune
the size of the cache. Instead, increase or decrease NPACKAGE and set NCUSERS
based on your requirements for real agents. (Refer to “Agents.”)
You can also set a package cache threshold that limits the number of packages that
will remain in the cache. At the end of a logical unit of work (LUW), the database
manager checks the number of packages in the cache. If that number exceeds the
threshold, the database manager releases the package that has been in the cache
the longest to make room for a new one.
The package cache threshold is determined at startup by an initialization
parameter (NPACKPCT) and is calculated as follows:
NPACKPCT
NPACKAGE X NCUSERS X ----------
100
For example, if there are 50 slots in the cache and NPACKPCT is 80%, the package
cache threshold is 40 packages (50X80/100). While NPACKAGE and NCUSERS
appear in the calculation, do not tune the threshold with them, rather, use
NPACKPCT.
Concurrency
Agents
The database manager uses a set of control blocks called an agent structure (or real
agent) to service requests from multiple users accessing a common database.
There are always at least two agent structures created: the Operator and the
Checkpoint agents. (The initialization process is executed under the Operator
88
Performance Tuning Handbook
agent. The checkpoint agent is activated whenever a checkpoint is to be taken.) In
single user mode, there is also a User agent structure under which the user’s SQL
requests are executed. In multiple user mode, one or more real agent structures are
allocated; the number is equal to the value of the NCUSERS initialization
parameter.
Allocating Users to Agent Structures
There are differences in agent handling between single and multiple user mode.
In single user mode (SUM) this process is quite simple. There are three agents
created: the Operator, Checkpoint, and User. At initialization time, the Operator
agent performs the initialization functions. When initialization is complete, it
becomes dormant and control is passed to the User agent, which is said to be
“dispatched”. The User agent executes until a checkpoint or archive is required, at
which point the Checkpoint agent is dispatched, and the User agent waits until the
checkpoint has been completed.
The User and Checkpoint agent alternate until the User agent finishes its work.
Then the Checkpoint agent performs a final checkpoint and the Operator agent
shuts down the application server.
In multiple user mode (MUM), when initialization has been completed, all the user
agents start dormant. When a user first issues an SQL statement, a connection is
established between the user and the database manager. The connection remains in
effect until an explicit or implicit (COMMIT WORK RELEASE) release occurs.
VSE: In VSE, a batch user is connected to the application server by connecting a
batch partition directly to a real agent in the database partition. An interactive user
is connected to the server by establishing at least one link between the CICS
partition and a real agent in the database partition. A remote DRDA user is
connected to a pseudo agent in the server. The pseudo agent then connects to a
real agent when one becomes available (refer to “Pseudo-Agents” on page 91).
VM: In an IBM VM system, a connection is established between the user machine
and a pseudo-agent in the database machine. The pseudo agent then connects to a
real agent when one becomes available (refer to “Pseudo-Agents” on page 91).
Tuning Parameters (NCUSERS)
In both VSE and VM the number of real agents is determined by the DB2 Server
for VSE & VM initialization parameter NCUSERS. If you have the resources to
support more users, increase NCUSERS. For example, ten users want to share the
server, but there are only four real agents available. Six users must wait for one of
the four to finish a logical unit of work before they receive access to a real agent. If
you have the processing power to concurrently service all ten, there is no reason to
make some wait.
However, remember that by increasing the level of concurrency in your system,
you are also increasing overhead. Each additional real agent requires a minimum
of 110KB of storage and, if you use the default size for your buffer pools, an
additional 18KB of storage (four 4KB local buffers and four 512-byte directory
buffers). Additional real agents can also:
v Increase the system paging in your database machine or partition, “Auxiliary
Storage” on page 43
v Increase overall DASD I/O and buffer looks, “Database I/O” on page 85
v Increase locking contention, deadlocks, and lock escalations, refer to “Locking”
on page 93
Chapter 4. Configuring the Application Server and Requester
89
v Increase the size of the package cache, “Package Cache” on page 88.
Performance Indicator
SHOW CONNECT: Use the SHOW CONNECT or SHOW USERS operator
command to see how many real agents are in use, and when appropriate how
many pseudo agents are waiting for real agents. If all your real agents are never in
use at the same time, you should reduce NCUSERS to save resources. If you
consistently have more than five pseudo agents waiting for a real agent consider
increasing NCUSERS by one if you have the resources to support an additional
real agent. Refer to page 29.
For CICS users, refer to the performance indicator discussion under the heading
“CICS.”
CICS
Before a CICS user can access your application server, you must establish at least
one link between the CICS partition and the database partition.
|
Tuning Parameters
|
CONNPOOL is a DBNAME directory entry for REMOTE type DBNAME entries
|
with TCPPORT parameter. This parameter if set to ″Y″ activates the Connection
|
pooling feature for online users conntected to the remote application server via
|
DRDA over TCP/IP.
|
The CIRB transaction defines one or more links (in the case of local application
|
servers and remote application servers connected via DRDA over TCP/IP), each of
|
which is exclusively attached to a real agent until it is terminated by the CIRT
|
transaction.
Because each link requires its own real agent it is important to establish an
appropriate number of links. If you establish too many links for the number of
concurrent users you expect to access your server through CICS, you will
needlessly tie up real agents, and the resources they require. However, if you do
not establish enough links, CICS users will be forced to wait for a free link. As
well as causing a delay, not having enough links increases your overhead. Storage
and processor time are consumed to concurrently manage these links. CICS must
manage all the links in a queue and select one user each time a link becomes
available.
To help you decide whether you should err on the side of too many links or not
enough, consider which resources are more constrained, — those of CICS or those
of your application server. If CICS resources are constrained, increase the number
of links. If your server’s resources are constrained, decrease the number of links.
Performance Indicator
|
There are two tools for CICS links, the CICSPARS/VSE report, and the CIRD
|
transaction. The CICSPARS/VSE report presents historical information on how
|
many waits for links occurred during a monitoring interval. In contrast, the CIRD
|
transaction provides a snapshot of the same information. Note that these tools
|
work closely with host OS VSE and hence reflects more accurate statistics for links
|
to local application servers than links to remote application servers.
90
Performance Tuning Handbook

Pseudo-Agents
Pseudo-agents allow many users to share, but not concurrently, a few real agent
structures. This saves a significant amount of storage because each real agent
requires a minimum of 110KB of storage, a pseudo-agent uses less than 600 bytes.
(The 110KB value increases depending on how the real agent is currently being
used, refer to the DB2 Server for VM System Administration or the DB2 Server for
VSE System Administration manuals.)
Differences between VM and VSE
While pseudo agents are always used in a VM system, they are only used in
a VSE system for remote DRDA users.
When a user CONNECTs to an application server, that user is allocated a
pseudo-agent. The pseudo-agent is assigned to a real agent (assuming one is
available) when the user sends an SQL statement to the server. If all real agents are
in use, any users having sent messages to the database machine have their
pseudo-agents placed on a “wait” queue until a real agent is available. A real agent
becomes available whenever an active user (one whose pseudo-agent already owns
a real agent) completes a logical unit of work.
Table 3. Real and Pseudo Agents
Real Agent
Pseudo Agent
Storage per Agent
Minimum 110KB
600 bytes
Number (VM)
NCUSERS (DB2 Server for
MAXCONN − minidisks − #
VM initialization parameter)
of active Stored Procedure
Servers - 1 (CP directory)
Number (VSE)
NCUSERS (DB2 Server for
RMTUSERS (remote DRDA
VSE initialization parameter)
users)
When assigned
At SQL command request
At CONNECT
When freed
End of LUW
End of connection
When no agents are
Pseudo agent waits in FIFO
No connection, error message
available
queue
Guest Sharing: With Guest Sharing, the DB2 Server for VSE Online Resource
Adapter, running under the control of CICS, can establish the number of
communication links specified during online Resource Adapter Initialization. Each
of the links is associated with a pseudo-agent to which a real agent is permanently
assigned. These pseudo and real agents are not available to other users until the
Online Resource Adapter is terminated.
Note: For CMS users to simultaneously access the database, NCUSERS must be
greater than the number of CICS links.
Tuning Parameter
The only reason you would want to restrict the number of pseudo agents is to
send an error message to a user indicating that no real agents are available instead
of putting this user in a queue.
Chapter 4. Configuring the Application Server and Requester
91
If this is not a problem, set the number of pseudo-agents to the maximum number
of users that could possibly wish to connect to the application server at one time.
The virtual storage requirement of 600 bytes per connection should be negligible.
VM (MAXCONN): The number of pseudo-agents allocated is equal to the value
of MAXCONN specified in the CP directory minus the number of CMS minidisks
used for the database machine and minus one for the connection to *IDENT.
VSE (RMTUSERS): Pseudo-agents are not used for CICS users nor are they used
for batch partition users. However, they are used for remote DRDA users. The
RMTUSERS initialization parameter sets the number of pseudo agents available to
remote DRDA users. This limits the number of remote DRDA users that can access
the server at any one time because each DRDA user requires one pseudo agent. To
calculate the number of real agents that can be shared between remote DRDA
users, subtract the number of active batch partition users and the number of CIRB
initiated CICS connections from the number of real agents (NCUSERS). For
example, consider the following:
v NCUSERS is 10, refer to “Tuning Parameters (NCUSERS)” on page 89
v There are 5 CIRB initiated CICS connections, refer to “Tuning Parameters” on
page 90
v Two batch partitions are active
v RMTUSERS is 20.
This means that there are three (10-5-2) real agents that must be shared between as
many as 20 pseudo agents (each connected to a remote DRDA user).
Privileged Remote DRDA User (VSE Server)
You can specify that a remote DRDA user is privileged. Normally, a remote DRDA
user is assigned one pseudo agent during the time it is connected to an application
server, and shares the available real agents with the other pseudo agents. It always
releases a real agent at the end of a logical unit of work (LUW) (refer to “Agents”
on page 88). However, a privileged remote DRDA user holds a real agent until it
disconnects from the server. Only specify a user as privileged if you expect it to
constantly submit work to the server. For example, large batch applications.
Interactive applications are not good candidates.
To specify a privileged remote DRDA user, you need to update the LOCALAXE
entry in the DBNAME directory for that user. For instructions, refer to the DB2
Server for VSE System Administration manual.
Performance Indicator (SHOW USERS)
You can use the SHOW USERS operator command to look for consistently free
pseudo agents. This indicates that you could probably reduce MAXCONN for VM,
or RMTUSERS for VSE. However, constantly busy pseudo agents may indicate that
you should increase them.
The most effective indicator that either parameter is set too low is to look for
complaints from your users that they cannot connect to the application server.
They will receive SQLCODE=-933 with SQLSTATE=57030.
Dispatching Agents
Real agents are placed in a queue and wait there until they receive a slice of the
processor time from the database manager (referred to as being dispatched). Before
an agent is dispatched, it must:
92
Performance Tuning Handbook
v Not be in a wait state. For example it cannot be waiting for an I/O operation to
complete or waiting for a lock held by another user.
v Be at the top of the queue. This is determined by two processes: Prioritization,
and Fair Share Auditing.
Prioritization
After each dispatch, the agents in the queue are reprioritized so that shorter LUWs
are moved to the top of the queue. “Special purpose” or “system” agents, such as
the operator or checkpoint agents, are not reprioritized after each dispatch; rather,
they permanently reside at the top of the dispatch queue so that they receive the
highest priority assigned to any agent.
Fair Share Auditing
Fair Share Auditing is invoked at regular intervals, during which the dispatch
queue is scanned for a “deprived” agent and, if one is found, it is moved to the
top of the queue. A deprived agent is one that has referenced the buffer pools less
than a calculated fair value. This value is based on the average number of
references per LUW and per real agent.
Tuning Parameter (DISPBIAS)
You can affect the frequency of Fair Share Auditing with the DISPBIAS
initialization parameter. You can set it from 1 to 10 and it defaults to 7. The higher
the number the less frequent the audits. A setting of 10 causes short LUWs to be
strongly favored and long LUWs to be strongly disfavored whereas a setting of 1
causes less favoritism to short LUWs.
Performance Indicator
While there are no quantifiable indicators for this parameter, you can determine if
it needs tuning by listening to your users. Can you differentiate between users that
use short LUWs and those that use long LUWs? If people with short LUWs
complain, try increasing DISPBIAS. If people with long LUWs complain, try
decreasing DISPBIAS.
Startup Mode
If there are periods where you only need to support large sequential jobs (for
example, an overnight batch window or long DBS utility job), consider running
your application server in single user mode (SUM). You will reduce the overhead
of both concurrent processing and in communications.
In single user mode, pseudo agents are not created and there is no overhead
associated with prioritizing real agents or with fair share auditing. Also, since the
application server does not need to communicate with a user machine or partition,
you reduce overhead by eliminating the APPC/VM (in VM) or XPCC (in VSE) or
TCP/IP conversations.
Locking
To optimize your application server’s performance, you need to minimize the
overhead of locking, while you maintain the integrity of your data. Concentrate on
three areas:
v Reduce lock contention by reducing the number of locks you require and the
duration of each lock, refer to “Locking Contention” on page 94.
v Reduce the number of lock escalations, refer to “Lock Escalation” on page 99.
v Reduce the number of potential deadlocks, refer to “Deadlock” on page 101.
Chapter 4. Configuring the Application Server and Requester
93
There are a number of techniques to help you with each area.
Locking Contention
Lock contention occurs when an agent tries to lock an object that is already locked
with a conflicting mode by another agent. The more locks the database manager
uses and the longer each lock lasts the greater the probability that contention will
occur.
To understand when locks come into contention, you must first understand:
v Locking Hierarchy
v Lock Modes
v Lock Compatibility
Locking Hierarchy
The database manager locks objects in the database according to a hierarchy.
DBSPACE
TABLE
DATA PAGE
INDEX PAGE
ROW
INDEX KEY VALUE
Figure 13. Locking Hierarchy
The database manager grants locks in the order of the hierarchy. Thus, an agent
accessing a row, has to first obtain a lock on the dbspace, the table and the page
that contain the row before it can obtain a lock on the row itself. (After the first
row is locked, it is not necessary to get the DBSPACE and table locks again since
they will be held until the end of the LUW.)
Lock Modes
There are eight types of locks, or lock modes:
Share (S)
This type locks an object (dbspace, table, page or row) for reading when
using the repeatable read (RR) or the cursor stability (CS) isolation levels.
Other agents can obtain share locks on the same object and look at it
simultaneously.
Exclusive (X)
This type locks an object for updating. Objects locked in X mode can be
read by applications using isolation level UR.
Super Exclusive (Z)
This type locks an object (dbspace, table, page or row) for updating. Other
agents cannot obtain any other locks on the same object and cannot read or
manipulate it in any way, even if using isolation UR.
94
Performance Tuning Handbook

Intent Share (IS)
This type indicates that a share lock is being used on an object lower in the
hierarchy. For example, if an agent needs a share lock on a table it first
needs to obtain an intent share lock on the dbspace that contains the table.
Intent Exclusive (IX)
This type indicates that an exclusive lock is being used on an object lower
in the hierarchy.
Intent None (IN)
This type indicates that no locks are held on objects lower in the hierarchy
for reading using isolation level UR. For example, an application using
isolation level UR to read a row will get an IN lock on the dbspace and
table, but will then not hold any locks on the page or row. See the DB2
Server for VSE & VM Diagnosis Guide and Reference manual for more
information.
Share with Intent Exclusive (SIX)
This type indicates that a share lock was held on this object but that an
exclusive lock is now being used on an object lower in the hierarchy.
Update (U)
This type of lock is used during a FETCH when the cursor is declared FOR
UPDATE. It locks an object for reading, but indicates that an update may
be required. If the agent finishes with an object without updating it, the
lock is downgraded to share. If an update is required, the lock is upgraded
to exclusive. While the update lock is held, other agents can obtain share
locks on the same object to look at it simultaneously, but they cannot
obtain update or exclusive locks on it.
Lock Duration
Locks can be held and released almost instantly or held until the end of the current
logical unit of work. The lock duration depends on the lock mode, the type of
internal data manipulation call, and the isolation level (refer to “Isolation Level” on
page 97). A detailed table including the relationships between all of these is
included in the DB2 Server for VSE & VM Diagnosis Guide and Reference manual.
Lock Compatibility
The main purpose of having different lock modes is to be able to define which
requests to access a certain object are compatible with other requests and which are
incompatible. The matrix in Table 4 indicates which lock modes are compatible
with each other. Yes means the requested lock is compatible with the held lock
(and therefore is granted). No means the request is denied or the requesting agent
is put in a LOCK WAIT. Either way a lock contention occurs.
Table
4. Compatibility of Lock Modes
MODE OF LOCK REQUEST
MODE OF LOCK
IN
IS
IX
S
U
SIX
X
Z
HOLD
IN
Yes
Yes
Yes
Yes
Yes
Yes
Yes
No
IS
Yes
Yes
Yes
Yes
Yes
Yes
No
No
IX
Yes
Yes
Yes
No
No
No
No
No
S
Yes
Yes
No
Yes
Yes
No
No
No
U
Yes
Yes
No
Yes
No
No
No
No
SIX
Yes
Yes
No
No
No
No
No
No
Chapter 4. Configuring the Application Server and Requester
95
Table 4. Compatibility of Lock Modes (continued)
MODE OF LOCK REQUEST
X
Yes
No
No
No
No
No
No
No
Z
No
No
No
No
No
No
No
No
Public and Private Dbspaces: More than one user can have concurrent access to a
private dbspace, but for read operations only. That is, multiple users can hold a
shared lock on the dbspace.
Number of Concurrent Users
The amount of locking contention is directly related to the number of concurrent
users allowed to access the application server (NCUSERS). While you could reduce
locking contention by reducing NCUSERS, this would affect your overall response
time, refer to “Tuning Parameters (NCUSERS)” on page 89. You need to find a
balance between having users wait for a lock and having them wait for access to
the server.
Minimum Lock Level
The smallest possible lock level is a single row in a table. However, you can
increase the minimum lock level in a dbspace to be a single page or the dbspace
itself. Using a larger minimum lock level reduces the number of locks required,
which reduces locking overhead but may increase locking contention. (The default
lock level is a single page.)
Tuning Parameter: You can define a larger lock level with the ACQUIRE
DBSPACE statement or change an existing size with ALTER DBSPACE.
The default lock level (PAGE) should be appropriate for most applications.
However, you may consider using the DBSPACE lock level if your application is
read-only and accesses the data primarily through dbspace scans.
Only consider ROW level locking for applications that access small answer sets
through index scans. Also, this level should not be used with an application
performing a dbspace scan using cursor stability.
Performance Indicator: You can find the minimum lock size for a given dbspace
in the SYSTEM.SYSDBSPACES catalog table in the LOCKMODE column. Refer to
“SYSTEM.SYSDBSPACES” on page 39.
Indexes
Remember that index pages and key values are locked for any SQL statement that
uses the index or whenever the table that they are indexing is updated. If your
indexes are not critical to fast access to your data, you can reduce lock contention
by reducing the number of indexes defined on your data. In other words, do not
create unnecessary indexes.
Unique Indexes and Row Level Locking: If you are using row level locking,
make sure that your tables contain a unique index. They perform better, with
respect to locking contention, because the database manager is able to determine
the exact row it needs to lock. Without a unique index it may unnecessarily lock
several rows at once. If you cannot create a unique index on a single column,
create a unique multicolumn index. For example if you want to sort the
EMPLOYEE table by the JOB column, create an index on JOB and EMPNO
(JOB,EMPNO). The index will still sort by JOB, but it can also be a UNIQUE index.
96
Performance Tuning Handbook
Access Path
You can usually reduce the number of locks required for a particular SQL
statement by ensuring that it is accessing the data as efficiently as possible. For
information on access path selection, refer to Chapter 5, “Improving Data Access
Performance,” on page 117.
Logical Unit of Work
Since a lock will never last longer than a logical unit of work (refer to “Logical
Units of Work” on page 102), it is critical that you make your LUWs as short as
possible. Commit work frequently, even if you are only reading tables.
Do not use ROLLBACK WORK to release locks. While rolling back a LUW also
releases locks, a roll back involves more work and processor time than a commit
work and should only be used when you want to undo updates, inserts, or
deletions.
Isolation Level
You can set the isolation level for a particular application program during
preprocessing. It represents the degree of independence that the application
program will have from other programs. A lower isolation level maximizes
concurrency and performance but increases the risk of inconsistent data appearing
in applications. There are three isolation levels: repeatable read, cursor stability, and
uncommitted read.
Repeatable Read (default): A repeatable read application program locks every
object it accesses until the end of the current logical unit of work. It guarantees
that within a logical unit of work it can repeatedly read the same row of data
without having it changed by some other user. With repeatable read, a user is
completely isolated from interference by other applications. Other users must wait
until your logical unit of work is complete before they can modify the data you
were using.
Cursor Stability: A cursor stability application program only locks an object for
as long as it is directly accessing it. This allows more than one user to work on the
same data at the same time. It is possible to issue the same query twice within a
logical unit of work and get different results. That is, rows in a table, or pages in a
DBSPACE, that you have already read are subject to change by other users. It also
means that the data may appear “inconsistent”. If this is not a problem, and will
not affect the integrity of your application program, seriously consider using cursor
stability. It can significantly reduce the locking contention in your system.
Cursor stability only applies to tables in PUBLIC DBSPACEs with PAGE or ROW
level locking. An application program that accesses tables in PRIVATE DBSPACEs
or PUBLIC DBSPACEs with DBSPACE level locking always act like a repeatable
read program.
Note: When the database manager uses a DBSPACE scan (does not use an index)
to access a table in a DBSPACE with ROW level locking using isolation level
cursor stability, the effect is similar to repeatable read: no other logical unit
of work can update the table until the logical unit of work performing the
DBSPACE scan ends. Also, if one logical unit of work has updated a table,
another logical unit of work (using cursor stability) cannot access that table
with a DBSPACE scan until the updating logical unit of work ends. This
reduced concurrency for DBSPACE scans does not apply for tables in
DBSPACEs with PAGE level locking, or when accessing through indexes.
Chapter 4. Configuring the Application Server and Requester
97
Uncommitted Read: Many uncommitted read (UR) application programs can
query the same data simultaneously while the data is being updated by another
application. This isolation level prevents read-only applications from waiting on
applications that have changed or may change the data about to be read.
Uncommitted read provides the lowest degree of isolation and hence greater
concurrency and throughput.
Since isolation level UR gives applications the ability to read data that is not
necessarily committed, data can appear to be inconsistent. For example, it is
possible for you to issue the same query twice within a logical unit of work and
get different results. You must be very careful when deciding to use uncommitted
read for your applications. Only choose it for an application if it is not important
that the data read is necessarily committed.
Note: Uncommitted read applies only to tables in PUBLIC DBSPACEs with page
or row level locking. Tables in PRIVATE DBSPACEs or PUBLIC DBSPACEs
with DBSPACE level locking always have the repeatable read isolation level.
Isolation level uncommitted read (UR) is defined as follows:
v An application can see uncommitted changes made by other application
processes
v An application cannot update uncommitted changes made by other application
processes
v The re-execution of a statement can be affected by other application processes
v Uncommitted updated rows cannot be updated by other application processes
v Uncommitted updated rows can only be read by application processes using UR
v Accessed rows can be updated by other application processes
v Accessed rows can be read by other application processes
v The current row of a read-only cursor can be changed by other application
processes
v The current row of an updatable cursor cannot be changed by other application
processes.
User Defined: While you normally set the isolation level for a program when you
preprocess it, you may allow the application program to dynamically set its
isolation levels during execution. For more information on this, refer to the USER
isolation level in the DB2 Server for VSE & VM Application Programming manual.
Isolation Level and Updates:
Note: The isolation level does not affect the duration of the locks held on data that
have been inserted, deleted, or updated in an LUW. Locks on this data are
always held until the end of the LUW, regardless of the isolation level.
Guidelines for Selecting an Isolation Level: We recommend that you use cursor
stability whenever possible because it reduces the duration of locks for the
application program that uses it. For even further reductions in locking and lock
durations, you may consider using uncommitted read. Only use this isolation level
for applications in which data integrity is not important. The effects of cursor
stability and uncommitted read can be very subtle. Specific guidelines for selecting
isolation levels are in the appropriate DB2 Server for VSE & VM manuals. For
guidelines on selecting an isolation level in application programs, see the DB2
Server for VSE & VM Application Programming manual. For guidelines that apply to
the DBS utility, see the DB2 Server for VSE & VM Database Services Utility or the
98
Performance Tuning Handbook
DB2 Server for VSE & VM Database Services Utility manuals. For ISQL guidelines,
see the DB2 Server for VSE & VM Interactive SQL Guide and Reference or the DB2
Server for VSE & VM Interactive SQL Guide and Reference manuals.
Catalog Tables
Catalog tables can be exclusively locked by:
v Data definition statements
v Data control statements (granting authorizations)
v Preprocessing
v Dynamic repreprocessing
v Inserts (loading tables and dbspaces)
v Extended dynamic CREATE PROGRAM, PREPARE, or DROP STATEMENT
v UPDATE STATISTICS
Try to avoid any or all of these during peak load periods and try not to include
them in your application programs. If you cannot avoid them, at least COMMIT
WORK after each statement.
Performance Indicator
To display locking contention as it occurs, use the SHOW LOCK operator
commands. They can help you identify agents that are locking other agents out of
critical data and solve immediate locking problems.
To test the frequency of lock contentions after they occur, use the COUNTER
operator command. Specify the WAITLOCK counter to get the number of lock
requests that resulted in a wait.
Lock Escalation
The database manager uses internal control blocks called lock request blocks
(LRBs) to manage locking. Each time a lock is acquired one or more LRBs are used.
The number of LRBs that can be held by any given agent is defined by the
initialization parameter NLRBU. The sum of the number of LRBs held by all agents
cannot exceed the limit defined by the NLRBS initialization parameter. When either
of these limits is reached, lock escalation is initiated for the agent that caused the
limit to be exceeded.
Lock escalation is the act of trading low level locks (page, row, table, index page, or
key value locks) for the appropriate DBSPACE lock for one of the DBSPACEs in
which the victim agent holds locks. The DBSPACE chosen is the one in which the
agent holds the most locks.
Note: The lock manager is selective about the locks it escalates. A request for data
in DBSPACE X does not necessarily cause escalation to go after a lock on
DBSPACE X.
The lock manager requests a lock on the chosen DBSPACE. The lock mode
requested is the same as the most restrictive lock that the agent holds in the
DBSPACE. For example, if the agent holds any Z locks, a Z lock is requested. The
next choice would be an X lock, followed by an S lock. If the DBSPACE lock
cannot be granted, the system checks for a possible deadlock. If no deadlock is
found, the DBSPACE lock request is queued. After the DBSPACE lock is granted,
the lower level locks are freed.
Chapter 4. Configuring the Application Server and Requester
99
As the user resumes access to the DBSPACE (which is now locked at the DBSPACE
level), lower level locks are not required and are not obtained. Thus, for any given
LUW, the user can escalate only once on a particular DBSPACE. Or another way of
looking at it, the maximum number of times an LUW can be escalated is the
number of DBSPACEs accessed during that LUW.
Tuning Parameters (NLRBU, NLRBS): If an application program is causing too
many lock escalations, consider the following alternatives:
v Change the locking level of some of the dbspace(s) used by the application (for
example, from ROW to PAGE) by using either the SQL ALTER DBSPACE or the
SQL LOCK statement. This will reduce the number of locks required by the
application.
Note: Using a larger minimum lock level can increase locking contention. Refer
to “Minimum Lock Level” on page 96.
v Reduce the duration of the locks by changing the application: add SQL
COMMIT WORK statements to the application.
v If appropriate, consider running the application by itself: either in single user
mode, where no locking is required, or in multiple user mode with a reduced
NCUSERS.
v If you are currently using the repeatable read isolation level, consider using
cursor stability or uncommitted read.
If you cannot reduce the number of lock escalations, you may need to increase the
number of available lock request blocks by increasing the the NLRBU, and NLRBS
initialization parameters.
To establish the lock request block requirements for running an DB2 Server for VSE
& VM preprocessor, or for an application that is causing escalation problems:
1. Start the application server in multiple user mode with NCUSERS=1, NLRBU
about five times its current setting, and NLRBS set to the same value as
NLRBU.
2. Start the application and allow it to complete processing.
3. Verify that no escalation occurred by displaying the ESCALATE and LOCKLMT
counters. If no escalation occurred, enter the SHOW LOCK MATRIX operator
command. MAX USED BY LUW will show the number of lock request blocks
required.
4. If an escalation did occur, set NLRBU to a value greater than or equal to MAX
USED BY LUW, then start the application server again, and rerun the
application.
Performance Indicators (COUNTER, SHOW LOCK MATRIX): To test the
frequency of lock escalations, use the COUNTER operator command, refer to
“COUNTER Operator Command” on page 22. Specify both the ESCALATE and the
LOCKLMT counters to get the number of successful escalations and the number of
unsuccessful escalation attempts respectively. (An escalation can fail if the LUW
that reached the lock limit is rolled back because of a deadlock, or if a sufficient
number of lock request blocks cannot be freed.)
Note: ESCALATE and LOCKLMT may increase during preprocessing, because
locks are required then as well.
You can also use the SHOW LOCK MATRIX operator command that displays
information about lock request block usage, refer to “Lock Escalation” on page 37.
100
Performance Tuning Handbook