DB2 Server for VSE. Operations Guide / Handbooks (2004-2007) - page 2

Figure 7 (Page 1 of 2). DASD Storage Requirements for Target Minidisks
Storage in
Minidisk
Cylinders
Usage
owner
Default
FB-512
SFS 4K
(user ID)
Address
DASD
CYLS
Blocks
Blocks
Default SFS Directory Name
5697F74B
2B2
9345
12
2400
300
Contains all the base code shipped with
3390
12
DB2 DProp Q Capture for VM V7.4
3380
12
VMSYS:5697F74B.DPROPR.OBJECT
5697F74B
2C2
9345
1
1200
150
Contains customization files. This disk may
3390
1
also be used for local modifications.
3380
1
VMSYS:5697F74B.DPROPR.SAMPLE
5697F74B
2D2
9345
15
4800
600
Contains serviced files
3390
15
3380
15
VMSYS:5697F74B.DPROPR.DELTA
5697F74B
2A6
9345
1
1200
150
Contains AUX files and software inventory
3390
1
tables that represent the test service level
3380
1
of DB2 DProp Q Capture for VM V7.4
VMSYS:5697F74B.DPROPR.APPLYALT
5697F74B
2A2
9345
1
1200
150
Contains AUX files and software inventory
3390
1
tables that represent the service level of
3380
1
DB2 DProp Q Capture for VM V7.4 that is
currently in production.
VMSYS:5697F74B.DPROPR.APPLYPROD
5697F74B
200
9345
12
2400
300
Test build disk. This code will be copied to
3390
12
a production disk, so the production disk
3380
12
will also require this amount of free space.
VMSYS:5697F74B.DPROPR.TBUILD
5697F74B
191
9345
4
4800
600
5697F74B user ID's 191 minidisk
3390
4
3380
4
VMSYS:5697F74B.
CAPTMACH
300
9345
12
2400
300
Production code build disk.
3390
12
3380
12
VMSYS:CAPTMACH.DPROPR.PBUILD
CAPTMACH
191
9345
1
1200
150
CAPTMACH user ID's 191 minidisk
3390
1
3380
1
VMSYS:CAPTMACH.
Note: Cylinder values defined in this table are based on a 4K block size. FB-512 block and SFS values are
derived from the 3380 cylinder values in this table. The FBA blocks are listed as 512 bytes but should be CMS
formatted at 1K size.
2700 4K blocks are needed for SFS install.
Installation Requirements and Considerations
10
6.0
Installation Instructions
This chapter describes the installation methods and the step-by-step procedures to install and activate
DB2 DProp Q Capture for VM V7.4.
The step-by-step procedures are in two column format. The steps to be performed are in bold large
numbers. Commands for these steps are on the left hand side of the page in bold print. Additional
information for a command may exist to the right of the command. For more information about the two
column format see 'Understanding Dialogs with the System' in the VM/ESA Installation Guide.
Each step of the installation instructions must be followed. Do not skip any step unless directed to do so.
Throughout these instructions, the use of IBM-supplied default minidisk addresses and user IDs is
assumed. If you use different user IDs, minidisk addresses, or SFS directories to install DB2 DProp Q
Capture for VM V7.4, adapt these instructions as needed for your environment.
Note!
The sample console output presented throughout these instructions was produced on a z/VM V4R3.0
system. If you are installing DB2 DProp Q Capture for VM V7.4 on a different VM/ESA system, the
results obtained for some commands may differ from those depicted here.
6.1
VMSES/E Installation Process Overview
The following is a brief description of the main steps in installing DB2 DProp Q Capture for VM V7.4 using
VMSES/E.
¹
Plan Your Installation
Use the VMFINS command to load several VMSES/E files from the product tape and to obtain DB2
DProp Q Capture for VM V7.4 resource requirements.
¹
Allocate Resources
The information obtained from the previous step is used to allocate the appropriate minidisks (or SFS
directories) and user IDs needed to install and use DB2 DProp Q Capture for VM V7.4.
¹
Install the DB2 DProp Q Capture for VM V7.4 Product
Use the VMFINS command to load the DB2 DProp Q Capture for VM V7.4 product files from tape to
the test BUILD and BASE minidisks/directories. VMFINS is then used to update the VM SYSBLDS file
used by VMSES/E for software inventory management.
¹
Perform Post-installation Tasks
Information about file tailoring and initial activation of the program is presented in 6.6, “Post-Installation
Considerations (optional)” on page 26.
Copyright IBM Corp. 1997, 2004
11
¹
Place DB2 DProp Q Capture for VM V7.4 Files into Production
Once the product files have been tailored and the operation of DB2 DProp Q Capture for VM V7.4 is
satisfactory, the product files are copied from the test BUILD disk(s) to production BUILD disk(s).
For a complete description of all VMSES/E installation options refer to VMSES/E Introduction and
Reference.
6.2
Plan Your Installation For DB2 DProp Q Capture for VM V7.4
The VMFINS command will be used to plan the installation. This section has 2 main steps that will:
¹
load the first tape file, containing installation files
¹
generate a 'PLANINFO' file listing
- all user ID/mdisks requirements
- required products
To obtain planning information for your environment:
1
Log on as DB2 DProp Q Capture for VM V7.4 installation planner.
This user ID can be any ID that has read access to MAINT's 5E5 minidisk
and write access to the MAINT 51D minidisk.
2
Mount the DB2 DProp Q Capture for VM V7.4 installation tape and attach it to
the user ID at virtual address 181. The VMFINS EXEC requires the tape
drive to be at virtual address 181.
3
Establish read access to the VMSES/E code.
link MAINT 5e5 5e5 rr
The 5E5 disk contains the VMSES/E code.
access 5e5 b
4
Establish write access to the Software Inventory disk.
link MAINT 51d 51d mr
The MAINT 51D disk is where the VMSES/E
access 51d d
system-level Software Inventory and other
dependent files reside.
Note: If another user already has the MAINT 51D minidisk linked in write
mode (R/W), you will only obtain read access (R/O) to this minidisk. If this
occurs, you will need to have that user re-link the 51D in read-only mode
(RR), and then re-issue the above LINK and ACCESS commands. Do not
continue with these procedures until a R/W link is established to the 51D
minidisk.
Installation Instructions
12
5 Load the DB2 DProp Q Capture for VM V7.4 product control files to the 51D
minidisk.
vmfins install info (nomemo
The NOMEMO option will load the memos from the
tape but will not issue a prompt to send them to
the system printer. Specify the MEMO option if
you want to be prompted for printing the memo.
This command will perform the following:
¹
load Memo-to-Users
¹
load various product control files, including the
Product Parameter File (PPF) and the
PRODPART files
¹
create VMFINS PRODLIST on your A-disk.
The VMFINS PRODLIST contains a list of
products on the installation tape.
VMFINS2760I VMFINS processing started
VMFINS1909I VMFINS PRODLIST created on your A-disk
VMFINS2760I VMFINS processing completed successfully
Ready;
6 Obtain resource planning information for DB2 DProp Q Capture for VM V7.4.
Notes:
a. The product will not be loaded by the VMFINS command at this time.
vmfins install ppf 5697F74B {DPROPR | DPROPRSFS} (plan nomemo
Installation Instructions
13
Use DPROPR for installing on minidisks or
DPROPRSFS for installing in Shared File System
directories.
The PLAN option indicates that VMFINS will
perform requisite checking, plan system resources,
and provide an opportunity to override the defaults
in the product parameter file.
You can override any of the following:
¹
the name of the product parameter file
¹
the default user IDs
¹
minidisk/directory definitions
Notes:
a. If you change the PPF name, a default user ID, or other parameters via a
PPF override, you will need to use your changed values instead of those
indicated (when appropriate), throughout the rest of the installation
instructions, as well as the instructions for servicing DB2 DProp Q
Capture for VM V7.4. For example, you will need to specify your PPF
override file name instead of 5697F74B for certain VMSES/E commands.
b. If you are not familiar with creating PPF overrides using VMFINS, you
should review the 'Using the Make Override Panel' section in Chapter 3
of the VMSES/E Introduction and Reference before you continue.
c. For more information about changing the VMSYS file pool name refer to
Chapter 3 in the VMSES/E Introduction and Reference.
VMFINS2767I Reading VMFINS DEFAULTS B for additional options
VMFINS2760I VMFINS processing started
VMFINS2601R Do you want to create an override for :PPF 5697F74B DPROPR
:PRODID. 5697F74B%DPROPR?
Enter 0 (No), 1 (Yes) or 2 (Exit)
0
VMFINS2603I Processing product :PPF 5697F74B DPROPR :PRODID
5697F74B%DPROPR
VMFREQ1909I 5697F74B PLANINFO created on your A-disk
VMFREQ2805I Product :PPF 5697F74B DPROPR :PRODID
5697F74B%DPROPR
has passed requisite checking
VMFINT2603I Planning for the installation of product :PPF 5697F74B
DPROPR
:PRODID 5697F74B%DPROPR
VMFRMT2760I VMFRMT processing started
VMFRMT2760I VMFRMT processing completed successfully
VMFINS2760I VMFINS processing completed successfully
Installation Instructions
14

Note!
Complete this step only if you received message VMFREQ2806W.
If you receive the following VMFREQ2806W message, you must do some additional processing.
VMFREQ2806W The following requisites for product 5697F74B component
DPROPR are not satisfied
Type
Product
Component
PTF
----------
----------
----------
----------
Requisite
5697F74A
This message indicates that 5697F42, product DB2 Server for VSE & VM is a pre-requisite
product for DB2 DProp Q Capture for VM V7.4. It must be installed before you continue the
install for DB2 DProp Q Capture for VM V7.4.
7 Review the install message log ($VMFINS $MSGLOG). If necessary, correct
any problems before going on. For information about handling specific error
messages, see VM/ESA: System Messages and Codes, or use on-line HELP.
vmfview install
6.3
Allocate Resources for Installing DB2 DProp Q Capture for VM
V7.4
Use the planning information in the 5697F74B PLANINFO file, created in the PLAN step (6.2, “Plan Your
Installation For DB2 DProp Q Capture for VM V7.4” on page 12), to:
¹
Create the 5697F74B and CAPTMACH user directories for minidisk install
OR
¹
Create the 5697F74B and CAPTMACH user directories for SFS install
6.3.1
Installing DB2 DProp Q Capture for VM V7.4 on Minidisk
1 Obtain the user directory from the 5697F74B PLANINFO file.
Installation Instructions
15
Notes:
a. The user directory entry is located in the resource section of the
PLANINFO file, at the bottom; these entries will contain all of the links
and privilege classes necessary for the 5697F74B and CAPTMACH user
IDs. Use the directory entry found in PLANINFO as a model of input to
your system directory.
b. When adding the directory entry for the CAPTMACH, keep in mind the
following about the sample directory statements in the PLANINFO file.
IUCV *IDENT CAPTURE LOCAL
The CAPTMACH must be authorized in its directory to connect
to the system service *IDENT. Authorization is granted by the
IUCV entry in the CAPTMACH directory.
CAPTURE Refers to a unique name for each database DB2
DProp Q Capture for VM V7.4 is being used with.
Specification of this name is in the file CAPTURE
ASNPARMS.
LOCAL Identifies the resource as a LOCAL resource.
c.
The Q Capture machine must run in XC mode because dataspaces are
being used. The following statements need to be added to the CP
directory for the Q Capture machine:
MACHINE XC
XCONFIG ACCESSLIST ALSIZE xxxx
XCONFIG ADDRSPACE MAXNUMBER nnnn TOTSIZE nnnnG
The xxxx is the number of dataspace that can be accessed at
once. The machine is authorized to create and delete up to
nnnn dataspaces where the total size of all dataspaces cannot
exceed nnnnG(gigabytes).
d. The MQ Client for VM and TCP/IP Client disks need to be linked in. For
example,
LINK MAINT 193 193 RR
LINK TCPMAINT 592 592 RR
2
Add the MDISK statements to the directory entries for 5697F74B and
CAPTMACH. Use Figure 7 on page 9 to obtain the minidisk requirements.
3
Add the 5697F74B and CAPTMACH directories to the system directory.
Change the passwords for 5697F74B and CAPTMACH from xxxxx to a valid
password, in accordance with your security guidelines.
Installation Instructions
16
4 Place the new directories on-line using VM/Directory Maintenance
(DIRMAINT) or an equivalent CP directory maintenance method.
Note
All minidisks for the 5697F74B and CAPTMACH user IDs must be
formatted before installing DB2 DProp Q Capture for VM V7.4.
6.3.2
Installing DB2 DProp Q Capture for VM V7.4 in SFS Directories
1
Obtain the user directory from the 5697F74B PLANINFO file.
Notes:
a. The user directory entry is located in the resource section of the
PLANINFO file, at the bottom; these entries will contain all of the links
and privilege classes necessary for the 5697F74B and CAPTMACH user
IDs. Use the directory entries found in PLANINFO as a model of input to
your system directory.
b. When adding the directory entry for the CAPTMACH, keep in mind the
following about the sample directory statements in the PLANINFO file.
IUCV *IDENT CAPTURE LOCAL
The CAPTMACH must be authorized in its directory to connect
to the system service *IDENT. Authorization is granted by the
IUCV entry in the CAPTMACH directory.
CAPTURE Refers to a unique name for each database DB2
DProp Q Capture for VM V7.4 is being used with.
Specification of this name is in the file CAPTURE
ASNPARMS.
LOCAL Identifies the resource as a LOCAL resource.
c.
The Q Capture machine must run in XC mode because dataspaces are
being used. The following statements need to be added to the CP
directory for the Q Capture machine:
MACHINE XC
XCONFIG ACCESSLIST ALSIZE xxxx
XCONFIG ADDRSPACE MAXNUMBER nnnn TOTSIZE nnnnG
The xxxx is the number of dataspace that can be accessed at
once. The machine is authorized to create and delete up to
nnnn dataspaces where the total size of all dataspaces cannot
exceed nnnnG(gigabytes).
d. The MQ Client for VM and TCP/IP Client disks need to be linked in. For
example,
Installation Instructions
17
LINK MAINT 193 193 RR
LINK TCPMAINT 592 592 RR
2
Add the 5697F74B and CAPTMACH directories to the system directory.
Change the passwords for 5697F74B and CAPTMACH from xxxxx to a valid
password, in accordance with your security guidelines.
3
Place the new directories on-line using VM/Directory Maintenance
(DIRMAINT) or an equivalent CP directory maintenance method.
4
An SFS install will also require the following steps:
a Determine the number of 4K blocks that are required for SFS directories
by adding up the 4K blocks required for each SFS directory you plan to
use.
If you intend to use all of the default DB2 DProp Q Capture for VM V7.4
SFS directories, the 4K block requirements for each are summarized in
Figure 7 on page 9.
This information will be used when enrolling the 5697F74B to the
VMSYS filepool.
b Enroll user 5697F74B in the VMSYS filepool using the ENROLL USER
command:
ENROLL USER 5697F74B VMSYS: (BLOCKS blocks
where blocks is the number of 4K blocks that you calculated in the
previous step.
Note: This must be done from a user ID that is an administrator for
VMSYS: filepool.
c Determine if there are enough blocks available in the filepool to install
DB2 DProp Q Capture for VM V7.4. This information can be obtained
from the QUERY FILEPOOL STORGRP command. If the number of
blocks free is smaller than the total 4K blocks needed to install DB2
DProp Q Capture for VM V7.4 in the appropriate storage group you will
need to add space to the filepool.
(The default storage group used on
the above ENROLL USER is group 2). See the VM/ESA SFS and CRR
Planning, Administration, and Operation manual for information on
adding space to a filepool.
d Create the necessary subdirectories listed in the 5697F74B PLANINFO
file using the CREATE DIRECTORY command.
Installation Instructions
18
set filepool vmsys:
dirid is the name of the SFS directory you are
create directory dirid
creating. An example of the create command is:
create directory vmsys:5697F74B.Dpropr
create directory vmsys:5697F74B.Dpropr.object
:
If necessary, see the VM/ESA CMS Command
Reference manual for more information about the
CREATE DIRECTORY command.
A complete list of default Dpropr SFS directories is provided in Figure 7
on page 9.
e Give the CAPTMACH user ID READ authority to the general-use test
build directory, using the GRANT AUTHORITY command.
grant auth vmsys:5697F74B.Dpropr.tbuild. to CAPTMACH (read newread
If necessary, see the VM/ESA CMS Command
Reference manual for more information about the
GRANT AUTHORITY command.
f If you intend to use an SFS directory as the work space for the
5697F74B user ID, include the following IPL control statement in the
5697F74B directory entry:
IPL CMS PARM FILEPOOL VMSYS
This will cause CMS to automatically access the 5697F74B's top
directory as file mode A.
6.4
Install DB2 DProp Q Capture for VM V7.4
The ppfname used throughout these installation instructions is 5697F74B, which assumes you are using
the PPF supplied by IBM for DB2 DProp Q Capture for VM V7.4. If you have your own PPF override file
for DB2 DProp Q Capture for VM V7.4, you should use your file's ppfname instead of 5697F74B. The
ppfname you use should be used throughout the rest of this procedure.
The compname used throughout these installation instructions is either DPROPR or DPROPRSFS, which
assumes you are using the component name within the 5697F74B PPF file. If you specify your own
ppfname, you should use the compname from that file instead of DPROPR or DPROPRSFS. The
compname you use should be used throughout the rest of this procedure.
1 Logon to the installation user ID 5697F74B.
2 Create a PROFILE EXEC that will contain the ACCESS commands for
MAINT 5E5 and 51D minidisks.
Installation Instructions
19
xedit profile exec a
If either 5E5 or 51D is in a shared file system
===> input /**/
(SFS) then substitute your SFS directory name in
===> input 'access 5e5 b'
place of the 5E5 and 51D in the access command.
===> input 'access 51d d'
===> file
3
Run the profile to access MAINT's minidisks.
profile
4
If the Software Inventory disk (51D) was accessed R/O (read only) then
establish write access to the Software Inventory disk.
Note: If the MAINT 51D minidisk was accessed R/O, you will need to have
the user who has it linked R/W link it as R/O. You then can issue the
following commands to obtain R/W access to it.
link MAINT 51d 51d mr
access 51d d
5
Have the DB2 DProp Q Capture for VM V7.4 installation tape mounted and
attached to 5697F74B at virtual address 181. The VMFINS EXEC requires
the tape drive to be at virtual address 181.
6
Install DB2 DProp Q Capture for VM V7.4.
Notes:
a. If you have already created a PPF override file, you should specify your
override file name, in place of the default PPF name (5697F74B), after
the PPF keyword for the following VMFINS command.
b. You may be prompted for additional information during VMFINS INSTALL
processing depending on your installation environment. If you are unsure
how to respond to a prompt, refer to the 'Installing Products with VMFINS'
and "Install Scenarios' chapters in the VMSES/E Introduction and
Reference to decide how to proceed.
c. VMFINS will access all disks needed during the installation, please
ensure that your installation id has your SQLMACHs 195 disk linked
before running the next step.
vmfins install ppf 5697F74B {DPROPR | DPROPRSFS} (nomemo nolink
Installation Instructions
20
Use DPROPR for installing on minidisks or
DPROPRSFS for installing in Shared File System
directories.
The NOLINK option indicates that you do not want
VMFINS to link to the appropriate minidisks, only
access them if not accessed.
Installation Instructions
21
VMFINS2767I Reading VMFINS DEFAULTS B for additional options
VMFINS2760I VMFINS processing started
VMFINS2601R Do you want to create an override for :PPF 5697F74B DPROPR
:PRODID. 5697F74B%DPROPR?
Enter 0 (No), 1 (Yes) or 2 (Exit)
0
VMFINS2603I Processing product :PPF 5697F74B DPROPR :PRODID
5697F74B%DPROPR
VMFREQ1909I 5697F74B PLANINFO created on your A-disk
VMFREQ2805I Product :PPF 5697F74B DPROPR :PRODID
5697F74B%DPROPR
has passed requisite checking
VMFINT2603I Installing product :PPF 5697F74B DPROPR :PRODID
5697F74B%DPROPR
VMFSET2760I VMFSETUP processing started
VMFUTL2205I Minidisk|Directory Assignments:
String
Mode Stat Vdev Label/Directory
VMFUTL2205I LOCALSAM E
R/W
2C2
SES2C2
VMFUTL2205I APPLY
F
R/W
2A6
SES2A6
VMFUTL2205I
G
R/W
2A2
SES2A2
VMFUTL2205I DELTA
H
R/W
2D2
SES2D2
VMFUTL2205I BUILD0
I
R/W
200
SES200
VMFUTL2205I BASE
J
R/W
2B2
SES2B2
VMFUTL2205I SYSTEM
K
R/O
195
DB2195
VMFUTL2205I --------
A
R/W
191
SES191
VMFUTL2205I --------
B
R/O
5E5
MNT5E5
VMFUTL2205I --------
D
R/W
51D
SES51D
VMFUTL2205I --------
S
R/O
190
MNT190
VMFUTL2205I --------
Y/S
R/O
19E
MNT19E
VMFSET2760I VMFSETUP processing completed successfully
VMFREC2760I VMFREC processing started
VMFREC1852I Volume 1 of 1 of INS TAPE 9800
VMFREC1851I (1 of 6) VMFRCAXL processing AXLIST
VMFRCX2159I Loading 0 part(s) to DELTA 2D2 (H)
VMFREC1851I (2 of 6) VMFRCPTF processing PARTLST
VMFRCP2159I Loading 0 part(s) to DELTA 2D2 (H)
VMFREC1851I (3 of 6) VMFRCCOM processing DELTA
VMFRCC2159I Loading 0 part(s) to DELTA 2D2 (H)
VMFREC1851I (4 of 6) VMFRCALL processing APPLY
VMFRCA2159I Loading part(s) to APPLY 2A6 (F)
VMFRCA2159I Loaded 1 part(s) to APPLY 2A6 (F)
VMFREC1851I (5 of 6) VMFRCALL processing BASE
VMFRCA2159I Loading part(s) to BASE 2B2 (J)
VMFRCA2159I Loaded 17 part(s) to BASE 2B2 (J)
VMFREC1851I (6 of 6) VMFRCALL processing BUILD
VMFRCA2159I Loading part(s) to BUILD0 200 (I)
VMFRCA2159I Loaded 12 part(s) to BUILD0 200 (I)
VMFREC2760I VMFREC processing completed successfully
VMFINT2603I Product installed
VMFINS2760I VMFINS processing completed successfully
7 Review the install message log ($VMFINS $MSGLOG). If necessary, correct
any problems before going on. For information about handling specific error
messages, see VM/ESA: System Messages and Codes, or use on-line HELP.
Installation Instructions
22
vmfview install
6.4.1
Update Build Status Table for DB2 DProp Q Capture for VM V7.4
1 Update the VM SYSBLDS software inventory file for DB2 DProp Q Capture
for VM V7.4.
vmfins build ppf 5697F74B {DPROPR | DPROPRSFS} (serviced nolink
Use DPROPR for installing on minidisks or
DPROPRSFS for installing in Shared File System
directories.
The SERVICED option will build any parts that
were not built on the installation tape (if any) and
update the Software Inventory build status table
showing that the product 5697F74B has been built.
2 Review the install message log ($VMFINS $MSGLOG). If necessary, correct
any problems before going on. For information about handling specific error
messages, see VM/ESA: System Messages and Codes, or use on-line HELP.
vmfview install
6.5
Place DB2 DProp Q Capture for VM V7.4 Into Production
6.5.1
Customize the CAPTMACH user ID
Customizing the CAPTMACH user ID involves setting up the CAPTMACH user ID as a user of a
database. Your installation may have a standard set-up that you should follow instead of the following
instructions.
1 Logon to the Capture machine, CAPTMACH.
If you are using minidisks you need to make sure that the 191 A-disk has
been formatted.
2 Access the database production disk or directory.
access {vdev:epv|dirid}. q
vdev is the address the database machine
production minidisk, or dirid is the name of the
database machine production SFS directory.
3 Copy the sample PROFILE EXEC for a user machine.
Installation Instructions
23
copyfile sqluser profile q profile exec a
You may need to add local environmental
commands. Obtain this information from your
system programming department.
4 Make the DB2 Server for VM message repository available.
set language ameng (add ari user
6.5.2
Copy DB2 DProp Q Capture for VM V7.4 Files Into Production
1 Put the DB2 DProp Q Capture for VM V7.4 code on the production build disk.
a If installing using minidisks
link 5697F74B 200 200 rr
The VMFCOPY command will update the VMSES
access 200 e
PARTCAT file on the 300 disk.
access 300 f
vmfcopy * * e = = f (prodid 5697F74B%DPROPR olddate replace
b If installing using Shared File System
access 5697F74B.DPROPR.tbuild e
The VMFCOPY command will update the VMSES
access CAPTMACH.DPROPR.pbuild f
PARTCAT file on the production SFS directory.
vmfcopy * * e = = f (prodid 5697F74B%DPROPR olddate replace
6.5.3
Load the DB2 DProp Q Capture for VM V7.4 Package files to a
database
To load the DB2 DProp Q Capture for VM V7.4 package, the ASNPLOAD EXEC must be used. This exec
uses the DBS Utility program RELOAD PACKAGE in multiple user mode to load the package files. The
ASNPLOAD EXEC assumes that the user ID is SQLDBA and that the password is SQLDBAPW. If the
password has been changed, it should be reassigned to SQLDBAPW before running ASNPLOAD.
Alternatively, update the CONNECT statement in the ASNPLOAD EXEC to specify the current password
for SQLDBA.
You must first use the SQLINIT EXEC to specify the name of the database that you are loading the
package to.
sqlinit dbname(dbname)
dbname is the database you are loading the
asnpload dbname
package files to.
Installation Instructions
24
6.5.4
Starting DB2 DProp Q Capture for VM V7.4
Note!
Prior to running DB2 DProp Q Capture for VM V7.4, DB2 UDB Universal Database Version 8
Release 2 must be installed and the Replication Center administration functions of defining at
least one replication source and subscription must be performed. If this is not done, DB2
DProp Q Capture for VM V7.4 will not start successfully and you will be unable to perform
installation verification.
The following MQ Server information needs to be inserted in the LASTING GLOBALV:
GLOBALV SELECT CENV SETLP MQSERVER <channel name>/TCP/<server-address(port)>
For example, GLOBALV SELECT CENV SETLP MQSERVER VM2MQ/TCP/9.26.78.125(1414).
For instructions on DB2 DProp Q Capture for VM V7.4 invocation, parameters, and operation, see the
DB2 DProp Q Capture for VM V7.4 information in the DB2 Replication and Event Publishing Guide and
Event Publishing Guide and Reference, SC18-7568, and its supplement for Q Capture VSE/VM.
Additionally, you may need to customize the CAPTURE ASNPARMS parameter file to specify the
language file that DB2 DProp Q Capture for VM V7.4 will use for displaying messages. The default
language is American English (ASNQS001). To issue messages in a different language, change the
LANGUAGE parameter in the CAPTURE ASNPARMS file and file it on the Capture virtual machine's
A-disk. Supported languages include:
Membername Description
ASNQS001 American English
ASNQS002
Upper case English
ASNQS003
French
ASNQS004
German
ASNQD001
Japanese
6.5.5
Installation Verification Procedure for DB2 DProp Q Capture for
VM V7.4
Once the DB2 DProp Q Capture for VM V7.4 is started, you should see an informational message
ASN0572I The program initialized successfully on the CAPTMACH console. It means the DB2 DProp Q
Capture for VM V7.4 has been able to connect to the DB2 database and is running successfully. Once
DB2 DProp Q Capture for VM V7.4 is started, it will continue to run until the STOP operator command is
issued. At this time, you may also look at the DB2 DProp Q Capture for VM V7.4 trace table,
ASN.IBMQREP_CAPTRACE, to verify that the same message is logged into the table.
Installation Instructions
25
6.6
Post-Installation Considerations (optional)
DB2 DProp Q Capture for VM V7.4 runs in a virtual machine capturing changes for one and only one DB2
Server for VM database. Additional virtual machines must be defined if there is more than one DB2
Server for VM database in which you want to capture changes. They can be modeled after the
CAPTMACH user ID, with the following changes:
¹
Change the link to the SQLMACH 195 Production disk to the 195 disk of the appropriate database.
¹
Update the *IDENT statement in the CP directory of the new virtual machine. You need to specify a
unique resource ID for each virtual machine running DB2 DProp Q Capture for VM V7.4.
¹
Customize the CAPTURE ASNPARMS parameter file for the virtual machine. You will need to update
the ENQ_NAME parameter with the name specified in the *IDENT above.
¹
Follow step 6.5.3, “Load the DB2 DProp Q Capture for VM V7.4 Package files to a database”
specifying the appropriate database name.
Note that the additional virtual machines can all link to the CAPTMACH 300 production disk to gain access
to the DB2 DProp Q Capture for VM V7.4 code.
DB2 DProp Q Capture for VM V7.4 is now installed and built on your
system.
Installation Instructions
26
7.0
Migration Instructions
The previous versions of Data Propagator Capture for VM cannot be migrated to
Data Propagator Q Capture. Follow the Installation Instructions, see 6.0,
“Installation Instructions” on page 11, to complete the installation.
Copyright IBM Corp. 1997, 2004
27
8.0
Service Instructions
This section of the Program Directory contains the procedure to install CORrective service to DB2 DProp
Q Capture for VM V7.4. VMSES/E is used to install service for DB2 DProp Q Capture for VM V7.4.
To become more familiar with service using VMSES/E, you should read the introductory chapters in the
VMSES/E Introduction and Reference. This manual also contains the command syntax for the VMSES/E
commands listed in the procedure.
Note: Each step of the servicing instructions must be followed. Do not skip any step unless directed to
do so. All instructions showing accessing of disks assume the use of default minidisk addresses. If
different minidisk addresses are used, or if using a shared file system, change the instructions
appropriately.
8.1
VMSES/E Service Process Overview
The following is a brief description of the main steps in servicing DB2 DProp Q Capture for VM V7.4 using
VMSES/E.
¹
Setup Environment
Access the software inventory disk. Use VMFSETUP command to establish the correct minidisk
access order.
¹
Merge Service
Use the VMFMRDSK command to clear the alternate apply disk before receiving new service. This
allows you to easily remove the new service if a serious problem is found.
¹
Receive Service
The VMFREC command receives service from the delivery media and places it on the Delta disk.
¹
Apply Service
The VMFAPPLY command updates the version vector table (VVT), which identifies the service level of
all the serviced parts. In addition, AUX files are generated from the VVT for parts that require them.
¹
Reapply Local Service (if applicable)
All local service (mods) must be entered into the software inventory to allow VMSES/E to track the
changes and build them into the system. Refer to Chapter 7 in the VM/ESA Service Guide for this
procedure.
¹
Build New Levels
The build task generates the serviced level of an object and places the new object on a test BUILD
disk.
¹
Place the New Service into Production
Copyright IBM Corp. 1997, 2004
28
Once the service is satisfactorily tested, it should be put into production by copying the new service to
the production disk.
¹
Load the DB2 DProp Q Capture for VM V7.4 Package file
8.2
Servicing DB2 DProp Q Capture for VM V7.4
8.2.1
Prepare to Receive Service
The ppfname used throughout these servicing instructions is 5697F74B, which assumes you are using the
PPF supplied by IBM for DB2 DProp Q Capture for VM V7.4. If you have your own PPF override file for
DB2 DProp Q Capture for VM V7.4, you should use your file's ppfname instead of 5697F74B. The
ppfname you use should be used throughout the rest of this procedure, unless otherwise stated.
The compname used throughout these servicing instructions is either DPROPR or DPROPRSFS, which
assumes you are using the component name within the 5697F74B PPF file. If you specify your own
ppfname, you should use the compname from that file instead of DPROPR or DPROPRSFS. The
compname you use should be used throughout the rest of this procedure.
1 Logon to DB2 DProp Q Capture for VM V7.4 service user ID 5697F74B
2 If the Software Inventory disk (51D) was accessed R/O (read only) then
establish write access to the Software Inventory disk.
Note: If the MAINT 51D minidisk was accessed R/O, you will need to have
the user that has it accessed R/W link it R/O. You then can issue the
following commands to obtain R/W access to it.
link MAINT 51d 51d mr
The 51D minidisk is where the VMSES/E Software
access 51d d
Inventory files and other product dependent files
reside.
3 Have the DB2 DProp Q Capture for VM V7.4 CORrective service tape
mounted and attached to 5697F74B.
4 Establish the correct minidisk access order.
vmfsetup 5697F74B {DPROPR | DPROPRSFS}
5697F74B is the PPF that was shipped with the
product. If you have your own PPF override you
should substitute your PPF name for 5697F74B.
Use DPROPR for installing on minidisks or
DPROPRSFS for installing in Shared File System
directories.
Service Instructions
29
5 Receive the documentation. VMFREC, with the INFO option, loads the
documentation and displays a list of all the products on the tape.
Electronic Service
If you are receiving service from Service Link (electronic service) see
Appendix A, 'Receiving Service for VMSES Envelopes', section Receive
Service Documentation, in the VM/ESA Service Guide, then return back to
this program directory and continue with step 7 below.
vmfrec info
This command will load the service memo to the
191 disk.
6 Check the receive message log ($VMFREC $MSGLOG) for warning and error
messages.
vmfview receive
Also make note of which products and components
have service on the tape. To do this, use the PF5
key to show all status messages which identify the
products on the tape.
7 Merge previously applied service to ensure that you have a clean alternate
apply disk for new service.
vmfmrdsk 5697F74B {DPROPR | DPROPRSFS} apply
Use DPROPR for installing on minidisks or
DPROPRSFS for installing in Shared File System
directories.
This command clears the alternate APPLY disk.
8 Review the merge message log ($VMFMRD $MSGLOG). If necessary,
correct any problems before going on. For information about handling
specific error messages, see VM/ESA: System Messages and Codes, or use
on-line HELP.
vmfview mrd
Service Instructions
30
8.2.2
Receive the Service
Electronic Service
If you are receiving service from Service Link (electronic service) see Appendix A, 'Receiving
Service for VMSES Envelopes', section Receive the Service, in the VM/ESA Service Guide.
Then return back to this program directory and continue with section 8.2.3, “Apply the Service.”
1 Receive the service.
vmfrec ppf 5697F74B {DPROPR | DPROPRSFS}
Use DPROPR for installing on minidisks or
DPROPRSFS for installing in Shared File System
directories.
This command receives service from your service
tape. All new service is loaded to the DELTA disk.
2 Review the receive message log ($VMFREC $MSGLOG). If necessary,
correct any problems before going on. For information about handling
specific error messages, see VM/ESA: System Messages and Codes, or use
on-line HELP.
vmfview receive
8.2.3
Apply the Service
1 Apply the new service.
vmfapply ppf 5697F74B {DPROPR | DPROPRSFS} Use DPROPR for installing on minidisks or
DPROPRSFS for installing in Shared File System
directories.
This command applies the service that you just
received. The version vector table (VVT) is
updated with all serviced parts and all necessary
AUX files are generated on the alternate apply
disk.
You must review the VMFAPPLY message log if
you receive a return code (RC) of 4, as this may
indicate that you have local modifications that need
to be reworked.
Service Instructions
31
2 Review the apply message log ($VMFAPP $MSGLOG). If necessary, correct
any problems before going on. For information about handling specific error
messages, see VM/ESA: System Messages and Codes, or use on-line HELP.
vmfview apply
Note
If you get the message VMFAPP2120W then re-apply any local modifications before building the
new DB2 DProp Q Capture for VM V7.4. Refer to chapter 7 in the VM/ESA Service Guide.
Follow the steps that are applicable to your local modification.
The following substitutions need to be made:
¹
esalcl should be 5697F74B
¹
esa should be 5697F74B
¹
compname should be DPROPR or DPROPRSFS (minidisk or SFS)
¹
appid should be 5697F74B
¹
fm-local should be the fm of 2C2
¹
fm-applyalt should be the fm of 2A6
¹
outmode localmod should be outmode localsam
If you have changed any of the installation parameters through a PPF override, you need to
substitute your changed values where applicable.
Keep in mind that when you get to the "Return to the Appropriate Section to Build Remaining
Objects" or "Rebuild Remaining Objects" step in the VM/ESA Service Guide, you should return
back to this program directory at 8.2.4, “Update the Build Status Table.”
8.2.4
Update the Build Status Table
1 Update the Build Status Table with serviced parts.
vmfbld ppf 5697F74B {DPROPR | DPROPRSFS} (status
Use DPROPR for installing on minidisks or
DPROPRSFS for installing in Shared File System
directories.
This command updates the Build Status Table.
Service Instructions
32
Note
If the $PPF files have been serviced you will get the following prompt:
VMFBLD2185R The following source product parameter files have been
serviced:
VMFBLD2185R 5697F74B $PPF
VMFBLD2185R When source product parameter files are serviced, all
product parameter files built from them must be recompiled
using VMFPPF before VMFBLD can be run.
VMFBLD2185R Enter zero (0) to have the serviced source product
parameter files built to your A-disk and exit VMFBLD so
you can recompile your product parameter files with VMFPPF.
VMFBLD2185R Enter one (1) to continue only if you have already
recompiled your product parameter files with VMFPPF.
0
Enter a 0 and complete the following steps
before you continue.
VMFBLD2188I Building 5697F74B $PPF
on 191 (A) from level $PFnnnnn
vmfppf 5697F74B *
Note: If you have created your own PPF
override then use your PPF name instead of
5697F74B.
copyfile 5697F74B $PPF a = = d (olddate replace
erase 5697F74B $PPF a
Note: Do not use your own PPF name in
place of 5697F74B for the COPYFILE and
ERASE commands.
vmfbld ppf 5697F74B {DPROPR | DPROPRSFS} (status
1
Re-issue VMFBLD to complete updating the
build status table.
Use DPROPR for installing on minidisks or
DPROPRSFS for installing in Shared File
System directories. When you receive the
prompt that was previously displayed, enter a
1 to continue.
Service Instructions
33
2 Use VMFVIEW to review the build status messages, and see what objects
need to be built.
vmfview build
8.2.5
Build Serviced Objects
1 Rebuild DB2 DProp Q Capture for VM V7.4 serviced parts.
vmfbld ppf 5697F74B {DPROPR | DPROPRSFS} (serviced
Use DPROPR for installing on minidisks or
DPROPRSFS for installing in Shared File System
directories.
Notes:
1. If your software inventory disk (51D) is not
owned by the MAINT user ID then make sure
the VMSESE PROFILE reflects the correct
owning user ID.
2. Rebuilding DB2 DProp Q Capture for VM V7.4
requires access to the SCEELKED TXTLIB.
2 Review the build message log ($VMFBLD $MSGLOG). If necessary, correct
any problems before going on. For information about handling specific error
messages, see VM/ESA: System Messages and Codes, or use on-line HELP.
vmfview build
8.3
Place the New DB2 DProp Q Capture for VM V7.4 Service Into
Production
8.3.1
Copy the New DB2 DProp Q Capture for VM V7.4 Serviced Files
Into Production
1 Logon to CAPTMACH to put DB2 DProp Q Capture for VM V7.4 code on the
production code build disk.
Service Instructions
34
a If installing using minidisks
link 5697F74B 200 200 rr
The VMFCOPY command will update the VMSES
access 200 e
PARTCAT file on the 300 disk.
access 300 f
vmfcopy * * e = = f (prodid 5697F74B%DPROPR olddate replace
b If installing using Shared File System
access 5697F74B.DPROPR.tbuild e
The VMFCOPY command will update the VMSES
access CAPTMACH.DPROPR.pbuild f
PARTCAT file on the production SFS directory.
vmfcopy * * e = = f (prodid 5697F74B%DPROPR olddate replace
8.3.2
Load the DB2 DProp Q Capture for VM V7.4 Package files to a
database
The DB2 DProp Q Capture for VM V7.4 packages must be reloaded in all databases if there is a service
update to the package. To load the DB2 DProp Q Capture for VM V7.4 packages, the ASNPLOAD EXEC
must be used. This exec uses the DBS Utility program RELOAD PACKAGE in multiple user mode to load
the package files. The ASNPLOAD EXEC assumes that the user ID is SQLDBA and that the password is
SQLDBAPW. If the password has been changed, it should be reassigned to SQLDBAPW before running
ASNPLOAD. Alternatively, update the CONNECT statement in the ASNPLOAD EXEC to specify the
current password for SQLDBA.
You must first use the SQLINIT EXEC to specify the name of the database that you are loading the
package to.
sqlinit dbname(dbname)
dbname is the database you are loading the
asnpload dbname
package files to.
You have finished servicing DB2 DProp Q Capture for VM V7.4.
Service Instructions
35
Reader's Comments
DataPropagator Q Capture for VM Version 7 Release 4.0
You may use this form to comment about this document, its organization, or subject matter. Please understand that
your feedback is of importance to IBM, but IBM makes no promises to always provide a response to your feedback.
For each of the topics below please indicate your satisfaction level by circling your choice from the rating scale. If a
statement does not apply, please circle N.
RATING SCALE
very
very
not
satisfied
◄▬▬▬▬▬▬▬▬▬▬▬▬▬▬▬▬▬▬▬▬▬▬▬▬▬▬▬▬▬▬►
dissatisfied
applicable
1
2
3
4
5
N
Satisfaction
Ease of product installation
1
2
3
4
5
N
Time required to install the product
1
2
3
4
5
N
Contents of program directory
1
2
3
4
5
N
Readability and organization of program directory tasks
1
2
3
4
5
N
Necessity of all installation tasks
1
2
3
4
5
N
Accuracy of the definition of the installation tasks
1
2
3
4
5
N
Technical level of the installation tasks
1
2
3
4
5
N
Installation verification procedure
1
2
3
4
5
N
Ease of customizing the product
1
2
3
4
5
N
Ease of migrating the product from a previous release
1
2
3
4
5
N
Ease of putting the system into production after
1
2
3
4
5
N
installation
Ease of installing service
1
2
3
4
5
N
¹
Did you order this product as an independent product or as part of a package?
Ø Independent
Ø Package
What type of package was ordered?
Ø CustomPac
Ø FunctionPac
Ø SystemPac
Ø System Delivery Offering (SDO)
Ø Other - Please specify type: ______________________________________
Copyright IBM Corp. 1997, 2004
37

¹
Is this the first time your organization has installed this product?
Ø Yes
Ø No
¹
Were the people who did the installation experienced with the installation of VM products using VMSES/E?
Ø Yes
How many years of experience do they have? __________
Ø No
¹
How long did it take to install this product? ____________________
¹
If you have any comments to make about your ratings above, or any other aspect of the product installation,
please list them below:
Please provide the following contact information:
Name and Job Title
Organization
Address
Telephone
Thank you for your participation.
Please send the completed form to the following address, or give to your IBM representative who will forward it to the
DataPropagator Q Capture for VM Development group:
IBM Canada Ltd.
DB2 Server for VSE & VM
B4/240/8200/MKM
8200 Warden Avenue
Markham, Ontario, Canada. L6G 1C7
Reader's Comments
38
DB2 Server for VSE & VM
DB2® DataPropagator™ Q Capture
Supplement
Version 7 Release 4
IBM Confidential
00-0000-00
IBM Confidential
Contents
About this manual
v
startmode
20
Who should read this book
v
term
21
Text conventions used in this book
v
trace_limit
21
Changing the Q Capture parameters
21
Changing the Q Capture parameters - overview
21
Chapter 1. Introduction to DB2
Methods of changing the Q Capture operating
DataPropagator Q Capture on VSE and
parameters
21
VM
1
Changing saved parameters in the
Overview
1
IBMQREP_CAPPARMS table
21
Limitations of the DB2 DataPropagator Q Capture
Setting parameter values at startup . .
22
program
1
Dynamically changing parameters while a Q
MQ environment
2
Capture program is running
22
Activating Q subscriptions
22
Chapter 2. Setting up the Q Capture
Deactivating Q subscriptions
23
program on VM
5
Stopping a Q Capture program
24
Operator commands
25
Overview
5
Command - STOP
25
MQ setup for VM
5
Command - REINIT
26
VM setup
5
Command - REINITQ
26
Setting up replication from sources to targets . . . 6
Command - QRYPARMS
27
Command - CHGPARMS
27
Chapter 3. Setting up the Q Capture
Command - PRUNE
28
program on VSE
7
Command - STATUS
28
Overview
7
Signals
29
MQ Setup for VSE
7
Signals - CAPSTOP
30
Setting up replication from sources to targets . .
10
Signals - CAPSTART
30
Signals - REINIT_SUB
31
Chapter 4. Running the Q Capture
Signals - LOADDONE
31
program on VSE or VM
11
Signals - QINERROR
32
Overview
11
Signals - IGNORETRANS
32
Starting a Q Capture program
11
Signals - STOP
33
Prerequisites
11
Initial load
33
Procedure
12
Loading options
33
Considerations when cold starting a Q Capture
Automatic load
34
program
13
Manual load
36
When to cold start a Q Capture program . . . 13
No load
37
Possible problems that can result from cold starts
Recommendations for loading
37
of the Q Capture program
13
Starting Capture
38
Preventing unexpected cold starts of the Q
Starting the Q Capture program on VM .
38
Capture program
13
Starting the Q Capture program on VSE .
38
Related concepts
13
Starting the Q Apply program
38
Related tasks
13
Parameters of a Q Capture program
14
Chapter 5. Running the Q Capture
Parameters of a Q Capture program - overview
14
program on VM and VSE (target is a
Descriptions of Q Capture parameters
15
VM or VSE platform)
39
adminq
15
Overview
39
autostop
16
Setting up the federated system
39
commit_interval
16
logreuse
17
Chapter 6. Problem diagnosis
41
logstdout
17
Overview
41
memory_limit
17
Tracing
41
prune_interval
18
FILEDEFs on VM
41
qmgr
18
Turning trace on and off
41
restartq
19
Formatting and reading trace output
42
signal_limit
19
sleep_interval
19
iii
IBM Confidential
Chapter 7. Important hints and tips . . 43
IBMQREP_SIGNAL control table
52
Overview
43
IBMQREP_CAPTRACE control table
53
Control table considerations
43
IBMQREP_ADMINMSG control table
53
Default values in control tables
43
Dataspace considerations
44
Notices
55
Storage Considerations
44
Trademarks
57
VSE queue maintenance considerations
44
Index
59
Appendix. Q Capture control tables . . 47
IBMQCAP_CAPPARMS control table
47
Contacting IBM
61
IBMQREP_SENDQUEUES control table
49
Product information
61
IBMQREP_SUBS control table
50
IBMQREP_SRC_COLS control table
51
iv DB2 DataPropagator Q Capture Supplement
IBM Confidential
About this manual
This document is a supplement to the DB2 UDB Replication and Event Publishing
Guide. It provides a reference for customers who are working with a replication
environment and have the Q Capture program running on VSE & VM. It also
provides a reference for those customers who want to use an Apply program to a
database running on VSE or VM. Installation instructions can be found in the
program directory for IBM DB2 DataPropagator Q Capture for VM and the
program directory for IBM DB2 DataPropagator Q Capture for VSE. Installation
should be performed before continuing with the Q Capture setup. Read this
supplement as well as the DB2 UDB Replication and Event Publishing Guide before
setting up replication.
Who should read this book
This book is for database administrators, data replication specialists, and others
who set up and maintain a Q replication or event publishing environment. This
book assumes that you are familiar with:
v Standard database terminology.
v Database design, database administration, database security, server connectivity,
and networking.
v The operating systems that will be involved in your Q replication or event
publishing environment.
v The data that you want to replicate or publish.
v The applications that you want to receive messages in event publishing.
v WebSphere MQ concepts and objects. (This book refers you to other sources for
more detailed information about configuring and using WebSphere MQ.)
Text conventions used in this book
This book uses these highlighting conventions:
v Boldface type indicates commands or user interface controls such as names of
fields, folders, icons, or menu choices.
v Monospace type indicates examples of text that you enter exactly as shown.
v Italic type indicates variables that you should replace with a value. It is also
used to indicate book titles and to emphasize words.
v
IBM Confidential
Chapter 1. Introduction to DB2 DataPropagator Q Capture on
VSE and VM
This document supplements the DB2 UDB Replication and Event Publishing Guide. It
provides a reference for VSE & VM customers who work in a replication
environment with the Q Capture program running on VSE or VM. It also provides
a reference for those customers who want to use an Apply program with a
database running on VSE or VM. Installation instructions can be found in the
program directory for IBM DB2 DataPropagator Q Capture for VM and in the
program directory for IBM DB2 DataPropagator Q Capture for VSE. The
installation and should be performed before continuing with this setup. Please read
this supplement as well as the DB2 UDB Replication and Event Publishing Guide
before setting up replication.
DataPropagator Q Replication is a replication solution that uses WebSphere MQ
message queues to transmit transactions between source and target databases. The
Q Capture program on VM or VSE reads the DB2 log file for changes to the source
tables that you specify.
Overview
Q Capture for VSE & VM replaces the SQL Capture product that has been
previously shipped with DB2 Server for VSE & VM. The Q Capture program will
read the DB2 for VSE & VM log files as the previous product did but instead of
data being inserted into change data tables, transactions will be built into MQ
messages and put onto the MQ message queues. The messages are read and
applied to targets by the QApply program.
DB2 DataPropagator Q Capture for VM runs on a separate VM computer and the
Q Capture program for VSE runs in its own partition.
Administration of replication can occur through the Replication Center.
Limitations of the DB2 DataPropagator Q Capture program
The limitations of the DB2 DataPropagator Q Capture include:
v Event publishing (storing the data in an XML format) is not supported. Only
standard Q replication is supported.
v There is no support for columns created with the keyword LONG VARCHAR
because there are incompatible column lengths between VSE VM and the other
platforms. However, a column created up to the VARCHAR length (32 700) is
supported, as long as the target column is of the same length. There are some
restrictions with respect to using the Replication Center when defining the
source and target columns. The Replication Center only supports column
definitions up to VARCHAR(254). For columns between 254 and 32 700, the
control tables must be manually populated.
v Search conditions are not supported. On the other platforms, you can specify a
search condition for each subscription. Any row that does not satisfy this
condition is not sent onto the queue. This capability is not supported on the VSE
and VM platforms.
v Only unidirectional replication is supported.
1
IBM Confidential
v No monitoring capability is provided for capture on the VSE and VM platforms.
MQ environment
The MQ environment that is required to run the Capture and Apply programs
differs between VM and VSE. This difference is caused by the unavailability of an
MQ server on VM.
For both VM and VSE, the following MQ objects are required:
v
Queue manager A program that manages queues for Q Capture programs, Q
Apply programs, and user applications. One queue manager is required on each
system. For VM, there is no queue manager, so only one queue manager is
required.
v
Send queue A queue that directs data messages from a Q Capture program to a
Q Apply program or user application. In remote configurations, this is the local
definition on the source system of the receive queue on the target system. Each
send queue should be used by only one Q Capture program. For VM systems,
the send and receive queue are the same
v
Receive queue A queue that receives data and informational messages from a Q
Capture program to a Q Apply program or user application. This queue is a
local one on the target system.
v
Administration queue (for Q Capture) A queue that receives control messages
from a Q Apply program or a user application to the Q Capture program. This
queue is a local one on the source system. Each administration queue should be
read by only one Q Capture program.
v
Administration queue (for Q Apply) A queue that directs control messages
from the Q Apply program or user application to a Q Capture program. In
remote configurations, this is the local definition on the target system of the Q
Capture administration queue on the source system.
v
Restart queue A queue that holds a single message that tells the Q Capture
program where to start reading in the DB2® recovery log after the system has
been restarted. This is a local queue on the source system. Each Q Capture
program must have its own restart queue.
v
Spill queue A model queue that you define on the target system to hold
transaction messages from a Q Capture program while a target table is being
loaded. The Q Apply program creates these dynamic queues during the loading
process based on your model queue definition, and then deletes them. The spill
queue must have a specific name, IBMQREP.SPILL.MODELQ.
The Q Capture and Q Apply programs must know about the WebSphere MQ
objects that you create. This is done when you create the control tables, and when
you create replication queue maps.
For details about the required MQ object settings for the MQ queues, refer to the
DB2 UDB Replication and Event Publishing Guide or to page 56 of the Q Replication
Guide Guide
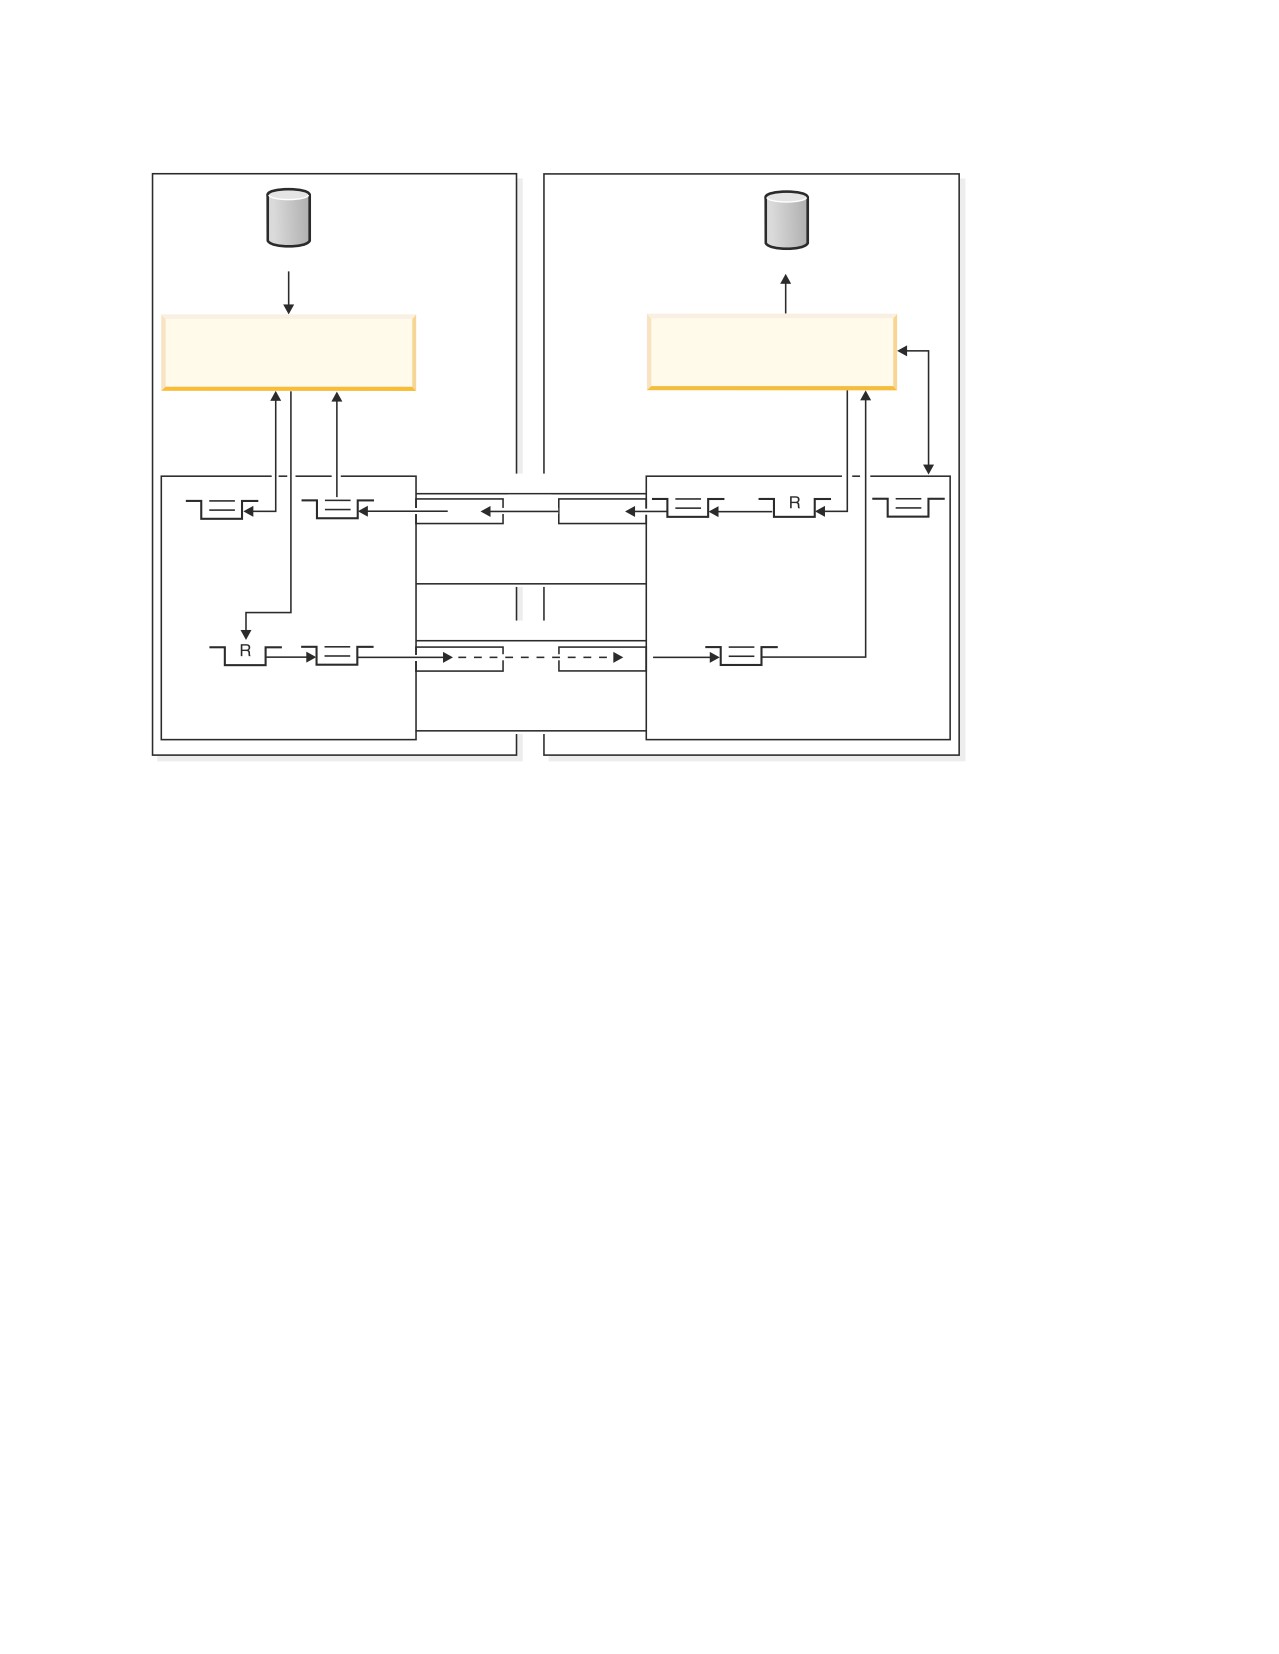
For a VSE replication environment, the following diagram depicts the source and
target systems. There is a queue manager at both ends and queues are residing at
both ends.
2
DB2 DataPropagator Q Capture Supplement
IBM Confidential
Source system
Target system
DB2 VSE
DB2 UDB
Q Capture
Q Apply
Source Queue
Target Queue
Manager
Manager
Target to source
restart
Administration
target
remote
spill
Channel
Channel
queue
queue
transmission
administration
queue
source
target to
queue
queue
from target
source
Source to target
remote
Source
receive
Channel
Channel
send
transmission
queue
source
target from
queue
queue
to target
source
Figure 1. VSE replication environment with source and target systems
Chapter 1. Introduction to DB2 DataPropagator Q Capture on VSE and VM
3
IBM Confidential
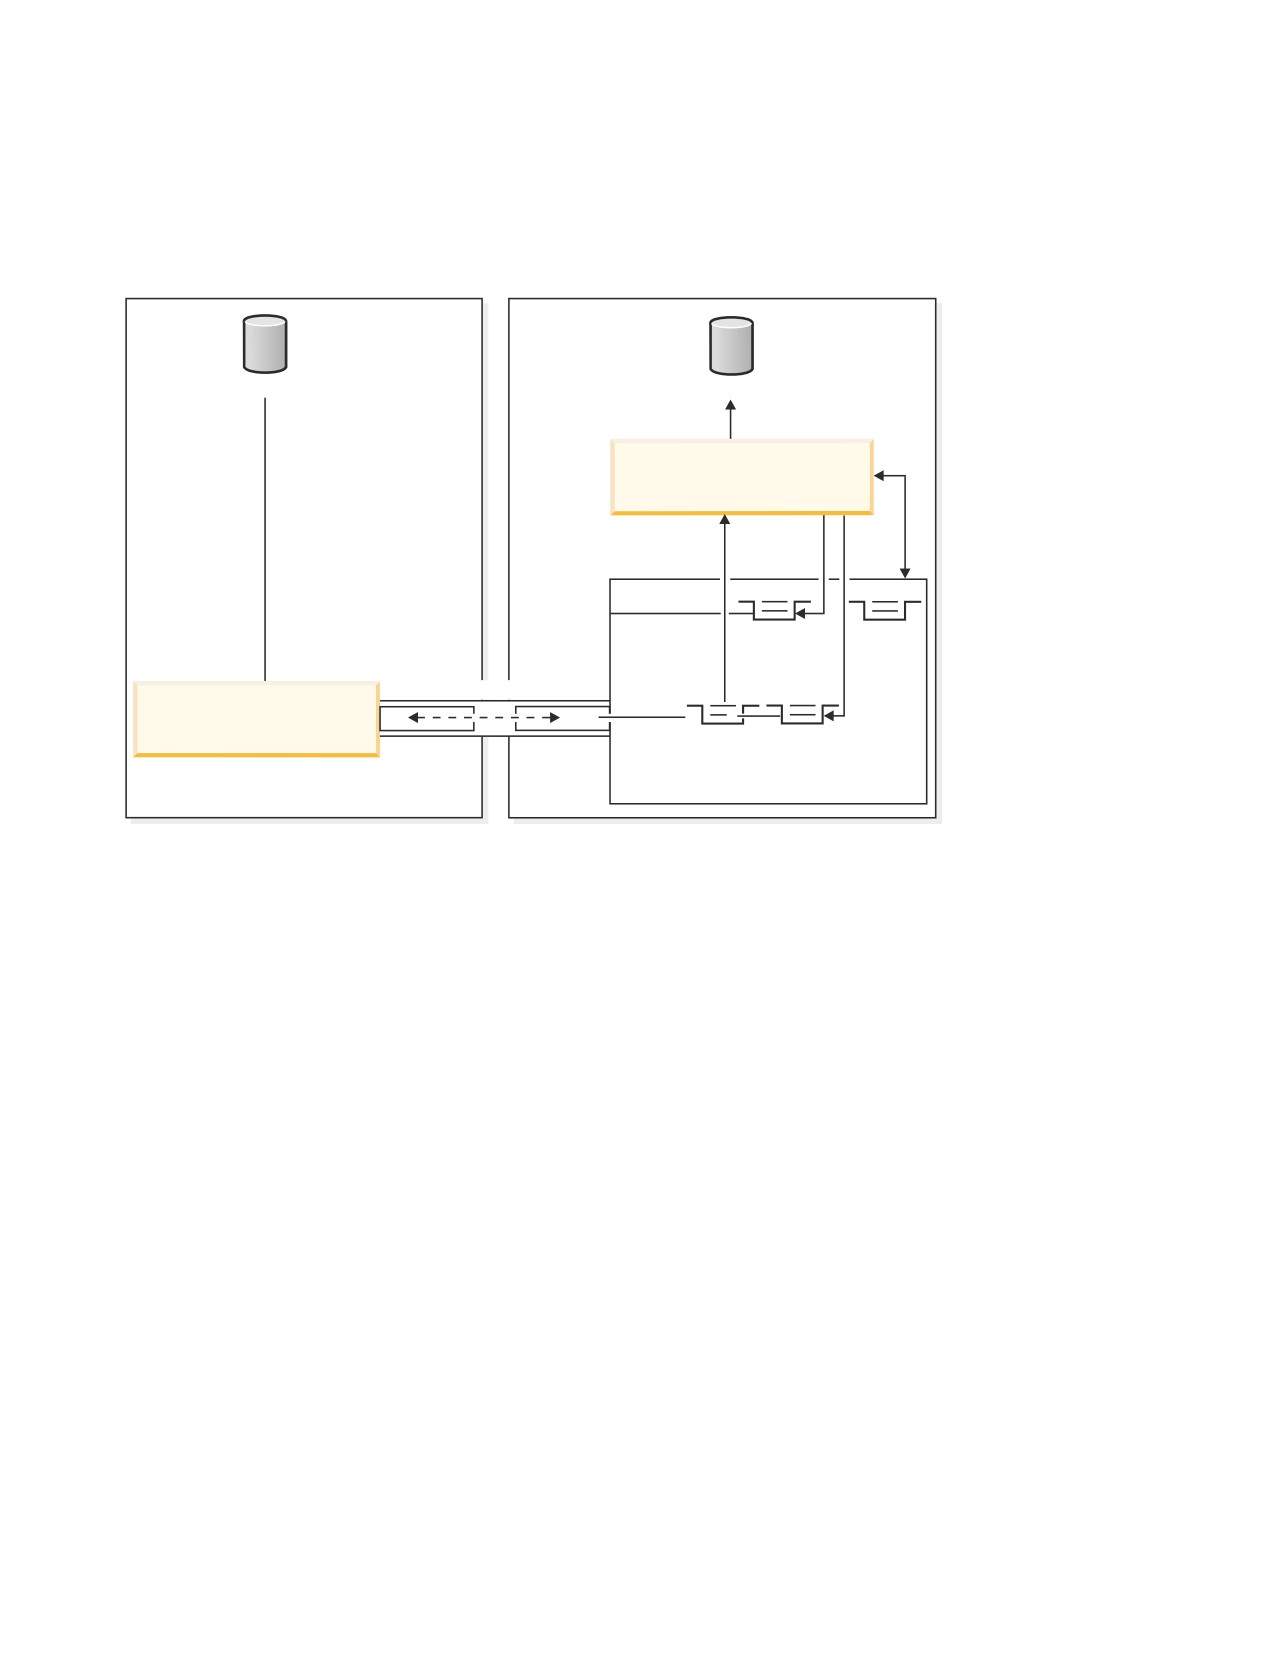
For a VM replication environment, the following diagram depicts the source and
target systems. Note that there is a Q manager only on the target side and there is
a two-way channel with queues residing on the target side. The receive queue is
both a receive queue and a send queue.
Source system
Target system
DB2 VM
DB2 UDB
Q Apply
Target Queue
Manager
administration
spill
queue
queue
Source to target
Q Capture
receive
restart
Channel
Channel
queue
queue
source
target
to target
from source
Figure 2. VM replication environment with source and target systems
4
DB2 DataPropagator Q Capture Supplement
IBM Confidential
Chapter 2. Setting up the Q Capture program on VM
Overview
This chapter describes the steps required to set up Q Capture on VM. The VM
setup only requires one command to be executed on the VM machine and two
directory statements to be updated. In addition to the VM setup, the control tables
must be set up and the Q subscriptions created.
MQ setup for VM
There is only an MQ client available for VM. In order for the Q Capture program
to connect to the MQ queue manager residing on another system, the following
statement must be executed:
GLOBALV SELECT CENV SETLP MQSERVER <channel name>/TCP/<server
address(port)>
where:
channel name
is the name of the WebSpere MQ channel
server address
is the IP address of the MQ server that the client must connect to
port
is the TCP/IP port used to communicate with the MQ server
The queues that must be created on the remote MQ Server are shown in the
following list:
v Send queue Used as both the send and receive queues because there is no
queue manager on VM. The Usage property of this queue should be set to
Normal.
v Admin queue Used by the Q Apply program to put control messages for Q
Capture. The Usage property must be set to Normal.
v Restart queue Used by Q Capture to read the point where it should start
reading in the DB2 log. Usage must be set to Normal.
The channel that must be created is:
v Server connection type channel (SVRCONN)
VM setup
Q Capture on VM and VSE makes use of dataspaces to store the log records that
the Capture program reads and must capture. The log records are stored in the
dataspaces until an MQ Commit occurs. In order to allow the VM computer where
Q Capture is running to use dataspaces, the following statements must be added to
the VM directory:
XCONFIG ACCESSLIST ALSIZE alecount
where alecount is the number of dataspaces that can be accessed at one time.
5
IBM Confidential
XCONFIG ADDRSPACE MAXNUMBER nnnnn TOTSIZE nnnnG
authorizes the computer to create and delete up to nnnnn dataspaces where the
total size of all dataspaces cannot exceed nnnnG (gigabytes)
The Q Capture program will create one dataspace at initialization, and will create
additional ones as they are needed. The size of the dataspace is determined by the
MEMORY_LIMIT parameter. This parameter and others are explained in more
detail later.
It is up to the user to decide the maximum number and the size of dataspaces that
can be created on the VM computer where Q Capture will run. This depends on
the size of data that has not been committed by MQ and must be stored on the
dataspace. It also depends on the number of active subscriptions.
Setting up replication from sources to targets
In addition to seting up replication on the VM computer, setup must be done from
the Replication Center for unidirectional replication. This setup includes the
following steps:
v Create control tables
v Create Q subscriptions
Refer to Chapter 8 and 9 of the DB2 UDB Replication and Event Publishing Guide for
information on how to perform this setup. Keep the following items in mind:
v Event publishing is not supported.
v Search conditions to filter rows is not supported.
v The send and receive queues must be the same on VM.
6
DB2 DataPropagator Q Capture Supplement
IBM Confidential
Chapter 3. Setting up the Q Capture program on VSE
Overview
This chapter describes the steps required to set up Q Capture on VSE. The VSE
setup is performed through the MQMT transaction which invokes MQ
configuration. This chapter explains the areas of setup required for the MQ objects
and communications. Setup for MQ objects includes queues, channels, and the
queue manager. In addition to the VSE setup, the control tables must be set up and
the Q subscriptions created.
MQ Setup for VSE
MQ VSE APAR PQ88102 is required to run Q Capture for VSE. The Q Capture
program uses the MQ Series Batch Interface. Before starting the Q Capture
program, the batch interface must be started. It can be configured to start
automatically when MQ Series is started. The Capture JCL must contain the name
of the MQ Batch Interface.
Refer to the MQ Series for VSE documentation for details on how to set up the
batch interface. Some information is provided here as a guide.
The MQMT transaction is used to start MQ configuration. The following four areas
must be defined:
v
Queue manager:
When defining the queue manager, the queue manager name is used to define
the subscriptions when setting up replication.
v
Communications:
The TCP/IP listener port must be defined here. This port is used when
configuring other MQ servers to communicate with this server.
The Batch Interface Identifer is used when starting Q Capture for VSE and is
specified in the JCL. You can set the Batch Interface auto-start field to Y to have
the batch interface automatically start when MQ Series is started. If you prefer to
start the batch interface manually, the MQBI transaction can be used.
v
Queues:
The following queues must be set up for unidirectional Q Capture from VSE:
- Local restart queue
(VSE system)
The Q Capture program uses this queue to store restart information. This
queue contains a single message that tells the Q Capture program where to
start reading the DB2 log when Q Capture restarts. The Q Apply program
does not use this queue.
The following fields should be filled in as follows:
Put Enabled = Y
Get Enabled = Y
Automatic reorganization of the VSAM file is recommended. (Automatic
Reorganize=Y). To be able to enable automatic reorganization, only one queue
can be defined per VSAM file.
7
IBM Confidential
Other fields should be set as follows:
Type=Local
Usage=N (for normal)
Triggering Enabled=N (no trigger)
-
Local administration queue
(VSE side)
The Q Apply program will put messages onto its local administration queue.
It is used to send control messages to the Q Capture program.
The following fields should be filled in as follows:
Put Enabled=Y
Get Enabled=Y
Automatic reorganization of the VSAM file is recommended. (Automatic
Reorganize=Y). To be able to enable automatic reorganization, only one queue
can be defined per VSAM file.
Other fields should be set as follows:
Type=Local
Usage=N (for normal)
Triggering Enabled=N (no trigger)
A receive channel must be configured between the remote systems for the
administration queue.
-
Remote send queue
(VSE side)
The Q Capture program puts source data and informational messages onto
the remote send queue to be read by the Q Apply program. A local
transmission queue and a send channel are required for the messages to be
transmitted to the remote target queue manager.
The following fields must be filled in:
Put Enabled=Y
Get Enabled=Y or N
Does not necessarily need to be set to Y
Remote Queue Name = name of a local receive queue on the remote target
MQ Series server.
Remote Queue Manager Name = name of the MQ Series queue manager on
the remote target server
Transmission Queue Name = name of local transmission queue
-
Local transmission queue for the remote send queue
(VSE Side)
A sender channel is required for the local transmission queue.
The following fields must be filled in:
Put Enabled = Y
Default Inbound Status = A (active)
Default Outbound Status = A (active)
Type = Local
Usage = T (transmission)
Triggering section:
Enabled = Y
Program Id = MQPSEND
Type = E for Every or F for First
There are some side effects that make trigger type F seem better than E. With
E, you will see messages indicating that the channel is busy frequently. This is
not a problem, but it may cause confusion. These messages go away if trigger
type is set to F.
8
DB2
DataPropagator Q Capture Supplement