Kia Niro Hybrid / Plug-in Hybrid (2022 year). Manual in english - page 3
Safety features of your vehicle
•
ONLY use your mobile device
Control your speed
Keep your vehicle in safe con-
when allowed by laws and when
dition
Excessive speed is a major factor in
conditions permit safe use. NEVER
crash injuries and deaths. Generally,
Having a tire blowout or a mechani-
text or email while driving. Most
the higher the speed, the greater the
cal failure can be extremely haz-
states have laws prohibiting drivers
risk, but serious injuries can also
ardous. To reduce the possibility of
from texting. Some states and
occur at lower speeds. Never drive
such problems, check your tire pres-
cities also prohibit drivers from
faster than is safe for current condi-
sures and condition frequently, and
using handheld phones.
tions, regardless of the maximum
perform all regularly scheduled
•
NEVER let the use of a mobile
speed posted.
maintenance.
device distract you from driving.
You have a responsibility to your
passengers and others on the road
to always drive safely, with your
hands on the wheel as well as your
eyes and attention on the road.
3
3
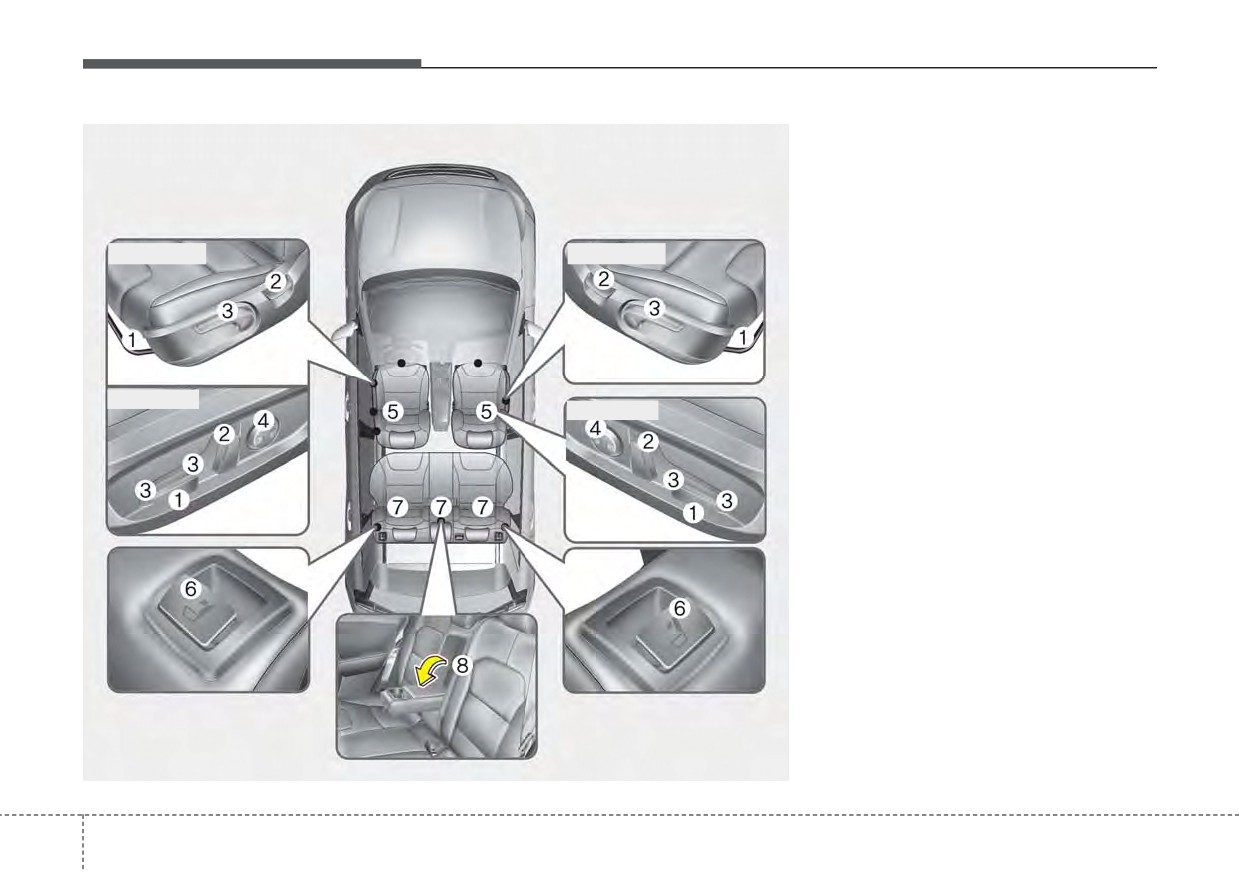
Safety features of your vehicle
SEAT
Front seat
(1) Forward and backward
(2) Seatback angle
(3) Seat cushion height
(4) Lumbar support
■ Manual seat
■ Manual seat
(5) Head rest
Rear seat
(6) Seatback folding
(7) Headrest
■ Power seat
■ Power seat
(8) Armrest
ODEP030001N
3
4
Safety features of your vehicle
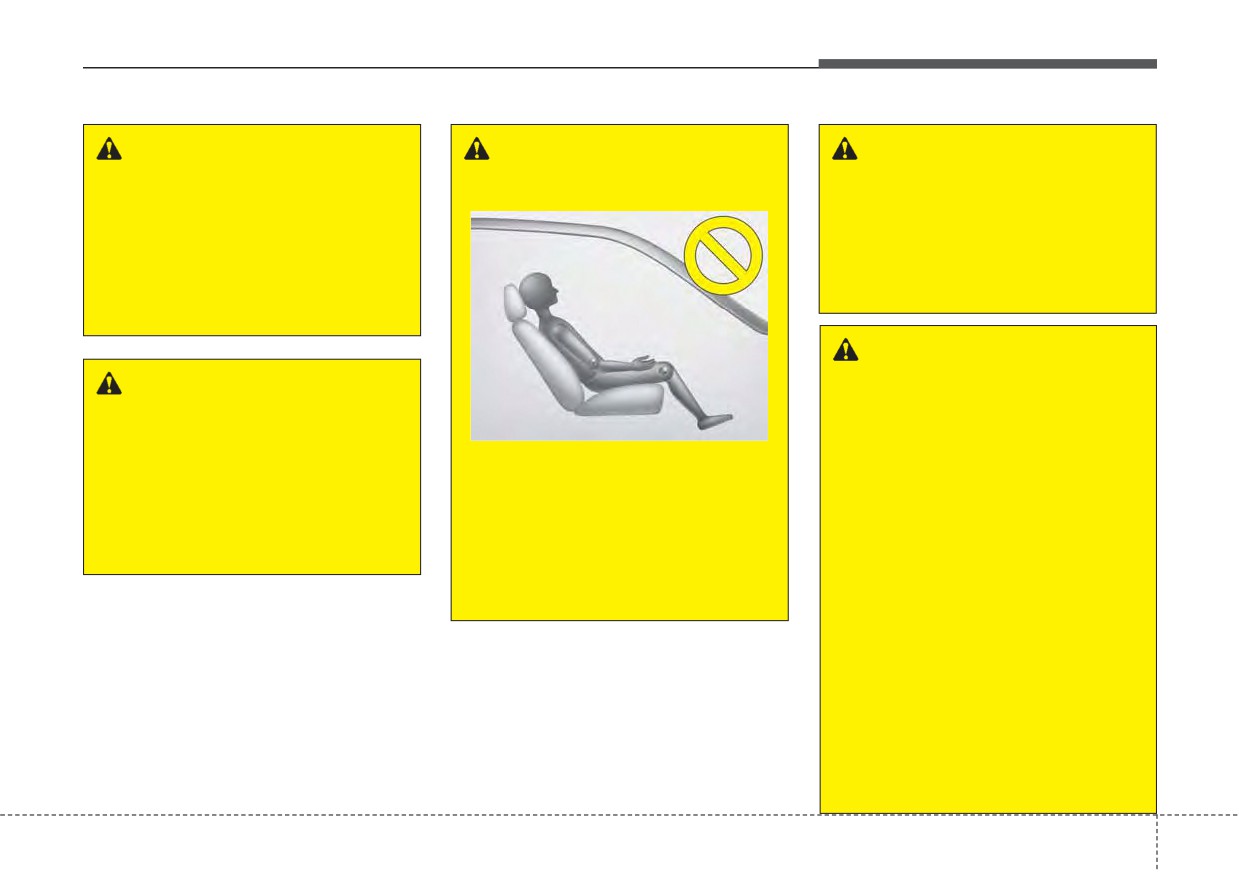
WARNING - Loose
WARNING - Driver respon-
WARNING - Seat cushion
objects
sibility for passengers
Occupants should never sit on
Do not place anything in the dri-
aftermarket seat cushions or sit-
ver's foot well or under the front
ting cushions. The passenger's
seats. Loose objects in the dri-
hips may slide under the lap por-
ver's foot area could interfere
tion of the seat belt during an
with the operation of the foot
accident or a sudden stop.
pedals.
WARNING - Driver’s seat
WARNING - Uprighting
•
Never attempt to adjust the
seat while the vehicle is mov-
seat
1KMN3662
ing. This could result in loss
Do not press the release lever on
of control of your vehicle.
a manual seatback without hold-
The driver must advise the pas-
•
Do not allow anything to inter-
ing and controlling the seatback.
sengers to keep the seatback in
fere with the normal position
The seatback will spring upright,
an upright position whenever
of the seatback. Storing items
possibly impacting you or other
the vehicle is in motion. If a seat
against the seatback could
passengers.
is reclined during an accident,
result in serious or fatal injury
the restraint system's ability to
in a sudden stop or collision.
restrain will be greatly reduced.
•
Sit as far back as possible from
the steering wheel while still
maintaining comfortable control
of the your vehicle. A distance of
at least 10 inch or inches (25 cm)
from your chest to the steering
wheel is recommended. Failure
to do so can result in air bag
inflation injuries to the driver.
3
5
Safety features of your vehicle
Feature of Seat Leather
WARNING - Rear seatbacks
WARNING - Seat
•
Leather is made from the outer
Always lock the rear seatback
adjustment
skin of an animal, which goes
before driving. Failure to do so
•
Do not adjust the seat while
through a special process to be
could result in passengers or
wearing seat belts. Moving the
available for use. Since it is a nat-
objects being thrown forward,
seat forward will cause strong
ural substance, each part differs in
injuring vehicle occupants.
pressure on the abdomen.
thickness or density.
•
Do not place your hand near
Wrinkles may appear as a natural
the seat bottom or seat track
result of stretching and shrinking
while adjusting the seat. Your
depending on the temperature and
WARNING - Unexpected
hand could get caught in the
humidity.
Seat Movement
seat mechanism.
•
The seat cover is made of stretch-
After adjusting a manual seat,
able material to improve comfort of
always check that it is locked by
passengers.
shifting your weight to the front
and back. Sudden or unexpect-
WARNING - Small
•
The parts contacting the body are
ed movement of the driver's
Objects
curved and the side supporting
seat could cause you to lose
Use extreme caution when pick-
area is high which provides driving
control of the vehicle.
ing up small objects trapped
comfort and stability.
under the seats or between the
•
Wrinkles may appear naturally
seat and the center console.
from usage. It is not a fault of the
Your hands might be cut or
product.
injured by the sharp edges of
the seats mechanism.
3
6
Safety features of your vehicle
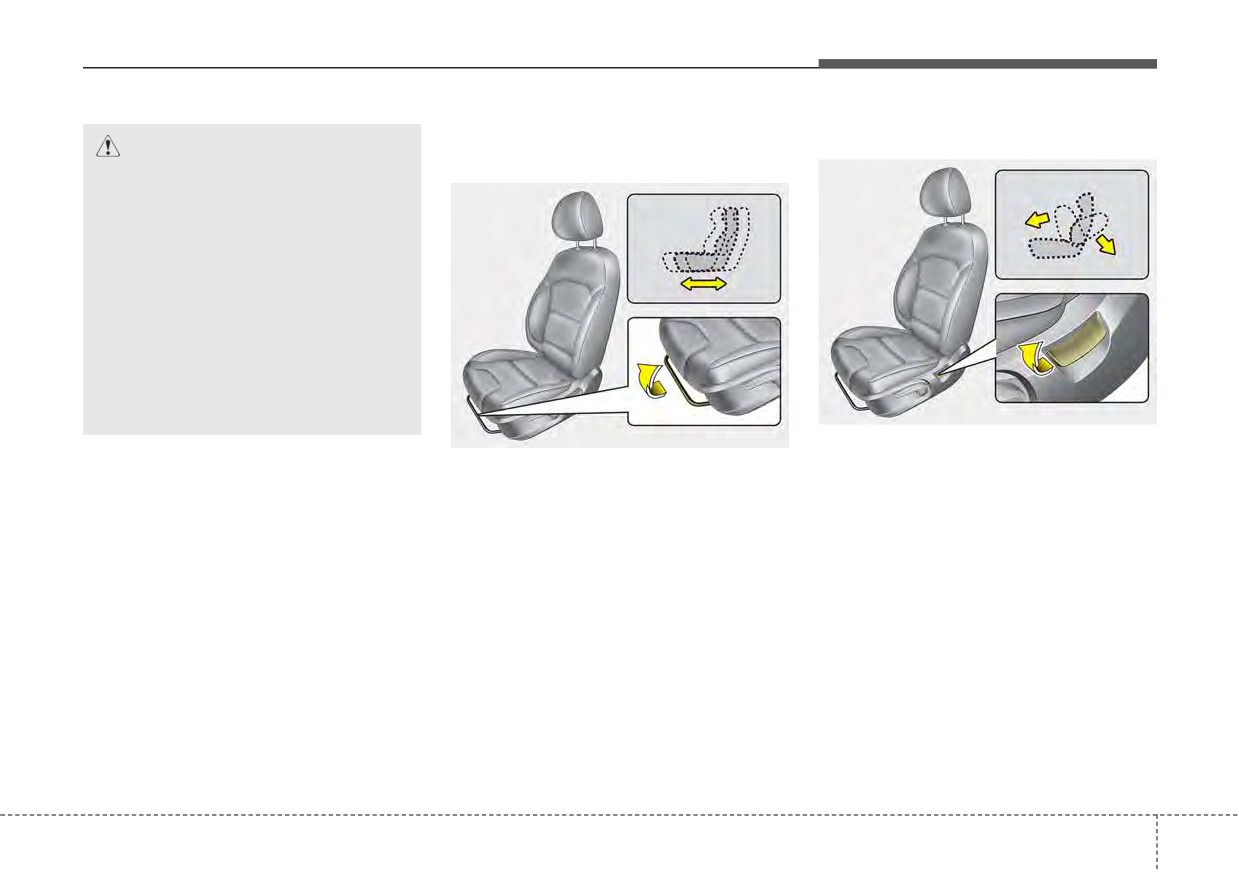
Front seat adjustment - manual
Seatback angle
CAUTION
Forward and backward
• Belts with metallic acces-
sories, zippers or keys inside
the back pocket may damage
the seat fabric.
• Make sure not to wet the seat.
It may change the nature of
natural leather.
• Jeans or clothes which could
bleach may contaminate the
surface of the seat covering
fabric.
ODEP039105N
ODEP030062N
To recline the seatback:
✽ NOTICE
To move the seat forward or backward:
1. Lean forward slightly and lift up the
seatback recline lever.
Wrinkles or abrasions which appear
1. Pull the seat slide adjustment
2. Carefully lean back on the seat
naturally from usage are not cov-
lever up and hold it.
and adjust the seatback of the
ered by warranty.
2. Slide the seat to the position you
seat to the position you desire.
desire.
3. Release the lever and make sure
3. Release the lever and make sure
the seat is locked in place.
the seatback is locked in place. (The
Adjust the seat before driving, and
lever MUST return to its original
make sure the seat is locked securely
position for the seatback to lock.)
by trying to move forward and back-
ward without using the lever. If the
seat moves, it is not locked properly.
3
7
Safety features of your vehicle
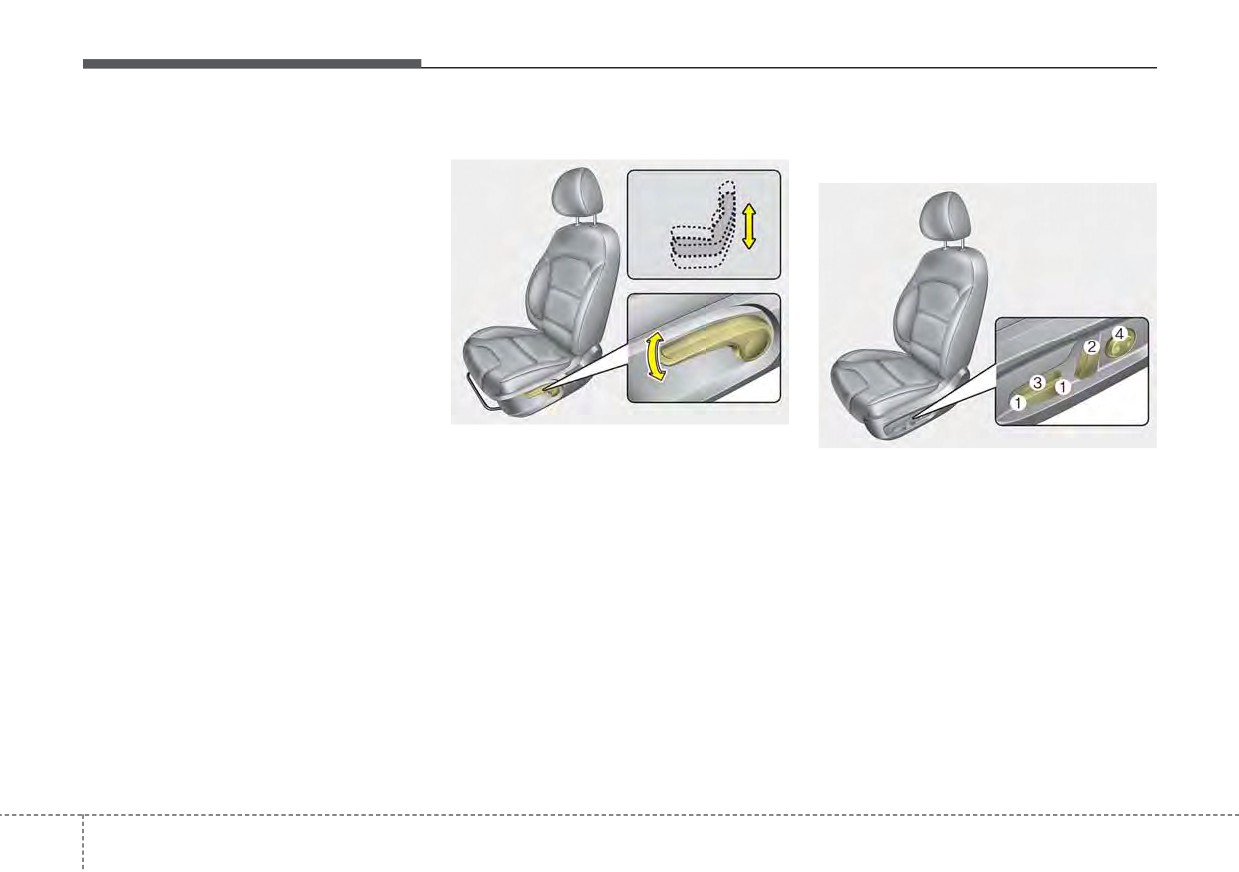
Reclining seatback
Seat height
Front seat adjustment - power
Sitting in a reclined position when
(if equipped)
the vehicle is in motion can be dan-
gerous. Even when buckled up, the
protections of your restraint system
(seat belts and/or air bags) is greatly
reduced by reclining your seatback.
Seat belts must be snug against your
hips and chest to work properly.
When the seatback is reclined, the
shoulder belt cannot do its job
because it will not be snug against
your chest. Instead, it will be in front
ODEP039106N
of you. During an accident, you could
ODEP039061
To change the height of the seat, push
be thrown into the seat belt, causing
neck or other injuries.
the lever upwards or downwards.
The front seat can be adjusted by
• To lower the seat cushion, push the
using the control switches located on
The more the seatback is reclined,
lever down several times.
the outside of the seat cushion.
the greater chance the passenger’s
Before driving, adjust the seat to the
hips will slide under the lap belt or
• To raise the seat cushion, pull the
proper position so you can easily
the passenger’s neck will strike the
lever up several times.
control the steering wheel, pedals
shoulder belt.
and switches on the instrument
panel.
3
8
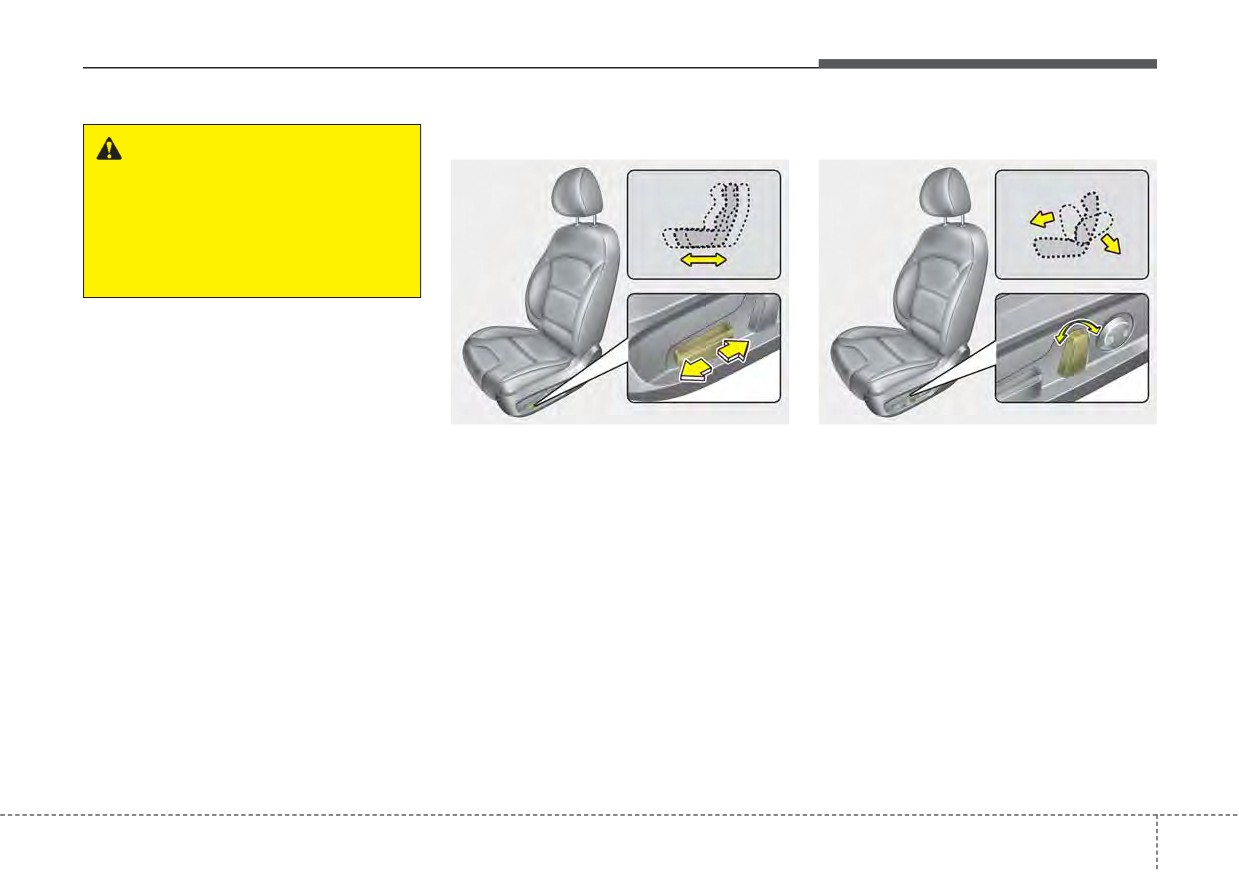
Safety features of your vehicle
Forward and backward
Seatback angle
WARNING - Unattended
children
Do not leave children unattend-
ed in the vehicle. Children might
operate features of the vehicle
that could injure them.
ODEP039107N
ODEP039108N
To move the seat forward or back-
To recline the seatback:
ward:
1. Push the control switch forward or
1. Push the control switch forward or
rearward to move the seatback to
rearward to move the seat to the
the desired angle.
desired position.
2. Release the switch once the seat
2. Release the switch once the seat
reaches the desired position
reaches the desired position.
3
9
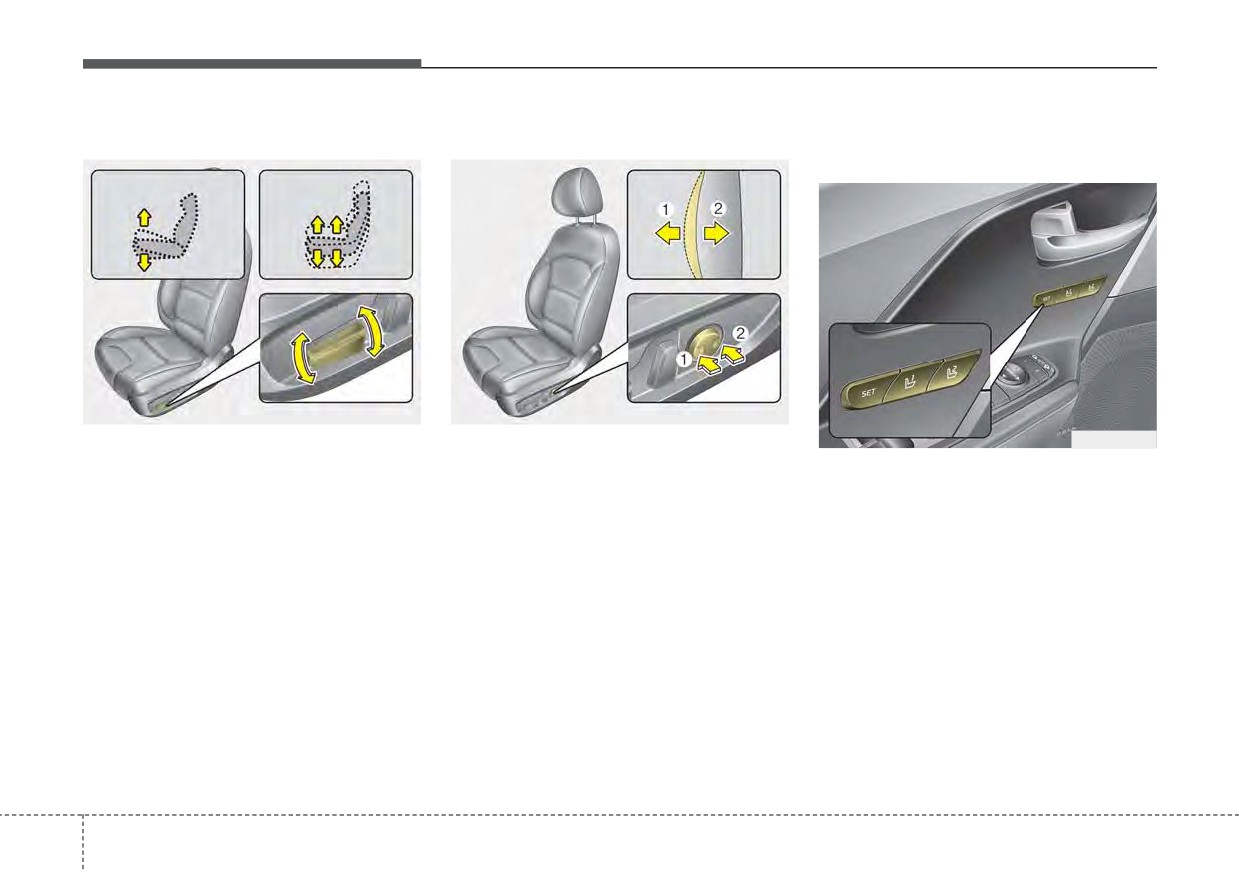
Safety features of your vehicle
Seat cushion height
Lumbar support
Driver position memory system
(if equipped, for power seat)
ODEP039109N
ODEP039110N
To change the height of the seat:
The lumbar support can be adjusted
ODE036023
1. Pull the front portion of the control
by pressing the lumbar support
A driver position memory system is
switch on the side of the seat.
switch up to raise or press down to
provided to store and recall the driv-
lower the front part of the seat
1. Press the front portion of the
er seat and outside rearview mirror
cushion. Pull the rear portion of
switch to increase support, or the
position with a simple button opera-
the control switch up to raise or
rear portion of the switch, to
tion. By saving the desired position
press down to lower the seat cush-
decrease support.
into the system memory, different
ion.
drivers can reposition the driver seat
2. Release the switch once it reach-
based upon their driving preference.
2. Release the switch once the seat
es the desired position.
If the battery is disconnected, the
reaches the desired position.
desired seat position memory will
need to be re-saved.
3
10
Safety features of your vehicle
Storing positions into memory
Recalling positions from memory
WARNING - Driver
using the buttons on the door
1. Shift the shift lever into P.
Position Memory System
Storing driver’s seat positions
2. To recall the position in the memo-
Never attempt to operate the
1. Shift the shift lever into P while the
ry, press the desired memory but-
driver position memory system
engine start/stop button is ON or
ton (1 or 2). The system will beep
while the vehicle is moving.
ignition switch is ON.
once, then the driver’s seat will
This could result in loss of con-
automatically adjust to the stored
2. Adjust the driver’s seat and out-
trol, and an accident
causing
position.
side rearview mirror comfortable
death or serious injury.
for the driver.
Adjusting the control switch for the
driver’s seat while the system is
3. Press SET button on the control
recalling the stored position will
panel. The system will beep once.
cause the movement to stop and
4. Press one of the memory buttons
move in the direction that the control
(1 or
2) within
4 seconds after
switch is moved.
pressing the SET button. The sys-
tem will beep twice when memory
has been successfully stored.
When recalling an adjustment mem-
ory button while sitting in the vehicle,
you can be surprised by the setting
chosen if the memory has been
adjusted by someone else. If that
occurs, immediately push the seat
position control knob in the direction
of the desired position to stop further
undesired movement.
3
11
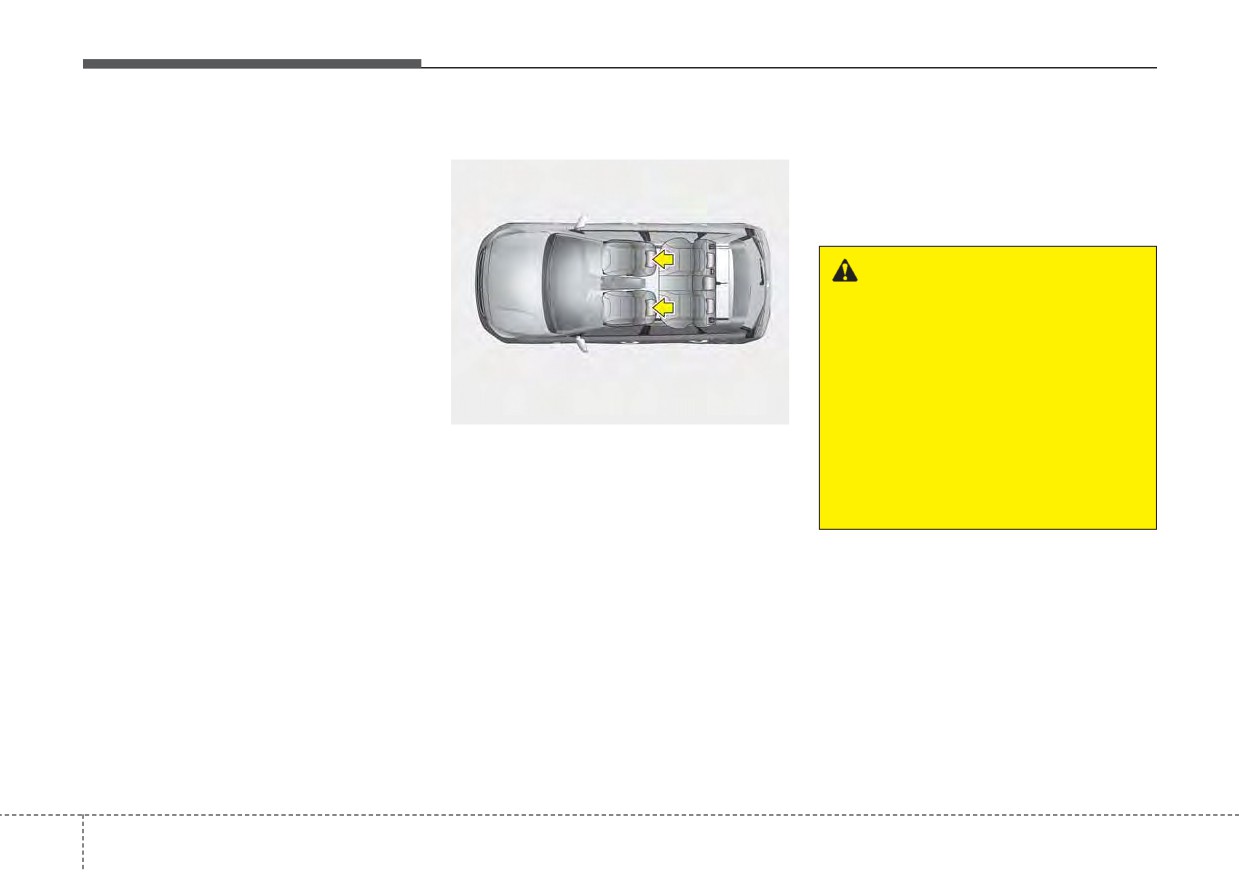
Safety features of your vehicle
Easy access function (if equipped)
Headrest (for front seat)
Also, adjust the headrest as close to
The system will move the driver's
your head as possible. For this rea-
seat automatically as follows:
son, the use of a cushion that holds
the body away from the seatback is
•
Without smart key system
not recommended.
- It will move the driver’s seat rear-
ward when the ignition key is
removed and front driver’s door is
WARNING - Headrest
opened.
removal/adjustment
- It will move the driver’s seat forward
•
Do not operate the vehicle
when the ignition key is inserted.
with the headrests removed.
Headrests can provide critical
• With smart key system
neck and head support in a
- It will move the driver’s seat rear-
ODE036074L
crash.
ward when the engine start/stop
•
Do not adjust the headrest
button is changed to the OFF
The driver's and front passenger's
height while the vehicle is in
position.
seats are equipped with a headrest
motion. Driver may lose con-
for the occupant's safety and comfort.
- It will move the driver’s seat for-
trol of the vehicle.
ward when the engine start/stop
The headrest not only provides com-
button is changed to the ACC or
fort for the driver and front passenger,
START position.
but also helps protect the head and
neck in the event of a rear collision.
- It will move the driver's seat for-
ward when you get in your vehicle
For maximum effectiveness in case
with the smart key after closing
of an accident, the headrest should
the driver's door.
be adjusted so the middle of the
headrest is at the same height of the
You can activate or deactivate this
feature. Refer to "User settings" in
center of gravity of an occupant's
head. Generally, the center of gravity
chapter 4.
of most people's head is similar with
the height of the top of their eyes.
3 12
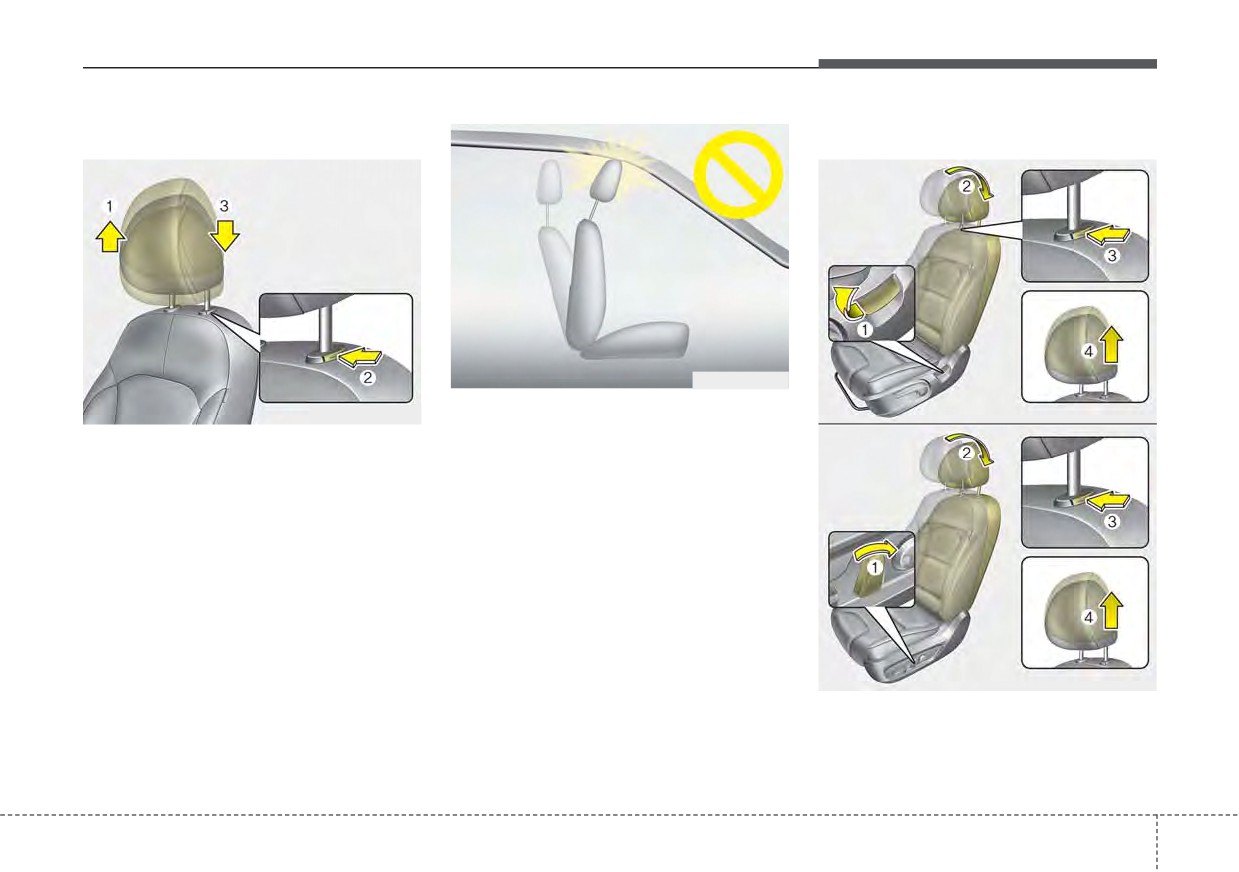
Safety features of your vehicle
Adjusting the height up and down
Removal and reinstallation
■ Type A
OYFH034205
ODEP039009
✽ NOTICE
ODEP039011
If you recline the seatback towards
■ Type B
To raise the headrest, pull it up to the
the front with the headrest and seat
desired position
(1). To lower the
cushion raised, the headrest may
headrest, push and hold the release
come in contact with the sun visor or
button (2) on the headrest support
other parts of the vehicle.
and lower the headrest to the desired
position (3).
ODEP039012
3
13
Safety features of your vehicle
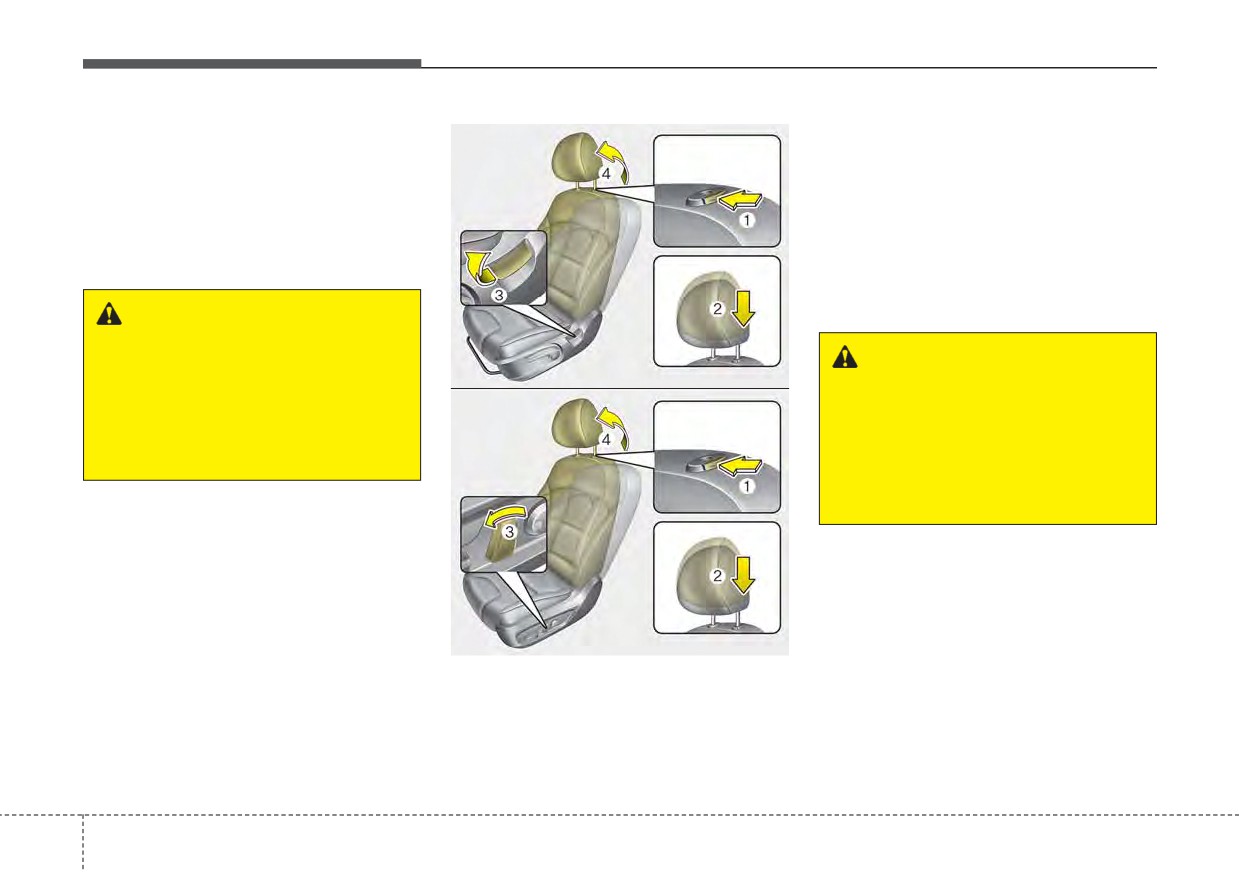
To remove the headrest:
■ Type A
To reinstall the headrest :
1. Recline the seatback (2) with the
1. Put the headrest poles (2) into the
recline lever or switch (1).
holes while pressing the release
button (1).
2. Raise headrest as far as it can go.
2. Recline the seatback (4) with the
3. Press the headrest release button
(3) while pulling the headrest up (4).
recline lever or switch (3).
3. Adjust the headrest to the appro-
priate height.
WARNING - Headrest
Removal
WARNING - Headrest
NEVER allow anyone to ride in a
ODEP039013
Reinstallation
seat with the headrest removed
■ Type B
or reserved. Headrests can pro-
To reduce the risk of injury to
vide critical neck and head sup-
the head or neck, always make
port in a crash.
sure the headrest is locked into
position and adjusted properly
after reinstalling.
ODEP039014
3 14
Safety features of your vehicle
Seatback pocket (if equipped)
Rear seat adjustment
For maximum effectiveness in case
of an accident, the headrest should
Headrest
be adjusted so the middle of the
headrest is at the same height of the
center of gravity of an occupant's
head. Generally, the center of gravity
of most people's heads is similar with
the height as the top of their eyes.
Also, adjust the headrest as close to
your head as possible. For this rea-
son, the use of a cushion that holds
the body away from the seatback is
not recommended.
ODE036015
ODE036075L
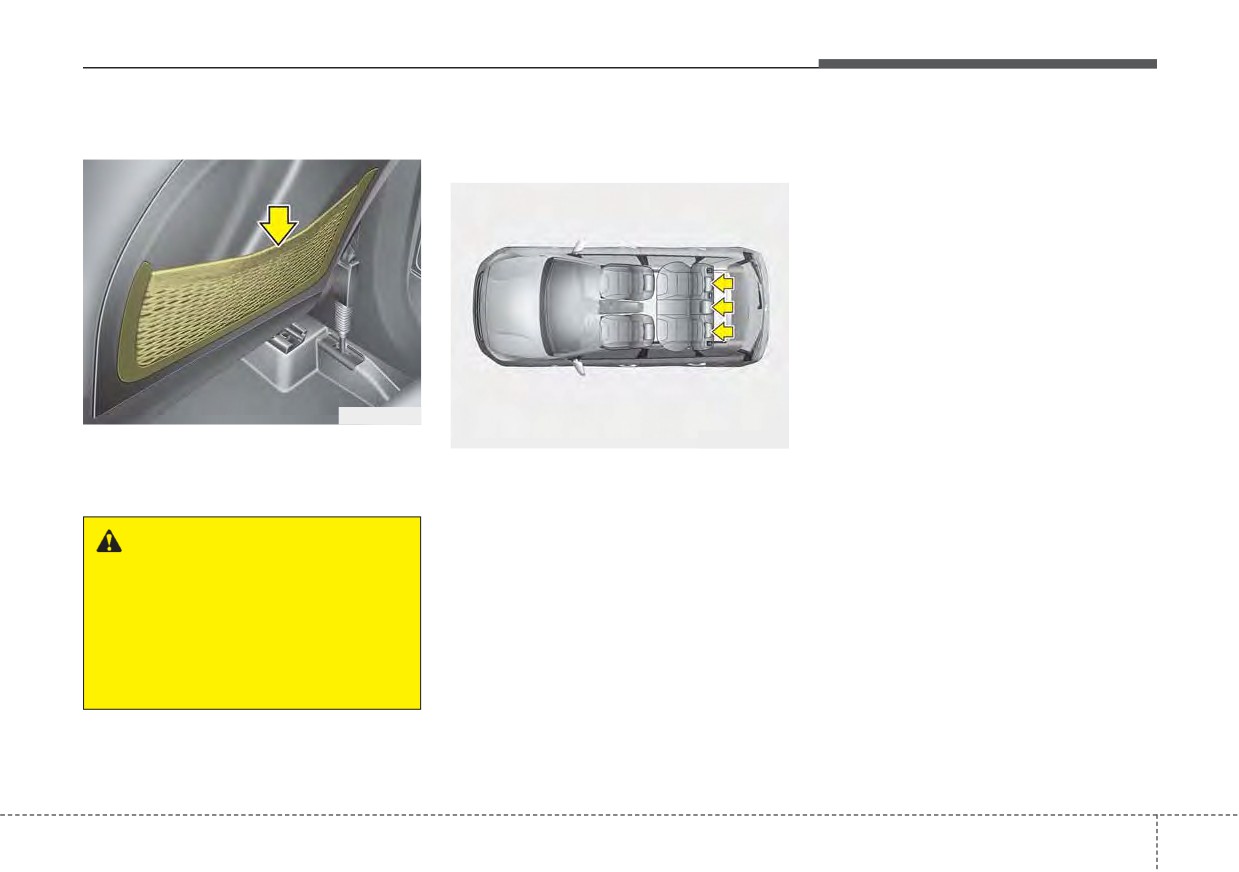
The seatback pocket is provided on
the back of the front passenger’s and
The rear seat is equipped with head-
driver’s seatbacks.
rests in all the seating positions for
the occupant's safety and comfort.
The headrest not only provides com-
WARNING - Seatback
fort for passengers, but also helps
pockets
protect the head and neck in the
Do not put heavy or sharp
event of a collision.
objects in the seatback pockets.
In an accident, they could come
loose from the pocket and
injure vehicle occupants.
3
15
Safety features of your vehicle
Armrest (if equipped)
ODE036016
ODE036017
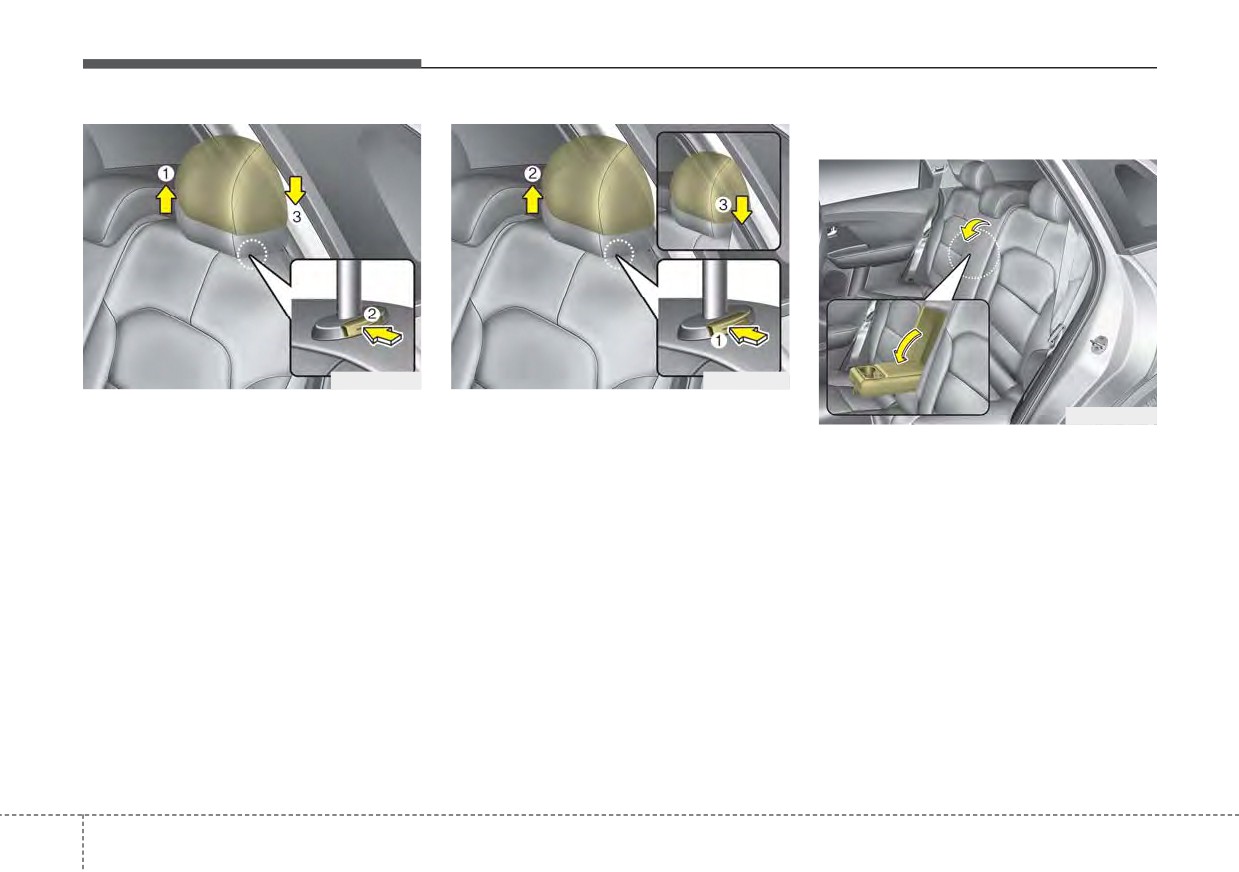
Adjusting the height up and down
Removal and reinstallation
ODE036018
To raise the headrest, pull it up to the
To remove the headrest, raise it as
To use the armrest, pull it forward
desired position
(1). To lower the
far as it can go then press the
from the seatback.
headrest, push and hold the release
release button (1) while pulling the
button (2) on the headrest support
headrest upward (2).
and lower the headrest to the desired
To reinstall the headrest, put the
position (3).
headrest poles
(3) into the holes
while pressing the release button (1).
Then adjust it to the appropriate
height and ensure that it locks in
position.
3
16
Safety features of your vehicle
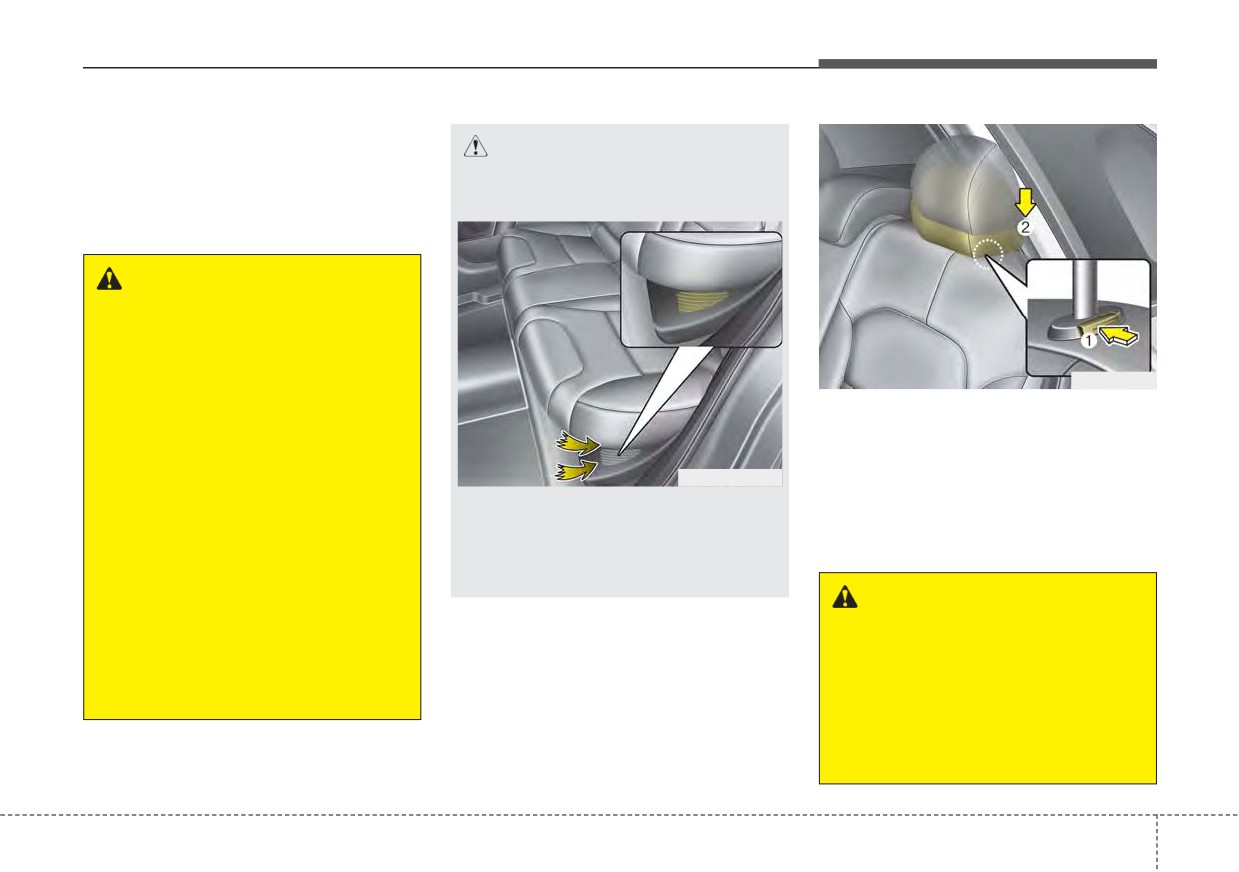
Folding the rear seat
CAUTION
The rear seatbacks may be folded to
- Blocked Hybrid battery
facilitate carrying long items or to
duct
increase the luggage capacity of the
vehicle.
WARNING - Folded
Seatback
The purpose of the fold-down
rear seatbacks is to allow you to
carry longer objects than could
ODE036019
not otherwise be accommodated.
To fold down the rear seatback
•
Never allow a passenger to sit
1. Set the front seatback to the
on top of the folded down
upright position and if necessary,
seatback while the car is mov-
ODEQ016007
slide the front seat forward.
ing. This is not a proper seat-
Do not put objects on the left
2. Lower the rear headrests to the
ing position since no seat
side of rear seats. This could
lowest position as above the pic-
belts are available for use.
block the battery cooling duct
ture.
• To reduce the risk of injury
causing battery degradation.
caused by sliding cargo within
WARNING - Objects
the passenger compartment
of the vehicle, objects carried
Objects carried on the folded
on the folded down seatback
down seatback should not
should not extend higher than
extend higher than the top of
the top of the front seats.
the front seatbacks. This could
allow cargo to slide forward and
cause injury or damage during
sudden stops.
3 17
Safety features of your vehicle
ODE036029L
ODEP039021N
ODEP039022N
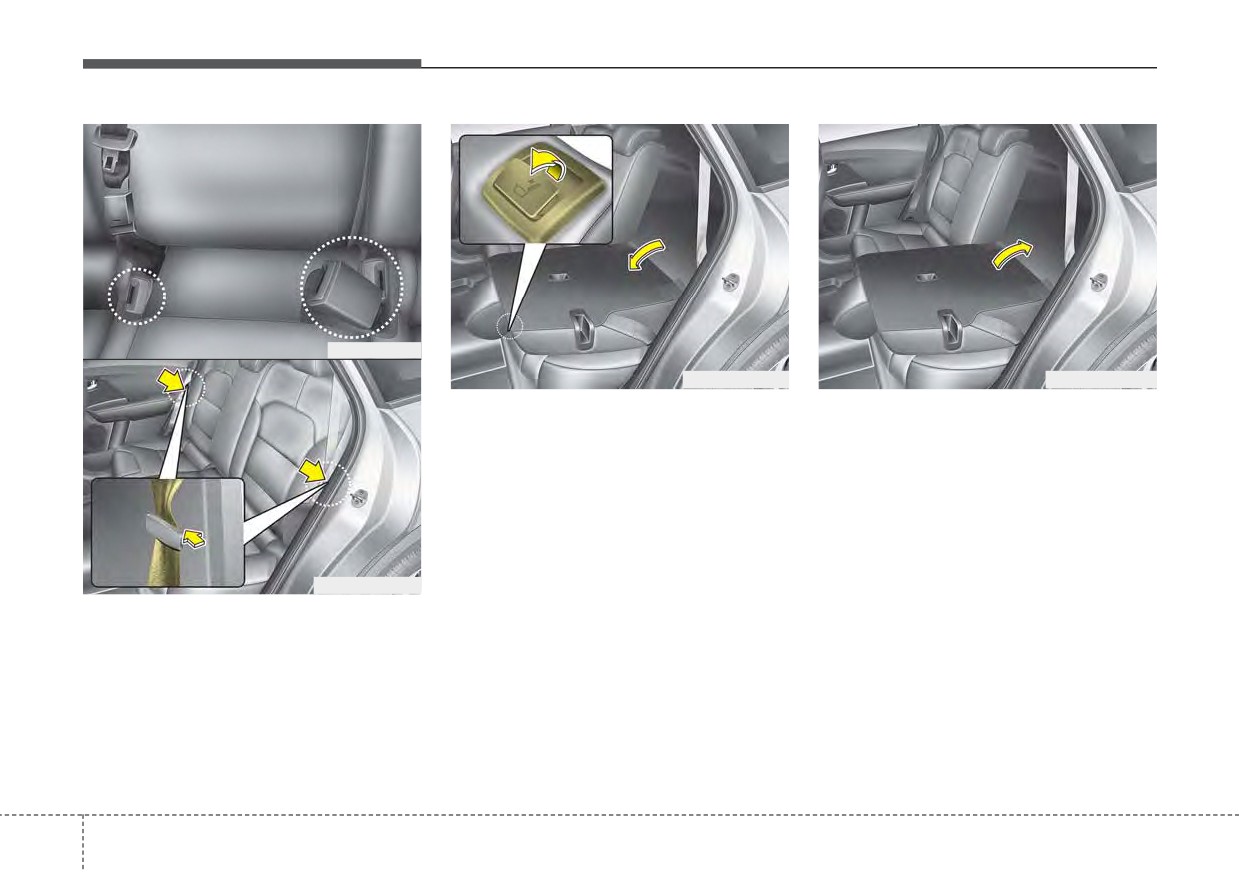
4. Pull on the seatback folding lever,
5. To use the rear seat, lift and pull the
then fold the seat toward the front
seatback backward by lifting up
of the vehicle. When you return the
seat back. Pull the seatback firmly
seatback to its upright position,
until it clicks into place. Make sure
always be sure it has locked into
the seatback is locked in place.
position by pushing on the top of
6. Return the rear seat belt to the
the seatback.
proper position.
ODEP039020N
3. When folding the seat back, insert
the rear seat belt buckle in the
pocket between the rear seatback
and cushion then make sure both
seatbelts do not interfere with
stowed luggage and cargo. Then
insert the seat belt into the two
webbing guide (or holder) located
on both sides.
3
18
Safety features of your vehicle
WARNING - Uprighting
WARNING - Rear
CAUTION - Damaging
seat
Seatback
rear seat belt buckles
When you return the seatback
To ensure maximum protection
When you fold the rear seat-
to its upright position, hold the
in the event of an accident or
back, insert the buckle between
seatback and return it slowly. If
sudden stop, when returning the
the rear seatback and cushion.
the seatback is returned with-
rear seat to the upright position:
Doing so can prevent the buckle
out holding it, the back of the
from being damaged by the rear
• Be careful not to damage the
seat could spring forward,
seatback.
seat belt webbing or buckle.
resulting in injury caused by
• Do not allow the seat belt
being struck by the seatback.
webbing or buckle to become
When returning the rear seatbacks to
pinched or caught in the rear
the upright position, remember to
seat.
return the rear shoulder belts to their
• Ensure the seatback is com-
proper position.
pletely locked into its upright
position by pushing on the
top of the seatback.
Failure to adhere to any of
these instructions could
result in serious injury or
death in the event of a crash.
3
19
Safety features of your vehicle
WARNING - Cargo
Cargo should always be
secured to prevent it from being
thrown about the vehicle in a
collision and causing injury to
the vehicle occupants. Do not
place objects on the rear seats,
since they cannot be properly
secured and may hit the front
seat occupants in a collision.
WARNING - Cargo loading
Make sure the engine is off, the
dual clutch transmission is in P
(Park) and the parking brake is
securely applied whenever load-
ing or unloading cargo. Failure
to take these steps may allow
the vehicle to move if the shift
lever is inadvertently moved to
another position.
3
20
Safety features of your vehicle
SEAT BELTS
Seat belt restraint system
Seat belts are designed to bear upon
WARNING - Shoulder Belt
the bony structure of the body, and
• For maximum restraint system pro-
should be worn low across the front
tection, the seat belts must always
•
Never wear the shoulder belt
under your arm or behind
of the pelvis, chest and shoulders, as
be used whenever the vehicle is
applicable; wearing the lap section of
moving. A properly positioned
your back. An improperly
positioned shoulder belt can-
the belt across the abdominal area
shoulder belt should be positioned
must be avoided.
midway over your shoulder across
not protect the occupant in a
crash.
Seat belts should be adjusted as
your collarbone.
firmly as possible, consistent with
• Never allow children to ride in the
•
Always wear both the shoul-
der portion and lap portion of
comfort, to provide the protection for
front passenger seat. See child
which they have been designed.
restraint system section for further
the lap/shoulder belt.
discussion.
A slack belt will greatly reduce the
protection afforded to the wearer.
WARNING - Damaged
Care should be taken to avoid con-
WARNING - Twisted seat
seat belt
tamination of the webbing with pol-
belt
ishes, oils and chemicals, and partic-
Replace the entire seat belt
Make sure your seat belt is not
ularly battery acid. Cleaning may
assembly if any part of the web-
twisted when worn. A twisted
safely be carried out using mild soap
bing or hardware is damaged as
seat belt may not properly pro-
and water. The belt should be
you can no longer be sure that a
tect you in an accident and
replaced if webbing becomes frayed,
damaged seat belt will provide
could even cut into your body.
contaminated or damaged.
protection in a crash.
3 21
Safety features of your vehicle
•
No modifications or additions
should be made by the user which
WARNING - Seat belt
would either prevent the seat belt
buckle
adjusting devices from operating to
Do not allow foreign material
remove slack, or prevent the seat
(gum, crumbs, coins, liquids,
belt assembly from being adjusted
etc.) to obstruct the seat belt
to remove slack.
buckle. This may prevent the
•
When you fasten the seat belt, be
seat belt from fastening securely.
careful not to latch the seat belt in
buckles of other seat. It's very dan-
gerous and you may not be pro-
tected by the seat belt properly.
•
Do not unfasten the seat belt and
do not fasten and unfasten the seat
belt repeatedly while driving. This
could result in loss of control, and
an accident causing death, serious
injury, or property damage.
•
When fastening the seat belt,
make sure that the seat belt does
not pass over objects that are hard
or can break easily.
3
22
Safety features of your vehicle
ODEP039084N
ODEP039083N
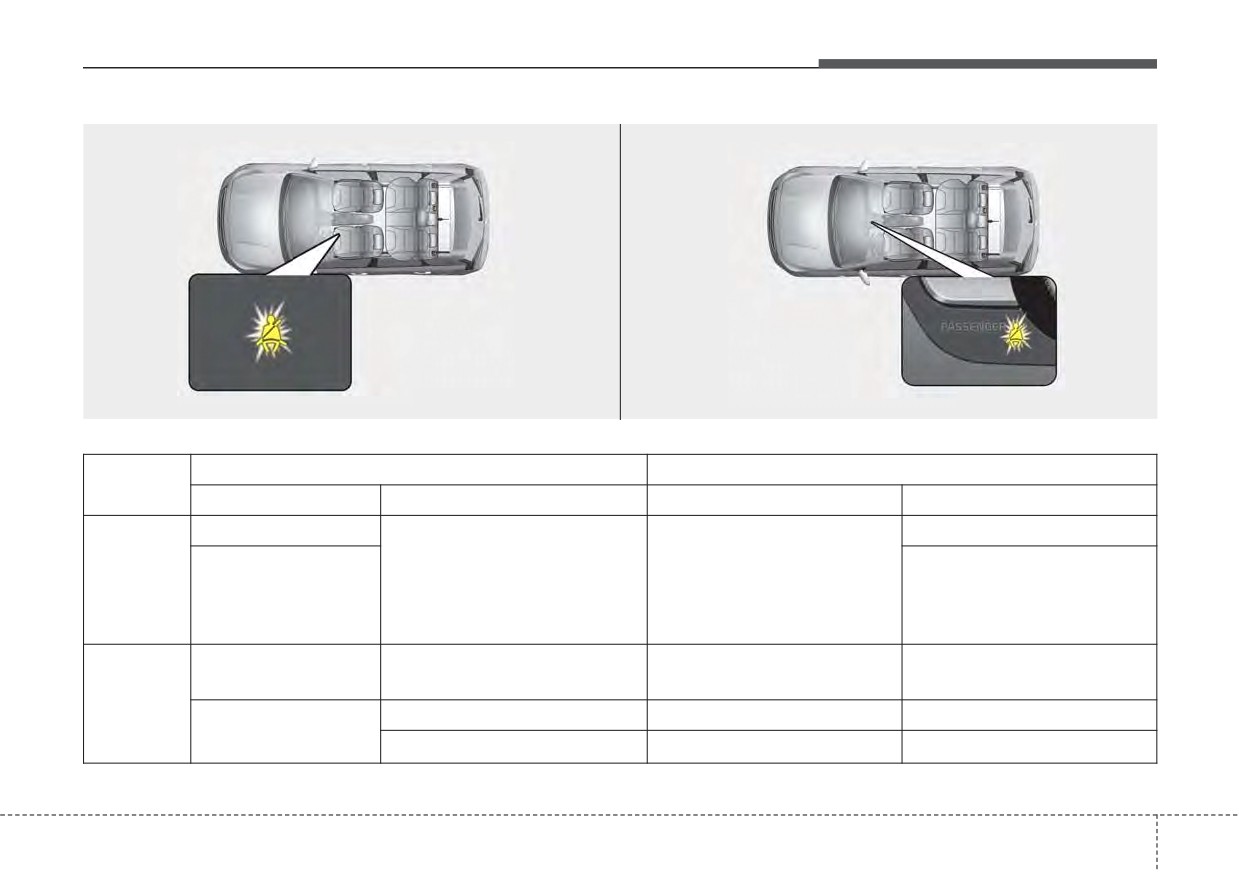
Front seat belt warning
Driving
Conditions
Warning pattern
conditions
Seat belt
Vehicle speed
Light
Sound
Buckled
No sound
While
- Sounds
parked
Illuminates
0 mph (0 km/h)
(for 6 seconds, driver`s seat)
(Ignition
Unbuckled
(for 6 seconds)
- No sound
switch ON)
(for passenger’s seat)
6 mph (9 km/h) or more but
Unbuckled
Continuously Illuminates
No sound
less than 12mph (20 km/h)
While
driving
When the seatbelt is
Less than 12 mph (20km/h)
Continuously Illuminates
No sound
unbuckled after use
12 mph (20 km/hr) or more
Blinks continuously
Alarm sounds for 100 seconds
3
23
Safety features of your vehicle
Seat belt - Driver's 3-point system
with emergency locking retractor
WARNING
You should place the lap belt
portion as low as possible and
snugly across your hips, not on
your waist. If the lap belt is
located too high on your waist,
it may increase the chance of
injury in the event of a collision.
Both arms should not be under
or over the belt. Rather, one
should be over and the other
B200A02NF
under, as shown in the illustra-
The seat belt automatically adjusts to
tion.
the proper length only after the lap
B180A01NF-1
Never wear the seat belt under
belt portion is adjusted manually so
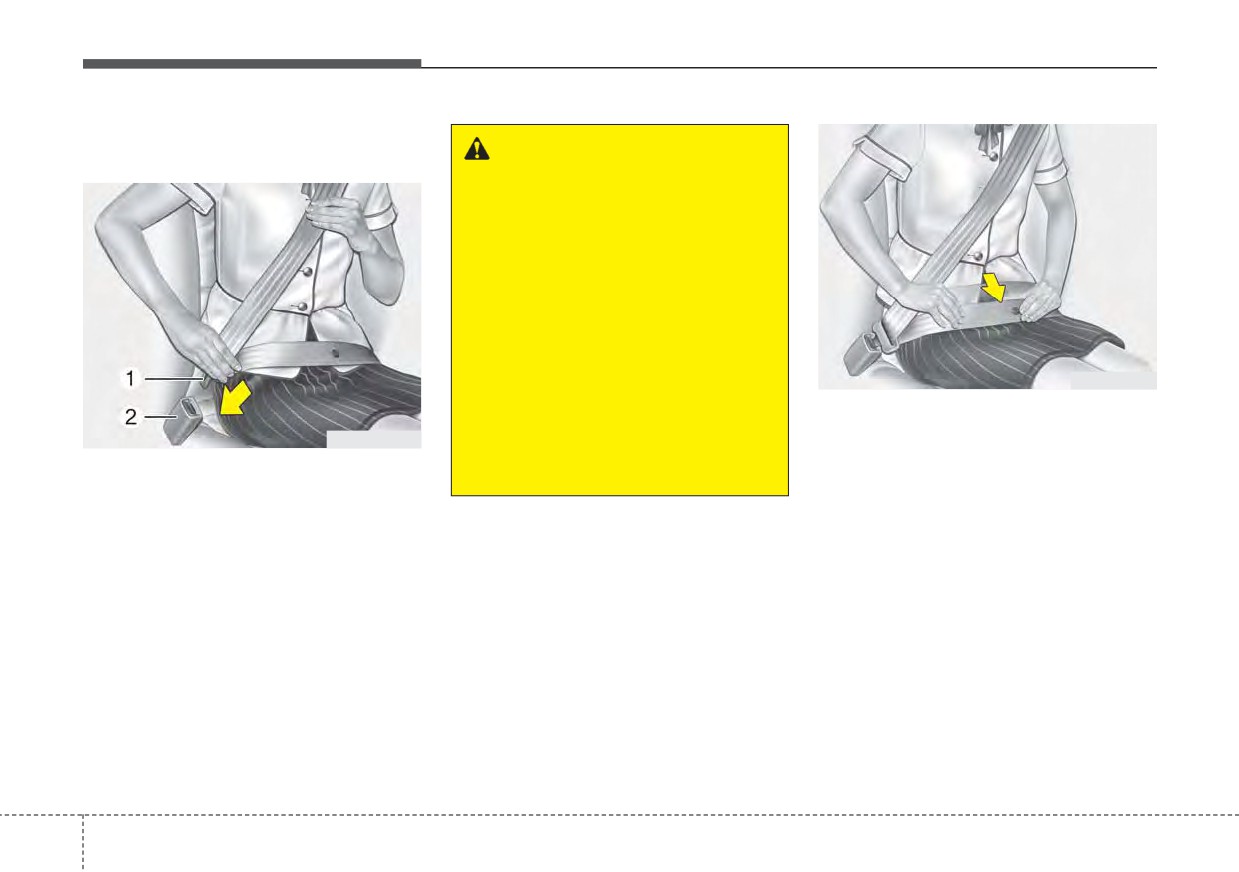
To fasten your seat belt:
the arm near the door.
that it fits snugly around your hips. If
To fasten your seat belt, pull it out of
you lean forward in a slow, easy
the retractor and insert the metal tab
motion, the belt will extend and let
(1) into the buckle (2). There will be
you move around. If there is a sud-
an audible "click" when the tab locks
den stop or impact, however, the belt
into the buckle.
will lock into position. It will also lock
if you try to lean forward too quickly.
✽ NOTICE
If you are not able to pull out the
seat belt from the retractor, firmly
pull the belt out and release it. Then
you will be able to pull the belt out
smoothly.
3
24
Safety features of your vehicle
Front seat
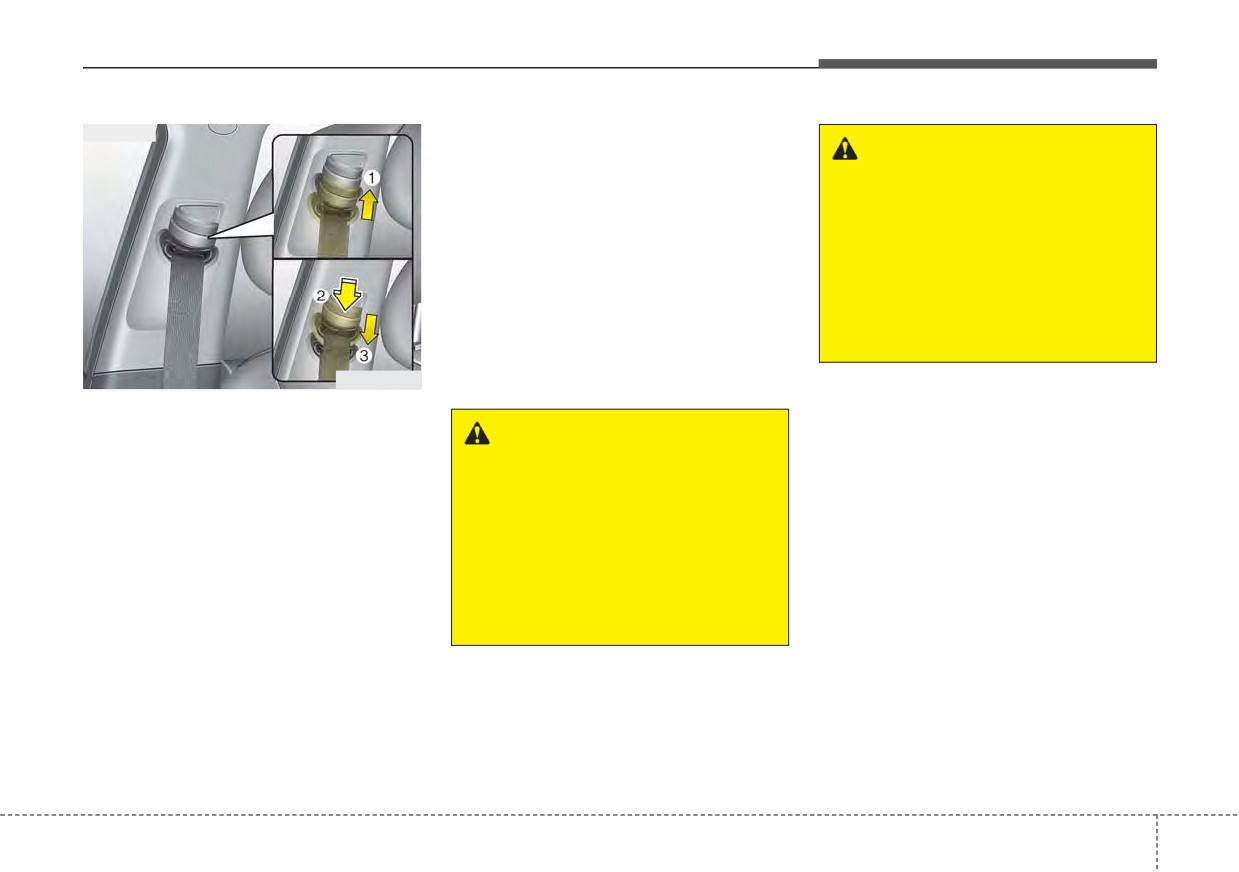
To adjust the height of the seat belt
anchor, lower or raise the height
WARNING - Seat belt
adjuster into an appropriate position.
replacement
To raise the height adjuster, pull it up
Replace your seat belts after
(1). To lower it, push it down (3) while
being in an accident. Failure to
pressing the height adjuster button (2).
replace seat belts after an acci-
Release the button to lock the
dent could leave you with dam-
anchor into position. Try sliding the
aged seat belts that will not pro-
height adjuster to make sure that it
vide protection in the event of
has locked into position.
another collision.
Improperly positioned seat belts can
ODE036030
cause serious injuries in an accident.
Height adjustment (For Front seat)
You can adjust the height of the
WARNING - Shoulder belt
shoulder belt anchor to one of the 4
positioning
positions for maximum comfort and
safety.
Verify the shoulder belt anchor
is locked into position at the
The height of the adjusting seat belt
appropriate height. Never posi-
should not be too close to your neck.
tion the shoulder belt across
The shoulder portion should be
your neck or face. Improperly
adjusted so that it lies across your
positioned seat belts can cause
chest and midway over your shoulder
serious injuries in an accident.
near the door and not your neck.
3
25
Safety features of your vehicle
Seat belts - Front passenger and
It automatically adjusts to the proper
rear seat 3-point system with
length only after the lap belt portion
CAUTION
combination locking retractor
of the seat belt is adjusted manually
Do NOT fold down the left por-
so that it fits snugly around your hips.
tion of the rear seat back when
To fasten your seat belt:
When the seat belt is fully extended
the rear center seat belt is buck-
Combination retractor type seat belts
from the retractor to allow the instal-
led. ALWAYS UNBUCKLE the
are installed in the rear seat posi-
lation of a child restraint system, the
rear center seat belt before fold-
tions to help accommodate the
seat belt operation changes to allow
ing down the left portion of the
installation of child restraint systems.
the belt to retract, but not to extend
rear seat back. If the rear center
Although a combination retractor is
(Automatic Locking Retractor Type).
seat belt is buckled when the
also installed in the front passenger
Refer to “Using a child restraint sys-
left portion of the rear seat back
seat position, it is strongly recom-
tem” in this section.
is folded down, distortion and
mended that children always be
damage to the top portion of the
seated in the rear seat. NEVER
seat back and seat belt garnish
place any infant restraint system in
✽ NOTICE
may result, causing the seat
the front seat of the vehicle.
Although the combination retractor
back to lock into the folded
This type of seat belt combines the
provides the same level of protection
down position.
features of both an emergency lock-
for seated passengers in either emer-
ing retractor seat belt and an auto-
gency or automatic locking modes,
matic locking retractor seat belt. To
have the seated passengers use the
fasten your seat belt, pull it out of the
emergency locking feature for improv-
retractor and insert the metal tab into
ed convenience. The automatic locking
the buckle. There will be an audible
function is intended to facilitate child
"click" when the tab locks into the
restraint installation. To convert from
buckle. When not securing a child
the automatic locking feature to the
restraint, the seat belt operates in the
emergency locking operation mode,
same way as the driver's seat belt
allow the unbuckled seat belt to fully
(Emergency Locking Retractor Type).
retract.
3
26
Safety features of your vehicle
WARNING
Prior to fastening the rear seat
belts, ensure the latch matches
the seat belt buckle. Forcefully
fastening the left or right seat
belt to the center buckle can
result in an improper fastening
scenario that will not protect
you in an accident.
ODEP037091L
ODEP037092L
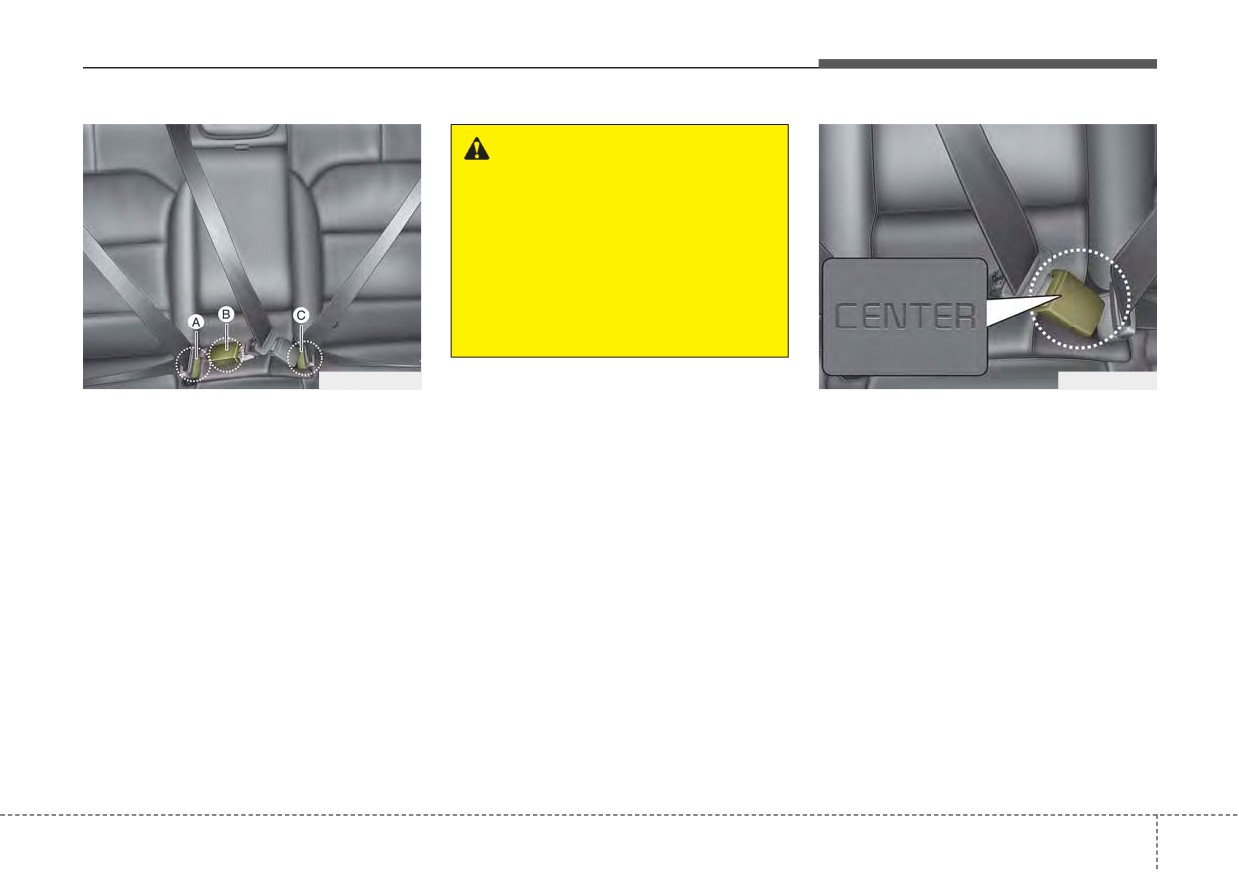
The seat belt should be locked into
When using the rear center seat belt,
the buckle on each seat cushion to
the buckle with the “CENTER” mark
be properly fastened.
must be used.
❈ A : Rear right seat belt fastening
buckle
B : Rear center seat belt fastening
buckle
C : Rear left seat belt fastening
buckle
3
27
Safety features of your vehicle
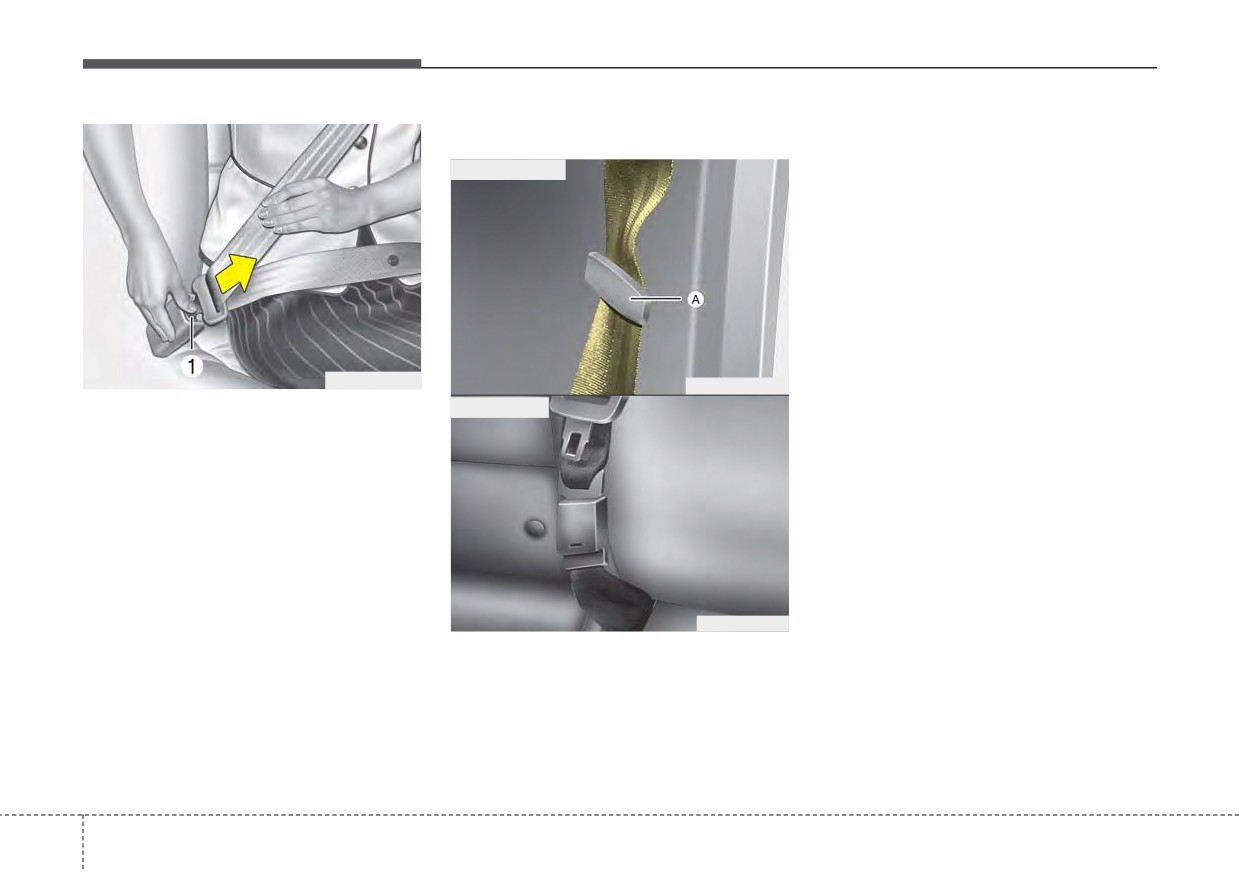
Stowing the rear seat belt
•
The rear seat belt buckles can be
stowed in the pocket between the
■ Outboard belt
rear seatback and cushion when
not in use.
•
Then insert the seat belt into the
two webbing guide (or holder)(A)
located on both sides. It will help
keep the belts from being trapped
behind or under the seats.
After inserting the seat belt, tighten
the belt webbing by pulling it up.
B210A01NF-1
ODEP039111N
To release the seat belt:
■ Center belt
The seat belt is released by pressing
the release button (1) on the locking
buckle. When it is released, the belt
should automatically draw back into
the retractor.
If this does not happen, check the
belt to be sure it is not twisted, then
try again.
ODE036027L
• If the center seat belt is not in use,
always lock the latch plate into the
buckle as above illustration.
3
28
Safety features of your vehicle
Pre-tensioner seat belt
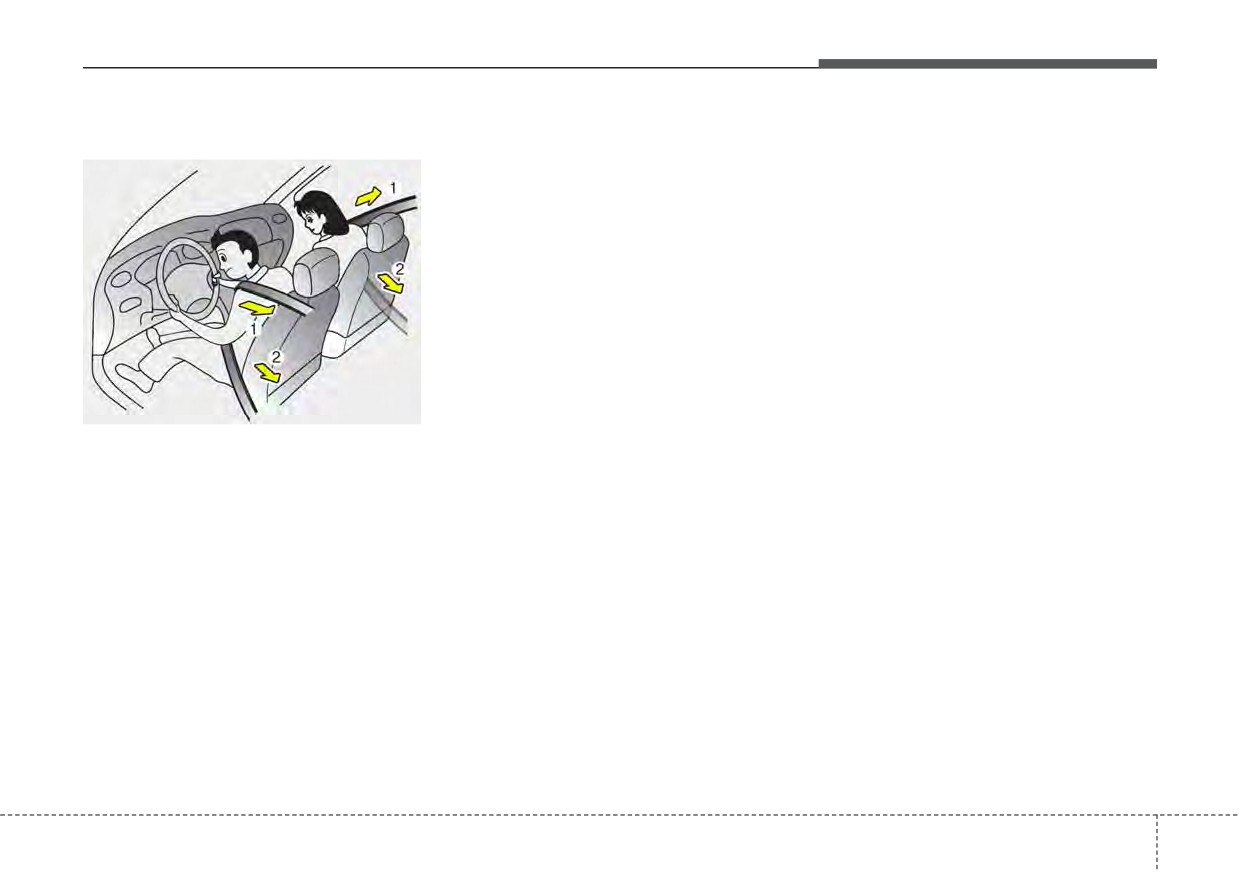
(1) Retractor Pe-tensioner
✽ NOTICE
The purpose of the retractor pre-
When the pre-tensioner seat belts
tensioner is to make sure that the
are activated, a loud noise may be
shoulder belts fit in tightly against
heard and fine dust, which may
the occupant's upper body in cer-
appear to be smoke, may be visible
tain frontal collisions.
in the passenger compartment.
(2) EFD (Emergency Fastening Device)
These are normal operating condi-
tions and are not hazardous.
The purpose of the EFD is to
make sure that the pelvis belts fit
in tightly against the occupant's
lower body in certain frontal colli-
sions.
OQL035065
Your vehicle is equipped with driver's
If the system senses excessive ten-
and front passenger's pre-tensioner
sion on the driver or passenger's
seat belts (retractor pe-tensioner and
seat belt when the pre-tensioner sys-
EFD (Emergency Fastening Device)).
tem activates, the load limiter inside
The pre-tensioner seat belts may be
the retractor pre-tensioner will release
activated, when a frontal collision is
some of the pressure on the affected
severe enough, together with the air
seat belt.
bags.
When the vehicle stops suddenly, or
if the occupant tries to lean forward
too quickly, the seat belt retractor
may lock into position. In certain
frontal collisions, the pre-tensioner
will activate and pull the seat belt into
tighter contact against the occu-
pant's body.
3
29
Safety features of your vehicle
✽ NOTICE
WARNING -
Skin Irritation
•
Both the driver's and front pas-
Wash all exposed skin areas
senger's seat belt pre-tensioner sys-
thoroughly after an accident in
tem may be activated not only in
which the pre-tensioner seat
certain frontal collisions but also in
belts were activated. The fine
certain side collisions or rollovers,
dust from the pre-tensioner
if the vehicle is equipped with a
activation may cause skin irrita-
side or curtain air bag.
tion and should not be breathed
•
Because the sensor that activates
for prolonged periods.
the SRS air bag is connected with
the pre-tensioner seat belt, the
ODMESA2024
SRS air bag warning light
on
the instrument panel will illumi-
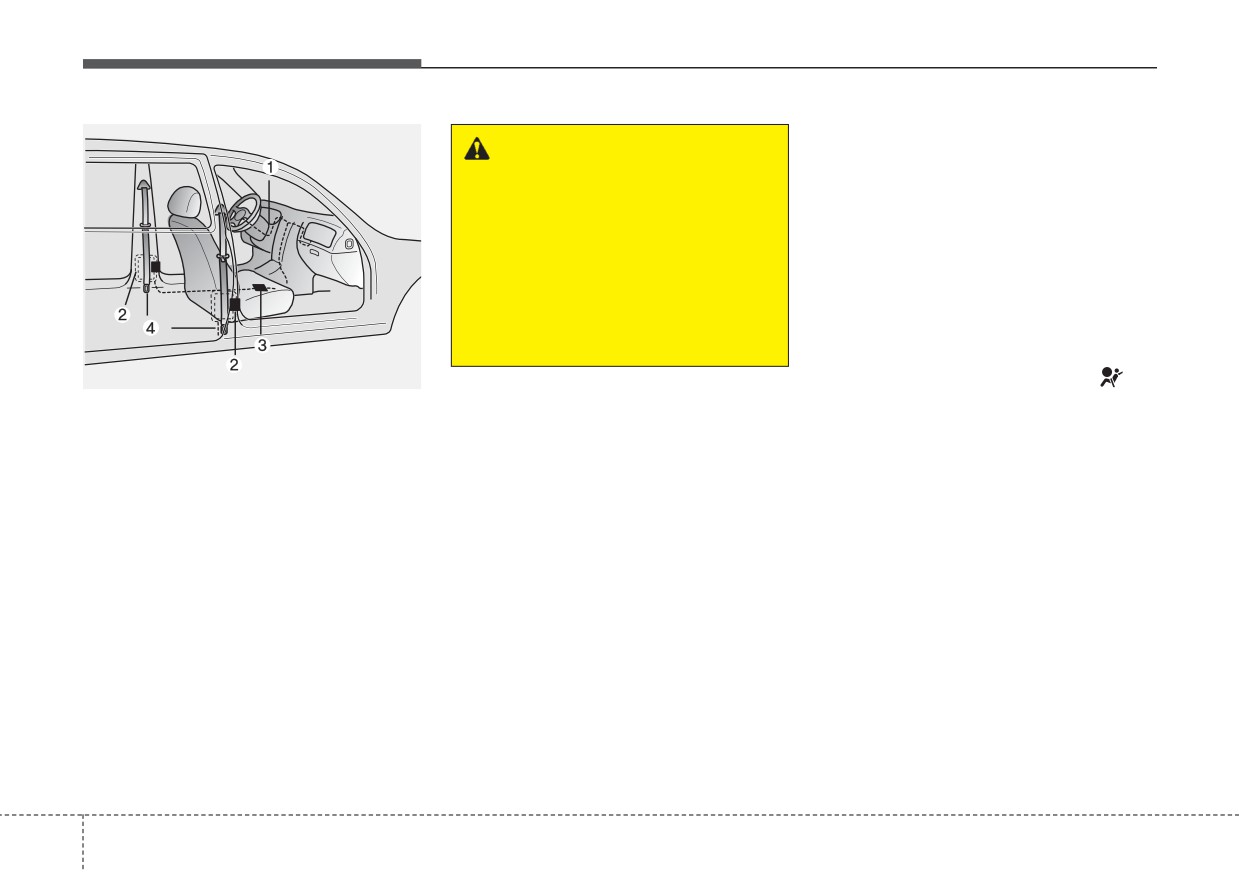
❈ The actual position of seat belt pre-
nate for approximately 6 seconds
tensioner system components may dif-
after engine start/stop button has
fer from the illustration.
been changed to ON position, and
then it should turn off.
The seat belt pre-tensioner system
consists mainly of the following com-
ponents. Their locations are shown in
the illustration:
(1) SRS air bag warning light
(2) Retractor pre-tensioner assembly
(3) SRS control module
(4) Emergency fastening device (EFD)
3
30
Safety features of your vehicle
If the pre-tensioner seat belt system
Seat belt precautions
is not working properly, this warning
WARNING - Hot
Infant or small child
light will illuminate even if there is not
pe-tensioner
a malfunction with the SRS air bag. If
All 50 states have child restraint laws.
Do not touch the pre-tensioner
the SRS air bag warning light does
You should be aware of the specific
seat belt assemblies for several
not illuminate when engine start/stop
requirements in your state. Child
minutes after they have been
button has been changed to ON, or if
and/or infant seats must be properly
activated. When the pre-ten-
it remains illuminated after illuminat-
placed and installed in the rear seat.
sioner seat belt mechanism
ing for approximately 6 seconds, or if
For more information about the use of
fires during a collision, the pre-
it illuminates while the vehicle is
these restraints, refer to
“Child
tensioner becomes hot and can
being driven, have an authorized Kia
restraint system” in this section.
burn you.
dealer inspect the pre-tensioner seat
belt and SRS air bag system as soon
✽ NOTICE
as possible.
Pre-tensioners are designed to oper-
Small children are best protected
ate only one time. After activation,
from injury in an accident when
pre-tensioner seat belts must be
✽ NOTICE
properly restrained in the rear seat
replaced. If the pre-tensioner must
Do not attempt to service or repair
by a child restraint system that meets
be replaced, contact an authorized
the pre-tensioner seat belt system in
the requirements of the Federal
Kia dealer.
any manner. Do not attempt to
Motor Vehicle Safety Standards.
inspect or replace the pre-tensioner
Before buying any child restraint sys-
seat belts yourself. This must be
tem, make sure that it has a label cer-
done by an authorized Kia dealer.
tifying that it meets Federal Motor
Vehicle Safety Standard
213. The
restraint must be appropriate for
your child's height and weight.
Check the label on the child restraint
for this information. Refer to “Child
restraint system” in this section.
3
31
Safety features of your vehicle
Larger children
If the shoulder belt portion slightly
Restraint of pregnant women
touches the child’s neck or face, try
Children who are too large for child
Pregnant women should wear
placing the child closer to the center of
restraint systems should always
lap/shoulder belt assemblies when-
the vehicle. If the shoulder belt still
occupy the rear seat and use the
ever possible according to specific
touches their face or neck they need to
available lap/shoulder belts. The lap
recommendations by their doctors.
be returned to a child restraint system.
portion should be fastened and
The lap portion of the belt should be
snugged on the hips as low as possi-
worn AS SECURELY AND LOW AS
ble. Check periodically to insure that
POSSIBLE.
WARNING - Small children
the belt fits. A child's squirming could
Do not allow small children to
put the belt out of position. Children
ride in the vehicle without an
are given the most safety in the event
WARNING - Pregnant
appropriate child restraint sys-
of an accident when they are
women
tem. If the shoulder belt comes
restrained by a proper restraint sys-
Pregnant women must never
in contact with your child's neck
tem in the rear seat. If a larger child
place the lap portion of the seat
or face, your child is too small to
(over age 13) must be seated in the
belt above or on the abdomen
ride in the vehicle. In a crash the
front seat, the child should be
where the fetus is located. The
seat belt will inflict injury to your
securely restrained by the available
force of the seat belt during a
child's neck, throat and face.
lap/shoulder belt and the seat should
collision and may crush and
be placed in the rearmost position.
injure the fetus.
Children age 13 and under should be
restrained securely in the rear seat.
NEVER place a child age 13 and
under in the front seat. NEVER place
a rear facing child seat in the front
seat of a vehicle.
3
32
Safety features of your vehicle
Injured person
Do not lie down
Care of seat belts
A seat belt should be used when an
To reduce the chance of injuries in
Seat belt systems should never be
injured person is being transported.
the event of an accident and to
disassembled or modified. In addi-
When this is necessary, you should
achieve maximum effectiveness of
tion, care should be taken to assure
consult a physician for recommenda-
the restraint system, all passengers
that seat belts and belt hardware are
tions.
should be sitting up and the front and
not damaged by seat hinges, doors
rear seats should be in an upright
or other abuse.
position when the vehicle is moving.
One person per belt
A seat belt cannot provide proper
Two people
(including children)
WARNING - Pinched seat
protection if the person is lying down
should never attempt to use a single
in the rear seat or if the front and rear
belt
seat belt. This could increase the
seats are in a reclined position.
Make sure that the webbing
severity of injuries in case of an acci-
and/or buckle does not get
dent.
caught or pinched in the rear
seat when returning the rear
seatback to its upright position.
A caught or pinched webbing/
buckle may become damaged
and could fail during a collision
or sudden stop.
WARNING
Seatbelts can become hot in a
vehicle that has been closed up
in sunny weather. They could
burn infants and children.
3
33
Safety features of your vehicle
Periodic inspection
All seat belts should be inspected
periodically for wear or damage of
any kind. Any damaged parts should
be replaced as soon as possible.
Keep belts clean and dry
Seat belts should be kept clean and
dry. If belts become dirty, they can be
cleaned by using a mild soap solu-
tion and warm water. Bleach, dye,
strong detergents or abrasives
should not be used because they
may damage and weaken the fabric.
When to replace seat belts
The entire in-use seat belt assembly
or assemblies should be replaced if
the vehicle has been involved in an
accident. This should be done even if
no damage is visible. Additional
questions concerning seat belt oper-
ation should be directed to an
authorized Kia dealer.
3
34