Volvo XC40 (2019 year). Manual - part 8


  Index      Volvo     Volvo XC40 - service manual 2019 year in english


Search            


Content   ..  6  7  8  9   ..


Volvo XC40 (2019 year). Manual - part 8


LIGHTING

* Option/accessory.

150

Welcome Light

Approach lighting is activated when the vehicle
is unlocked and can be used to provide light as
you walk toward the vehicle.

The function is activated when the remote key is
used for unlocking. The parking lights, outer door
handle lights

*, license plate lights, interior ceiling

lights, footwell lighting and trunk/cargo compart-
ment lighting will be illuminated. If a door is
opened while the function is activated, the light-
ing in the outer door handle

* and the interior

lighting will remain illuminated for a longer period
of time.

This function can be activated and deactivated in
the center display.

Related information

Adjusting light functions via the center dis-
play (p. 141)

Using home safe lighting (p. 149)

Remote key (p. 211)

Interior Lighting

The interior is equipped with several different
types of lighting to improve the experience. This
includes reading lamps, glove box lighting and
ground lighting.

All lighting in the passenger compartment can be
turned on and off manually within 5 minutes
after:

the engine has been switched off and the
ignition is in mode 0.

the vehicle is unlocked but the engine has
not been started.

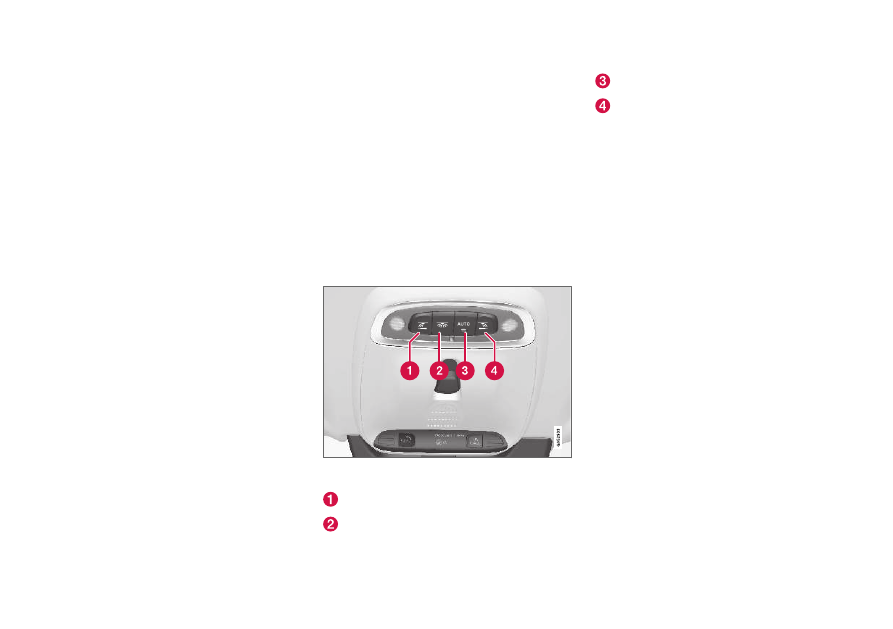
Front ceiling lighting

The controls in the ceiling console for the front reading
lights and courtesy lighting.

Reading light left side

Passenger compartment lighting

Courtesy lighting auto switch

Reading light right side

Reading lights

The reading lights on the right and left sides are
switched on and off by briefly pressing the but-
tons in the ceiling console. To adjust the bright-
ness, press and hold the button.

Passenger compartment lighting

Briefly press the button in the ceiling console to
switch on or off the footwell lighting and ceiling
lighting.

Courtesy lighting auto switch

Activate the auto switch by briefly pressing the
AUTO button in the ceiling console. With Auto
activated, the indicator light in the button and the
courtesy lighting come on and are turned off as
follows.

The courtesy lighting:

comes on when the vehicle is unlocked and
when the ignition is switched off

goes off when the engine is started and
when the vehicle is locked

comes on or goes off when a side door is
opened or closed

remains on for 2 minutes if any of the side
doors are open.

LIGHTING

* Option/accessory.

151

Rear roof lighting

*

Reading lights are located in the rear section of
the vehicle and can also be used as passenger
compartment lighting.

Reading lights over the rear seat.

In vehicles with panoramic roofs

*, there are two lamp

units, one on each side of the ceiling.

Briefly press the button on the light to turn on or
off the reading lights. To adjust the brightness,
press and hold the button.

Glove compartment lighting

The glove compartment lighting comes on or
goes off when the glove compartment is opened
or closed.

Vanity mirror lighting

*

The vanity mirror lighting comes on or goes off
when the cover over the mirror is opened or
closed.

Ground lighting

*

The ground lighting comes on or goes off when a
door is opened or closed.

Cargo compartment lighting

The cargo compartment lighting comes on or
goes off when the tailgate is opened or closed.

Ambient Lighting

The ambient lighting comes on when the doors
are opened and goes out when the vehicle is
locked. Ambient lighting brightness can be
adjusted in the center display and also fine-tuned
using the thumb wheel in the dashboard.

Mood lighting

*

The vehicle is equipped with several LEDs that
provide faint lighting in various colors. This light-
ing is on when the engine is running. Mood light-
ing can be adjusted in the center display and also

fine-tuned using the thumb wheel in the dash-
board.

Lighting in the door storage
compartments

Lighting in the door storage compartments
comes on when the doors are opened and goes
out when the vehicle is locked. The brightness
can be adjusted using the thumb wheel in the
dashboard.

Lighting in the front tunnel console
cupholders

The lighting in front console cupholders switches
on when the vehicle is unlocked and off when the
vehicle is locked. The brightness can be adjusted
using the thumb wheel in the dashboard.

Related information

Adjusting interior lighting (p. 152)

Lighting panel and controls (p. 140)

Ignition modes (p. 374)

Passenger compartment interior (p. 524)

LIGHTING

* Option/accessory.

152

Adjusting interior lighting

Illumination in the vehicle varies depending on
ignition mode. The interior lighting can be
adjusted with a thumb wheel in the dashboard
and certain light functions can also be adjusted
via the center display.

The thumb wheel on the dash-
board at the steering wheel can
be used to adjust the bright-
ness of the display lighting,
instrument lights, ambient light-
ing and mood lighting

*

Adjust ambient decor lighting

1. Tap 

Settings

 in the Top view in the center

display.

2. Tap 

My Car

Lights and Lighting

Interior Lighting

.

3. Choose from among the following settings:

Under 

Ambient Light Intensity

, select

Off

Low

 or 

High

.

Under 

Ambient Light Level

, select

Reduced

 or 

Full

.

Adjusting mood lighting

*

The vehicle is equipped with several LEDs that
provide faint lighting in various colors. This light-
ing is on when the engine is running.

Changing the brightness

1. Tap 

Settings

 in the Top view in the center

display.

2. Tap 

My Car

Lights and Lighting

Interior Lighting

Interior Mood Lighting

.

3. Under 

Interior Mood Light Intensity

, select

Off

Low

 or 

High

.

Changing the color of the light

1. Tap 

Settings

 in the Top view in the center

display.

2. Tap 

My Car

Lights and Lighting

Interior Lighting

Interior Mood Lighting

.

3. Choose 

By Temperature

 or 

By Color

 to

change the color of the light.

If 

By Temperature

 is selected, the light will

change according to the temperature set for
the passenger compartment.

If 

By Color

 is selected, the subcategory

Theme Colors

 can be used to make further

adjustments.

Related information

Interior Lighting (p. 150)

Adjusting light functions via the center dis-
play (p. 141)

Ignition modes (p. 374)

WINDOWS, GLASS AND MIRRORS

* Option/accessory.

154

Windows, glass and mirrors

The vehicle is equipped with controls for win-
dows, glass and mirrors. Some of the windows
in the car are laminated.

Laminated glass

The windshield and panoramic roof

* have lamina-

ted glass. The glass is reinforced, which provides
better protection against break-ins and improved
soundproofing in the passenger compartment.
Laminated glass is available as an option for
some other glass surfaces.

The symbol shows the windows containing laminated
glass

1

Related information

Pinch protection for windows and sun cur-
tains (p. 154)

Panoramic roof

* (p. 160)

Power windows (p. 155)

Rearview/door mirrors (p. 157)

Using the windshield wipers (p. 164)

Using the windshield and headlight washers
(p. 167)

Activating and deactivating the heated wind-
shield

* (p. 203)

Activating and deactivating the heated rear
window and door mirrors (p. 205)

Pinch protection for windows and

sun curtains

All windows and sun curtains

* that are controlled

electrically have a pinch protection function that
is triggered if anything blocks them while they
are opening or closing.

If pinch protection is activated, movement will
stop and then retract automatically to approx.
50 mm (2 inches) from the point at which it was
blocked (or to full ventilation position).

If pinch protection has been triggered, it is still
possible to operate the window or sun curtain
once more in the same direction without pinch
protection, if this is done within 10 seconds after
pinch protection has been triggered. It is thus still
possible to override pinch protection when clos-
ing is interrupted (e.g. due to ice) by pressing and
holding down the control until the window or sun
curtain is fully closed.

WARNING

If the starter battery is disconnected, the func-

tion for automatic opening and closing must

be reset to function correctly. A reset is

required in order for the pinch protection to

work.

1

Does not apply to windshield and panoramic roof

*, which are always laminated and therefore do not have this symbol.

WINDOWS, GLASS AND MIRRORS

}}

* Option/accessory.

155

Related information

Reset procedure for pinch protection
(p. 155)

Operating the power windows (p. 156)

Panoramic roof

* (p. 160)

Reset procedure for pinch

protection

If the power windows are not operating properly,
you can try a reset procedure.

WARNING

If the starter battery is disconnected, the func-

tion for automatic opening and closing must

be reset to function correctly. A reset is

required in order for the pinch protection to

work.

If the problem persists or if it affects the panor-
amic roof or sunroof, contact a workshop.

2

Resetting a power window

1. Start with the window in the closed position.

2. Then operate the window in manual mode

three times upward toward the closed posi-
tion.
> The system will be automatically initiated.

Related information

Pinch protection for windows and sun cur-
tains (p. 154)

Operating the power windows (p. 156)

Power windows

The power windows are operated using the con-
trol panels found in the doors. The driver's door
has controls for operating all windows and for
activating the child safety locks.

Driver's door control panel.

Electric child safety locks

* that deactivate the

controls in the rear doors to prevent the
doors or windows from being opened from
the inside.
Rear window controls.

Front window controls.

The power windows have pinch protection. If
there is any problem with the pinch protection, a
rest procedure can be tested.

2

An authorized Volvo workshop is recommended.

||

WINDOWS, GLASS AND MIRRORS

* Option/accessory.

156

WARNING

Children, other passengers or objects can be

trapped by the moving parts.

Always operate the windows with caution.

Do not allow children to play with the
operating controls.

Never leave a child alone in the vehicle.

Remember to always cut the current to
the power windows by setting the vehi-
cle's electrical system to ignition mode 0
and then taking the remote key with you
when leaving the vehicle.

Never stick objects or body parts out
through the windows, even if the vehicle
electrical system is completely turned off.

Related information

Operating the power windows (p. 156)

Pinch protection for windows and sun cur-
tains (p. 154)

Reset procedure for pinch protection
(p. 155)

Operating the power windows

All power windows can be operated using the
control panel in the driver's door. The control
panels in the other doors can be used to oper-
ate that particular door.

The power windows have pinch protection. If
there is any problem with the pinch protection, a
rest procedure can be tested.

WARNING

Children, other passengers or objects can be

trapped by the moving parts.

Always operate the windows with caution.

Do not allow children to play with the
operating controls.

Never leave a child alone in the vehicle.

Remember to always cut the current to
the power windows by setting the vehi-
cle's electrical system to ignition mode 0
and then taking the remote key with you
when leaving the vehicle.

Never stick objects or body parts out
through the windows, even if the vehicle
electrical system is completely turned off.

Operating the power windows.

Operating manually. Move one of the controls
slightly up or down. The power windows go
up or down while the control is held in posi-
tion.
Operating with automatic controls. Move one
of the controls up or down to its end position
and release it. The window moves automati-
cally to its fully closed/open position.

To use the power windows, the ignition must be
in at least mode I or II. After the ignition has
been switched off, the power windows can be
operated for several minutes or until a door is
opened. Only one control panel can be operated
at a time.

It can also be operated using keyless opening

*

with the door handle.

WINDOWS, GLASS AND MIRRORS

* Option/accessory.

157

WARNING

Make sure that no child or other passenger

comes into contact with the windows as they

are closing with keyless closing

*.

NOTE

One way to reduce the pulsating wind noise
heard when the rear windows are open is to
also open the front windows slightly.

NOTE

The windows cannot be opened at speeds
over approx. 180 km/h (ca112 mph), but they
can be closed.

The driver is always responsible for following
applicable traffic regulations.

Related information

Power windows (p. 155)

Pinch protection for windows and sun cur-
tains (p. 154)

Reset procedure for pinch protection
(p. 155)

Keyless locking and unlocking

* (p. 226)

Locking and unlocking using the remote key
(p. 213)

Locking and unlocking from inside the vehi-
cle (p. 229)

Rearview/door mirrors

The rearview mirror and door mirrors can be
used to improve the driver's visibility behind the
vehicle.

Rearview mirror

The rearview mirror can be easily adjusted man-
ually. The rearview mirror can be equipped with
HomeLink

*, auto-dim* and compass*.

Door mirrors

WARNING

The door mirror on the passenger side is

curved to improve visibility. Objects in the mir-

ror may appear farther away than they actually

are.

The joystick in the drivers' door control panel is
used to adjust the position of the door mirrors.
There are also several automatic settings that
can also be connected to the memory function
buttons for the power seat

*.

Related information

HomeLink

®

* (p. 421)

Compass

* (p. 424)

Adjusting the rearview mirror dimming func-
tion (p. 158)

Adjusting the door mirrors (p. 158)

Storing memory settings in power front
seats

* (p. 174)

Activating and deactivating the heated rear
window and door mirrors (p. 205)

WINDOWS, GLASS AND MIRRORS

* Option/accessory.

158

Adjusting the rearview mirror

dimming function

Bright light entering the vehicle from behind, e.g.
from the headlights of following vehicles, could
reflect in the rearview mirror and door mirrors
and cause a glare. Use the dimming function
when light from behind is distracting.

Auto-dim

If bright light enters the vehicle from behind, the
door mirrors will automatically dim. Auto-dim is
always active when the engine is running, except
when reverse gear is engaged.

NOTE

When the level of sensitivity is changed, this
change will not be noticeable immediately but
will instead take effect after a short period of
time.

The sensitivity level for dimming will affect both
the rearview mirror and door mirrors.

1. Tap 

Settings

 in the Top view in the center

display.

2. Tap 

My Car

Mirrors and Convenience

.

3. Under 

Rearview Mirror Auto Dimming

,

select 

Normal

Dark

 or 

Light

.

The rearview mirror instead has two sensors -
one pointing forward and one pointing rearward -
which work together to identify and eliminate

glare. The forward-pointing sensor monitors
ambient light, while the rearward-pointing sensor
monitors light from the headlights of following
vehicles.

For the door mirrors to be equipped with auto-
dim, the rearview mirror must also be equipped
with auto-dim.

NOTE

If the sensors are obstructed by e.g. a parking
permit, transponder, sunshade or objects on
the seats or in the cargo compartment in a
way that prevents light from reaching the sen-
sors, the auto-dim function in the door and
rearview mirrors will be reduced.

Related information

Rearview/door mirrors (p. 157)

Adjusting the door mirrors (p. 158)

Adjusting the door mirrors

To improve visibility to the rear, the door mirrors
need to be adjusted to the driver's height and
seating position. There are several automatic
settings that can also be connected to the mem-
ory function buttons for the power seat

*.

Controls used for door mirrors

Door mirror controls.

The joystick in the drivers' door control panel is
used to adjust the position of the door mirrors.

1. Press the L button for the left door mirror or

R for the right door mirror. The button will
light up.

2. Adjust the position using the joystick located

between the buttons.

3. Press the L or R button again. The light in

the button will go out.

WINDOWS, GLASS AND MIRRORS

* Option/accessory.

159

Resetting the mirrors' position

A mirror that has been moved out of position
manually (e.g. hit or bumped into) must be electri-
cally returned to its normal position for automatic
folding to function properly.

1. Fold in the mirrors by pressing the L and R

buttons at the same time.

2. Open them again by pressing the L and R

buttons at the same time.

3. Repeat the above procedure as needed.

The mirrors are now reset to their original posi-
tions.

Automatically folding door mirrors

*

The door mirrors can be automatically folded
when driving or parking in tight spaces.

1. Press the L and R buttons at the same time

(ignition must be in mode I or higher).

2. Release the buttons after about 1 second.

The mirrors will automatically stop when they
are completely folded in.

Open the mirrors by pressing L and R at the
same time. The mirrors will automatically stop
when they are completely open.

Tilting when parking

3

The door mirrors can be tilted down to improve
the driver's view along the sides of the vehicle
(e.g. to see the curb while parking).

Select reverse gear and press the L or R mir-
ror button.

Please note that the button may need to be
pressed twice depending on settings. When the
door mirror is tilted down, the light in the button
will flash. When reverse gear is engaged, the
door mirrors will automatically start to move after
3 seconds and will reach their original position
after about 8 seconds.

Automatically tilting when parking

3

With this setting, the door mirrors will automati-
cally tilt down when reverse gear is engaged. The
folded position is preset and cannot be adjusted.
To immediately return the door mirrors to their
original position, press the L or R button twice.

1. Tap 

Settings

 in the center display's Top

view.

2. Tap 

My Car

Mirrors and Convenience

.

3. Under 

Exterior Mirror Tilt at Reverse

,

select 

Off

Driver

Passenger

 or 

Both

 to

activate/deactivate and to select which mir-
ror to tilt.

Automatic folding when the vehicle is
locked

*

The door mirrors automatically fold in when the
vehicle is locked and open when the vehicle is
unlocked using the remote key.

1. Tap 

Settings

 in the center display's Top

view.

2. Tap 

My Car

Mirrors and Convenience

.

3. Select 

Fold Mirror When Locked

 to acti-

vate/deactivate.

Related information

Rearview/door mirrors (p. 157)

Adjusting the rearview mirror dimming func-
tion (p. 158)

Storing memory settings in power front
seats

* (p. 174)

Activating and deactivating the heated rear
window and door mirrors (p. 205)

3

Only on models equipped with a power driver's seat with memory buttons

*.

WINDOWS, GLASS AND MIRRORS

* Option/accessory.

160

Panoramic roof

*

The panoramic roof is divided into two glass
sections. The front section can be opened verti-
cally at the rear edge (ventilation position) or hor-
izontally (open position). The rear section cannot
be moved.

The panoramic roof has a wind deflector and
sun curtain made of perforated fabric (located
beneath the glass sections) for extra protection
in e.g. bright sunlight.

The panoramic roof and sun curtain are operated
using the controls in the ceiling.

It can also be operated using keyless opening

*

with the door handle.

To operate the panoramic roof and sun curtain,
the ignition must be in mode I or II.

WARNING

Children, other passengers or objects can be

trapped by the moving parts.

Always operate the windows with caution.

Do not allow children to play with the
operating controls.

Never leave a child alone in the vehicle.

Remember to always cut the current to
the power windows by setting the vehi-
cle's electrical system to ignition mode 0
and then taking the remote key with you
when leaving the vehicle.

Never stick objects or body parts out
through the windows, even if the vehicle
electrical system is completely turned off.

CAUTION

Do not open the panoramic roof when
load carriers are installed.

Never place heavy objects on the panor-
amic roof.

CAUTION

Remove ice and snow before opening the
panoramic roof.

Do not operate the panoramic roof if it is
frozen in place.

Wind blocker

The panoramic roof is equipped with a wind
blocker that folds up when the roof is open.

Related information

Operating the panoramic roof

* (p. 161)

Auto closing the panoramic roof

* sun curtain

(p. 163)

Pinch protection for windows and sun cur-
tains (p. 154)

Keyless locking and unlocking

* (p. 226)

Locking and unlocking using the remote key
(p. 213)

Locking and unlocking from inside the vehi-
cle (p. 229)

WINDOWS, GLASS AND MIRRORS

}}

* Option/accessory.

161

Operating the panoramic roof

*

The panoramic roof and sun curtain are oper-
ated using a control in the ceiling panel, and
both are equipped with pinch protection.

WARNING

Children, other passengers or objects can be

trapped by the moving parts.

Always operate the windows with caution.

Do not allow children to play with the
operating controls.

Never leave a child alone in the vehicle.

Remember to always cut the current to
the power windows by setting the vehi-
cle's electrical system to ignition mode 0
and then taking the remote key with you
when leaving the vehicle.

Never stick objects or body parts out
through the windows, even if the vehicle
electrical system is completely turned off.

CAUTION

Do not open the panoramic roof when
load carriers are installed.

Never place heavy objects on the panor-
amic roof.

CAUTION

Remove ice and snow before opening the
panoramic roof.

Do not operate the panoramic roof if it is
frozen in place.

To operate the panoramic roof and sun curtain,
the ignition must be in mode I or II.

It can also be operated using keyless opening

*

with the door handle.

WARNING

Make sure that no child or other passenger

comes into contact with the windows as they

are closing with keyless closing

*.

CAUTION

Check that the panoramic roof is properly
closed when closing.

The movement of the roof will stop if the control
is released during manual operation or when the
glass has reached the comfort

4

 or fully open/

closed position. The movement of both the pan-
oramic roof and the sun curtain is also stopped if
the control in the ceiling is operated again in the

direction opposite that of the current direction of
movement.

The panoramic roof and sun curtain are also
equipped with pinch protection.

NOTE

For manual opening, the sun curtain must be
completely open before the panoramic roof
can be opened. For the reverse procedure,
the panoramic roof must be completely
closed before the sun curtain can be com-
pletely closed.

4

The comfort position is a position which helps keep wind and resonance sounds to a comfortably low level.

||

WINDOWS, GLASS AND MIRRORS

* Option/accessory.

162

Opening and closing ventilation
position

Ventilation position, rear edge raised.

Open by pushing the control upward once.

Close by pushing the control downward
once.

When ventilation mode is selected, the rear edge
of the front section of the roof is raised. If the sun
curtain is fully closed when ventilation position is
selected, it will automatically open approx. 50 mm
(approx. 2 inches).

If the panoramic roof is closed from the ventila-
tion position, the sun curtain will also automati-
cally close.

Fully opening and closing the
panoramic roof with the control in the
ceiling

Operation, manual mode

Operation, automatic mode

Manual operation

1. To open the sun curtain, pull the control

backward to the manual open mode.

2. To open the panoramic roof to the comfort

position, pull the control backward a second
time to the manual opening position.

3. To open the panoramic roof fully, pull the

control backward a third time to the manual
opening position.

Close by repeating the above procedure in
reverse - push the control forward/down to the
manual closing position.

Auto operation

1. To open the sun curtain to the fully open

position, pull the control backward to the
auto open mode and release.

2. To open the panoramic roof to the comfort

position, pull the control backward a second
time to the automatic opening position and
release.

3. To open the panoramic roof fully, pull the

control backward a third time to the auto-
matic opening position and release.

Close by repeating the above procedure in
reverse - push the control forward/down to the
auto close position.

Automatic operation - rapid opening or
closing

The panoramic roof and sun curtain can be
opened or closed simultaneously:

Open - press the control backward twice to
the automatic operation position and release.

Close - press the control forward/down twice
to the automatic operation position and
release.

Related information

Panoramic roof

* (p. 160)

Auto closing the panoramic roof

* sun curtain

(p. 163)

Pinch protection for windows and sun cur-
tains (p. 154)

WINDOWS, GLASS AND MIRRORS

* Option/accessory.

163

Keyless locking and unlocking

* (p. 226)

Locking and unlocking using the remote key
(p. 213)

Locking and unlocking from inside the vehi-
cle (p. 229)

Auto closing the panoramic roof

*

sun curtain

With this function, the sun curtain closes auto-
matically 15 minutes after the car has been
locked if it is parked in hot weather. This is done
to lower the passenger compartment tempera-
ture and protect the upholstery against being
bleached by the sun.

The function is deactivated as the default factory
setting and can be activated or deactivated using
the center display.

1. Tap 

Settings

 in the Top view in the center

display.

2. Tap 

My Car

Locking

.

Select 

Auto Close Sunroof Curtain

 to

activate/deactivate.

NOTE

The sun curtain also closes when all windows
are closed with keyless closing

*.

Related information

Panoramic roof

* (p. 160)

Operating the panoramic roof

* (p. 161)

Pinch protection for windows and sun cur-
tains (p. 154)

Keyless locking and unlocking

* (p. 226)

Locking and unlocking using the remote key
(p. 213)

Locking and unlocking from inside the vehi-
cle (p. 229)

WINDOWS, GLASS AND MIRRORS

* Option/accessory.

164

Using the windshield wipers

The windshield wipers clean the windshield. The
right-side steering wheel lever is used to adjust
windshield wiper settings.

Right-hand steering wheel lever.

Thumb wheel, used to set rain sensor sensi-
tivity and interval wiper speed.

Single sweep

Move the lever down and release for a
single sweep.

Wipers off

Move the lever to position 0 to turn off
the windshield wipers.

Interval wipers

Set the number of sweeps per time unit
with the thumb wheel when interval wip-

ers are selected.

Continuous wipers

Move the lever upward for the wipers to
operate at normal speed.

Move the lever upward again for the wip-
ers to operate at high speed.

CAUTION

Before activating the wipers, make sure that
the wiper blades are not frozen in place and
that any snow or ice on the windshield and
rear window has been scraped away.

CAUTION

Use plenty of washer fluid when the wipers
clean the windshield. The windshield must be
wet when the windshield wipers are working.

Related information

Using the rain sensor (p. 165)

Using the windshield and headlight washers
(p. 167)

Using automatic rear window wiping when
backing up (p. 168)

Heated windshield washer nozzles

* (p. 165)

Using the rain sensor's memory function
(p. 166)

Using the rear window wiper/washer
(p. 168)

Filling washer fluid (p. 590)

Windshield wipers in the service position
(p. 589)

Replacing windshield wiper blades (p. 588)

Changing rear window wipers (p. 587)

WINDOWS, GLASS AND MIRRORS

}}

* Option/accessory.

165

Heated windshield washer nozzles

*

The washer nozzles are heated automatically in
cold weather to prevent the washer fluid from
freezing.

Related information

Using the rain sensor (p. 165)

Using the windshield and headlight washers
(p. 167)

Using automatic rear window wiping when
backing up (p. 168)

Using the rain sensor's memory function
(p. 166)

Using the rear window wiper/washer
(p. 168)

Filling washer fluid (p. 590)

Windshield wipers in the service position
(p. 589)

Replacing windshield wiper blades (p. 588)

Changing rear window wipers (p. 587)

Using the windshield wipers (p. 164)

Using the rain sensor

The rain sensor monitors the amount of water on
the windshield and automatically starts the wind-
shield wipers. Rain sensor sensitivity can be
adjusted using the thumb wheel on the right-
hand steering wheel lever.

Right-hand steering wheel lever.

Rain sensor button

Thumb wheel, sensitivity/interval wiper speed

When the rain sensor is activated, the 

 rain

sensor symbol will be displayed in the instrument
panel.

Activating the rain sensor

When the rain sensor is activated, the engine
must be running or the ignition must be in mode I
or II. The windshield wiper lever must also be in
position 0 or in the single sweep position.

Activate the rain sensor by pressing the rain sen-
sor button 

.

If the lever is pressed down, the wipers will make
additional sweeps across the windshield.

Turn the thumb wheel upward for increased sen-
sitivity and downward for decreased sensitivity.
The wipers will make one extra sweep when the
thumb wheel is turned upward.

Deactivate the rain sensor

Deactivate the rain sensor by pressing the 
rain sensor button or moving the lever upward to
another wiper mode.

The rain sensor is automatically deactivated in
ignition mode 0 or when the engine is switched
off.

The rain sensor is also automatically deactivated
when the wiper blades are put in the service
position. The rain sensor will reactivate when
service mode is switched off.

CAUTION

The windshield wipers may start inadvertently
and be damaged in automatic car washes.
Deactivate the rain sensor when the engine is
running or when the ignition is in mode I or II.
The symbol in the instrument panel will go
out.

||

WINDOWS, GLASS AND MIRRORS

* Option/accessory.

166

Related information

Using the windshield and headlight washers
(p. 167)

Using automatic rear window wiping when
backing up (p. 168)

Heated windshield washer nozzles

* (p. 165)

Using the rain sensor's memory function
(p. 166)

Using the rear window wiper/washer
(p. 168)

Filling washer fluid (p. 590)

Windshield wipers in the service position
(p. 589)

Replacing windshield wiper blades (p. 588)

Changing rear window wipers (p. 587)

Using the windshield wipers (p. 164)

Using the rain sensor's memory

function

The rain sensor monitors the amount of water on
the windshield and automatically starts the wind-
shield wipers.

Activating/deactivating memory
function

The rain sensor's memory function can be set to
activate so that the rain sensor button does not
need to be pressed each time the engine is
started:

1. Tap 

Settings

 in the Top view in the center

display.

2. Tap 

My Car

Wipers

.

3. Select 

Rain Sensor Memory

 to activate/

deactivate the memory function.

Related information

Using the rain sensor (p. 165)

Using the windshield and headlight washers
(p. 167)

Using automatic rear window wiping when
backing up (p. 168)

Heated windshield washer nozzles

* (p. 165)

Using the rear window wiper/washer
(p. 168)

Filling washer fluid (p. 590)

Windshield wipers in the service position
(p. 589)

Replacing windshield wiper blades (p. 588)

Changing rear window wipers (p. 587)

Using the windshield wipers (p. 164)


Content   ..  6  7  8  9   ..