Volvo V50 (2012 year). Manual - part 9


  Index      Volvo     Volvo V50 - service manual 2012 year in english


Search            


Content   ..  7  8  9  10   ..


Volvo V50 (2012 year). Manual - part 9


06 Starting and driving

Automatic gearbox 

06

160

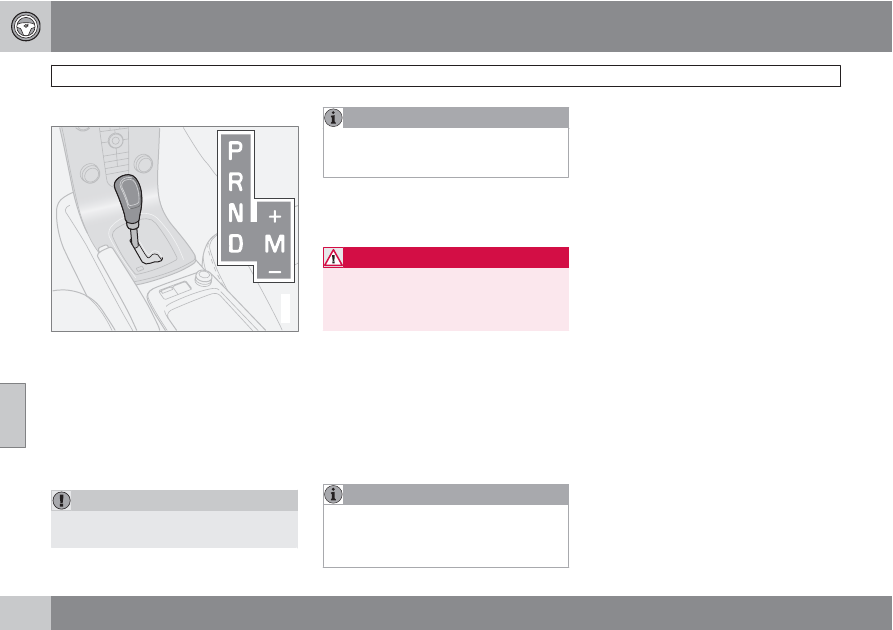
Geartronic automatic gear positions

G018264

D: Automatic gear positions. M (+/): Manual gear
positions.

The information display shows the position of
the gear selector using the following indica-
tions: 

P

R

N

D

1

2

3

4

5

 or 

6

, see

page 51.

P – Parking position

Select position P when you wish to start the
engine or park the car.

IMPORTANT

The car must be stationary when position
P is selected.

NOTE

The brake pedal must be depressed in order
to be able to disengage the gear lever from
the P position.

The gearbox is mechanically blocked when
the P position is engaged. Always apply the
parking brake when parking the car.

WARNING

Get into the habit of always applying the
parking brake when parking on a slope - the
automatic transmission's P position is not
sufficient to hold the car in all situations.

R – Reverse

The car must be stationary when position R is
selected.

N – Neutral

No gear is engaged and the engine can be
started. Apply the parking brake when the car
is stationary with the gear selector in posi-
tion N.

NOTE

The brake pedal must be depressed in order
to be able to disengage the gear lever from
the N position if the car has been stationary
for more than 3 seconds.

D – Drive

D is the normal driving position. The car auto-
matically shifts up and down depending on the
level of acceleration and speed. The car must
be stationary when the gear selector is moved
to position D from position R.

Geartronic manual gear positions (+/-)

The driver can also change gear manually
using the Geartronic automatic gearbox. The
car engine-brakes when the accelerator pedal
is released.

Manual gearshift mode is obtained by moving
the lever to the side from position D to the end
position at +/. The information display shifts
the indication from 

D

 to one of the figures 

1

 –

6

, which is equivalent to the gear that is

engaged just then, see page 51.

Move the lever forwards towards + (plus)
to change up a gear and release it, the lever
returns to its rest position between + and
.

or

Pull the lever back towards  (minus) to
change down a gear and release it.

The manual gearshift mode (+/) can be
selected at any time while driving.

Geartronic automatically shifts down if the
driver allows the speed to decrease lower than

06 Starting and driving

 Automatic gearbox

06

``

161

a level suitable for the selected gear, in order
to avoid jerking and stalling.

To return to automatic driving mode:

Move the lever to the side to the end posi-
tion at D.

Kick-down

When the accelerator pedal is pressed all the
way to the floor (beyond the position normally
regarded as full acceleration) a lower gear is
immediately engaged. This is known as kick-
down.

If the accelerator is released from the kick-
down position, the gearbox automatically
changes up.

Kick-down is used when maximum accelera-
tion is needed, such as for overtaking.

Safety function

To prevent overrevving the engine, the gearbox
control program has a protective downshift
inhibitor which prevents the kick-down func-
tion.

Geartronic does not permit downshifting/kick-
down which would result in an engine speed
high enough to damage the engine. Nothing
happens if the driver still tries to shift down in
this way at high engine speed – the original
gear remains engaged.

When kick-down is activated the car can
change one or more gears at a time depending
on engine speed. The car changes up when the
engine reaches its maximum speed in order to
prevent damage to the engine.

Mechanical gear selector inhibitor

G020237

The gear selector can be moved forward and
back freely between N and D. Other positions
are locked with a latch that is released with the
inhibitor button on the gear selector.

With the inhibitor button depressed the lever
can be moved forwards or backwards between
PRN and D.

Automatic gear selector inhibitor

Cars with an automatic gearbox have special
safety systems:

Keylock

To remove the remote control key, the gear
selector must be in the P position. The key is
locked in all other positions.

Parking position (P)

Stationary car with engine running:

Hold your foot on the brake pedal when
moving the gear selector to another posi-
tion.

Electric gear inhibitor – Shiftlock Parking
position (P position)

To be able to move the gear selector from the
P position to other gear positions, the remote
control key must be in position II and the brake
pedal must be depressed.

Shiftlock – Neutral (N position)

If the gear selector is in the N position and the
car has been stationary for at least three sec-
onds (irrespective of whether the engine is run-
ning) then the gear selector is locked in the N
position.

To be able to move the gear selector from the
N position to another gear position, the brake
pedal must be depressed and the remote con-
trol key must be in position II.

06 Starting and driving

Automatic gearbox 

06

162

*


Option/accessory, for more information, see Introduction.

Disengaging the gear selector inhibitor

G018263

In certain cases, it may be necessary to move
the car when it is not driveable, for example if
the battery is flat. Proceed as follows to move
the car:

1.

There is a small cover behind P-R-N-D on
the gear selector panel. Open it at the rear
edge.

2.

Fully insert the key blade from the remote
control key.

3.

Hold the key blade down and at the same
time move the gear lever out of the P posi-
tion.

Cold start

When starting in low temperatures, the gear
changes can sometimes feel hard. This is due
to the gearbox oil's viscosity at low tempera-
tures. To reduce engine emissions, the gear-
box shifts up later than normal when the engine
is started at low temperatures.

NOTE

Depending on the engine temperature when
the engine is started, the idle speed after a
cold start may be higher than normal for
certain engine types.

Automatic gearbox Powershift*

G018264

D: Automatic gear positions. M (+/): Manual gear
positions.

Powershift is a six-stage automatic gearbox
that has double mechanical clutch discs in
contrast to a conventional automatic gearbox.
A conventional automatic gearbox has a
hydraulic torque converter instead that trans-
fers power from engine to gearbox.

Powershift transmission operates in the same
way and has similar controls and functions as
the Geartronic automatic transmission, descri-
bed in the previous section.

In the event of uncertainty as to whether or not
the car is equipped with Powershift transmis-
sion, this can be verified by checking the des-

06 Starting and driving

 Automatic gearbox

06

163

ignation on the decal number (5) under the
bonnet - see page 286. The designa-
tion ”MPS6” means that it is Powershift trans-
mission - otherwise it is Geartronic automatic
transmission.

To bear in mind

The transmission's double clutch has overload
protection that is activated if it becomes too
hot, e.g. if the car is held stationary with the
accelerator pedal on an uphill gradient for a
long time.

Overheated transmission causes the car to
shake and vibrate, and the warning symbol illu-
minates and the information display shows a
message. The transmission can also overheat
during slow driving in queues (10 km/h or

slower) on an uphill gradient, or with a trailer
hitched. The transmission cools down when
the car is stationary, with foot brake depressed
and the engine running at idling speed.

Overheating during slow driving in queues can
be avoided by driving in stages: Stop the car
and wait with your foot on the brake pedal until
there is a moderate distance to the traffic
ahead, drive forward a short distance, and then
wait another moment with your foot on the
brake pedal.

IMPORTANT

Use the foot brake to hold the car stationary
on an uphill gradient - do not hold the car
with the accelerator pedal. The gearbox
could then overheat.

For important information regarding Powershift
transmission and towing - see page 178.

Text message and action

In some situations the display can show a mes-
sage at the same time as a symbol is illumi-
nated.

The table shows three steps with an increased
degree of seriousness should the gearbox
become too hot. In parallel with the display text
the driver is also advised that the car's elec-
tronics are temporarily changing the driving
characteristics. Follow the instructions on the
information display where appropriate.

06 Starting and driving

Automatic gearbox 

06

164

Symbol

Display

Driving characteristics

Action

TRANSM. OVERHEAT BRAKE TO
HOLD

Difficulty in maintaining even speed at con-
stant engine speed.

Gearbox overheated. Keep the car station-
ary using the foot brake

A

.

TRANSM. OVERHEAT PARK SAFELY

Significant pulling in the car's traction.

Gearbox overheated. Park the car immedi-
ately in a safe manner.

TRANSM. COOLING LET ENGINE RUN

No drive due to overheated gearbox.

Gearbox overheated. For fastest cooling:
Run the engine at idling speed with the gear
lever in the N or P position until the mes-
sage clears.

A

For fastest cooling: run the engine at idling speed with the gear lever in the N or P position, until the message clears.

NOTE

The table's examples are no indication that
the car is defective but instead show that a
safety function has been activated inten-
tionally to prevent damage to one of the
car's components.

WARNING

If a warning symbol combined with the text

TRANSM. OVERHEAT PARK SAFELY

 is

ignored then the heat in the gearbox may
become so high that the power transmis-
sion between engine and gearbox is tem-
porarily halted in order to prevent the clutch
from malfunctioning - the car then loses
drive and is stationary until gearbox tem-
perature has cooled to an acceptable level.

For more possible display messages with their
respective proposals for solutions concerning
automatic transmission, see page 56.

A display text clears automatically after the
action has been carried out or after one press
on the indicator stalk READ button.

06 Starting and driving

 DRIVe Start-Stop*

06

``

*


Option/accessory, for more information, see Introduction.

165

General

Quieter and cleaner

Environmental care is one of Volvo Car Corpo-
ration's core values and it influences all of our
operations. This target-orientation has resulted
in the DRIVe vehicle series whose concept
consists of an interaction between several sep-
arate energy-saving functions, all with the
common purpose of reducing fuel consump-
tion, which in turn contributes to reduced
exhaust emissions.

Start/Stop

In addition to being equipped with a reliable
and fuel-efficient diesel engine, this car's
engine is equipped with a Start and Stop func-
tion which comes into action in the event of e.g.
stationary traffic queues or waiting at traffic
lights - see the detailed description on the next
page.

The engine's automatic restart sequence runs
so smoothly that it is hardly noticeable that the
engine has actually been switched off. The
experience is that the engine has been running
the whole time but with an extremely quiet and
low idling speed.

The Start/Stop function gives the driver the
opportunity for a more active environmentally
conscious driving style by means of being able
to disengage gear and letting the engine auto-
stop, whenever appropriate.

Smart charging

The car's kinetic energy is used during engine
braking by means of it being converted into
electricity and stored in the car's battery.

Adapted power steering

Another DRIVe function is that the power steer-
ing's energy take-off is adapted according to
requirements. By means of optimisation and
the introduction of an energy saving function
the energy take-off can be minimised on occa-
sions where power assistance (help in turning
the steering wheel) is not necessary.

Aerodynamics

The DRIVe concept also includes a lowered
chassis, front and rear spoilers with low wind
resistance, as well as specially developed
wheel rims

1

.

1

The range varies depending on the market.

06 Starting and driving

DRIVe Start-Stop* 

06

166

*


Option/accessory, for more information, see Introduction.

Function and operation

On/Off button and display text 

AUTO START-

STOP ON

.

The Start/Stop system is activated automati-
cally when the engine is started with the key.
The driver is made aware of this function by
means of the On/Off button's green lamp being
illuminated.

NOTE

After starting with the key and each auto-
stop the car must first reach 5 km/h before
the automatic Start/Stop function is re-acti-
vated - following which certain conditions
must also be fulfilled, refer to these under
the heading "The engine does not auto-
stop".

All of the car's normal systems such as lighting,
radio, etc. work as normal even with an auto-
stopped engine, except that some equipment
may have its function temporarily reduced, e.g.
the climate control system's fan speed or
extremely high volume on the audio system.

Auto-stopping the engine

In order for the engine to stop automatically the
car must be stationary - however, the
Start/Stop function does accept slow rolling,
the equivalent to normal walking pace:

Set the gear lever in neutral position and
release the clutch pedal - the engine stops
automatically.

The display text 

ENGINE IN

AUTO START

, and the but-

ton's illuminated green lamp,
reminds - and indicates - that
the engine has been auto-
stopped.

Auto-starting the engine

With the gear lever in neutral position:

Depress the clutch pedal - the engine
starts automatically.

or

Depress the accelerator pedal - the engine
starts automatically.

On a downhill gradient there is also the option
to start the engine automatically as follows:

Release the foot brake and allow the car to
move off - the engine starts automatically
when the speed exceeds normal walking
pace.

After starting the engine:

Engage a suitable gear and continue the
journey.

Gear indicator

An essential detail in connection with environ-
mental driving is to drive in the right gear and
to change gear in time.

The driver is assisted by an
indicator which notifies the
driver when it is most advan-
tageous to engage the next
higher or lower gear - GSI
(Gear Shift Indicator).

06 Starting and driving

 DRIVe Start-Stop*

06

*


Option/accessory, for more information, see Introduction.

167

Indication is made with an up or down arrow in
the combined instrument panel's lower dis-
play.

Deactivating the Start/Stop function

The information display shows here that the Start/
Stop function has been disengaged.

In certain situations, it may
advisable to temporarily
switch off the automatic
Start/Stop function - this is
carried out by pressing this
button once, at which point
the button's lamp goes out.

Disengaged Start/Stop function is indicated by
a message appearing on the information dis-
play for about 5 seconds.

The Start/Stop function is disengaged until it is
reactivated with the button or until the next
time the engine is started with the key.

Limitations

The engine does not auto-stop

Even if the Start/Stop function is activated, the
engine does not auto-stop if:

the driver has opened the seatbelt's
buckle.

the car has not stopped completely.

the car has been reversed and reverse gear
is disengaged.

the engine does not have normal operating
temperature.

outside temperature is below freezing
point or above approx. 30 °C.

the environment in the passenger com-
partment differs from the preset values -
indicated by the ventilation fan running at
a high speed.

the capacity of the battery is below the
minimum permissible level.

battery temperature is below freezing point
or above approx. 55 °C.

The engine auto-starts without driver
intervention

An auto-stopped engine may restart in some
cases without the driver having decided that
the journey should continue. In the following
cases the engine auto-starts even if the driver

has not depressed the clutch pedal in order to
engage a gear:

The driver's seatbelt buckle is opened.

Misting forms on the windows.

The outside temperature is below freezing
point or above approx. 30 °C.

There is a temporarily high current take-off
or battery capacity has dropped below the
lowest permissible level.

The car starts to roll - faster than the equiv-
alent normal walking pace.

Repeated pumping of the brake pedal.

WARNING

Do not open the bonnet when the engine
has stopped automatically - the engine may
suddenly start automatically. In order to
avoid starting automatically with raised
bonnet:

Engage a gear and apply the parking
brake.

The engine does not auto-start

In the following cases the engine does not
auto-start after having auto-stopped:

The driver's seatbelt buckle has been
opened - a display text prompts the driver
to start the engine normally.

A gear is engaged without declutching - a
display text prompts the driver to set the

06 Starting and driving

DRIVe Start-Stop* 

06

168

*


Option/accessory, for more information, see Introduction.

gear lever in neutral position in order to
enable auto-start.

Involuntary engine stop

In the event that a start-up fails and the engine
stops, proceed as follows:

1.

Depress the clutch pedal again - the engine
starts automatically after the gear lever has
been set in neutral position. Prior to this the
information display showed the text 

PUT

GEAR IN NEUTRAL TO START

.

Text message

In combination with this indicator
lamp the Start/Stop function may
display text messages on the infor-
mation display for certain situa-
tions. A recommended action

should be performed for some of them. The
following table shows some examples.

Message

AUTO START-
STOP ON

Illuminates for
about 5 seconds
after Start/Stop has
been activated.

AUTO START-
STOP OFF

Illuminates for
about 5 seconds
after Start/Stop has
been switched off.

Message

TURN KEY TO
START

The engine will not
auto-start

A

 - per-

form a normal start
using the key.

PUT GEAR IN
NEUTRAL TO
START

Set the gear lever in
neutral position

B

.

DEPRESS
CLUTCH PEDAL
TO START

The engine is ready
to auto-start - wait-
ing for declutching.

AUTO START-
STOP SERVICE
REQUIRED

Start/Stop function
disengaged. A work-
shop should be con-
tacted.

A

Occurs if the seatbelt is unbuckled after the engine has auto-
stopped, for example.

B

Occurs if a gear is engaged without declutching after the
engine has auto-stopped.

If a message does not go out after performing
an action a workshop should be contacted - an
authorised Volvo workshop is recommended,
which also applies in the event of the need for
any other form of technical assistance.

06 Starting and driving

 Brake system

06

169

Brake servo

If the car is rolling or is being towed with the
engine turned off, the brake pedal must be
depressed about 5 times harder than when the
engine is running. If the brake pedal is
depressed when the engine is started, you will
feel the pedal drop. This is normal and due to
the brake servo becoming active. This may be
more noticeable if the car has Emergency
Brake Assistance (EBA).

WARNING

The brake servo only works when the engine
is running.

NOTE

If braking with the engine switched off,
press the brake pedal sharply once, not
repeatedly.

Brake circuits

This symbol illuminates if a brake
circuit is not working.

If a fault should occur in one of the
circuits, it is still possible to brake

the car. The brake pedal will travel further and
may feel softer than normal. Harder pressure
on the pedal is needed to produce the normal
braking effect.

Dampness can affect braking
characteristics

Brake components become wet when the car
is driven in heavy rain, through pools of water
or when the car is washed. This may alter brake
pad friction characteristics so that there is a
delay before braking effect is noticed.

Press the brake pedal lightly from time to time
if driving for long stretches in rain or slushy
snow, as well as after setting off in very damp
or cold weather. This warms up the brake pads
and dries off any water. This precaution is also
recommended before parking the car for a long
period in such weather conditions.

If the brakes are used heavily

When driving in the Alps or other roads with
similar characteristics, the car's brakes are
heavily loaded even if the brake pedal is not
being depressed especially hard.

Because speed is often low, the brakes are not
cooled as effectively as when driving on flat
roads at higher speed.

So as not to overload the brakes, shift down
when driving downhill instead of using the foot
brake. Use the same gear driving downhill as
you would use driving uphill. This uses engine
braking more efficiently so the foot brake is
only required for brief periods.

Bear in mind that driving with a trailer puts an
additional load on the car's brakes.

Anti-lock braking system - ABS

The anti-lock braking system
(ABS) prevents the wheels from
locking up during braking.

This means the ability to steer is

maintained and it is easier to swerve to avoid a
hazard for example.

After the engine has been started, the ABS will
perform a brief self-test at a speed of
about 20 km/h. This can be felt and heard as
pulses in the brake pedal.

To get the most out of the ABS:

1.

Depress the brake pedal with full force.
Pulses will be felt.

2.

Steer the car in the direction of travel. Do
not release the pressure on the pedal.

Practice braking with the ABS system in a traf-
fic-free area and in different weather condi-
tions.

06 Starting and driving

Brake system 

06

170

Emergency Brake Assistance – EBA

For sudden braking, EBA (Emergency Brake
Assist) provides full-strength braking instanta-
neously. The EBA function senses when heavy
braking is underway by registering how quickly
the brake pedal is depressed.

Continue braking without easing off on the
brake pedal. The function disengages when
the pressure on the brake pedal eases.

This function is always active. It cannot be dis-
engaged.

WARNING

If the BRAKE and ABS warning symbols illu-
minate at the same time, there may be a
fault in the brake system. If the level in the
brake fluid reservoir is normal at this stage,
drive carefully to the nearest workshop and
have the brake system checked - an author-
ised Volvo workshop is recommended.

If the brake fluid is under the MIN level in the
brake fluid reservoir, do not drive further
before topping up the brake fluid.

The reason for the loss of brake fluid must
be investigated.

NOTE

When EBA is activated the brake pedal low-
ers slightly more than usual, depress (hold)
the brake pedal as long as necessary. If the
brake pedal is released then all braking
ceases.

Emergency brake lights and automatic
hazard warning flashers

Emergency brake lights are activated to alert
vehicles behind about sudden braking. The
function means that the brake light flashes
instead of - as in normal braking - shining with
a constant glow.

Emergency brake lights are activated at
speeds above 50 km/h if the ABS system is
working and/or in the event of sudden braking.
After the car's speed has been slowed below
10 km/h the brake light returns from flashing to
the normal constant glow - while at the same
time the hazard warning flashers are activated,
and they flash until the driver changes engine
speed with the accelerator pedal or they are
deactivated with their button, see page 73.

06 Starting and driving

 DSTC – Stability and traction control system*

06

*


Option/accessory, for more information, see Introduction.

171

General

The stability and traction control system, DSTC
(Dynamic Stability and Traction Control) helps
the driver to avoid skidding and improves the
car's traction.

A pulsing sound may be noticed during braking
or acceleration when the system is in action.
The car may accelerate slower than expected
when the accelerator pedal is depressed.

Active Yaw Control

The function limits the driving and brake force
of the wheels individually in order to stabilise
the car.

Spin Control

The function prevents the driving wheels from
spinning against the road surface during accel-
eration.

Traction control system

The function is active at low speed and trans-
fers power from the driving wheel that is spin-
ning to the one that is not.

Reduced operation

G029057

Controls and information display.

Thumbwheel

1

RESET button

1

The stability system is activated automatically
each time the car is started.

System operation during skidding and accel-
eration can be partially deactivated. Operation
during skidding is then delayed and so allows
more skidding which provides greater freedom
for dynamic driving. Traction in deep snow or
sand is improved at the same time as acceler-
ation is no longer limited.

Operation

1.

Turn the thumbwheel until the DSTC menu
appears.

DSTC ON 

 means that the system function

is unchanged.

DSTC SPIN CONTROL OFF

 means that

system operation is reduced.

2.

Press and hold the RESET button until the
DSTC menu is changed.

The system remains reduced until the
driver reactivates it or until the engine is
switched off - after the engine is started the
next time DSTC is back in its normal mode
again.

WARNING

Suppressing system function may alter the
driving characteristics of the car.

NOTE

DSTC ON 

 is shown for several seconds on

the display each time the engine is started.

1

No function in cars without trip computer, fuel-driven parking heater as well as stability and traction control system.

06 Starting and driving

DSTC – Stability and traction control system* 

06

172

*


Option/accessory, for more information, see Introduction.

Messages on the information display

TRACTION CONTROL TEMPORARILY
OFF

 means that the system has been tempo-

rarily reduced due to excessive brake tempera-
ture.

The function is reactivated automatically
when the brakes have cooled.

ANTI-SKID SERVICE REQUIRED

 system

disabled due to a fault.

Stop the car in a safe place and turn off the
engine.

> If the message remains when the engine

is restarted, drive to a workshop. An
authorised Volvo workshop is recom-
mended.

Symbols in the combined instrument
panel

DSTC system

Information

If the symbols 

 and 

 are displayed at the

same time:

Read the message on the information dis-
play.

If the symbol 

 appears alone then it may

appear as follows:

Flashing light means that the DSTC system
is now being activated.

Constant glow for 2 seconds means sys-
tem check when the engine is started.

Constant glow after starting the engine or
while driving means that there is a fault in
the DSTC system.

06 Starting and driving

 Park Assist*

06

*


Option/accessory, for more information, see Introduction.

173

General information on parking
assistance

Parking assistance front and rear.

Parking assistance is used as an aid to parking.
A signal indicates the distance to a detected
obstacle.

WARNING

Parking assistance does not relinquish the
driver's own responsibility during parking.
The sensors have blind spots where obsta-
cles cannot be detected. Be aware of chil-
dren or animals near the car.

Variants

Parking assistance is available in two variants:

Rear only.

Both front and rear.

Function

The frequency of the signal increases the
shorter the distance to an obstacle, in front of
or behind the car. If the volume of another
audio source from the audio system is high,
then this is automatically lowered.

The tone becomes constant at a distance of
about 30 cm. If there are obstacles within this
distance both behind and in front of the car, the
signal alternates between left and right-hand
speakers.

Rear parking assistance only

The system is automatically engaged when the
car is started.

Rear parking assistance is activated when
reverse gear is engaged and the message 

Park

Assist


active


EXIT to deactivate

 is shown on

the audio system's display.

If the system is switched off, the display shows

Park Assist


deactivated


ENTER to

activate

 as soon as reverse gear is engaged.

To change the settings, see page 84.

The distance covered behind the car is
about 1.5 metres. The signal comes from the
rear loudspeakers.

Limitations

The system must be deactivated when revers-
ing with a trailer, or bike carrier on the towbar
or similar. Otherwise the trailer or bike carrier
would trigger the sensors.

NOTE

Rear parking assistance is deactivated
automatically when towing a trailer if a Volvo
genuine trailer cable is used.

Parking assistance both front and rear

Button for Off/On (button location depends on
other selected equipment).

06 Starting and driving

Park Assist* 

06

174

*


Option/accessory, for more information, see Introduction.

The system is automatically engaged when the
car is started and the switch's On/Off lamp is
illuminated. If parking assistance is switched
off with the button, the lamp goes out.

Front

Front parking assistance is active at speeds
below 15 km/h. The system is deactivated at
higher speeds. When the speed is below
10 km/h the system is reactivated.

The distance covered to the front of the car is
about 0.8 metres. The signal for obstacles in
front comes from the front loudspeakers.

Limitations

Front parking assistance cannot be combined
with extra lights because the sensors are affec-
ted by the extra lights.

Rear

Rear parking assistance is activated when
reverse gear is engaged.

The distance covered to the rear of the car is
about 1.5 metres. The signal for obstacles
behind comes from the rear loudspeakers.

Limitations

See the previous section Rear parking assis-
tance only.

Fault indicator

If the information symbol illumi-
nates with constant glow and the
display shows 

PARK ASSIST

SERVICE REQUIRED

 then park-

ing assistance is disengaged. For

attention, contact a workshop - an authorised
Volvo workshop is recommended.

IMPORTANT

In certain conditions the parking assistance
system may produce incorrect warning sig-
nals that are caused by external sound
sources that emit the same ultrasonic fre-
quencies that the system works with.

Examples of such sources include horns,
wet tyres on asphalt, pneumatic brakes and
exhaust noises from motorcycles etc.

Cleaning the sensors

Parking assistance sensors.

The sensors must be cleaned regularly to
ensure that they work properly. Clean them
with water and car shampoo.

NOTE

Dirt, ice and snow covering the sensors may
cause incorrect warning signals.

06 Starting and driving

 BLIS* – Blind Spot Information System

06

*


Option/accessory, for more information, see Introduction.

175

General

G020295

Rearview mirror with BLIS system.

BLIS camera

Indicator lamp

BLIS symbol

WARNING

The system is a supplement to, not a
replacement for, a safe driving style and use
of the rearview mirrors. It can never replace
the driver's attention and responsibility. The
responsibility for changing lanes safely
always rests with the driver.

BLIS is an information system that under cer-
tain conditions can help to draw the driver's
attention to vehicles moving in the same direc-
tion in the so-called "blind spot".

The system is designed to work most effec-
tively when driving in dense traffic on multi-lane
highways.

BLIS is based on camera technology. The cam-
eras (1) are located under the door mirrors.

When a camera has detected a vehicle inside
the blind spot zone the indicator lamp (2) illu-
minates with a constant glow.

NOTE

The lamp illuminates on the side of the car
where the system has detected the vehicle.
If the car is overtaken on both sides at the
same time then both lamps illuminate.

BLIS advises the driver with a message if a fault
arises in the system. If for example the sys-
tem's cameras are obscured then the BLIS
indicator lamp flashes and a message is shown
in the information display. In such cases, check
and clean the lenses. If necessary, the system
can be switched off temporarily by pressing the
BLIS button see page 176.

Blind spots

A = approx. 3.0 m, B = approx. 9.5 m.

When BLIS operates

The system operates when the car is driven at
a speed above 10 km/h.

Overtaking

The system is designed to react if you overtake
another vehicle at a speed of up to 10 km/h
faster than the other vehicle.

The system is designed to react if you are over-
taken by a vehicle travelling up to 70 km/h
faster than your vehicle.


Content   ..  7  8  9  10   ..