Volvo S60 (2018 year). Manual - part 21


  Index      Volvo     Volvo S60 - service manual 2018 year in english


Search            


Content   ..  19  20  21  22   ..


Volvo S60 (2018 year). Manual - part 21


||

MAINTENANCE AND SERVICING

* Option/accessory.

348

Removal

Switch off the ignition, remove the remote key
from the ignition slot and wait at least 5 minutes
before disconnecting the battery so that all infor-
mation in the vehicle's electrical system can be
stored in the control modules.

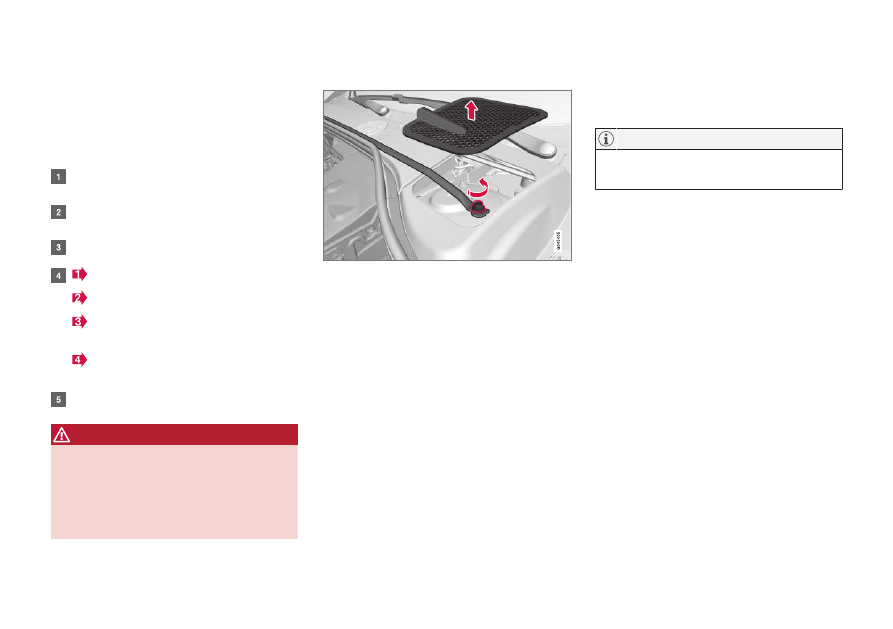
Open the clips on the front cover and remove
the cover.

Release the rubber molding so that the rear
cover is free.

Remove the rear cover by pulling it away.

 Detach the black negative cable.

 Detach the red positive cable

 Detach the ventilation hose from the bat-

tery

 Loosen the screw holding the battery

clamp.

Move the battery to the side and lift it up.

WARNING

PROPOSITION 65 WARNING!
Battery posts, terminals, and related accesso-
ries contain lead and lead compounds, chemi-
cals known to the state of California to cause
cancer and reproductive harm. Wash hands
after handling.

Rally bar R-Design models*

Rally bar and bulkhead hatch

Vehicles with the optional R-Design package are
equipped with a rally bar in the engine compart-
ment that must be removed before the battery
can be replaced.

1. Remove the hatch in the bulkhead on both

sides of the engine compartment (pry them
up carefully with a plastic knife or similar
object).

2. Remove the screw on each side of the

engine compartment holding the rally bar in
place.

3. Lift out the rally bar.

> The battery can now be removed (see the

instructions in the previous section).

After a new battery has been installed (see
the following section), reinstall the rally bar in
the reverse order.

NOTE

When reinstalling the rally bar, tighten the
screws to 22 ft lbs (30 Nm).

MAINTENANCE AND SERVICING

349

Installation

1. Lower the battery into the battery box.

2. Move the battery inward and to the side until

it reaches the rear edge of the box.

3. Tighten the clamp that secures the battery.

4. Connect the ventilation hose.

> Be sure that it is correctly connected to

the battery and the vent in the vehicle's
body.

5. Connect the red positive cable.

6. Connect the black negative cable.

7. Press in the rear cover. (See Removal).

8. Reinstall the molding. (See Removal).

9. Reinstall the front cover and secure it with

the clips. (See Removal).

Related information

Battery – handling (p. 345)

Battery – symbols (p. 344)

Fuses – introduction

The fuses help protect the vehicle's electrical
components from overloading.

There are relay/fuseboxes located in the engine
compartment, the passenger compartment and
the trunk.

If an electrical component fails to function, this
may be due to a blown fuse. The easiest way to
see if a fuse is blown is to remove it.

To do so:

1. Pull the fuse straight out. If a fuse is difficult

to remove, a special fuse removal tool is
located on the inside of the engine com-
partment fusebox cover.

2. From the side, examine the curved metal wire

in the fuse to see if it is intact.

If the wire is broken, insert a new fuse of the
same color and amperage (written on the fuse).

If fuses burn out repeatedly, have the electrical
system inspected by a trained and qualified Volvo
service technician.

WARNING

Never use metal objects or fuses with higher
amperage than those stated on the following
pages. Doing so could seriously damage or
overload the vehicle's electrical system.

Location of the fuseboxes

Engine compartment

Under the glove compartment

Under the glove compartment

Trunk

Engine compartment cold zone (Start/Stop
only)

MAINTENANCE AND SERVICING

350

Fuses – engine compartment

The fuses in the engine compartment protect
e.g., engine and brake functions.

MAINTENANCE AND SERVICING

}}

* Option/accessory.

351

Engine compartment, upper

Engine compartment, front

Engine compartment, lower

Positions

These fuses are all located in the engine com-
partment box. Fuses in C are located under A.

A decal on the inside of the cover shows the
positions of the fuses.

Fuses 1 – 15, 34 and 42 – 44 are relays/
circuit breakers and should only be removed
or replaced by a trained and qualified Volvo
service technician.

Fuses 16 – 33 and 35 – 41 may be changed
at any time when necessary.

There is a special fuse removal tool on the under-
side of the cover.

Pos

Function

A

Circuit breaker: central
electrical module under
the glove compartment

A

50

Circuit breaker: central
electrical module under
the glove compartment

50

Pos

Function

A

Circuit breaker: central
electrical module in the
trunk

A

60

Circuit breaker: central
electrical module under
the glove compartment

A

60

Circuit breaker: central
electrical module under
the glove compartment

A

60

Headed windshield

*, driv-

er's side

40

Windshield wipers

30

Climate system blower

A

40

Headed windshield

*, pas-

senger's side

40

ABS pump

40

ABS valves

20

Headlight washers

20

Pos

Function

A

Active Bending Lights-
headlight leveling

*

10

Central electrical module
(under the glove compart-
ment)

20

ABS

5

Adjustable steering force

*

5

Engine Control Module
(ECM), transmission, SRS

10

Heated washer nozzles

*

10

-

Lighting panel

5

-

-

-

Relay coils

5

Auxiliary lights

*

20

Horn

15

Relay coils, Engine Control
Module (ECM)

10

||

MAINTENANCE AND SERVICING

352

Pos

Function

A

Control module - auto-
matic transmission

15

A/C compressor (not 4-
cyl. engines)

15

Relay-coils A/C, relay coils
in engine compartment
cold zone for Start/Stop

5

Starter motor relay

A

30

Engine control module (4-
cyl. engines)

Ignition coils (5 cyl.
engines)

20

Engine Control Module (4-
cyl. engines)

20

Engine Control Module (5-
cyl. engines)

10

4-cyl. engines: mass air
meter, thermostat, EVAP
valve

10

5-cyl. engines: Injection
system, engine control
module

15

Pos

Function

A

A/C compressor (5-cyl.
engines), engine valves, oil
level sensor (5-cyl. only)

10

Engine valves/oil pump/
center heated oxygen
sensor (4-cyl. engines)

15

Front/rear heated oxygen
sensors (4-cyl. engines),
EVAP valve (5-cyl.
engines), heated oxygen
sensors (5-cyl. engines)

15

Oil pump/crankcase venti-
lation heater/coolant
pump (5-cyl. engines)

10

Ignition coils (4-cyl.
engines)

15

Fuel leakage detection (5-
cyl. engines), control mod-
ule for radiator shutter (5-
cyl. engines)

5

Fuel leakage detection,
A/C solenoid (4-cyl.
engines)

7.5

Coolant pump (4-cyl.
engines)

50

Pos

Function

A

Cooling fan

60 or 80
(4-cyl.
engines)

60 (5-cyl.
engines)

Power steering

100

A

This position is not used on vehicles with the optional Start/

Stop function, refer to the table "Engine compartment cold

zone" in Fuses – engine compartment cold zone (Start/Stop

only) (p. 357).

Related information

Fuses – glove compartment (p. 353)

Fuses – cargo area/trunk (p. 356)

MAINTENANCE AND SERVICING

}}

* Option/accessory.

353

Fuses – glove compartment

The fuses under the glove compartment protect
components such as the infotainment system
and optional power seat.

Fusebox A: General fuses

Fusebox B: Control module fuses

Fold aside the upholstery covering the fuseboxes.

1. Press the cover's lock and fold it up.

2. The fuses are accessible.

Positions: fusebox A

Pos

Function

A

Circuit breaker for the infotain-
ment system and for fuses 16-20

40

Windshield washers

25

-

-

-

Pos

Function

A

Keyless drive

* (door handles)

5

-

Controls in driver's door

20

Controls in front passenger's door

20

Controls in right rear passenger's
door

20

||

MAINTENANCE AND SERVICING

* Option/accessory.

354

Pos

Function

A

Controls in left rear passenger's
door

20

Keyless drive

*

7.5

Power driver's seat

*

20

Power front passenger's seat

*

20

-

Infotainment system display

5

Infotainment system: amplifier, Sir-
iusXM

™ satellite radio*

10

Sensus control module

15

Bluetooth hands-free system

5

-

Power moonroof

*

Courtesy lighting, climate system
sensor

5

12-volt sockets in tunnel console

15

Heated rear seat

* (passenger's

side)

15

Heated rear seat

* (driver's side)

15

Pos

Function

A

-

Heated front passenger's seat

*

15

Heated driver's seat

*

15

Park assist

*

Blind Spot Information System
(BLIS)

*, park assist camera*

5

All Wheel Drive

* control module

15

Active chassis system

*

10

Positions: fusebox B

Pos

Function

A

-

-

Front courtesy lighting, driver's
door power window controls,
power seat(s)

*,

7.5

Instrument panel

5

Adaptive cruise control/collision
warning

*

10

Pos

Function

A

Courtesy lighting, rain sensor

*,

HomeLInk

®

 Wireless Control Sys-

tem

*

7.5

Steering wheel module

7.5

Cental locking: fuel filler door

10

Electrically heated steering wheel

*

15

Electrically heated windshield

*

15

Trunk open

10

Electrical folding rear seat out-
board head restraints

*

10

Fuel pump

20

Climate system control panel

5

-

Alarm, On-board diagnostic sys-
tem

5

Satellite radio 

*, audio system

amplifier

10

Airbag system, occupant weight
sensor

10

Collision warning system

*

5

MAINTENANCE AND SERVICING

* Option/accessory.

355

Pos

Function

A

Accelerator pedal sensor, auto-
dim mirror function, heated rear
seats

*

7.5

-

Brake lights

5

Power moonroof

*

20

Immobilizer

5

Related information

Fuses – engine compartment (p. 350)

Fuses – cargo area/trunk (p. 356)

Fuses – engine compartment cold zone
(Start/Stop only) (p. 357)

MAINTENANCE AND SERVICING

* Option/accessory.

356

Fuses – cargo area/trunk

The fuses in the cargo area/trunk protect com-
ponents such as trailer connections, the parking
brake, etc.

Located behind the upholstery on the left side of the trunk

Positions

Pos

Function

A

Electric parking brake (left side)

30

Electric parking brake (right side)

30

Heated rear window

30

Trailer socket 2

*

15

-

Pos

Function

A

12-volt socket in trunk

15

-

-

-

-

Pos

Function

A

Trailer socket 1

*

40

-

Related information

Fuses – engine compartment (p. 350)

Fuses – glove compartment (p. 353)

Fuses – engine compartment cold zone
(Start/Stop only) (p. 357)

MAINTENANCE AND SERVICING

}}

357

Fuses – engine compartment cold

zone (Start/Stop only)

5

There are fuses in the engine compartment cold
zone on models with the Start/Stop function.

Location of Start/Stop fuses

Positions

Fuses A1, A2 and 1–11 are relays/circuit
breakers and should only be removed or
replaced by a trained and qualified Volvo
service technician.

Fuse 12 may be changed at any time when
necessary.

Pos

Function

A

Circuit breaker: central electrical
module in the engine compart-
ment

175

Circuit breaker: fuseboxes under
the glove compartment, central
electrical module in the trunk

175

Pos

Function

A

-

Circuit breaker: fusebox B under
the glove compartment (see
Fuses – glove compartment
(p. 353))

50

5

Option on 4-cyl. engines

||

MAINTENANCE AND SERVICING

358

Pos

Function

A

Circuit breaker: fusebox A under
the glove compartment (see
Fuses – glove compartment
(p. 353))

60

Circuit breaker: fusebox A under
the glove compartment (see
Fuses – glove compartment
(p. 353))

60

Circuit breaker: central electrical
module in the trunk

60

Climate system blower

40

Starter motor relay

30

Internal diode

50

Auxiliary battery

70

Central electrical module: auxili-
ary battery reference voltage,
auxiliary battery charging point

15

Related information

Fuses – engine compartment (p. 350)

Fuses – glove compartment (p. 353)

Fuses – cargo area/trunk (p. 356)

Start/Stop – introduction (p. 260)

MAINTENANCE AND SERVICING

}}

* Option/accessory.

359

Washing the vehicle

The vehicle should be washed at regular inter-
vals since dirt, dust, insects and tar spots
adhere to the paint and may cause damage. To
help prevent corrosion, it is particularly important
to wash the car frequently in the wintertime.

The following points should be kept in mind when
washing and cleaning the car:

CAUTION

Avoid using car washing detergents with a pH
value lower than 3.5 or higher than 11.5.
Doing so could result in discoloring of ano-
dized aluminum surfaces on e.g., roof rails or
the frames around the side windows.

Avoid washing your car in direct sunlight.
Doing so may cause detergents and wax to
dry out and become abrasive. To avoid
scratching, use lukewarm water to soften the
dirt before you wash with a soft sponge, and
plenty of sudsy water.

Bird droppings: Remove from paintwork as
soon as possible. Otherwise the finish may
be permanently damaged.

A detergent can be used to facilitate the
softening of dirt and oil.

Dry the car with a clean chamois and
remember to clean the drain holes in the
doors and rocker panels.

Tar spots can be removed with tar remover
after the car has been washed.

A stiff-bristle brush and lukewarm soapy
water can be used to clean the wiper blades.
Frequent cleaning of the windshield and
wiper blades improves visibility considerably
and also helps prolong the service life of the
wiper blades.

Wash off the dirt from the underside (wheel
housings, fenders, etc).

In areas of high industrial fallout, more fre-
quent washing is recommended.

NOTE

When washing the vehicle, remember to
remove dirt from the drain holes in the doors
and sills.

CAUTION

During high pressure washing, the spray
mouthpiece must never be closer to the
vehicle than 13" (30 cm). Do not spray
into the locks.

Dirt, snow, etc., on the headlights can
reduce lighting capacity considerably.
Clean the headlights regularly, for exam-
ple when refueling.

Special moonroof cautions:

Always close the moonroof and sun
shade before washing your vehicle.

Never use abrasive cleaning agents on
the moonroof.

Never use wax on the rubber seals
around the moonroof.

Exterior components

Volvo recommends the use of special cleaning
products, available at your Volvo retailer, for
cleaning colored plastic, rubber, or ornamental
components such as chromed strips on the exte-
rior of your vehicle. The instructions for using
these products should be followed carefully. Sol-
vents or stain removers should not be used.

The frames around the side windows, roof rails
and door frames near the windows

* are made of

anodized aluminum and should only be washed

||

MAINTENANCE AND SERVICING

360

with a cleaning product with a pH value between
3.5 till 11.5.

Components that should be washed with a cleaning
product with a pH value between 3.5 till 11.5 (generic
illustration)

CAUTION

Avoid waxing or polishing plastic or rub-
ber components

Polishing chromed strips can wear away
or damage the surface

Polishes containing abrasive substances
should not be used

Related information

Polishing and waxing (p. 361)

Cleaning the interior (p. 361)

Automatic car wash

The vehicle should be washed at regular inter-
vals since dirt, dust, insects and tar spots
adhere to the paint and may cause damage. To
help prevent corrosion, it is particularly important
to wash the car frequently in the wintertime.

We do NOT recommend washing your car in
an automatic wash during the first few
months (because the paint will not have
hardened sufficiently).

An automatic wash is a simple and quick way
to clean your car, but it is worth remembering
that it may not be as thorough as when you
yourself go over the car with sponge and
water. Keeping the underbody clean is most
important, especially in the winter. Some
automatic washers do not have facilities for
washing the underbody.

NOTE

Condensation may form temporarily on the
inside of the lenses of exterior lights such as
headlights, fog lights, or taillights. This is nor-
mal and the lights are designed to withstand
moisture. Normally, condensation will dissi-
pate after the lights have been on for a short
time.

CAUTION

Before driving into an automatic car
wash, turn off the optional rain sensor to
avoid damaging the windshield wipers.

Make sure that side view mirrors, auxiliary
lamps, etc, are secure, and that any
antenna(s) are retracted or removed. Oth-
erwise there is risk of the machine dis-
lodging them.

Chromed wheels: Clean chrome-plated
wheels using the same detergents used
for the body of the vehicle. Aggressive
wheel-cleaning agents can permanently
stain chrome-plated wheels.

WARNING

When the vehicle is driven immediately
after being washed, apply the brakes,
including the parking brake, several times
in order to remove any moisture from the
brake linings.

Engine cleaning agents should not be
used when the engine is warm. This con-
stitutes a fire risk.

Related information

Polishing and waxing (p. 361)

Cleaning the interior (p. 361)

Washing the vehicle (p. 359)

MAINTENANCE AND SERVICING

}}

361

Polishing and waxing

Normally, polishing is not required during the
first year after delivery, however, waxing may be
beneficial.

Before applying polish or wax the vehicle
must be washed and dried. Tar spots can be
removed with kerosene or tar remover. Diffi-
cult spots may require a fine rubbing com-
pound.

After polishing use liquid or paste wax.

Several commercially available products con-
tain both polish and wax.

Waxing alone does not substitute for polish-
ing a dull surface.

A wide range of polymer-based waxes can
be purchased today. These waxes are easy to
use and produce a long-lasting, high-gloss
finish that protects the bodywork against oxi-
dation, road dirt and fading.

Do not polish or wax your vehicle in direct
sunlight (the surface of the vehicle should
not be warmer than 113 °F (45  °C).

CAUTION

Volvo does not recommend the use of long-
life or durable paint protection coatings, some
of which may claim to prevent pitting, fading,
oxidation, etc. These coatings have not been
tested by Volvo for compatibility with your
vehicle's clear coat. Some of them may cause
the clear coat to soften, crack, or cloud. Dam-
age caused by application of paint protection
coatings may not be covered under your vehi-
cle's paint warranty.

Do not use metal polishing agents on ano-
dized aluminum surfaces. Doing so could
result in discoloring and damage the surface
finish.

Related information

Washing the vehicle (p. 359)

Cleaning the interior

Only use cleaning agents and car care products
recommended by Volvo. Clean regularly and fol-
low the instructions included with the car care
product.

Cleaning the interior

Upholstery care

Fabric

Clean with soapy water or a detergent. For more
difficult spots caused by oil, ice cream, shoe pol-
ish, grease, etc., use a clothing/fabric stain
remover. Consult your Volvo retailer.

Alcantera

TM

 suede-like material

Suede-like upholstery can be cleaned with a soft
cloth and mild soap solution.

||

MAINTENANCE AND SERVICING

362

Leather care

Volvo's leather upholstery is manufactured with a
protectant to repel soiling. Over time, sunlight,
grease and dirt can break down the protection.
Staining, cracking, scuffing, and fading can result.

Volvo offers an easy-to-use, non-greasy leather
care kit formulated to clean and beautify your
vehicle's leather, and to renew the protective
qualities of its finish. The cleaner removes dirt
and oil buildup. The light cream protectant
restores a barrier against soil and sunlight.

Volvo also offers a special leather softener that
should be applied after the cleaner and protec-
tant. It leaves leather soft and smooth, and
reduces friction between leather and other fin-
ishes in the vehicle.

Volvo recommends cleaning, protecting and con-
ditioning your vehicle's leather two to four times a
year. Ask your Volvo retailer about Leather Care
Kit 951 0251 and Leather Softener 943 7429.

Cleaning leather upholstery

1. Pour leather cleaner on a damp sponge and

squeeze it until the cleaner foams.

2. Apply the foam to the stain by moving the

sponge with circular movements.

3. Dampen the stain thoroughly with the

sponge. Let the sponge absorb the stain, do
not rub.

4. Dry the stain with soft paper towels or a

towel, and allow the leather to dry completely.

Protecting leather upholstery

1. Put a small amount of protectant cream on a

cloth and apply a thin coating of cream to the
upholstery with light circular movements.

2. Allow the leather to dry for 20 minutes.

This will help the leather resist staining and pro-
tect against sunlight's harmful UV rays.

CAUTION

Under no circumstances should gasoline,
naphtha or similar cleaning agents be
used on the plastic or the leather since
these can cause damage.

Take extra care when removing stains
such as ink or lipstick since the coloring
can spread.

Use solvents sparingly. Too much solvent
can damage the seat padding.

Start from the outside of the stain and
work toward the center.

Sharp objects (e.g. pencils or pens in a
pocket) or Velcro fasteners on clothing
may damage the textile upholstery.

Clothing that is not colorfast, such as
new jeans or suede garments, may stain
the upholstery.

Cleaning a leather-covered steering wheel

Remove soil, dust, etc., with a damp sponge
and a neutral soap solution.

Leather should be allowed to breath. Never
cover the steering wheel with a plastic pro-
tector.

Volvo recommends cleaning, protecting and
conditioning the steering wheel with Volvo's
Leather Care Kit 951 0251 and Leather
Softener 943 7429.

If there are stains on the steering wheel:

Type 1 (ink, wine, coffee, milk, sweat or blood)

Use a soft cloth or sponge. Wipe the wheel
with a solution with 5% ammonia. For blood
stains, mix approx. 1 cup (2 dl) of water and
one ounce (25g) of salt and wipe the stain.

Type 2 (fat, oil, sauces, or chocolate)

1. Same procedure as for type I stains.

2. Finish by rubbing the wheel with absorbent

paper or a towel.

Type 3 (dry soil or dust)

1. Remove the soil/dust with a soft brush.

2. Same procedure as for type I stains.

CAUTION

Sharp objects, such as rings, could damage
the leather on the steering wheel.

MAINTENANCE AND SERVICING

}}

363

Cleaning the seat belts

Clean only with lukewarm water and a mild soap
solution.

Cleaning floor mats

The floor mats should be vacuumed or brushed
clean regularly, especially during winter when
they should be taken out for drying. Spots on tex-
tile mats can be removed with a mild detergent.
For best protection in winter, Volvo recommends
the use of Volvo rubber floor mats. Consult your
Volvo retailer.

Spots on interior plastic, metal, or wood
surfaces

Cleaning interior plastic components should be
done with a cleaning agent specially designed for
this purpose. Consult your Volvo retailer.

CAUTION

Do not use cleaning agents with high
alcohol content such as washer fluid to
clean instrument panel glass.

Never spray cleaning agents or water
directly onto components with electrical
buttons or controls. Clean components of
this type by applying the cleaning agent/
water sparingly to a cloth and wiping the
components so that no liquid penetrates
into these components.

Related information

Washing the vehicle (p. 359)

Touching up paintwork

Paint damage requires immediate attention to
avoid rusting. Make it a habit to check the finish
regularly, for instance washing the vehicle.
Touch-up if necessary.

Paint repairs require special equipment and skill.
Contact your Volvo retailer for any extensive dam-
age.

Minor scratches can be repaired by using Volvo
touch-up paint.

Color code

Sample color code: US models


Content   ..  19  20  21  22   ..