Volkswagen New Beetle. Manual - part 2332


  Index      Volkswagen     Volkswagen New Beetle 1998-2008 year - service repair manual


Search            


Content   ..  2330  2331  2332  2333   ..


Volkswagen New Beetle. Manual - part 2332


Removal & Installation (01V Transaxle) 

1. On vehicles with auxiliary heater, remove exhaust pipe bolts at noise insulation. On all vehicles, remove 

noise insulation tray. See Fig. 25 . Place drain pan under transaxle. Remove drain plug. See Fig. 14 . 
Drain ATF. Unscrew bolts on oil pan in diagonal sequence and remove oil pan. Unscrew 2 bolts on ATF 
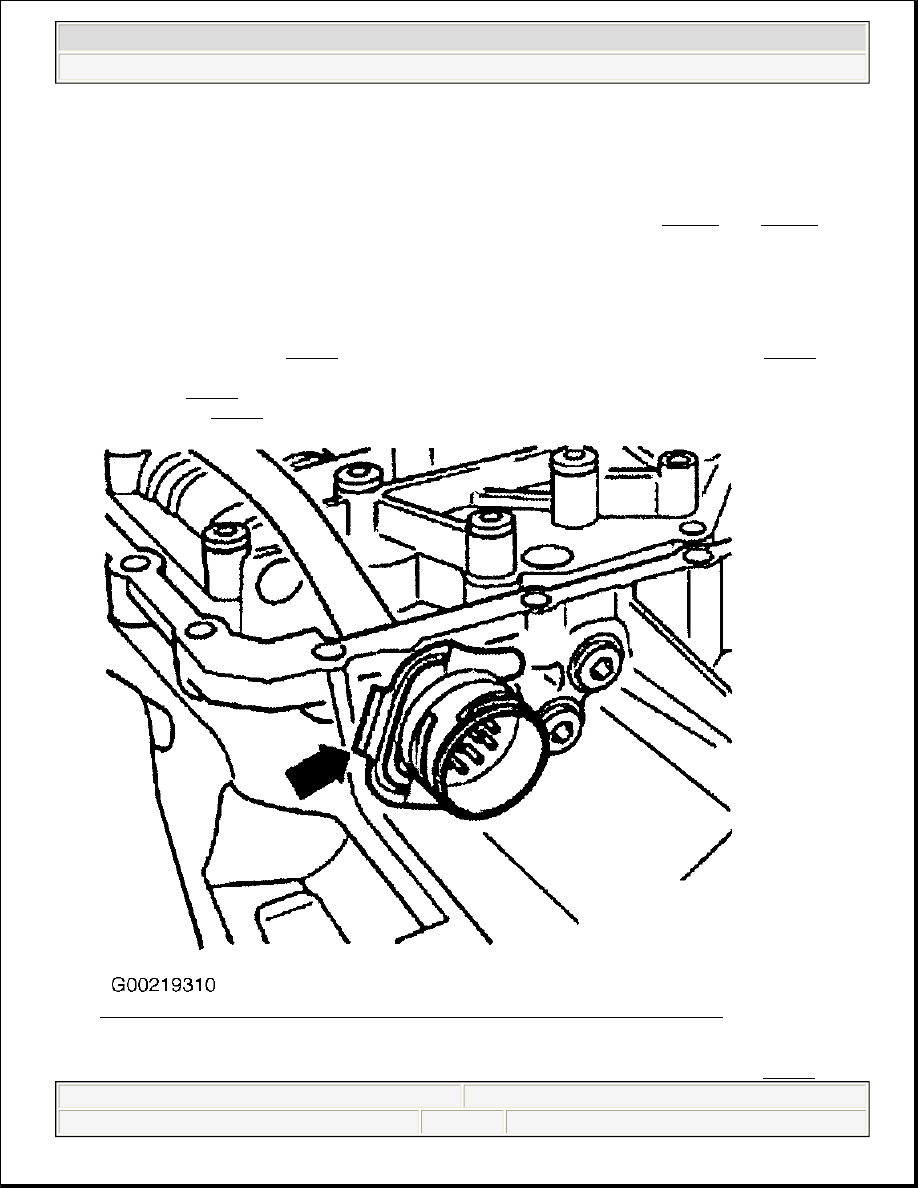
screen. See Fig. 43 . Pull ATF screen off valve body. Pry securing clip (arrow) off wiring harness 
connector. See Fig. 65 . 

Fig. 65: Removing Securing Clip Off Wiring Harness Connector (01V Transaxle) 
Courtesy of VOLKSWAGEN UNITED STATES, INC. 

2. On both valve bodies, pull connector (arrow or "A") off transaxle vehicle speed sensor. See Fig. 66 and 

NOTE:

Transaxle uses 2 different hydraulic control system valve body designs. Valve 
bodies are identified as E17 and E18. The following procedures apply to both 
valve body designs. For valve body exploded views, see Fig. 72 and Fig. 73 . 

NOTE:

In the following procedures, letters and numbers in parenthesis are shown in 
illustrations. 


2003 Volkswagen New Beetle GLS 

2001-04 AUTOMATIC TRANSMISSIONS Servicing - 01M & 01V


Helpmelearn Repair Manuals 


Wednesday, December 14, 2005 8:59:38 AM

Page 74 

© 2004 Mitchell Repair Information Company, LLC. 

Fig. 67 . On E18 valve body, pull connector "B" off transaxle RPM sensor. See Fig. 67 . On both valve 
bodies, only remove the bolts from the valve body which are marked with an arrow. See Fig. 68 . On E18 
valve body, bolt (A) does not apply and should be ignored. On E17 valve body, bolt (A) is shorter than all 
the other bolts.  

3. On both valve bodies, do not remove any other bolts as this could influence the function of the valve 

body. Detach valve body from transaxle and guide out connector on wiring harness. On E17 valve body, 
do not place valve body upside down on transaxle RPM sensor. 

Fig. 66: Removing Transaxle Vehicle Speed Sensor Connector (01V Transaxle - E17 Valve Body) 
Courtesy of VOLKSWAGEN UNITED STATES, INC.


2003 Volkswagen New Beetle GLS 

2001-04 AUTOMATIC TRANSMISSIONS Servicing - 01M & 01V


Helpmelearn Repair Manuals 


Wednesday, December 14, 2005 8:59:39 AM

Page 75 

© 2004 Mitchell Repair Information Company, LLC. 

Fig. 67: Removing Transaxle Vehicle Speed Sensor Connector (01V Transaxle - E18 Valve Body) 
Courtesy of VOLKSWAGEN UNITED STATES, INC.


2003 Volkswagen New Beetle GLS 

2001-04 AUTOMATIC TRANSMISSIONS Servicing - 01M & 01V


Helpmelearn Repair Manuals 


Wednesday, December 14, 2005 8:59:39 AM

Page 76 

© 2004 Mitchell Repair Information Company, LLC. 

Fig. 68: Removing & Installing Valve Body Bolts (01V Transaxle) 
Courtesy of VOLKSWAGEN UNITED STATES, INC. 

4. To install, reverse removal procedure. On E18 valve body, to ensure wiring harness does not become 

trapped when installing the valve body, route the wire with connector (C) according to the illustration. 


2003 Volkswagen New Beetle GLS 

2001-04 AUTOMATIC TRANSMISSIONS Servicing - 01M & 01V


Helpmelearn Repair Manuals 


Wednesday, December 14, 2005 8:59:39 AM

Page 77 

© 2004 Mitchell Repair Information Company, LLC. 


Content   ..  2330  2331  2332  2333   ..