Volkswagen Golf Variant / Jetta. Manual - part 248


  Index      Volkswagen     Volkswagen Golf Variant (2007), Jetta (2005) - service repair manual


Search            


Content   ..  246  247  248  249   ..


Volkswagen Golf Variant / Jetta. Manual - part 248


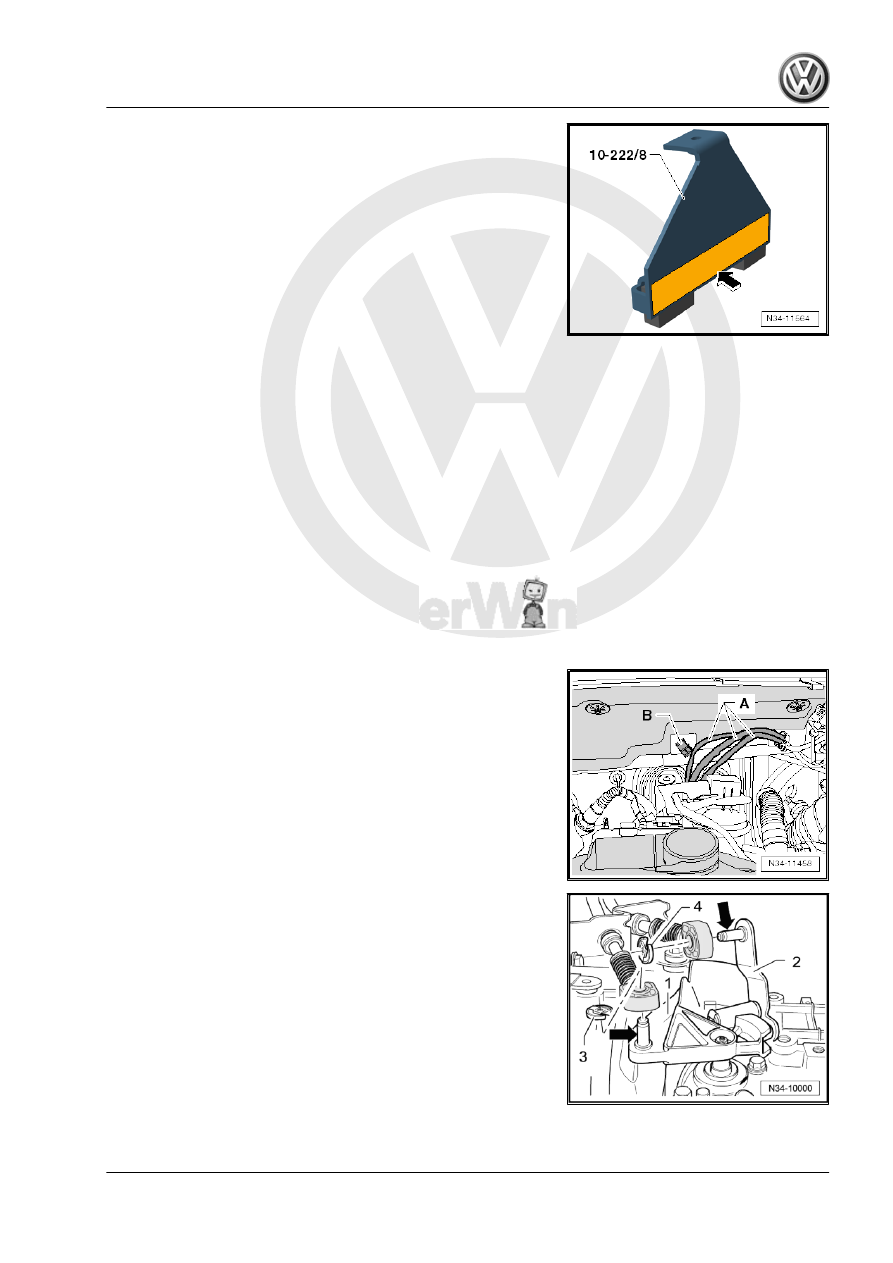
Bridge - Engine Support Feet - 10-222A/8- with cloth tape

-arrow-. Refer to the Parts Catalog (Chemical Materials).

5.1.1

Transmission, Removing

– First check whether a coded radio is installed. If so, obtain the

anti-theft code.

– Disconnect the battery ground cable. Refer to ⇒  Electrical

Connecting .

Later in the procedure, the Engine Support Bridge - 10-222A- is

connected to the engine lifting eyes.
– Remove the engine cover if it is blocking the lifting eyes.
– Remove the air filter housing if it is located near the battery.

Filter; Air Filter Housing, Removing and Installing .

– Remove the battery and the battery tray. Refer to ⇒  Electrical

Equipment; Rep. Gr.  27 ; Battery; Battery, Removing and In‐

stalling .

– Remove the lines -A- out from the bracket -B-.

– Remove the shift cable lock washer -3- from the transmission

shift lever -1- and remove the cable from the pin -arrow-.

Metal Relay Lever
– Remove the selector cable lock washer -4- from the relay lever

-2- and remove the cable from the pin -arrow-.

Plastic Relay Lever

5. Transmission, Removing and Installing, Jetta from MY 2005 , Golf Wagon from MY 2007 and Golf Wagon from MY 2010, Vehicles with

AWD    

167

be disconnected from the selector lever before removal.

– Pull the securing mechanism all the way forward in direction

of -arrow 1- and then unlock to the left in direction of

-arrow 2-.

– Press the relay lever forward (in the direction of -arrow 3-).
– The plastic relay lever is removed together with the cable re‐

tainer later in the procedure.

Continuation for All

– Remove the cable bracket from the transmission -arrows-, tie

up to the side.

– If equipped, remove the bleeder tube from the bevel gear

-arrow-.

Vehicles with A Pipe between the Clutch Master and Slave Cyl‐

inders
– Clamp the clutch master cylinder hose using a Hose Clamps

- Up To 25mm - 3094- .

168

and Slave Cylinders
– Clamp off the hose on the hose/line assembly -A- to the clutch

slave cylinder using the Hose Clamps - Up To 25mm - 3094- .

Continuation for All
– Pull the clamp -arrow- for the hose/line assembly or the pipe

out all the way to the stop.

– Remove the hose/line assembly or pipe from the bleeder/

clutch slave cylinder and seal it off.

Caution

Do not press the clutch pedal anymore.

– Remove the ground cable -1- from the top starter bolt.
– Disconnect the connector -2- from the Back-Up Lamp Switch

- F4- .

– Disconnect the connector and the wire from the starter.

– Remove the upper engine/transmission connecting bolts

-arrows-.

– Remove the upper bolt from the starter.
– If there are hose and cable connections located near the en‐

gine lifting eyes for the Engine Support Bridge - 10-222A- ,

these must now be removed.

– Install the Engine Support Bridge - Gearbox Bracket - T10346-

in the most rear hole out of the three holes in the battery tray.

– Use a collar bolt M6 x 80 or one of the battery tray bolts for

this.

– If there are hose and cable connections located near the en‐

gine lifting eyes for the Engine Support Bridge - 10-222A- ,

these must now be removed.

– Position the Engine Support Bridge - 10-222A- in front of the

hood support.

5. Transmission, Removing and Installing, Jetta from MY 2005 , Golf Wagon from MY 2007 and Golf Wagon from MY 2010, Vehicles with

AWD    

169

10-222A/8- :

– Then connect the Engine Support Bridge - Gearbox Bracket -

T10346- to the Engine Support Bridge - 10-222A- .

– Hook the Spindles into the left lifting eye on the engine.
– Pretension the engine/transmission assembly and Engine

Support Bridge - 10-222A- via the spindles.

– Loosen left and right front wheel bolts.
– Raise the vehicle.
– Remove the front wheels.
– Remove the lower part of the left front wheel housing liner.

– Remove the noise insulation. Refer to ⇒  Body Exterior; Rep.

Gr.  50 ; Noise Insulation .

170


Content   ..  246  247  248  249   ..