Volkswagen Golf Variant / Jetta. Manual - part 49


  Index      Volkswagen     Volkswagen Golf Variant (2007), Jetta (2005) - service repair manual


Search            


Content   ..  47  48  49  50   ..


Volkswagen Golf Variant / Jetta. Manual - part 49


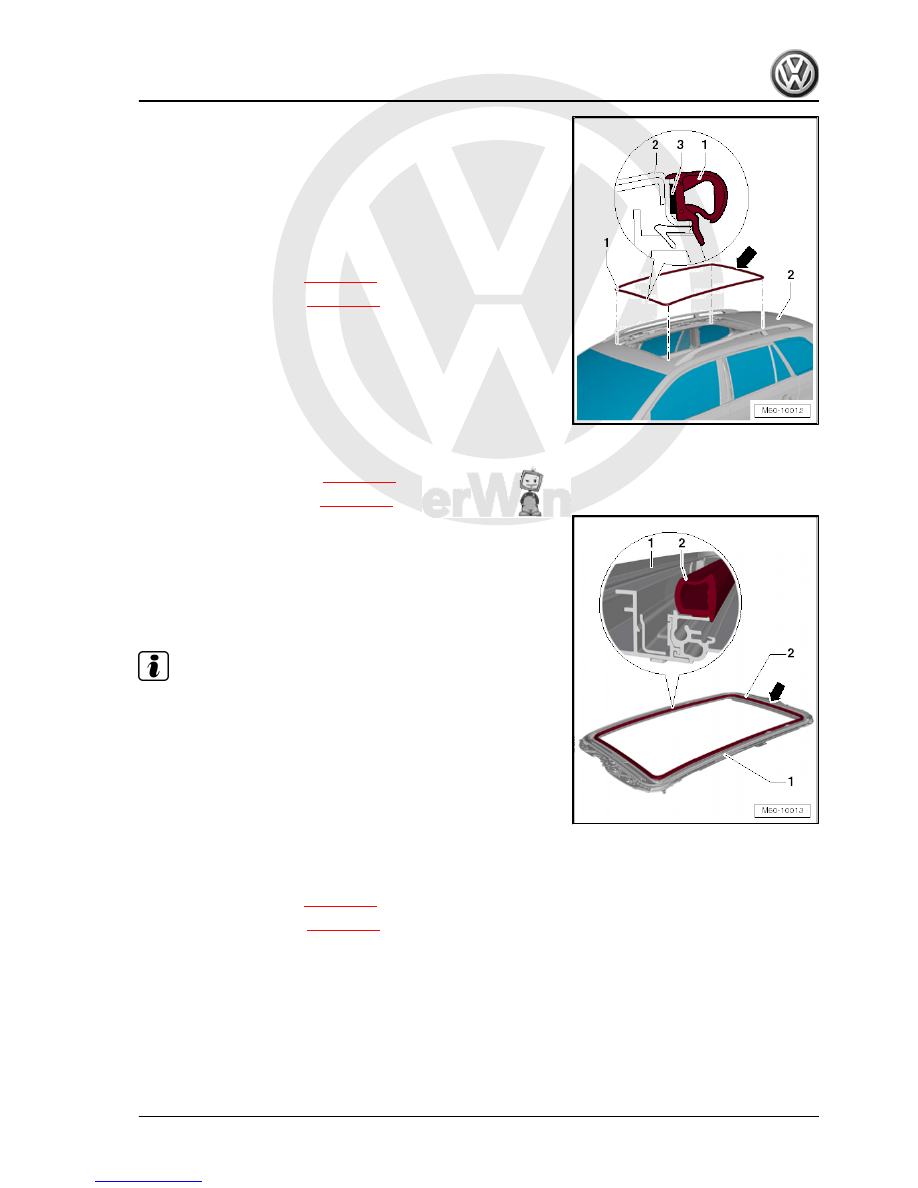
– Pull protective backing from adhesive tape -3- of new outer

seal -1- and press seal on roof -2-.

– The seal must not pull into the radii, otherwise the seal will

stretch and compress.

– Press in outer seal evenly and all round twice using roller for

door insulation foil -3356- .

– Install rear glass panel 

⇒ page 187

 .

– Install front glass panel 

⇒ page 185

 .

2.10

Renewing inner seal

– Remove front glass panel 

⇒ page 185

 .

– Remove rear glass panel 

⇒ page 187

 .

– Pull inner seal -2- off assembly frame -1-.
– Remove existing adhesive residue using adhesive strip re‐

mover -VAS 6349- .

– Bonding surface must be free of dust and grease.
– Clean bonding surface completely using cleaning solution -D

009 401 04- .

Note

To guarantee a good bonding of seal, do not bond at a tempera‐

ture below 20°C.

– Place inner seal -2- with butt positioned on rear centre of roof

cut-out, onto bonding surface of assembly frame -1-.

– Pull protective backing from adhesive tape of new inner seal

section by section and press it on.

– The seal must not pull into the radii, otherwise the seal will

stretch and compress.

– Press inner seal in evenly and all round twice using roller

-3356- .

– Install rear glass panel 

⇒ page 187

 .

– Install front glass panel 

⇒ page 185

 .

2.11

Removing and installing wind deflector

2.11.1

Removing

– Open front glass panel completely.

2. Panorama sliding sunroof (Arvin-Meritor)    

193


– Using a screwdriver, unclip mounting bracket -2- of wind de‐

flector -1- from assembly frame -3-.

– Remove bolts -2- from wind deflector -1-.
– Remove wind deflector -1- upwards.

2.11.2

Installing

Install in reverse order of removal.
Specified torque
Wind deflector bolts 2 Nm

194


Wind deflector mounting bracket must engage audibly.

Securing clip of mounting bracket must always be renewed

after removal.

2.12

Removing and installing wind deflector

bracket

2.12.1

Removing

– Remove wind deflector 

⇒ page 193

 .

– Using a drift -1-, drive dowel pin -3- out of upper net strip -2-.

– Pull wind deflector bracket -1- out of net strip -5- in direction

of -arrow-.

– Pull tensioning wire -2- out of lower net strip -4- and net -3-.

2.12.2

Installing

– Carefully push tensioning wire -2- through net -3- into lower

net strip -4-.

Further installation is performed in reverse order of removal.
Use a new dowel pin to secure wind deflector bracket.
– Install wind deflector 

⇒ page 193

 .

2. Panorama sliding sunroof (Arvin-Meritor)    

195


glass panel and sun blind

– Removing preselector for panorama sliding roof glass panel

trim .

2.14

Removing and installing sliding sunroof

motor

2.14.1

Removing

– Removing lights and front operating unit ⇒  Electrical system;

Rep. Gr.  96 ; Lights and switches in roof trim .

WARNING

On some models, a ribbon cable is bonded to the light cut-out

web. Before removing sliding sunroof motor, carefully detach

ribbon cable from web and push it to side. Ensure that ribbon

cable is not damaged when doing this.

196


Content   ..  47  48  49  50   ..