Toyota Sienna (2019 year). Manual - part 11


  Index      Toyota     Toyota Sienna - service manual 2019 year in english


Search            copyright infringement  


Content   ..  9  10  11  12   ..


Toyota Sienna (2019 year). Manual - part 11


SIENNA_OM_OM08025U_(U)

161

3-3. Adjusting the seats

3

Op
eration

 o

f each

 compo

nen
t

?

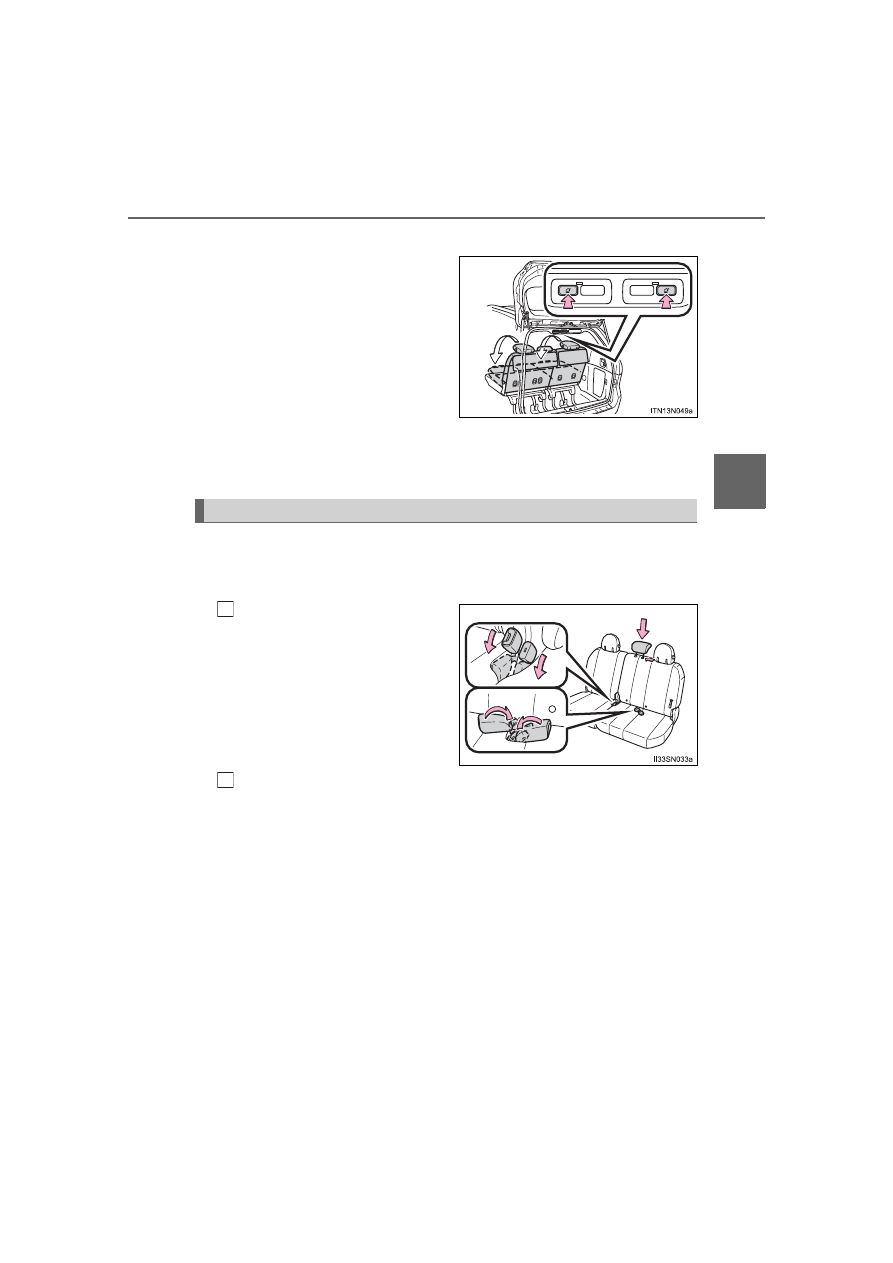
Folding down the third seatbacks
Press 

the 

folding/returning

switch.

?

Returning the third seatbacks
Press  the  folding/returning  switch,  returning  switch  (

P.  164)  or

seatback angle adjustment switch (

P. 154).

Before stowing or returning third seat, remove any items from the floor
area to prevent interference with moving parts.

?

Before stowing the third seats

Lower  the  center  head
restraint  to  the  lowest  posi-
tion (

P. 173), and stow the

seat belt buckles.

Stow the center seat belt. (

P. 32)

Stowing the third seats (manual seats)

1

2

162

SIENNA_OM_OM08025U_(U)

3-3. Adjusting the seats

?

Stowing the third seats

Pull  the  handle  to  move  the
seat rearward. Then push the
seat down.

The  outside  head  restraints  are
folded automatically.

Push  the  seat  against  the
floor. 
Open the flaps.

?

Before returning the third seats
Be sure to move the second seats forward from the rearmost posi-
tion, as they may interfere with the third seats returning operation.

1

2

SIENNA_OM_OM08025U_(U)

163

3-3. Adjusting the seats

3

Op
eration

 o

f each

 compo

nen
t

?

Returning the third seats

Return the flaps. 
Pull the handle and lift up the
seat rearward.

Push  the  seat  forward  and
then  engage  the  front  leg
locks.

Make  sure  the  front  and  rear
legs are locked securely.

Raise the seatback and the outside head restraints. (

P. 159)

You  can  operate  the  power  third  seats  when  the  shift  lever  is  in  P.
Before stowing or returning third seat, remove any items from the floor
area to prevent interference with moving parts.

?

Before stowing the third seats

Lower  the  center  head
restraint  to  the  lowest  posi-
tion  (

P.  173)  and  stow  the

seat belt buckles.

Stow the center seat belt. (

P. 32)

1

2

Stowing the third seats (power seats)

3

1

2

164

SIENNA_OM_OM08025U_(U)

3-3. Adjusting the seats

?

Stowing the third seats

Press  and  hold  the  stowing
switch.

A beep sounds twice to indicate
the  start  of  the  operation.  The
beep  sounds  again  twice  when
the operation is completed.

Open the flaps.

?

Before returning the third seats
Be sure to move the second seats forward from the rearmost posi-
tion, as they may interfere with the third seats returning operation.

?

Returning the third seats

Return the flaps. 
Press and hold the returning
switch  until  the  seat  cushion
is locked.

A beep sounds twice to indicate
the  start  of  the  operation.  The
beep  sounds  again  twice  when
the  seats  are  locked  in  folded-
down  position.  Make  sure  the
front  and  rear  legs  are  locked
securely.

Raise the outside head restraints.

1

ITN13N056

2

1

2

SIENNA_OM_OM08025U_(U)

165

3-3. Adjusting the seats

3

Op
eration

 o

f each

 compo

nen
t

?

Power third seat (vehicles with power third seat)

?

If the indicator light above the switches flashes three times when the folding/
returning  switch  is pressed, the  folding operation will not start.  Make  sure
the shift lever is in P.

?

If any of the following conditions occur while the seat is operating, the seat
operation  will  stop.  The  indicator  light  above  the  switches  will  flash  three
times and a beep will sound for about 10 seconds:
• An object is caught between the seatback and seat cushion.
• The stowing switch is released.
• Other  power  third  seat  switch  is  pushed  while  operating  the  stowing

switch.

• The shift lever is moved from P when the engine switch is turned to the

“ON”  position  (vehicles  without  a  smart  key  system)  or  IGNITION  ON
mode (vehicles with a smart key system).

If  the  engine  is  started  during  operating,  the  seat  operation  may  also  be
stopped.
To continue the folding operation, the seatback must be returned to its orig-
inal position first.

?

AUTO ACCESS SEAT (if equipped)
The AUTO ACCESS SEAT cannot be removed.

?

“3RD SEAT” warning light (vehicles with power third seat)
The  warning  light  comes  on  if  the  third
seat  operation  is  not  yet  complete  when
the  engine  switch  is  turned  to  the  “ON”
position (vehicles without a smart key sys-
tem)  or  IGNITION  ON  mode  (vehicles
with a smart key system).

166

SIENNA_OM_OM08025U_(U)

3-3. Adjusting the seats

WARNING

?

When folding the rear seatbacks down
Observe the following precautions. Failure to do so may result in death or
serious injury.

?

Do not fold the seatbacks down while driving.

?

Stop the vehicle on level ground, set the parking brake and shift the shift
lever to P.

?

Do not allow anyone to sit on a folded seatback or in the luggage compart-
ment while driving.

?

Do not allow children to enter the luggage compartment.

?

Be careful not to get any part of your body pinched by a seat.

?

Seat adjustment

?

Be careful that the seat does not hit passengers or luggage.

?

To  reduce  the risk  of sliding  under  the lap  belt during a  collision,  do  not
recline the seat more than necessary. 
If the seat is reclined too far, the lap belt may slide past the hips and apply
restraint  forces  directly  to  the  abdomen,  or  your  neck  may  contact  the
shoulder belt, increasing the risk of death or serious injury in the event of
an accident. 
Adjustments should not be made while driving as the seat may unexpect-
edly move and cause the driver to lose control of the vehicle.

?

After returning the rear seatbacks or installing seats
Observe the following precautions. Failure to do so may result in death or
serious injury.

?

Make sure the seatback is securely locked by pushing it forward and rear-
ward on the top.

?

Check that the seat belts are not twisted or caught in the seatback.

?

Make sure the seat is locked in place by trying to shake the seatback and
lift up the seat cushion.

?

Removing the second seats

?

Do not leave a seat in the vehicle if it has been disengaged from the floor.

?

Do not sit on or place anything on a seat that has been removed from the
vehicle.

SIENNA_OM_OM08025U_(U)

167

3-3. Adjusting the seats

3

Op
eration

 o

f each

 compo

nen
t

WARNING

?

Stowing the third seats

?

Make sure that the seat path is clear before moving the seat. Otherwise,
injury  may  result  from  contact  with,  or  by  being  pinched  by  parts  of  the
seat.

?

Manual  third  seats:  Do  not  sit  on  the  third  seat  when  it  is  in  the  stowed
position with the seatback upright.

?

Power third seats: Do not continue the stowing operation when the indica-
tor above the stowing switch and returning switch comes on or flashes. An
object or a person may be caught in the seat.

?

Power  third  seats:  During  the  stowing  operation,  to  prevent  the  vehicle
from moving, do not shift the shift lever out of P with the engine switch in
the “ON” position (vehicles without a smart key system) or IGNITION ON
mode (vehicles with a smart key system).

?

When  adjusting  the  seat  position or  the  ottoman  (vehicles  with  Otto-
man seats)
Make  sure  to  leave  enough  space  around  the  feet  so  as  not  to  get  them
caught.

?

When using the ottoman (vehicles with Ottoman seats)

?

Do not sit on the ottoman. Seat belts may not be properly worn which may
result in death or serious injury.

?

Stow the ottoman when you get in and out of the vehicle or when the otto-
man is not in use to avoid stumbling over it.

?

Do not use the ottoman feature when the vehicle is in motion. The ottoman
feature should only be used when the vehicle is stationary. If the ottoman
feature is in use during an accident the lap belt may slide past the hips.
This could also result in restraint forces being applied to the abdomen or
your  neck  may  contact  the  shoulder  belt,  increasing  the  risk  of  death  or
serious injury.

168

SIENNA_OM_OM08025U_(U)

3-3. Adjusting the seats

NOTICE

?

To prevent damage to the seat

?

Avoid putting heavy loads on a folded seat that is being used as a tempo-
rary table.

?

Do not sit on or put heavy loads on a second seat that has been removed
from the vehicle. The metal tips of the seat leg may be damaged, prevent-
ing reinstallation of the seat.

?

The second seats must be reinstalled in their original positions. If they are
installed in the wrong position, the seat locks or bezels will be damaged.

?

Make sure that the path the seat will move through is clear before stowing
or returning the third seat.

?

8-passenger  models:  Be  sure  to  raise  the  stowed  second  center  seat
above the outer trim, when removing from the storage box of the luggage
room.

?

Stowing the seat belt
The seat belts and the buckles must be stowed before you fold down the
rear seatbacks.

?

To prevent an ottoman malfunction (vehicles with Ottoman seats)

?

Do not place any objects in the second passenger footwell that could pre-
vent the operation of the ottoman.

?

Do not place heavy luggage on the ottoman.

?

Do not place anything under the ottoman when in use. There is a possibil-
ity that something may get caught and cause damage when stowing the
ottoman.

169

SIENNA_OM_OM08025U_(U)

3-3. Adjusting the seats

3

Op
eration

 o

f each

 compo

nen
t

Driving position memory

The seat is automatically adjusted to allow the driver to enter and exit
the vehicle easily.
When  all  of  the  following  have
been  performed, the driver’s seat
is  automatically  adjusted  to  a
position that allows driver to enter
and exit the vehicle easily.

• The shift lever has been shifted

to P.

• The  engine  switch  has  been

turned off.

• The driver’s seat belt has been unfastened.

When any of the following has been performed, the driver’s seat will
automatically return to their original positions.

• The engine switch has been turned to ACCESSORY mode.
• The driver’s seat belt has been fastened.

?

Operation of the power easy access system
When exiting the vehicle, the power easy access system may not operate if
the seat is already close to the rearmost position, etc.

: If equipped

This feature automatically adjusts the driver’s seat and outside
rear view mirrors to make entering and exiting the vehicle easier
or to suit your preferences.

Power easy access system

170

SIENNA_OM_OM08025U_(U)

3-3. Adjusting the seats

Your  preferred  driving  position  (the  position  of  the  driver’s  seat  and
outside rear view mirrors) can be recalled by pressing a button.
Two different driving positions can be recorded into memory.

?

Recording procedure

Check that the shift lever is in P.
Turn the engine switch to IGNITION ON mode.
Adjust  the  driver’s  seat  and  outside  rear  view  mirrors  to  the
desired positions.
While  pressing  the  “SET”
button,  or  within  3  seconds
after  the  “SET”  button  is
pressed,  press  button  “1”  or
“2” until the signal beeps.

If  the  selected  button  has
already  been  preset,  the  previ-
ously  recorded  position  will  be
overwritten.

?

Recall procedure

Check that the shift lever is in P.
Turn the engine switch to IGNITION ON mode.
Press  one  of  the  buttons  for
the driving position you want
to  recall  until  the  signal
beeps.

Driving position memory

1

2

3

4

1

2

3

SIENNA_OM_OM08025U_(U)

171

3-3. Adjusting the seats

3

Op
eration

 o

f each

 compo

nen
t

?

To stop the position recall operation part-way through
Perform any of the following:

?

Press the “SET” button.

?

Press button “1” or “2”.

?

Operate  any  of  the  seat  adjustment  switches  (only  cancels  seat  position
recall).

?

Operating  the  driving  position  memory  after  turning  the  engine switch
off
Recorded seat positions can be activated up to 180 seconds after the driver’s
door is opened and another 60 seconds after it is closed again.

?

In order to correctly use the driving position memory function
If a seat position is already in the furthest possible position and the seat is
operated in the same direction, the recorded position may be slightly different
when it is recalled.

Each electronic key can be registered to recall your preferred driving
position.

?

Registering procedure
Record your driving position to button “1” or “2” before performing
the following:
Carry only the key you want to register, and then close the driver’s
door.
If 2 or more keys are in the vehicle, the driving position cannot be
recorded properly.

Check that the shift lever is in P.
Turn the engine switch to IGNITION ON mode.
Recall the driving position that you want to record.
While  pressing  the  recalled
button,  press  and  hold  the
door  lock  switch  (either  lock
or  unlock)  until  the  signal
beeps.

Memory recall function

1

2

3

4

172

SIENNA_OM_OM08025U_(U)

3-3. Adjusting the seats

?

Recall procedure
Make  sure  that  the  doors  are  locked  before  recalling  the  driving
position.  Carry  the  electronic  key  that  has  been  registered  to  the
driving position, and then unlock and open the driver’s door using
the smart key system or wireless remote control.

The driving position will move to the recorded position.
If the driving position is in a position that has already been recorded, the
seat and outside rear view mirrors will not move.

?

Cancelation procedure
Carry only the key you want to cancel and then close the driver’s
door.
If 2 or more keys are in the vehicle, the driving position cannot be
canceled properly.

Check that the shift lever is in P.
Turn the engine switch to IGNITION ON mode.
While  pressing  the  “SET”  button,  press  and  hold  the  door  lock
switch (either lock or unlock) until the signal beeps twice.

If  the  button  could  not  be canceled,  the  signal  beeps  continuously  for
approximately 3 seconds.

?

Recalling the driving position using the memory recall function

?

Different driving positions can be registered for each electronic key. There-
fore, the driving position that is recalled may be different depending on the
key being carried.

?

If a door other than the driver’s door is unlocked with the smart key system,
the driving position cannot be recalled. In this case, press the driving posi-
tion button which has been set.

?

Customization
The unlock door settings of the memory recall function can be customized. 
(Customizable features: 

P. 545)

WARNING

?

Seat adjustment caution
Take care during seat adjustment so that the seat does not strike the rear
passenger or squeeze your body against the steering wheel.

1

2

3

173

SIENNA_OM_OM08025U_(U)

3-3. Adjusting the seats

3

Op
eration

 o

f each

 compo

nen
t

Head restraints

Up

Pull the head restraints up.

Down

Push the head restraint down while
pressing the lock release button. 

Up

Pull the head restraints up.

Down

Push the head restraint down while
pressing the lock release button.

*

: 8-passenger models only

To use

Pull the head restraints up.

To fold

Press the button.

Head restraints are provided for all seats.

Front and second outside seats

Lock release button

1

2

Second center

*

 and third center seats

Lock release button

1

2

Third outside seats

1

2

174

SIENNA_OM_OM08025U_(U)

3-3. Adjusting the seats

?

Removing the head restraints

Front and second outside seats

Second center

*

 and third center seats

Third outside seats

The head restraint cannot be removed.

Pull  the  head  restraint  up  while  pressing
the lock release button.

Pull  the  head  restraint  up  while  pressing
the lock release button.

*

:  8-passenger models only

Lock release button

Lock release button

SIENNA_OM_OM08025U_(U)

175

3-3. Adjusting the seats

3

Op
eration

 o

f each

 compo

nen
t

?

Installing the head restraints

Front and second outside seats

Second center

*

 and third center seats

?

Adjusting the height of the head restraints

?

Adjusting the center seat head restraints
Always  raise  the  head  restraint  one  level  from  the  stowed  position  when
using.

Align  the  head  restraint  with  the  installa-
tion  holes  and  push  it  down  to  the  lock
position.
Press  and  hold  the  lock  release  button
when lowering the head restraint.

Align  the  head  restraint  with  the  installa-
tion  holes  and  push  it  down  to  the  lock
position.
Press  and  hold  the  lock  release  button
when lowering the head restraint.

*

:  8-passenger models only

Make  sure  that  the  head  restraints  are
adjusted  so  that  the  center  of  the  head
restraint is closest to the top of your ears.

Lock release button

Lock release button

176

SIENNA_OM_OM08025U_(U)

3-3. Adjusting the seats

WARNING

?

Head restraint precautions
Observe the following precautions regarding the head restraints. Failure to
do so may result in death or serious injury.

?

Use the head restraints designed for each respective seat.

?

Adjust the head restraints to the correct position at all times.

?

After  adjusting  the  head  restraints,  push  down  on  them  and  make  sure
they are locked in position.

?

Do not drive with the head restraints removed.


Content   ..  9  10  11  12   ..