Toyota 86 (2018 year). Manual - part 13

2-2. Instrument cluster
Setting the shift position indicator and shift-up indicator
(vehicles with a manual transmission)
Displaying of the shift position indicator and shift-up indicator can be
turned on/off.
STEP
1
Press the “ODO/TRIP” switch repeatedly until the setting
screen is displayed. (P. 202)
STEP
2
Each time the switch is pressed and held, the display changes
between on/off.
“G-on”: Display on
“G-oFF”: Display off
Setting the REV indicator
■ Changing the REV indicator settings
The engine speed at which the REV indicator turns on at and
whether a buzzer sounds or not when the light turns on can be set.
Engine speed setting range: From 2000 to 7400 rpm (r/min)
Press the “DISP” switch repeatedly until the setting screen is
STEP
1
displayed. (P. 203)
STEP
2
Press and hold the
“DISP”
switch.
“REV.” and the thousandth place
flash. After flashing, the number
changes each time the button is
pressed and held.
204

2-2. Instrument cluster
STEP
3
Press the “DISP” switch.
The hundredth place flashes.
After flashing, the number
changes each time the button is
pressed and held.
2
Press the “DISP” switch.
STEP
4
A buzzer sounds once, and setting of the engine speed value is
complete.
STEP
5
Press and hold the
“DISP”
switch.
Each time the “DISP” switch is
pressed and held, the buzzer
changes between activated and
deactivated.
“b-on”: Buzzer activated
“b-oFF”: Buzzer deactivated
When the setting changes from
“b-oFF” to
“b-on”, the buzzer
sounds 3 times.
Press the “DISP” switch.
STEP
6
When the buzzer sounds, all settings have been completed. The set-
tings are displayed.
■ Deactivating the REV indicator settings
After setting the thousandth
place to
“-”, press the
“DISP”
switch once.
205

2-2. Instrument cluster
■ Outside temperature display
● In the following situations, the correct outside temperature may not be
displayed.
• When the vehicle is very hot, such as when under the sun.
• When the vehicle is idling or being driven at low speeds such as in a
traffic jam or when the engine is stopped and then restarted immedi-
ately afterward.
• When the actual outside temperature is outside of the indicator range.
● If “” is displayed for approximately 1 minute or more or if the outside
temperature is not displayed, the system may be malfunctioning. Have
the vehicle inspected by your Toyota dealer.
WARNING
■ The information display at low temperatures
Allow the interior of the vehicle to warm up before using the liquid crystal
information display. At extremely low temperatures, the information display
monitor may respond slowly, and display changes may be delayed.
For example, there is a lag between the driver's shifting and the new shift
position number appearing on the display. In this case, wait until the display
changes and take care not to downshift again, causing rapid and excessive
engine braking and possibly an accident resulting in death or serious injury.
206

2-2. Instrument cluster
Multi-information display (color display)
Summary of functions
The multi-information display presents the driver with a variety of driv-
ing-related data, such as the current outside temperature. The multi-
information display can also be used to change the meter settings.
2
Meter control switches (P. 208)
“ODO/TRIP” switch (P. 208)
Menu icons (P. 209)
The menu icon bar will be displayed momentarily when the meter control
switch is used to change the displayed content.
Content display area
A variety of information can be displayed by selecting a menu icon. Addi-
tionally, a warning message will be displayed in some situations.
• Menu icon content (P. 209)
• Warning message (P. 218, 407)
Odometer/trip meter display area (P. 219)
Displays the following items:
• Odometer/trip meter
• Outside temperature
207

2-2. Instrument cluster
Using the multi-information display
■ Using the content display area
The content display area is operated using the meter control
switches.
: Select menu icons
: Change displayed
content, scroll up/
down the screen
and move the cursor
:
Enter
:
Return to the previ-
ous screen
For information pertaining to the content of each menu icon, refer to
the explanation of each item under the heading of the relevant menu
icon.
■ Using the odometer/trip meter display area
Items in this area are operated using the “ODO/TRIP” switch.
Press: Change displayed item
Each time the switch is pressed,
the displayed item changes in the
order of odometer trip meter A
trip meter B.
Press and hold: Reset
Display the desired trip meter and
press and hold the switch to reset
the trip meter.
208

2-2. Instrument cluster
Menu icons
Select a menu icon to display its content.
Drive information (P. 210)
Select to display various drive data.
Exclusive content for 86 (P. 212)
2
Select to display the G-force display, stopwatch, and other useful
functions for sporty driving.
Settings display (P. 217)
Select to change the meter display settings.
Warning message display (P. 218, 407)
Select to display warning messages and measures to be taken if a
malfunction is detected.
209

2-2. Instrument cluster
Drive information (
)
■ Drive information (page 1)
Current fuel consumption
Displays the current rate of fuel
consumption.
Average fuel consumption
Displays the average fuel con-
sumption since the function was
reset.
Driving range
Displays the estimated maximum
distance that can be driven with
the quantity of fuel remaining.
● Pressing and holding
will reset the average fuel consump-
tion.
● Use the displayed fuel consumption as a reference.
● This distance is computed based on your average fuel con-
sumption. As a result, the actual distance that can be driven may
differ from that displayed.
● When only a small amount of fuel is added to the tank, the dis-
play may not be updated.
When refueling, turn the “ENGINE START STOP” switch off. If
the vehicle is refueled without turning the
“ENGINE START
STOP” switch off, the display may not be updated.
210
2-2. Instrument cluster
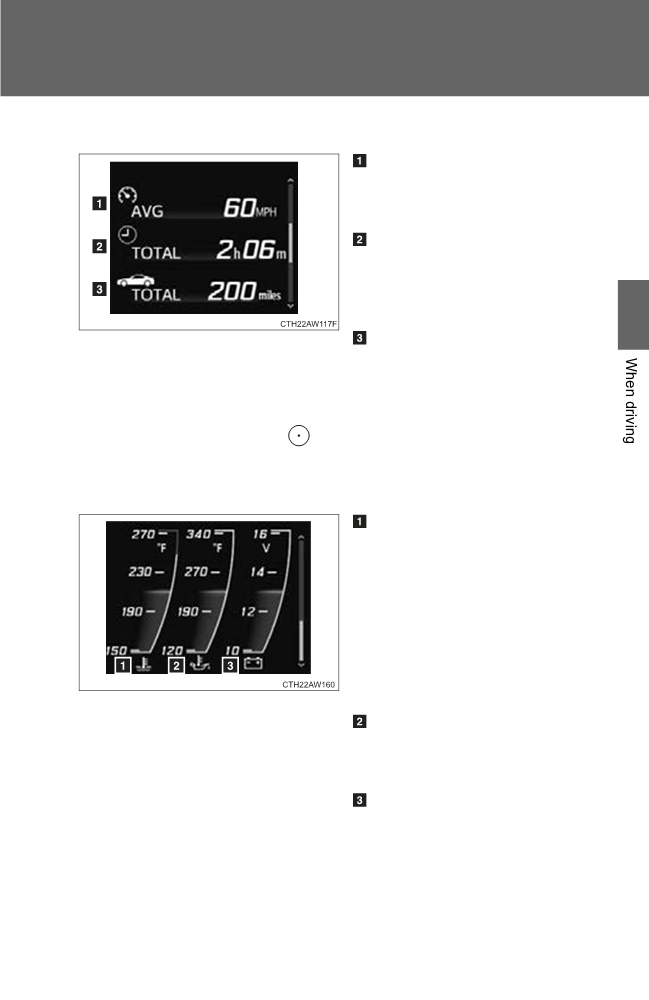
■ Drive information (page 2)
Average vehicle speed
Displays the average vehicle
speed since display was reset.
Driving time
Displays the cumulative time the
vehicle has been driven since dis-
play was reset.
2
Driving distance
Displays the cumulative distance
the vehicle has been driven since
display was reset.
● Pressing and holding
will reset the average vehicle speed/
driving time/driving distance.
■ Drive information (page 3)
Engine coolant temperature
gauge
Displays the engine coolant tem-
perature.
If the engine coolant temperature
gauge needle/indicator enters the
red zone, a buzzer will sound and
a warning message will be dis-
played.
Engine oil temperature gauge
Displays the engine oil tempera-
ture.
Voltmeter
Displays the charging voltage.
As voltage displayed may
be different from the actual
battery voltage, use the volt-
meter as a guideline.
211

2-2. Instrument cluster
● Pressing and holding
will turn the range value display on the
engine coolant temperature gauge display on/off.
Exclusive content for 86 (
)
■ G-force
Displays lateral G-forces on the vehicle
Also displays, around the periphery of the G-force display, the left and
right steering amount, accelerator pedal input, and brake fluid pres-
sure
The following 2 screens are available for displaying G-force
• Normal display screen: Suitable for confirming current lateral G-forces
on the vehicle
• Peak-hold display screen: Suitable for confirming the size and direction
of the maximum lateral G-forces on the vehicle
212

2-2. Instrument cluster
● Reading the display
Record of the maximum G-
forces
• Displayed on the peak-hold
display screen only
• To reset the record of maxi-
mum G-forces, press and hold
while the peak-hold display
2
screen is displayed.
Current G-force value
(ana-
lyzed value of front/rear and
left/right G-forces)
G-force values that can be dis-
played
Front/Rear: Up to 1.3 G
Left/Right: Up to 2.5 G
G-force ball trace
The maximum number of ball
trace segments for the normal
display screen is 20 and 10 for
the peak-hold display screen.
G-force ball
(acceleration G-
forces on the vehicle)
213

2-2. Instrument cluster
Scale of the G-force display
The scale of the record of the
maximum G-forces and G-force
ball trace can be changed
between
1.0 G and
0.5 G by
pressing and holding
while
the normal display screen is dis-
played.
Accelerator pedal input
Brake fluid pressure
Steering amount
If the steering wheel is turned
completely to the left or right, the
bottom side of the gauge on the
corresponding side will be illumi-
nated in red.
This display is intended for use as a guideline. Depending on factors such as
the road surface condition, temperature and vehicle speed, the display may
not show the actual condition of the vehicle.
■ Power and torque curve
Power output
Torque
Current engine speed
The vertical bar will slide laterally
according to the current engine
speed.
This chart is intended for reference only and does not show the actual
engine torque or output.
214

2-2. Instrument cluster
■ Stopwatch
Measures and displays current lap time and previous lap times
Top screen
Measurement screen
2
Fastest lap time (top screen)
When the timer is reset, “’”” will be displayed.
Fastest lap time (measurement screen)
Current lap time
Total lap time
Past lap times
Records of the 50 most recent lap times will be displayed.
Meter control switch operation guide
● Changing between the stopwatch screens
To change to the measurement screen: Press
To change to the top screen: Press
215

2-2. Instrument cluster
● Operating the measurement screen
:
Start/stop measure-
ment
:
Mark off one lap
:
Reset measured lap
times
: Scroll through the
lap times
● Resetting measured lap times
After stopping the measurement, press
● To display other content while the stopwatch is operating
If the measurement screen is displayed, press
to display the
top screen. Then operate the meter control switches to display
other content. While other items are displayed, the measurement
will continue but the stopwatch cannot be operated.
216

2-2. Instrument cluster
Settings display (
)
Use the meter control switches on the steering wheel to change set-
tings.
STEP
1
Press
or
to select
STEP
2
Operate the switches to select a desired item.
STEP
3
Press
/
or
/
to change the setting and then
2
press
to confirm the change.
Item
Settings
Details
On
Select to enable/disable the welcome
screen when the “ENGINE START
Welcome screen
STOP” switch is turned to IGNITION
Off
ON mode.
Select to enable/disable the REV indi-
cator and set the engine speed at
which the REV indicator will be illumi-
--00 rpm
nated.
RPM
(OFF) ~
To disable, select “--” for the engine
7400 rpm
speed (--00 rpm)
Selectable engine speed range: 2000
REV.
to 7400 rpm
On
Select to enable/disable the sounding
of a buzzer when the REV indicator is
Buzzer
illuminated. This setting can be
Off
changed only when the REV indicator
is enabled.
GSI (vehicles with a
On
Select to enable/disable the shift posi-
manual transmis-
tion indicator and shift-up indicator.
Off
sion)
(P. 186)
English
Select to change the language dis-
Language
French
played.
Spanish
217

2-2. Instrument cluster
Item
Settings
Details
km, km/h,
km/l
km, km/h,
Select to change the units of measure
Units
l/100km
displayed.
miles,
MPH,
MPG
Yes
Select to reset the meter display set-
Initialization
tings to the default setting.
No
Warning message (
)
Select to display warning messages related to situations such as a
vehicle malfunction.
● If there is more than one message to be displayed, press
/
to change the display.
● If there are no warning mes-
sages to be displayed, a mes-
sage indicating so will be
displayed.
218

2-2. Instrument cluster
Odometer/trip meter display area
■ Odometer
Displays the total distance the vehicle has been driven.
■ Trip meter A/trip meter B
Displays the distance the vehicle has been driven since the meter
was last reset. Trip meters A and B can be used to record and display
different distances independently.
2
To reset, display the desired trip meter and press and hold the “ODO/
TRIP” switch.
■ Outside temperature
Displays the outside temperature within the range of -40°F (-40°C) to
122°F (50°C). Low outside temperature indicator comes on when the
ambient temperature is 37°F (3°C) or lower.
219

2-2. Instrument cluster
■G-force display
● Depending on the vehicle usage conditions, the brake fluid pressure dis-
play may not reach its maximum reading even though the brake pedal is
fully depressed.
● If a battery terminal is disconnected and reconnected, the steering
amount display may be disabled temporarily. After driving the vehicle for
a while, the display will be enabled.
■ Suspension of the settings display
● The settings cannot be changed while driving. When changing settings,
park the vehicle in a safe place.
● If a warning message is displayed, operation of the settings display will
be suspended.
■ Using the stopwatch
If the engine is stopped while the stopwatch is operating, the stopwatch will
stop and the time up to that point will be recorded.
■ Outside temperature display
● In the following situations, the correct outside temperature may not be
displayed.
• When the vehicle is very hot, such as when under the sun.
• When the vehicle is idling or being driven at low speeds such as in a
traffic jam or when the engine is stopped and then restarted immedi-
ately afterward.
• When the actual outside temperature is outside of the indicator range.
● If “” is displayed for approximately 1 minute or more or if the outside
temperature is not displayed, the system may be malfunctioning. Have
the vehicle inspected by your Toyota dealer.
■Liquid crystal display
Small spots or light spots may appear on the display. This phenomenon is
characteristic of liquid crystal displays, and there is no problem continuing to
use the display.
220