Renault Megane Coupe (2016 year). Manual - part 12


  Index      Renault     Renault Megane Coupe - service manual 2016 year in english


Search            


Content   ..  10  11  12  13   ..


Renault Megane Coupe (2016 year). Manual - part 12


4.6

ENGINE OIL LEVEL: topping up, filling 

(1/3)

Topping up/filling

The vehicle must be parked on level 

ground and the engine should be cold 

(for instance, before the engine is 

started up for the first time in the day).
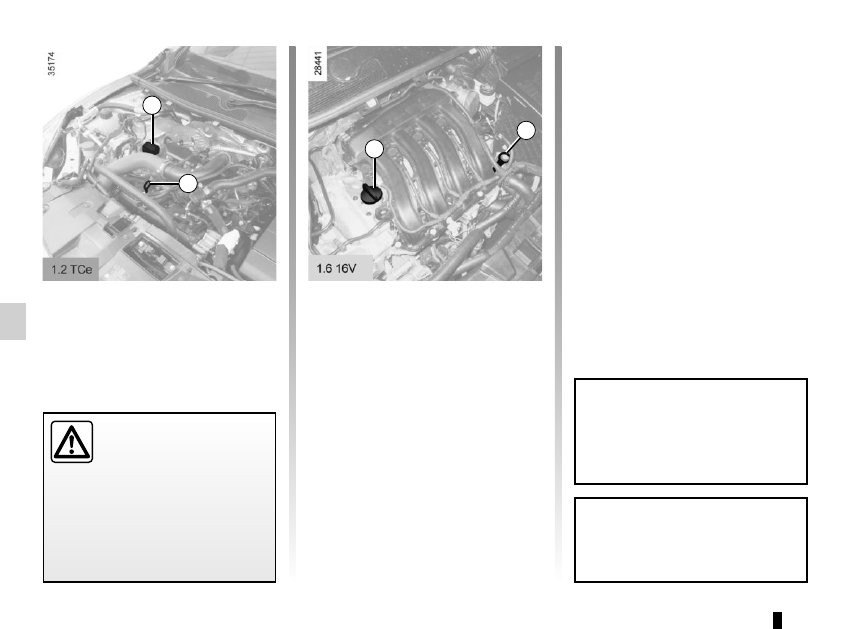
– Unscrew cap 1;
–  top up the level (as a guide, the ca-

pacity between the minimum and 

maximum reading on the dipstick 2 

is between 1.5 and 2 litres, depend-

ing on the engine);

–  wait for approximately 10 minutes to 

allow the oil to flow into the engine;

–  check the level using the dipstick 2 

(as described above).

Once the operation has been com-

pleted, ensure that the dipstick is 

pushed in as far as it will go or that the 

cap-type dipstick is completely screwed 

in.

Do not exceed the max level and 

do not forget to refit cap 1 and dip-

stick 2.

1

2

1

2

Before performing any 

action in the engine com-

partment, the ignition must 

be switched off by pressing 

the engine stop button (please see 

the information on “Starting, stop-

ping the engine” in Section 2).

In order to prevent splashback, it is 

recommended that a funnel be used 

when topping up/filling with oil.

4.7

ENGINE OIL LEVEL: topping up, filling 

(2/3)

2

1

2

1

1

2

1

2

1

2

In order to prevent splashback, it is 

recommended that a funnel be used 

when topping up/filling with oil.

Do not exceed the max level and 

do not forget to refit cap 1 and dip-

stick 2.

Consult your approved Dealer at 

once if you notice an abnormal or 

repeated drop in any of the fluid 

levels.

4.8

2

ENGINE OIL LEVEL: topping up, filling 

(3/3)/

OIL CHANGE

Engine oil change: if you 

are changing the oil when 

the engine is hot, be careful 

not to scald yourself if the 

oil overflows.

Filling: take care when 

topping up the oil that 

no oil drips onto engine 

components - risk of fire. 

Remember to refit the cap securely 

as there is a risk of fire if oil splashes 

onto hot engine components.

Never run the engine in an 

enclosed space as exhaust 

gases are poisonous.

Oil change

Service interval: refer to the 

Maintenance Document for your vehi-

cle.

Engine oil grade

Refer to the maintenance document for 

your vehicle.

Oil change capacity

Please refer to the maintenance docu-

ment for your vehicle, or contact an au-

thorised dealer. 

Always check the engine oil level using 

the dipstick, as explained previously (it 

should never fall below the minimum 

level, or be over the maximum level on 

the dipstick).

1

The engine may be hot 

when carrying out opera-

tions in close proximity. In 

addition, the engine cooling 

fan can come on at any moment.
Risk of injury.

Before performing any 

action in the engine com-

partment, the ignition must 

be switched off by pressing 

the engine stop button (please see 

the information on “Starting, stop-

ping the engine” in Section 2).

2

1

4.9

LEVELS 

(1/3)

Coolant

With the engine switched off and on 

level ground, the level when cold must 

be between the “MINI" and "MAXI" 

marks on coolant reservoir 1.
Top this level up when cold before it 

reaches the MINI mark.

Checking intervals
Check the coolant level regularly
 

(very severe damage is likely to be 

caused to the engine if it runs out of 

coolant).
If the level needs to be topped up, only 

use products approved by our Technical 

Department which ensure:
–  protection against freezing;
–  anticorrosion protection of the coo-

ling system.

No operations should be 

carried out on the cooling 

circuit when the engine is 

hot.

Risk of burns.

Consult your approved dealer at 

once if you notice an abnormal or 

repeated drop in any of the fluid 

levels.

1

Replacement intervals
Refer to the Maintenance Document for 

your vehicle.

The engine may be hot 

when carrying out opera-

tions in close proximity. In 

addition, the engine cooling 

fan can come on at any moment.
Risk of injury.

Before performing any 

action in the engine com-

partment, the ignition must 

be switched off by pressing 

the engine stop button (please see 

the information on “Starting, stop-

ping the engine” in Section 2).

4.10

LEVELS 

(2/3)

Brake fluid level

The level should be read with the engine 

switched off and on level ground. This 

should be checked frequently, and any 

time you notice even the slightest loss 

in braking efficiency.

Level 2
It is normal for the level to drop as 

the linings become worn, but it should 

never drop below the “MINI” warning 

line.
If you wish to check the disc and drum 

wear yourself, you should obtain the 

document explaining the checking pro-

cedure from our network or from the 

manufacturer’s website.

Topping up
After any operation on the hydraulic cir-

cuit, a specialist must replace the fluid.
Only use fluids approved by our 

Technical Department (and taken from 

a sealed container).

Replacement intervals
Refer to the Maintenance Document for 

your vehicle.

2

Consult your approved dealer at 

once if you notice an abnormal or 

repeated drop in any of the fluid 

levels.

Before performing any 

action in the engine com-

partment, the ignition must 

be switched off by pressing 

the engine stop button (please see 

the information on “Starting, stop-

ping the engine” in Section 2).

The engine may be hot 

when carrying out opera-

tions in close proximity. In 

addition, the engine cooling 

fan can come on at any moment.
Risk of injury.

4.11

LEVELS 

(3/3)

/FILTERS

Windscreen/headlight washer 

reservoir

Topping up
With the engine switched off, open the 

cap  3, fill until you can see the fluid, 

then refit the cap.

Liquid
Screen wash product (product with an-

tifreeze in winter).

Jets
Use a tool such as a needle to adjust 

the height of the windscreen washer 

jets.

NOTE
Depending on the vehicle, to find 

out the fluid level, open the cap 3 

and pull out the dipstick.

Filters

The replacement of filter elements (air 

filter, passenger compartment filter, 

diesel filter, etc.) is scheduled in the 

maintenance operations for your vehi-

cle.
Replacement intervals for filter ele-

ments:  refer to the Maintenance 

Service Booklet for your vehicle.

3

The engine may be hot 

when carrying out opera-

tions in close proximity. In 

addition, the engine cooling 

fan can come on at any moment.
Risk of injury.

Before performing any 

action in the engine com-

partment, the ignition must 

be switched off by pressing 

the engine stop button (please see 

the information on “Starting, stop-

ping the engine” in Section 2).

4.12

TYRE PRESSURE 

(1/2)

A

Label A

Open the door to read it.
Tyre pressures should be checked 

when the tyres are cold.
If the tyre pressures cannot be checked 

when the tyres are cold, increase the 

pressures from 0.2 to 0.3 bar (or 3 PSI). 

Never deflate a hot tyre.

Vehicle fitted with a tyre pressure 

monitoring system
If under-inflated (puncture, low pres-

sure, etc.), the warning light 


lights up on the instrument panel; 

please refer to “Tyre pressure loss 

warning” or “Tyre pressure monitoring 

system” in Section 2.
Special note concerning fully laden 

vehicles (Maximum Permissible All-Up 

Weight) and towing a trailer: the maxi-

mum speed must be limited to 60 mph 

(100 kph) and the tyre pressure in-

creased by 0.2 bar.

Please refer to the information on 

“Weights” in Section 6.

Tyre safety and use of snow chains: 

Refer to the information on “Tyres” in 

Section 5 for the servicing conditions 

and, depending on the version, the use 

of chains.

4.13

TYRE PRESSURES 

(2/2)

G: tyre pressure for the emergency 

spare wheel.

H: emergency spare wheel tyre dimen-

sion if different to the four tyres fitted to 

the vehicle.

B: dimension of the tyres fitted to the 

vehicle.
C: tyre pressures for the front wheels 

(non-motorway).
D: tyre pressures for the rear wheels 

(non-motorway).
E: tyre pressures for the front wheels 

(motorway).
F: tyre pressures for the rear wheels 

(motorway).

C

D

F

E

G

A

H

B

For your safety and to 

comply with the law. 
When they need to be re-

placed, only tyres of the 

same make, size, type and profile 

should be used on a single axle.
They must: either have a load ca-

pacity and speed rating at least 

equal to those of the original 

tyres, or conform to those recom-

mended by an authorised dealer.
Failure to heed these instructions 

could endanger your safety and 

affect your vehicle’s roadworthi-

ness.
Risk of loss of control of the ve-

hicle.

4.14

The battery 1 does not require any 

maintenance.

Label A

Observe the indications on the battery:

– 2  naked flames and smoking are for-

bidden;

– 3 eye protection required;

– 4 keep away from children;

– 5 explosive materials;

– 6 refer to the handbook;

– 7 corrosive materials.

Handle the battery with care 

as it contains sulphuric acid 

which must not come into 

contact with the eyes or 

skin. If it does, wash the affected 

area with plenty of cold water. If 

necessary, consult a doctor.
Ensure that naked flames, red hot 

objects and sparks do not come into 

contact with the battery as there is a 

risk of explosion.

BATTERY 

(1/2)

Depending on the vehicle, a system 

continuously checks the battery charge 

status. If the level drops, the message 

“Battery low start engine” is displayed 

on the instrument panel. In this case, 

start the engine. Then the message 

“Battery charging” appears on the in-

strument panel for the duration of the 

charging time.
The charge status of your battery can 

decrease especially if you use your ve-

hicle:
–  for short journeys;
–  for driving in town;
–  when the temperature drops;
–  after extended use of consumers 

(radio etc.) with the engine switched 

off.

1

The engine may be hot 

during operations in close 

proximity. In addition, the 

engine cooling fan may 

start at any moment.
Risk of injury.

A

2

3

4

5

6

7

4.15

BATTERY 

(2/2)

The battery is a specific 

type, please ensure it is 

replaced with the same 

type. Consult an approved 

dealer.

8

9

Replacing the battery
As this operation is complex, we advise 

you to contact an authorised dealer.

Vehicle fitted with the Stop and Start 

function
After changing or disconnecting the bat-

tery, the message “New battery?” ap-

pears on the instrument panel. Select 

“Yes” or “No” with a short press on one 

of the buttons 8 or 9, then confirm with 

a long press on one of the two buttons.

Before performing any 

action in the engine com-

partment, the ignition must 

be switched off by pressing 

the engine stop button (please see 

the information on “Starting, stop-

ping the engine” in Section 2).

4.16

BODYWORK MAINTENANCE 

(1/2)

You should

Wash your car frequently, with the 

engine off, with cleaning products rec-

ommended by the manufacturer (never 

use abrasive products). Rinse thor-

oughly beforehand with a jet:

–  

spots of tree resin and industrial 

grime;

–  

mud in the wheel arches and under-

neath the body which forms damp 

patches;

–  

bird droppings, which cause a 

chemical reaction with the paint that 

rapidly discolours paintwork and 

may even cause the paint to peel 

off;

   wash the vehicle immediately to 

remove these marks since it is im-

possible to remove them by polish-

ing;

–  

salt, particularly in the wheel arches 

and underneath the body after driv-

ing in areas where the roads have 

been gritted.

Remove any plant matter (resin, leaves, 

etc.) from the vehicle regularly.

What you should not do

Do not degrease or clean mechani-

cal components (e.g. the engine com-

partment), underneath the body, parts 

with hinges (e.g. inside the doors) and 

painted plastic external fittings (e.g. 

bumpers) using high-pressure clean-

ing equipment or by spraying on prod-

ucts not approved by our Technical 

Department. Doing this could give rise 

to corrosion or operational faults.
Wash the vehicle in bright sunlight or 

freezing temperatures.
Do not scrape off mud or dirt without 

pre-wetting.
Allow dirt to accumulate on the exterior.
Allow rust to form following minor im-

pacts.
Do not use solvents not approved by 

our Technical Department to remove 

stains as this could damage the paint-

work.
Do not drive in snow or muddy condi-

tions without washing the vehicle, par-

ticularly under the wheel arches and 

body.

A well-maintained vehicle will last 

longer. It is therefore recommended to 

maintain the exterior of the vehicle reg-

ularly.
Your vehicle has been treated with very 

effective anti-corrosion products. It is 

nevertheless subject to various outside 

influences.

Corrosive agents in the atmosphere

–  

atmospheric pollution (built-up and 

industrial areas),

–  

saline atmospheres (near the sea, 

particularly in hot weather),

–  

seasonal and damp weather condi-

tions (e.g. road salt in winter, water 

from road cleaners, etc.).

Minor impacts

Abrasive action

Dust and sand in the air, mud, road grit 

thrown up by other vehicles, etc.
You should take a number of minor pre-

cautions in order to safeguard your ve-

hicle against such risks.

4.17

Respect local regulations about wash-

ing vehicles (e.g. do not wash your ve-

hicle on a public highway).
Observe the vehicle stopping distances 

when driving on gravelled surfaces to 

prevent paint damage.
Repair, or have repaired quickly, areas 

where the paint has been damaged, to 

prevent corrosion spreading.
Remember to visit the body shop pe-

riodically in order to maintain your 

anti-corrosion warranty. Refer to the 

Maintenance Document.
If it is necessary to clean mechani-

cal components, hinges, etc., spray 

them with products approved by our 

Technical Department to protect them 

after they have been cleaned.

BODYWORK MAINTENANCE 

(2/2)

We have selected special products 

to care for your vehicle and you can 

obtain these from the manufactur-

er’s accessory outlets.

Using a roller type car wash

Return the windscreen wiper stalk to 

the Park position (refer to the informa-

tion on the “Windscreen washer, wiper” 

in Section 1). Check the mounting of 

external accessories, additional lights 

and mirrors, and ensure that the wiper 

blades are secured with adhesive tape.

Remove the radio aerial mast if your 

vehicle is fitted with this equipment. 

Remember to remove the tape and refit 

the antenna after washing.

Cleaning the headlights

As the headlights are made of plastic 

“glass”, use a soft cloth or cotton wool 

to clean them. If this does not clean 

them properly, moisten the cloth with 

soapy water, then wipe clean with a soft 

damp cloth or cotton wool.

Finally, carefully dry off with a soft dry 

cloth.
Cleaning products containing alco-

hol must not be used.

Vehicles with a matte paint 

finish

This type of paint requires certain pre-

cautions.

Do not do the following
–  

use wax-based products (polishing);

–  

rub hard;

–  

wash the vehicle in a roller-type car 

wash;

–  

wash the vehicle using a high-pres-

sure device;

–  

attach stickers to the paintwork (risk 

of leaving marks).

You should do the following
Wash the vehicle by hand using plenty 

of water, using a soft cloth or a gentle 

sponge.

4.18

Glass instrument panel

(e.g.: instrument panel, clock, exterior 

temperature display, radio display, mul-

timedia or multifunction display etc.)
Use a soft cloth (or cotton wool).

If this does not clean them properly, 

use a soft cloth (or cotton wool) slightly 

moistened with soapy water and then 

wipe clean with another soft damp cloth 

or cotton wool.

Finally, carefully dry off with a soft dry 

cloth.
Do not use products containing alco-

hol and/or spray fluids on the area.

Seat belts

These must be kept clean.

Use products selected by our Technical 

Department (Approved outlets) or 

warm, soapy water and a sponge and 

wipe with a dry cloth.

Detergents or dyes must not be used 

under any circumstances.

INTERIOR TRIM MAINTENANCE 

(1/2)

Textiles (seats, door trim, etc)

Vacuum-clean the textiles regularly.

Liquid stain
Use soapy water.
Dab lightly (never rub) with a soft cloth, 

rinse and remove the excess.

Solid or pasty stain
Carefully remove the excess solid or 

pasty material immediately with a spa-

tula (working from the edges to the 

centre to avoid spreading the stain).

Clean as for a liquid stain.

Special instructions for sweets or 

chewing gum
Put an ice cube on the stain to solidify 

it, then proceed as for a solid stain.

A well-maintained vehicle will last 

longer. It is therefore recommended to 

maintain the interior of the vehicle re-

gularly.
A stain should always be dealt with 

swiftly.
Whatever type of stain is on the trim, 

use cold (or warm) soapy water with 

natural soap.
Detergents (washing-up liquid, pow-

dered products, alcohol-based pro-

ducts) should not be used.
Use a soft cloth.
Rinse and soak up the excess.

For further recommendations for 

maintaining the interior, and/or for 

any unsatisfactory results, please 

see an authorised dealer.

4.19

You are strongly recom-

mended not to use high-

pressure or spray cleaning 

equipment inside the pas-

senger compartment: use of such 

equipment could impair the correct 

functioning of the electrical or elec-

tronic components in the vehicle, or 

have other detrimental effects.

INTERIOR TRIM MAINTENANCE 

(2/2)

You should not:

You are strongly advised not to po-

sition objects such as deodorants, 

scents, etc. near air vents, as this could 

damage your dashboard trim.

Removal/replacing removable 

equipment originally fitted in 

the vehicle

If you need to remove equipment in 

order to clean the passenger com-

partment (for example, mats), always 

ensure that they are correctly refitted 

and are the right way around (the dri-

ver’s mat should be fitted on the driver’s 

side, etc.) and fit them with the compo-

nents supplied with the equipment (for 

example, the driver mat should always 

be fixed using the pre-fitted mounting 

components).
With the vehicle stationary, ensure that 

nothing will impede driving (anything 

obstructing the pedals, heel wedged by 

the mat, etc.).

4.20

5.1

Section 5: Practical advice

Puncture  . . . . . . . . . . . . . . . . . . . . . . . . . . . . . . . . . . . . . . . . . . . . . . . . . . . . . . . . . . . . . . . . . . . . . .  

5.2

Emergency spare wheel . . . . . . . . . . . . . . . . . . . . . . . . . . . . . . . . . . . . . . . . . . . . . . . . . . . . . . . . . .  

5.2

Tyre inflation kit . . . . . . . . . . . . . . . . . . . . . . . . . . . . . . . . . . . . . . . . . . . . . . . . . . . . . . . . . . . . . . . . .  

5.3

Tools (Jack/Wheelbrace, etc.) . . . . . . . . . . . . . . . . . . . . . . . . . . . . . . . . . . . . . . . . . . . . . . . . . . . . . .  

5.8

Wheel trims - wheel . . . . . . . . . . . . . . . . . . . . . . . . . . . . . . . . . . . . . . . . . . . . . . . . . . . . . . . . . . . . . .  

5.9

Changing a wheel . . . . . . . . . . . . . . . . . . . . . . . . . . . . . . . . . . . . . . . . . . . . . . . . . . . . . . . . . . . . . . .   5.10

Tyres (tyre and wheel safety, use in winter)  . . . . . . . . . . . . . . . . . . . . . . . . . . . . . . . . . . . . . . . . . . .   5.12

Headlights (changing bulbs) . . . . . . . . . . . . . . . . . . . . . . . . . . . . . . . . . . . . . . . . . . . . . . . . . . . . . . .   5.15

Rear lights (changing bulbs) . . . . . . . . . . . . . . . . . . . . . . . . . . . . . . . . . . . . . . . . . . . . . . . . . . . . . . .   5.18

Indicator lights (changing bulbs) . . . . . . . . . . . . . . . . . . . . . . . . . . . . . . . . . . . . . . . . . . . . . . . . . . . .   5.23

interior lighting:<UD-sous-titre> changing bulbs</UD-sous-titre> . . . . . . . . . . . . . . . . . . . . . . . . . . .   5.24

Fuses . . . . . . . . . . . . . . . . . . . . . . . . . . . . . . . . . . . . . . . . . . . . . . . . . . . . . . . . . . . . . . . . . . . . . . . . .   5.26

Battery . . . . . . . . . . . . . . . . . . . . . . . . . . . . . . . . . . . . . . . . . . . . . . . . . . . . . . . . . . . . . . . . . . . . . . . .   5.28

RENAULT card: battery . . . . . . . . . . . . . . . . . . . . . . . . . . . . . . . . . . . . . . . . . . . . . . . . . . . . . . . . . . .   5.30

Fitting a radio . . . . . . . . . . . . . . . . . . . . . . . . . . . . . . . . . . . . . . . . . . . . . . . . . . . . . . . . . . . . . . . . . . .   5.31

Accessories . . . . . . . . . . . . . . . . . . . . . . . . . . . . . . . . . . . . . . . . . . . . . . . . . . . . . . . . . . . . . . . . . . . .   5.32

Wipers (replacing blades) . . . . . . . . . . . . . . . . . . . . . . . . . . . . . . . . . . . . . . . . . . . . . . . . . . . . . . . . .   5.33

Towing . . . . . . . . . . . . . . . . . . . . . . . . . . . . . . . . . . . . . . . . . . . . . . . . . . . . . . . . . . . . . . . . . . . . . . . .   5.34

Operating faults . . . . . . . . . . . . . . . . . . . . . . . . . . . . . . . . . . . . . . . . . . . . . . . . . . . . . . . . . . . . . . . . .   5.36


Content   ..  10  11  12  13   ..