Renault Megane Coupe (2016 year). Manual - part 10


  Index      Renault     Renault Megane Coupe - service manual 2016 year in english


Search            


Content   ..  8  9  10  11   ..


Renault Megane Coupe (2016 year). Manual - part 10


3.10

Manual use
Pressing button 11 allows air recircula-

tion to be forced, in which case the in-

tegrated warning light comes on as well 

as warning light 14.
Prolonged use of this position may lead 

to odours, caused by non-renewal of 

air, and the formation of condensation 

on the windows.
We therefore advise you to return to au-

tomatic mode as soon as the air recir-

culation function is no longer required, 

by pressing button 11 again.

Stopping the system

Press the button 7 to switch off the 

system; in this case “OFF” is shown on 

the display 12. To switch the system on, 

press one of switches 23 or 4.

Recycling

This function is managed automati-

cally (operation is confirmed by warn-

ing light 14 on display 12), but you can 

also activate it manually.

Note:

–  during recirculation, air is taken from 

the passenger compartment and 

is recycled, with no air being taken 

from outside the vehicle;

–  air recirculation allows the external 

atmosphere to be cut off (when dri-

ving in polluted areas, etc.);

– lowering the passenger compart-

ment temperature as quickly as pos-

sible.

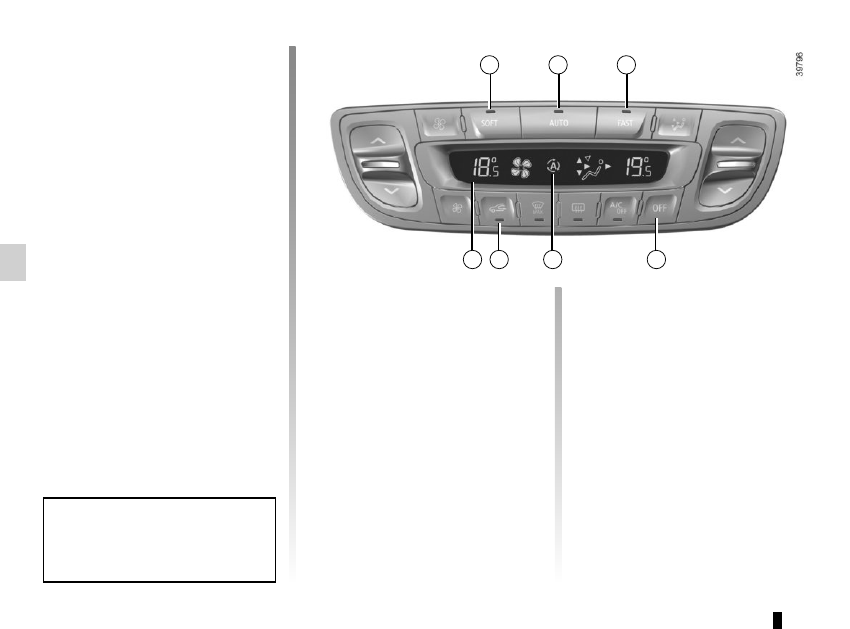
AUTOMATIC CLIMATE CONTROL 

(5/5)

The demisting/de-icing will still take 

priority over the air recirculation.

2

3

4

7

11

12

14

3.11

AIR CONDITIONING: information and advice on use

Fuel consumption
You will normally notice an increase 

in fuel consumption (especially 

when driving in town) when the air 

conditioning is operating.
For vehicles fitted with manual air 

conditioning, switch off the system 

when it is not required.

Advice for reducing 

consumption and therefore 

helping to preserve the 

environment:
Drive with the air vents open and 

the windows closed.
If the vehicle has been parked in 

the sun, open the doors for a few 

moments to let the hot air escape 

before starting the engine.

Maintenance
Refer to the Maintenance Document 

for your vehicle for the inspection 

frequency.

Operating faults
As a general rule, contact your ap-

proved Dealer in the event of an op-

erating fault:
–  reduction in de-icing, demist-

ing or air conditioning per-

formance. This may be caused 

by the passenger compartment 

filter cartridge becoming clogged;

–  no cold air is being produced. 

Check that the controls are set 

correctly and that the fuses are 

sound. Otherwise, switch off the 

system.

Advice on use
In some situations, (air conditioning 

off, air recirculation activated, venti-

lation speed at zero or low, etc.) you 

may notice that condensation starts 

to form on the windows and wind-

screen.
If there is condensation, use the 

“Clear View” function to remove it, 

then use the air conditioning in auto-

matic mode to stop it forming again. 

If the condensation does not clear, 

use the FAST programme.

Do not open the refriger-

ant fluid circuit. The fluid 

may damage eyes or skin.

Note
Presence of water under the ve-

hicle. After prolonged use of the air 

conditioning system, it is normal for 

water to be present under the vehi-

cle. This is caused by condensation.

3.12

These systems operate with the igni-

tion on or off, until one of the front doors 

is opened (limited to about 3 minutes).

From the driver’s seat, use switch:

  1  for the driver’s side;

  2  for the front passenger side;

  3 and  5 for the rear passenger win-

dows.

From the passenger seats, use 

switch 6.

Note: if the window detects resistance 

when closing (e.g.: fingers, branch of 

a tree, etc.) it stops and then lowers 

again by a few centimetres.

ELECTRIC WINDOWS, ELECTRIC SUNROOF 

(1/3)

Electric windows

Press or pull the switch to raise or lower 

a window to the desired height (the rear 

windows do not open fully);

One-touch mode

This mode works in addition to the 

operation of the electric windows de-

scribed previously. It either operates on 

the front windows only, or on all the win-

dows.

Briefly press or pull the window switch 

fully: the window is fully lowered or 

raised. Pressing the switch again stops 

the window moving.

1

2

3

4

5

6

Avoid resting any objects against 

a half-open window: there is a risk 

that the electric window could be 

damaged.

Safety of rear occupants

The driver can disable op-

eration of the electric win-

dows and, depending on 

the vehicle, the rear doors, by 

pressing switch 4. The indicator light 

integrated in the switch lights up to 

confirm that the locks have been ac-

tivated.

Driver’s responsibility

Never leave your vehicle with the 

RENAULT card inside and never 

leave a child (or a pet) unsuper-

vised, even for a short while. They 

may pose a risk to themselves or to 

others by starting the engine, acti-

vating equipment such as the elec-

tric windows or by locking the doors. 

If any part of the body becomes 

trapped, reverse the direction of the 

window immediately by pressing the 

relevant switch.

Risk of serious injury.

3.13

ELECTRIC WINDOWS, ELECTRIC SUNROOF 

(2/3)

Sunroof

  Open the sun blind
–  To open slightly: turn button 9 to 

position A;

–  To open fully: turn button 9 to po-

sition BC or D, depending on the 

opening position required;

–  To close: turn button 9 to position 0.

Sun blind

–  to open: push handle 7 upwards 

and guide the blind as it retracts;

–  to close: pull handle 7 until it clicks 

into the catch.

Special note

Your vehicle is equipped with an antip-

inch facility: when the sunroof encoun-

ters resistance whilst closing, (some-

body’s fingers, etc.) it stops and then 

moves back several centimetres.

Driver’s responsibility
Never leave your vehicle 

with the RENAULT card 

inside and never leave a 

child (or a pet) unsupervised, even 

for a short while.
The reason for this is that the child 

may endanger himself or others by 

starting the engine, activating equip-

ment such as the window winders 

for example, or locking the doors.
If a body part gets trapped, reverse 

the direction of travel as soon as 

possible by turning button 9 fully to 

the right (position D).
Risk of serious injury.

7

0

A B

C

D

9

8

3.14

ELECTRIC WINDOWS, ELECTRIC SUNROOF 

(3/3)

Precautions during use

– check that the sunroof is properly 

closed before leaving your vehicle;

– clean the seal every three months 

using products recommended by our 

Technical Department;

–  do not open the sunroof immedi-

ately after the vehicle has been in 

the rain or after your car has been 

washed.

–  Vehicle with roof bars

As a general rule, if there is a load 

on the roof, use of the sunroof is not 

recommended.
Before using the sunroof, check the 

objects and/or accessories (bike 

racks, roof boxes, etc.) attached to 

the roof bars: they should be prop-

erly arranged and secured and 

should not interfere with the opera-

tion of the sunroof.
Contact your approved Dealer for 

details of possible conversions.

Operating faults

Electric windows

In case of a fault when closing a window, 

the system reverts to normal mode: 

pull the switch concerned up as often 

as necessary to fully close the window 

(the window will close gradually), hold 

the switch (still on the closure side) for 

three seconds then lower and raise the 

window fully to reinitialise the system.

If necessary, contact your approved 

Dealer.

Electric sunroof

If the roof does not close, turn button 9 

to the position 0 and then press button 8 

until the roof is fully closed: consult an 

approved Dealer.

Remote control window 

closing

(for vehicles with one-touch windows 

on all windows).
When you lock the doors from the out-

side, press the locking button on the 

RENAULT card twice in quick suc-

cession, or on the driver's door in 

hands-free mode, and all the windows 

will close automatically.
It is recommended that the user only 

operates the system when the vehi-

cle can be seen clearly and no one is 

inside.
Note: locking the doors using the 

RENAULT card deactivates hands-free 

mode.

Closing windows can cause 

serious injury.

If the vehicle is equipped 

with this function, this action 

will activate deadlocking.
Check that there is no-one 

still inside the vehicle

Important: during this operation, 

the sunroof anti-pinch facility is de-

activated. Contact your approved 

dealer as soon as possible.

3.15

MANUAL WINDOW WINDERS / SUN VISOR

Manual window winders

Turn handle 1.

1

2

3

Sun visor

Lower the sun visor 2 over the wind-

screen or unclip it and turn it over the 

side window.

Courtesy mirrors

Slide cover 3, depending on the vehi-

cle, and the mirror is lit.

3.16

INTERIOR LIGHTING 

(1/2)

When the doors or luggage com-

partment are unlocked and opened 

the courtesy and footwell lights 

come on temporarily.

1

2

3

Courtesy light

Tilt switch 2 to move it to the position 

for:
– permanent lighting;
–  intermittent lighting, which comes 

on when a door is opened. This 

switches off after a time delay, once 

the doors concerned have been 

closed correctly;

–  immediate switching off.

Front door lights

Light  4 comes on when the door is 

opened.

4

Map reading lights

(depending on vehicle)
Move switches 1 or 3.

3.17

Boot light 6

Depending on the vehicle, the light 6 

comes on when the boot is opened.

INTERIOR LIGHTING 

(2/2)

6

5

Glovebox light 5

Light  5 comes on when the cover is 

opened.

3.18

Door pockets 1

PASSENGER COMPARTMENT STORAGE SPACE AND FITTINGS 

(1/4)

1

Nothing should be placed 

on the floor area in front of 

the driver as such objects 

may slide under the pedal 

during braking manoeuvres, thus 

obstructing its use.

Sun visor storage 2

This can be used for storing motorway 

tickets, cards, etc.

2

Ensure that no hard, heavy 

or pointed objects are 

placed in the “open” storage 

compartments in such a 

way that they may fall onto passen-

gers during sudden turning, braking 

or in the event of an accident.

3.19

Centre console storage 

compartments 5

Front centre armrest storage 

compartment A

Press the button 3 and lift the cover 4.

PASSENGER COMPARTMENT STORAGE SPACE AND FITTINGS 

(2/4)

Passenger storage 

compartment

Pull the handle 6 to open it.
The glove box can hold A4-size docu-

ments, a large bottle of water, etc.
The storage compartment is ventilated 

and refrigerated.

6

3

4

A

5

Ensure that no hard, heavy 

or pointed objects are 

placed in the “open” storage 

compartments in such a 

way that they may fall onto passen-

gers during sudden turning, braking 

or in the event of an accident.

3.20

Door storage compartment 7

Storage compartment 8

PASSENGER COMPARTMENT STORAGE SPACE AND FITTINGS 

(3/4)

Rear armrest with cup holder

Pull down the armrest 9.

7

8

9

3.21

PASSENGER COMPARTMENT STORAGE SPACE AND FITTINGS 

(4/4)

Rear centre console storage 

compartments 13

13

Depending on the vehicle, the stor-

age compartment 13 may be re-

placed by air vents; refer to Section 

3 “Air vents”.

12

Front seat storage pockets 12

10

11

Clothes hooks 10

Grab handle 11

This offers support and can be held 

when the vehicle is being driven.
Do not use it for getting into or out of 

the vehicle.

3.22

ASHTRAY, ACCESSORIES SOCKET

Accessories sockets 1

They are designed for connecting ac-

cessories with a maximum power rating 

of 120 Watts (voltage: 12V) which 

have been approved by our Technical 

Department.

If your vehicle is not fitted with a cigar lighter and an ashtray, these can be ob-

tained from an approved Dealer.

1

2

2

1

Ashtray 2

To open, lift the cover. To empty, pull the 

ashtray towards you and it will be re-

leased from its housing.

Connect accessories 

with a maximum power of 

120 Watts only.
Fire hazard.

3.23

Press button 

1 and lower the 

seatback(s) A.

To fold down the seatback
Ensure that the front seats are far 

enough forward.
Lower the rear headrests (refer to the 

information on the “Rear headrests” in 

Section 1).
Place the seat belts 2 in their guides 3.

Sport tourer versions

Depending on the vehicle, seatback A 

can be folded down on its own to allow 

long or bulky objects to be transported.

REAR BENCH SEAT functions 

(1/2)

1

A

2

3

For safety reasons, carry 

out any adjustments when 

the vehicle is not being 

driven.

Before moving the seat-

back, put seat belt 2 in belt 

guide 3 to avoid damaging 

it.

3.24

When refitting the seat-

back, make sure it is cor-

rectly locked in place.

If seat covers are fitted

make sure these do not prevent the 

seatback latch from locking in.

Make sure that the seat belts are 

positioned correctly.

Reposition the headrests.

The seat and the seatback may be 

folded away to allow bulky objects to be 

carried.

To fold away the seat base
Tilt seat base B against the front seats.

To fold down the seatback
After folding the seat base down, 

remove the rear headrests (refer to the 

section on “rear headrests”) then press 

button 1 and lower the seatback(s) C.

In all situations, remove the rear 

headrests (refer to the informa-

tion on the “Rear headrests” in 

Section 1).

For safety reasons, carry 

out any adjustments when 

the vehicle is not being 

driven.

1

C

B

REAR BENCH SEAT functions 

(2/2)

When moving the rear 

bench seat, ensure that 

nothing obstructs the an-

chorage points (part of the 

body, a pet, gravel, cloth, toys, etc.).

3.25

TAILGATE

To open
Press button 1 and lift the tailgate.

To close
Pull down the tailgate using handle 2 

inside the tailgate to assist you.

1

Opening manually from 

inside the vehicle

Special note:
If it is impossible to unlock the tailgate, 

it can be done from inside.
–  access the luggage compartment by 

folding forward the seatback(s) of 

the rear bench seat,

–  insert a pencil or similar object in 

cavity 3 and slide the unit as shown 

in the illustration,

–  push the tailgate to open it.

2

3


Content   ..  8  9  10  11   ..