Renault Kangoo VAN Z.E. (2012 year). Manual - part 9


  Index      Renault     Renault Kangoo VAN Z.E. - service manual 2012 year in english


Search            


Content   ..  7  8  9  10   ..


Renault Kangoo VAN Z.E. (2012 year). Manual - part 9


3.21

To raise the seatback

Before raising the seatback, make sure 

there are no objects (water bottle, tool 

box etc.) which will prevent it from lock-

ing properly.
Raise the seatback and click it into po-

sition. Check that it is correctly locked.

To fold down the seatback

Before moving the bench seat, make 

sure the front seats are pushed forward 

enough, that the rear seat belts are un-

fastened and that nothing will obstruct 

the manoeuvre.
Lower the rear headrests to storage po-

sition.
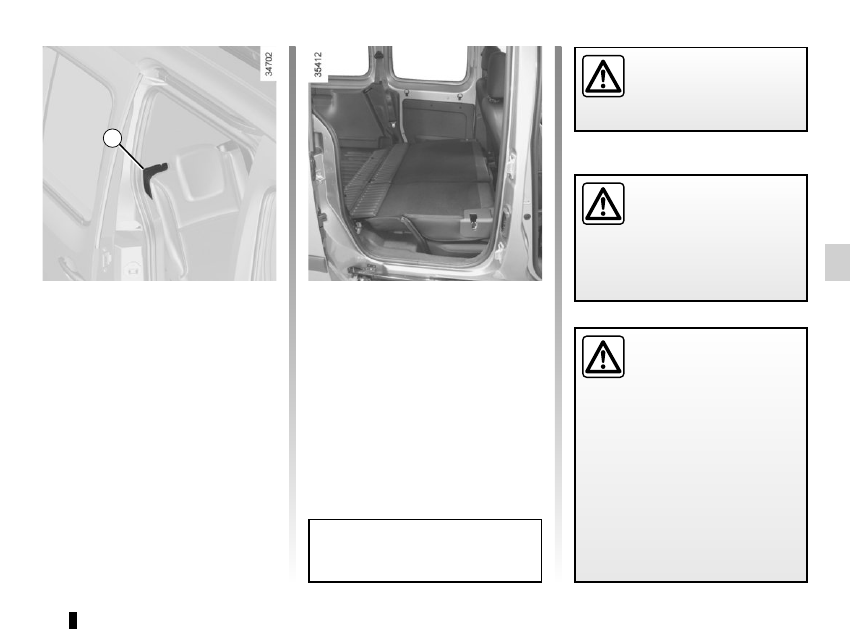
Pull lever 1 of the seatback you wish to 

fold down (on the right or left-hand side 

of the bench seat), and bring the seat-

back down.

REAR BENCH SEAT: functions 

(1/2)

For safety reasons, carry 

out any adjustments when 

the vehicle is not being 

driven.

When moving the rear 

bench seat, make sure 

the bench seat anchor-

age points are clean (they 

should be free from grit, cloths etc.).

When refitting the seatback, 

make sure it is correctly 

locked.
If using seat covers, make 

sure they do not prevent the seat-

back and seat base latches from 

locking in. Ensure that the seat belts 

and seat belt fasteners are correctly 

positioned.
Reposition the headrests.

Max. weight: 300 kg, evenly distrib-

uted.

1

3.22

REAR BENCH SEAT: functions 

(2/2)

Use restriction

It is forbidden to drive with a seatback 

or a front seat folded down when there 

is a passenger occupying a rear seat.

For safety reasons, carry 

out any adjustments when 

the vehicle is not being 

driven.

3.23

The headrest is a safety 

component; check that it is 

fitted and in the correct po-

sition.

Storage position 2

Pull it towards you and lower it com-

pletely.
The fully lowered headrest position 

is a storage position: it should not be 

in this position when a seat is occupied.

To raise it

Slide it to the required height.

To lower it

Pull it towards you and slide it to the re-

quired height.

To remove it

Raise the headrest then press tabs 1 to 

release it.

To refit it

Press tab 1 and insert the rods into the 

holes, with the notches facing forwards.

REAR HEADRESTS

Child’s convertible headrest

If fitted to the vehicle, the child head-

rest and booster cushion can only be 

installed on the rear side seats.
For fitting and use, refer to the equip-

ment instructions.

1

2

3.24

Always position the hea-

viest items directly on the 

floor.
Use the lashing points on 

the floor of the luggage compart-

ment, if these are fitted to the vehi-

cle. 
The luggage should be loaded in 

such a way that no items will be 

thrown forward and strike the occu-

pants if the driver has to brake sud-

denly.
Fasten the rear seat belts, even if 

the seats are not occupied.

TRANSPORTING OBJECTS IN THE BOOT 

(1/2)

Always position the objects trans-

ported so that the largest surface is 

against:

– the rear bench seatbacks, for 

normal loads;

–  the front seats for maximum loads.

Always position the heaviest items di-

rectly on the floor.

3.25

TRANSPORTING OBJECTS IN THE BOOT 

(2/2)

/TOWING

Permissible nose weight, maxi-

mum permissible towing weight, 

braked and unbraked: refer to 

the information on “Weights” in 

Section 6.
For fitting and conditions of use, 

refer to the equipment’s fitting ins-

tructions.
Please keep these instructions with 

the rest of the vehicle documenta-

tion.

If the towbar ball obscures the regis-

tration plate or the rear fog lights, it 

should be removed when not in use.
In all cases, comply with local legis-

lation.

A = 830 mm.

A

3.26

The luggage net

(depending on vehicle)
This is located in the luggage compart-

ment.
It may be attached behind the front 

seats or behind the rear bench seat.
Hooks 1 may also be used to hang 

clothes.

LUGGAGE NET

For more information, refer to the 

label sewn onto the net.

1

1

3

4

Positioning the net 2

–  Upper section: insert the tabs at the 

ends of the net in hooks 1;

– lower section: engage belts 3 in 

lashing rings 4 on the floor. Ensure 

that both forks of the lower hook are 

engaged;

–  tighten the net using the tensioning 

units.

Luggage compartment an-

chorages (rings) 4 cannot 

be used if they are already 

being used to secure two 

other components (eg. luggage 

net + load in the luggage compart-

ment or child seat + load in the lug-

gage compartment).

2

The luggage net must not 

be used to restrain or hold 

objects.
Risk of injury

3.27

MULTIMEDIA EQUIPMENT

The presence and location of this 

equipment depends on the vehicle’s 

multimedia equipment.
1 Multimedia touchscreen;
2 multimedia sockets;
3 radio;
4  steering column control.

To operate this equipment: please 

refer to the instructions for the equip-

ment which should be kept with the 

other vehicle documentation.

1

3

2

4

4.1

Section 4: Maintenance

Bonnet . . . . . . . . . . . . . . . . . . . . . . . . . . . . . . . . . . . . . . . . . . . . . . . . . . . . . . . . . . . . . . . . . . . . . . . .  

4.2

Levels  . . . . . . . . . . . . . . . . . . . . . . . . . . . . . . . . . . . . . . . . . . . . . . . . . . . . . . . . . . . . . . . . . . . . . . . .  

4.4

coolant . . . . . . . . . . . . . . . . . . . . . . . . . . . . . . . . . . . . . . . . . . . . . . . . . . . . . . . . . . . . . . . . . . 

4.4

brake fluid . . . . . . . . . . . . . . . . . . . . . . . . . . . . . . . . . . . . . . . . . . . . . . . . . . . . . . . . . . . . . . . . 

4.5

windscreen washer reservoir . . . . . . . . . . . . . . . . . . . . . . . . . . . . . . . . . . . . . . . . . . . . . . . . . 

4.5

12V battery  . . . . . . . . . . . . . . . . . . . . . . . . . . . . . . . . . . . . . . . . . . . . . . . . . . . . . . . . . . . . . . . . . . . .  

4.6

Tyre pressures . . . . . . . . . . . . . . . . . . . . . . . . . . . . . . . . . . . . . . . . . . . . . . . . . . . . . . . . . . . . . . . . . .  

4.8

Bodywork maintenance . . . . . . . . . . . . . . . . . . . . . . . . . . . . . . . . . . . . . . . . . . . . . . . . . . . . . . . . . . .  

4.9

Interior trim maintenance . . . . . . . . . . . . . . . . . . . . . . . . . . . . . . . . . . . . . . . . . . . . . . . . . . . . . . . . . .   4.11

4.2

BONNET 

(1/2)

1

Do not do any work under 

the bonnet when the vehicle 

is charging or when the igni-

tion is switched on.

To open the bonnet, pull the handle 1.

The engine may be hot 

when carrying out opera-

tions in close proximity. In 

addition, the engine cooling 

fan can come on at any moment.

Risk of injury.

Unlocking the bonnet catch

To open, push tab 2 to the left as you 

open the bonnet.

Opening the bonnet

Lift the bonnet, helping it up, and it will 

rest in position with the help of struts.

Do not press down on the 

bonnet: there is a risk that 

the bonnet may accidentally 

close.

When working in the engine 

compartment, ensure that 

the windscreen wiper stalk 

is in the park position.

Risk of injury.

2

4.3

Ensure that the bonnet is 

properly locked.
Check that nothing is pre-

venting the catch from lock-

ing (gravel, cloth, etc.).

BONNET 

(2/2)

Closing the bonnet

Check that nothing has been left in the 

engine compartment.

To close the bonnet again, hold the 

bonnet in the middle and lower it to 

30  cm above the closed position, then 

release it. It will latch automatically 

under its own weight.

After carrying out any work 

in the engine compart-

ment, check that nothing 

has been left behind (cloth, 

tools, etc.).

These may damage the engine or 

cause a fire.

In the event of even a slight 

impact involving the radia-

tor grille or bonnet, have 

the bonnet lock checked by 

an approved dealer as soon as pos-

sible.

4.4

Replacement intervals
Refer to the Maintenance Document for 

your vehicle.

LEVELS 

(1/2)

Coolant

The level is checked with the engine 

switched off and on flat ground. The 

level when cold must be between the 

“MIN” and “MAX” marks on coolant res-

ervoir 1 and 2 measures.

Top this level up when cold before the 

“MINIMUM” mark is reached.

Checking intervals
Check the coolant level regularly 

(very severe damage is likely to be 

caused to the engine if it runs out of 

coolant).
If the level needs to be topped up, only 

use products approved by our Technical 

Department which ensure:
–  protection against freezing;
–  anticorrosion protection of the cool-

ing system.

No operations should be 

carried out on the cooling 

circuit when the engine is 

hot.

Risk of burns.

Consult your approved dealer at 

once if you notice an abnormal or 

repeated drop in any of the fluid 

levels.

1

2

The engine may be hot 

when carrying out opera-

tions in close proximity. In 

addition, the engine cooling 

fan can come on at any moment.
Risk of injury.

Do not do any work under 

the bonnet when the vehicle 

is charging or when the igni-

tion is switched on.

4.5

Windscreen washer reservoir

Topping up
– Open cap 4;
–  fill until you can see the fluid;
–  close the cap.

Liquid
Screen wash product (product with 

antifreeze in winter).

Jets
To adjust the height of the windscreen 

washer jets, use a tool such as a flatb-

lade screwdriver.

4

Level 3
It is normal for the level to drop as 

the linings become worn, but it should 

never drop below the “MINI” warning 

line.
If you wish to check the disc and drum 

wear yourself, you should obtain the 

document explaining the checking pro-

cedure from our network or from the 

manufacturer’s website.

Topping up
After any operation on the hydraulic cir-

cuit, a specialist must replace the fluid.
Only use fluids approved by our 

Technical Department (and taken from 

a sealed container).

Replacement intervals
Refer to the Maintenance Document for 

your vehicle.

Consult your approved dealer at 

once if you notice an abnormal or 

repeated drop in any of the fluid 

levels.

Brake fluid level

This should be checked frequently, 

and immediately if you notice even the 

slightest loss in braking efficiency.
The level should be read with the engine 

switched off and on level ground.

3

LEVELS 

(2/2)

4.6

Maintenance

Refer to the Maintenance Document for 

your vehicle.

Handle the battery with care 

as it contains sulphuric acid, 

which must not come into 

contact with eyes or skin. If 

it does, wash the affected area with 

plenty of cold water. If necessary, 

consult a doctor.
Ensure that naked flames, red hot 

objects and sparks do not come into 

contact with the battery as there is a 

risk of explosion.

12 VOLT BATTERY 

(1/2)

Never open the battery cover 1.
The charge status of the 12V battery 

can decrease, especially if you use 

your vehicle:

–  when the exterior temperature drops;

–  after extended use of energy-con-

suming devices (radio etc.) with the 

engine switched off.

Replacement

As this operation is complex, we advise 

you to contact an approved Dealer.

1

The battery is a specific 

type, please ensure it is 

replaced with the same 

type. Consult an approved 

dealer.

Do not work on the 12 volt 

battery (charging, replac-

ing, etc.):
– without switching off the 

ignition;

–  if your traction battery is charg-

ing. 

Please refer to the information 

on “Electric vehicle: charging” in 

Section 1.
Risk of serious injury.

Replacing the 12V battery
For your own safety, you 

must  respect the replace-

ment intervals (without 

exceeding them) as stated in the 

maintenance document.

4.7

A 2

3

4

5

6

7

Label A

Observe the indications on the battery:

–  2  naked flames and smoking are for-

bidden;

–  3 eye protection required;

–  4 keep away from children;

–  5 explosive materials;

–  6 refer to the handbook;

–  7 corrosive materials.

The engine may be hot 

during operations in close 

proximity. In addition, the 

engine cooling fan may 

start at any moment.
Risk of injury.

12 VOLT BATTERY 

(2/2)

Do not do any work under 

the bonnet when the vehicle 

is charging or when the igni-

tion is switched on.

4.8

TYRE PRESSURE

A

B : tyre pressures for the front wheels 

(non-motorway).
C : tyre pressures for the rear wheels 

(non-motorway).

D : tyre pressures for the front wheels 

(motorway).
E : tyre pressures for the rear wheels 

(motorway).
Special note concerning fully laden 

vehicles (Maximum Permissible All-Up 

Weight) and towing a trailer: the maxi-

mum speed must be limited to 60 mph 

(80 km/h) and the tyre pressure in-

creased by 0.2 bar.
Please refer to the information on 

“Weights” in Section 6.
Tyre safety and use of snow chains: 

Refer to the information on “Tyres” in 

Section 5 for the servicing conditions 

and, depending on the version, the use 

of chains.

B

C

E

D

A

When they need to be replaced, only tyres of the same make, size, type 

and profile should be used.
They must:  either be identical to those fitted originally or conform 

to those recommended by your authorised dealer.

Label A

Open the driver’s door to read it.
Tyre pressures should be checked 

when the tyres are cold.
If the tyre pressures cannot be checked 

when the tyres are cold, increase the 

pressures from 0.2 to 0.3 bar (or 3 PSI). 

Never deflate a hot tyre.

4.9

BODYWORK MAINTENANCE 

(1/2)

What you should not do

Do not degrease or clean mechani-

cal components (e.g. the engine com-

partment), underneath the body, parts 

with hinges (e.g. inside the doors) and 

painted plastic external fittings (e.g. 

bumpers) using high-pressure clean-

ing equipment or by spraying on prod-

ucts not approved by our Technical 

Department. Doing this could give rise 

to corrosion or operational faults.
Wash the vehicle in bright sunlight or 

freezing temperatures.
Do not scrape off mud or dirt without 

pre-wetting.
Allow dirt to accumulate on the exterior.
Allow rust to form following minor im-

pacts.
Do not use solvents not approved by 

our Technical Department to remove 

stains as this could damage the paint-

work.
Do not drive in snow or muddy condi-

tions without washing the vehicle, par-

ticularly under the wheel arches and 

body.

A well-maintained vehicle will last 

longer. It is therefore recommended to 

maintain the exterior of the vehicle reg-

ularly.
Your vehicle has been treated with very 

effective anti-corrosion products. It is 

nevertheless subject to various outside 

influences.

Corrosive agents in the atmosphere

–  

atmospheric pollution (built-up and 

industrial areas),

–  

saline atmospheres (near the sea, 

particularly in hot weather),

–  

seasonal and damp weather condi-

tions (e.g. road salt in winter, water 

from road cleaners, etc.).

Minor impacts

Abrasive action

Dust and sand in the air, mud, road grit 

thrown up by other vehicles, etc.
You should take a number of minor pre-

cautions in order to safeguard your ve-

hicle against such risks.

You should

Wash your car frequently, with the 

engine off, with cleaning products rec-

ommended by the manufacturer (never 

use abrasive products). Rinse thor-

oughly beforehand with a jet:

–  

spots of tree resin and industrial 

grime;

–  

mud in the wheel arches and under-

neath the body which forms damp 

patches;

–  

bird droppings, which cause a 

chemical reaction with the paint that 

rapidly discolours paintwork and 

may even cause the paint to peel 

off;

   wash the vehicle immediately to 

remove these marks since it is im-

possible to remove them by polish-

ing;

–  

salt, particularly in the wheel arches 

and underneath the body after driv-

ing in areas where the roads have 

been gritted.

Withdraw the vegetable falls (resin, film 

etc.) from the vehicle regularly.


Content   ..  7  8  9  10   ..