Peugeot Boxer (2016 year). Manual - part 6


  Index      Peugeot     Peugeot Boxer - service manual 2016 year in english


Search            copyright infringement  


Content   ..  4  5  6  7   ..


Peugeot Boxer (2016 year). Manual - part 6


Practical information

 79

3

EASE OF USE 

and

 COMFORT

boxer_en_Chap03_ergo-et-confort_ed01-2015

Sun visor

to avoid glare from ahead, fold the sun visor 
down.

Pockets are arranged in the sun visors for 
storing toll cards, tickets, ...
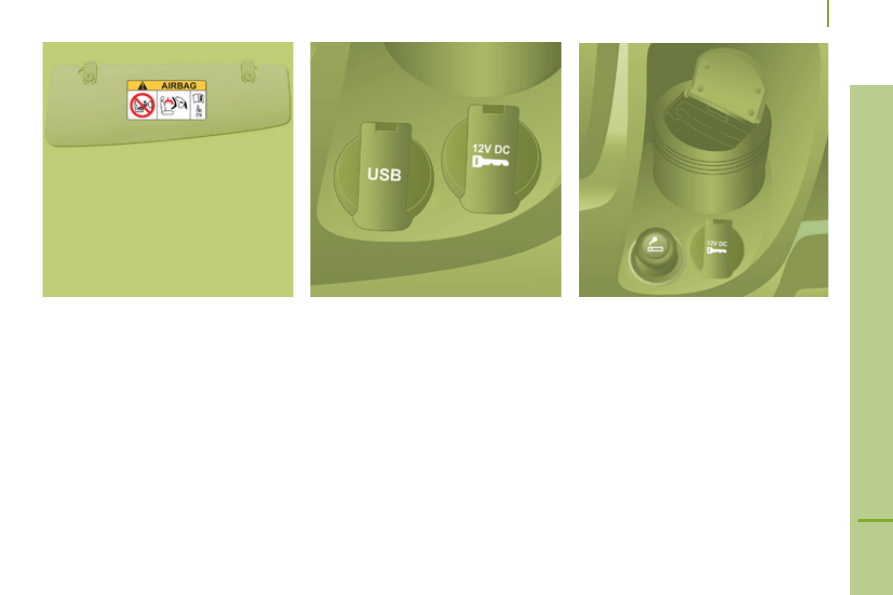
12 volt socket

Maximum power: 180 W.

Portable ashtray

After opening the ashtray, pull it upwards 
then empty it into a bin.

Storage boxes

uSB port

this port is used only to power or recharge 
the portable device connected.

cigarette lighter

Press and wait a few moments until the 
lighter pops out automatically.

Practical information

 80

boxer_en_Chap03_ergo-et-confort_ed01-2015

Controls located at the bottom 
of the dashboard on the driver's 
side allow the driver to switch the 
passenger spotlamp on or off.

reading lamps

these are controlled by the switches.

the driver's switch controls both reading 
lamps simultaneously.

the passenger switch controls either the 
driver's reading lamp or the passenger's 
reading lamp.

courtesy lamp

It can be activated by means of:

the switches located on the 
courtesy lamp, with the ignition on - 
runnInG position,

opening or closing one of the front 
doors,

locking/unlocking the vehicle.

It switches off automatically:

if the switch is not pressed to the right or 
to the left,

in all cases after 15 minutes, if the doors 
remain open,

or when the ignition is switched on.

overhead storage compartment

this is located above the sun visors.

Maximum load: approximately 20 kg.

Practical information

 81

3

EASE OF USE 

and

 COMFORT

boxer_en_Chap03_ergo-et-confort_ed01-2015

LoAd SPAcE FIttInGS

Support for stowing rail

Supports for securing a stowing rail are 
available above the trims, on each side of 
the vehicle.

Maximum load: 200 kg.

12 volt socket

Maximum power: 180 W.

Lashing rings

Lashing rings are provided on the floor to 
secure and make safe your loads: 8 for 
L1 and L2 length vehicles, 10 for L3 and 
L4 length vehicles.

two additional rings are located on the 
partition behind the cab.

Maximum load: 500 kg.

Side trim

the lower parts of the sides are fitted with 
load protection trims.

As a safety precaution in case of sharp 
braking, you are advised to place 

heavy objects as far forwards towards the 
cab as possible.

Practical information

 82

boxer_en_Chap03_ergo-et-confort_ed01-2015

Load retainer

On the floor, behind the front seats, a 
horizontal partition protects the driver and 
front passengers against the risk of load 
movement.

courtesy lamps

If fitted on your vehicle, one or two courtesy 
lamps are located above the rear and side 
doors.

they can be activated by:

tilting the courtesy lamp (to the left or to 
the right),

opening or closing the rear or side 
doors.

this lighting switches off automatically, after 
a few minutes, if the doors are left open.

reading lamps

Inetrior roof storage

this is a storage compartment located in 
the load space, above the cab. Its capacity 
varies depending on the height of the van 
(type H2 or H3).

Ladder type vertical partition

Depending on the country of sale, behind 
the driver's seat, a ladder type vertical 
partition protects the driver against the risk 
of load movement.

Glazed partition

Depending on the country of sale, a glazed 
partition separates the cabin from the load 
space.

However, you can use the control to open/
close its sliding window.

uSB port

this port is used only to power or recharge 
the portable device connected.

cigarette lighter

Press and wait a few moments until the 
lighter pops out automatically.

As a safety measure, do not place 
heavy objects in the roof storage 
space.

they are located above each row 
of seats.

Practical information

 83

3

EASE OF USE 

and

 COMFORT

boxer_en_Chap03_ergo-et-confort_ed01-2015

Sliding side windows

Depending on the vehicle's equipment, the 
side windows of row 2 can be opened.

Squeeze the two controls then slide the 
window.

torch

If your vehicle has one, the magnetic torch is 
located at the rear courtesy lamp.

A lamp is locatred in the centre of the torch 
base.

Remove the torch from its base by 
pressing the button then pivoting the torch 
downwards by 90 degrees.

to switch on the torch, slide the switch 
forwards.

to change the 4 batteries (NiMH type), 
remove the protective cover, located on the 
torch.

With the vehicle stationary, key in the 
ignition switch or removed, recharging 

and lighting from the torch stops after 
around 15 minutes.

the torch batteries recharge automatically 
while driving.

to put the torch back in place, engage 
it in the notches on the base and pivot it 
upwards.

 While driving, the window must be 
closed or secured in an intermediate 
position.

Do not extend long objects outside the 
vehicle via the window.

Practical information

 84

boxer_en_Chap03_ergo-et-confort_ed01-2015

ExtErIor FIttInGS

Protective grille

Depending on the country of sale, a 
protective grille fitted to the inside of 
the front bumper provides protection for 
underbonnet components against flying 
stones...

Very cold conditions protectors

Depending on the country of sale, protective 
foam pads are present to avoid the ingress 
of cold or snow to the upper part of the 
underbonnet.

Located at the edge of each headlamp, 
they are fitted to the front panel above the 
radiator.

Slide them towards the outisde of the 
vehicle to remove them.

Folding foot board

to faciltate the entry and exit of rear 
passengers, your vehicle may be fitted with 
a foot board, which is deployed on opening 
the sliding side door.

Mirrors and windows

 85

3

EASE OF USE 

and

 COMFORT

boxer_en_Chap03_ergo-et-confort_ed01-2015

MIrrorS

door mirrors

these are divided into two zones:

A - upper mirror

B - Lower mirror

the mirror glass is spherical in order to 
widen the lateral field of vision. Objects 
seen in the mirror are in reality closer than 
they appear. therefore, this must be taken 
into account in order to assess the distance 
correctly.

the shell incorporates the direction indicator 
side repeater and the aerials, according to 
the equipment available on board (gPS, 
gSM, Radio, ...).

Electrical controls

the ignition switch must be in the MAr position.

turn the control to select the mirror zone.

1 Driver's mirror:

A1 - upper mirror

B1 - Lower mirror

then move the control in the direction of the 
adjustment required.

2 Passenger mirror:

A2 - upper mirror

B2 - Lower mirror

then move the control in the direction of the 
adjustment required.

rear view mirror

the lever located on the lower edge moves 
the mirror into two positions.

For the day position, the lever is pushed.

For the night position to prevent dazzle, pull 
the lever towards you.

Electric folding

Press this control.

defrosting the mirrors

Press the rear screen defrosting 
button.

Mirrors and windows

 86

boxer_en_Chap03_ergo-et-confort_ed01-2015

ELEctrIc WIndoWS

A.  driver's electric window

B.  Passenger's electric window

You have two options:

Manual operation

Press or pull control switch A/B, without 
passing the point of resistance.

the window stops when you release the 
control switch.

Automatic operation

Press or pull control switch A, beyond the 
point of resistance: the window opens or 
closes fully when the control is released.

Pressing the control switch again stops the 
movement of the window.

Good practice

Always remove the key from the ignition 
when leaving the vehicle, even for a short 
time.

If the electric windows meet an obstacle 
during operation, you must reverse the 
movement of the window. to do this, press 
the control switch in question.

When the driver operates the passenger 
electric windows, they must ensure that 
no one is preventing correct closing of the 
windows.

the driver must ensure that the passengers 
use the electric windows correctly.

Be particularly aware of children when 
operating the windows.

Vehicle configuration

 87

4

TECHNOLOGY

 ON

 BOARD

boxer_en_Chap04_technologie-a-bord_ed01-2015

PErSonALISAtIon - conFIGurAtIon

using the ModE control panel

this control panel located alongside the 
steering wheel provides access to menus for 
the personalisation of some of the vehicle 
systems.

the corresponding information appears in 
the instrument panel screen.

eleven languages are offered: Brazilian, 
Dutch, english, French, german, Italian, 
Polish, Portuguese, Russian, Spanish and 
turkish.

You have access to all the menus if your 
vehicle is fitted with an audio system.

If your vehicle is fitted with a touch screen 
audio system, certain menus are only 
accessible using the audio system control 
panel.

scroll down through a menu,

decrease a value.

this ModE button enables you to:

access the menus and sub-menus,

confirm your selections, within 
a menu,

exit from the menus.

A long press enables you to return to 
the welcome screen.

this button enables you to:

this button enables you to:

scroll up through a menu,

increase a value.

 As a safety precaution, some menus 
can only be accessed when the ignition 
is off.

Vehicle configuration

 88

boxer_en_Chap04_technologie-a-bord_ed01-2015

Menu...

Press...

Sub-menu…

Press...

Select…

confirm 
and exit

Enables you to...

1 Speed beep

ON

Increase

Activate/deactivate the audible 
signal indicating exceeding of 
the programmed speed and 
select the speed.

Decrease

OFF

2   Headlamp 

sensor

Increase

Set the sensitivity of the 
sunshine sensor (1 to 3).

Decrease

3   Activation 

trip B

Activate

Display a second distance 
"trip B".

Deactivate

4  Setting the 

time

Hours/ 
Minutes

Increase

Set the clock.

Decrease

time format

24

Select the clock display mode.

12

5  Setting the 

date

Year/Month/
Day

Activate

Set the date.

Deactivate

6 Autoclose

While moving

ON

Activate/Deactivate automatic 
door locking above approx 
12 mph (20 km/h).

OFF

Vehicle configuration

 89

4

TECHNOLOGY

 ON

 BOARD

boxer_en_Chap04_technologie-a-bord_ed01-2015

Menu…

Press...

Sub-menu…

Press...

Select…

confirm 
and exit

Enables you to...

7  Measurement 

unit (unit)

Distance

Km

Select the distance display unit.

Miles

Fuel 
consumption

km/l

Select the fuel consumption 
display unit.

l/100 km

temperature

°C

Select the temperature display 
unit.

°F

8 Languages

List of languages 
available

Select the display language.

9  Volume of 

annou ncements 
(Buzz)

Increase

Increase/decrease the volume 
of the announcements or of the 
audible warning.

Decrease

10  Daytime 

running lamps

ON

Activate/deactivate daytime 
running lamps.

OFF

11 Service

Service (Miles/km 
before service)

Display the miles/kilometres 
remaining before the next 
service.

Oil (Miles/Km 
before oil change)

Display the miles/kilometres to 
the next oil change.

12   Passenger 

airbag 
(BAg P)

ON

Yes

Activate the passenger airbag.

No

OFF

Yes

Deactivate the passenger 
airbag.

No

13  exit from 

menu

exit from the menu. Press the 
arrow at the bottom to go to the 
first menu.

Vehicle configuration

 90

boxer_en_Chap04_technologie-a-bord_ed01-2015

using the touch screen audio 
system

this audio system control panel, located in 
the middle of the dashboard, gives access to 
personalisation menus for certain systems.

the corresponding information appears in 
the touch screen.

Nine languages are offered: Dutch, english, 
French, german, Italian, Polish, Portuguese, 
Spanish and turkish.

As a safety precaution, some menus 
can only be accessed when the ignition 
is off.

this control panel button gives 
access to the "Settings" menu.

"Settings" menu

1. "Display".

2.  "Voice commands".

3.  "time and Date".

4.  "Safety / Help".

5. "Lighting".

6.  "Doors & locking".

7. "Audio".

8.  "telephone / Bluetooth".

9.  "Radio settings".

10.  "Restore Settings" to return to factory 

settings.

11.  "Del. pers. data" to delete all of your 

personal data, related to the Bluetooth 
equipment in the audio system.

this button in the screen allows 
you to go up a level in a menu or 
increase a value.

this button in the screen allows 
you to go down a level in a menu 
or decrease a value.

For more information on the audio 
system, the telephone, the radio and the 
navigation system, the sub-menus 27
89 and 11 are described in detail in the 
"Audio equipment and telematics" section.

the settings for sub-menus 45 and 
6 vary according to the equipment 
installed on the vehicle.

Vehicle configuration

 91

4

TECHNOLOGY

 ON

 BOARD

boxer_en_Chap04_technologie-a-bord_ed01-2015

From the "Safety / Help" sub menu, you can:

select "Parkview Camera", then 
"Reversing camera" to activate or 
deactivate its use (On, Off),

select "Parkview Camera", then 
"Camera delay" to activate or deactivate 
the maintaining of the display for  
10 seconds or up to 11 mph (18 km/h)  
(On, Off),

select "Passenger airbag" to activate or 
deactivate its use (On, Off).

From the "Lighting" sub-menu, you can:

select "Day lamps" to activate or 
deactivate their use (On, Off),

select "Headlamp sensor" to adjust its 
sensitivity (1, 2, 3).

From the "Doors & locking", you can:

select "Autoclose" to activate or 
deactivate its use (On, Off).

From the "Display" sub-menu, you can:

select "Languages" and choose one of 
the languages listed above,

select "units of measurement" to choose 
the units for fuel consumption  
(l/100 km, mpg), distance (miles, km) 
and temperature (°C, °F),

select "Display trip B" to switch trip B 
On or Off in the trip computer.

From the "time and Date" sub-menu, you 
can:

select "Adjust time and format" to set the 
hour, minutes and seconds and choose 
the format (24 h, 12 h with am or pm),

select "Adjust Date" to set the day, 
month and year.

to set the time manually, "Synch time" 
must be Off.

 92

Vehicle data

boxer_en_Chap04_technologie-a-bord_ed01-2015

the trIP button, located at the end of the 
wiper control stalk, gives access to the 
following information:

range 


this indicates the distance that can still 
be travelled with the fuel remaining in 
the tank on the basis of the average 
consumption over the last few miles 
(kilometres) travelled.

Average speed A 


this is the average speed calculated 
since the last trip computer zero reset 
(with the ignition on).

trip duration A 


this indicates the total time since the 
last trip recorder zero reset.

distance A 


this indicates the distance travelled 
since the last trip computer zero reset.

Average fuel consumption A 


this is the average quantity of fuel 
consumed since the last trip computer 
zero reset.

current fuel consumption A 


this is the average quantity of fuel 
consumed during the last few seconds.

trIP coMPutEr

If tRIP B is activated in the ModE menu:

Distance B

Average fuel consumption B

Average speed B

trip duration B

 93

4

TECHNOLOGY

 ON

 BOARD

Vehicle data

boxer_en_Chap04_technologie-a-bord_ed01-2015

tAcHoGrAPH

If your vehicle is fitted with a tachograph, 
this permits storing of all of the data relating 
to the vehicle in the unit and on a card 
inserted in it.

example: at the beginning of each journey 
or change of team.

When the card is inserted, all of the data 
can be:

displayed on the tachograph screen,

- printed,

transferred to external storage media via 
an interface.

For further information, refer to the 
documents supplied by the manufacturer of 
the tachograph.

If your vehicle is fitted with a 
tachograph, disconnection of the 

negative (-) terminal of the battery (located 
under the floor on the left-hand side, in the 
cab) is recommended if the vehicle is not to 
be used for a period of more than 5 days.

Parking sensors

 94

boxer_en_Chap04_technologie-a-bord_ed01-2015

AudIBLE rEAr PArKInG SEnSorS

If fitted on your vehicle, the system consists 
of four proximity sensors, installed in the 
rear bumper.

they detect any obstacle: person, vehicle, 
tree, fence, behind the vehicle during the 
manoeuvre.

However, objects the size or thickness of 
which are detected at the beginning of the 
manoeuvre will no longer be detected at the 
end of the manoeuvre: blind spots between 
and below the sensors. examples: stake, 
roadworks cone or pavement post.

the rear parking sensor system may be 
coupled with a reversing camera.

operation

engage reverse gear with the gear lever.

the proximity information is indicated by an 
audible signal of increasing frequency as the 
vehicle approaches the obstacle.

When the distance between the rear of 
the vehicle and the obstacle is less than 
approximately thirty centimetres, the audible 
signal becomes continuous.

Switching off

Come our of reverse gear into neutral.

operating fault

If this warning lamp comes 
on in the instrument panel 
accompanied by a message in 
the screen, contact a PeugeOt 
dealer or a qualified workshop.

Good practice

the system cannot, in any circumstances, 
replace the need for vigilance on the part of 
the driver.

take even greater care if you reverse with a 
rear door open.

In bad weather or in winter, ensure that the 
sensors are not covered with mud, ice or 
snow.


Content   ..  4  5  6  7   ..