Peugeot 308 SW BL Dag (2009.5). Manual - part 16


  Index      Peugeot     Peugeot 308 SW BL Dag 2009.5 - service manual in english


Search            


Content   ..  14  15  16  17   ..


Peugeot 308 SW BL Dag (2009.5). Manual - part 16


246

TRAFFIC

04

1

2

4

5

3

 TRAFFIC INFORMATION 

CONFIGURE THE FILTERING AND 
DISPLAYING OF THE TMC MESSAGES 

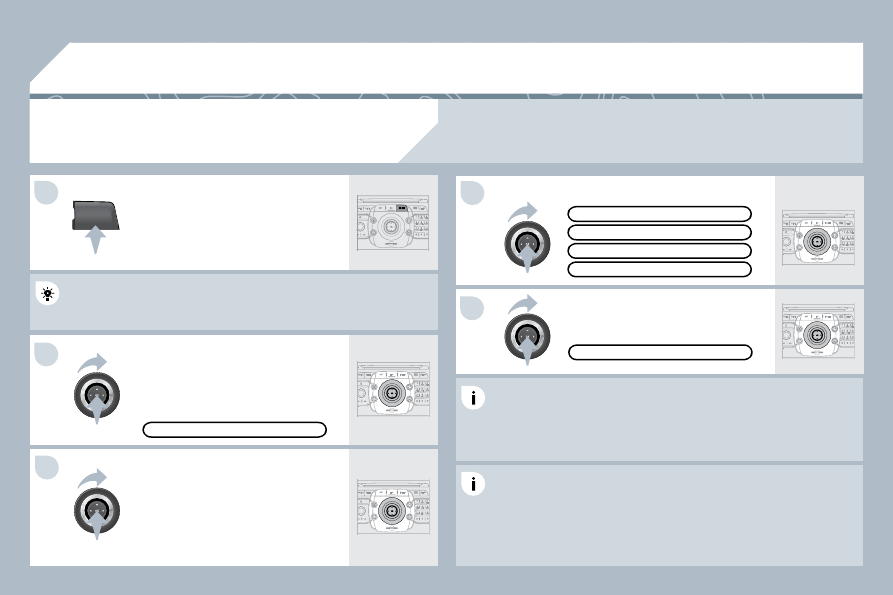
  When all of the messages on the route are selected, the addition 

of a geographic fi lter is recommended (within a radius of 3 miles 

(5 km) for example) to reduce the number of messages displayed 

on the map. The geographic fi lter follows the movement of the 
vehicle.  

  The fi lters are independent and their results are concealed. 

 We recommend: 

   -   a fi lter over 6 miles (10 km) around the vehicle in heavy traffi c, 

  -   a fi lter over 30 miles (50 km) around the vehicle or a fi lter on the 

route on motorway journeys.    

  Press the TRAFFIC button again or 

select the Traffi c Menu function and 

press OK to confi rm. 

  Select "Geo. Filter". 

  The list of TMC messages appears under the Traffi c Menu sorted in 

  The list of TMC messages appears under the Traffi c Menu sorted in 
order of proximity.  

  Select the fi lter of your choice: 

 MESSAGES ON ROUTE 

 ONLY WARNING MESSAGES 

 ALL WARNINGS ON ROUTE 

 ALL MESSAGES  

 TRAFFIC MENU    

  Select "Select preferred list" 
MESSAGE FILTERING and press OK 

to confi rm.  

  The TMC (Traffi c Message Channel) messages provide information relating to traffi c and weather 
conditions, received in real time and transmitted to the driver audibly and visually on the navigation map. 

 The guidance system can then suggest an alternative route.  

  Press the TRAFFIC button.  

 GEO. FILTER  

247

04

2

1

3

2

1

 TRAFFIC INFORMATION 

PRINCIPAL TMC SYMBOLS 

  Red and yellow triangle: traffi c information, for example: 

  Black and blue triangle: general information, for example: 

  With the current audio source 
displayed on the screen, press the 
dial.  

  The shortcut menu for the source appears and gives access to: 

  The shortcut menu for the source appears and gives access to: 

  Select Traffi c Announcements (TA) 

and press the dial to confi rm and go 
to the associated settings.   

 TA  

  The TA (Traffi c Announcement) function gives priority to TA alert 
messages. To operate, this function needs good reception of a radio 

station transmitting this type of message. When a traffi c report is 

transmitted, the current audio source (Radio, CD, Jukebox, ...) is 
interrupted automatically to play the TA message. Normal playback 
of the audio source resumes at the end of the transmission of the 
message.  

RECEIVING TA MESSAGES 

248

RADIO

1

1

2

3

05

  SELECTING A STATION 

  When the current radio station is 
displayed on the screen, press OK.  

  The radio source short-cuts menu appears and provides

ovides access to 

the following short-cuts: 

  Select the function required and press 

OK to confi rm to gain access to the 
corresponding settings.  

 TA 

  The RDS, if displayed, allows you to continue listening to th

g to the same 

station by automatic retuning to alternative frequencies. How

s. However, in 

certain conditions, coverage of an RDS station may not be a

ot be assured 

throughout the country as radio stations do not cover 100 %

 100 % of the 

territory. This explains the loss of reception of the station dur

ion during a journey.   

The external environment (hill, building, tunnel, underground car park...) may interfere with the 
reception, including in RDS following mode. This phenomenon is a normal result of the way 

in which radio waves are transmitted and does not in any way indicate a failure of the audio 

equipment. 

  RDS - REGIONAL MODE 

 REGIONAL PROG. 

 RADIOTEXT 

 RDS 

  Press the RADIO button to display 
the list of stations received locally 
sorted in alphabetical order. 
 Select the station required by turning 

the ring and press to confi rm.  

  Press one of the buttons on the numeric keypad for mo

or more than 

2 seconds to store the current station. A bleep confi rms that it 

2 seconds to store the current station. A bleep confi rms that it 
has been stored. 
 Press the button on the numeric keypad to recall the sto

the stored radio 

station.   

 AM  

 RADIO 

  When the "RADIO" screen is displayed, turn the 
ring or use the 4-direction navigator to select the 
previous or next station on the list.  

  While listening to the radio, press buttons    and 
  for the automatic search for a lower or higher 
frequency.  

249

06  MUSIC MEDIA PLAYERS 

CD, MP3/WMA CD,
MP3/WMA SD CARD/USB READER 

  In order to be able to play a recorded CDR or CDRW, w

RW, when 

recording it is preferable to select the ISO 9660 level 1, 

vel 1, 2 or Joliet 

standard. 
 If the disc is recorded in another format it may not be pla

t be played 

correctly. 
 It is recommended that the same recording standard is 

ard is always used 

for an individual disc, with as low a speed as possible (4x maximum) 

for an individual disc, with as low a speed as possible (4x maximum) 
for optimum sound quality. 
 In the particular case of a multi-session CD, the Joliet st

oliet standard is 

recommended.  

  The audio equipment will only play audio fi les with the extension 

  The audio equipment will only play audio fi les with the extension 
".mp3" with a speed of between 8 Kbps and 320 Kbps a

bps and the 

extension ".wma" with a speed of between 5 Kbps and 3

s and 384 Kbps. 

 It also supports the VBR (Variable Bit Rate) mode. 

 No other type of fi le (.mp4, .m3u...) can be played.  

 The MP3 format, an abbreviation of MPEG 1, 2 & 2.5 A

 2.5 Audio Layer 3 

and the WMA format, an abbreviation of Windows Medi

 Media Audio and 

the property of Microsoft, are audio compression standa

standards which 

permit the recording of several tens of music fi les on a single disc.  

permit the recording of several tens of music fi les on a single disc.  

  Connecting an IPod: 

 To play MP3 type fi les, connect the IPod using the USB port 

 To play MP3 type fi les, connect the IPod using the USB port 

(limited functions). 

 To play ITunes fi les, connect the IPod using the auxiliary socket 

 To play ITunes fi les, connect the IPod using the auxiliary socket 

(AUX).  

  In order to be read, a USB memory stick must be forma

 formatted 

to FAT 32.  

  It is advisable to restrict fi le names to 20 characters, without using of 

  It is advisable to restrict fi le names to 20 characters, without using of 

special characters (e.g.: " " ? ; ù) to avoid any playing and displaying 

special characters (e.g.: " " ? ; ù) to avoid any playing and displaying 
problems.  

  During play, exit the "SD-Card" or "USB" source before 

efore removing the 

SD card or the USB memory stick from its reader.  

  To avoid any risk of theft, remove the SD card or the US

the USB memory 

stick when you leave your vehicle with the roof open.   

  INFORMATION AND ADVICE 

250

4

5

6

2

7

3

1

MEDIA

06

2

ABC

3

DEF

5

JKL

4

GHI

6

MNO

8

TUV

7

PQRS

9

WXYZ

0

*

#

1

RADIO

MEDIA

NAV

ESC

TRAFFIC

SETUP

ADDR
BOOK

  SELECTING/PLAYING  

CD, MP3/WMA CD, MP3/WMA SD CARD/
USB READER 

 The playing and displaying of an MP3/WMA compilation may depend 

 The playing and displaying of an MP3/WMA compilation may depend 

on the recording programme and/or the parameters used. We 

on the recording programme and/or the parameters used. We 
recommend the ISO 9660 recording standard.  

 Press the MEDIA button. 

 Select the "Select media" function 

and press OK to confi rm. 

 Press this button. 

 Select the music source required. 

Press OK to confi rm. Play begins. 

 SELECT MEDIA 

 "MEDIA" MENU 

 Press the MEDIA button again or 
select the "Media" Menu function and 

press OK to confi rm. 

 When the "MEDIA" screen is 
displayed, turn the ring up or down to 
select the previous or next compatible 
source. 

 The list of tracks or MP3/WMA fi les appears under "Media" Menu. 

 The list of tracks or MP3/WMA fi les appears under "Media" Menu. 

 Insert the audio or MP3 CD in the player, 
the SD card in the card reader or the USB 
peripheral in the USB reader. Play begins 
automatically. 

 MP3 CDs, SD cards or USB peripherals are the compatible sources. 

 MUSIC MEDIA PLAYERS 

251

2

ABC

3

DEF

5

JKL

4

GHI

6

MNO

8

TUV

7

PQRS

9

WXYZ

0

*

#

1

RADIO

MEDIA

NAV

ESC

TRAFFIC

SETUP

ADDR
BOOK

1

2

3

4

5

6

7

8

9

MEDIA

06

  Select "Jukebox management" then 

"Add fi les"and press OK at each step 

to confi rm. 

  Press the MEDIA button. Press the 
MEDIA button again or select Media 

Menu and press OK to confi rm.  

  Insert an audio/MP3 CD, a USB 
memory stick or an SD card.  

JUKEBOX 

 ADD FILES  

  Check that the active MEDIA source is that of the mediu

 medium used 

(CD, USB or SD card).  

  Select "Add fi les from MP3-Disc" for 
example and press OK to validate. 

  Select the tracks required then 
"Rip selection" or select all of the 
tracks using "Rip all".  

  Select "[New folder]" to create a new 
folder or select an existing folder 

(created previously). 

 ADD FILES FROM MP3-DISC  

 [NEW FOLDER]  

  "Do you want to change the names of 

the tracks that will be ripped?": select 
"Yes" to change them or "No". 

  To copy an MP3 CD, then select 

"Real time ripping", "Fast ripping"/

"High quality (192 kbit/sec)" or 

"Standard quality (128 kbit/sec)" then 
select "Start ripping".  

  Confi rm the warning message by 
pressing "OK" to start the copy. 

 OK   

 YES

NO  

 When copying is in progress, switching off the ignition will interrupt the process but it will resume 

directly when the ignition is switched on again.  

 MUSIC MEDIA PLAYERS 

  COPYING A CD, A USB STICK OR 
AN SD CARD ONTO THE HARD DISK 

252

3

3

22

MEDIA

3

3

44

55

22

MEDIA

1

11

06

  Press the MEDIA button. 
 Press the MEDIA button again or 
select Media Menu and press OK to 

confi rm.  

  Select "Jukebox management" and 

press OK to confi rm.  

  Select "Play options" and press OK 

to confi rm. 
 Select "Folders & Files" or "Playlists" 

then press OK to confi rm.  

  Press the ESC button to return to the fi rst fi le level. 
 Playlists can be created in the Jukebox. 
 Media Menu> Jukebox management> Create new playlist. Add the 
tracks required one by one then save the change. The "Playlists" 
play mode must then be selected.   

JUKEBOX 

  LISTENING TO THE JUKEBOX 

 JUKEBOX MANAGEMENT  

 MODIFY CONTENT   

  Press the MEDIA button.  

  Press the MEDIA button again or 
select Media Menu and press OK to 

confi rm.  

  Select "Jukebox management" and 

press OK to confi rm. 

  Select "Modify content" and press OK 

confi rm. 

 JUKEBOX 

  RENAMING OR DELETING AN ALBUM 

  Activate the playing of a source other than the Jukebox 

(CD, radio, etc...).  

  Check that the active source is not the Jukebox in order

 order to be able to 

rename or delete a track/folder.  

 MUSIC MEDIA PLAYERS 

253

1

3

4

2

2

3

MEDIA

1

MEDIA

06

2

ABC

3

DEF

5

JKL

4

GHI

6

MNO

8

TUV

7

PQRS

9

WXYZ

0

*

#

1

RADIO

MEDIA

NAV

ESC

TRAFFIC

SETUP

ADDR
BOOK

 Connect the portable equipment (MP3 player, camcorder, camera…) 

 Connect the portable equipment (MP3 player, camcorder, camera…) 

to the RCA socket (white and red for audio; red and yellow for video) 

to the RCA socket (white and red for audio; red and yellow for video) 

in the glove box using a JACK/RCA audio cable. 

 Press the MEDIA button then press 
it again or select the "Media" Menu 

function and press OK to confi rm. 

 Select the AUX music source and 

press OK to confi rm. Play begins 
automatically. 

 Select "Select media" then 

"External device (AV)" and press OK 
to activate it. 

 EXTERNAL DEVICE 

 The display and management of the controls is via the p

a the portable 

equipment.  

USING AN EXTERNAL DEVICE (AUX)  

AUDIO/VIDEO/RCA CABLE NOT SUPPLIED 

 If the external device is not activated, select "Ext. Device (Aux) 

 If the external device is not activated, select "Ext. Device (Aux) 
management" to activate it. 

  VIEWING A VIDEO DVD 

  Select the video source required ("DVD-Video", "Extern

xternal device 

(AV)"). Press OK to confi rm. Play begins.   

  Press the MEDIA button to gain 
access to the DVD menu at any time, 
or to the functions of the Media Menu 

which adjust the video (brightness/

contrast, image format...).  

  If the DVD does not appear on the 
screen, press the MODE button to 
gain access to the "MEDIA" screen 
which displays the DVD screen.  

  Insert the DVD in the player. Play begins 
automatically.  

  The 4-direction navigator and the chromed ring allow you to move 
the DVD selection cursor. Change chapter by pressing the    or 
  button.  

 MUSIC MEDIA PLAYERS 

254

07

1

2

CHOOSING BETWEEN THE BLUETOOTH 
TELEPHONE/INTERNAL TELEPHONE 

  To activate the Bluetooth telephone 
or the internal telephone, press PICK 
UP TEL.  

 USING THE TELEPHONE 

  Select Phone menu, then "Select 
phone" then choose between 
"Telephone off", "Use Bluetooth 
phone" or "Use internal phone". 

Press OK at each step to confi rm.  

  The system can only be connected to one Bluetooth tele

th telephone and 

one SIM card (Internal telephone) at the same time. 
 In this case, the phone book is synchronised with the Bl

the Bluetooth 

telephone.   

255

07

1

3

5

4

2

1

  *   The services available via the telephone depend on the network, the SIM card and the compatibility 

of the Bluetooth equipment used. Refer to your telephone's manual and your operator to check which 

services you have access to. A list of mobile telephones which offer the best range of services is 

available from dealers.  

 USING THE TELEPHONE 

  CONNECTING A BLUETOOTH 
TELEPHONE   

  For safety reasons and because they require prolonged

onged attention on 

the part of the driver, the operations for pairing the Blue

 Bluetooth mobile 

telephone to the hands-free system of the PC Com 3D 

m 3D must be 

carried out with the vehicle stationary and the ignition on

ition on.  

  Activate the telephone's Bluetooth function. 
 The last telephone connected is reconnected 
automatically.  

  If no telephone is connected, the 
system prompts you to "Connect 
phone". Select "Yes" and press OK to 

confi rm.  

  Enter the authentication code on the 
telephone. The code to be entered is 
displayed on the screen.  

  To change the telephone connected, 
press the TEL button, then select 
Phone menu, then "Select phone" 
then "Connect Bluetooth phone" 
then select the telephone required or 
"Search phone". 

 Press OK at each step to confi rm.   

  Once the telephone has been connected, the PC Com 3

Com 3D can 

synchronise the address book and the call list. This sync

is synchronisation 

may take a few minutes * .  

  The list of telephones connected previously (4 maximum) appears on 

  The list of telephones connected previously (4 maximum) appears on 
the multifunction screen. Select the telephone required 

uired then select 

"Connect phone" for a new connection. Select "Delete p

elete pairing" to 

cancel the connection to the telephone.  

  Press the TEL button.  

  For a fi rst connection, select 
"Search phone" and press OK to 

confi rm. Then select the name of the 
telephone. 

 SEARCH PHONE  

256

2

ABC

3

DEF

5

JKL

4

GHI

6

MNO

8

TUV

7

PQRS

9

WXYZ

0

*

#

1

07

1

22

3

3

11

22

  Extract the holder by pressing the eject button.  

  Install the SIM card in the holder 
and then insert it in the slot.  

  To remove the SIM card, repeat step 1.  

  For safety reasons and because they require prolonged attention 
on the part of the driver, the SIM card installation operations must 
be carried out when stationary.  

  Enter the PIN code on the keypad 

then select OK and confi rm. 

  The system asks "Do you want to 

switch to the internal phone?", select 
"Yes" if you wish to use your SIM card 
for your personal calls. Otherwise, 
only the emergency call and the 
services will use the SIM card.  

 REMEMBER PIN  

  When entering your PIN code, tick the "Remember PIN" tab to allow 
use of the telephone without having to enter this code when it is 
used subsequently.  

USING THE INTERNAL TELEPHONE 
WITH SIM CARD 

 USING THE TELEPHONE 

  Once the SIM card has been installed, the system can synchronise 
the address book and the call list. 
 This synchronisation may take a few minutes.   

 If you have declined to use the internal telephone for personal calls, you can still connect a Bluetooth 

telephone to receive your calls on the vehicle's audio system. 

257

3

1

1

2

3

2

07

 Press the end of the steering mounted control to 
accept the call or end the call in progress.  

 Select the "Yes" tab to accept or "No" 

to refuse and confi rm by pressing OK. 

  RECEIVING A CALL 

  MAKING A CALL 

 An incoming call is announced by a ring and a superimp

perimposed display 

on the screen. 

 To hang up, press the HANG UP TEL 
button or press OK and select "End 

call" then confi rm by pressing OK. 

 END CALL 

 Press the PICK UP TEL button. 

 Press the end of the steering mounted control for more 

more than 

two seconds to open the address book.  

 It is also possible to select a number from the address b

ress book. You 

can select "Dial from address book". The PC Com 3D p

 3D permits the 

recording of up to 4 096 entries. 

 DIAL NUMBER 

 Select "Dial number", then dial the 
telephone number using the virtual 
keypad. 

 "PHONE" MENU 

 Select the "Phone" menu function and 

press OK to confi rm. 

 YES

NO 

 The list of the last 20 calls made and received in the veh

he vehicle appears 

under "Phone" menu. You can select a number and pres

d press OK to 

make the call. 

 The PICK UP TEL button accepts, the HANG UP TEL button refuses 
the incoming call. 

 USING THE TELEPHONE 

258

5

6

SETUP

1

2

3

4

08  CONFIGURATION 

SETTING THE DATE AND TIME 

  Set the parameters using the ring 
and move on to the next using the 
4-direction navigator. 

 Press OK to confi rm.  

  Select the "Date format" function and 

press OK to confi rm. 
 Select the format required using the 

ring and press OK to confi rm.  

  Select the "Set date & time" function 

and press OK to confi rm. 

  Pressing the SETUP button for more than 2 seconds pe

ds permits 

access to: 

  This setting operation must be carried out if the battery h

ttery has been 

disconnected.  

  Press the SETUP button.  

  Select the "Time format" function and 

press OK to confi rm. 
 Select the format required using the 

ring and press OK to confi rm.  

 SET DATE & TIME  

  Select the "Date & Time" function and 

press OK to confi rm. 

 DEMO MODE   

 GPS COVERAGE 

 DESCRIPTION OF THE UNIT 

 DATE & TIME  

 Principle of the GPS synchro (GMT): 
   1.  Confi rm the "Synchronise with GPS" selection, the time is then set to GMT universal time, the date 
is also updated. 
  2.  Using the 4-direction navigator, move the cursor to the time fi elds and press OK. 
  3.  You can then use the ring to set the time to the time zone of your choice.   
Take care when changing between summer/winter time, the time zone must be changed again 
manually.    

 This function provides access to the options in the SETUP menu. 

259

09

  RADIO: selection of the previous stored station. 

 Audio CD: selection of the previous track. 

 If "MEDIA" is displayed on the screen: 

 MP3 CD/SD CARD/JUKEBOX: selection of the 
previous directory. 
 Selection of the previous entry in the address book.  

  RADIO: selection of the next stored station. 

 Audio CD: selection of the next track. 

 If "MEDIA" is displayed on the screen: 

 MP3 CD/CARD/JUKEBOX: selection of the next 
directory. 
 Selection of the next entry in the address book.  

  RADIO: automatic search for a higher frequency. 

 CD/SD CARD/JUKEBOX: selection of the next track. 

 CD/SD CARD/JUKEBOX: continuous press: fast forward play.  

  RADIO: automatic search for a lower frequency. 

 CD/SD CARD/JUKEBOX: selection of the previous track. 

 CD/SD CARD/JUKEBOX: continuous press: fast backward play.   

    -   Change the sound source. 
  -   Make a call from the address book. 

  -   Pick up/Hang up the telephone. 

  -   Press for more than 2 seconds: 

access to the address book.   

  Volume increase.  

  Volume decrease.  

        STEERING MOUNTED CONTROLS 

  Mute: by pressing 
the volume increase 
and decrease buttons 
simultaneously. 

 Restore the sound: by 
pressing one of the two 
volume buttons.  

  Wiper stalk: display of "RADIO" and "MEDIA". 
 Lighting stalk: activation of the voice command by means of a short press; indication of the current 
navigation instruction by means of a long press.  

260

TU

PQRS

0

*

11

SETUP

22

09

  Before using the system for the fi rst time, you are advised to 
listen to, say and repeat the instructions for use.  

  Press the SETUP button and 
select the "Language & Speech" 
function. Turn the ring and select 
"Voice control". Activate the voice 
recognition. 
 Select "Tutorial".  

VOICE COMMANDS - 

VOICE RECO. INITIATION 

  The phrases to be spoken according to the context are 
indicated in the tables below. 
 Speak and PC Com 3D acts.  

  Long press on this button or press on the 

end of the lighting stalk: activates the voice 
recognition.  

   CONTEXT   

   SAY   

   ACTION   

   GENERAL   

 Help address book 
 Help voice control 
 Help media 
 Help navigation 
 Help telephone 
 Help radio 
 Cancel 

 Correction 

 Access to the address book help 
 Access to the voice reco help 
 Access to the media management help 
 Access to the guidance, navigation help 
 Access to the telephone help 
 Access to the radio help 
 To cancel a voice command which is in 
progress 
 Request to correct the last voice 
recognition carried out 
 Clear 

   RADIO   

 Select station 

 Station <tts:stationName> 

 Read out station list 
 Enter frequency 

 Select wave band 

 AM 
 FM 
 TA on 
 TA off 

 Select a radio station 
 Select a radio station using its RDS 

description <tts:station Name> from the 

RADIO list 
 Listen to the list of stations available 
 Listen to the frequency of the current 
radio station 
 Choose the frequency waveband (AM 

or FM) 

 Change the frequency waveband to AM 
 Change the frequency waveband to FM 

 Activate the Traffi c Info (TA) 

 Deactivate the Traffi c Info 

   NAVIGATION   

 Destination input 

 Voice advice off 

 Voice advice on 
 Save address 
 Start guidance 

 Abort guidance 
 Navigate entry 

 POI Search 

 Command to enter a new destination 
address 
 Deactivate the spoken guidance 
instructions 
 Activate the spoken guidance instructions 
 Save an address in the address book 
 Start guidance (once the address has 

been entered) 

 Stop the guidance 

 Start guidance to a fi le in the address 

book 
 Start guidance to a point of interest 

 VOICE COMMANDS AND STEERING MOUNTED CONTROLS 

261

09

VOICE RECO. INITIATION 

 VOICE COMMANDS AND STEERING MOUNTED CONTROLS 

  CONTEXT  

   SAY   

  ACTION  

   MEDIA   

 Media 
 Select media 
 Single slot 
 Jukebox 
 USB 
 External device 
 SD-Card 
 Track <1 - 1 000> 

 Folder <1 - 1 000> 

 Select the MEDIA source 
 Choose a source 
 Select the CD player source 
 Select the Jukebox source 
 Select the USB reader source 
 Select the audio AUX input source 
 Select the SD card source 

 Select a specifi c track (number between 1 and 

1 000) on the active MEDIUM 

 Select a Folder (number between 1 and 1 000) 

on the active MEDIUM 

   TELEPHONE   

 Phone menu 
 Enter number 
 Phone book 
 Dial 
 Save number 
 Accept 
 Reject 

 Open the Telephone Menu 
 Enter a telephone number to be called 
 Open the phone book 
 Make a call 
 Save a number in the phone book 
 Accept an incoming call 
 Refuse an incoming call 

   ADDRESS BOOK   

 Address book menu 
 Call <entry> 

 Navigate <entry> 

 Open the address book 

 Call fi le using its description <fi le> as described 

in the address book 
 Start guidance to an address in the address book 

using its description <fi le> 


Content   ..  14  15  16  17   ..