Peugeot 308 CC Dag (2010.5). Manual - part 9


  Index      Peugeot     Peugeot 308 CC Dag 2010.5 - service manual in english


Search            


Content   ..  7  8  9  10   ..


Peugeot 308 CC Dag (2010.5). Manual - part 9


7

SAFETY

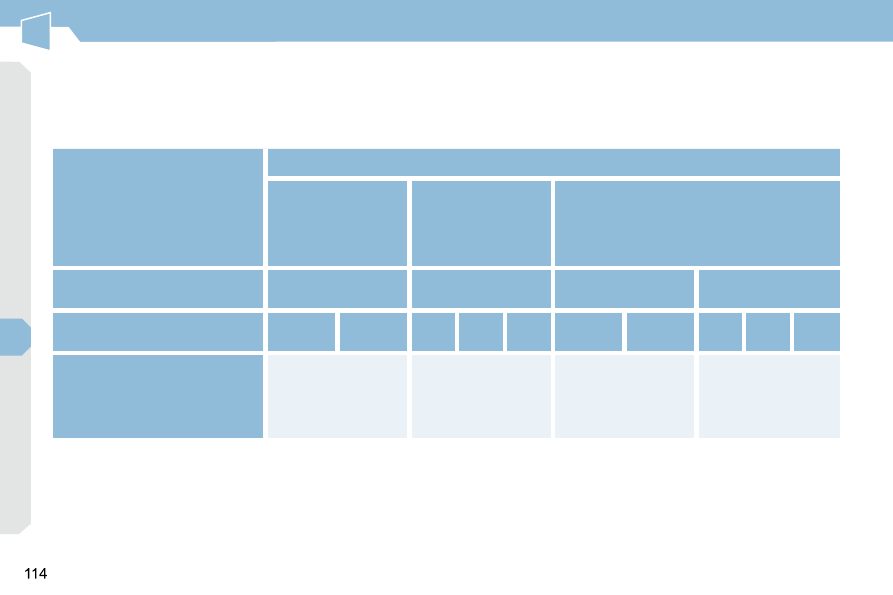
LOCATIONS FOR FITTING ISOFIX CHILD SEATS 

 In accordance with European Regulations, this table indicates the options for installing ISOFIX child seats on seats in the 

vehicle fi tted with ISOFIX mountings. 
 In the case of universal and semi-universal ISOFIX child seats, the ISOFIX size category, determined by a letter from  A  to  G , 
is indicated on the child seat next to the ISOFIX logo. 


IL-SU:  seat suitable for the installation of an  I sofi x  S emi- U niversal seat either: 

   -   "rear facing" fi tted with a stay, 

  -   "forward facing" fi tted with a stay.  
  

X:  seat which is not suitable for the installation of an ISOFIX seat of the size category indicated. 


   Weight of the child /indicative age  

   Less than 10 kg  

 (group 0)   

Up to approx. 

6 months  

   Less than 10 kg   

 (group 0)  

Less than 13 kg   

 (group 0+)   

Up to approx. 1 year  

   From 9 to 18 kg (group 1)   

From approx. 1 to 3 years  


Type of ISOFIX child seat   

   Infant car seat  *   

   "rear facing"   

   "rear facing"   

   "forward facing"   


ISOFIX size category   

   F   

  G  

   C   

   D   

   E   

   C   

   D   

   A   

   B   

   B1   

   ISOFIX   universal and 

semi-universal   child seats 

  which can be installed on 

the     outer rear seats   

   X   

   IL-SU   

   IL-SU   

   IL-SU   

  *   Infant car seats and "car" cots cannot be installed on the front passenger seat.  

8

!

i

!

115

DRIVING

 When  parking  on  a  slope,  direct 
your wheels against the pavement, 
apply  the  parking  brake  and  en-
gage a gear.   

PARKING BRAKE  

  Applying 

      Pull the parking brake lever fully up 

to immobilise your vehicle.   

 When the vehicle is being driven, 
if this warning lamp and the  STOP  
warning  lamp  come  on,  accom-
panied by an audible signal and a 

message on the multifunction screen, this 
indicates that the parking brake is still on or 
has not been properly released. 

  Releasing 

      Pull  the  parking  brake  lever  gently, 

press the release button then lower 
the lever fully.  

6-SPEED MANUAL GEARBOX 

 As a safety precaution and to facili-
tate starting of the engine: 
   -  

always select neutral, 

  -  

press the clutch pedal.   

 Only  engage  reverse  gear  when 
the  vehicle  is  stationary  with  the 
engine at idle. 

  Engaging reverse gear 

      Raise  the  ring  under  the  knob  and 

push  the  gear  lever  to  the  left  then 
forwards.  

8

i

116

DRIVING

GEAR SHIFT INDICATOR *  

 System which reduces fuel consumption 
by  advising  the  driver  to  change  up  on 

vehicles fi tted with a manual gearbox. 

  Operation 

 The system intervenes only when driving 
economically. 
 Depending on the driving situation and 
your  vehicle's  equipment,  the  system 
may  advise  you  to  skip  one  or  more 
gears.  You  can  follow  this  instruc-
tion  without  engaging  the  intermediate 
gears. 
 The  gear  recommended  should  not 
be  considered  compulsory.  In  fact,  the 

confi guration  of  the  road,  the  amount 

of traffi c and safety remain determining 

factors  when  choosing  the  best  gear. 
Therefore, the driver remains responsi-
ble for deciding whether or not to follow 
the advice given by the system. 
 This function cannot be deactivated.  

  The  information  appears  in  the  form 
of  an  arrow  on  the  instrument  panel 
screen. 
 Depending on your vehicle's equipment, 
this arrow may be accompanied by the 
recommended gear.  

  In the case of driving which makes 
particular  demands  on  the  perfor-

mance  of  the  engine  (fi rm  pres-

sure  on  the  accelerator  pedal,  for 

example,  when  overtaking...),  the 

system will not recommend a gear 
change. 
 The system never suggests: 
   -   engaging fi rst gear, 
  -  

engaging reverse gear, 

  -  

engaging a lower gear.    

  *   According to engine.  

  Example: 
   -  

You are in third gear. 

  -  

You  press  the  accelerator  pedal 
moderately. 

  -  

The  system  may  suggest  that  you 
engage a higher gear, if appropriate.  

8

117

DRIVING

"PORSCHE TIPTRONIC 
SYSTEM" AUTOMATIC 
GEARBOX 

 Four  or  six  speed  automatic  gearbox 

which offers a choice between the com-
fort  of  fully  automatic  operation,  en-
hanced by sport and snow programmes, 
or manual gear changing. 
 Four driving modes are provided: 
   -  

 automatic   operation  for  electronic 
management  of  the  gears  by  the 

gearbox, 

  -  

 sport  programme for a more dynamic 
style of driving, 

  -  

 snow   programme  to  improve  driving 
when traction is poor, 

  -  

 manual   operation  for  sequential 
changing of the gears by the driver.  

  Gear lever 

  P.   Park. 
   -  

Immobilisation  of  the  vehicle,  park-
ing brake on or off. 

  -  

Starting the engine.  

  R.   Reverse. 
   -  

Reversing manoeuvres, vehicle sta-
tionary, engine at idle.  

  N.   Neutral. 
   -  

Immobilisation  of  the  vehicle,  park-
ing brake on. 

  -  

Starting the engine.  

  D.   Automatic operation. 
  M.+/-   Manual operation with sequential 

changing of the four or six gears. 

      Push forwards to change up through 

the gears.  

 or 
      Pull  rearwards  to  change  down 

through the gears.   

  Displays in the instrument panel 

 When  you  move  the  lever  in  the  gate 
to  select  a  position,  the  corresponding 
indicator lamp is displayed in the instru-
ment panel. 
  P.    Park 
  R.   Reverse 
  N.   Neutral 
  D.

   Drive (Automatic driving) 

  S.    Sport  programme 
   .   Snow  programme 
  1 to 4.    Gear engaged during 
  1 to 6.    manual operation 
  -.    Invalid value during manual operation 

  Gear selection gate 

   1.   Gear lever. 
  2.   Button " S "  (sport) . 
  3.   Button "  "  (snow) .   

      When  this  warning  lamp 

fl ashes,  press  the  brake 

pedal  to  allow  disengage-
ment of the gear lever from 
the  P  position.    

  Foot on brake 

8

!

!

i

118

DRIVING

  Moving off 

      Apply the parking brake. 
     Select position  P  or  N . 
     Start the engine.  
 If this procedure is not followed, a loud 
audible signal is heard, accompanied by 
a message in the multifunction screen. 
      With  the  engine  running,  press  the 

brake pedal. 

     Release the parking brake. 
     Select position  R ,  D  or  M , 
     Gradually release the brake pedal.  
 The vehicle moves off immediately. 

 If  position   N   is  engaged  inadver-
tently  while  driving,  allow  the  en-
gine  to  return  to  idle  then  engage 
position  D  to accelerate. 

 The  gearbox  then  operates  in  auto-

adaptive mode, without any intervention 
on the part of the driver. It continuously 
selects  the  most  suitable  gear  accord-

ing to the style of driving, the profi le of 

the road and the load in the vehicle. 
 For  maximum  acceleration  without 

touching  the  lever,  press  the  accelera-

tor  pedal  down  fully  (kick  down).  The 

gearbox  changes  down  automatically 

or maintains the gear selected until the 

maximum engine speed is reached. 

 On braking, the gearbox changes down 

automatically to provide effi cient engine 

braking. 
 If  you  release  the  accelerator  sharply, 

the gearbox will not change to a higher 

gear for safety reasons. 

  Automatic operation 

      Select  position   D   for   automatic  

changing of the four or six gears.  

     appears  in  the  instrument 
panel.   

  Snow programme "  " 

      Press  button  "  ",  after  starting  the 

engine.  

 The  gearbox  adapts  to  driving  on  slip-

pery roads. 
 This programme improves starting and 
drive when traction is poor. 

  S   appears  in  the  instrument 
panel.  

  Sport programme "S" 

      Press  button   "S" ,  after  starting  the 

engine.  

 The  gearbox  automatically  favours  a 

dynamic style of driving. 

 Never  select  position   N   while  the 
vehicle is moving. 
 Never  select  positions   P   or   R   un-
less  the  vehicle  is  completely  sta-
tionary.  

 When  the  engine  is  running  at 
idle,  with  the  brakes  released,  if 
position  R ,  D  or  M  is selected, the 
vehicle moves even without the ac-
celerator being pressed. 
 When the engine is running, never 
leave  children  in  the  vehicle  with-
out supervision. 
 When carrying out maintenance with 
the  engine  running,  apply  the  park-
ing brake and select position  P .  

  Sport and snow programmes 

 These two special programmes supple-
ment  the  automatic  operation  in  very 

specifi c conditions of use. 

  Return to automatic operation 

      At  any  time,  press  the  button  se-

lected  again  to  quit  the  programme 
engaged and return to auto-adaptive 
mode.   

8

PRND

!

i

119

DRIVING

  Stopping the vehicle 

 Before  switching  off  the  engine,  you 
can engage position  P  or  N  to place the 

gearbox in neutral. 
 In  both  cases,  apply  the  parking  brake 
to immobilise the vehicle. 

  Operating fault 

 When  the  ignition  is  on,  the 
lighting  of  this  warning  lamp, 
accompanied by an audible sig-
nal  and  a  message  in  the  mul-

tifunction  screen,  indicates  a  gearbox 

malfunction. 
 In  this  case,  the  gearbox  switches  to 

emergency  mode  and  is  locked  in  3rd 
gear. You may feel a substantial knock 
when changing from  P  to  R  and from  N  
to  R . This will not cause any damage to 

the gearbox. 

 Do  not  exceed  a  speed  of  60  mph 

(100 km/h), local speed restrictions per-

mitting. 
 Have it checked by a PEUGEOT dealer. 
 This warning lamp may also come on if 
a door is opened. 

 There  is  a  risk  of  damage  to  the 

gearbox: 
   -  

if you press the accelerator and 
brake pedals at the same time, 

  -  

if you force the lever from posi-
tion  P  to another position when 

the battery is fl at.  

  Manual operation 

      Select  position   M   for   sequential  

changing of the four or six gears. 

     Push the lever towards the  +  sign to 

change up a gear. 

     Pull  the  lever  towards  the   -   sign  to 

change down a gear.  

  D   disappears  and  the  gears 
engaged  appear  in  succes-
sion on the instrument panel. 
 If the engine spped is too low 
or too high, the gear selected 

fl ashes for a few seconds, then the ac-

tual gear engaged is displayed. 
 It is possible to change from position  D  

(automatic)  to  position   M   (manual)  at 

any time. 
 When  the  vehicle  is  stationary  or mov-

ing  very  slowly,  the  gearbox  selects 

gear  M1  automatically. 
 The sport and snow programmes do not 
operate in manual mode. 

 If  the  lever  is  not  in  position   P , 
when the driver's door is opened or 

approximately 45 seconds after the 

ignition  is  switched  off,  an  audible 
signal is heard and a message ap-
pears. 
      Return  the  lever  to  position   P ; 

the audible signal stops and the 
message disappears.   

 It  is  only  possible  to  change  from  one 
gear to another if the vehicle speed and 
engine  speed  permit;  otherwise,  the 

gearbox will operate temporarily in au-

tomatic mode. 

  Invalid value during manual 
operation 

 This  symbol  is  displayed  if  a 
gear  is  not  engaged  correctly 
(selector  between  two  posi-

tions).   

 To limit fuel consumption when sta-
tionary for long periods with the en-

gine  running  (traffi c  jam...),  place 

the gear lever in position  N  and ap-
ply the parking brake.  

8

i

120

DRIVING

SPEED LIMITER 

 System which prevents the vehicle from 

exceeding  the  speed  programmed  by 

the driver. 
 When  the  programmed  speed  limit  is 
reached, pressing the accelerator pedal 
no longer has any effect. 
 The speed limiter is  switched on  man-
ually:  it  requires  a  programmed  speed 

of at least 20 mph (30 km/h). 
 The  speed  limiter  is   switched  off   by 
manual operation of the control. 
 The 

programmed 

speed 

can 

be 

exceeded  temporarily  by  pressing  the 

accelerator fi rmly. 
 To  return  to  the  programmed  speed, 
simply slow down to a speed below the 
programmed speed. 
 The  programmed  speed  remains  in  the 
memory when the ignition is switched off. 

 The controls of this system are grouped 
together on stalk  A . 
   1.   Speed limiter mode selection dial 
  2.   Value decrease button 
  3.   Value increase button 
  4.

   Speed limiter on/off button   

 The 

programmed 

information 

is 

grouped  together  on  the  instrument 
panel screen. 
  5.

   Speed limiter on/off indication 

  6.   Speed limiter mode selection indication 
  7.   Programmed speed value  

  Steering mounted controls 

  Displays on the instrument panel 

 The  speed  limiter  cannot,  in  any 
circumstances,  replace  the  need 
to  respect  speed  limits,  nor  can  it 
replace  the  need  for  vigilance  and 
responsibility  on  the  part  of  the 
driver. 

8

!

121

DRIVING

 On a steep descent or in the event 
of  sharp  acceleration,  the  speed 
limiter  will  not  be  able  to  prevent 

the vehicle from exceeding the pro-

grammed speed. 
 To avoid any risk of jamming of the 

pedals: 
   -  

ensure  that  the  mat  is  posi-
tioned correctly, 

  -   do not fi t one mat on top of an-

other.   

  Programming 

      Turn dial  1  to the  "LIMIT"  position: 

the speed limiter mode is selected 

but is not switched on (OFF).  

  Exceeding the programmed speed 

 Pressing the accelerator pedal to exceed the programmed 

speed  will  not  have  any  effect  unless  you  press  the  pedal 
 

fi rmly  past the  point of resistance . 
 The  speed  limiter  is  deactivated  temporarily  and  the  pro-

grammed speed, which is still displayed, fl ashes. 
 Returning to the programmed speed, by means of intention-
al or unintentional deceleration of the vehicle, automatically 

cancels the fl ashing of the programmed speed.  

  Return to normal driving 

      Turn dial  1  to the  "0"  position: the speed limiter mode is 

deselected. The display returns to the distance recorder.   

  Operating fault 

 In the event of a speed limiter malfunc-
tion,  the  speed  is  cleared  resulting  in 

fl ashing of the dashes. 
 Have  the  system  checked  by  a 
PEUGEOT dealer. 

 You do not have to switch the speed 
limiter on in order to set the speed. 

      Switch the speed limiter on by pressing button  4 . 
     Switch the speed limiter off by pressing button  4 : the dis-

play confi rms that it has been switched off (OFF). 

     Switch  the  speed  limiter  back  on  by  pressing  button   4  

again.   

      Set the speed value by pressing button  2  or  3  (e.g.: 55 mph 

(90 km/h)).  

 You  can  then  change  the  programmed  speed  using  buttons  2  
and  3 : 
   -   by + or - 1 mph (km/h) = short press, 

  -   by + or - 5 mph (km/h) = long press, 

  -   in steps of + or - 5 mph (km/h) = maintained press.  

8

i

122

DRIVING

CRUISE CONTROL 

 System  which  automatically  maintains 
the  speed  of  the  vehicle  at  the  value 
programmed  by  the  driver,  without  any 
action on the accelerator pedal. 
 The  cruise  control  is   switched  on  
manually: it requires a minimum vehicle 

speed of 25 mph (40 km/h) and the en-

gaging: 
   -  

of  fourth  gear  on  the  manual  gear-

box, 

  -  

of  second  gear  on  the  automat-

ic  gearbox,  in  sequential  driving 

mode, 

  -  

of position  D

  on the automatic gearbox.  

 The cruise control is  switched off  man-
ually or by pressing the brake or clutch 
pedal  or  on  triggering  of  the  ESP  sys-
tem for safety reasons. 
 It is possible to exceed the programmed 

speed  temporarily  by  pressing  the  ac-
celerator pedal. 
 To  return  to  the  programmed  speed, 
simply release the accelerator pedal. 
 Switching  off  the  ignition  cancels  any 
programmed speed value. 

 The controls of this system are grouped 
together on lever  A . 
   1.   Cruise control mode selection dial 
  2.

   Speed programming/value decrease 

button 

  3.

   Speed programming/value increase 

button 

  4.

   Cruise control off/resume button  

 The 

programmed 

information 

is 

grouped  together  on  the  instrument 
panel screen. 
  5.

   Cruise control off/resume indication 

  6.   Cruise  control  mode  selection  indi-

cation 

  7.   Programmed speed value  

  Steering mounted controls 

  Displays on the instrument panel 

 The  cruise  control  cannot,  in  any 
circumstances,  replace  the  need 
to  respect  speed  limits,  nor  can  it 
replace  the  need  for  vigilance  and 
responsibility  on  the  part  of  the 
driver. 
 You  are  advised  to  keep  your  feet 
near the pedals at all times.  

8

!

123

DRIVING

 When the cruise control is switched 
on,  be  careful  if  you  maintain  the 
pressure on one of the programmed 
speed  changing  buttons:  this  may 
result in a very rapid change in the 
speed of your vehicle. 
 Do  not  use  the  cruise  control  on 

slippery roads or in heavy traffi c. 
 On  a  steep  descent,  the  cruise 
control  will  not  be  able  to  prevent 

the vehicle from exceeding the pro-

grammed speed. 
 To avoid any risk of jamming of the 

pedals: 
   -  

ensure  that  the  mat  is  posi-
tioned correctly, 

  -   never fi t one mat on top of an-

other.   

  Programming 

      Turn  dial   1   to  the   "CRUISE"   po-

sition:  the  cruise  control  mode  is 
selected  but  is  not  switched  on 

(OFF). 

  Exceeding the programmed speed 

 Intentional  or  unintentional  exceeding  of  the  programmed 

speed results in fl ashing of this speed on the display. 
 Return to the programmed speed, by means of intentional or 
unintentional deceleration of the vehicle, automatically can-

cels the fl ashing of the speed.  

  Return to normal driving 

      Turn dial  1  to the  "0"  position: the cruise control mode is 

deselected. The display returns to the distance recorder.   

  Operating fault 

 In the event of a cruise control malfunc-
tion,  the  speed  is  cleared  resulting  in 

fl ashing of the dashes. 
 Have it checked by a PEUGEOT dealer. 

     Set the programmed speed by ac-

celerating  to  the  required  speed, 
then  press  button   2   or   3   (e.g.: 

70 mph (110 km/h)).  

      Switch  off  the  cruise  control  by  pressing  button   4 :  the 

display confi rms that it has been switched off (OFF). 

     Switch  the  cruise  control  back  on  by  pressing  button   4  

again.    

 You  can  then  change  the  programmed  speed  using  buttons  2  
and  3 : 
   -   by + or - 1 mph (km/h) = short press, 

  -   by + or - 5 mph (km/h) = long press, 

  -   in steps of + or - 5 mph (km/h) = maintained press. 

8

!

124

DRIVING

PARKING SENSORS 

 This system indicates the proximity of an 

obstacle (person, vehicle, tree, gate, etc.) 

which comes within the fi eld of detection 

of sensors located in the bumper. 
 Certain  types  of  obstacle  (stake,  road-

works  cone,  etc.)  detected  initially  will 

no longer be detected at the end of the 
manoeuvre due to the presence of blind 
spots.  

  This  function  cannot,  in  any  cir-
cumstances,  take  the  place  of  the 
vigilance  and  responsibility  of  the 
driver.   

  Rear parking sensors 

  Audible assistance 
 The proximity information is given by a 

discontinuous  audible  signal,  the  fre-
quency  of  which  increases  as  the  ve-
hicle approaches the obstacle. 
 The sound emitted by the speaker (right 

or left) indicates the side on which the 

obstacle is located. 
 When the distance between the vehicle 
and the obstacle becomes less than ap-

proximately thirty centimetres, the audi-

ble signal becomes continuous.   

 The system is switched on by engaging 
reverse  gear.  This  is  accompanied  by 
an audible signal. 
 The  system  is  switched  off  when  you 

exit reverse gear. 

 This supplements the audible signal by 
displaying  segments  in  the  multifunc-
tion  screen  which  move  progressively 
nearer  to the  vehicle.  When  the  obsta-
cle is near, the "Danger" symbol is also 
displayed in the screen.   

   Visual assistance 

8

i

i

125

DRIVING

       Front parking sensors 

 In  addition  to  the  rear  parking  sensors, 
the  front  parking  sensors  are  triggered 
when  an  obstacle  is  detected  in  front 
and the speed of the vehicle is still below 

6 mph (10 km/h). 
 The sound emitted by the speaker (front 

or rear) indicates whether the obstacle is 

in front or behind. 
 The front parking sensors are interrupted 
if  the  vehicle  stops  for  more  than  three 
seconds in forward gear, if no further ob-
stacles are detected or when the speed 

of the vehicle exceeds 6 mph (10 km/h).   

  Deactivation/Activation of the front 
and rear parking sensors 

 The function is deactivated by pressing 
this  button.  The  indicator  lamp  on  the 
button comes on. 
 Pressing  this  button  again  reactivates 
the function. The indicator lamp on the 
button switches off.   

   Deactivation/Activation of the rear 
parking sensors 

   The function will be deactivated au-
tomatically if a trailer is being towed 

or a bicycle carrier is fi tted (vehicle 

fi tted with a towbar or bicycle car-

rier recommended by PEUGEOT).   

  Operating fault 

 If  an  operating  fault  occurs, 
when  reverse  gear  is  engaged 
this  warning  lamp  is  displayed 

on the instrument panel and/or 

a message appears on the screen, ac-
companied  by  an  audible  signal  (short 

bleep). 
 Consult a PEUGEOT dealer. 

  In bad weather or in winter, ensure 
that  the  sensors  are  not  covered 
with  mud,  ice  or  snow.  When  re-
verse gear is engaged, an audible 

signal  (long  bleep)  indicates  that 

the sensors may be dirty. 
 When  the  vehicle  is  moving  at 

a  speed  below  6  mph  (10  km/h), 

certain  sound  sources  (motorcy-

cle, lorry, pneumatic drill, etc.) may 

trigger  the  audible  signals  of  the 
parking sensor system.   

 The function is deactivated 
or activated via the vehicle 

confi guration menu. 
 The  status  of  the  function 
is stored when the ignition 
is switched off. 

 For  more  information  on  access  to  the 
parking sensors menu, refer to the sec-

tion covering the confi guration of vehicle 

systems.   

9

i

!

127

CHECKS

BONNET 

     Push  the  exterior  safety  catch   B   to 

the left and raise the bonnet. 

     Unclip the stay  C  from its housing. 
     Fix the stay in the notch to hold the 

bonnet open.  

  Closing 

      Take  the  stay  out  of  the  support 

notch. 

     Clip the stay in its housing. 
     Lower  the  bonnet  and  release  it  at 

the end of its travel. 

     Pull on the bonnet to check that it is 

secured correctly.   

  Opening 

      Open the front left door. 
     Pull  the  interior  bonnet  release 

lever  A , located at the bottom of the 
door frame. 

 The  location  of  the  interior  bonnet 
release  lever  prevents  opening  of 
the bonnet while the front left door 
is closed. 

 When the engine is hot, handle the 
exterior  safety  catch  and  the  bon-
net stay with care (risk of burns).  

9

i

128

CHECKS

RUNNING OUT OF FUEL 
(DIESEL) 

 If your vehicle is fi tted with an HDI en-

gine, the fuel system must be primed if 
you  run  out  of  fuel;  refer  to  the  engine 
compartment  view  on  the  "Diesel  en-
gine" page. 

  1.6 litre Turbo HDI engine 

   

   Fill the fuel tank with at least fi ve li-

tres of diesel. 

     Open the bonnet. 
     Squeeze  and  release  the  priming 

pump  repeatedly  until  it  hardens  (it 

may be hard at the fi rst press). 

     Operate  the  starter  until  the  engine 

starts. 

     Close the bonnet.   

  2 litre Turbo HDI engine 

   

   Fill the fuel tank with at least fi ve litres 

of Diesel. 

     Open the bonnet. 
     Unclip the style cover for access to 

the priming pump. 

     Slacken the bleed screw. 
     Squeeze  and  release  the  priming 

pump  repeatedly  until  fuel  appears 
in  the  transparent  pipe  with  the 
green connector. 

     Retighten the bleed screw. 
     Operate  the  starter  until  the  engine 

starts. 

     Put the style cover back in position 

and clip it in place. 

     Close the bonnet.   

 If  the  engine  does  not  start  fi rst 

time, don't keep trying. 
 Operate  the  priming  pump  again, 
then the starter motor. 

9

129

CHECKS

PETROL ENGINES 

 The  various  caps  and  covers  allow 
access  for  checking  the  levels  of  the 

various  fl uids  and  for  replacing  certain 

components. 

   1.   Power steering reservoir. 

  2.   Screenwash  and  headlamp  wash 

reservoir. 

  3.   Coolant reservoir. 

  4.

   Brake fl uid reservoir. 

  5.   Battery/Fuses. 

  6.   Fusebox. 

  7.

   Air fi lter. 

  8.   Engine oil dipstick. 

  9.

   Engine oil fi ller cap.  

9

130

CHECKS

DIESEL ENGINES 

 The  various  caps  and  covers  allow  ac-
cess for checking the levels of the various 

fl uids, for replacing certain components 

and for priming the fuel system. 

   1.   Power steering reservoir. 

  2.   Screenwash  and  headlamp  wash 

reservoir. 

  3.   Coolant reservoir. 

  4.

   Brake fl uid reservoir. 

  5.   Battery/Fuses. 

  6.   Fusebox. 

  7.

   Air fi lter. 

  8.   Engine oil dipstick. 

  9.

   Engine oil fi ller cap. 

  10.  Priming pump * . 

  11.  Bleed screw * .  

  *   According to engine.  


Content   ..  7  8  9  10   ..