Peugeot 206 P Dag (2010.5). Manual - part 4


  Index      Peugeot     Peugeot 206 P Dag 2010.5 - service manual in english


Search            


Content   ..  2  3  4  5   ..


Peugeot 206 P Dag (2010.5). Manual - part 4


i

47

       WINDOW CONTROLS 

 System  which  opens  or  closes  a  win-
dow manually or automatically. 

  Electric windows 

      Press or pull the switch. The window 

stops  as  soon  as  the  switch  is  re-
leased.   

  One-touch electric windows 

 There are two methods of operation: 
   -  

 manual mode  

     Press  or  pull  the  switch  gently. 

The window stops as soon as the 
switch is released.  

  -  

 automatic mode  

     Press or pull the switch fully. The 

window opens or closes complete-
ly when the switch is released. 

    Pressing  the  switch  again  stops 

the movement of the window.   

REAR QUARTER WINDOWS 

 On  the  3-door  versions,  system  for  venti-
lation  of  the  rear  seats  limiting  the  partial 
opening of the window. 

  Opening 

      Tilt the lever outwards. 
     Push the window to open it.   

  Closing 

      Pull the lever to close the window. 
     Tilt the lever fully inwards to secure 

the window in the closed position.   

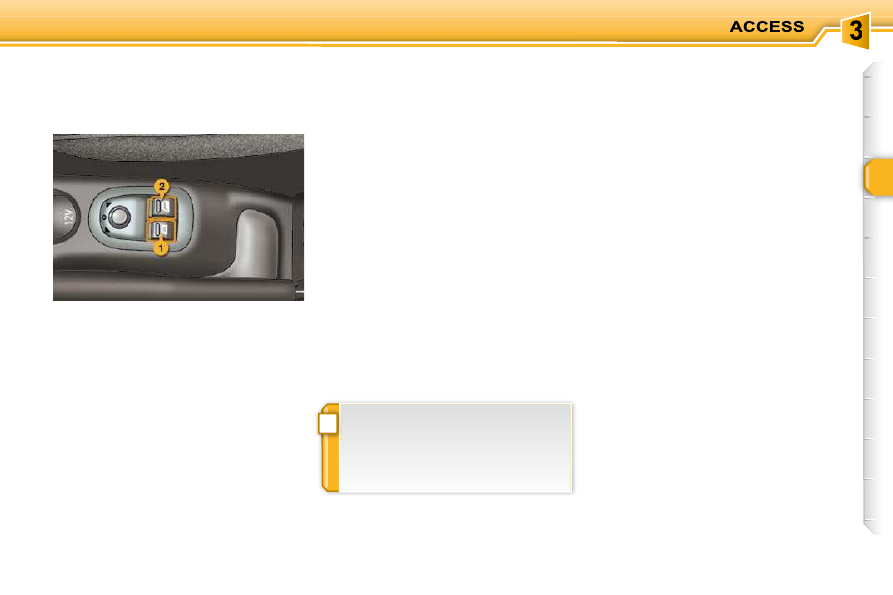
   1.    Driver's electric window switch.  
  2.    Passenger's electric window switch.   

 The  electric  window  switches  re-

main  operational  for  approximately 

45  seconds  after  the  ignition  is 
switched  off  or  until  a  front  door  is 
opened.  

48

DOORS  

  Opening the doors from outside  

  Opening the doors from inside  

  "Door open" warning 
  With  the  engine  running ,  you  are 
warned if a door is not shut properly by 
an audible signal. 
  When  the  vehicle  is  moving ,  if  the 
courtesy  lamp  button  is  in  the  "lighting 
on  opening  a  door"  position,  the  cour-

tesy lamp fl ashes, accompanied by an 

audible signal.   

        Locking/Unlocking from the inside 

  Automatic central locking of the 
doors. 

 Pressing  button   A   permits  locking/
unlocking of the doors.  

  To switch on 
 Press and hold button  A . 
 Activation  of  the  function  is  accompa-
nied by an audible signal.  

  To switch off 
 Press and hold button  A . 
  Notes:  if one of the doors is open, lock-
ing from the inside and automatic central 
locking are not possible. 
 If  the  boot  is  open,  automatic  central 
locking of the doors is active.   

 The doors can lock automatically when 
you are driving (at a speed of more than 
6 mph (10 km/h)).  

Above 6 mph (10 km/h), press button  A  

briefl y to unlock the doors temporarily. 
 You can activate or deactivate this function.  

49

CHILD LOCK 

 On each rear door, this prevents open-
ing of the door from the inside. 
 Turn  control   1   an  eighth  turn  (45 de-
grees) towards the inside of the vehicle 
using the ignition key. 
 Check  that  the  safety  lock  is  engaged 
correctly. The control  1  should no longer 
be in the vertical position. 

LOCKING/UNLOCKING 
THE BOOT 

 Locking  and  unlocking  of  the  boot  is 
simultaneous with the doors. 
 To open the boot, press the control  A . 
  The lighting is controlled by opening 
the boot.
  

          Tailgate release 

 System for mechanical unlocking of the 
boot  in  the  event  of  a  central  locking 
malfunction. 

  Unlocking 
      Fold  back  the  rear  seats  to  gain 

access  to  the  lock  from  inside  the 
boot. 

     Pull the tailgate trim to detach it. 
     Pull the opening control  1  upwards.    

50

FUEL TANK 

 Reservoir which should be refi lled with 

fuel, when the minimum level has been 
detected. 
  Fuel  tank  capacity:  approximately 
50 litres.
  

  Filling 

 A label affi xed to the inside of the tank 

reminds  you  of  the  type  of  fuel  to  be 
used depending on your engine. 

 More than 5 litres of fuel must be add-
ed in order to be registered by the fuel 
gauge. 
 The  key  cannot  be  removed  from  the 

lock until the fi ller cap is refi tted. 
 Opening  the  cap  may  release  a  vacu-
um, indicated by a noise. This is caused 
by the sealing of the fuel system. 

 To fi ll the tank safely: 
       the engine   must be   switched off,  
  

   insert the key in the fi ller cap, then 

turn it to the left, 

  

   remove the fi ller cap, 

  

   fi ll  the  tank,   but  do  not  continue 

after the 3rd cut-off of the pump ; 
this could cause malfunctions.  

 When you have fi lled the tank: 
   

   refi t the fi ller cap, 

     turn the key to the right, then remove 

it from the fi ller cap.   

DIESEL

51

           Quality of the fuel used for 
petrol engines 

  The  petrol  engines  are  perfectly  com-
patible  with  E10  type  petrol  biofuels 
(containing  10 %  ethanol),  conforming 
to  European  standards  EN  228  and 
EN 15376. 
 E85  type  fuels  (containing  up  to  85 % 

ethanol)  are  reserved  exclusively  for 

vehicles  marketed  for  the  use  of  this 

type  of  fuel  (BioFlex  vehicles).  The 

quality of the ethanol must comply with 
European standard EN 15293. 
 For  Brazil  only,  special  vehicles  are 
marketed to run on fuels containing up 
to 100 % ethanol (E100 type).   

             Quality of the fuel used for 
Diesel engines 

  The  Diesel  engines  are  perfectly  com-
patible  with  biofuels  which  conform  to 
current and future European standards 
(Diesel  fuel  which  complies  with  stan-

dard EN 590 mixed with a biofuel which 

complies  with  standard  EN  14214) 
available  at  the  pumps  (containing  up 
to 7 % Fatty Acid Methyl Ester). 
 The  B30  biofuel  can  be  used  in  cer-
tain  Diesel  engines;  however,  this  use 
is  subject  to  strict  application  of  the 
special  servicing  conditions.  Consult  a 
PEUGEOT dealer. 
 The  use  of  any  other  type  of  (bio)fuel 
(vegetable or animal oils, pure or dilut-
ed, domestic fuel...) is strictly prohibited 
(risk  of  damage  to  the  engine  and  fuel 
system).   

i

52

LIGHTING CONTROL STALK 

 System for selecting and controlling the 
various  front  and  rear  lamps  providing 
the vehicle's lighting. 

  Manual controls 

 Lighting off 

 Sidelamps 

 Dipped/Main beam headlamps 

  Lighting 

 The various front and rear lamps of the 
vehicle  are  designed  to  improve  the 
driver's visibility depending on the exte-
rior conditions: 
   -  

sidelamps, to be seen, 

  -  

dipped beam headlamps, to see with-
out dazzling other drivers, 

  -  

main  beam  headlamps,  for  good 
visibility when the road is clear, 

  -  

rear foglamp, to be seen from a dis-
tance, 

  -  

front  foglamps,  for  even  better  for-
ward vision.   

  Programming 

 Various automatic lighting control modes 
are  also  available  according  to  the  fol-
lowing options: 
   -  

guide-me-home lighting, 

  -  

automatic illumination of headlamps.   

 Selection is by turning ring  A . 

 Automatic  illumination  of 
healamps 

  Lighting on reminder 
 With  the  ignition  off  and  the  automatic 
illumination 

of 

headlamps 

function 

switched  off,  when  the  driver's  door  is 
opened,  a  buzzer  sounds  if  you  have 
left the lighting on.   

  Front foglamps and rear 
foglamp 

 Rotate  the  ring  forwards  to  switch  on 
and backwards to switch off. The status 

is  confi rmed  by  the  indicator  lamp  on 

the instrument panel. 

  Vehicles fi tted with a rear 

foglamp (ring B) 

  Dipped/Main beam change 
 Pull the stalk towards you.  

 When  the  lighting  is  switched  off 
automatically,  the  rear  foglamp 
and  the  dipped  headlamps  re-
main on (turn the ring backwards 
to  switch  off  the  rear  foglamp. 
The dipped beam headlamps and 
sidelamps then switch off).  

 This only operates with the dipped/main 
beam headlamps. 

!

i

i

53

                       "Guide me home" lighting 
 When  you  leave  your  vehicle,  the  side-
lamps and dipped beam headlamps can 
be left on for approximately 30 seconds. 
 To do this: 
   -  

place the key in the  STOP  position, 

  -  

place the lighting stalk in the  0  posi-
tion, 

  -   fl ash the headlamps, 
  -  

get out of the vehicle and lock it.  

  Direction indicators (fl ashers) 

  Left:  downwards. 

  Right:  upwards.   

 In  good  or  rainy  weather,  both 
day and night, the front foglamps 
and the rear foglamp cause daz-
zle and their use is prohibited. 
 Do  not  forget  to  switch  them  off 
when they are no longer needed.  

  Vehicles fi tted with front 

foglamps and a rear foglamp 
(ring C) 

 When the lighting is switched off 
automatically or when the dipped 
beam  headlamps  are  switched 
off  manually,  the  front  foglamps, 
the  rear  foglamp  and  the  side-
lamps  remain  on  (turn  the  ring 
backwards to switch off the front 
foglamps.  The  sidelamps  then 
switch off).   

 Front foglamps (fi rst rotation of the ring 

forwards) 

 To switch off the rear foglamp and 
the  front  foglamps,  turn  the  ring 
backwards twice in succession. 

 The  front  foglamps  operate  with  the 
sidelamps, the dipped beam headlamps 
and the main beam headlamps. 
 Front and rear foglamps (2nd rotation of 
the ring forwards). 

54

AUTOMATIC ILLUMINATION OF 
HEADLAMPS 

 The sidelamps and dipped beam head-
lamps come on automatically if the light 
is  poor  and  when  the  windscreen  wip-
ers operate continuously and switch off 
when  the  light  becomes  bright  enough 
or  the  windscreen  wipers  are  switched 
off. 
  

In foggy weather or in snow, the   sun-

shine  

  sensor  may  detect  suffi cient 

light, the lighting will not come on au-

tomatically. If necessary, the dipped 

beam  headlamps  must  be  switched 

on manually.  
 This function is active when the vehicle 
is supplied to the customer. 
 To deactivate or activate the function: 
   -  

Place the key in the accessories po-
sition (1st notch), 

  -  

Place the lighting stalk in the  0  posi-
tion, 

  -  

Press the end of the lighting stalk for 
more than four seconds.  

  Do  not  cover  the    sunshine  

  sensor, 

coupled with the rain sensor, located 

in the centre of the windscreen, be-

hind  the  rear  view  mirror.  It  is  used 

for  the  automatic  illumination  of 
headlamps.
  

  Operating check 

  Activation 
 Activation is accompanied by an audible 
signal and a message in the multifunc-
tion screen.  

  Deactivation 
 Deactivation is accompanied by an au-
dible signal. 
 When the driver uses the manual light-
ing controls, the function is temporarily 
deactivated. 
  If the   sunshine   sensor does not func-
tion correctly
 , the lighting come on ac-
companied  by  an  audible  signal  and  a 
message in the multifunction screen. 
 Consult a PEUGEOT dealer.   

HEADLAMP ADJUSTMENT 

 Depending on the load in your vehicle, 
it  is  recommended  that  the  headlamp 
beam is adjusted. 
  0.   1 or 2 people in the front seats. 
  -.   3 people. 
  1.   5 people. 
  2.   5  people  +  maximum  authorised 

load. 

  3.   Driver + maximum authorised load. 
  Initial setting is position 0.  

55

WIPER CONTROL STALK 

  System for selecting and controlling the 
various front and rear wiping modes for 
clearing rain and cleaning. 
 The front and rear wipers of the vehicle 
are  designed  to  improve  the  driver's 
visibility  progressively  according  to  the 
weather conditions. 

  Programming 
 Various automatic wiper control modes 
are  also  available  according  to  the  fol-
lowing options: 
   -  

automatic rain sensitive windscreen 
wipers, 

  -  

rear wiping when reverse gear is en-
gaged.   

  Front windscreen wiper with 

intermittent wipe 
  2    Fast wipe (heavy rain). 
  1    Normal wipe (moderate rain). 
  I    Intermittent wipe. 
  0    Off. 
        Single wipe (press downwards). 
 In  the   I ntermittent  position,  the  wiping 
speed  is  in  proportion  to  the  vehicle 
speed.  

  Front windscreen wiper with 

automatic wipe 
  2   

Fast wipe (heavy rain). 

  1   

Normal wipe (moderate rain). 

  AUTO    Automatic wipe. 
  0   

Off. 


Single wipe (press downwards). 

 In the  AUTO  position, the wiping speed 
is  in  proportion  to  the  intensity  of  the 
rainfall. 
 If the ignition has been off for more than 
one  minute,  with  the  wipers  stalk  in  a 
position other than off,  

the wipers must 

be must be reactivated : 
   -  

move the stalk to any position, 

  -  

then  move  it  back  to  the  required 
position.    

i

56


Automatic rain sensitive windscreen 

wipers 
 In  the   AUTO   position,  the  windscreen 
wipers operate automatically and  adapt 
their  speed  to  the  intensity  of  the 
rainfall
 .  

  Operating check 
  Activation  
 Activation  of  the  function  is  accompa-
nied by a message on the multi-function 
screen. 
  In the event of malfunction , the driver 
is informed by an audible signal. 
 In  the   AUTO   position,  the  windscreen 
wiper will operate in intermittent mode. 
 Contact a PEUGEOT dealer to have the 
system checked. 
 Do  not  cover  the  rain  sensor  located 
on the windscreen behind the rear view 
mirror. 
 When  using  an  automatic  car  wash, 
switch off the ignition or check that the 
wiper stalk is not in the  AUTO  position. 
 In  winter,  it  is  advisable  to  wait  for  the 
windscreen  to  completely  clear  of  ice 
before  operating  the  automatic  rain 
sensitive wipers.   


Windscreen wash 
 Pull  the  wiper  stalk  towards  you.  The 
windscreen wash, then the windscreen 

wipers, operate for a specifi ed time.   


Rear screen wiper 

 Turn ring  A 

 to the fi rst notch for intermit-

tent wiping. 
  

If  the  ignition  is  switched  off,  it  is 

necessary  to  reactivate  the  control 
each  time
 .  To  do  this,  move  the  stalk 
to any position, then move it back to the 
required position. 

  Automatic rear screen wiper 
 When the windscreen wipers control is 
activated and you engage reverse gear, 
the rear screen wiper operates intermit-
tently. 

  Rear screen wash 
 Turn  ring   A 

 past  the  fi rst  notch;  the 

screen wash then the wiper operate for 

a fi xed period.   

 If  you  use  a  bicycle  carrier,  con-
sult  a  PEUGEOT  dealer  to  have 
this function deactivated or install 

a specifi c bicycle carrier approved 

by PEUGEOT.  

COURTESY LAMPS 

 System for selecting and controlling the 
various passenger compartment lamps. 

  Front courtesy lamp (button A) 

   -  

when the vehicle is unlocked, 

  -  

when a door is opened, 

  -  

when the ignition is switched off.  

 It  switches  off  when  the  vehicle  is 
locked. 
 It  fl ashes  while  driving  if  a  door  is  not 

closed correctly. 

 Permanently off. 

 Permanently  on,  when  the  key 
is in the accessories position or 
with the ignition on.  

 In  this  position,  the  courtesy 
lamp  comes  on  for  approxi-
mately 30 seconds: 

i

57

DIRECTION INDICATORS 

      Lower  the  lighting  stalk  when  moving 

to the left. 

     Raise the lighting stalk when moving to 

the right.  

HAZARD WARNING LAMPS 

      Press this button, the direction indi-

cators fl ash.  

 They can operate with the ignition off. 

             Automatic operation of hazard 
warning lamps 

 When  braking  in  an  emergency,  de-
pending on the deceleration, the hazard 
warning lamps come on automatically. 
 They  switch  off  automatically  the  fi rst 

time you accelerate. 
      You  can  also  switch  them  off  by 

pressing the button.   

      Press one of the spokes of the steering 

wheel.  

 Use  the  horn  moderately  and  only 
in the following cases: 
   -  

immediate danger, 

  -  

overtaking  a  cyclist  or  pedes-
trian, 

  -  

when  approaching  an  area 
where there is no visibility.   

  Audible warning to alert other road users 
to an imminent danger. 

 Selection of the left or right direction in-
dicators to signal a change of direction 
of the vehicle. 

 A  visual  warning  by  means  of  the  direc-
tion indicators to alert other road users to 
a vehicle breakdown, towing or accident. 

!

i

SAFETY

58

  When  braking  in  an  emergency, 

press very fi rmly without releasing 

the pressure.  

  When  replacing  wheels  (tyres  and 
rims), ensure that they conform to the 
manufacturer's recommendations.   

BRAKING ASSISTANCE 
SYSTEMS 

  Anti-lock braking system 
and electronic brake force 
distribution 

 Linked systems which improve the sta-
bility  and  manoeuvrability  of  your  vehi-
cle  when  braking,  in  particular  on  poor 
or slippery surfaces. 

  Activation 
 The  anti-lock  braking  system  comes 
into operation automatically when there 
is a risk of wheel lock. 
 Normal operation of the ABS may make 
itself felt by slight vibration of the brake 
pedal.  

  Operating fault 

          Emergency braking assistance 

 System  which,  in  an  emergency,  en-
ables you to obtain the optimum braking 
pressure  more  quickly,  thus  reducing 
the stopping distance. 

  Activation 
 It is triggered by the speed at which the 
brake pedal is pressed. 
 The  effect  of  this  is  a  reduction  in  the 
resistance of the pedal and an increase 

in braking effi ciency. 
 When  braking  in  an  emergency,  press 

fi rmly without releasing the pressure.   

 Group  of  supplementary  sys-
tems  which  help  you  to  obtain 
optimum  braking  in  complete 
safety in emergency situations: 

   -  

anti-lock braking system (ABS), 

  -  

electronic  brake  force  distribution 
(EBFD), 

  -  

emergency braking assistance (EBA).  

 If this warning lamp comes on, 
accompanied by an audible sig-
nal and a message on the mul-
tifunction  screen,  it  indicates  a 

malfunction of the anti-lock braking sys-
tem which could result in loss of control 
of the vehicle when braking. 
 If  this  warning  lamp  comes  on,  togeth-
er  with  the   STOP   and   ABS   warning 
lamps, accompanied by an audible sig-
nal and a message on the multifunction 
screen, it indicates a malfunction of the 
electronic brake force distribution which 
could result in loss of control of the ve-
hicle when braking. 
  You  must  stop  as  soon  as  it  is  safe 
to do so.
  

 In  either  case,  contact  a  PEUGEOT 
dealer.  

!

59

TRAJECTORY CONTROL 
SYSTEMS 

  Anti-skid regulation (ASR) and 
electronic stability programme 
(ESP) 

  Activation 
 These systems are activated automati-
cally each time the vehicle is started. 

 They  come  into  operation  in 
the event of a grip or trajectory 
problem. 
 This is indicated by fl ashing of 

this warning lamp on the instru-
ment panel.   

   Deactivation 
 In exceptional conditions (starting a ve-
hicle  which  is  bogged  down,  stuck  in 
snow,  on  soft  ground...),  it  may  be  ad-
visable to deactivate the ASR and ESP 
systems,  so  that  the  wheels  can  move 
freely and regain grip. 

      Press the  "ESP OFF"  button, located 

on the left below the steering wheel.  

  Reactivation 
 These systems are reactivated automat-
ically each time the ignition is switched 
back on. 
      Press the  "ESP OFF"  button again 

to reactivate them manually.   

  If this warning lamp comes on in 
the  instrument  panel  and  the  in-
dicator lamp in the button comes 
on, this indicates that the ASR and 
ESP systems are deactivated.  

  Operating fault 

 If this warning lamp comes on, 
accompanied  by  an  audible
signal  and  a  message  in  the 
multifunction  screen,  this  in-
dicates  a  malfunction  of  these 
systems. 

  Have  the  systems  checked  by  a
PEUGEOT dealer. 

 The  ESP/ASR  systems  offer  ex-
ceptional  safety  in  normal  driving, 
but  this  should  not  encourage  the 
driver to take extra risks or drive at 
high speed. 
 The  correct  functioning  of  these 
systems  depends  on  observation 
of  the  manufacturer's  recommen-
dations regarding the wheels (tyres 
and rims), the braking components, 
the electronic components and the 
PEUGEOT  assembly  and  opera-
tion procedures. 
 After  an  impact,  have  these  sys-
tems  checked  by  a  PEUGEOT 
dealer.   

  The anti-skid regulation (also known as 
Traction  Control)  optimises  traction  to 
prevent skidding of the wheels, by act-
ing on the brakes of the driving wheels 
and on the engine. 
 The electronic stability programme acts 
on the brake of one or more wheels and 
on the engine to keep the vehicle on the 
trajectory  required  by  the  driver,  within 
the limits of the laws of physics.  

SAFETY

60

SEAT BELTS  

  Driver's seat belt not 
fastened/unfastened warning 
lamp *  

  Front seat belt height adjustment 
 To  lower  the  attachment  point,  pull  the 
control  towards  you  and  slide  it  down-
wards. 
 To raise the attachment point, slide the 
control upwards.  

  Fastening the seat belts 
 Pull  the  strap,  then  insert  the  tongue 
into the buckle. 
 Check  that  the  seat  belt  is  fastened 
correctly by pulling the strap.  

  Unfastening the seat belts 
 Press the red button on the buckle.  

  Front seat belts with pre-tensioner 
and force limiter *  
 Safety in the event of front impacts has 
been  improved  by  the  introduction  of 
seat  belts  with  pre-tensioner  and  force 
limiter for the front seats. Depending on 
the seriousness of the impact, the pre-
tensioning system instantly tightens the 
seat  belts  and  pulls  them  against  the 
bodies of the occupants. 

  Rear seat belts 
 The rear seats are fi tted with three-point 

inertia reel seat belts.   

 The pre-tensioning seat belts are active 
when the ignition is on. 
 The force limiter eases the pressure of 
the  seat  belt  against  the  chest  of  the 
occupant so increasing protection.  

  *   According to model.  

 The warning lamp comes on each time 
the ignition is switched on. 
 The  warning  lamp remains on  until the 
driver fastens their seat belt. 
 From 12 mph (20 km/h) and for two minu tes, 

the warning lamp fl ashes accompanied by 

an audible signal which increases in volume 
and a message on the multifunction screen. 
 Once these two minutes have elapsed, 
the  warning  lamp  remains  on  until  the 
driver fastens their seat belt.  

i

61

      The  driver  must  ensure  that  passen-
gers  use  the  seat  belts  correctly  and 
that  they  are  all  restrained  securely 
before setting off. 
 Wherever  you  are  seated  in  the  ve-
hicle,  always  fasten  your  seat  belt, 
even for short journeys. 
 Do not invert the seat belt buckles as 

they will not fulfi l their role fully. 

 The seat belts are fi tted with an inertia 

reel  permitting  automatic  adjustment 
of the length of the strap to your size. 
The  seat  belt  is  stored  automatically 
when not in use. 
 Before and after use, ensure that the 
seat belt is reeled in correctly. 
 The  lower  part  of  the  strap  must  be 
positioned  as  low  as  possible  on  the 
pelvis. 
 The upper part must be positioned in 
the hollow of the shoulder. 
 The inertia reels are fi tted with an au-

tomatic  locking  device  which  comes 
into operation in the event of a collision, 
emergency  braking  or  if  the  vehicle 
rolls  over.  You  can  release  the  device 
by  pulling  rapidly  on  the  strap  and  re-
leasing it. 

  *   According to model.  

 In order to be effective, a seat belt: 
   -  

must be tightened as close to the 
body as possible, 

  -  

must restrain one person of adult 
size only, 

  -  

must not bear any trace of cuts or 
fraying, 

  -  

must be pulled in front of you with 
a  smooth  movement,  checking 
that it does not twist, 

  -   must not be transformed or modifi ed 

to avoid altering its performance.  

 In accordance with current safety reg-
ulations,  all  repairs  and  checks  must 
be carried out by a PEUGEOT dealer 
who guarantees that the work is car-
ried out correctly. 
 Have your seat belts checked regularly 
by a PEUGEOT dealer and particularly 
if the straps show signs of damage. 
 Clean the seat belt straps with soapy 
water  or  a  textile  cleaning  product, 
sold by PEUGEOT dealers. 
 After  folding  or  moving  a  seat  or  rear 
bench seat, ensure that the seat belt is 
positioned and is reeled in correctly.  

  Recommendations for children 
 Use  a  suitable  child  seat  if  the  pas-
senger  is  less  than  12  years  old  or 

shorter than one metre fi fty. 
 Never  use  the  same  seat  belt  to 
secure more than one person. 
 Never  allow  a  child  to  travel  on  your 
lap. 
  Depending  on  the  nature  and  se-
riousness  of  the  impacts
 ,  the  pre-
tensioning  device *   may  be  triggered 
before  and  independently  of  the  air-
bags. Triggering of the pre-tensioners 
is accompanied by a slight discharge 
of harmless  smoke  and  a noise,  due 
to  the  activation  of  the  pyrotechnic 
cartridge incorporated in the system. 
 In all cases, the airbag warning lamp 
comes on. 
 Following  an  impact,  have  the  seat 
belts  system  checked,  and  if  neces-
sary replaced, by a PEUGEOT dealer.   


Content   ..  2  3  4  5   ..