Peugeot 206 P Dag (2010.5). Manual - part 3


  Index      Peugeot     Peugeot 206 P Dag 2010.5 - service manual in english


Search            


Content   ..  1  2  3  4   ..


Peugeot 206 P Dag (2010.5). Manual - part 3


!

!

35

  Manual control 

 Depending  on  your  requirements,  you 
can make a different selection from that 
offered  by  the  system  by  changing  a 
setting.  The  other  functions  will  still  be 
controlled automatically.   
      Press  the   "AUTO"   button  to  return 

to fully automatic operation.  

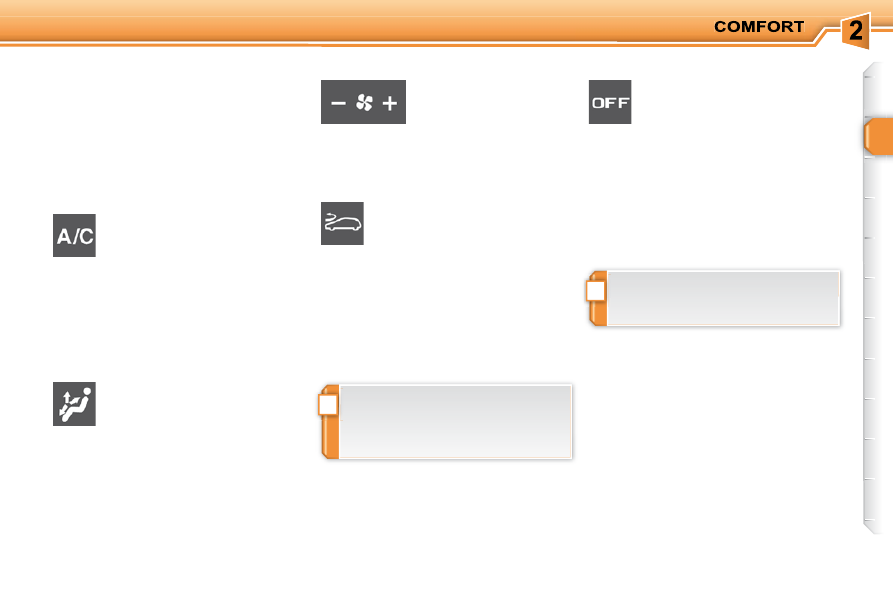
  4. Air conditioning On/Off 

  5. Air distribution adjustment 

  6. Air fl ow adjustment 

  7. Air intake/Air recirculation 

  Deactivation of the system 

 Avoid prolonged operation in inte-
rior  air  recirculation  mode  (risk  of 
condensation and of deterioration 
of the air quality).   

 Avoid driving for too long with the 
air conditioning deactivated.  

      Press  this  button  to  switch 

the  air  conditioning  off.  The 
 "ECO"  symbol is displayed.  

      Press  this  button  several 

times in succession to direct 

the air fl ow in turn towards: 

      Press  the   "-"   but-

ton  to  reduce  the  air 

fl ow. 

     Press  the   "+"   button 

to  increase  the  air 

fl ow.   

      Press this button to recircu-

late  the  interior  air.  The  air 
recirculation  symbol  is  dis-
played.  

      Press the  "OFF"  button.  

 This  action  deactivates  all  of  the  func-
tions of the air conditioning system. 
 The  temperature  is  no  longer  main-
tained at a comfortable level. However, 

a slight fl ow of air, due to the movement 

of the vehicle, can still be felt. 
      Press the  "OFF" ,  "AUTO"  or  "visi-

bility"  button again to reactivate the 
system  with  the  values  which  were 
set before it was deactivated.  

 Switching the system off may result in some 
discomfort (humidity, condensation). 
      Press  the  button  again  to  return 

to  automatic  operation  of  the  air 

conditioning.  The  symbol  " A/C "  is 

displayed.   

   -   the windscreen and side windows 

(demisting or defrosting), 

  -   the windscreen, the side windows 

and the footwells, 

  -   the footwells, 
  -   the  central  vents,  the  side  vents 

and the footwells, 

  -   the central and side vents.    

 Air recirculation prevents exterior odours 
and smoke from entering the passenger 
compartment. 
 Choose this position for rapid cooling of 
the passenger compartment. 
      As soon as possible, press this button 

again  to  permit  the  intake  of  exterior 
air and prevent condensation.  

36

!

i

37

  1 - Forwards-backwards adjustment 
 Lift the control and slide the seat forwards 
or backwards.  

  2 - Height adjustment 
 Pull the handle upwards. 
 Remove  your  weight  from  the  seat  to 
raise, or press on the seat to lower.  

  3 - Access to the rear seats 
 (3-door),  A  or  B  according to model 
   A.

   Place your fi ngers in one of the two 

handles  and  push  forwards  to  fold 
down  the  seat  back  and  move  the 
seat forwards.  


When  put  back,  the  seat  returns  to 
its initial position.  


No  person  or  object  must  prevent 
the  seat  from  returning  to  its  initial 
position. Returning to this position is 
necessary for the seat to lock. 

  4 - Seat back angle adjustment 
 Push the handle towards the rear.  

  5 - Head restraint height adjustment 
 To  raise  the  head  restraint,  pull  it  up-
wards. 
  

The  adjustment  is  correct  when  the 

upper  edge  of  the  head  restraint  is 

level with the top of the head.  

 The head restraint is fi tted with a frame 

with  notches,  which  prevent  the  head 
restraint dropping down (this is a safety 
device in case of impact). 

                 FRONT SEATS 

  Seat consisting of a seat cushion, seat 
back  and  head  restraint  which  can  all 
be  adjusted  to  your  optimum  driving 
and comfort position. 

 Never  drive  with  the  head  re-
straints  removed;  they  should  be 
in place and correctly adjusted.  

 It is impossible to access the rear 
seats if the front seat is in a reclin-
ing position.  

  Heated seats 
 Press the switch, located on the control 
panel  next  to  the  steering  wheel.  The 
temperature  is  regulated  automatically. 
Press again to switch off.  

  Rear head restraint 
 These  have  a  position  for  use  (high) 
and a position for storage (low). 
 To lower the  head restraints,  press the 
lug. 
 They can also be removed. 
 To remove the head restraints, pull up-
wards as far as the stop then press the 
release control.   

 To lower the head restraint, push simul-
taneously: 
   -  

the  button  on  the  left-hand  guide 
at  the  base  of  the  head  restraint 
frame, 

  -  

the head restraint downwards.  

 To remove the head restraint, press the 
lug. 

  B.

   Place your fi ngers in one of the two 

handles  and  push  forwards  to  fold 
down the seat back. The seat does 
not move forwards.  


When  put  back,  the  seat  back  re-
turns to its initial angle.  

!

!

38

REAR SEATS 

  -  

position the seat belt under the belt 
holder  2 , 

  -  

pull  control   3   to  unlock  the  seat 
back  4 , 

  -  

remove or lower the head restraint, 

  -  

tilt the seat back  4 .  

 When repositioning: 
   -  

return  the  seat  back  to  the  upright 
position, 

  -  

fold back the seat cushion, 

  -  

reposition  the  seat  belt  buckles 
before  locking  the  front  of  the  seat 
cushion, 

  -  

check that the seats are locked cor-
rectly.  


Control   must be in the low position.  

 Rear  seat  or  bench  seat  which  can  be 
folded  to  adapt  the  load  space  in  the 
boot. 
 To fold the rear seats: 
   -  

lift the front of the seat cushion  1 , 

  -  

tilt  the  seat  cushion   1   against  the 
front seats, 

  Take  care  not  to  trap  the  seat 
belts.


Always start with the seat   cush-

ion  , never the seat back (risk of 
damage).
  

!

!

39

BENCH SEAT 

  -  

position the seat belt under the belt 
holder  2 , 

  -  

pull the controls  3  to unlock the seat 
back  4 , 

  -  

remove  or  lower  the  head  re-
straints, 

  -  

tilt the seat back  4 .  

 When repositioning: 
   -  

return  the  seat  back  to  the  upright 
position, 

  -  

fold back the seat cushion, 

  -  

reposition  the  seat  belt  buckles 
before  locking  the  front  of  the  seat 
cushion, 

  -  

check that the bench seat is secured 

fi rmly.  


The  controls   3   must  be  in  the  low 
position.  

 To fold the bench seat: 
   -  

lift the front of the seat cushion  1 , 

  -  

tilt  the  seat  cushion   1   against  the 
front seats, 

  Take  care  not  to  trap  the  seat 
belts.


Always start with the seat   cush-

ion  , never the seat back (risk of 
damage).
  

40

  Removing the rear seat 

Folding seat back 

TRANSPORTING LONG OBJECTS 

   -  

Tilt  the  seat  cushion  against  the 
front seats. 

  -  

Squeeze  the  seat  fasteners  to  re-
lease them from their attachments. 

  -  

Remove the seat cushion.   

   -  

Remove the head restraint for com-
plete folding of the seat back. 

  -  

Push  one  of  the  two  handles   5   to-
wards the rear to tilt the seat back.   

  Front seat:  
   -  

Fold the seat back towards the front 
using the control  5  (see correspond-
ing paragraph).  

  Rear seat:  
   -  

Remove the seat cushion. 

  -  

Tilt the seat back.  

41

     MIRRORS 

  Door mirrors 

  Manual model 

  Adjustment 
      Move the lever in all four directions 

to direct the mirror correctly.   

  Folding 
      When parked, fold the mirror inwards 

manually to protect it.   

  Unfolding 
      Before starting, unfold the mirror.    

  Electric model 

  Adjustment 
      Turn  the  control   1   to  the  right  or  to 

the  left  to  select  the  corresponding 
mirror. 

     Move the control  1  in all four direc-

tions to adjust. 

     Return  the  control   1   to  the  centre 

position.    

 Adjustable  mirror  permitting  the  lateral 
rearward  vision  necessary  when  over-
taking or parking.  

      Rear view mirror 

  Adjustment 
      Adjust the mirror to direct it correctly 

in the "day" position.   

  Day/night position 
   

   Pull the lever to change to the "night" 

anti-dazzle position. 

     Push the lever to change to the nor-

mal "day" position.  

 As a safety precaution, the mirrors must 

be adjusted to reduce the "blind spot".   

 Adjustable  mirror  permitting  central 
rearward vision. 
 The mirror is fi tted with a night anti-dazzle 

device. 

!

42

STEERING WHEEL ADJUSTMENT 

 The height of the steering wheel can be 
adjusted to adapt the driving position to 
the size of the driver. 

  Adjustment 

       When stationary , lower the control 

lever to unlock the steering wheel. 

     Adjust the height. 
     Raise  the  control  lever  to  lock  the 

steering wheel.  

  As  a  safety  precaution,  these  op-
erations  must  only  be  carried  out 
while the vehicle is stationary.   

SUN VISOR 

 Component  which  protects  against 
sunlight from the front or the side, also 
equipped with a courtesy mirror. 
 The  sun  visors  are  fi tted  with  a  cour-

tesy mirror, with concealing fl ap for the 

driver. 

       Automatic day/night model  

 By means of a sensor, which measures 
the light from the rear of the vehicle, this 
system automatically and progressively 
changes  between  the  day  and  night 
uses. 
 It has an anti-dazzle system which dark-
ens  the  mirror  glass:  this  reduces  any 
driver  discomfort  caused  by  the  light 
beams of following vehicles, the sun... 

  In order to ensure optimum visibility during 
your manoeuvres, the mirror lightens auto-
matically when reverse gear is engaged.   

43

             BOOT FITTINGS  

  Rear parcel shelf 
 To remove the shelf: 
   -  

unhook the two strings  1 , 

  -  

slightly raise the shelf, then remove it.  

  Warning triangle 
 Depending  on  the  country  of  sale,  a 
warning  triangle  may  be  stored  in  the 
boot.   

 There are several options for storing the 
shelf: 
   -  

either behind the front seats, 

  -   or fl at in the boot.   

12 V ACCESSORIES SOCKET 

GLOVE BOX 

 To open the glove box, lift the handle. 
   1.   Handbook pack storage. 
  2.   Cup holder. 
  3.   Pen holder. 
  4.   Spectacles storage. 
  5.   Map storage. 
  6.   Coin storage.  

 It  is  supplied  with  power  with  the  ignition 
key in the accessories position (1 st  notch). 

i

!

44

KEYS  

  Central locking and unlocking 
 From the front doors, the keys allow you 
to lock and unlock the doors and boot. 
 If  one  of  the  doors  is  open,  the  central 
locking does not work. 
 If  the  boot  is  open,  the  central  locking 
works.   

  Remote control 

 This  carries  out  the  same  functions  as 
the key, from a distance. 

  Locking 
 Press button  A  to lock the vehicle. 
 This is confi rmed by fi xed lighting of the 

direction  indicators  for  approximately 

two seconds.  

  Unlocking 
 Press button  B  to unlock the vehicle. 
 This  is  confi rmed  by  rapid  fl ashing  of 

the direction indicators. 

          Starting the vehicle 

 There are four possible positions of the 
key in the ignition switch: 
   1.    STOP position:   
 

the ignition is off. 

  2.    1 st  notch, Accessories position:   
 

the ignition is off but the accessories 
can operate. 

  3.    2nd notch, On position:   
 

the ignition is on. 

  4.    Starting position:   
 

the starter is operated.  

 Avoid pressing the buttons of your 
remote control out of range of your 
vehicle  as  this  could  stop  it  from 
working. The remote control would 
then  have  to  be  reinitialised  (refer 
to the corresponding section).   

 A heavy object (key ring, etc.), at-
tached  to  the  key  and  weighing 
down  on  its  shaft  in  the  switch, 
may cause a malfunction. 

!

46

               Keys 

 Make a careful note of the number of each key. This number is coded on the 
label attached to the key.  

  Remote control 

 The  high  frequency  remote  control  is  a  sensitive  system;  do  not  operate 
it  while  it  is  in  your  pocket  as  there  is  a  possibility  that  it  may  unlock  the 
vehicle, without you being aware of it. 
 Do not repeatedly press the buttons of your remote control out of range and 
out of sight of your vehicle. You run the risk of stopping it from working and 
the remote control would have to be reprogrammed. 
 The remote control  does  not operate when  the key is in the  ignition, even 

when the ignition is switched off, except for reinitialisation.  

         Do not throw the remote control bat-
teries away, they contain metals which 
are harmful to the environment. 
 Take them to an approved collection 
point. 

  Locking the vehicle 

 Driving with the doors locked may make access to the passenger compartment 

by the emergency services more diffi cult in an emergency. 
 As  a  safety  precaution  (with  children  on  board),  remove  the  key  from  the 
ignition when you leave the vehicle, even for a short time.  

  Anti-theft protection 

 Do not make any modifi cations to the electronic engine immobiliser system, 

this could cause malfunctions.  

  When purchasing a second-hand vehicle 

 Have the key codes memorised by a PEUGEOT dealer, to ensure that the 
keys in your possession are the only ones which can start the vehicle.  

  Lost keys 

 Visit  a  PEUGEOT  dealer  with  the  vehicle's  V5  registration  certifi cate  and 

your personal identifi cation documents. 
 The  PEUGEOT  network  will  be  able  to  retrieve  the  key  code  and  the 
transponder code to order a replacement key.  

i

!

44

KEYS  

  Central locking and unlocking 
 From the front doors, the keys allow you 
to lock and unlock the doors and boot. 
 If  one  of  the  doors  is  open,  the  central 
locking does not work. 
 If  the  boot  is  open,  the  central  locking 
works.   

  Remote control 

 This  carries  out  the  same  functions  as 
the key, from a distance. 

  Locking 
 Press button  A  to lock the vehicle. 
 This is confi rmed by fi xed lighting of the 

direction  indicators  for  approximately 

two seconds.  

  Unlocking 
 Press button  B  to unlock the vehicle. 
 This  is  confi rmed  by  rapid  fl ashing  of 

the direction indicators. 

          Starting the vehicle 

 There are four possible positions of the 
key in the ignition switch: 
   1.    STOP position:   
 

the ignition is off. 

  2.    1 st  notch, Accessories position:   
 

the ignition is off but the accessories 
can operate. 

  3.    2nd notch, On position:   
 

the ignition is on. 

  4.    Starting position:   
 

the starter is operated.  

 Avoid pressing the buttons of your 
remote control out of range of your 
vehicle  as  this  could  stop  it  from 
working. The remote control would 
then  have  to  be  reinitialised  (refer 
to the corresponding section).   

 A heavy object (key ring, etc.), at-
tached  to  the  key  and  weighing 
down  on  its  shaft  in  the  switch, 
may cause a malfunction. 

i

45

  Steering lock 
 Before  starting,  unlock  the  steering,  if 
necessary, by turning the steering wheel 
slightly while turning the key. 
 It is advisable to press the clutch pedal 
whle  operating  the  starter  to  facilitate 
the starting of the engine.   

ELECTRONIC ENGINE 
IMMOBILISER 

 This locks the engine management sys-
tem  as  soon  as  the  ignition  has  been 
switched  off  and  therefore  prevents 
starting  of  the  vehicle  by  anyone  who 
does not have the key. 
 The  ignition  key has  an  electronic  chip 
which has a special code. When the ig-
nition is switched on, the code must be 
recognised for starting to be possible. 
  If  the  system  does  not  function  cor-
rectly,
   the  central  locking  button  indica-
tor lamp, situated on the centre console, 

fl ashes  rapidly  when  the  ignition  is 

switched on (2nd notch). 
 In this case your vehicle will not start. 
 Contact a PEUGEOT dealer as soon as 
possible. 

  Key in ignition 

 If the key is left in the ignition, this 
is  indicated  by  an  audible  signal 
when the driver's door is opened.  

       Locating your vehicle 
 To  locate  your  vehicle,  if  you  have 
locked it, in a car park: 
      press  button   A ,  the  courtesy  lamps 

come on and the direction indicators 

fl ash for a few seconds.    

          Changing the remote control 
battery 

 Battery ref.: CR2016/3 volts. 
 If the remote control battery is fl at, you 

are warned by a message on display B. 
 To  replace  the  battery,  remove  the 
screw  then  unclip  the  casing  using  a 
coin at the ring. 
 If the remote control does not work after 
the  battery  has  been  changed,  repro-
gramme the remote control.  

          Reinitialising the remote control 

      Switch off the ignition. 
     Switch the ignition on again. 
     Press  button   A   immediately  for  a 

few seconds. 

     Switch  off  the  ignition  and  remove 

the remote control key from the igni-
tion lock. The remote control is now 
working again.   

!

46

               Keys 

 Make a careful note of the number of each key. This number is coded on the 
label attached to the key.  

  Remote control 

 The  high  frequency  remote  control  is  a  sensitive  system;  do  not  operate 
it  while  it  is  in  your  pocket  as  there  is  a  possibility  that  it  may  unlock  the 
vehicle, without you being aware of it. 
 Do not repeatedly press the buttons of your remote control out of range and 
out of sight of your vehicle. You run the risk of stopping it from working and 
the remote control would have to be reprogrammed. 
 The remote control  does  not operate when  the key is in the  ignition, even 

when the ignition is switched off, except for reinitialisation.  

         Do not throw the remote control bat-
teries away, they contain metals which 
are harmful to the environment. 
 Take them to an approved collection 
point. 

  Locking the vehicle 

 Driving with the doors locked may make access to the passenger compartment 

by the emergency services more diffi cult in an emergency. 
 As  a  safety  precaution  (with  children  on  board),  remove  the  key  from  the 
ignition when you leave the vehicle, even for a short time.  

  Anti-theft protection 

 Do not make any modifi cations to the electronic engine immobiliser system, 

this could cause malfunctions.  

  When purchasing a second-hand vehicle 

 Have the key codes memorised by a PEUGEOT dealer, to ensure that the 
keys in your possession are the only ones which can start the vehicle.  

  Lost keys 

 Visit  a  PEUGEOT  dealer  with  the  vehicle's  V5  registration  certifi cate  and 

your personal identifi cation documents. 
 The  PEUGEOT  network  will  be  able  to  retrieve  the  key  code  and  the 
transponder code to order a replacement key.  

i

45

  Steering lock 
 Before  starting,  unlock  the  steering,  if 
necessary, by turning the steering wheel 
slightly while turning the key. 
 It is advisable to press the clutch pedal 
whle  operating  the  starter  to  facilitate 
the starting of the engine.   

ELECTRONIC ENGINE 
IMMOBILISER 

 This locks the engine management sys-
tem  as  soon  as  the  ignition  has  been 
switched  off  and  therefore  prevents 
starting  of  the  vehicle  by  anyone  who 
does not have the key. 
 The  ignition  key has  an  electronic  chip 
which has a special code. When the ig-
nition is switched on, the code must be 
recognised for starting to be possible. 
  If  the  system  does  not  function  cor-
rectly,
   the  central  locking  button  indica-
tor lamp, situated on the centre console, 

fl ashes  rapidly  when  the  ignition  is 

switched on (2nd notch). 
 In this case your vehicle will not start. 
 Contact a PEUGEOT dealer as soon as 
possible. 

  Key in ignition 

 If the key is left in the ignition, this 
is  indicated  by  an  audible  signal 
when the driver's door is opened.  

       Locating your vehicle 
 To  locate  your  vehicle,  if  you  have 
locked it, in a car park: 
      press  button   A ,  the  courtesy  lamps 

come on and the direction indicators 

fl ash for a few seconds.    

          Changing the remote control 
battery 

 Battery ref.: CR2016/3 volts. 
 If the remote control battery is fl at, you 

are warned by a message on display B. 
 To  replace  the  battery,  remove  the 
screw  then  unclip  the  casing  using  a 
coin at the ring. 
 If the remote control does not work after 
the  battery  has  been  changed,  repro-
gramme the remote control.  

          Reinitialising the remote control 

      Switch off the ignition. 
     Switch the ignition on again. 
     Press  button   A   immediately  for  a 

few seconds. 

     Switch  off  the  ignition  and  remove 

the remote control key from the igni-
tion lock. The remote control is now 
working again.   


Content   ..  1  2  3  4   ..