Nissan Qashqai (2007-2010). Manual - part 81


  Index      Nissan     Nissan Qashqai - service and repair manual 2007 - 2010 year


Search            copyright infringement  


Content   ..  79  80  81  82   ..


Nissan Qashqai (2007-2010). Manual - part 81


EM-272

< ON-VEHICLE REPAIR >

[K9K]

TURBOCHARGER

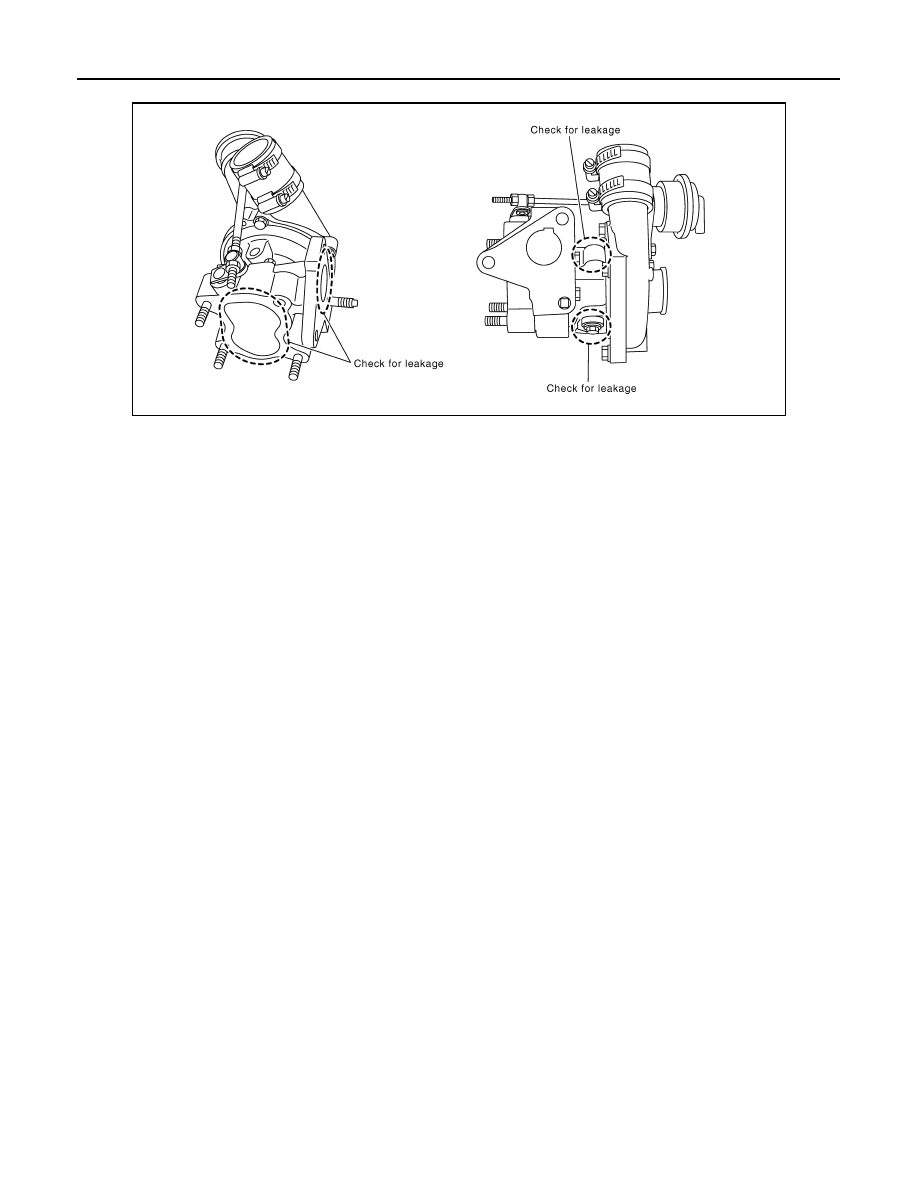
INSPECTION AFTER REMOVAL

CAUTION:

When the compressor wheel turbine wheel or rotor shaft is damaged, remove all the fragments and
foreign matter left in the following passages in order to prevent a secondary failure:

MBIB1419E

Suction side

: Between turbocharger and air cleaner

Exhaust side

: Between turbocharger and catalyst

EXHAUST MANIFOLD

EM-273

< ON-VEHICLE REPAIR >

[K9K]

C

D

E

F

G

H

I

J

K

L

M

A

EM

N

P

O

EXHAUST MANIFOLD

Exploded View

INFOID:0000000001060436

Removal and Installation

INFOID:0000000001060437

REMOVAL

1.

Remove battery ground cable.

2.

Remove engine undercover.

3.

Remove air cleaner case and air duct (inlet). Refer to 

EM-265, "Removal and Installation"

.

4.

Remove wiper assembly.

5.

Remove bulk head cover.

6.

Remove EGR unit assembly. Refer to 

EM-268, "Removal and Installation"

.

7.

Remove turbocharger assembly. Refer to 

EM-271, "Removal and Installation"

.

8.

Loosen exhaust manifold mounting nuts in the reverse order as
shown. Then remove exhaust manifold.

CAUTION:

Be careful not to deform each turbocharger piping when pulling
out the assembly.

INSTALLATION

1.

Clean the surface of exhaust manifold and cylinder head.

2.

Install new gasket to cylinder head.

1.

Gasket

2.

Exhaust manifold

A.

To cylinder head

Refer to 

GI-4, "Components"

 for symbols in the figure.

E1BIA0002GB

MBIB1417E

EM-274

< ON-VEHICLE REPAIR >

[K9K]

EXHAUST MANIFOLD

3.

Tighten the mounting nuts in numerical order as shown.

4.

Install in reverse order of removal after this step.

Inspection

INFOID:0000000001060438

INSPECTION AFTER INSTALLATION

Start engine and raise engine speed to check no exhaust emission leaks.

: 26.0 N·m (2.7 kg-m, 19 ft-lb)

MBIB1417E

GLOW PLUG

EM-275

< ON-VEHICLE REPAIR >

[K9K]

C

D

E

F

G

H

I

J

K

L

M

A

EM

N

P

O

GLOW PLUG

Exploded View

INFOID:0000000001060276

Removal and Installation

INFOID:0000000001060439

REMOVAL

CAUTION:

Remove glow plug only if necessary. If carbon adheres, it may be stuck and broken.
1.

Disconnect battery ground cable.

2.

Remove engine cover. Refer to 

EM-266, "Removal and Installation"

.

3.

Disconnect harness connector from glow plug.

4.

Remove glow plug.

CAUTION:

• When removing or installing, do not use such tools as an air impact wrench.
• Handle it carefully without giving any impact, even after removal. [As a guide, if it drops from

height of 10 cm (3.94 in) or higher, always replace it.]

INSTALLATION

1.

Remove adhered carbon from glow plug installation hole with a reamer.

2.

Install glow plug.

3.

Install remaining parts in reverse order of removal.

1.

Glow plug

 : Engine front

Refer to 

GI-4, "Components"

 for symbols in the figure.

E1BIA0005GB

: 15.0 N·m (1.5 kg-m, 11 ft-lb)


Content   ..  79  80  81  82   ..