Mazda CX-7 (2012 year). Manual - part 24


  Index      Mazda     Mazda CX-7 - service manual 2012 year in english


Search            


Content   ..  22  23  24  25   ..


Mazda CX-7 (2012 year). Manual - part 24


Black plate (376,1)

WARNING

Use only the front and rear jacking
positions recommended in this manual:

Attempting to jack the vehicle in
positions other than those
recommended in this manual is
dangerous. The vehicle could slip off
the jack and seriously injure or even
kill someone. Use only the front and
rear jacking positions recommended
in this manual.

Do not jack up the vehicle in a position
other than the designated jack-up
position or place any objects on or
under the jack:

Jacking up the vehicle in a position
other than the designated jack-up
position or placing objects on or
under the jack is dangerous as it
could deform the vehicle body or the
vehicle could fall off the jack
resulting in an accident.

Use only the jack provided with your
Mazda:

Using a jack that is not designed for
your Mazda is dangerous. The vehicle
could slip off the jack and seriously
injure someone.

Never place objects under the jack:

Jacking the vehicle with an object
under the jack is dangerous. The jack
could slip and someone could be
seriously injured by the jack or the
falling vehicle.

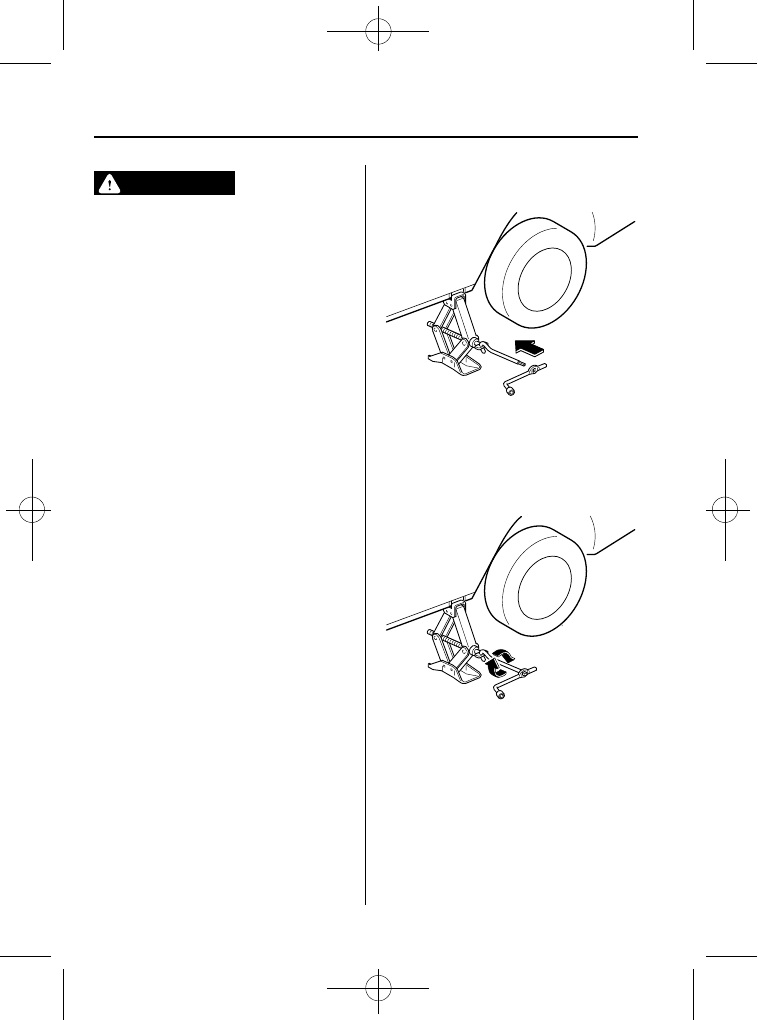
6. Insert the jack lever and attach the lug

wrench to tire jack.

7. Turn the lug wrench clockwise and

raise the vehicle high enough so that
the spare tire can be installed. Before
removing the lug nuts, make sure your
Mazda is firmly in position and that it
cannot slip or move.

7-8

In Case of an Emergency

Flat Tire

CX-7_8CG3-EA-11J_Edition1 Page376
Saturday, September 24 2011 10:33 AM

Black plate (377,1)

WARNING

Do not jack up the vehicle higher than
is necessary:

Jacking up the vehicle higher than is
necessary is dangerous as it could
destabilize the vehicle resulting in an
accident.

Do not start the engine or shake the
vehicle while it is jacked up:

Starting the engine or shaking the
vehicle while it is jacked up is
dangerous as it could cause the
vehicle to fall off the jack resulting in
an accident.

Never go under the vehicle while it is
jacked up:

Going under the vehicle while it is
jacked up is dangerous as it could
result in death or serious injury if the
vehicle were to fall off the jack.

8. Remove the lug nuts by turning them

counterclockwise; then remove the
wheel and center cap.

qLocking Lug Nuts

í

If your vehicle has optional antitheft
wheel lug nuts, one on each wheel will
lock the tires and you must use a special
key to unlock them. This key is attached
to the lug wrench and is stored with the
spare tire. Register them with the lock
manufacturer by filling out the card
provided in the glove compartment and
mailing it in the accompanying envelope.
If you lose this key, consult an Authorized
Mazda Dealer or use the lock
manufacturer's order form, which is with
the registration card.

Special key

Antitheft lug nut

To remove an antitheft lug nut

1. Obtain the key for the antitheft lug nut.

2. Place the key on top of the nut, and be

sure to hold the key square to it. If you
hold the key at an angle, you may
damage both key and nut. Do not use a
power impact wrench.

3. Place the lug wrench on top of the key

and apply pressure. Turn the wrench
counterclockwise.

In Case of an Emergency

Flat Tire

7-9

í

Some models.

CX-7_8CG3-EA-11J_Edition1 Page377
Saturday, September 24 2011 10:33 AM

Black plate (378,1)

To install the nut

1. Place the key on top of the nut, and be

sure to hold the key square to it. If you
hold the key at an angle, you may
damage both key and nut. Do not use a
power impact wrench.

2. Place the lug wrench on top of the key,

apply pressure, and turn it clockwise.

qMounting the Spare Tire

1. Remove dirt and grime from the

mounting surfaces of the wheel and
hub, including the hub bolts, with a
cloth.

WARNING

Make sure the mounting surfaces of
the wheel, hub and lug nuts are clean
before changing or replacing tires:

When changing or replacing a tire,
not removing dirt and grime from the
mounting surfaces of the wheel, hub
and hub bolts is dangerous. The lug
nuts could loosen while driving and
cause the tire to come off, resulting in
an accident.

2. Mount the spare tire.

3. Install the lug nuts with the beveled

edge inward; tighten them by hand.

WARNING

Do not apply oil or grease to lug nuts
and bolts and do not tighten the lug
nuts beyond the recommended
tightening torque:

Applying oil or grease to lug nuts and
bolts is dangerous. The lug nuts
could loosen while driving and cause
the tire to come off, resulting in an
accident. In addition, lug nuts and
bolts could be damaged if tightened
more than necessary.

4. Turn the jack handle counterclockwise

and lower the vehicle. Use the lug
wrench to tighten the nuts in the order
shown.

7-10

In Case of an Emergency

Flat Tire

CX-7_8CG3-EA-11J_Edition1 Page378
Saturday, September 24 2011 10:33 AM

Black plate (379,1)

If you are unsure of how tight the nuts
should be, have them inspected at an
Authorized Mazda Dealer.

Nut tightening torque

N·m (kgf·m, ft·lbf)

88

―118 (9―12, 65―87)

WARNING

Always securely and correctly tighten
the lug nuts:

Improperly or loosely tightened lug
nuts are dangerous. The wheel could
wobble or come off. This could result
in loss of vehicle control and cause a
serious accident.

Be sure to reinstall the same nuts you
removed or replace them with metric
nuts of the same configuration:

Because the wheel studs and lug nuts
on your Mazda have metric threads,
using a non-metric nut is dangerous.
On a metric stud, it would not secure
the wheel and would damage the
stud, which could cause the wheel to
slip off and cause an accident.

5. Remove the center cap by tapping it

with the lug wrench.

6. Store the damaged tire, using the wing

bolt to hold it in place.

Tire clamp

Spare tire cover

Wing bolt

NOTE

Always use the wing bolt to secure the
damaged tire. Store the tire hold-down bolt
used to tighten down the spare tire in the same
place as where the wing bolt had been stored.

7. Remove the tire blocks and store the

tools, jack, and damaged tire.

8. Check the inflation pressure. Refer to

Tires on page 10-7.

9. Have the flat tire repaired or replaced

as soon as possible.

WARNING

Do not drive with any tires that have
incorrect air pressure:

Driving on tires with incorrect air
pressure is dangerous. Tires with
incorrect pressure could affect
handling and result in an accident.
When you check the regular tires' air
pressure, check the spare tire, too.

NOTE

(With Tire Pressure Monitoring System)
A tire pressure sensor is not installed to the
temporary spare tire. The warning light will
flash continuously while the temporary spare
tire is being used (page 5-31).

NOTE

To prevent the jack and tool from rattling, store
them properly.

In Case of an Emergency

Flat Tire

7-11

CX-7_8CG3-EA-11J_Edition1 Page379
Saturday, September 24 2011 10:33 AM

Black plate (380,1)

Overheating

If the temperature gauge indicates
overheating, the vehicle loses power, or
you hear a loud knocking or pinging
noise, the engine is probably too hot.

WARNING

Switch the ignition to off and

make sure the fan is not running before
attempting to work near the cooling
fan:

Working near the cooling fan when it
is running is dangerous. The fan
could continue running indefinitely
even if the engine has stopped and
the engine compartment temperature
is high. You could be hit by the fan
and seriously injured.

Do not remove either cooling

system caps when the engine and
radiator are hot:

When the engine and radiator are
hot, scalding coolant and steam may
shoot out under pressure and cause
serious injury.

Open the hood ONLY after steam is no
longer escaping from the engine:

Steam from an overheated engine is
dangerous. The escaping steam could
seriously burn you.

If the temperature gauge indicates
overheating:

1. Drive safely to the side of the road and

park off the right-of-way.

2. Shift into park (P).

3. Apply the parking brake.

4. Turn off the air conditioner.

5. Check whether coolant or steam is

escaping from under the hood or from
the engine compartment.

If steam is coming from the engine
compartment:
Do not go near the front of the vehicle.
Stop the engine.
Wait until the steam dissipates, then
open the hood and start the engine.

If neither coolant nor steam is
escaping:
Open the hood and idle the engine until
it cools.

CAUTION

If the cooling fan does not operate
while the engine is running, the
engine temperature will increase.
Stop the engine and call an
Authorized Mazda Dealer.

6. Make sure the cooling fan is operating,

then turn off the engine after the
temperature has decreased.

7. When cool, check the coolant reservoir

level.
If it's low, look for coolant leaks from
the radiator and hoses.

7-12

In Case of an Emergency

Overheating

CX-7_8CG3-EA-11J_Edition1 Page380
Saturday, September 24 2011 10:33 AM

Black plate (381,1)

If you find a leak or other damage, or if
coolant is still leaking:
Stop the engine and call an Authorized
Mazda Dealer.

If you find no problems, the engine is
cool, and no leaks are obvious:
Carefully add coolant as required (page
8-23).

CAUTION

If the engine continues to overheat or
frequently overheats, have the
cooling system inspected. The engine
could be seriously damaged unless
repairs are made. Consult an
Authorized Mazda Dealer.

In Case of an Emergency

Overheating

7-13

CX-7_8CG3-EA-11J_Edition1 Page381
Saturday, September 24 2011 10:33 AM

Black plate (382,1)

Starting a Flooded Engine

If the engine fails to start, it may be
flooded (excessive fuel in the engine).

Follow this procedure:

1. If the engine does not start within five

seconds on the first try, switch the
ignition off, wait ten seconds and try
again.

2. Depress the accelerator all the way and

hold it there.

3. Switch the ignition to START and hold

it there

―for up to ten seconds. If the

engine starts, release the key and
accelerator immediately because the
engine will suddenly rev up.

4. If the engine fails to start, crank it

without depressing the accelerator

―for

up to ten seconds.

If the engine still does not start using the
above procedure, have your vehicle
inspected by an Authorized Mazda
Dealer.

7-14

In Case of an Emergency

Emergency Starting

CX-7_8CG3-EA-11J_Edition1 Page382
Saturday, September 24 2011 10:33 AM

Black plate (383,1)

Jump-Starting

Jump-starting is dangerous if done incorrectly. So follow the procedure carefully. If you
feel unsure about jump-starting, we strongly recommend that you have a competent service
technician do the work.

WARNING

Follow These Precautions Carefully:

To ensure safe and correct handling of the battery, read the following precautions
carefully before using the battery or inspecting it.

Always wear eye protection when working near the battery:

Working without eye protection is dangerous. Battery fluid contains SULFURIC ACID
which could cause blindness if splashed into your eyes. Also, hydrogen gas produced
during normal battery operation, could ignite and cause the battery to explode.

Wear eye protection and protective gloves to prevent contact with battery

fluid:

Spilled battery fluid is dangerous.
Battery fluid contains SULFURIC ACID which could cause serious injuries if it gets in
eyes, skin or clothing. If this happens, immediately flush your eyes with water for 15
minutes or wash your skin thoroughly and get medical attention.

Always keep batteries out of the reach of children:

Allowing children to play near batteries is dangerous. Battery fluid could cause
serious injuries if it gets in the eyes or on the skin.

Do not allow the positive (

) terminal to contact any other metal object that

could cause sparks:

Flames and sparks near open battery cells are dangerous. Hydrogen gas, produced
during normal battery operation, could ignite and cause the battery to explode. An
exploding battery can cause serious burns and injuries. When working near a
battery, do not allow metal tools to contact the positive (

) or negative ( )

terminal of the battery.

In Case of an Emergency

Emergency Starting

7-15

CX-7_8CG3-EA-11J_Edition1 Page383
Saturday, September 24 2011 10:33 AM

Black plate (384,1)

Keep all flames, including cigarettes, and sparks away from open battery cells:

Flames and sparks near open battery cells are dangerous. Hydrogen gas, produced
during normal battery operation, could ignite and cause the battery to explode. An
exploding battery can cause serious burns and injuries.

Do not jump-start a frozen battery or one with a low fluid level:

Jump-starting a frozen battery or one with a low fluid level is dangerous. It may
rupture or explode, causing serious injury.

Connect the negative cable to a good ground point away from the battery:

Connecting the end of the second jumper cable to the negative ( ) terminal of the
discharged battery is dangerous.
A spark could cause the gas around the battery to explode and injure someone.

Route the jumper cables away from parts that will be moving:

Connecting a jumper cable near or to moving parts (cooling fans, belts) is dangerous.
The cable could get caught when the engine starts and cause serious injury.

CAUTION

Use only a 12 V booster system. You can damage a 12 V starter, ignition system, and
other electrical parts beyond repair with a 24 V power supply (two 12 V batteries in
series or a 24 V motor generator set).

Connect cables in numerical order and disconnect in reverse order

Booster battery

Jumper 
cables

Discharged battery

7-16

In Case of an Emergency

Emergency Starting

CX-7_8CG3-EA-11J_Edition1 Page384
Saturday, September 24 2011 10:33 AM

Black plate (385,1)

1. Remove the battery cover.

2. Make sure the booster battery is 12 V

and that its negative terminal is
grounded.

3. If the booster battery is in another

vehicle, don't allow both vehicles to
touch. Turn off the engine of the
vehicle with the booster battery and all
unnecessary electrical loads in both
vehicles.

4. Connect the jumper cables in the exact

sequence as in the illustration.

l

Connect one end of a cable to the
positive terminal on the discharged
battery (1).

l

Attach the other end to the positive
terminal on the booster battery (2).

l

Connect one end of the other cable
to the negative terminal of the
booster battery (3).

l

Connect the other end to the ground
point indicated in the illustration
away from the discharged battery
(4).

5. Start the engine of the booster vehicle

and run it a few minutes. Then start the
engine of the other vehicle.

6. When finished, carefully disconnect the

cables in the reverse order described in
the illustration.

7. If the battery cover has been removed,

install it in the reverse order of
removal.

NOTE

Verify that the covers are securely installed.

In Case of an Emergency

Emergency Starting

7-17

CX-7_8CG3-EA-11J_Edition1 Page385
Saturday, September 24 2011 10:33 AM

Black plate (386,1)

Push-Starting

Do not push-start your Mazda.

NOTE

You can't start a vehicle with an automatic
transaxle by pushing it.

7-18

In Case of an Emergency

Emergency Starting

CX-7_8CG3-EA-11J_Edition1 Page386
Saturday, September 24 2011 10:33 AM

Black plate (387,1)

Towing Description

We recommend that towing be done only
by an Authorized Mazda Dealer or a
commercial tow-truck service.

Proper lifting and towing are necessary to
prevent damage to the vehicle.
Particularly when towing a AWD vehicle,
where all the wheels are connected to the
drive train, proper transporting of the
vehicle is absolutely essential to avoid
damaging the drive system. Government
and local laws must be followed.

Wheel dollies

A towed 2WD vehicle should have its
drive wheels (front wheels) off the
ground. If excessive damage or other
conditions prevent this, use wheel dollies.

When towing a 2WD vehicle with the rear
wheels on the ground, release the parking
brake.

A towed AWD vehicle must have all its
wheels off the ground.

CAUTION

Do not tow the vehicle pointed
backward with driving wheels on the
ground. This may cause internal
damage to the transaxle.

CAUTION

Do not tow with sling-type
equipment. This could damage your
vehicle. Use wheel-lift or flatbed
equipment.

In Case of an Emergency

Emergency Towing

7-19

CX-7_8CG3-EA-11J_Edition1 Page387
Saturday, September 24 2011 10:33 AM

Black plate (388,1)

WARNING

Always tow a AWD vehicle with all four
wheels off the ground:

Towing a AWD vehicle with either the
front or rear wheels on the ground is
dangerous as the drive train could be
damaged, or the vehicle could trail
away from the tow truck and cause
an accident. If the drive train has
been damaged, transport the vehicle
on a flat bed truck.

Tiedown Hooks

CAUTION

Do not use the front and rear
tiedown eyelets for towing the
vehicle.
They have been designed only for
securing the vehicle to a transport
vessel during shipping.
Using the eyelets for any other
purpose could result in the vehicle
being damaged.

qTiedown Hooks

1. Remove the tiedown eyelet from the

trunk (page 7-3).

2. Press the marking on the cover as

shown in the figure to remove the
cover.

Front

7-20

In Case of an Emergency

Emergency Towing

CX-7_8CG3-EA-11J_Edition1 Page388
Saturday, September 24 2011 10:33 AM

Black plate (389,1)

Rear

CAUTION

The cap cannot be completely
removed. Do not use excessive force
as it may damage the cap or scratch
the painted bumper surface.

NOTE

If it is difficult to remove the tiedown eyelet,
wrap the jack lever with a cloth as shown in
the figure and press the marking on the cover
to remove it.

Front

Rear

3. Securely install the tiedown eyelet

using the lug wrench.

In Case of an Emergency

Emergency Towing

7-21

CX-7_8CG3-EA-11J_Edition1 Page389
Saturday, September 24 2011 10:33 AM

Black plate (390,1)

Front

Lug wrench

Rear

Lug wrench

4. Hook the tying rope to the tiedown

eyelet.

Front

Rear

CAUTION

If the tiedown eyelet is not securely
tightened, it may loosen or disengage
from the bumper when tying down
the vehicle. Make sure that the
tiedown eyelet is securely tightened
to the bumper.

7-22

In Case of an Emergency

Emergency Towing

CX-7_8CG3-EA-11J_Edition1 Page390
Saturday, September 24 2011 10:33 AM

Black plate (391,1)

Recreational Towing

An example of

“recreational towing” is

towing your vehicle behind a motorhome.
The transaxle is not designed for towing
this vehicle on all 4 wheels.
When doing recreational towing refer to

“Towing Description” (page 7-19) and

“Tiedown Hooks” (page 7-20) and
carefully follow the instructions.

In Case of an Emergency

Emergency Towing

7-23

CX-7_8CG3-EA-11J_Edition1 Page391
Saturday, September 24 2011 10:33 AM


Content   ..  22  23  24  25   ..