Honda Accord Coupe (2017 year). Manual - part 33


  Index      Honda     Honda Accord Coupe - service manual 2017 year in english


Search            


Content   ..  31  32  33  34   ..


Honda Accord Coupe (2017 year). Manual - part 33


uu

Maintenance Minder

TM

u

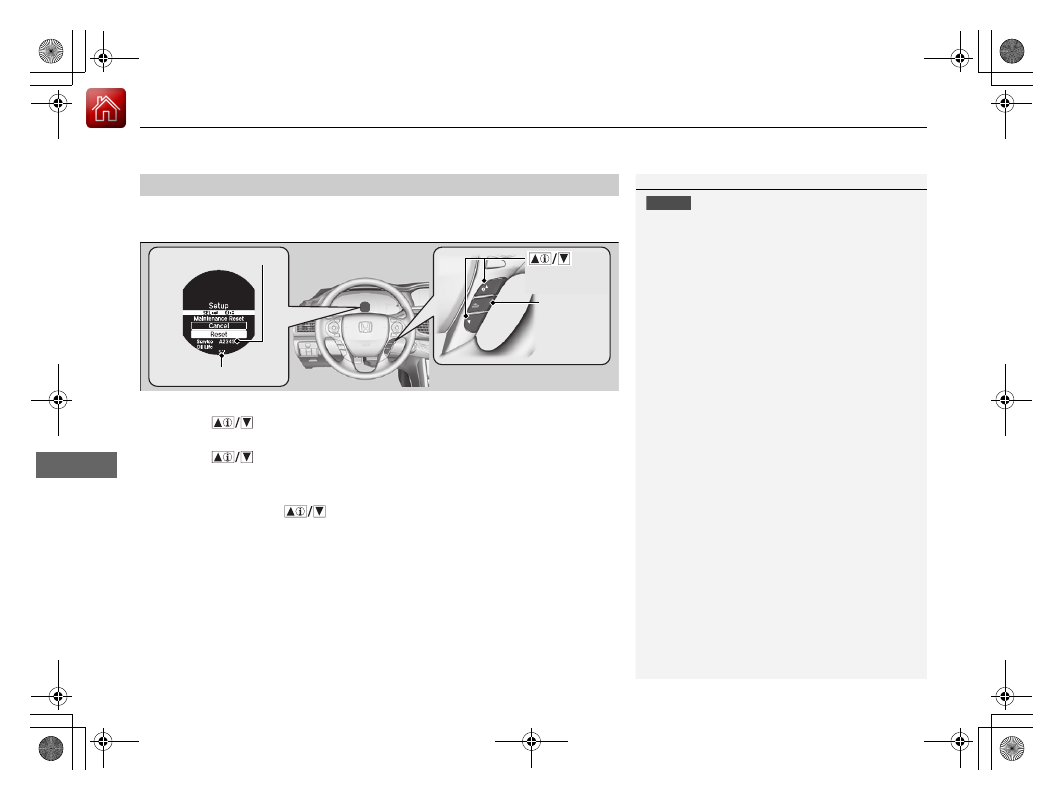
To Use Maintenance Minder

TM

512

Main

tenan

ce

Reset the maintenance minder information display if you have performed the 
maintenance service.

1. Turn the ignition switch to ON 

(

w

*1

.

2. Press the 

 button to select Vehicle Settings, then press the SEL/RESET 

button.

3. Press the 

 button until Maintenance Reset appears on the display.

4. Press the SEL/RESET button.

u

The oil life reset mode is displayed on the multi-information display.

5. Select Reset with the 

 button, then press the SEL/RESET button.

u

The displayed maintenance items disappear, and the engine oil life display 
returns to 100%.

To cancel the oil life reset mode, select Cancel, then press the SEL/RESET button.

*1: Models with the smart entry system have an ENGINE START/STOP button instead of an 
ignition switch.

Resetting the Display

1

Resetting the Display

NOTICE

Failure to reset the Maintenance Minder

TM

 display 

after a maintenance service results in the system 
showing incorrect maintenance intervals, which can 
lead to serious mechanical problems.

The dealer will reset the Maintenance Minder

TM


display after completing the required maintenance 
service. If someone other than a dealer performs 
maintenance service, reset the Maintenance 
Minder

TM

 display yourself.

You can reset the Maintenance Minder

TM

 display 

using the audio/information screen

*

 or audio/

information touch screen

*

.

Customized Features P. 298, 316

Engine Oil Life

SEL/RESET 
Button

Maintenance Item Codes


(Information) 
Button

* Not available on all models

513

Continued

Main

tenan

ce

Maintenance Under the Hood

Maintenance Items Under the Hood

4-cylinder models

Brake Fluid 
(Black Cap)

Engine Coolant 
Reserve Tank

Radiator Cap

Washer Fluid 
(Blue Cap)

Engine Oil Dipstick 
(Orange)

Clutch Fluid 
(Light Gray Cap)

Engine Oil Fill Cap

Battery

Manual transmission 
models

514

uu

Maintenance Under the Hood

u

Maintenance Items Under the Hood

Main

tenan

ce

6-cylinder models

Engine Oil Dipstick 
(Orange)

Washer Fluid 
(Blue Cap)

Engine Coolant 
Reserve Tank

Radiator Cap

Brake Fluid 
(Black Cap)

Engine Oil Fill Cap

Battery

Clutch Fluid 
(Light Gray Cap)

Manual transmission 
models

515

uu

Maintenance Under the Hood

u

Opening the Hood

Continued

Main

tenan

ce

Opening the Hood

1. Park the vehicle on a level surface, and set 

the parking brake.

2. Pull the hood release handle under the 

lower left corner of the dashboard.

u

The hood will pop up slightly.

3. Push up the hood latch lever in the center 

of the hood to release the lock mechanism, 
and open the hood.

4. Remove the support rod from the clamp 

using the grip. Mount the support rod in 
the hood.

When closing, remove the support rod, and 
stow it in the clamp, then gently lower the 
hood. Remove your hand at a height of 
approximately 12 inches (30 cm) and let the 
hood close.

1

Opening the Hood

NOTICE

Do not open the hood when the wiper arms are 
raised.
The hood will strike the wipers, and may damage 
either the hood or the wipers.

When closing the hood, check that the hood is 
securely latched.

If the hood latch lever moves stiffly, or if you can 
open the hood without lifting the lever, the latch 
mechanism should be cleaned and lubricated.

Hood Release Handle

Pull

Lever

Support Rod

Grip

Clamp

4-cylinder models

516

uu

Maintenance Under the Hood

u

Opening the Hood

Main

tenan

ce

4. Lift the hood up most of the way.

u

The hydraulic supports will lift it up the 
rest of the way and hold it up.

When closing, lower it to approximately 12 
inches (30 cm), then press down firmly with 
your hands.

6-cylinder models

517

uu

Maintenance Under the Hood

u

Recommended Engine Oil

Main

tenan

ce

Recommended Engine Oil

Oil is a major contributor to your engine's 
performance and longevity. If you drive the 
vehicle with insufficient or deteriorated oil, 
the engine may fail or be damaged.

This seal indicates the oil is energy conserving 
and that it meets the American Petroleum 
Institute’s latest requirements.

Use Genuine Honda Motor Oil or another 
commercial engine oil of suitable viscosity for 
the ambient temperature as shown here.

Synthetic oil

You may also use synthetic motor oil if it is labeled with the API Certification Seal 
and is the specified viscosity grade.

• Genuine Honda Motor Oil
• Premium-grade 0W-20 detergent oil with an API Certification Seal on the 

container.

1

Recommended Engine Oil

Engine Oil Additives
Your vehicle does not require oil additives. In fact, 
they may adversely affect the engine performance 
and durability.

Ambient Temperature

518

uu

Maintenance Under the Hood

u

Oil Check

Main

tenan

ce

Oil Check

We recommend that you check the engine oil level every time you refuel.
Park the vehicle on level ground.
Wait approximately three minutes after turning the engine off before you check the 
oil.

1. Remove the dipstick (orange).
2. Wipe the dipstick with a clean cloth or 

paper towel.

3. Insert the dipstick back all the way into its 

hole.

1

Oil Check

If the oil level is near or below the lower mark, slowly 
add oil being careful not to overfill.

4-cylinder models

6-cylinder models

519

uu

Maintenance Under the Hood

u

Oil Check

Main

tenan

ce

4. Remove the dipstick again, and check the 

level. It should be between the upper and 
lower marks. Add oil if necessary.

4-cylinder models

6-cylinder models

Upper Mark

Lower Mark

Upper Mark
Lower Mark

520

uu

Maintenance Under the Hood

u

Adding Engine Oil

Main

tenan

ce

Adding Engine Oil

1. Unscrew and remove the engine oil fill cap.
2. Add oil slowly.
3. Reinstall the engine oil fill cap, and tighten 

it securely.

4. Wait for three minutes and recheck the 

engine oil dipstick.

1

Adding Engine Oil

If any oil spills, wipe it away immediately. Spilled oil 
may damage the engine compartment components.

NOTICE

Do not fill the engine oil above the upper mark. 
Overfilling the engine oil can result in leaks and 
engine damage.

4-cylinder models

6-cylinder models

Engine Oil Fill Cap

Engine Oil Fill Cap

521

uu

Maintenance Under the Hood

u

Changing the Engine Oil and Oil Filter

Continued

Main

tenan

ce

Changing the Engine Oil and Oil Filter

You must change the engine oil and oil filter regularly in order to maintain the 
engine's lubrication. The engine may be damaged if they are not changed regularly.

Change the oil and filter in accordance with the maintenance message on the 
information display

*

/multi-information display

*

.

1. Run the engine until it reaches normal 

operating temperature, and then turn the 
engine off.

2. Open the hood and remove the engine oil 

fill cap.

3. Remove the drain bolt and washer from 

the bottom of the engine, and drain the 
oil into a suitable container.

1

Changing the Engine Oil and Oil Filter

NOTICE

You may damage the environment if you do not 
dispose of the oil in a suitable way. If you are 
changing the oil by yourself, appropriately dispose of 
the used oil. Put the oil in a sealed container and take 
it to a recycling center. Do not throw the oil away 
into a garbage can or onto the ground.

4-cylinder models

6-cylinder models

Drain Bolt

Washer

Drain Bolt

Washer

* Not available on all models

uu

Maintenance Under the Hood

u

Changing the Engine Oil and Oil Filter

522

Main

tenan

ce

4. Remove the oil filter and dispose of the 

remaining oil.

5. Check that the filter gasket is not stuck to 

the engine contact surface.

u

If it is stuck, you must detach it.

6. Wipe away dirt and dust adhering to the 

contact surface of the engine block, and 
install a new oil filter.

u

Apply a light coat of new engine oil to 
the oil gasket.

7. Put a new washer on the drain bolt, then 

reinstall the drain bolt.

u

Tightening torque: 

30 lbf∙ft (40 N∙m, 4.0 kgf∙m)

29 lbf∙ft (39 N∙m, 4.0 kgf∙m)

8. Pour the recommended engine oil into the engine.

u

Engine oil change capacity (including 
filter): 

4.4 US qt (4.2 L)

4.5 US qt (4.3 L)

9. Reinstall the engine oil fill cap securely and 

start the engine.

10. Run the engine for a few minutes, and 

then check that there is no leak from the 
drain bolt or oil filter.

11. Stop the engine, wait for three minutes, 

and then check the oil level on the dipstick.

u

If necessary, add more engine oil.

1

Changing the Engine Oil and Oil Filter

You will need a special wrench to replace the oil 
filter. You can buy this wrench from a dealer.

When installing the new oil filter, follow the 
instructions supplied with the oil filter.

Reinstall the engine oil fill cap. Start the engine. The 
low oil pressure indicator should go off within five 
seconds. If it does not, turn off the engine, and check 
your work.

4-cylinder models

6-cylinder models

Oil Filter

Oil Filter

4-cylinder models

6-cylinder models

4-cylinder models

6-cylinder models

523

uu

Maintenance Under the Hood

u

Engine Coolant

Continued

Main

tenan

ce

Engine Coolant

This coolant is premixed with 50% antifreeze and 50% water. Do not add any 
straight antifreeze or water.

We recommend you check the engine coolant level every time you refuel. Check the 
reserve tank first. If it is completely empty, also check the coolant level in the 
radiator. Add the engine coolant accordingly.

1. Check the amount of coolant in the reserve 

tank.

2. If the coolant level is below the MIN mark, 

add the specified coolant until it reaches 
the MAX mark.

3. Inspect the cooling system for leaks.

Specified coolant: Honda Long Life Antifreeze/Coolant Type 2

Reserve Tank

1

Engine Coolant

NOTICE

If temperatures consistently below −22°F (−30°C) are 
expected, the coolant mixture should be changed to 
a higher concentration. Consult a dealer for more 
information.

If Honda antifreeze/coolant is not available, you may 
use another major brand non-silicate coolant as a 
temporary replacement. Check that it is a high quality 
coolant recommended for aluminum engines. 
Continued use of any non-Honda coolant can result 
in corrosion, causing the cooling system to 
malfunction or fail. Have the cooling system flushed 
and refilled with Honda antifreeze/coolant as soon as 
possible.

Do not add rust inhibitors or other additives to your 
vehicle’s cooling system. They may not be compatible 
with the coolant or with the engine components.

Reserve 
Tank

MAX

MIN

uu

Maintenance Under the Hood

u

Engine Coolant

524

Main

tenan

ce

1. Make sure the engine and radiator are 

cool.

2. Turn the radiator cap counterclockwise to 

relieve any pressure in the cooling system. 
Do not push the cap down when turning.

3. Push down and turn the radiator cap 

counterclockwise to remove it.

4. The coolant level should be up to the base 

of the filler neck. Add coolant if it is low.

5. Put the radiator cap back on, and tighten it 

fully.

6. Pour coolant into the reserve tank until it 

reaches the MAX mark. Put the cap back 
on the reserve tank.

Radiator

1

Radiator

NOTICE

Pour the fluid slowly and carefully so you do not spill 
any. Clean up any spills immediately; they can 
damage components in the engine compartment.

3

WARNING

Removing the radiator cap while the 
engine is hot can cause the coolant to spray 
out, seriously scalding you.

Always let the engine and radiator cool 
down before removing the radiator cap.

Radiator Cap

525

uu

Maintenance Under the Hood

u

Transmission Fluid

Continued

Main

tenan

ce

Transmission Fluid

Have a dealer check the fluid level and replace if necessary.

Have a dealer check the fluid level and replace if necessary.

Continuously Variable Transmission (CVT) Fluid

Specified fluid: HCF-2

Manual Transmission Fluid

Specified fluid: Honda Manual Transmission Fluid (MTF)

4-cylinder models with continuously variable transmission (CVT)

1

Continuously Variable Transmission (CVT) Fluid

NOTICE

Do not mix HCF-2 with other transmission fluids.
Using a transmission fluid other than HCF-2 may 
adversely affect the operation and durability of your 
vehicle's transmission, and damage the transmission.
Any damage caused by using a transmission fluid that 
is not equivalent to HCF-2 is not covered by Honda's 
new vehicle warranty.

4-cylinder/6-cylinder models with manual transmission

1

Manual Transmission Fluid

If Honda MTF is not available, you may use the API 
certificated SAE 0 W-20 or 5 W-20 viscosity motor oil 
as a temporary measure.
Replace with MTF as soon as possible. Motor oil does 
not contain the proper additives for the transmission 
and continued use can cause decreased shifting 
performance and lead to transmission damage.

uu

Maintenance Under the Hood

u

Transmission Fluid

526

Main

tenan

ce

Have a dealer check the fluid level and replace if necessary.

Automatic Transmission Fluid

Specified fluid: Honda ATF DW-1 (automatic transmission fluid)

6-cylinder models with automatic transmission

1

Automatic Transmission Fluid

NOTICE

Do not mix Honda ATF DW-1 with other 
transmission fluids.
Using a transmission fluid other than Honda ATF 
DW-1 may adversely affect the operation and 
durability of your vehicle's transmission, and damage 
the transmission.
Any damage caused by using a transmission fluid that 
is not equivalent to Honda ATF DW-1 is not covered 
by Honda's new vehicle warranty.

527

uu

Maintenance Under the Hood

u

Brake/Clutch Fluid

Main

tenan

ce

Brake/Clutch Fluid

Use the same fluid for both the brakes and clutch.

The fluid level should be between the MIN 
and MAX marks on the side of the reservoir.

The fluid level should be between the MIN 
and MAX marks on the side of the reservoir.

Specified fluid: Honda Heavy Duty Brake Fluid DOT 3

Checking the Brake Fluid

1

Brake/Clutch Fluid

NOTICE

Brake fluid marked DOT 5 is not compatible with your 
vehicle's braking system and can cause extensive 
damage.

If the specified brake fluid is not available, you should 
use only DOT 3 or DOT 4 fluid from a sealed 
container as a temporary replacement.

Using any non-Honda brake fluid can cause corrosion 
and decrease the longevity of the system. Have the 
brake system flushed and refilled with Honda Heavy 
Duty Brake Fluid DOT 3 as soon as possible.

If the brake fluid level is at or below the MIN mark, 
have a dealer inspect the vehicle for leaks or worn 
brake pads as soon as possible.

Brake Reservoir

MIN

MAX

Checking the Clutch Fluid

Manual transmission models

1

Checking the Clutch Fluid

If the clutch fluid level is at or below the MIN mark, 
have a dealer inspect for leaks or an excessively worn 
clutch plate as soon as possible.

Clutch Reservoir

MIN

MAX


Content   ..  31  32  33  34   ..