Ford Focus RS (2011 year). Manual - part 17


  Index      Ford     Ford Focus RS - service repair manual (2011 year) in english


Search            


Content   ..  15  16  17  18   ..


Ford Focus RS (2011 year). Manual - part 17


Item 27

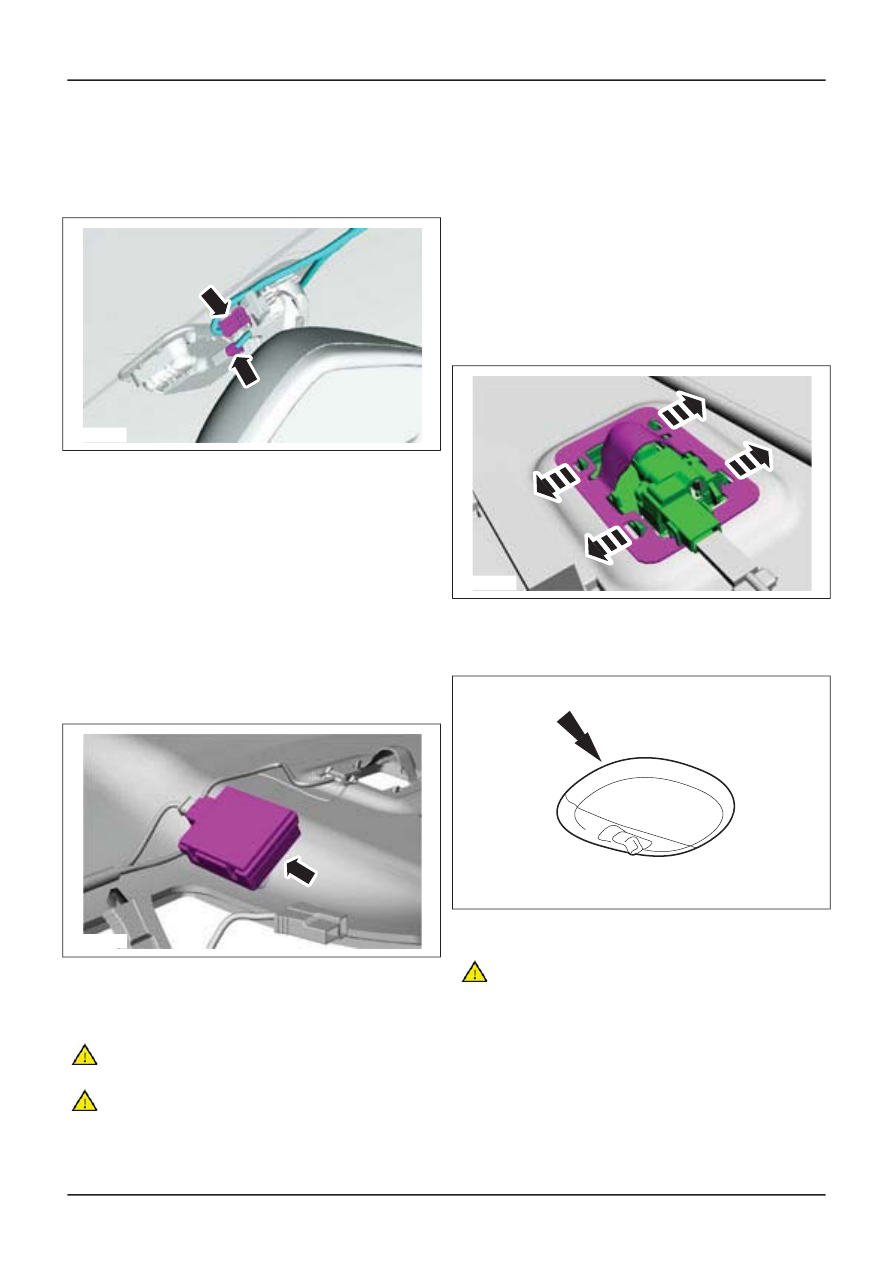
Auto-dimming interior mirror and rain

sensor electrical connectors

1. Disconnect the auto-dimming interior mirror

and rain sensor electrical connectors.

E51018

Item 28

Headliner trim panel

1. Tilt the front seats forward.

2. With the aid of another technician, remove

the headliner through the liftgate opening.

Item 30

Radio frequency (RF) receiver

NOTE: Make a note of the position of the RF
receiver to make sure that it is installed in exactly
the same position as removed.

1. Using a suitable knife, detach the RF receiver

from the headliner.

E51463

Item 32

Roof wiring harness

CAUTIONS:

Take care not to damage the insulation of
the roof wiring harness.

The roof wiring harness must be cut off
the headliner and not pulled or ripped.
Failure to follow this instruction could

result in the incorrect function of electrical
components.

NOTE: Make a note of the position of the roof
wiring harness to make sure that it is installed in
exactly the same position as removed.

1. Using a suitable knife, remove the roof wiring

harness from the headliner.

Item 33

Sun-visor illumination lamps

1. Release the sunvisor illumination lamp

retaining clips.

E51019

Item 34

Rear interior lamp

1. Lever out the rear interior lamp.

MPE0005082

Item 35

Rear window washer tube

CAUTION: Take care not to damage the
rear window washer tube. Failure to follow
this instruction could result in damage to
the headliner.

NOTE: Make a note of the position of the rear
window washer tube to make sure that it is installed
in exactly the same position as removed.

1. Using a suitable knife, remove the rear

window washer tube from the headliner.

G410777en

501-05-

88

Interior Trim and Ornamentation

501-05-

88

REMOVAL AND INSTALLATION

Installation Details

Item 35

Rear window washer tube

CAUTION: The rear window washer tube
must be installed in the same position as
removed.

1. Using a suitable adhesive, bond the rear

window washer tube to the headliner.

Item 32

Roof wiring harness

CAUTION: The roof wiring harness must
be installed in the same position as
removed.

1. Using a suitable adhesive, bond the roof

wiring harness to the headliner.

Item 28

Headliner trim panel

1. With the aid of another technician, install the

headliner.

Item 18

B-pillar trim panels

NOTE: Make sure the B-pillar safety belt height
adjustment lever is aligned with the safety belt
height adjustment mechanism.

E51422

Item 13

Roof wiring harness

1. Using

the Draw cord, feed the roof

wiring

harness

through the NVH material.

Item 11

Noise, vibration and harshness (NVH)

material

1. Reposition the NVH material.

G410777en

501-05-

89

Interior Trim and Ornamentation

501-05-

89

REMOVAL AND INSTALLATION

Rear Quarter Trim Panel — 3-Door

1. Remove the parcel shelf trim panel.

2. Tilt the rear seat cushion forward.

3. Tilt the rear seat backrest forward.

4. Release the rear seat backrest outer pivot

retaining lock.

1. Using a suitable pair of long nose pliers,

press in the retaining clips.

2. Using a suitable flat blade screwdriver,

release the outer locking clip.

3. Using a suitable flat blade screwdriver, rotate

the outer mounting bracket pivot locking
latch.

E51421

1

3

1

2

5.

CAUTION: The rear seat backrest inner

pivot pin has radial grooves. Take care not
to damage the backrest inner pivot bush.

Remove the rear seat backrest.

1. Detach the rear seat backrest outer pivot pin

from the outer mounting bracket.

2. Slide the backrest from the center mounting

bracket.

E50070

1

2

6. Remove the B-pillar trim panel.

T

rim Panel - 3-Door

(501-05 Interior Trim

and Ornamentation, Removal and
Installation).

7. Remove the components in the order

indicated in the following illustration(s) and
table(s).

G410783en

501-05-

90

Interior Trim and Ornamentation

501-05-

90

REMOVAL AND INSTALLATION

For additional information,

refer to:

B-Pillar

E50671

4

1

3

2

Description

Item

Liftgate opening weatherstrip

See Removal Detail

1

Parcel shelf support trim panel retaining
screws

2

Description

Item

Parcel shelf tray support trim panel

See Removal Detail

3

Parcel shelf support trim panel retaining
clips

See Installation Detail

4

G410783en

501-05-

91

Interior Trim and Ornamentation

501-05-

91

REMOVAL AND INSTALLATION

E51574

11

11

9

6

5

38 Nm

8

10

7

Description

Item

Front scuff plate

See Removal Detail

5

Front door opening weatherstrip

See Removal Detail

6

Rear quarter trim panel upper retaining
clips

7

Rear quarter trim panel lower retaining
clips

8

Description

Item

Rear safety belt lower anchor

See Removal Detail

9

Rear quarter trim panel

10

Rear quarter trim panel retaining clips

See Installation Detail

11

8. To install, reverse the removal procedure.

G410783en

501-05-

92

Interior Trim and Ornamentation

501-05-

92

REMOVAL AND INSTALLATION

Removal Details

Item 1

Liftgate opening weatherstrip

1. Detach the liftgate opening weatherstrip.

Item 3

Parcel shelf tray support trim panel

1. Detach the parcel shelf support trim panel.

• Pull the parcel shelf support trim panel away

from the rear quarter body panel to release
the retaining tang from the rear quater glass
trim panel.

• Feed the rear safety belt harness through

the parcel shelf support trim panel.

E50672

Item 5

Front scuff plate

1. Detach the front scuff plate.

Item 6

Front door opening weatherstrip

1. Detach the front door opening weatherstrip.

Item 9

Rear safety belt lower anchor

1. Detach the rear safety belt lower anchor.

Installation Details

Item 11

Rear quarter trim panel retaining clips

1. Install the rear quarter trim panel retaining

clips to the trim panel before the trim panel
is installed to the vehicle.

Item 4

Parcel shelf support trim panel retaining

clips

1. Install the parcel shelf support trim panel

retaining clips to the trim panel before the
trim panel is installed to the vehicle.

G410783en

501-05-

93

Interior Trim and Ornamentation

501-05-

93

REMOVAL AND INSTALLATION

Rear Quarter Trim Panel — 5-Door/Wagon

1. Tilt the rear seat cushion forward.

2. Tilt the rear seat backrest forward.

3. Release the rear seat backrest outer pivot

retaining lock.

1. Using a suitable pair of long nose pliers,

press in the retaining clips.

2. Using a suitable flat blade screwdriver,

release the outer locking clip.

3. Using a suitable flat blade screwdriver, rotate

the outer mounting bracket pivot locking
latch.

E50069

1

1

3

2

4.

CAUTION: The left-hand rear seat

backrest inner pivot pin has radial grooves.
Take care not to damage the backrest inner
pivot bushing.

Remove the rear seat backrest.

1. Detach the rear seat backrest outer pivot pin

from the outer mounting bracket.

2. Slide the backrest from the center mounting

bracket.

E50070

1

2

5. Remove the components in the order

indicated in the following illustration(s) and
table(s).

E51416

3

4

4

1

2

G410784en

501-05-

94

Interior Trim and Ornamentation

501-05-

94

REMOVAL AND INSTALLATION

Description

Item

Rear door opening weatherstrip

See Removal Detail

1

Rear quarter trim panel retaining clips

2

Description

Item

Rear quarter trim panel

See Removal Detail

3

Rear quarter trim panel retaining clips

See Installation Detail

4

6. To install, reverse the removal procedure.

Removal Details

Item 1

Rear door opening weatherstrip

1. Detach the rear door opening weatherstrip.

Item 3

Rear quarter trim panel

CAUTION: When removing the rear quarter
trim panel from under the rear parcel shelf

support trim panel, do not place excessive
strain on the rear quarter trim panel
retaining clip mouldings.

Installation Details

Item 4

Rear quarter trim panel retaining clips

1. Install the rear quarter trim panel retaining

clips to the rear quarter trim panel before the
rear quarter trim panel is installed to the
vehicle.

G410784en

501-05-

95

Interior Trim and Ornamentation

501-05-

95

REMOVAL AND INSTALLATION


Content   ..  15  16  17  18   ..