Lotus Elise / Lotus Exige. Instruction - part 118
Page 21
Lotus Service Notes
2-Eleven
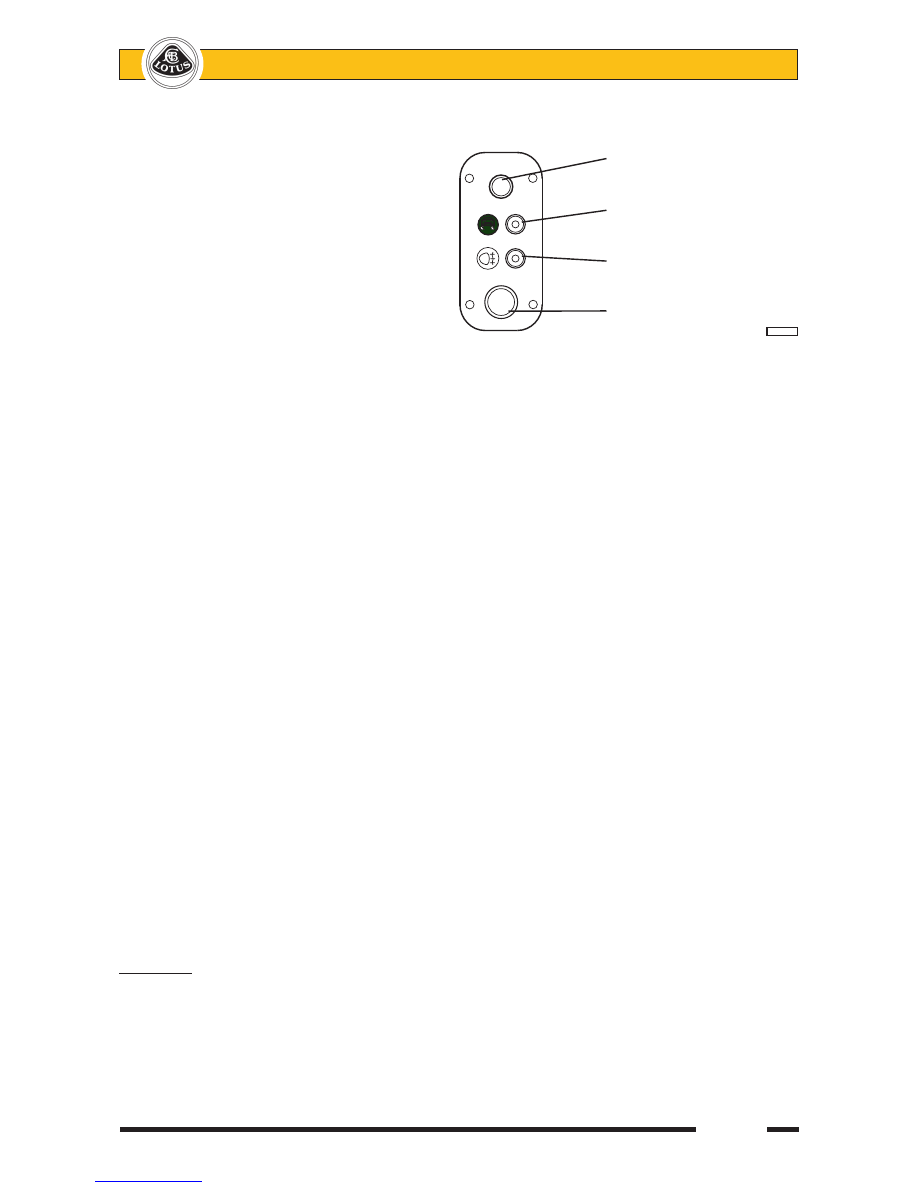
SIDE PANEL SWITCHES
Situated at the end of the fascia, outboard
of the steering column is a switch panel pro-
viding various functions dependent on vehicle
specification.
Engine Start Button
Fitted on all cars, at the bottom of this
panel is a red button to activate the engine
starter motor. This circuit is operative only
when the ignition is switched on. Care should
be taken not to press the button when the
engine is running, as damage to the starter
mechanism is likely to be caused.
For correct operation of this function see ‘Starting Procedure’.
Rear Fog/Rain Light Switch (if fitted)
On cars fitted with full road lighting, the switch above the starter button controls the two rear fog lamps,
which operate only in conjunction with the ignition and headlamps. Tell tales in the switch button and instrument
pack light up amber to indicate when the circuit is active. Press a second time to switch off the lamps.
Note that whenever the headlamps and/or ignition are switched off, the fog lamps will also switch off. On
re-instatement of ignition and headlamps, the fog lamps will remain off until requested again by pressing the
switch.
For track cars fitted with rear warning ‘rain’ lamps, these may be activated any time the ignition is on, by
pressing this button. Tell tales in the switch button and instrument pack light up amber to indicate when the
circuit is active. Press a second time to switch off the rain lamps.
Lotus Traction Control
All cars are equipped with Lotus Traction Control (LTC), whether or not the optional Limited Slip Differential
(LSD) is specified.
Lotus Traction Control (LTC) is a software programme within the engine electronic control unit (ECU) which
uses inputs from the wheel speed sensors to determine the degree of wheelspin occurring, and when necessary,
modulate fuel injector delivery to control engine power output until grip is restored. This feature, which operates
at all speeds above 6 mph, can improve vehicle stability in some extreme conditions of use, especially where
variable surface grip prevails, or when maximum vehicle performance is being exploited.
The optional Torsen type Limited Slip Differential (LSD) is a mechanical gear system incorporated into the
final drive unit, and limits the speed differential between the two rear wheels by distributing the applied torque
in accordance with the available grip at each tyre. This feature can enhance vehicle performance in certain
types of off-road or closed venue competition, and help maintain mobility in mud, snow or sand. LTC then acts
electronically to stabilise high speed vehicle behaviour under high cornering loads or extreme manoeuvres.
If the LTC tell tale in the instrument panel is seen to flicker, this is an indication that the tractive limit has
been reached, and traction control activated.
Lotus Traction Control ‘Off’ Button:
In certain circumstances, such as loose or soft surfaces, it may be desirable temporarily to switch off the
traction control, for which purpose an LTC ‘off’ button is provided on the switch panel outboard of the steering
column. To switch off the LTC; with the ignition switched on, hold the button pressed for 2 seconds. The button
tell tale together with the instrument panel tell tale will light up amber to confirm system de-activation.
WARNING:
• LTC should always be active when driving on the public highway.
•
If the system is switched off when driving off-highway, be aware of the consequent change in
vehicle behaviour and modify driving style accordingly.
To re-activate LTC, press (momentarily) the button a second time and check that the button and instrument
panel tell tales go out. Note that the button tell tale will flicker in conjunction with the instrument panel tell tale
if traction control is triggered. Irrespective of the system status at the time of ignition switch off, LTC will default
to ‘on’ next time the ignition is switched on.
Variable traction control
Traction control 'off' switch
Rear fog/rain light switch
Engine start button
ohs162