Lotus Elise / Lotus Exige. Instruction - part 12
Lotus Service Notes Section BR
Page 3
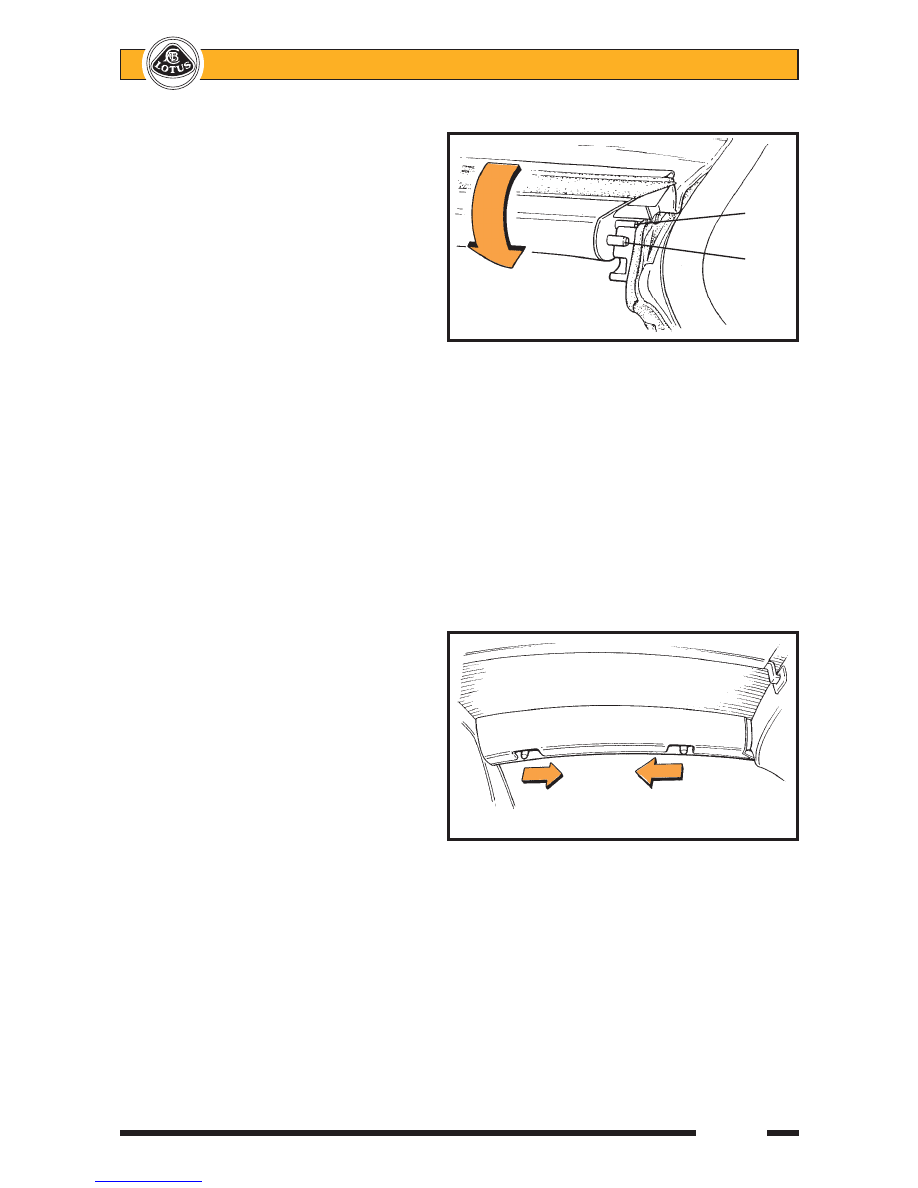
4.
Roll out the left hand side of the roof, and
engage the fixed spigot pin on the front and
rear end of the rail, into the uppermost slot
in the latch blocks at the front and rear of
the roof aperture.
5.
Ensure that the tensioning cables at the front
and rear edges of the roof canopy are cor-
rectly located in the channels between the
seal and body before rotating the left hand
side rail downwards.
Ensure that both spring loaded pins ‘click’
into their ramped slots indicating that latch-
ing is complete. If necessary, ease the latch
handles on the inside face of the side rails
inwards to facilitate latching. Pull up on the
side rail to check security.
6.
On the right hand side of the car, repeat steps (4) and (5) for the second side rail, noting that greater
rotating force will be required as tension is applied to the canopy.
Note: Engaging the left hand roof side rail first, will minimise the possibility of the canopy tensioning
cable adjusters causing damage to the roof seals.
Soft Top - Removal
WARNING: The soft top roof should be removed only whilst the vehicle is safely parked.
1.
Open both doors or lower both door win-
dows.
2.
On the inside face of the right hand roof
side rail, locate the two latch release levers:
Pull the two lever handles towards each
other to release the side rail latches (press
down on the side rail if necessary to relieve
the load on the latch pins), and rotate the
rail upwards to release the canopy tension.
3.
Repeat step (2) for the left hand side rail.
Note: Releasing the right hand roof side
rail first, will minimise the possibility of the
canopy tensioning cable adjusters causing
damage to the roof seals.
4.
Carefully roll up each side of the roof canopy towards the centre, lift off the car, and stow in the roof bag.
5.
Unhook the two roof stays and stow in the roof bag.
Important Note: If the roof is not fully dry, it should be stowed for no longer than a few days before unrolling
or refitting and allowing to air dry completely. Prolonged stowage of a wet or damp roof will promote rotting of
the fabric.
Roof Cable - Front: The tension of the steel cable running through the front edge of the roof canopy should be
adjusted with the side rails latched. Hook a spring balance under the centre of the cable, and apply an upwards
force of 6 kgf. Adjust the cable tension to achieve a vertical gap of 6mm between the cable and top surface of
the windscreen surround.
Spigot
pin
Spring
loaded
pin
FITTING SIDERAIL
ohs111
RELEASING ROOF SIDE RAIL
ohs112