Snowmobile Polaris Two Stroke (2007 year). Instruction - part 26


  Index      Snowmobiles / ATV     Snowmobile Polaris Two Stroke - instruction 2007 year


Search            


Content   ..  24  25  26  27   ..


Snowmobile Polaris Two Stroke (2007 year). Instruction - part 26


4.21

FUEL DELIVERY

4

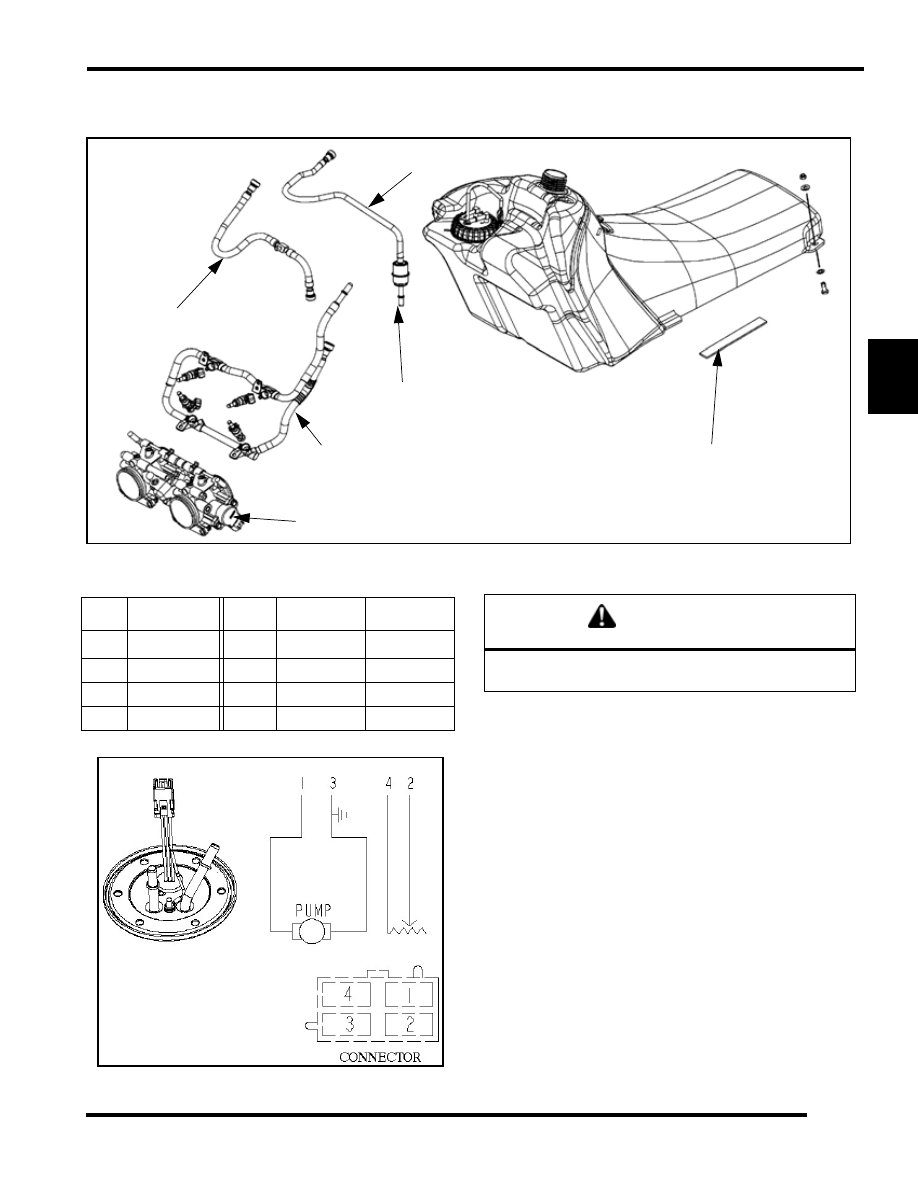
600 CFI Fuel Tank / Fuel Supply

600 CFI Pump / Sender Specifications

600 CFI Fuel Pump Replacement

1.

Siphon the fuel out of the fuel tank into a suitable
container.

2.

Remove the console and the seat assembly.

3.

Disconnect the positive (+) battery cable from the battery
if applicable.

4.

Remove the fasteners securing the fuel tank to the tunnel.

5.

Bleed the pressure from the fuel rail. See “Fuel Rail
Bleeding” on page 4.20.

6.

Lift and move the tank back to gain access to the fuel lines.

7.

Remove the fuel supply and return hoses from the top of
the tank.

8.

Disconnect the wiring harness, then remove the tank from
the snowmobile. Place tank in a well-ventilated area.

TPS (PTO SIDE)

FUEL FILTER

(ARROWS POINTS TO THROTTLE BODY)

SUPPLY HOSE

FOAM PAD

RETURN HOSE

FUEL RAIL

P

INS

C

OLOR

F

UNCTION

Full


8 ±1

1

Red

Pump PWR

1/2

40 +/-3

2

WHT/BLU

Sender

Empty

85 +/- 4

3

Black

Ground

4

Pink/Black

Sender

WARNING

Only the 2007 600 CFI models use the drop-in style fuel 

pump. 

4.22

FUEL DELIVERY

9.

Using the PFA spanner wrench (PS-48459-1) and nut
socket (PS-48459), carefully remove the PFA nut.

10. Carefully extract the PFA out of the tank making sure the

float and fuel hoses do not become kinked or bent.

11. Remove the old gasket and destroy.

12. Clean the tank’s gasket mating surface with Isopropyl

Alcohol. Allow the surface to dry completely.

13. Install a new gasket ensuring the inside portion of the

gasket hooks onto the bead on the inside diameter of the
neck.

14. Remove any containments from the gasket with Isopropyl

Alcohol.

15. Carefully place the PFA back into the tank. Push the float

assembly against the hoses to fit it into the hole.

16. Hand tighten the PFA nut keeping the arrow between the

PFA alignment marks.

17. Using the PFA spanner wrench and nut socket (PS48459-

1 and -2), tighten the PFA to specification.

18. Fuel tank installation is the reverse of removal. Always test

the PFA gasket seal before tank installation by performing
a pressure check.

Fuel Tank Pressure Test

1.

Connect a Mity Vac hand pump to the fuel tank vent
fitting. Seal the fuel supply and return fittings.

2.

Pressurize the tank to 5 PSI. 

NOTE: Using a hand pump to pressurize the fuel
tank may take a very long time. The installation of an
in-line Schrader Valve (PN: 2872602) and the use of
a low pressure pump (bicycle tire pump) is
recommended.

3.

Once the tank is pressurized, spray the area around the PFA
gasket with a mixture of water and mild detergent.

4.

If any bubbles form, re-check the PFA nut torque. If bubble
formation continues, the PFA gasket will have to be
replaced, or tank replacement is required.

Throttle Body Removal

1.

Remove the air box.

2.

Remove the throttle body air box adapter.

3.

Pinch off the coolant lines with the hose pincher tool PN
PU-45149.

4.

Remove the coolant lines from the throttle body.

5.

Loosen the intake boot clamps and pull the throttle body
upward, enough to gain access to the throttle cable and TPS
connector.

6.

Loosen the throttle cable lock nut and remove the cable
from the throttle body.

7.

Disconnect the TPS from the throttle body.

8.

Remove throttle body.

WARNING

Never re-use a used PFA gasket.

T 

PFA Nut Torque = 21 Ft.Lbs. (28 Nm)

WARNING

Do not over-pressurize the fuel tank past 6 PSI.

4.23

FUEL DELIVERY

4

Fuel Filter Removal

1.

Carefully remove the fuel filter (A) from the bracket (B). 

2.

Using the 3/8” fuel line disconnection tool remove the fuel
line (C) from the fuel filter.

3.

Using the fuel line disconnection tool remove the filter line
from the fuel sender.

4.

Remove the fuel filter.

Fuel Filter Installation

1.

Dip the male end of the fuel filter line in 30w engine oil.

2.

Snap the male end into the fuel line (C).

3.

Connect the fuel filter end onto the fuel sender.

4.

Snap the filter (B) into the fuel filter holder (A).

C

A

B

NOTES

FUEL DELIVERY

4.24


Content   ..  24  25  26  27   ..