Suzki Burgman AN400. Manual - part 25


  Index      Motorcycles     Suzki Burgman AN400 - service and repair manual 2002 year


Search            


Content   ..  23  24  25  26   ..


Suzki Burgman AN400. Manual - part 25


ENGINE     3-63

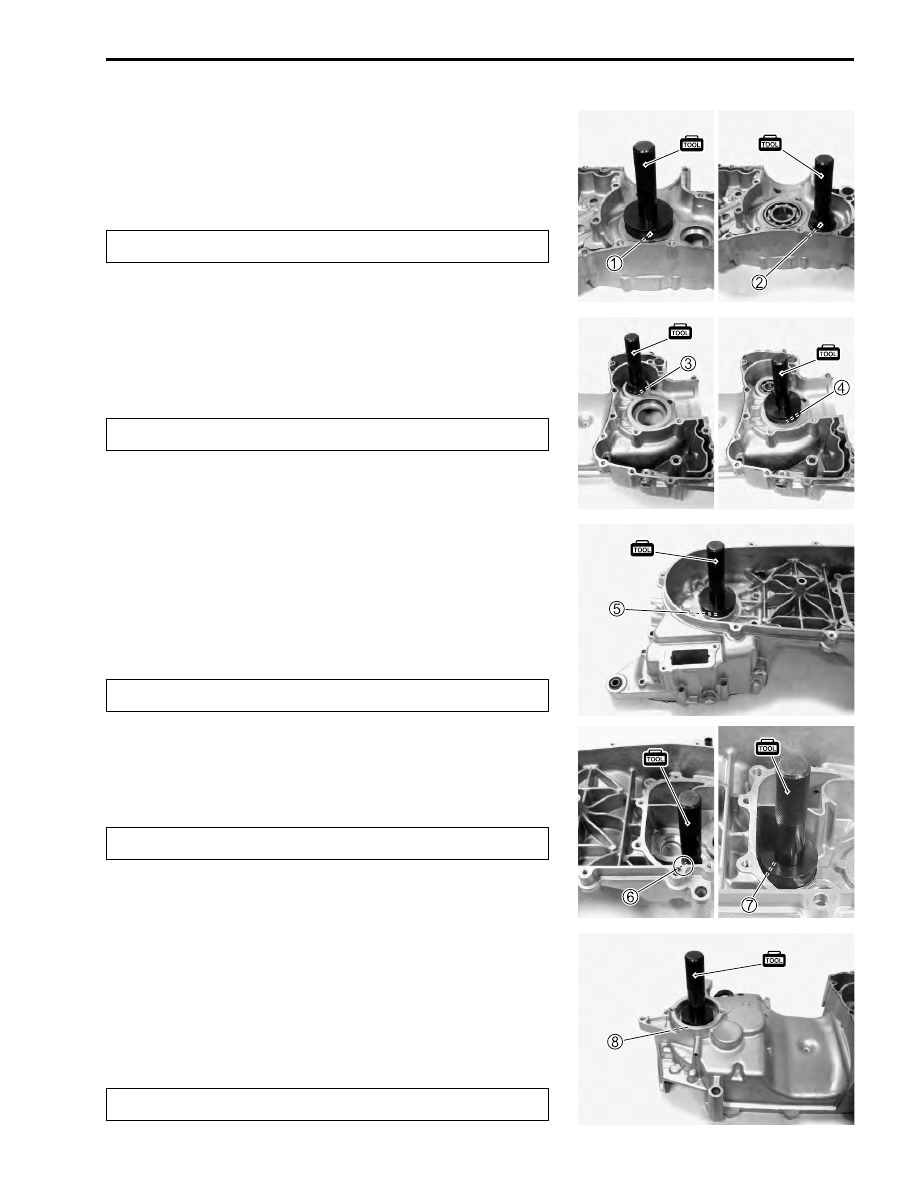
BEARING REINSTALLATION

• Install the bearings 


1


2

 using the special tool.

%

09913-70210: Bearing installer set (


1

 72 × 75 mm)

(


2

 42 × 47 mm)

$

• Install the bearings 


3


4

 using the special tool.

%

09913-70210: Bearing installer set (


3

 42 × 47 mm)

(


4

 72 × 75 mm)

$

• Install the oil seal 


5

 using the special tool.

%

09913-70210: Bearing installer set (62 × 68 mm)

• Apply SUZUKI SUPER GREASE to the oil seal lip.

"

99000-25010: SUZUKI SUPER GREASE “A” (Others)
99000-25030: SUZUKI SUPER GREASE “A” (USA)

$

• Install the bearings 


6


7

 using the special tool.

%

09913-70210: Bearing installer set (


6

 32 × 35 mm)

(


7

 52 × 55 mm)

$

• Install the oil seal 


8

 using the special tool.

%

09913-70210: Bearing installer set (52 × 55 mm)

• Apply SUZUKI SUPER GREASE to the oil seal lip.

"

99000-25010: SUZUKI SUPER GREASE “A” (Others)
99000-25030: SUZUKI SUPER GREASE “A” (USA)

$

Replace the bearings with new ones.

Replace the bearings with new ones.

Replace the oil seal with a new one.

Replace the bearings with new ones.

Replace the oil seal with a new one.

3-64     ENGINE

• Install the bearing 


9

 using the special tool.

%

09913-70210: Bearing installer set (72 × 75 mm)

$

• Install the bearing retainer 


0

.

NOTE:
Install the bearing retainer toward the upper side 


A

 of the

engine.

• Using a vice and a tube of appropriate size for outside diame-

ter of the mounting bushing 


A

, press in the bushing.

%

09924-84521: Bearing installer set

$

Replace the bearing with a new one.

Press in the mounting bushing so that the end of out-
side 


A

 shell becomes flush with the inside face 


B

 of

crankcase.

ENGINE     3-65

ENGINE REASSEMBLY

• Reassemble the engine in the reverse order of disassembly.
• Pay attention to the following point:

$

CRANKSHAFT

• Using the special tool, press in the crankshaft into the left

crankcase.

NOTE:
Fit steel plates between the crankcase and the special tool when
installing the crankshaft with the special tool.

%

09910-32812: Crankshaft installer
09910-32870: Attachment

$

BALANCER SHAFT

• Install the balancer shaft 


1

.

CRANKCASE

• Install the O-ring 


1

.

$

* Make sure to coat the rotating and sliding sections

with engine oil.

* Care must be taken so that the drive belt, drive face

and driven face are completely free from oil and
grease.

* Do not hit the crankshaft with a plastic hammer or

the like to install it into the crankcase.

* Be careful not to cause damage to the oil seal lip

when pressing the crankshaft into the crankcase.

Replace the O-ring with new a one.

3-66     ENGINE

• Clean and degrease the crankcase mating surfaces(both sur-

faces)with a cleaning solvent.

• Fit the dowel pins 


1

 into the left crankcase.

• Apply SUZUKI BOND to the right crankcase.

,

99000-31110: SUZUKI BOND “1215” (Others)

-

99104-31140: SUZUKI BOND “1207B” (USA)

$

• Assemble the crankcases with in few minutes.

• Fit the gasket washer to the right crankcase bolts 


A

.

$

• Fit the gasket washers to the left crankcase bolts 


B

.

$

* Coat the sealant evenly without break.
* Application of sealant must be performed within a

short period of time.

* Take extreme care not to let sealant enter into the oil

hole or bearing.

(Others)

(USA)

Replace the copper washer with a new one.

Replace the copper washers with new ones.


Content   ..  23  24  25  26   ..