Volkswagen Golf / Golf GTI / Golf Variant. Service manual - part 832


  Index      Volkswagen     Volkswagen Golf / Golf GTI / Golf Variant - service and repair manual 2013 year


Search            copyright infringement  


Content   ..  830  831  832  833   ..


Volkswagen Golf / Golf GTI / Golf Variant. Service manual - part 832


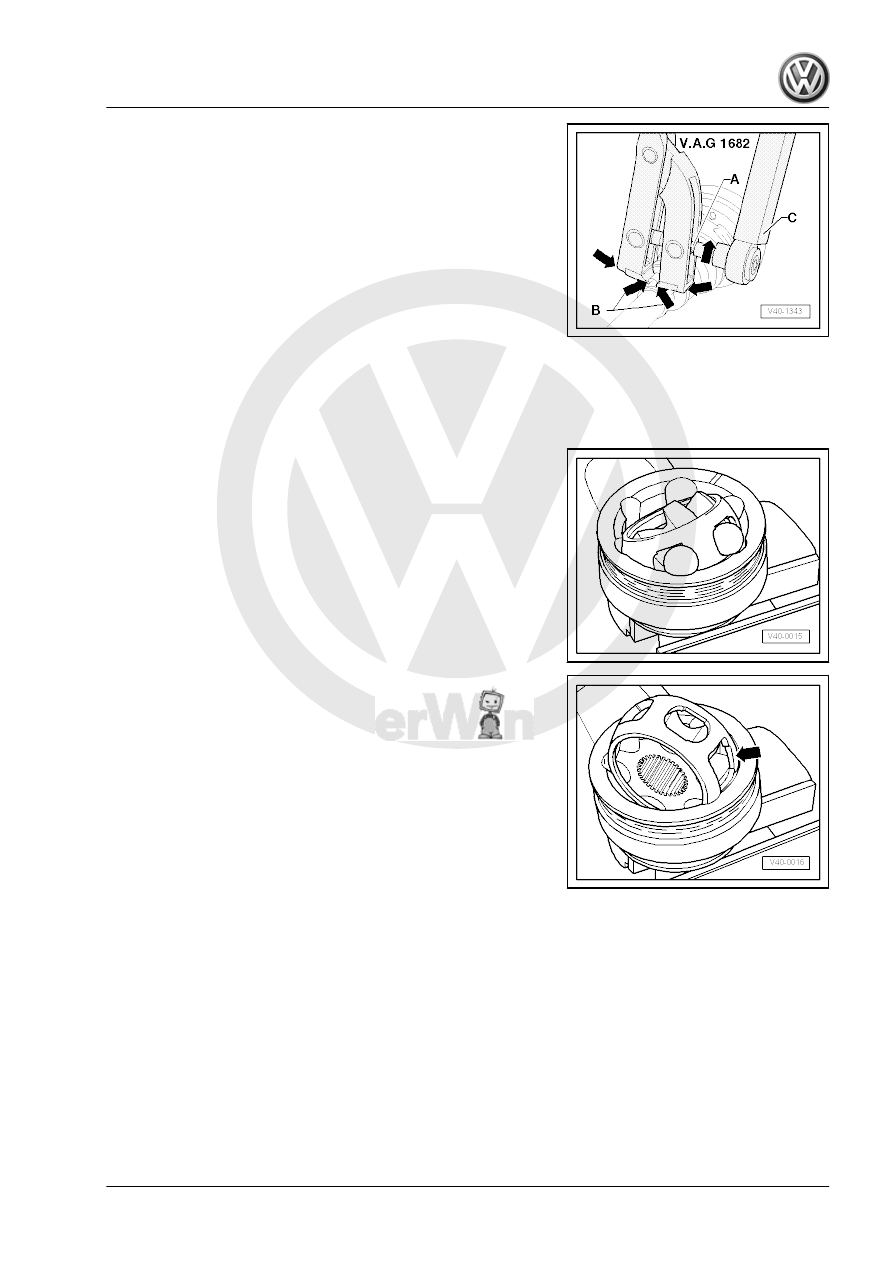
Tightening the Tensioning Clamp on the Smaller Diameter on the

Inner/Outer Joint

6.7

Outer CV Joint, Checking

It is necessary to disassemble the joint whenever replacing the

grease or if the ball surfaces show wear or damage.
Removing
– Mark position of ball hub to ball cage and to housing before

disassembling, using electro-writer or grindstone.

– Swivel the ball hub and ball cage.
– Remove the balls one after the other.

– Turn cage until the two rectangular windows -arrow- are

aligned with the joint housing.

– Lift out cage with hub.

– Swing segment of hub into rectangular window of cage.
– Fold hub out from cage.
The 6 balls of each joint belong to one tolerance group. Check

stub axle, hub, cage and balls for small depressions (pitting build-

up) and chafing. Excessive circumferential backlash in joint

makes itself noticed via tip-in shock, in such cases joint should be

replaced. Flattening and running marks of balls are no reason to

replace joint.
Installing
– Press in half of the total grease amount (40 grams) into joint

body.

– Insert cage with hub into joint body.
– Press in opposing balls in sequence, during this, previous po‐

sition of ball hub to ball cage and to joint body must be

established again.

– Install new circlip into the hub.
– Distribute remaining grease in the joint boot.

6.8

Inner CV Joint, Checking

Removing
The joint must be disassembled for the following work:
♦ Replace the grease if it is very dirty
♦ For checking the contact surfaces for wear
♦ For checking the bearings for wear
– Swivel the ball hub and ball cage.
– Remove the joint in direction of -arrow-.
– Remove the balls from the cage.

Note

Ball hub and joint piece are paired. Do not mix up.

– Flip out ball hub from ball cage via running path of ball

-arrows-.

– Check joint piece, ball hub, ball cage and balls for small broken

off depressions (pitting build-up) and chafing.

Excessive circumferential backlash in joint makes itself noticed

via tip-in shock. Joint must be replaced in such cases. Flattening

and running marks of balls are no reason to replace joint.
Installing

– Insert ball hub into ball cage via two chamfers. The installation

position is at random. Press balls into cage.

Ball hub has 2 different distances between ball tracks, a larger

and a smaller.
– Insert hub with cage and balls upright into joint piece.

When inserting, make sure that in each case the wide gap -a- at

joint piece contacts narrow gap -b- at hub after swinging in.
Chamfer on inner diameter of ball hub (splines) must face large

diameter of joint piece.
– Also note chamfer on inner diameter of ball hub, it must be

visible after swiveling in.

– Swing in ball hub, to do this swing out hub far enough from

cage -arrows- so that the balls have the distance of the running

paths.

– Swing in hub with balls by pressing forcefully onto cage

-arrow-.

CV Joint, Checking for Function
CV joint is properly assembled, if ball hub can be slid back and

forth by hand over whole compensation length.

7

Special Tools

Special tools and workshop

equipment required
♦ Puller - Ball Joint - 3287A-
♦ Digital Torque Wrench -

VAG1756A-

♦ Torque Wrench 1332 Insert

- Ring Wrench - 18mm -

VAG1332/10-


Content   ..  830  831  832  833   ..