Volkswagen Golf / Golf GTI / Golf Variant. Service manual - part 785


  Index      Volkswagen     Volkswagen Golf / Golf GTI / Golf Variant - service and repair manual 2013 year


Search            copyright infringement  


Content   ..  783  784  785  786   ..


Volkswagen Golf / Golf GTI / Golf Variant. Service manual - part 785


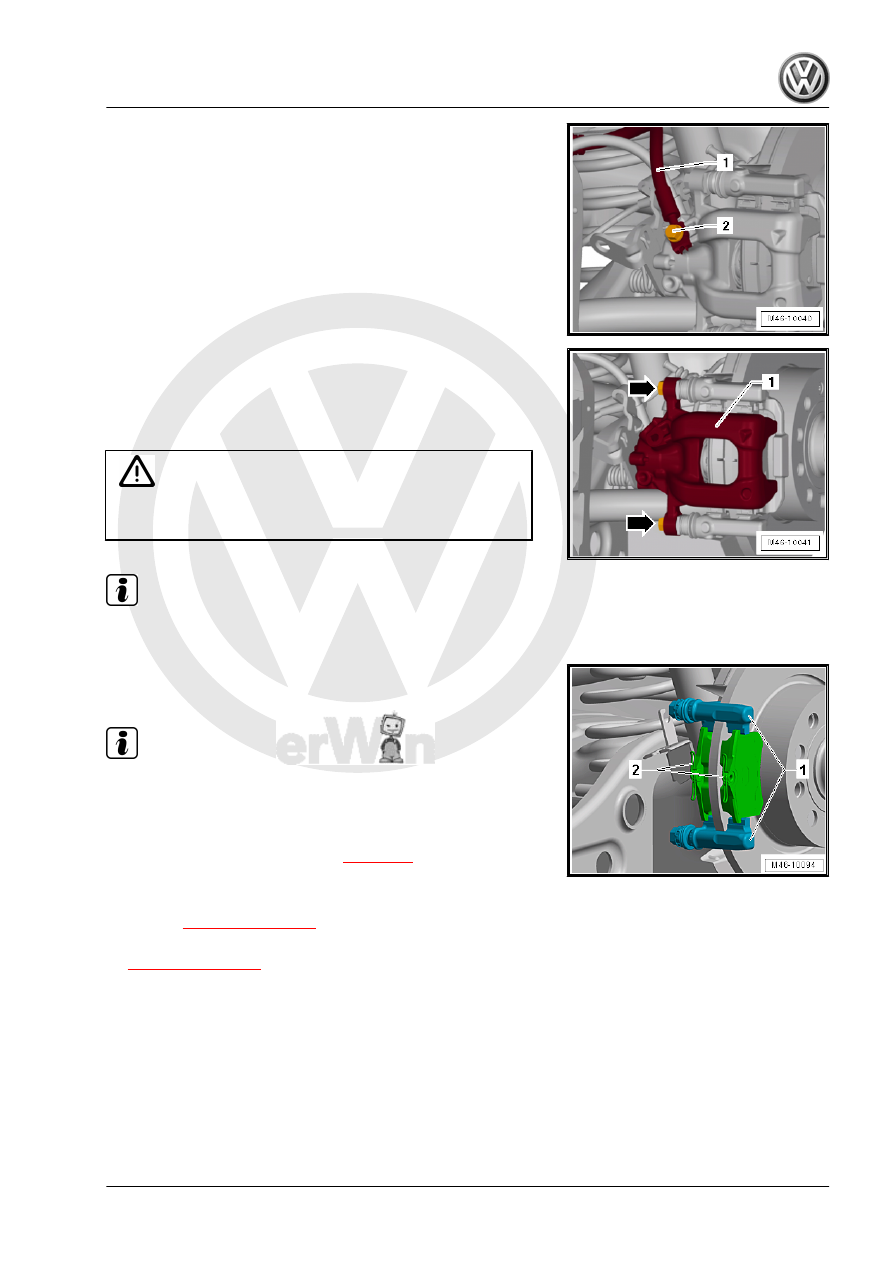
– Remove the brake hose -1- and banjo bolt -2- to the brake

caliper.

– Close the brake hose immediately with Sealing Plugs from the

Repair Kit - 1H0 698 311 A- .

– Remove the brake caliper -1- from the brake carrier.
– To do this, remove bolts -arrows-.
– Remove the brake caliper from the brake carrier.
Cleaning

WARNING

Do not blow brake system using compressed air, the dust pro‐

duced is harmful to health!

Note

Use only appropriate solvents for cleaning brake system.

Installing
Install in reverse order of removal. Note the following:

Note

Replace the self-locking screws for installing the brake caliper.

After installing, press the brake pedal several times firmly to

properly seat brake pads in their normal operating position.

• Piston is pressed back. Refer to 

⇒ page 65

 .

• Brake pads sit on the brake carrier.
– check the protective caps for damage and correct seating

-item 9- 

⇒ Item 9 (page 102)

 .

– Check the guide pins for ease of movement -item 8-

⇒ Item 8 (page 102)

 .

– Attach the brake caliper -1- with the new self-locking screws

-arrows- to the brake carrier.

– While tightening counterhold the guide pin with a suitable

wrench.

– Attach the brake hose connection -1- and the banjo bolt -2- to

the brake caliper.

– Remove the Brake Pedal Actuator - VAG1869/2- .

– Push the parking brake cable -1- through the bracket -4- on

the brake caliper until the tabs -3- engage.

– Push the lever on the brake caliper -2- in the direction of the

-arrow-.

– Engage the parking brake cable -1- in the lever on the brake

caliper -2-.

– Bleed the brake system. Refer to

⇒ “6 Hydraulic System”, page 132

 .

– Adjust parking brake. Refer to

⇒ “3.2 Parking Brake, Adjusting”, page 81

 .

– Before moving the vehicle, press the brake pedal firmly sev‐

eral times to seat the brake pads correctly in their operating

position.

– Check brake fluid level.
Tightening Specification
♦ Refer to 

⇒ “2.1 Overview - Rear Brakes”, page 55

♦ Refer to 

⇒ “2.1 Overview - Rear Brake Caliper”, page 100

♦ For installing the wheel bolts. Refer to ⇒  Suspension, Wheels,

Steering; Rep. Gr.  44 ; Wheels and Tires; Wheel Bolt Tight‐

ening Specifications .

2.4

Brake Carrier, Removing and Installing

Special tools and workshop equipment required
♦ Torque Wrench 1331 5-50Nm - VAG1331-
♦ Torque Wrench 1332 40-200Nm - VAG1332-
♦ Brake Caliper Tool - T10165-
♦ Multipoint Socket - T10035-

Caution

This procedure contains mandatory replaceable parts. Refer

to component overview prior to starting procedure.

Mandatory Replacement Parts
♦ Bolt - Wheel bearing housing to brake carrier
♦ Bolt - Wheel hub with wheel bearing
♦ Dust cap
♦ Bolts - Brake caliper to brake carrier
Removing

Note

When removing, mark brake pads that will be used again. In‐

stall in the same position, otherwise braking effect will be

uneven.

Do not open the brake hydraulic system when removing!

– Loosen the wheel bolts.
– Raise the vehicle.
– Remove the wheel.
– Remove brake pads. Refer to

⇒ “2.2.1 Brake Pads, Multi-Link Rear Axle, Removing and In‐

stalling”, page 60

 .

– Remove brake caliper and secure with wire so that the weight

of the brake caliper does not burden or damage the brake

hose.

– Unscrew the threaded connection -arrows- on the brake car‐

rier -1-.

– Remove the brake carrier -1-.
Cleaning

WARNING

Do not blow brake system using compressed air, the dust pro‐

duced is harmful to health!

Note

Use only appropriate solvents for cleaning brake system.

Installing
Install in reverse order of removal. Note the following:
– Thoroughly clean the contact surfaces on the brake carrier for

the brake pads and remove any corrosion.

If using the brake pads again, install the marked pads in the same

location.
– Secure the brake caliper with new self-locking bolts. Refer to

the Parts Catalog.

– Install wheel and tighten.
– Before moving the vehicle, press the brake pedal firmly sev‐

eral times to seat the brake pads correctly in their operating

position.

– Check brake fluid level.
Tightening Specification
♦ Refer to 

⇒ “2.1 Overview - Rear Brakes”, page 55

♦ Refer to 

⇒ “2.1 Overview - Rear Brake Caliper”, page 100

♦ Wheel bolts. Refer to ⇒  Suspension, Wheels, Steering; Rep.

Gr.  44 ; Wheels and Tires; Wheel Bolt Tightening Specifica‐

tions .

2.5

Brake Rotor, Removing and Installing

Special tools and workshop equipment required
♦ Torque Wrench 1331 5-50Nm - VAG1331-
♦ Torque Wrench 1332 40-200Nm - VAG1332-
♦ Brake Caliper Tool - T10165-
Removing

Note

When removing, mark brake pads that will be used again. In‐

stall in the same position, otherwise braking effect will be

uneven.

Do not open the brake hydraulic system when removing!

– Loosen the wheel bolts.


Content   ..  783  784  785  786   ..