Volkswagen Golf / Golf GTI / Golf Variant. Service manual - part 517
 

  Index      Volkswagen     Volkswagen Golf / Golf GTI / Golf Variant - service and repair manual 2013 year


Search            copyright infringement  


Content   ..  515  516  517  518   ..


Volkswagen Golf / Golf GTI / Golf Variant. Service manual - part 517


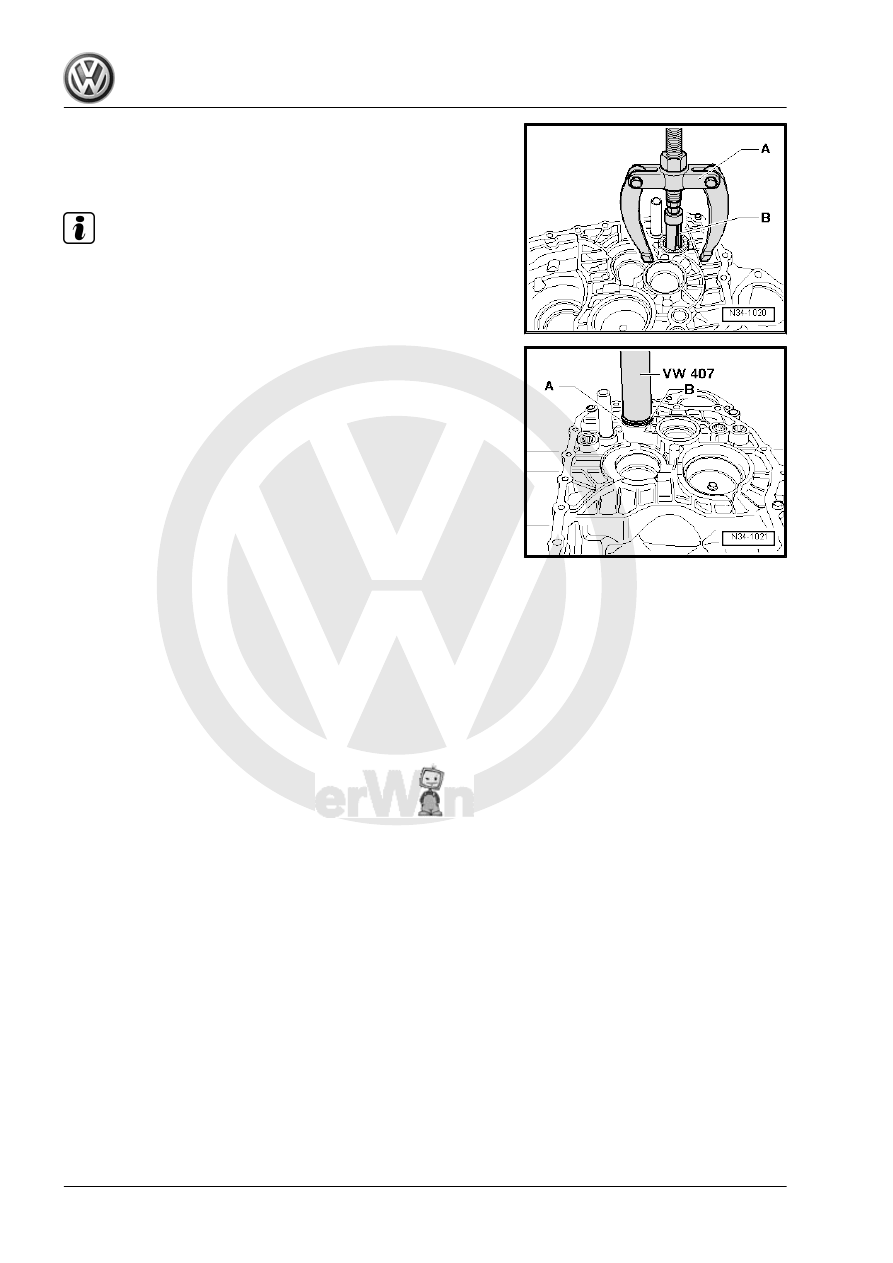
Removing the Needle Sleeve from the Clutch Housing
A - Counter Support , for example, -22/2-
B - Internal Puller 23.5 to 30 mm , for example -21/4-

Note

The needle sleeve will get damaged when it is removed and must

be replaced.

Installing the Needle Sleeve -A- into the Clutch Housing
– Lay the reverse shaft thrust washer -B- on the needle sleeve

while pressing it in.

7

Securing on Engine and Transmis‐

sion Holder

⇒ “7.1 Securing on Engine and Transmission Holder”,

page 141

7.1

Securing on Engine and Transmission

Holder

Special tools and workshop equipment required
♦ Holding Plate - VW309A-
♦ Transmission Support - VW353-
♦ Drip Tray for VAG1202A - VAG1306-
Procedure
– Secure the transmission with the -VW353- to the -VW309-

-arrows-.

Note

If one of the fastening holes does not touch the Transmission

Support , place washers between the fastening hole and the

Transmission Support .

– Insert the - VW309- in the -VAS6095A- .

8

Transmission Fluid

⇒ “8.1 Transmission Fluid Level, Checking”, page 142

8.1

Transmission Fluid Level, Checking

Special tools and workshop equipment required
♦ For oil filler plug with multi-point fitting Triple Square Socket

Driver - 3357- .

♦ Torque Wrench 1331 5-50Nm - VAG1331-
♦ Used Oil Collection and Extraction Unit - SMN372500-
Transmission fluid specification. Refer to the Parts Catalog.
– Remove the noise insulation. Refer to ⇒  Body Exterior; Rep.

Gr.  66 ; Noise Insulation; Overview - Noise Insulation .

– Place the -SMN372500- under the transmission.
– Remove the plug for checking the transmission fluid level

-arrow-.

The level is correct when the transmission fluid comes up to the

bottom edge of oil filler hole.
– Add transmission fluid, if necessary, until it reaches the lower

edge of the filler hole.

– If present with new seal, install bolt -arrow-.
– Tighten the bolt -arrow-

⇒ Fig. ““Different Versions of Fluid Fill and Drain Plugs”“ , page

142

 .

Different Versions of Fluid Fill and Drain Plugs
I - Fluid fill or drain plug with internal multi-point: 45 Nm
II - Fluid fill or drain plug with inner hex socket: 30 Nm
– Install the noise insulation. Refer to ⇒  Body Exterior; Rep. Gr. 

66 ; Noise Insulation; Overview - Noise Insulation .

9

Special Tools

♦ Slide Hammer Set - Adapt‐

er 40 - VW771/40-

♦ Engine Support Brackets -

T40093/3-6- (quantity 2)

♦ Engine Support Bridge -

Special Hook (2 pc.) -

10-222A/20-

♦ Engine Support - Basic Set

- Square Pipe - T40091/1-

(quantity 2)

♦ Engine Support - Basic Set

- Movable Joint - T40091/3-

(quantity 2)

♦ Engine Support - Supple‐

ment Kit - Spindle -

T40093/3- (quantity 2) from

the Engine Support - Sup‐

plement Kit - T40093A-

♦ Engine Sling - Engine

Bracket - 2024A/1- from

Engine Sling - 2024A-


Content   ..  515  516  517  518   ..