Volkswagen Golf / Golf GTI / Golf Variant. Service manual - part 1007


  Index      Volkswagen     Volkswagen Golf / Golf GTI / Golf Variant - service and repair manual 2013 year


Search            copyright infringement  


Content   ..  1005  1006  1007  1008   ..


Volkswagen Golf / Golf GTI / Golf Variant. Service manual - part 1007


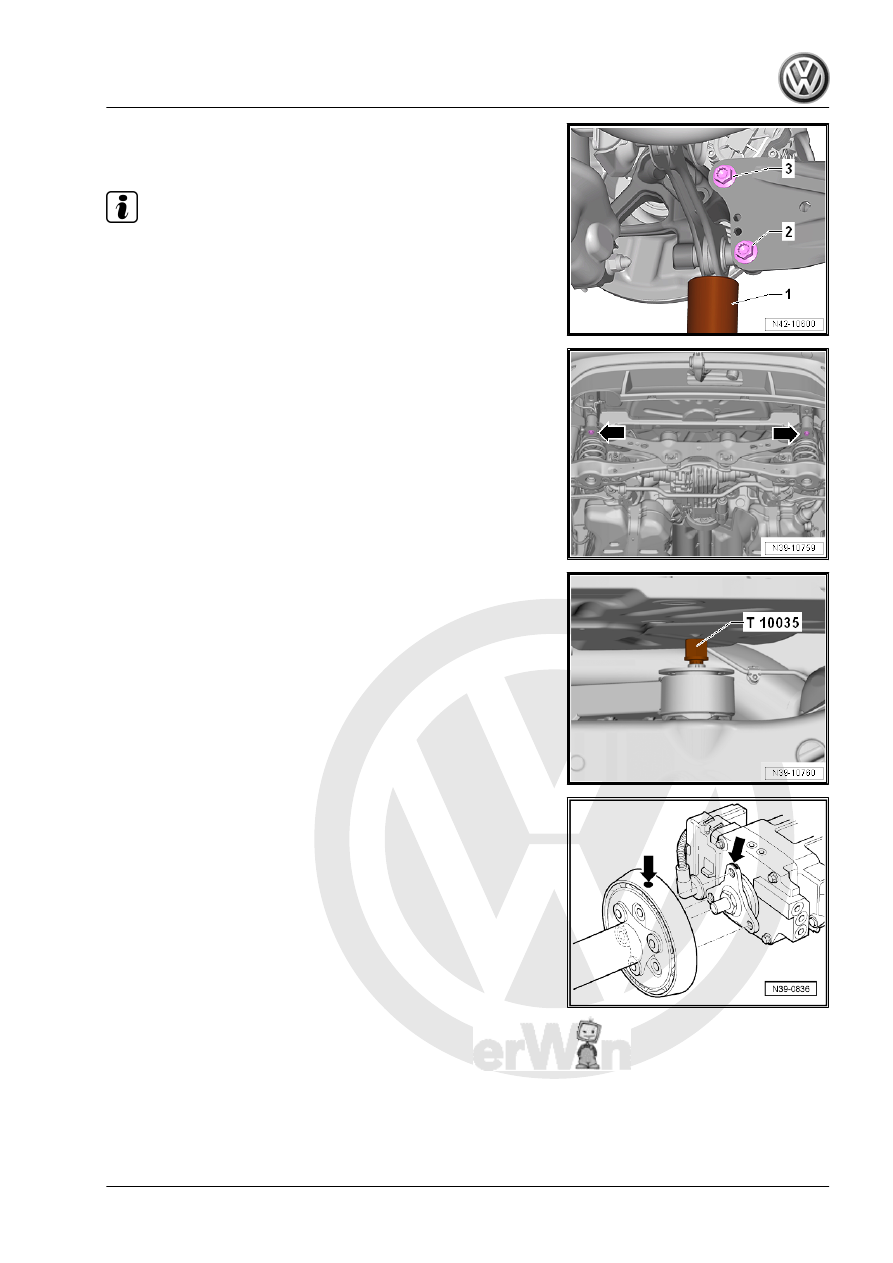
– Position the Engine and Gearbox Jack - VAS6931- -1- under

the tie rod, and push upward until the driveshaft can be re‐

moved from the final drive flange.

Note

Ignore items -2 and 3-.

– Guild the driveshaft carefully down.

– Looses the rear axle from the rear mounting points -arrows-

and lower approximately 40 mm, refer to ⇒  Suspension,

Wheels, Steering; Rep. Gr.  42 ; Rear Axle; Rear Axle, Low‐

ering .

– Remove the rear final drive bolts from the rear axle using the

Multipoint Socket - T10035- . To remove the bolts the Bits for

VAG1331/13 - T10099/1- can also be used.

– Before removing, see if there is a marking (color dot) on the

flexible disc and on the flange/final drive as well as on the

flange/driveshaft -arrows-. If the dot is not there, mark the in‐

stalled position of the flexible disc.

Golf 2015 ➤

Rear Final Drive - Edition 09.2013

3. Final Drive    

21

– Remove the flexible disc with the vibration damper from the

rear final drive -arrows-.

– Counterhold using Counterhold - Kit - Multiple Use - T10172-

when loosening and tightening the bolts.

– Place the wood block -A- on the Engine and Gearbox Jack -

VAS6931- and support the rear final drive.

– Remove the bolt -B- and the top washer -C- from the bracket.
Always replace the bolts.
– Push the final drive as far as possible to the rear.
– Remove the driveshaft from the final drive and lay it on the

tunnel brace; place a cloth on the tunnel brace to protect the

shaft.

– When removing and installing the driveshaft, be careful not to

damage the bushing -arrow-.

Golf 2015 ➤

Rear Final Drive - Edition 09.2013

22

     Rep. Gr.39 - Final Drive, Differential

– Position the final drive in the vehicle on an angle as shown in

the illustration while lowering it at the same time.

– Secure final drive against falling down onto the universal sup‐

port using the strap.

– Remove the connector -B- from the All Wheel Drive Control

Module - J492- -A-. Ignore item -C-.

– Remove the ventilation lines -arrows- from the final drive.

Note

Ignore item -A-.

– Guide the driveshaft -A- upward and support it in this position

with a suitable piece of wood on the tunnel brace -1-.

Note

Ignore item -2-.

– Pull the final drive “forward” when lowering, while doing this

pay attention to make “clearance” to other components.

Installing
Install in reverse order of removal:
– Secure final drive against falling down with universal support

strap.

Golf 2015 ➤

Rear Final Drive - Edition 09.2013

3. Final Drive    

23

– Move the rear final drive to the illustrated position.

– Pay attention that the stop washers -B- are positioned on the

rear bearing from above as shown. Correct placement pre‐

vents the gummy nipples -A- from falling or sliding out of the

washer when installing.

– Before installing the final drive, place the two new bolts in the

rear bearing from above -arrows-.

– Lift the final drive and guide it over the rear axle. While lifting

guide the driveshaft to the flange shaft.

– Connect the vent lines -arrows- to the final drive vent pipes.
– Lift the final drive using the transmission jack into the installa‐

tion position.

– Place a cloth on the tunnel brace and lay the driveshaft on it.
– Push the final drive as far as possible to the rear.

Golf 2015 ➤

Rear Final Drive - Edition 09.2013

24

     Rep. Gr.39 - Final Drive, Differential


Content   ..  1005  1006  1007  1008   ..