Toyota Auris (2018 year). Manual in english - page 1

14
Pictorial index
Pictorial index
■Exterior
1
Doors
P. 146
Locking/unlocking
P. 146
Opening/closing the side windows
P. 206
Locking/unlocking using the mechanical key*1
P. 619
Warning lights/warning messages*2
P. 569, 581
2
Back door
P. 152
Locking/unlocking
P. 152
Warning lights/warning messages*2
P. 569, 581
3
Outside rear view mirrors
P. 203
Adjusting the mirror angle
P. 203
Folding the mirrors
P. 203
Defogging the mirrors
P. 432, 439
Pictorial index
15
4
Windshield wipers
P. 268
Precautions for winter
P. 363
Precautions for using a car wash
P. 474
5
Fuel filler door
P. 274
Refueling method
P. 274
Fuel type/fuel tank capacity
P. 644
6
Tires
P. 509
Tire size/inflation pressure
P. 657
Winter tires/tire chains
P. 363
Checking/rotation/tire pressure warning system*1
P. 509
Coping with flat tires
P. 587
7
Hood
P. 485
Opening
P. 485
Engine oil
P. 646
Coping with overheating
P. 629
Light bulbs of the exterior lights for driving
(Replacing method: P. 543, Watts: P. 659)
8
Headlights/front position lights/daytime running lights/
turn signal lights
P. 258, 260
9
Front fog lights*1
P. 266
10
Stop lights/tail lights/turn signal lights
P. 258, 260
11
License plate lights
P. 260
12
Tail lights
P. 260
Rear fog light*4
P. 266
Back-up light*3
Shifting the shift lever to R
P. 248, 255
13
Tail lights
P. 260
Rear fog light*3
P. 266
Back-up light*4
Shifting the shift lever to R
P. 248, 255
*1: If equipped
*2: Vehicles with a 2-ring meter
*3: Left-hand drive vehicles
*4: Right-hand drive vehicles

16
Pictorial index
■Instrument panel (left-hand drive vehicles)
1
Engine switch
P. 234, 238
Starting the engine/changing the modes
P. 234, 238
Emergency stop of the engine
P. 559
When the engine will not start
P. 617
Warning messages*1
P. 581
2
Shift lever
P. 248, 255
Changing the shift position
P. 248, 255
Precautions against towing
P. 561
When the shift lever does not move*2
P. 253
3
Meters
P. 110
Reading the meters/adjusting the meter light
P. 110
Warning lights/indicator lights
P. 104
When the warning lights come on
P. 569

Pictorial index
17
4
Multi-information display
P. 113, 119
If a warning message or indicator is displayed*1
P. 581
5
Parking brake
P. 259
Applying/releasing
P. 259
Precautions for winter
P. 364
Warning buzzer/message*1
P. 259
6
Turn signal lever
P. 258
Headlight switch
P. 260
Headlights/front position lights/tail lights/
daytime running lights
P. 260
Front fog lights*3/rear fog light
P. 266
7
Windshield wiper and washer switch
P. 268
Usage
P. 268
Adding washer fluid
P. 506
Headlight cleaners*3
P. 268
8
Emergency flasher switch
P. 558
9
Hood lock release lever
P. 485
10
Tilt and telescopic steering lock release lever
P. 199
Adjustment
P. 199
11
Heater system*3
P. 430
Air conditioning system*3
P. 435
Usage
P. 430, 435
Rear window defogger
P. 432, 439
12
Audio system*3
P. 368
Navigation/multimedia system*3, 4
Trip information/past record
P. 130
13
Tire pressure warning reset switch*3
P. 512
*1: Vehicles with a 2-ring meter
*2: Vehicles with a Multidrive
*3: If equipped
*4: Refer to “Navigation and multimedia system Owner’s manual”.

18
Pictorial index
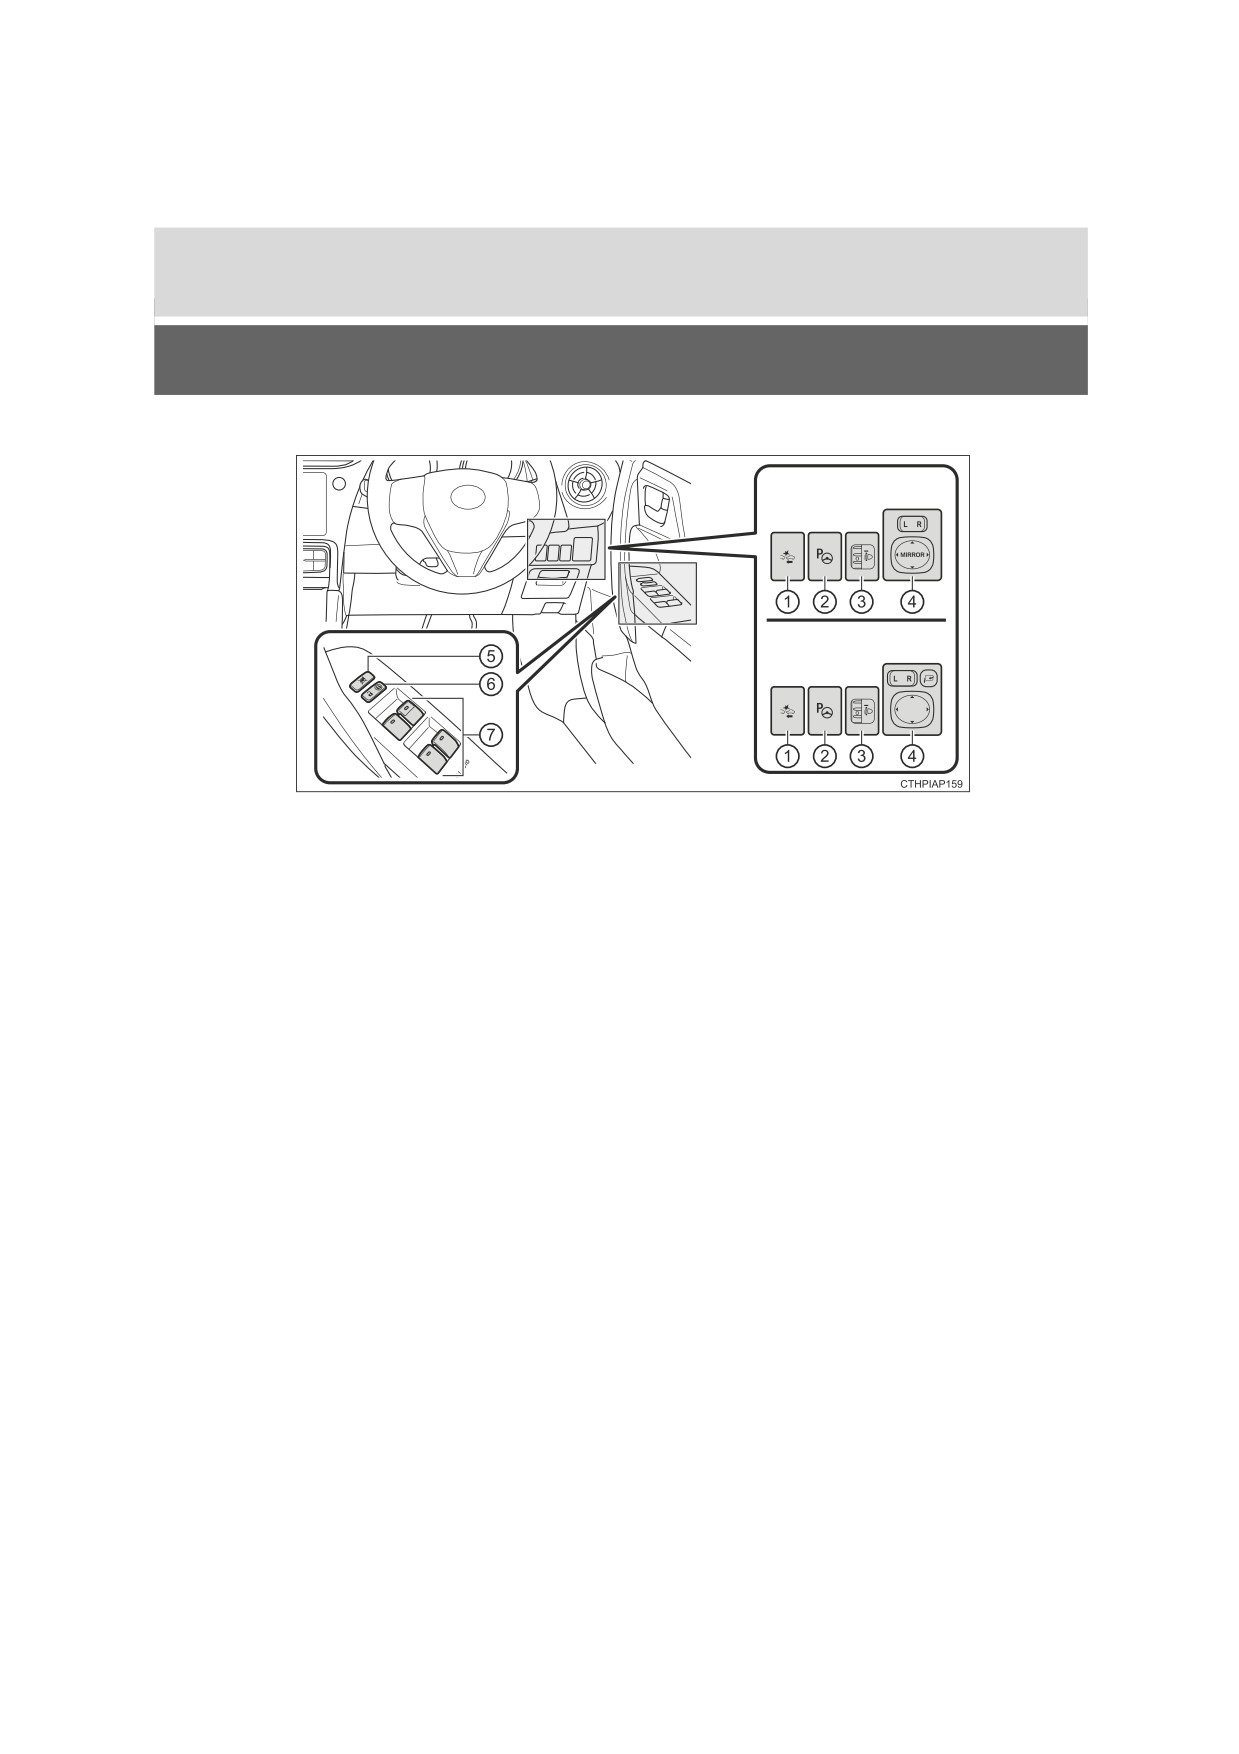
■Switches (left-hand drive vehicles)
Type A
Type B

Pictorial index
19
1
Outside rear view mirror switches
P. 203
2
Headlight leveling dial*
P. 263
3
Power heater switch*
P. 443
4
PCS (Pre-Crash Safety system) switch*
P. 283
5
Simple-IPA switch*
P. 341
6
Window lock switch
P. 206
7
Door lock switch
P. 149
8
Power window switches*
P. 206
*: If equipped

20
Pictorial index
Type A
Type B
1
Audio remote control switches*1
P. 369
2
Paddle shift switches*2
P. 250
3
Telephone switches*1
P. 405
4
Speed limiter switch*2
P. 329
5
“DISP” switch
P. 114
6
Cruise control switch*2
P. 324
7
Meter control switches
P. 121, 122
8
LDA (Lane Departure Alert) switch*2
P. 296
9
Talk switch*1
P. 405

Pictorial index
21
1
Sport mode switch*2
P. 249
2
VSC OFF switch
P. 358, 359
3
Stop & Start cancel switch*2
P. 313
4
Seat heater switches*2
P. 445
*1: For vehicles with navigation/multimedia system, refer to “Navigation and multimedia
system Owner’s manual”.
*2: If equipped

22
Pictorial index
■Interior (left-hand drive vehicles)
1
SRS airbags
P. 42
2
Floor mats
P. 34
3
Front seats
P. 193
4
Head restraints
P. 197
5
Seat belts
P. 38
6
Console box
P. 452
7
Inside lock buttons
P. 149
8
Cup holders
P. 454
9
Rear seats*1
P. 195

Pictorial index
23
1
Inside rear view mirror
P. 201
2
Sun visors*2
P. 463
3
Vanity mirrors
P. 463
4
Vanity lights*1
P. 448
5
Interior lights/personal lights
P. 448, 449
6
Panoramic roof shade switch*1
P. 468
7
Auxiliary boxes
P. 455
8
Assist grips
P. 467
*1: If equipped
*2: NEVER use a rearward facing child
restraint on a seat protected by an
ACTIVE AIRBAG in front of it, DEATH
or SERIOUS INJURY to the CHILD
can occur. (P. 72)

24
Pictorial index
■Instrument panel (right-hand drive vehicles)
1
Engine switch
P. 234, 238
Starting the engine/changing the modes
P. 234, 238
Emergency stop of the engine
P. 559
When the engine will not start
P. 617
Warning messages*1
P. 581
2
Shift lever
P. 248, 255
Changing the shift position
P. 248, 255
Precautions against towing
P. 561
When the shift lever does not move*2
P. 253
3
Meters
P. 110
Reading the meters/adjusting the meter light
P. 110
Warning lights/indicator lights
P. 104
When the warning lights come on
P. 569
Pictorial index
25
4
Multi-information display
P. 113, 119
If a warning message or indicator is displayed*1
P. 581
5
Parking brake
P. 259
Applying/releasing
P. 259
Precautions for winter
P. 364
Warning buzzer/message*1
P. 259
6
Turn signal lever
P. 258
Headlight switch
P. 260
Headlights/front position lights/tail lights/
daytime running lights
P. 260
Front fog lights*3/rear fog light
P. 266
7
Windshield wiper and washer switch
P. 268
Usage
P. 268
Adding washer fluid
P. 506
8
Emergency flasher switch
P. 558
9
Hood lock release lever
P. 485
10
Tilt and telescopic steering lock release lever
P. 199
Adjustment
P. 199
11
Heater system*3
P. 430
Air conditioning system*3
P. 435
Usage
P. 430, 435
Rear window defogger
P. 432, 439
12
Audio system*3
P. 368
Navigation/multimedia system*3, 4
Trip information/past record
P. 130
13
Tire pressure warning reset switch
P. 512
*1: Vehicles with a 2-ring meter
*2: Vehicles with a Multidrive
*3: If equipped
*4: Refer to “Navigation and multimedia system Owner’s manual”.
26
Pictorial index
■Switches (right-hand drive vehicles)
Type A
Type B
Pictorial index
27
1
PCS (Pre-Crash Safety system) switch*
P. 283
2
Simple-IPA switch*
P. 341
3
Headlight leveling dial*
P. 263
4
Outside rear view mirror switches
P. 203
5
Window lock switch
P. 206
6
Door lock switch
P. 149
7
Power window switches*
P. 206
*: If equipped

28
Pictorial index
Type A
Type B
1
Audio remote control switches*1
P. 369
2
Telephone switches*1
P. 405
3
Speed limiter switch*2
P. 329
4
“DISP” switch
P. 114
5
Cruise control switch*2
P. 324
6
Paddle shift switches*2
P. 250
7
Meter control switches
P. 121, 122
8
LDA (Lane Departure Alert) switch*2
P. 296
9
Talk switch*1
P. 405

Pictorial index
29
1
Seat heater switches*2
P. 445
2
Sport mode switch*2
P. 249
3
VSC OFF switch
P. 358, 359
4
Stop & Start cancel switch*2
P. 313
*1: For vehicles with navigation/multimedia system, refer to “Navigation and multimedia
system Owner’s manual”.
*2: If equipped

30
Pictorial index
■Interior (right-hand drive vehicles)
1
SRS airbags
P. 42
2
Floor mats
P. 34
3
Front seats
P. 193
4
Head restraints
P. 197
5
Seat belts
P. 38
6
Console box
P. 452
7
Inside lock buttons
P. 149
8
Cup holders
P. 454
9
Rear seats*1
P. 195

Pictorial index
31
1
Inside rear view mirror
P. 201
2
Sun visors*2
P. 463
3
Vanity mirrors
P. 463
4
Vanity lights*1
P. 448
5
Interior lights/personal lights
P. 448, 449
6
Panoramic roof shade switch*1
P. 468
7
Auxiliary boxes
P. 455
8
Assist grips
P. 467
*1: If equipped
*2: NEVER use a rearward facing child
restraint on a seat protected by an
ACTIVE AIRBAG in front of it, DEATH
or SERIOUS INJURY to the CHILD
can occur. (P. 72)
32
Pictorial index
33
For safety and security
1
1-1. For safe use
Before driving
34
For safe driving
36
Seat belts
38
SRS airbags
42
Airbag manual on-off
system
52
Safety information for
children
54
Child restraint systems
55
Installing child restraints
64
Exhaust gas precautions
74
1-2. Theft deterrent system
Engine immobilizer
system
75
Alarm
99
Double locking system
102

34
1-1. For safe use
Before driving
Floor mat
Use only floor mats designed specifically for vehicles of the same
model and model year as your vehicle. Fix them securely in place
onto the carpet.
Insert the retaining hooks (clips)
1
into the floor mat eyelets.
Turn the upper knob of each
2
retaining hook (clip) to secure
the floor mats in place.
*
*: Always align the
marks.
The shape of the retaining hooks (clips) may differ from that shown in the
illustration.

1-1. For safe use
35
WARNING
Observe the following precautions.
Failure to do so may cause the driver’s floor mat to slip, possibly interfering
with the pedals while driving. An unexpectedly high speed may result or it may
become difficult to stop the vehicle. This could lead to an accident, resulting in
death or serious injury.
1
■ When installing the driver’s floor mat
●Do not use floor mats designed for other models or different model year
vehicles, even if they are Toyota Genuine floor mats.
●Only use floor mats designed for the driver’s seat.
●Always install the floor mat securely using the retaining hooks (clips) pro-
vided.
●Do not use two or more floor mats on top of each other.
●Do not place the floor mat bottom-side up or upside-down.
■ Before driving
●Check that the floor mat is securely
fixed in the correct place with all the
provided retaining hooks
(clips). Be
especially careful to perform this check
after cleaning the floor.
●With the engine stopped and the shift
lever in P
(Multidrive) or N
(manual
transmission), fully depress each pedal
to the floor to make sure it does not
interfere with the floor mat.

36
1-1. For safe use
For safe driving
For safe driving, adjust the seat and mirror to an appropriate
position before driving.
Correct driving posture
Adjust the angle of the
1
seatback so that you are sitting
straight up and so that you do
not have to lean forward to
steer. (P. 193)
Adjust the seat so that you can
2
depress the pedals fully and so
that your arms bend slightly at
the elbow when gripping the
steering wheel. (P. 193)
Lock the head restraint in place with the center of the head restraint
3
closest to the top of your ears. (P. 197)
Wear the seat belt correctly. (P. 38)
4
Correct use of the seat belts
Make sure that all occupants are wearing their seat belts before driv-
ing the vehicle. (P. 38)
Use a child restraint system appropriate for the child until the child
becomes large enough to properly wear the vehicle’s seat belt.
(P. 55)

1-1. For safe use
37
Adjusting the mirrors
Make sure that you can see backward clearly by adjusting the inside
and outside rear view mirrors properly. (P. 201, 203)
WARNING
Observe the following precautions.
1
Failure to do so may result in death or serious injury.
●Do not adjust the position of the driver’s seat while driving.
Doing so could cause the driver to lose control of the vehicle.
●Do not place a cushion between the driver or passenger and the seatback.
A cushion may prevent correct posture from being achieved, and reduce
the effectiveness of the seat belt and head restraint.
●Do not place anything under the front seats.
Objects placed under the front seats may become jammed in the seat
tracks and stop the seat from locking in place. This may lead to an acci-
dent and the adjustment mechanism may also be damaged.
●Always observe the legal speed limit when driving on public roads.
●When driving over long distances, take regular breaks before you start to
feel tired.
Also, if you feel tired or sleepy while driving, do not force yourself to con-
tinue driving and take a break immediately.

38
1-1. For safe use
Seat belts
Make sure that all occupants are wearing their seat belts before
driving the vehicle.
Correct use of the seat belts
● Extend the shoulder belt so that
it comes fully over the shoulder,
but does not come into contact
with the neck or slide off the
shoulder.
● Position the lap belt as low as
possible over the hips.
● Adjust the position of the
seatback. Sit up straight and
well back in the seat.
● Do not twist the seat belt.
Fastening and releasing the seat belt
To fasten the seat belt, push the
1
plate into the buckle until a click
sound is heard.
2
To release the seat belt, press
the release button.
Release button

1-1. For safe use
39
Adjusting the seat belt shoulder anchor height (front seats)
Push the seat belt shoulder
1
anchor down while pressing the
release button.
2
Push the seat belt shoulder
anchor up.
1
Move the height adjuster up and
down as needed until you hear a
click.
Seat belt pretensioners (front seats)
The pretensioners help the seat
belts to quickly restrain the occu-
pants by retracting the seat belts
when the vehicle is subjected to
certain types of severe frontal or
side collision.
The pretensioners do not activate
in the event of a minor frontal
impact, a minor side impact, a rear
impact or a vehicle rollover.
■ Emergency locking retractor (ELR)
The retractor will lock the belt during a sudden stop or on impact. It may also
lock if you lean forward too quickly. A slow, easy motion will allow the belt to
extend so that you can move around fully.
■ Child seat belt usage
The seat belts of your vehicle were principally designed for persons of adult
size.
●Use a child restraint system appropriate for the child, until the child
becomes large enough to properly wear the vehicle’s seat belt. (P. 55)
● When the child becomes large enough to properly wear the vehicle’s seat
belt, follow the instructions regarding seat belt usage. (P. 38)
■ Replacing the belt after the pretensioner has been activated (front seats)
If the vehicle is involved in multiple collisions, the pretensioner will activate for
the first collision, but will not activate for the second or subsequent collisions.

40
1-1. For safe use
■ Seat belt regulations
If seat belt regulations exist in the country where you reside, please contact
any authorized Toyota dealer or repairer, or another duly qualified and
equipped professional for seat belt replacement or installation.
WARNING
Observe the following precautions to reduce the risk of injury in the event of
sudden braking, sudden swerving or an accident.
Failure to do so may cause death or serious injury.
■ Wearing a seat belt
● Ensure that all passengers wear a seat belt.
● Always wear a seat belt properly.
●Each seat belt should be used by one person only. Do not use a seat belt
for more than one person at once, including children.
● Toyota recommends that children be seated in the rear seat and always
use a seat belt and/or an appropriate child restraint system.
● To achieve a proper seating position, do not recline the seat more than
necessary. The seat belt is most effective when the occupants are sitting
up straight and well back in the seats.
●Do not wear the shoulder belt under your arm.
● Always wear your seat belt low and snug across your hips.
■ Pregnant women
Obtain medical advice and wear the seat
belt in the proper way. (P. 38)
Women who are pregnant should posi-
tion the lap belt as low as possible over
the hips in the same manner as other
occupants, extending the shoulder belt
completely over the shoulder and avoid-
ing belt contact with the rounding of the
abdominal area.
If the seat belt is not worn properly, not
only the pregnant woman, but also the
fetus could suffer death or serious injury
as a result of sudden braking or a colli-
sion.

1-1. For safe use
41
WARNING
■ People suffering illness
Obtain medical advice and wear the seat belt in the proper way. (P. 38)
■ When children are in the vehicle
Do not allow children to play with the seat belt. If the seat belt becomes
twisted around a child’s neck, it may lead to choking or other serious injuries
1
that could result in death.
If this occurs and the buckle cannot be unfastened, scissors should be used
to cut the belt.
■ Seat belt pretensioners (front seats)
If the pretensioner has activated, the SRS warning light will come on. In that
case, the seat belt cannot be used again and must be replaced at any
authorized Toyota dealer or repairer, or another duly qualified and equipped
professional.
■ Adjustable shoulder anchor (front seats)
Always make sure the shoulder belt is positioned across the center of your
shoulder. The belt should be kept away from your neck, but not falling off
your shoulder. Failure to do so could reduce the amount of protection in an
accident and cause death or serious injuries in the event of a sudden stop,
sudden swerve or accident. (P. 39)
■ Seat belt damage and wear
●Do not damage the seat belts by allowing the belt, plate, or buckle to be
jammed in the door.
●Inspect the seat belt system periodically. Check for cuts, fraying, and loose
parts. Do not use a damaged seat belt until it is replaced. Damaged seat
belts cannot protect an occupant from death or serious injury.
●Ensure that the belt and plate are locked and the belt is not twisted.
If the seat belt does not function correctly, immediately contact any autho-
rized Toyota dealer or repairer, or another duly qualified and equipped pro-
fessional.
●Replace the seat assembly, including the belts, if your vehicle has been
involved in a serious accident, even if there is no obvious damage.
●Do not attempt to install, remove, modify, disassemble or dispose of the
seat belts. Have any necessary repairs carried out by any authorized
Toyota dealer or repairer, or another duly qualified and equipped profes-
sional. Inappropriate handling may lead to incorrect operation.

42
1-1. For safe use
SRS airbags
The SRS airbags inflate when the vehicle is subjected to certain
types of severe impacts that may cause significant injury to the
occupants. They work together with the seat belts to help reduce
the risk of death or serious injury.
◆ SRS front airbags
SRS driver airbag/front passenger airbag
1
Can help protect the head and chest of the driver and front pas-
senger from impact with interior components
SRS driver’s knee airbag (if equipped)
2
Can help provide driver protection
◆ SRS side and curtain shield airbags
3
SRS front side airbags
Can help protect the torso of the front seat occupants
4
SRS curtain shield airbags
Can help protect primarily the head of occupants in the outer
seats

1-1. For safe use
43
SRS airbag system components
1
1
Airbag manual on-off switch
8
Driver airbag
2
Front passenger airbag
9
Side impact sensors (front)
3
Front side airbags
10
Seat belt pretensioners and
force limiters
4
Curtain shield airbags
11
Driver’s knee airbag
(if
5
“PASSENGER AIR BAG” indi-
equipped)
cator
12
Front impact sensors
6
SRS warning light
13
Airbag sensor assembly
7
Side impact sensors (rear)
The main SRS airbag system components are shown above. The
SRS airbag system is controlled by the airbag sensor assembly. As
the airbags deploy, a chemical reaction in the inflators quickly fills the
airbags with non-toxic gas to help restrain the motion of the occu-
pants.

44
1-1. For safe use
WARNING
■ SRS airbag precautions
Observe the following precautions regarding the SRS airbags.
Failure to do so may cause death or serious injury.
●The driver and all passengers in the vehicle must wear their seat belts
properly.
The SRS airbags are supplemental devices to be used with the seat belts.
●The SRS driver airbag deploys with considerable force, and can cause
death or serious injury especially if the driver is very close to the airbag.
Since the risk zone for the driver’s airbag is the first 50 - 75 mm (2 - 3 in.)
of inflation, placing yourself 250 mm (10 in.) from your driver airbag pro-
vides you with a clear margin of safety. This distance is measured from
the center of the steering wheel to your breastbone. If you sit less than
250 mm (10 in.) away now, you can change your driving position in sev-
eral ways:
• Move your seat to the rear as far as you can while still reaching the ped-
als comfortably.
• Slightly recline the back of the seat.
Although vehicle designs vary, many drivers can achieve the 250 mm
(10 in.) distance, even with the driver seat all the way forward, simply by
reclining the back of the seat somewhat. If reclining the back of your
seat makes it hard to see the road, raise yourself by using a firm, non-
slippery cushion, or raise the seat if your vehicle has that feature.
• If your steering wheel is adjustable, tilt it downward. This points the
airbag toward your chest instead of your head and neck.
The seat should be adjusted as recommended above, while still maintain-
ing control of the foot pedals, steering wheel, and your view of the instru-
ment panel controls.
●The SRS front passenger airbag also deploys with considerable force, and
can cause death or serious injury especially if the front passenger is very
close to the airbag. The front passenger seat should be as far from the
airbag as possible with the seatback adjusted, so the front passenger sits
upright.
●Improperly seated and/or restrained infants and children can be killed or
seriously injured by a deploying airbag. An infant or child who is too small
to use a seat belt should be properly secured using a child restraint sys-
tem. Toyota strongly recommends that all infants and children be placed in
the rear seats of the vehicle and properly restrained. The rear seats are
safer for infants and children than the front passenger seat. (P. 55)

1-1. For safe use
45
WARNING
■ SRS airbag precautions
●Do not sit on the edge of the seat or
lean against the dashboard.
1
●Do not allow a child to stand in front of
the SRS front passenger airbag unit or
sit on the knees of a front passenger.
●Do not allow the front seat occupants to
hold items on their knees.
●Do not lean against the door, the roof
side rail or the front, side and rear pil-
lars.
●Do not allow anyone to kneel on the
passenger seats toward the door or put
their head or hands outside the vehicle.

46
1-1. For safe use
WARNING
■ SRS airbag precautions
● Vehicles without an SRS driver’s knee
airbag: Do not attach anything to or lean
anything against areas such as the
dashboard or steering wheel pad.
These items can become projectiles
when the SRS driver and front passen-
ger airbags deploy.
Vehicles with an SRS driver’s knee
airbag: Do not attach anything to or lean
anything against areas such as the
dashboard, steering wheel pad, lower
portion of the instrument panel.
These items can become projectiles
when the SRS driver, front passenger
and driver’s knee airbag deploy.
●Do not attach anything to areas such as
a door, windshield, side door glass,
front or rear pillar, roof side rail and
assist grip. (Except for the speed limit
label P. 605)
● Vehicles without a smart entry & start
system and with a driver’s knee airbag:
Do not attach any heavy, sharp or hard
objects such as keys and accessories
to the key. The objects may restrict the
SRS driver’s knee airbag inflation or be
thrust into the driver’s seat area by the
force of the deploying airbag, thus caus-
ing a danger.
●Do not hang coat hangers or other hard objects on the coat
hooks. All of
these items could become projectiles and may cause death
or serious
injury, should the SRS curtain shield airbags deploy.
● Vehicles with an SRS driver’s knee airbag: If a vinyl cover is put on the
area where the SRS driver’s knee airbag will deploy, be sure to remove it.

1-1. For safe use
47
WARNING
■ SRS airbag precautions
●Do not use seat accessories which cover the parts where the SRS side
airbags inflate as they may interfere with inflation of the airbags. Such
accessories may prevent the side airbags from activating correctly, disable
the system or cause the side airbags to inflate accidentally, resulting in
death or serious injury.
1
●Do not strike or apply significant levels of force to the area of the SRS
airbag components.
Doing so can cause the SRS airbags to malfunction.
●Do not touch any of the component parts immediately after the SRS
airbags have deployed (inflated) as they may be hot.
●If breathing becomes difficult after the SRS airbags have deployed, open a
door or window to allow fresh air in, or leave the vehicle if it is safe to do
so. Wash off any residue as soon as possible to prevent skin irritation.
●If the areas where the SRS airbags are stored, such as the steering wheel
pad and front and rear pillar garnishes are damaged or cracked, have
them replaced by any authorized Toyota dealer or repairer, or another duly
qualified and equipped professional.
■ Modification and disposal of SRS airbag system components
Do not dispose of your vehicle or perform any of the following modifications
without consulting any authorized Toyota dealer or repairer, or another duly
qualified and equipped professional. The SRS airbags may malfunction or
deploy (inflate) accidentally, causing death or serious injury.
●Installation, removal, disassembly and repair of the SRS airbags
●Repairs, modifications, removal or replacement of the steering wheel,
instrument panel, dashboard, seats or seat upholstery, front, side and rear
pillars or roof side rails
●Repairs or modifications of the front fender, front bumper, or side of the
occupant compartment
●Installation of a grille guard (bull bars, kangaroo bar, etc.), snow plows or
winches
●Modifications to the vehicle’s suspension system
●Installation of electronic devices such as mobile two-way radios (RF-trans-
mitter) and CD players
● Modifications to your vehicle for a person with a physical disability
48
1-1. For safe use
■ If the SRS airbags deploy (inflate)
●Slight abrasions, burns, bruising etc., may be sustained from SRS airbags,
due to the extremely high speed deployment (inflation) by hot gases.
● A loud noise and white powder will be emitted.
● Parts of the airbag module (steering wheel hub, airbag cover and inflator) as
well as the front seats, parts of the front and rear pillars, and roof side rails
may be hot for several minutes. The airbag itself may also be hot.
●The windshield may crack.
■SRS airbag deployment conditions (SRS front airbags)
●The SRS front airbags will deploy in the event of an impact that exceeds the
set threshold level (the level of force corresponding to an approximately 20 -
30 km/h [12 - 18 mph] frontal collision with a fixed wall that does not move or
deform).
However, this threshold velocity will be considerably higher in the following
situations:
• If the vehicle strikes an object, such as a parked vehicle or sign pole,
which can move or deform on impact
• If the vehicle is involved in an underride collision, such as a collision in
which the front of the vehicle “underrides”, or goes under, the bed of a
truck
●Depending on the type of collision, it is possible that only the seat belt
pretensioners will activate.
■ SRS airbag deployment conditions (SRS side and curtain shield airbags)
●The SRS side and curtain shield airbags will deploy in the event of an
impact that exceeds the set threshold level (the level of force corresponding
to the impact force produced by an approximately 1500 kg [3300 lb.] vehicle
colliding with the vehicle cabin from a direction perpendicular to the vehicle
orientation at an approximate speed of 20 - 30 km/h [12 - 18 mph]).
●The SRS curtain shield airbags will deploy in the event of a severe frontal
collision.

1-1. For safe use
49
■ Conditions under which the SRS airbags may deploy (inflate), other than
a collision
The SRS front airbags and SRS curtain shield airbags may also deploy if a
serious impact occurs to the underside of your vehicle. Some examples are
shown in the illustration.
● Hitting a curb, edge of pavement or hard
surface
1
●Falling into or jumping over a deep hole
●Landing hard or falling
■ Types of collisions that may not deploy the SRS airbags (SRS front
airbags)
The SRS front airbags do not generally inflate if the vehicle is involved in a
side or rear collision, if it rolls over, or if it is involved in a low-speed frontal
collision. But, whenever a collision of any type causes sufficient forward
deceleration of the vehicle, deployment of the SRS front airbags may occur.
●Collision from the side
●Collision from the rear
● Vehicle rollover
■ Types of collisions that may not deploy the SRS airbags (SRS side and
curtain shield airbags)
The SRS side and curtain shield airbags may not activate if the vehicle is
subjected to a collision from the side at certain angles, or a collision to the
side of the vehicle body other than the passenger compartment.
●Collision from the side to the vehicle
body other than the passenger compart-
ment
●Collision from the side at an angle

50
1-1. For safe use
The SRS side airbags do not generally inflate if the vehicle is involved in a
frontal or rear collision, if it rolls over, or if it is involved in a low-speed side
collision.
●Collision from the front
●Collision from the rear
● Vehicle rollover
The SRS curtain shield airbags do not generally inflate if the vehicle is
involved in a rear collision, if it rolls over, or if it is involved in a low-speed side
or low-speed frontal collision.
●Collision from the rear
● Vehicle rollover
■ When to contact any authorized Toyota dealer or repairer, or another
duly qualified and equipped professional
In the following cases, the vehicle will require inspection and/or repair. Con-
tact any authorized Toyota dealer or repairer, or another duly qualified and
equipped professional as soon as possible.
●Any of the SRS airbags have been inflated.
●The front of the vehicle is damaged or
deformed, or was involved in an acci-
dent that was not severe enough to
cause the SRS front airbags to inflate.

1-1. For safe use
51
● A portion of a door or its surrounding
area is damaged or deformed, or the
vehicle was involved in an accident that
was not severe enough to cause the
SRS side and curtain shield airbags to
inflate.
1
● Vehicles without an SRS driver’s knee
airbag: The pad section of the steering
wheel or dashboard near the front pas-
senger airbag is scratched, cracked, or
otherwise damaged.
Vehicles with an SRS driver’s knee
airbag: The pad section of the steering
wheel, dashboard near the front passen-
ger airbag or lower portion of the instru-
ment panel is scratched, cracked, or
otherwise damaged.
● The surface of the seats with the side
airbag is scratched, cracked, or other-
wise damaged.
● The portion of the front pillars, rear pil-
lars or roof side rail garnishes (padding)
containing the curtain shield airbags
inside is scratched, cracked, or other-
wise damaged.

52
1-1. For safe use
Airbag manual on-off system
This system deactivates the front passenger airbag.
Only deactivate the airbag when using a child restraint system
on the front passenger seat.
1
“PASSENGER AIR BAG” indi-
cator
Vehicles without a smart entry &
start system: The
“PASSENGER
AIR BAG” and “ON” indicator light
turns on when the airbag system is
on, and about after
60 seconds
they go off (only when the engine
switch is in the “ON” position).
Vehicles with a smart entry & start
system: The
“PASSENGER AIR
BAG” and “ON” indicator light turns
on when the airbag system is on,
and about after 60 seconds they go
off (only when the engine switch is
in IGNITION ON mode).
Airbag manual on-off switch
2

1-1. For safe use
53
Deactivating the front seat passenger airbag
Vehicles without a smart entry &
start system: Insert the key into
the cylinder and turn it to the
“OFF” position.
The “OFF” indicator light turns on
1
(only when the engine switch is in
the “ON” position).
Vehicles with a smart entry & start
system: Insert the mechanical key
into the cylinder and turn it to the
“OFF” position.
The “OFF” indicator light turns on (only when the engine switch is in IGNI-
TION ON mode).
■“PASSENGER AIR BAG” indicator information
If any of the following problems occur, it is possible that there is a malfunction
in the system. Have the vehicle inspected by any authorized Toyota dealer or
repairer, or another duly qualified and equipped professional.
● Neither “ON” nor “OFF” comes on.
● The indicator light does not change when the airbag manual on-off switch is
switched to “ON” or “OFF”.
WARNING
■ When installing a child restraint system
For safety reasons, always install a child restraint system in a rear seat. In
the event that the rear seat cannot be used, the front seat can be used as
long as the airbag manual on-off system is set to “OFF”.
If the airbag manual on-off system is left on, the strong impact of the airbag
deployment (inflation) may cause serious injury or even death.
■ When a child restraint system is not installed on the front passenger
seat
Ensure that the airbag manual on-off system is set to “ON”.
If it is left off, the airbag may not deploy in the event of an accident, which
may result in serious injury or even death.

54
1-1. For safe use
Safety information for children
Observe the following precautions when children are in the vehi-
cle.
Use a child restraint system appropriate for the child, until the
child becomes large enough to properly wear the vehicle’s seat
belt.
● It is recommended that children sit in the rear seats to avoid acci-
dental contact with the shift lever, wiper switch, etc.
● Use the rear door child-protector lock or the window lock switch to
avoid children opening the door while driving or operating the
power window accidentally.
● Do not let small children operate equipment which may catch or
pinch body parts, such as the power window, hood, back door,
seats, etc.
WARNING
Never leave children unattended in the vehicle, and never allow children to
have or use the key.
Children may be able to start the vehicle or shift the vehicle into neutral.
There is also a danger that children may injure themselves by playing with
the windows or other features of the vehicle. In addition, heat build-up or
extremely cold temperatures inside the vehicle can be fatal to children.

1-1. For safe use
55
Child restraint systems
Toyota strongly urges the use of child restraint systems.
Points to remember
1
Studies have shown that installing a child restraint on a rear seat is
much safer than installing one on the front passenger seat.
● Choose a child restraint system that suits your vehicle and is appro-
priate to the age and size of the child.
● For installation details, follow the instructions provided with the child
restraint system.
General installation instructions are provided in this manual.
(P. 64)
● If child restraint system regulations exist in the country where you
reside, please contact any authorized Toyota dealer or repairer, or
another duly qualified and equipped professional for the child
restraint system installation.
● Toyota recommends that you use a child restraint system which
conforms to the regulation ECE No.44.

56
1-1. For safe use
Types of child restraints
Child restraint systems are classified into the following
5 groups
according to the regulation ECE No.44:
Group 0: Up to 10 kg (22 lb.) (0 - 9 months)
Group 0+: Up to 13 kg (28 lb.) (0 - 2 years)
Group I: 9 to 18 kg (20 to 39 lb.) (9 months - 4 years)
Group II: 15 to 25 kg (34 to 55 lb.) (4 years - 7 years)
Group III: 22 to 36 kg (49 to 79 lb.) (6 years - 12 years)
In this owner’s manual, the following 3 types of popular child restraint
systems that can be secured with the seat belts are explained:
Baby seat
Child seat
Equal to Group 0 and 0+ of ECE Equal to Group 0+ and I of ECE
No.44
No.44
Junior seat
Equal to Group II and III of ECE
No.44

1-1. For safe use
57
Child restraint system suitability for various seating positions
Information provided in the table shows your child restraint system
suitability for various seating positions.
Seating
Front passenger seat
position
Rear seat
Airbag manual on-off
1
switch
Mass groups
ON
OFF
Outboard
Center
0
X
U*1
U
Up to 10 kg (22 lb.)
X
Never put
L1*1
L1
(0 - 9 months)
0+
X
U*1
U
Up to 13 kg (28 lb.)
X
Never put
L1*1
L1
(0 - 2 years)
Rear-
facing —
I
X
9 to 18 kg
Never put
U*1
U*2
X
(20 to 39 lb.)
Forward-
(9 months - 4 years)
facing —
UF*1
II, III
15 to 36 kg
U*2
UF*1
U*1
X
(34 to 79 lb.)
L2*2
(4 - 12 years)
58
1-1. For safe use
Key of letters inserted in the above table:
U: Suitable for “universal” category child restraint system approved
for the use in this mass group.
UF: Suitable for forward-facing “universal” category child restraint
system approved for the use in this mass group.
L1: Suitable for “TOYOTA G 0+, BABY SAFE PLUS with SEAT BELT
FIXATION, BASE PLATFORM” (0 to 13 kg [0 to 28 lb.]) approved
for the use in this mass group.
L2: Suitable for
“TOYOTA KIDFIX” (15 to 36 kg [34 to 79 lb.])
approved for the use in this mass group.
X: Not suitable seat position for children in this mass group.
*1: Adjust the front seatback to the most upright position. Move the front seat
cushion to the fully rearward.
Remove the head restraint if it interferes with your child restraint system.
Vehicles with a vertical height adjustment lever: Adjust the seat cushion to
the highest position.
Follow these procedures
• For installing a baby seat with support base
If the baby seat interferes with the seatback when latching the baby seat
into the support base, adjust the seatback rearward until there is no
interference.
• For installing a forward-facing child seat
If the seat belt shoulder anchor is ahead of the child seat belt guide,
move the seat cushion forward.
• For installing a junior seat
If the child in your child restraint system is in a very upright position,
adjust the seatback to the most comfortable position.
If the seat belt shoulder anchor is ahead of the child seat belt guide,
move the seat cushion forward.
*2: Remove the head restraint if it interferes with your child restraint system.
The child restraint system mentioned in the table may not be available
outside of the EU area.
Other child restraint system which is different from the system men-
tioned in the table can be used, but the suitability of the systems must
be carefully checked with the child restraint system manufacturer con-
cerned and the seller of those seats.

1-1. For safe use
59
Child restraint system suitability for various seating positions
(with ISOFIX rigid anchors)
Information provided in the table shows your child restraint system
suitability for various seating positions.
Vehicle ISOFIX
Recommended
Size
1
positions
Mass groups
Fixture
Child Restraint
class
Systems
Rear outboard
F
ISO/L1
X
-
Carrycot
G
ISO/L2
X
-
(1)
X
-
0
“TOYOTA MINI”,
E
ISO/R1
IL
Up to 10 kg
“TOYOTA MIDI”
(22 lb.)
(0 - 9 months)
(1)
X
-
E
ISO/R1
IL
0+
“TOYOTA MINI”,
D
ISO/R2
IL
Up to 13 kg
“TOYOTA MIDI”
(28 lb.)
C
ISO/R3
IL
(0 - 2 years)
(1)
X
-
D
ISO/R2
IL
-
C
ISO/R3
IL
I
9 to 18 kg
B
ISO/F2
IUF*, IL*
(20 to 39 lb.)
“TOYOTA MIDI”,
B1
ISO/F2X
IUF*, IL*
(9 months
“TOYOTA DUO+”
- 4 years)
A
ISO/F3
IUF*, IL*
(1)
X
-
II, III
15 to 36 kg
(1)
X
-
(34 to 79 lb.)
(4 - 12 years)

60
1-1. For safe use
(1) For the child restraint system which do not carry the ISO/XX size
class identification (A to G), for the applicable mass group, the
car manufacturer shall indicate the vehicle specific ISOFIX child
restraint system(s) recommended for each position.
Key of letters inserted in the above table:
IUF: Suitable for ISOFIX forward-facing child restraint systems of uni-
versal category approved for use in this mass group.
IL: Suitable for ISOFIX child restraint systems of the categories for
“specific vehicles”, “restricted”, or “semi-universal”, approved for
use in this mass group.
X: ISOFIX position not suitable for ISOFIX child restraint systems in
this mass group and/or this size class.
*: Remove the head restraint if it interferes with your child restraint system.
When using a “TOYOTA MINI” or “TOYOTA MIDI”, adjust the support
leg and the ISOFIX connectors as follows:
1
Lock the support leg where 5th
hole can be seen.
Lock the ISOFIX connectors
2
where numbers 4 and 5 can be
seen.
When using the right side seat for the child restraint system, do not sit
in the center seat.
The child restraint system mentioned in the table may not be available
outside of the EU area.
Other child restraint systems different from the systems mentioned in
the table can be used, but the suitability of the systems must be care-
fully checked with the child restraint system manufacturer and retailer.

1-1. For safe use
61
■ When installing a child restraint system on the front passenger seat
When you have to use a child restraint system on the front passenger seat,
adjust the following:
● The seatback to the most upright posi-
tion.
If the child restraint system interferes
with the seatback when latching the
1
child restraint system into the support
base, adjust the seatback rearward until
there is no interference.
● Remove the head restraint if it interferes
with your child restraint system.
● Move the seat as far back as possible.
If the CRS cannot be installed properly,
due to hitting part of the vehicle interior
and so forth, adjust the position of the
front seat and its seatback angle.
If the seat belt shoulder anchor is ahead
of the child seat belt guide, move the
seat cushion forward.
● Vehicles with a vertical height adjust-
ment lever: Adjust the seat cushion to
the highest position.
■ Selecting an appropriate child restraint system
●Use a child restraint system appropriate for the child until the child becomes
large enough to properly wear the vehicle’s seat belt.
●If the child is too large for a child restraint system, sit the child on a rear seat
and use the vehicle’s seat belt. (P. 38)

62
1-1. For safe use
WARNING
■ Using a child restraint system
The use of a child restraint system not suitable for the vehicle may not prop-
erly secure the infant or child. It may result in death or serious injury (in the
event of sudden braking or an accident).
■ Child restraint precautions
●For effective protection in automobile accidents and sudden stops, a child
must be properly restrained, using a seat belt or child restraint system
depending on the age and size of the child. Holding a child in your arms is
not a substitute for a child restraint system. In an accident, the child can be
crushed against the windshield, or between you and the vehicle’s interior.
● Toyota strongly urges the use of a proper child restraint system that con-
forms to the size of the child, installed on the rear seat. According to acci-
dent statistics, the child is safer when properly restrained in the rear seat
than in the front seat.
●Never use a rear-facing child restraint system on the front passenger seat
when the airbag manual on-off switch is on. (P. 52)
In the event of an accident, the force of the rapid inflation of the front pas-
senger airbag can cause death or serious injury to the child.
● A forward-facing child restraint system may be installed on the front pas-
senger seat only when it is unavoidable. A child restraint system that
requires a top strap should not be used in the front passenger seat since
there is no top strap anchor for the front passenger seat. Adjust the
seatback as upright as possible and always move the seat as far back as
possible because the front passenger airbag could inflate with consider-
able speed and force. Otherwise, the child may be killed or seriously
injured.
●Do not allow the child to lean his/her head or any part of his/her body
against the door or the area of the seat, front and rear pillars or roof side
rails from which the SRS side airbags or SRS curtain shield airbags deploy
even if the child is seated in the child restraint system. It is dangerous if
the SRS side airbags and curtain shield airbags inflate, and the impact
could cause death or serious injury to the child.
●Make sure you have complied with all installation instructions provided by
the child restraint manufacturer and that the system is properly secured. If
it is not secured properly, it may cause death or serious injury to the child
in the event of a sudden stop or accident.

1-1. For safe use
63
WARNING
■ When children are in the vehicle
Do not allow children to play with the seat belt. If the seat belt becomes
twisted around a child’s neck, it may lead to choking or other serious injuries
that could result in death.
If this occurs and the buckle cannot be unfastened, scissors should be used
to cut the belt.
1
■ When the child restraint system is not in use
●Keep the child restraint system properly secured on the seat even if it is
not in use. Do not store the child restraint system unsecured in the pas-
senger compartment.
● If it is necessary to detach the child restraint system, remove it from the
vehicle or store it securely in the luggage compartment. If a head restraint
was removed when installing a child restraint system, always install the
head restraint before driving. This will prevent it from injuring passengers
in the event of a sudden stop or accident.

64
1-1. For safe use
Installing child restraints
Follow the child restraint system manufacturer’s instructions.
Firmly secure child restraints to the seats using a seat belt or
ISOFIX rigid anchors. Attach the top strap when installing a child
restraint.
Seat belts (An ELR belt requires a
locking clip)
ISOFIX rigid anchors
Lower anchors are provided for the
outboard rear seats. (Labels dis-
playing the location of the anchors
are attached to the seats.)
Anchor brackets (for top strap)
An anchor bracket is provided for
each outer rear seat.

1-1. For safe use
65
Installing child restraints using a seat belt
■ Rear-facing Baby seat/child seat
Place the child restraint sys-
1
tem on the rear seat facing
the rear of the vehicle.
1
Run the seat belt through the
2
child restraint system and
insert the plate into the
buckle. Make sure that the
belt is not twisted.
Install a locking clip near the
3
tab of the lap and shoulder
belt by inserting the lap and
shoulder webbing through
the recesses of the locking
clip. Buckle the belt again. If
the belt has any slack,
release the buckle and rein-
stall the locking clip.

66
1-1. For safe use
■ Forward-facing Child seat
Place the child restraint sys-
1
tem on the seat facing the
front of the vehicle.
If your child restraint system
interferes with a head restraint
and cannot be installed properly,
install the child restraint system
after
removing the head
restraint. (P. 197)
Run the seat belt through the
2
child restraint system and
insert the plate into the
buckle. Make sure that the
belt is not twisted.
Install a locking clip near the
3
tab of the lap and shoulder
belt by inserting the lap and
shoulder webbing through
the recesses of the locking
clip. Buckle the belt again. If
the belt has any slack,
release the buckle and rein-
stall the locking clip.

1-1. For safe use
67
■ Junior seat
1
Place the child restraint system on the seat facing the front of the
vehicle.
If your child restraint system interferes with a head restraint and cannot
be installed properly, install the child restraint system after removing the
head restraint. (P. 197)
High back type
Booster type
1
Sit the child in the child
2
restraint system. Fit the seat
belt to the child restraint sys-
tem according to the manu-
facturer’s instructions and
insert the plate into the
buckle. Make sure that the
belt is not twisted.
Check that the shoulder belt is correctly positioned over the child’s
shoulder and that the lap belt is as low as possible. (P. 38)

68
1-1. For safe use
Removing a child restraint installed with a seat belt
Push the buckle release button
and fully retract the seat belt.

1-1. For safe use
69
Installation with ISOFIX rigid anchors
Adjust the head restraint to the
1
uppermost position.
If your child restraint system inter-
feres with a head restraint and can-
not be installed properly, install the
child restraint system after remov-
1
ing the head restraint. (P. 197)
2
If the child restraint has a top strap, remove the luggage cover.
(P. 461)
Latch the buckles onto the exclusive fixing bars.
3
Insert the ISOFIX connectors
into the gap until they latch onto
the exclusive fixing bars.
If the child restraint has a top strap, the top strap should be latched onto
the anchor bracket.
Run the top strap under the head restraint.

70
1-1. For safe use
Child restraint systems with a top strap
Adjust the head restraint to the
1
uppermost position.
If your child restraint system inter-
feres with a head restraint and can-
not be installed properly, install the
child restraint system after remov-
ing the head restraint. (P. 197)
2
Secure the child restraint sys-
tem using the seat belt or
ISOFIX rigid anchors.
3
Remove the luggage cover. (P. 461)
4
Latch the hook onto the anchor
bracket and tighten the top
strap.
Run the top strap under the head
restraint.
Make sure the top strap is securely
latched.

1-1. For safe use
71
■ When installing a child restraint system
You need a locking clip to install the child restraint system. Follow the instruc-
tions provided by the manufacturer of the system. If your child restraint sys-
tem does not provide a locking clip, you can purchase the following item from
any authorized Toyota dealer or repairer, or another duly qualified and
equipped professional:
Locking clip for child restraint system
1
(Part No. 73119-22010)
WARNING
■ When installing a child restraint system
Follow the directions given in the child restraint system installation manual
and fix the child restraint system securely in place.
If the child restraint system is not correctly fixed in place, the child or other
passengers may be seriously injured or even killed in the event of a sudden
braking or an accident.
●If the driver’s seat interferes with the
child restraint system and prevents it
from being attached correctly, attach the
child restraint system to the right-hand
rear seat (left-hand drive vehicles) or
the left-hand rear seat (right-hand drive
vehicles).
●Adjust the front passenger seat so that
it does not interfere with the child
restraint system.
●Only put a forward-facing child restraint
system on the front seat when unavoid-
able.
●When installing a forward-facing child
restraint system on the front passenger
seat, move the seat as far back as pos-
sible and remove the head restraint.
Failure to do so may result in death or
serious injury if the airbags deploy
(inflate).

72
1-1. For safe use
WARNING
■ When installing a child restraint system
●Never use a rear-facing child restraint
system on the front passenger seat
when the airbag manual on-off switch is
on. (P. 52)
The force of the rapid inflation of the
front passenger airbag can cause death
or serious injury to children in the event
of an accident.
●There is a label(s) on the passenger
side sun visor, indicating it is forbidden
to attach a rear-facing child restraint
system to the front passenger seat.
Details of the label(s) are shown in the
illustration below.
///////////////////////////////////////