Toyota Avalon (2018 year). Manual - part 24


  Index      Toyota     Toyota Avalon - service manual 2018 year in english


Search            


Content   ..  22  23  24  25   ..


Toyota Avalon (2018 year). Manual - part 24


369

6-3. Do-it-yourself maintenance

6

Mainten

ance an

d ca

re

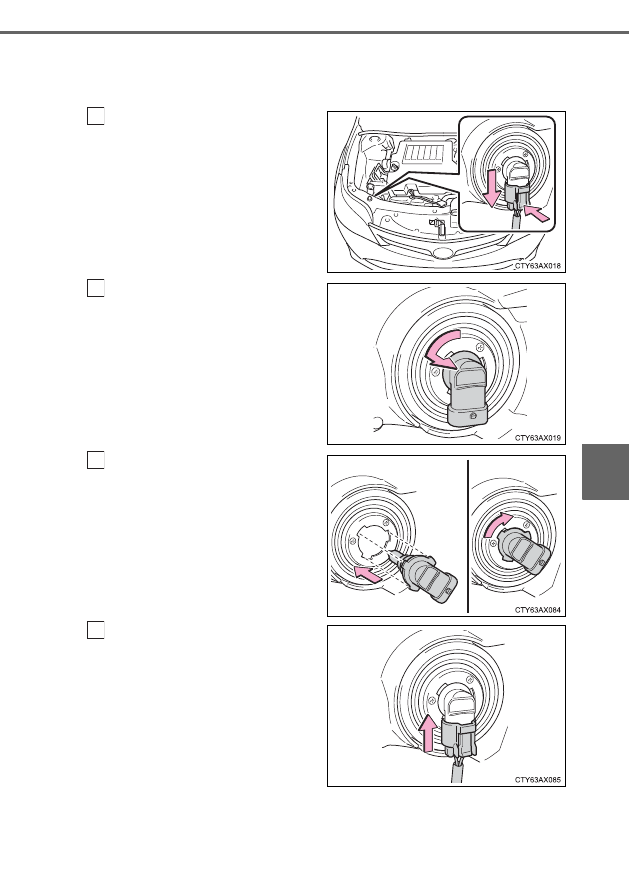
Headlight high beam and daytime running light (vehicles with
halogen bulbs for low beams)/Headlight high beam (vehicles
with discharge bulbs for low beams)

Unplug the connector while
pressing the lock release.

Turn the bulb base counter-
clockwise.

Set the new light bulb.

Align the 3 tabs on the light bulb
with the mounting, and insert.
Turn it clockwise to set.

Set the connector.

After installing the connector,
shake the bulb base gently to
check that it is not loose, turn
the headlights on once and visu-
ally confirm that no light is leak-
ing through the mounting.

1

2

3

4

370

6-3. Do-it-yourself maintenance

Front turn signal/parking light

To allow enough working
space, turn the steering
wheel to the opposite side of
the bulb to be replaced.
Remove the 3 fender liner
clips.

Turn the steering wheel to the
left when replacing the right side
light bulb, and turn the steering
wheel to the right when replac-
ing the left side light bulb.

Remove the fender liner bolt
and partly remove the fender
liner.

Unplug the connector while
pressing the lock release.

1

2

3

371

6-3. Do-it-yourself maintenance

6

Mainten

ance an

d ca

re

Turn the bulb base counter-
clockwise.

Remove the light bulb.

When installing, reverse the steps listed.

4

5

6

372

6-3. Do-it-yourself maintenance

Rear turn signal light

Open the trunk lid and
remove the luggage trim
cover clip.

Pull the hook while depress-
ing the button.

Partly remove the luggage
trim cover.

1

2

3

373

6-3. Do-it-yourself maintenance

6

Mainten

ance an

d ca

re

Turn the bulb base counter-
clockwise.

Remove the light bulb.

When installing, reverse the steps listed.

4

5

6

374

6-3. Do-it-yourself maintenance

Back-up light

Open the trunk lid and
remove the clips. Then partly
remove the trunk panel
cover.

Turn the bulb base counter-
clockwise.

Remove the light bulb.

When installing, reverse the steps listed.

1

2

3

4

375

6-3. Do-it-yourself maintenance

6

Mainten

ance an

d ca

re

Replacing the following bulbs

If any of the lights listed below has burnt out, have it replaced by
your Toyota dealer.
● Headlight low/high beams (LED type)
● Headlight low beams (discharge bulb type)
● Daytime running lights (vehicles with discharge or LED head-

lights)

● Side marker lights
● Side turn signal lights
● Stop/tail lights
● High mounted stoplight
● Outer foot lights (if equipped)
● License plate light

376

6-3. Do-it-yourself maintenance

Discharge headlights (if equipped)
If voltage to the discharge bulbs is insufficient, the bulbs may not come on, or
may go out temporarily. The discharge bulbs will come on when normal
power is restored.

LED light bulbs
The headlight low/high beams (LED type), parking lights/daytime running
lights (vehicles with discharge or LED headlights), side marker lights (vehi-
cles with LED headlights), stop/tail lights, high mounted stoplight, outer foot
lights and license plate light each consist of a number of LEDs. If any of the
LEDs burn out, take your vehicle to your Toyota dealer to have the light
replaced.

Condensation build-up on the inside of the lens
Temporary condensation build-up on the inside of the lens does not indicate a
malfunction. Contact your Toyota dealer for more information in the following
situations:

Large drops of water have built up on the inside of the lens.

Water has built up inside the lens.

Removing and installing the clips
The fender liner, luggage trim cover and trunk panel cover clip

When replacing light bulbs
P. 364

Removing

Installing

1
2

377

6-3. Do-it-yourself maintenance

6

Mainten

ance an

d ca

re

WARNING

Replacing light bulbs

Turn off the lights. Do not attempt to replace the bulb immediately after
turning off the lights. 
The bulbs become very hot and may cause burns.

Do not touch the glass portion of the light bulb with bare hands. When it is
unavoidable to hold the glass portion, use and hold with a clean dry cloth
to avoid getting moisture and oils on the bulb. 
Also, if the bulb is scratched or dropped, it may blow out or crack.

Fully install light bulbs and any parts used to secure them. Failure to do so
may result in heat damage, fire, or water entering the headlight unit. This
may damage the headlights or cause condensation to build up on the lens.

Vehicles with discharge headlights:

While the low beam headlights are
turned on, and for a short time after
they have been turned off, metal com-
ponents at the rear of the headlight
assembly will be extremely hot. To pre-
vent burns, do not touch these metal
components until you are certain they
have cooled down.

Metal components

378

6-3. Do-it-yourself maintenance

WARNING

Discharge headlights (if equipped)

Contact your Toyota dealer before replacing the discharge headlights
(including light bulbs).

Do not touch the discharge headlight’s high voltage socket when the head-
lights are turned on.
An extremely high voltage of 30000 V will be discharged and could result
in death or serious injury by electric shock.

Do not attempt to take apart or repair the headlight bulbs, connectors,
power supply circuits, or related components.
Doing so could result in electric shock and death or serious injury.

To prevent damage or fire 

Make sure bulbs are fully seated and locked. 

Check the wattage of the bulb before installing to prevent heat damage.

380

7-1. Essential information

Press the switch.

All the turn signals will flash.
To turn them off, press the switch
once again.

Emergency flashers
If the emergency flashers are used for a long time while the engine is not
operating, the battery may discharge.

Emergency flashers

The emergency flashers are used to warn other drivers when the
vehicle has to be stopped in the road due to a breakdown, etc.

381

7-1. Essential information

7

Wh

en tro

uble

 a

ris

es

Steadily step on the brake pedal with both feet and firmly depress it.

Do not pump the brake pedal repeatedly as this will increase the effort
required to slow the vehicle.

Shift the shift lever to N.

If the shift lever is shifted to N

After slowing down, stop the vehicle in a safe place by the road.

Stop the engine.

If the shift lever cannot be shifted to N

Keep depressing the brake pedal with both feet to reduce vehicle
speed as much as possible.

To stop the engine, press and
hold the engine switch for 2
consecutive seconds or more,
or press it briefly 3 times or
more in succession.

Stop the vehicle in a safe place by the road.

If your vehicle has to be stopped in an 

emergency

Only in an emergency, such as if it becomes impossible to stop
the vehicle in the normal way, stop the vehicle using the follow-
ing procedure:

1

2

3
4

3

Press and hold for 2 seconds or more 
or press briefly 3 times or more

4

WARNING

If the engine has to be turned off while driving
Power assist for the brakes and steering wheel will be lost, making the
brake pedal harder to depress and the steering wheel heavier to turn.
Decelerate as much as possible before turning off the engine.

5

382

7-2. Steps to take in an emergency

The following may indicate a problem with your transmission. Contact
your Toyota dealer or commercial towing service before towing.
● The engine is running but the vehicle does not move.
● The vehicle makes an abnormal sound.

If your vehicle needs to be towed

If towing is necessary, we recommend having your vehicle
towed by your Toyota dealer or commercial towing service,
using a wheel-lift type truck or flatbed truck.
Use a safety chain system for all towing, and abide by all state/
provincial and local laws.

Situations when it is necessary to contact dealers before towing

383

7-2. Steps to take in an emergency

7

Wh

en tro

uble

 a

ris

es

Do not tow with a sling-type truck
to prevent body damage.

Towing with a sling-type truck

Towing with a wheel-lift type truck

From the front

From the rear

Release the parking brake.

Use a towing dolly under the
front wheels.

384

7-2. Steps to take in an emergency

If your vehicle is transported by a
flatbed truck, it should be tied
down at the locations shown in the
illustration.

If you use chains or cables to tie
down your vehicle, the angles
shaded in black must be 45

°.

Do not overly tighten the tie
downs or the vehicle may be dam-
aged.

Using a flatbed truck

WARNING

Observe the following precaution. 
Failure to do so may result in death or serious injury.

When towing the vehicle

While towing

When towing using cables or chains, avoid sudden starts, etc. which place
excessive stress on the towing eyelets, cables or chains. The towing eye-
lets, cables or chains may become damaged, broken debris may hit peo-
ple, and cause serious damage.

Do not turn the engine switch off. 
There is a possibility that the steering wheel is locked and cannot be oper-
ated.

Be sure to transport the vehicle with the
front wheels raised or with all four wheels
raised off the ground. If the vehicle is
towed with the front wheels contacting
the ground, the drivetrain and related
parts may be damaged.


Content   ..  22  23  24  25   ..