Toyota Avalon (2018 year). Manual - part 19


  Index      Toyota     Toyota Avalon - service manual 2018 year in english


Search            


Content   ..  17  18  19  20   ..


Toyota Avalon (2018 year). Manual - part 19


289

5-4. Other interior features

5

In

te

rior fe

atures

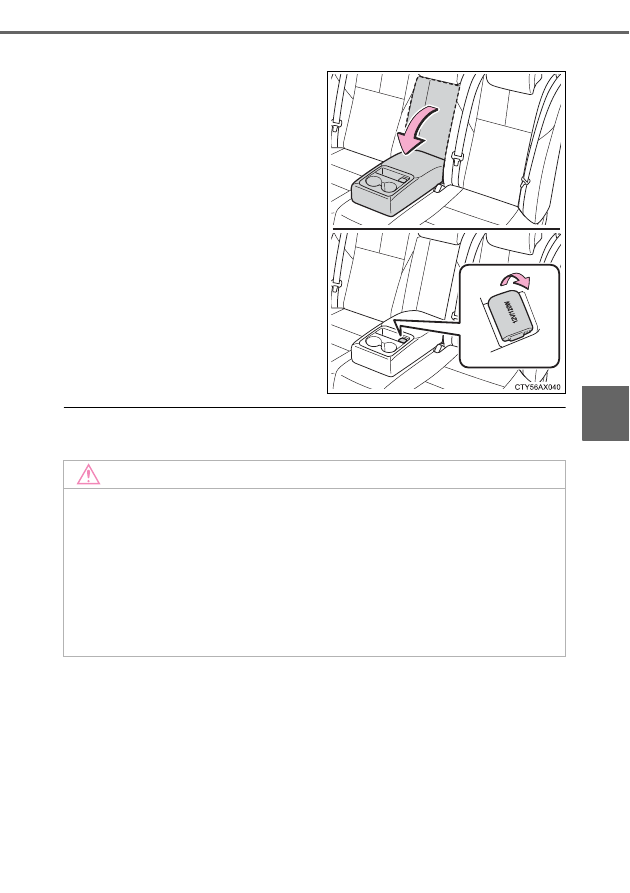
Rear armrest (if equipped)

The power outlets can be used when
The engine switch is in ACCESSORY or IGNITION ON mode.

NOTICE

To avoid damaging the power outlets, close the power outlet lids when the
power outlets are not in use. 
Foreign objects or liquids that enter the power outlets may cause a short
circuit.

To prevent blown fuse, do not use an accessory that uses more than 12 V
10 A.

To prevent battery discharge, do not use the power outlets longer than
necessary when the engine is off.

290

5-4. Other interior features

Fold down the armrest for use.

Armrest

NOTICE

To prevent damage to the armrest, do not apply too much load on the arm-
rest.

291

5-4. Other interior features

5

In

te

rior fe

atures

The rear sunshade can be raised and lowered by pressing the switch
shown below.

Extends/retracts the rear sun-
shade

The rear sunshade can be used when
The engine switch is in IGNITION ON mode.

Reverse operation feature
To ensure adequate rear visibility, the rear sunshade automatically lowers
when the shift lever is shifted to R.

However, the rear sunshade is raised again if either of the following occurs:

The button is pressed again.

The shift lever is shifted out of R, and the vehicle reaches a speed of 9 mph
(15 km/h).

If the engine is turned off when the rear sunshade has been lowered due to
the reverse operation feature, it will not be raised even when the engine is
turned on again and the vehicle reaches a speed of 9 mph (15 km/h). To raise
the sunshade again, press the button.

Customization
Settings (e.g. time elapsed before the reverse operation feature activates)
can be changed.
(Customizable features: 

P. 449)

Rear sunshade (if equipped)

WARNING

When the rear sunshade is being raised or lowered, do not place fingers or
other objects in the fastener section or in the opening. They may get caught,
causing injury.

292

5-4. Other interior features

Long objects can be loaded into the vehicle by utilizing the trunk
space and rear seat area.

Fold down the armrest.

Push down the handle and
open the armrest door.

The armrest door can be locked
and unlocked using the
mechanical key.

Lock

Unlock

NOTICE

To prevent battery discharge, do not operate the rear sunshade when the
engine is not running.

To ensure normal operation of the sunshade, observe the following precau-
tions.

Do not place excessive load on the motor or other components.

Do not place objects where they may hinder opening and closing opera-
tions.

Do not attach items to the rear sunshade.

Keep the opening clean and clear of obstructions.

Do not operate the rear sunshade continuously for long periods of time.

Trunk storage extension

1

2

1
2

WARNING

When not in use
Ensure that the armrest door is closed.
In the event of sudden braking, items stored in the trunk may be thrown for-
ward into the cabin, resulting in injury.

293

5-4. Other interior features

5

In

te

rior fe

atures

The coat hooks are provided with
the rear assist grips.

An assist grip installed on the ceil-
ing can be used to support your
body while sitting on the seat.

Coat hooks

WARNING

Do not hang coat hangers or other hard or sharp objects on the hook. If the
SRS curtain shield airbags deploy, these items may become projectiles,
causing death or serious injury.

Assist grips

WARNING

Do not use the assist grip when getting in or out of the vehicle or rising from
your seat.

NOTICE

To prevent damage to the assist grip, do not hang any heavy object or put a
heavy load on the assist grip.

294

5-4. Other interior features

The garage door opener (HomeLink

 Universal Transceiver) is manu-

factured under license from HomeLink

.

The HomeLink

 compatible transceiver in your vehicle has 3 buttons

which can be programmed to operate 3 different devices. Refer to the
programming method below appropriate for the device.

Indicator light

Buttons

Garage door opener

: If equipped

The garage door opener can be programmed to operate garage
doors, gates, entry doors, door locks, home lighting systems,
security systems, and other devices.

Programming the HomeLink

®

 (for U.S.A. owners)

1
2

295

5-4. Other interior features

5

In

te

rior fe

atures

Programming the HomeLink

Point the remote control for
the device 1 to 3 in. (25 to 75
mm) from the HomeLink

control buttons.

Keep the indicator light on the
HomeLink

 in view while pro-

gramming.

Press and hold one of the
HomeLink

®

 buttons and the

transmitter button. When the
HomeLink

®

 indicator light

changes from a slow to a
rapid flash, you can release
both buttons.

If the HomeLink

®

 indicator light

comes on but does not flash, or
flashes rapidly for 2 seconds
and remains lit, the HomeLink

®

button is already programmed.
Use the other buttons or follow
the “Reprogramming a Home-
Link

®

 button” instructions. (

→P.

299)

1

2

296

5-4. Other interior features

Test the operation of the
HomeLink

®

 by pressing the

newly programmed button.

If programming a garage door
opener, check to see if the
garage door opens and closes.
If the garage door does not
operate, see if your garage
transmitter is of the Rolling
Code type. Press and hold the
programmed HomeLink

®

 button.

The garage door has the rolling
code feature if the indicator light
(on the HomeLink

®

) flashes rap-

idly for 2 seconds and then
remains lit. If your transmitter is
the Rolling Code type, proceed
to the heading “Programming a
rolling code system”.

Repeat the steps above to program another device for each of
the remaining HomeLink

 buttons.

3

4

297

5-4. Other interior features

5

In

te

rior fe

atures

Programming a Rolling Code system (for U.S.A. owners)

If your device is Rolling Code equipped, follow the steps under the
heading “Programming the HomeLink

” before proceeding with the

steps listed below.

Locate the training button on the ceiling mounted garage door
opener motor. The exact location and color of the button may
vary by brand of garage door opener.

Refer to the operation manual supplied with the garage door opener for
the location of the training button.

Press the training button.

Following this step, you have 30 seconds in which to initiate step 3
below.

Press and hold the vehicle’s programmed HomeLink

 button for

2 seconds and release it. Repeat this step once again. The
garage door may open.

If the garage door opens, the programming process is complete. If the
door does not open, press and release the button a third time. This third
press and release will complete the programming process by opening
the garage door.

The ceiling mounted garage door opener motor should now recognize
the HomeLink

 transceiver and operate the garage door.

Repeat the steps above to program another rolling code system
for any of the remaining HomeLink

 buttons.

1

2

3

4

298

5-4. Other interior features

Programming an entry gate (for U.S.A. owners)/Programming
all devices in the Canadian market

Place your transmitter 1 to 3 in. (25 to 75 mm) away from the sur-
face of the HomeLink

.

Keep the indicator light on the HomeLink

 in view while programming.

Press and hold the selected HomeLink

 button.

Repeatedly press and release (cycle) the device’s remote control
button for two seconds each until step 4 is completed.

When the indicator light on the HomeLink

 compatible trans-

ceiver starts to flash rapidly, release the buttons.

Test the operation of the HomeLink

 by pressing the newly pro-

grammed button. Check to see if the gate/device operates cor-
rectly.

Repeat the steps above to program another device for each of
the remaining HomeLink

 buttons.

Programming other devices

To program other devices such as home security systems, home
door locks or lighting, contact your authorized Toyota dealer for
assistance.

Reprogramming a button

The individual HomeLink

 buttons cannot be erased but can be

reprogrammed. To reprogram a button, follow the “Basic program-
ming” instructions.

1

2
3

4

5

6

299

5-4. Other interior features

5

In

te

rior fe

atures

Press the appropriate HomeLink

 button. The HomeLink

 indicator

light on the HomeLink

 transceiver should turn on.

The HomeLink

 continues to send a signal for up to 20 seconds as long as

the button is pressed.

Press and hold the desired HomeLink

®

 button. After 20 seconds, the

HomeLink

®

 indicator light will start flashing slowly. Keep pressing the

HomeLink

®

 button and press and hold the transmitter button until the

HomeLink

®

 indicator light changes from a slow to a rapid flash.

Release the buttons.

Press and hold down the 2 out-
side buttons for 10 seconds until
the indicator light flashes.

If you sell your vehicle, be sure to
erase the programs stored in the
HomeLink

 memory.

Operating the HomeLink

®

Reprogramming a HomeLink

®

 button

Erasing the entire HomeLink

®

 memory (all three programs)

300

5-4. Other interior features

Before programming

Install a new battery in the transmitter.

The battery side of the transmitter must be pointed away from the
HomeLink

.

Certification for the garage door opener

For vehicles sold in the U.S.A.

FCC ID: NZLWZLHL4

NOTE:
This device complies with Part 15 of the FCC Rules.

Operation is subject to the following two conditions: (1) this device may not
cause harmful interference, and (2) this device must accept any interference
received, including interference that may cause undesired operation.

FCC WARNING:
Changes or modifications not expressly approved by the party responsible for
compliance could void the user’s authority to operate the equipment.

For vehicles sold in Canada

NOTE:
Operation is subject to the following two conditions: (1) this device may not
cause interference, and (2) this device must accept any interference, includ-
ing interference that may cause undesired operation of the device.

For additional programming assistance with your HomeLink

®

 Universal

Transceiver
Visit on the web at www.homelink.com or call 1-800-355-3515.

WARNING

When programming a garage door or other remote control device
The garage door may operate, so ensure people and objects are out of dan-
ger to prevent potential harm.

Conforming to federal safety standards
Do not use the HomeLink

 Compatible Transceiver with any garage door

opener or device that lacks safety stop and reverse features as required by
federal safety standards.
This includes any garage door that cannot detect an obstruction object. A
door or device without these features increases the risk of death or serious
injury.

301

5-4. Other interior features

5

In

te

rior fe

atures

System components

Microphone

LED light indicators

“SOS” button

Safety Connect

: If equipped

Safety Connect is a subscription-based telematics service that
uses Global Positioning System (GPS) data and embedded cel-
lular technology to provide safety and security features to sub-
scribers. Safety Connect is supported by Toyota’s designated
response center, which operates 24 hours per day, 7 days per
week.

Safety Connect service is available by subscription on select,
telematics hardware-equipped vehicles.

By using the Safety Connect service, you are agreeing to be
bound by the Telematics Subscription Service Agreement and
its Terms and Conditions, as in effect and amended from time to
time, a current copy of which is available at Toyota.com. All use
of the Safety Connect service is subject to such then-applicable
Terms and Conditions.

1
2
3

302

5-4. Other interior features

Services

Subscribers have the following Safety Connect services available:
● Automatic Collision Notification

*

Helps drivers receive necessary response from emergency ser-
vice providers. (

→P. 304)

*

: U.S. Patent No. 7,508,298 B2

● Stolen Vehicle Location

Helps drivers in the event of vehicle theft. (

P. 305)

● Emergency Assistance Button (SOS)

Connects drivers to response-center support. (

P. 305)

● Enhanced Roadside Assistance

Provides drivers various on-road assistance. (

P. 305)

Subscription

After you have signed the Telematics Subscription Service Agree-
ment and are enrolled, you can begin receiving services. 
A variety of subscription terms is available for purchase. Contact
your Toyota dealer, call 1-800-331-4331, or push the “SOS” button
in your vehicle for further subscription details.

303

5-4. Other interior features

5

In

te

rior fe

atures

Safety Connect Services Information

Phone calls using the vehicles Bluetooth

®

 technology will not be possible

during Safety Connect.

Safety Connect is available beginning Fall 2009 on select Toyota models.
Contact with the Safety Connect response center is dependent upon the
telematics device being in operative condition, cellular connection availabil-
ity, and GPS satellite signal reception, which can limit the ability to reach the
response center or receive emergency service support. Enrollment and
Telematics Subscription Service Agreement required. A variety of subscrip-
tion terms is available; charges vary by subscription term selected.

Automatic Collision Notification, Emergency Assistance, Stolen Vehicle
Location, and Enhanced Roadside Assistance will function in the United
States, including Hawaii and Alaska, and in Canada. No Safety Connect
services will function outside of the United States in countries other than
Canada.

Safety Connect services are not subject to section 255 of the Telecommuni-
cations Act and the device is not TTY compatible.

Languages
The Safety Connect response center will offer support in multiple languages.
The Safety Connect system will offer voice prompts in English and Spanish.
Please indicate your language of choice when enrolling.

When contacting the response center
You may be unable to contact the response center if the network is busy.

304

5-4. Other interior features

When the engine switch is turned to IGNITION ON mode, the red indi-
cator light comes on for 2 seconds then turns off. Afterward, the green
indicator light comes on, indicating that the service is active.
The following indicator light patterns indicate specific system usage
conditions:
● Green indicator light on = Active service
● Green indicator light flashing = Safety Connect call in process
● Red indicator light (except at vehicle start-up) = System malfunction

(contact your Toyota dealer)

● No indicator light (off) = Safety Connect service not active

Automatic Collision Notification

In case of either airbag deployment or severe rear-end collision, the
system is designed to automatically call the response center. The
responding agent receives the vehicle’s location and attempts to
speak with the vehicle occupants to assess the level of emergency.
If the occupants are unable to communicate, the agent automati-
cally treats the call as an emergency, contacts the nearest emer-
gency services provider to describe the situation, and requests that
assistance be sent to the location.

Safety Connect LED light Indicators

Safety Connect services


Content   ..  17  18  19  20   ..